
Chapter 31
Programming the Office 2013 Ribbon
VBA programmers may want to customize the Office applications' Ribbons programmatically (via macro code as opposed to the user employing the Options dialog box). Perhaps your organization wants to hide certain features in Excel, add a step-through wizard to Word, create a Ribbon that is custom-designed for working with a particular presentation, add a special tab containing capabilities relevant to your business, or otherwise automate management of this major part of the user interface.
Or you might want to create dynamic Ribbon effects, such as hiding, disabling, revealing, or modifying Ribbon elements—labels, groups, controls, or whatever—based on the user's behaviors in the application or on some other criterion.
This chapter explores all aspects of Ribbon customization so you'll be able to fully exploit the Ribbon's capabilities programmatically.
Note that the Ribbon can be programmatically modified in two ways: The most efficient approach is to create XML code and make it interact with VBA procedures. This chapter employs this technique and describes how to customize the Ribbon in Word, Excel, and PowerPoint. A second, more complex approach requires writing COM add-ins, a technique that is beyond the scope of this book.
The Access Ribbon can't be modified in the same way that you modify the Ribbon in Word, Excel, and PowerPoint. Access requires a unique approach, including creating a specialized table to hold the XML code that modifies the Ribbon. Modifying the Access Ribbon is covered at the end of this chapter.
The Ribbon's contents are described in the XML language, but you don't need to know how to write XML to manipulate the Ribbon. Throughout this chapter, you can just copy and paste XML code examples, making modifications to them to suit your needs.
As you'll see shortly, there's also a handy utility you can download that helps you avoid several tedious steps when modifying the Ribbon and verifies that your XML statements are “well formed” (that they follow the rules of XML and thus should work).
In this chapter you will learn to do the following:
- Understand what XML is
- Hide a group on the Ribbon
- Add a new, custom group
- Create callbacks for event handling
- Manipulate the Access Ribbon
- Debug Ribbon programming
What Is XML?
XML means extensible markup language. It's a way to combine data with descriptions of that data.
Think of a file cabinet holding various documents, each of which is stored in a folder with a label describing the meaning of its document: Telephone Bill, Boat Insurance, Bobby's Arrest, and so on.
But XML takes this a step further, becoming more granular (more finely detailed) in its marking (labeling) of data. Each paragraph, sentence, or even individual words can also be contained within descriptive “tags,” like this:
<FirstArrest>
      <DateofArrest>12,1,2013</DateofArrest>
      <Location>Sao Paulo, Brazil
      </Location>
</FirstArrest>
<SecondArrest>
<DateofArrest>12,14,2013</DateofArrest>
      <Location>Miami Airport
      </Location>

…
You get the idea: descriptive tags, then the data contained, followed by closing tags. For example, <Location> is a tag presumably containing some kind of geographical data; </Location> is a tag with a backslash, meaning that this is the end of the information about location. Any opening tag must be paired with a closing tag, and they thus surround the data that they describe.
XML is “extensible,” meaning anybody can make up their own tags. XML is a way of storing information along with descriptions of the meaning of that information. You can think of it as similar to a record in a database.
Contrast this with HTML (the markup language that underlies web pages), which describes how to display information and contains standardized tags, such as <i> </i> for italic, understood by all browsers.
If you want to know more about XML, you'll find a good introductory tutorial here:
http://w3schools.com/xml/
Hiding the Editing Group on the Word Ribbon
To get an idea of how to modify the Ribbon, let's assume that you want to remove the Editing group in the Word Ribbon's Home tab. This group has three options: Find, Replace, and Select. However, you decide that you just don't need to display these options because you always press Ctrl+F to open the Find dialog box and Ctrl+H to open the Replace dialog box, and you select by simply dragging the mouse. To you, this Editing group is useless, just wasting valuable space on the Ribbon.
To hide the Editing group on the Ribbon, follow these steps:
- First you'll want to download a free utility that makes working with the Ribbon much easier. Go to
http://openxmldeveloper.org/blog/b/openxmldeveloper/archive/2010/08/10/23248.aspx
and download, then install, the Office Custom UI Editor tool. This utility can be downloaded via a link on this web page named OfficeCustomUIEditorSetup.zip. (The file is just above the comments.) When you extract the contents of this zip file, you'll have an installer (.msi) file. Just double-click it to install the Custom UI Editor.
- Start Word.
- Press Alt, F, N, (or click the File tab, then click the New option). Then click the blank document template.
- Press Alt, F, A and save the document as RibbonMod.docm to your Desktop (or some other location such as C: emp where you can easily locate it).
- Press Alt, F, C to close this document. Closing the document is necessary because if it's still open when you attempt to store your XML code in it (by choosing File
 Save in the Custom UI Editor for Microsoft Office), you'll get an error message.
WHY YOU SHOULD USE MACRO-ENABLED FILE TYPES
Note that you could also save the document as the default .docx file type, but in this chapter you'll always use the macro-enabled .docm type (and the other “m” type, such as .xlsm for macro-enabled Excel files and .pptm for PowerPoint). These types of files can include macros, and in some of the examples in this chapter, you'll need to write procedures to handle events—triggered when the user clicks a control that you've added to the Ribbon.
- Run the Custom UI Editor for Microsoft Office.
- Choose File Open.
- Browse to the RibbonMod.docm file that you saved in step 4, and open it.
- In the right pane of the Custom UI Editor, type the following XML code:
/2009/07/<customUI xmlns="http://schemas.microsoft.com/office/2009/07/customui">
  <ribbon>
     <tabs>
        <tab idMso="TabHome">
           <group idMso="GroupEditing" visible="false" />
        </tab>
     </tabs>
  </ribbon>
</customUI>
Identifiers (idMso), images (imageMso), and other attributes in Ribbon XML code can have an Mso suffix. Mso is short for Microsoft Office, and when appended to an attribute it means built-in. So, a tab with an idMso attribute is one of the tabs on the Ribbon by default. A tab with a plain id attribute is a new tab you've added to the Ribbon. Likewise, an imageMso is one of the set of built-in Office 2013 icons, but an image is an icon you created by importing a graphics file (see “Creating Your Own Icons” later in this chapter).
 Real World Scenario
WATCH OUT FOR SPECIAL CHARACTERS
XML will choke on special characters—it expects plain vanilla text with none of those slanted quotation marks (called “smart quotes”) or other fancy formatting. You used to be able to paste code into Notepad, then copy it from Notepad and paste it into the VBA Editor or the Custom UI Editor. When text was dipped into Notepad like this, all special characters were stripped off. Slanted quotation marks (which are two distinct characters, open and close quotes) turned into a single, vertical quotation-mark character. This was quite a good way to wash text. No more. Those at Microsoft who fiddle with good tools and make them less useful decided to justify their salaries by not leaving Notepad alone. After all, they're getting paid to do something, so they get restless. Until the latest version, Notepad has been left alone, unchanged for decades.
How do you get rid of characters like smart quotes (“and”) that XML (and the VBA Editor) cannot work with, replacing them with straight quotes (")? There are three ways, but #3 is the best:
- Hand-edit each bad character by selecting it, then pressing the " key. If you press this key in Notepad or a code editor, it will appear as the correct " simple quotation mark (no slant).
- If you're working with a large piece of code with many quotation marks, paste it into Notepad, then press Ctrl+H to open the Replace dialog box. Paste one of the bad, open-quote (“) slanted quotation-mark characters into the Find What field, then click the Replace With field and press the “key. (Notepad by default uses the straight-quotes character.) Note that you'll have to repeat this process with the close-quote (”) slanted quotation-mark character.
- What do we do when faced with a repetitive and tedious task? Anyone?
Yes. Write a macro. Here's a macro that opens a new, blank Word document, pastes in the text that needs changing, then makes the necessary replacements:
1. Sub StraightenQuotes()
2. ' Changes smart quotes (slanted) to straight quotes
3.
4. On Error GoTo Problem
5. Dim aDO As DataObject
6. Set aDO = New DataObject
7. aDO.GetFromClipboard
8. aDO.GetText
9.
10. Dim bQuotesOn As Boolean
11. bQuotesOn = Options.AutoFormatAsYouTypeReplaceQuotes
12.
13. Options.AutoFormatAsYouTypeReplaceQuotes = False
14.
15. Documents.Add Template:="Normal", NewTemplate:=False, DocumentType:=0
16.
17. Selection.Paste
18.
19.     Selection.WholeStory
20.
21.     Selection.Find.ClearFormatting
22.     Selection.Find.Replacement.ClearFormatting
23.
24.     With Selection.Find
25.         .Text = ChrW(8221)
26.         .Replacement.Text = """"
27.         .Wrap = wdFindStop
28.         .Forward = True
29.     End With
30.     Selection.Find.Execute Replace:=wdReplaceAll
31.
32.     Selection.Find.ClearFormatting
33.     Selection.Find.Replacement.ClearFormatting
34.
35.     With Selection.Find
36.         .Text = ChrW(8220)
37.         .Replacement.Text = """"
38.         .Wrap = wdFindStop
39.         .Forward = True
40.         End With
41.     Selection.Find.Execute Replace:=wdReplaceAll
42.
43. Options.AutoFormatAsYouTypeReplaceQuotes = bQuotesOn
44.
45. Exit Sub
46.
47. Problem:
48. MsgBox "There was a problem. Be sure that you have copied some text into the
Clipboard before executing this macro."
49.
50. End Sub
To test this, just copy some text (that contains the unwanted slanted quotation marks) into the Windows Clipboard (select the text, then press Ctrl+C). Then run the macro. Here's what the code does:
- Line 4 says that if something goes wrong, jump down to the label named Problem at the end of the procedure. The most likely problem is that the user has a graphic in the Clipboard (they pressed PrtScn, for example) rather than text.
- Lines 5–8 fetch the text from the Clipboard.
- Lines 10 and 11 save the user's setting for smart quotes so we can restore it at the end of the macro.
- Line 13 turns off Word's Smart Quotes feature so when in our code the slanted quotation marks are replaced by straight quotation marks, Word will permit this. Line 15 opens a new, blank document. This is important because you might currently also be working on a second, ordinary text document where you want smart quotes.
- Line 17 pastes the text from the Clipboard into the blank document.
- Line 19 selects all the text.
- Lines 21 through 41 carry out the find and replace. Remember, this code must be executed twice, once for the open-quote and a second time for the close-quote characters.
- Line 43 restores the user's setting for the Smart Quotes option.
- Line 45 exits the procedure so we don't fall into the error handler after successfully running the procedure without error.
- Line 47's label identifies the error-handler code.
- Line 48 handles the error by reminding the user that there must be text in the Clipboard for this macro to work.
Yes, I used Word's Macro Recorder to help me write this code. Having been programming in BASIC and writing books on it for 25 years, I'm almost freakishly proficient in the language. But I had only a vague idea what kind of code would turn off Word's Smart Quotes feature. So, I turned on the Macro Recorder, then went to File
 Options in Word and turned off Smart Quotes. VBA created this code:
Options.AutoFormatAsYouTypeReplaceQuotes = False
So I just copied the code into my macro. I used the same trick to get the code that opens a new document and does the finding and replacing. Unless you're Martha Stewart and can remember everything you've ever read or done, you'll need to rely on the Macro Recorder and online code samples to write macros of even moderate complexity.
- In the Custom UI Editor, click the icon with the red check mark.
This tool validates your XML code (a very handy feature).
If you don't now see the message “Custom UI XML is well formed,” you've made a typo in the XML code or included bad special characters. Retype it (or better yet, copy and paste it from this book's web page—see this book's introduction for information on copying code).
If you see an error message stating “ “” is an unexpected token…,” you need to fix the quotation marks in the XML code to make them straight, not “smart” quotation marks, as described in the sidebar in this chapter titled “Watch Out for Special Characters.”
You should always validate your XML code because if there is an error of some kind, your Ribbon customization simply won't happen. You will be given no error message or other warning when executing the customization itself. It just won't work.
- Choose File Save (which saves your Word document), then File Exit to close the UI Editor.
- Now, to see the effect, open the RibbonMod document by clicking the File tab on Word's Ribbon and then clicking Open. In the list of recent documents, choose RibbonMod.docm (or double-click that filename in Windows Explorer).
If you entered the correct XML code, you'll see a Ribbon like the one on the bottom of Figure 31.1.
FIGURE 31.1 Word's Ribbon with (top) and without its Editing group (bottom)

The key lines in the XML code are these:
<tab idMso="TabHome">
     <group idMso="GroupEditing" visible="false" />
The line of code that begins with <tab specifies the tab on the Ribbon you want to modify—in this case, it's the Home tab. The group element specifies which group within the tab you are targeting. In this case, it's the Editing group. Finally, the code specifies that the Editing group's Visible attribute should be set to false. (I'll define the XML terms element and attribute shortly.)
Real World Scenario
DECIDING WHAT TO INCLUDE ON THE RIBBON
Practical Ribbon programming can require a little planning. When you modify the Ribbon, you'll want to include utilities or features that you use frequently, and perhaps hide those you'll never need.
Here's a useful tip: Real estate on the Ribbon is valuable. Notice in Figure 31.1 that when you remove the Editing group, the Ribbon automatically expands the options visible for the Styles group—displaying nine rather than eight styles. So, if you're planning to add some new options or a new group of your own (as described later in this chapter), consider making room for them by hiding a group you don't need.
Also, Office applications are quite mature software and contain a large number of features. Of necessity, Microsoft had to choose what to include on the Ribbon. Quite a few features simply had to be left off or relegated to dialog boxes that appear when you click the small arrow icon found in the bottom right of many Ribbon groups.
But Microsoft's choices of what to show or hide are unlikely to completely match your preferences. To see if there is a feature missing from Word's default Ribbon that you want to add to it, right-click the Ribbon and choose Customize The Ribbon. In the Choose Commands From dropdown list, select Commands Not In The Ribbon. You'll see a list—a long list.
A Word of Warning
There's a major problem to be aware of when you're working with XML code. When XML was being designed, some crack committee decided that this language would be case sensitive. That decision has caused countless problems for programmers over the years. It's easy to generate bugs in languages that are case sensitive because ThisVariableName is not the same as ThisVariablename. The capital N in the first version means that these two words refer to two different variables (even though, of course, the programmer intended them to represent the same variable). And since the two versions look very much the same, it is often difficult to locate and fix this bug. Your XML code won't work if you don't precisely match capitalization, but you won't be told why.
Fortunately and sensibly, VBA isn't case sensitive, so you never have to worry about this kind of error in VBA code. But if you're getting an error when attempting to modify the Ribbon using XML, make sure there isn't a case mismatch somewhere in all that code. A good rule is to simply always use lowercase when writing XML code. If you name a function or variable without any capitalization—and stick to that practice—you'll avoid the case-related debugging headaches that XML programmers have struggled with for years.
See the section at the end of this chapter titled “What to Look For If Things Go Wrong” for additional possible problems when working with the Ribbon.
XML Terminology
To understand the descriptions of XML code examples in this chapter, you need to know the meaning of two terms.
In XML, an element is roughly what a programmer would call an object. For example, a button control is an element in XML code. An element's tag (name) is enclosed within these symbols: < and /> (immediately following the < is the name of the element).
And just as objects in ordinary programming (such as VBA) have properties and methods, XML's elements have attributes. So, in the following example code, a button element is defined, and it has four attributes: label, size, onAction, and imageMso. Of the four, three are analogous to properties (qualities), with onAction similar to an object's method (a behavior). But in XML, they are all simply referred to as attributes.
<button id="b1"
       label="Check Spelling"
       size="large"
       onAction="module1.test"
       imageMso="diamond" />
Because each attribute is named (label, size, and so on), the order of the attributes in code is irrelevant in XML. For example, in the previous code you could put the imageMso attribute above the label attribute and nothing would change. You'll explore various additional attributes later in this chapter.
However, although the order of attributes is irrelevant in XML, the order of elements does matter. XML is hierarchical (also known as nested or a tree), meaning that you need to put elements inside each other in the proper order, as with a Russian doll set.
When working with the Microsoft Ribbon, the order of the element tags is Ribbon, tabs, tab, group, button (or other control), as you can see in this code:
<customUI xmlns="http://schemas.microsoft.com/office/2009/07/customui">
     <ribbon>
          <tabs>
               <tab idMso="TabView">
                 <group id="CustomViewsGroup"
                  label="Next Window"
                  insertAfterMso="GroupWindow">
                     <labelControl id="null"/>
                     <button idMso="WindowNext"/>
                 </group>
               </tab>
          </tabs>
    </ribbon>
</customUI>
If you violate this nesting structure—by putting a group tag outside a tab tag, for example—you'll get an error message (“The name in the end tag must match the name in the start tag”) :
<button idMso="WindowNext"/>
    </tab>
</group>
Or if you leave out one of the closing tags (signified by the />), you'll get the same error message (here the closing </tab> tag is missing):
      </group>
 </tabs>
Using Built-in Icons
The imageMso “galleries” can be downloaded from this web page:
www.microsoft.com/downloads/details.aspx?FamilyID=2D3A18A2-2E75-4E43-8579-D543C19D 0EED&displaylang=e&displaylang=en?
Load this .docx file into Word. Choose Enable Editing if asked. Then you see a mystery message in boldface: “Images are in the ImageMso 0 and ImageMso 1 tabs in the Backstage.” Are you among the few who know what the term backstage means in relation to Office applications? It means, “click the File tab on the Ribbon.” But it's so much more fun to have us try to guess what it means.
You'll see two new items listed on the left side under Options: ImageMso 0 and ImageMso 1. Click these to see a complete list of icons and the names you can use to reference them in your XML code, like this: imageMso="diamond".
Working with Excel and PowerPoint
To modify Excel's or PowerPoint's Ribbons, you use the same techniques demonstrated with Word's Ribbon in the previous section. To illustrate this, the following example hides PowerPoint's Ink group in the Ribbon's Review tab.
- Start PowerPoint. Click the Blank Presentation template.
- Click the File tab on the Ribbon; then click Save As, A and save the document as PPMod.pptx to your Desktop (or another location where you can easily locate it).
- Click the File tab on the Ribbon and click Close to close this document.
- Run the Custom UI Editor for Microsoft Office.
- Choose File Open.
- Browse to the PPMod.pptx file that you saved in step 2, and open it.
- In the Custom UI tab of the Editor, type the following XML code:
<customUI xmlns="http://schemas.microsoft.com/office/2009/07/customui"> <ribbon> <tabs> <tab idMso="TabReview"> <group idMso="GroupInk" visible="false" /> </tab> </tabs> </ribbon> </customUI> - Click the icon with the red check mark to validate your XML code. If you don't see the message “Custom UI XML is well formed,” you've made a typo in the XML code. Retype it (or copy and paste it from this book's web page).
- Choose File Save, then File Exit to close the UI Editor.
At this point, open PPMod.pptx and click the Review tab. The Ink group should now be hidden, and as a result of the freed space, the Themes group should display several additional themes.
Undoing Ribbon Modifications
In the previous two sections, you've modified the Ribbon: first by hiding a group in Word, then by hiding a group in PowerPoint. In other examples later in this chapter, you'll add new groups to the Ribbon.
But what if you want to undo the changes you made to the Ribbon or modify those changes? It's quite easy. Just open the document, presentation, workbook, or template in the Custom UI Editor for Microsoft Office. You will see the XML code that represents your customization. Delete it or modify it, and then simply validate and save it (overwriting it) back to your hard drive. If you explore the Ribbon technology in depth—working directly with .zip and other files that are part of an Office 2013 document—you'll come to appreciate all the tedious and error-prone steps that the Custom UI Editor saves you.
Selecting the Scope of Your Ribbon Customization
Recall that where you put your VBA macros determines their scope: You can embed a macro in a single document, in a template used by multiple documents, or (for Word) in the Normal.dotm file that is used.
When you create XML code to manipulate the Ribbon, where you store your code determines its scope—much the same as the way scope works with macros. Here are your options, listed in increasing size of scope:
- To apply your Ribbon customization to only a single document, just embed it in that document, as illustrated in the two previous examples.
- To use the custom Ribbon for all documents based on a particular template, put the XML code in a macro-enabled template file type (file types with the .dotm, .xltm, and .potm filename extensions).
- Add the XML code to Normal.dotm if you want the custom Ribbon automatically available to all Word documents. Just follow the same steps as in the first example in this chapter, but instead of modifying the RibbonMod.docm file in the Custom UI Editor for Microsoft Office, modify Normal.dotm.
(Normal.dotm can be found in a path similar to this: C:UsersRichardAppDataRoaming MicrosoftTemplates. However, replace Richard with your username.)
Recall that you add custom Ribbons to individual PowerPoint or Excel documents much the same way that you add them to Word—by adding XML code and using the Custom UI Editor. However, it's not that simple to add a global custom Ribbon to PowerPoint or Excel documents because they don't have a direct equivalent to Normal.dotm. Instead, with Excel and PowerPoint, you must create an add-in file to globally customize the Ribbon.
Adding a New Group
In this next example, you'll see how to specify where on the Ribbon you want to place a new, custom element and also where to find the correct control identifier (idMso attribute) for built-in dialog boxes, commands, and controls.
Cautions about Customizing
When customizing the Ribbon for coworkers, you could, of course, hide an entire group and then replace it by adding a new group of your own—reproducing some or all of Microsoft's original buttons on the group and adding some new ones of your own. But you should think twice before taking this approach because lots of study has gone into these groupings and most people will find them well organized if not totally intuitive. What's more, people get used to the Ribbon's organization.
Of course, if you're just customizing the Ribbon for yourself and your coworkers won't use it, you can more freely rearrange things.
BACK TO THE 1950s
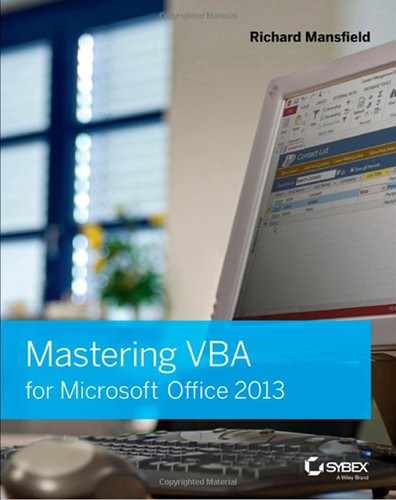
As an aside, we're using the term button here because that's the technical term. However, on the Ribbon and elsewhere in the Windows 8 Modern interface, there's no visual button that the user clicks. In an effort to provide us with a “modern” (1950s) aesthetic, the photorealism (now derided as skeuomorphism) that reached its zenith in Windows 7 has been stripped away by Microsoft's design team. The user interface is now flattened. Pretty much gone are gradients, dimensional effects, reflections, textures, subtle colors, buttons, highlights, opacity, serif typefaces, and shadowing. Figure 31.2 illustrates the difference.
I frequently like to cycle through open Word documents, and that requires the Next Window feature. The Word Ribbon displays a Switch Windows drop-down list on the View tab, but I don't want to choose from a list; I want to just click a button to open each active document in turn (like the way you can switch to each active Windows application by pressing Alt+Tab).
The Next Window command is listed in the Commands Not In The Ribbon list in the Word Options dialog box. Normally, you want to avoid filling up the Ribbon with new groups because some of the Ribbon's built-in buttons must be hidden in order to make room for your custom groups. This can force the user to have to click the Ribbon to reveal what is perhaps a favorite, frequently used button. But in Word's View tab, there's plenty of room to add a new group. Figure 31.2 shows how the new group will look in the new “modern” Windows 8 style.
FIGURE 31.2 A traditional button control on a VBA form (left) compared to the simplified “button” on Word's Ribbon (right).
A good place for our new tab, which we will call Shuffle, is just to the right of the built-in Window group. This will leave the Macros group on the far right of the View tab, as it is in the default Ribbon arrangement.
To create a new group (called Shuffle) and a new button (called Next Window) in that group, follow the steps in the first example in this chapter. But replace the XML code in step 9 with this XML code:
<customUI xmlns="http://schemas.microsoft.com/office/2009/07/customui">
     <ribbon>
          <tabs>
               <tab idMso="TabView">
                    <group id="CustomViewsGroup" label="Shuffle"
insertAfterMso="GroupWindow">
                           <labelControl id="null"/>
                           <button idMso="WindowNext"/>
                    </group>
               </tab>
          </tabs>
     </ribbon>
</customUI>
There are several things to notice in this code. Each element in the Ribbon (the group, label, and button) is given an identifier, an id—a unique string. And there are two types of IDs: the idMso and the plain id. An idMso refers to a built-in Microsoft command, control, or dialog box (such as the Next Window command or a font dialog box). A plain id refers to a customized element you are adding to the Ribbon, such as a customized group, a new tab, a button that triggers one of your macros, and so on.
Note that I added a button control to the Ribbon (there are other controls you can place on the Ribbon, such as a label, as you'll see in another example shortly).
The code in this example illustrates how to use the XML element id:
group id="CustomViewsGroup"
You can also use it like this:
labelControl id="null"
The id name that you give to these objects (such as CustomViewsGroup) is not displayed; it's for internal programming purposes only. So name them as you wish.
Note that I added a Label control but didn't provide any text caption (I included no Label attribute). Used this way, a Label control acts as a spacer, pushing the Next Window button to the middle of the group area. Without it, the button would be displayed at the top of the Ribbon. Add two of these captionless Label spacer controls if you want to push the button to the bottom of the Ribbon.
In this code, the View tab is specified as the tab we're going to use (<tab idMso="TabView">). The caption that will be displayed on the Ribbon to describe our new group is Next Window, thanks to this code: label="Shuffle". The position of our new item on the Ribbon is specified as being to the right of the built-in Window group: insertAfterMso="GroupWindow">.
Two Ways to Find the Correct idMso
How did I know that the proper Microsoft name for this Next Window command is WindowNext? Right-click the Ribbon and click Customize The Ribbon. If you look up the command in the Choose Commands From drop-down list (Commands Not In The Ribbon) in the Word Options dialog box, it is displayed as Next Window. But if you use Next Window in the code for the idMso (Microsoft built-in command ID), nothing will be displayed on the Ribbon because Next Window is not the correct internal ID. This won't work:
<button idMso="Next Window"/>
You must use this:
<button idMso="WindowNext"/>
The quickest way to identify the correct internal Microsoft ID (idMso) for any control or command is to pause your mouse pointer on top of the command in the Options dialog box's Choose Commands From drop-down list, as shown in Figure 31.3. The control name appears in parentheses at the far right of the tooltip that is displayed when you hover your mouse pointer over any command in the list.
If you prefer, you can download a more detailed list of the commands and controls to use with the idMso attribute. To download tables (that can be viewed in Excel) of all the built-in Office 2013 controls—such as the font dialog box or the Clipboard task pane (ShowClipboard)—go to this web page:
www.microsoft.com/en-us/download/details.aspx?id=36798
FIGURE 31.3 Hover your mouse pointer over any command in this list to see the correctID to use in your XML code. In this example, you can see that the Next Window command has an ID of WindowNext.

Adding Callbacks
Now it's time to employ some VBA code to respond when the user interacts with the Ribbon. Unlike in the previous example—where we added a button that triggered Word's built-in Next Window feature—you'll now add a button that triggers one of your own macros.
To run VBA code, you insert a callback in the XML code to execute whatever VBA macro you specify. When the user clicks a control, such as a button, the XML code that services this control sends a message to the Office application, telling it that a response is needed (this is very similar to the triggering of a Click event in ordinary VBA programming). The Office application then “calls back” to your VBA procedure—whatever procedure is specified by the onAction attribute you write in the XML code.
Put another way, to create a callback, you type in an attribute in the XML code, specifying which macro you want to execute. It looks like this:
onAction="module1.test"
If you add this attribute to a Button control on the Ribbon, it means that when the user clicks that button, the macro named test located in module1 is executed. (The OnAction attribute is similar to the Click event in VBA. In addition to the Button control, the CheckBox, ToggleButton, and Gallery controls have an OnAction attribute.)
To see exactly how this communication between a button and a VBA macro works, follow these steps (refer to the first example in this chapter if you need additional information about how to carry out these steps):
- Create a new, empty Word document.
- Press Alt+F11 to open the VBA Editor.
- Double-click ThisDocument in the Project Explorer to open the Code window for your new, empty Word document. (Make sure you're clicking the correct ThisDocument project if there is more than one document currently open in Word.)
- Now type in this macro that you will execute via a button on the Ribbon:
Sub test(control As IRibbonControl)

MsgBox "Hi!"

End Sub
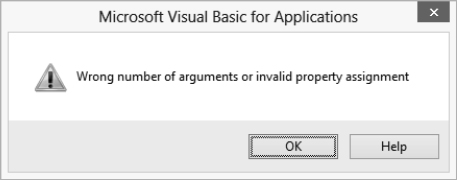
Notice the argument for this procedure: control As IRibbonControl. This argument is necessary when you're interacting with the Ribbon using a button (or any of the large number of other controls that can be put on the Ribbon). If you don't include this argument, you'll get a “Wrong number of arguments, or invalid property assignment” error message.
- Go back to Word itself and click the File tab on the Ribbon. Choose Save As to save this document as RibbonTest.docm. Then close the document. (Make sure to save it as a .docm file.)
- Run the Custom UI Editor for Microsoft Office.
- Choose File Open.
- Browse to the RibbonTest.docm file that you saved in step 5 and open it.
- In the Custom UI tab of the Editor, type the following XML code:
<customUI xmlns="http://schemas.microsoft.com/office/2009/07/customui"> <ribbon> <tabs> <tab id="t1" label="Execute"> <group id="g1" label="Run Test"> <button id="b1" label="See Message" onAction="ThisDocument.test" /> </group> </tab> </tabs> </ribbon> </customUI> - Click the icon with the red check mark to validate the XML code. If the code isn't well formed according to the validation test, you've made a typo in the XML code. Retype it (or better, copy and paste it from this book's web page).
- Choose File Save, then File Exit to close the UI Editor.
- Now, to see your new tab, group, and button, open RibbonTest.docm in Word, click the new Execute tab at the far right of the button, and click the See Message “button.”
You should see a message box appear with the message “Hi!” in it. If you don't, check out the section “What to Look For If Things Go Wrong” later in this chapter.
Try modifying the code in the previous example to see the effect of some other attributes of the Button control. That control has the following attributes: description, enabled, id, idMso, idQ, image, imageMso, insertAfterMso, insertAfterQ, insertBeforeMso, insertBeforeQ, keytip, label, ScreenTip, showImage, showLabel, size, supertip, tag, and visible.
Adding Attributes
As you can see, the Ribbon is quite dramatically modifiable; in fact, you can create it from scratch. In this section, you'll explore some additional ways to modify the Ribbon. For this and the remaining examples in this chapter, we'll use Word because it's the most popular Office application and because modifying the Excel or PowerPoint Ribbons works much the same way, as the second example in this chapter illustrated.
Using Built-in Icons and ScreenTips
Try following the steps in the previous section again, but this time modify the XML code for the button element by adding two additional attributes, like this:
<button id="b1"
         label="See Message"
         imageMso= "ShowTimeZones"
         screentip="Say Hi!"
         onAction="module1.test" />
When you load the .docm file and click the Execute tab that you've added to the Ribbon, you'll now see two changes from the previous example, reflecting the two attributes you added to the button element. First, there is a globe icon (one of the built-in imageMso icons).
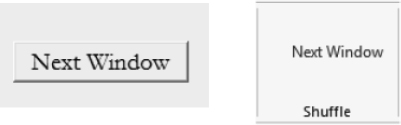
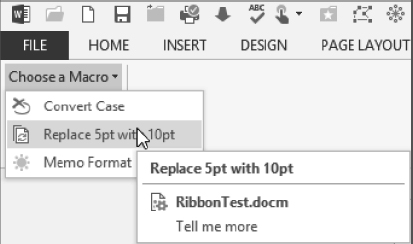
Also, when you pause your mouse cursor on top of the button, a tooltip (now called a ScreenTip by Microsoft) is displayed. You can employ this attribute to remind the user of the purpose of the button. There are actually two elements to a ScreenTip: the ScreenTip attribute displays a heading in boldface and the supertip attribute displays a normal-font “body text” message. You can use either or both. The following code produces the result shown in Figure 31.4:
screentip="Run a Macro"
supertip="Click this button to execute the test macro."
FIGURE 31.4 The ScreenTip attribute is shown on top in boldface. The supertip attribute displays the body text in a regular font, below.
Creating Your Own Icons
Although Microsoft provides an extensive collection of built-in icons, you can also create your own. You can use any .bmp, .jpg, or .ico file. The attribute for a custom icon is image rather than imageMso.
The Custom UI Editor for Microsoft Office provides an easy way to find and employ custom icons. To see how this works, open RibbonTest.docm in the UI Editor, and then click the middle icon in the UI Editor (its ScreenTip is Insert Icons). An Insert Custom Icons dialog box opens. Browse your hard drive until you locate the graphics file you want to use. All permitted graphics file types will be displayed in the browser.
It's not necessary to reduce the size of a large graphics file; it will automatically be reduced for you when displayed.
When you find the file you want, double-click it. The dialog box closes and a picture of the image as well as its name are displayed in the left panel of the UI Editor. You have to click the small + next to the customUI entry in the left pane to see the image. Right-click the image to delete it or to change its ID.
Notice that the filename extension, such as .jpg, is stripped off in the UI Editor. This reminds you that you don't use the extension when you add this image to the XML code. A photo of a rose is used as an icon in the following code.
The file on the hard drive is rose.jpg, but notice that in the code it's referred to merely as rose:
<button id="b1"
          label="See Message"
          image="Rose"
          size="large"
     screentip="Say Hi!"
     onAction="module1.test" />
Using Menus and Lists
Although the button is the most common control employed on the Ribbon (or indeed in any user interface), you can use other controls as well. For example, if you want to offer the user multiple options—such as choosing between executing three different macros—a drop-down list box or a menu might be preferable to using up Ribbon space by adding three buttons on the top level (what's always visible in a tab) of the Ribbon.
Adding Menus
Here's how to add to the Ribbon a menu that, when clicked, displays three buttons—each of which launches a different macro:
- Open RibbonTest.docm in the Custom UI Editor.
- Type this XML code into the Custom UI Editor:
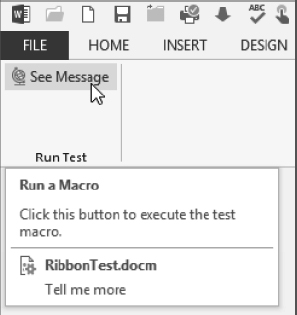
<customUI xmlns="http://schemas.microsoft.com/office/2009/07/customui">
<ribbon>
  <tabs>
    <tab id="t1" label="Execute">
      <group id="g1" label="Favorite Macros">

<menu id="m1" label="Choose a Macro">
 <button id="b1"
     imageMso="InkDeleteAllInk"
     label="Convert Case"
     onAction="ThisDocument.ConvertCase" />
 <button id="b2"
     imageMso="DataRefreshAll"
     label="Replace 5pt with 10pt"
     onAction="ThisDocument.UpSize" />
 <button id="b3"
     imageMso="PictureBrightnessGallery"
     label="Memo Format"
     onAction="ThisDocument.Memo" />
</menu>

      </group>
    </tab>
  </tabs>
</ribbon>
</customUI>
Note that I chose imageMso icons that symbolize the various actions taken by these macros (see Figure 31.5).
FIGURE 31.5 Click the Choose A Macro menu, and the menu items are displayed as a set of buttons, ready to launch various macros when clicked.
- Click the Validate button in the Custom UI Editor, and if the message says your code has no typos (meaning it is well formed), choose File Save in the UI Editor to store this XML code in the RibbonTest.docm file.
- Open RibbonTest.docm in Word and press Alt+F11 to open the VBA Editor. Ensure that you have three macros in the ThisDocument module, named ConvertCase, UpSize, and Memo. They should look like this:
Sub ConvertCase(control As IRibbonControl)

  MsgBox "convert"

End Sub

Sub UpSize(control As IRibbonControl)

  MsgBox "upsize"

End Sub

Sub Memo(control As IRibbonControl)

  MsgBox "memo"

End Sub
(These message boxes are mere stubs for testing purposes; your actual procedure will, of course, contain real macros that convert case, resize fonts, and display a memo form.)
You can now return to the document RibbonTest.docm and try out the new menu. Click the Execute tab, and notice the Choose A Macro menu in the Favorite Macros group. A menu is indicated in the Ribbon by a down-arrow icon that the user clicks to display the menu items, as shown in Figure 31.5.
If you prefer, you can send all the menu buttons to the same macro and then choose between them in the VBA code by testing their id attribute (which is passed to the VBA code by the ID property of the control object). The VBA code would look like this:
Sub choosemacro(control As IRibbonControl)

    Select Case control.ID
        Case "b1"
            MsgBox ("button1")
        Case "b2"
            MsgBox ("button2")
        Case "b3"
            MsgBox ("button3")
    End Select

End Sub
For this select-case technique to work, you also need to modify the XML code in this example so that each button executes this same choosemacro procedure:
<menu id="m1" label="Choose a Macro">
    <button id="b1"
            imageMso="InkDeleteAllInk"
            label="Convert Case"
            onAction="ThisDocument.choosemacro" />
    <button id="b2"
            imageMso="DataRefreshAll"
            label="Replace 5pt with 10pt"
            onAction="ThisDocument.choosemacro" />
    <button id="b3"
            imageMso="PictureBrightnessGallery"
            label="Memo Format"
            onAction="ThisDocument.choosemacro" />
</menu>
Adding a DropDown List Control
You can employ a DropDown List control much as you would a menu when you want to offer the user a set of choices. Here's an example of XML code that displays a drop-down list on the Ribbon. This example displays the same choices (three macros) to the user as the previous example. But here we use a drop-down list rather than a menu:
<customUI xmlns="http://schemas.microsoft.com/office/2009/07/customui">
<ribbon>
   <tabs>
      <tab id="t1" label="Execute">
         <group id="g1" label="Favorite Macros">

<dropDown id="ddlist1"
getSelectedItemIndex="setfirst"

            label="Favorite Macros"
            onAction="ThisDocument.test">

     <item id="i1" label="Convert Case"/>
     <item id="i2" label="Replace 5pt with 10pt"/>
     <item id="i3" label="Memo Format"/>

</dropDown>

         </group>
      </tab>
   </tabs>
</ribbon>
</customUI>
You create a DropDown List control by adding a dropDown element in the XML code and then adding as many item child elements as you wish within the parent dropDown element. (Remember that XML is very particular about capitalization. If you try to use dropdown rather than dropDown, you'll cause an error because your XML code will not be well formed.)
You should include a getSelectedItemIndex attribute, as illustrated earlier, so the DropDown List control's text box will not initially be blank, confusing the user. This attribute executes a macro named setfirst, which you must write. This macro returns the index number of the item you want to initially display in the DropDown List control's text box. In this example, the macro returns a zero (which means to display the first item). So in this example, Convert Case will be displayed. Here's the macro that causes this to happen by setting the return value argument (passed back in the variable named x) to zero:
Sub setfirst(ByVal control As IRibbonControl, ByRef x)
    x = 0
End Sub
Pay particular attention to this GetSelectedItemIndex attribute. Recall that this attribute transfers execution to a VBA procedure when the document is being loaded (before the user sees the Ribbon), so it is a form of initialization. (For other kinds of initialization, you can use other attributes in the set of built-in get attributes, including getEnabled, getImageMso, getLabel, and getVisible.)
One additional macro must be written as well. This second macro (pointed to by the onAction attribute in the XML code) responds appropriately when the user clicks an item in the list:
Sub test(control As IRibbonControl, id As String, index As Integer)

    Select Case index

        Case 0
            MsgBox ("item1")
        Case 1
            MsgBox ("item2")
        Case 2
            MsgBox ("item3")
    End Select

End Sub
When the user clicks an item in the list, the values of both that item's id and index attributes are passed to the macro. So you can use either one to decide what code to execute. In this example, I'm using the index number, but you could just as easily use the ID string (such as Case "i1") to detect the ID of each item.
Using a DialogBoxLauncher
Some of the Ribbon's built-in groups display a small arrow in the lower-right corner (see the Font group on Word's Home tab for an example). Click that arrow, and a dialog box or task pane appears. This is a way to conserve space on the Ribbon if displaying a whole slew of options at all times would be impractical.
If you want to add a dialog box to one of your custom groups, use the DialogBoxLauncher control by writing some XML code like this:
<customUI xmlns="http://schemas.microsoft.com/office/2009/07/customui">
<ribbon>
   <tabs>
      <tab id="t1" label="Execute">
           <group id="g1"
               imageMso="StartAfterPrevious"
               label="Insert Date">
<dialogBoxLauncher>

     <button id="b1"
     onAction="test" />

</dialogBoxLauncher>

           </group>
        </tab>
     </tabs>
   </ribbon>
  </customUI>
This DialogBoxLauncher merely transfers execution to a macro (named Test in this example). So, when the user clicks the small arrow at the bottom of the custom group named Execute, the test macro displays whatever built-in dialog box is appropriate. Write this code, and the macro displays the Date And Time dialog box:
Sub test(control As IRibbonControl)

    Dialogs(wdDialogInsertDateTime).Show

End Sub
The VBA Editor will show you a list of the available dialog boxes as soon as you type the left parenthesis in Dialogs(. (This assumes that you've got the handy Auto List Members feature turned on in the VBA Editor. Choose Tools ![]() Options, then click the Editor tab in the Options dialog box.)
Options, then click the Editor tab in the Options dialog box.)
Test this example. It will insert the current date, formatted as the user chooses by selecting an option in the Date And Time dialog box.
Toggling with a Toggle-Button Control
A toggle button used to look like a regular button, but now, with the Windows 8 Modern interface, it's just text, like a hyperlink. The button, when clicked, used to animate itself. Shadows were displayed behind a clicked toggle button to make the button look like it had been pressed. With Office 2010, however, the shadowing was, for some reason, removed. When toggled, an Office 2010 button startlingly turned yellow. I guess that's somebody's idea of a improving this visual cue. As we all know, when you press something it does turn yellow.
With Office 2013, a pressed toggle button is, surprisingly, indicated by a blue background around the button's label.
What's next? We can hope that sooner or later things will settle down and we can get accustomed to cues that last longer than each revision of Office, and that, at long last, make sense.
VBA ESCAPES THE VISUAL FLATTENING DUE TO NEGLECT
Fortunately VBA's forms have consistently retained over the years the same shadowed, realistic buttons and other three-dimensional controls (see Figure 31.2). This, however, is most likely a matter of neglect rather than common sense on Microsoft's part. For now, anyway, their decision-makers appear to be generally uninterested in any form of the Basic language, including VBA. They tolerate it as a function of backward compatibility and, I suppose, because of the millions of people who like to use Basic in their Office applications, and in other contexts (see Microsoft's Visual Studio for ways to use Visual Basic to create stand-alone applications).
If you need to add an on-off control to the Ribbon, you can use either a check-box control or a toggle button. Both visually cue users about their status: the check box with a check and the toggle button by turning color and adding a frame.
Either of these controls can be used for two-state situations, such as allowing the user to choose between italic text or no italic text. Here's an example showing how to employ the toggle button. When the user clicks it, the button lights up and looks as if it's been pressed into the Ribbon. When the button is clicked a second time, the yellow lighting effect is turned off.
Your VBA procedure can detect the status of the button—pressed or not—by examining a Boolean argument I named down that is passed to your procedure. Here's how to use it in your VBA code:
Sub test(control As IRibbonControl, down As Boolean)

    If down Then
        MsgBox "Button Down"
    Else
        MsgBox "Button Up"
    End If

End Sub
This VBA procedure will respond to the following XML code you can store in your document by using the UI Editor as described in the various step-through examples throughout this chapter:
<customUI xmlns="http://schemas.microsoft.com/office/2009/07/customui">
<ribbon>
   <tabs>
      <tab id="t1" label="Execute">
         <group id="g1" label="Run Test">

<
toggleButton id="tbutton1"
   label="Click to Toggle"
   imageMso="DeclineInvitation"
   onAction="ThisDocument.test" />

         </group>
      </tab>
   </tabs>
</ribbon>
</customUI>
Modifying the Ribbon in Access
As you've doubtless noticed in previous examples in this book, Access often takes its own, sometimes rather meandering, path to accomplish a given task. Ribbon customization is no exception.
You can still use the Custom UI Editor for Microsoft Office (or any other XML editor) to enter and validate your XML code, but you can't use it to store the XML in an Access database the way you've stored XML in Word and PowerPoint in previous examples in this chapter.
With Access, you must store XML by hand, in a cell in a special table. Let's call it less than elegant. I don't want to use the word kludge.
In the following example, you'll see how to modify the Access Ribbon by adding a new tab, group, and toggle button—just as we added these elements to Word's Ribbon in the previous section. When the Access Ribbon has been modified, you can click the new toggle button and see the message “Button Down” or “Button Up.” The result is the same as in the previous section, “Toggling with a Toggle-Button Control,” but the steps to achieve that result in Access are quite dissimilar from those you took to add a toggle button to Word's Ribbon.
Follow these steps:
- Open a new blank database by running Access, clicking the Blank Desktop Database template, typing in the name R.accdb, and then clicking the Create button.
(You could also open Northwind or any other database and modify its Ribbon following these steps, but for simplicity, let's stick with a blank database for this example.)
- Right-click the Navigation pane's title bar where it says All Access Objects. (The Navigation pane is on the left side.)
- Choose Navigation Options from the context menu.
- Check the Show System Objects check box in the Navigation Options dialog box. Then click OK to close the dialog box. You're going to create a special table named USysRibbons, and it won't be visible in the Navigation pane if this check box isn't checked.
- Now you want to make sure you see some error messages if there's a bug in your Ribbon-customization programming. To do this, follow these steps:
- Click the File tab on the Ribbon.
- Click Options.
- Click the Client Settings button in the left pane of the Access Options dialog box. Scroll down until you locate the General section near the bottom.
- Check the Show Add-in User Interface Errors check box. If you're using Access 2010, this option is enabled by default. In Access 2013 it's disabled by default, as it is in Word and the other Office 2013 applications.
- Click OK to close the dialog box.
- Next you'll create your special table. Click the Ribbon's Create tab, and then click the Table Design button in the Tables group on the Ribbon.
- In the first column of the first row, type ID for the field name, and in the second column, choose AutoNumber as the data type.
- In the second row, type RibbonName and choose Short Text as the data type.
- In the third row, type RibbonXml and choose Long Text as the data type.
- Click the cell where you typed in ID to select it, and then click the Primary Key button in the Tools group on the Ribbon. (You may need to click a tab at the very top named Table Tools.)
A key symbol is displayed in the record selector.
- Click the File tab, then click Save to save your new table. Be sure to name the table USysRibbons. Click the Yes button in the two message boxes that are displayed.
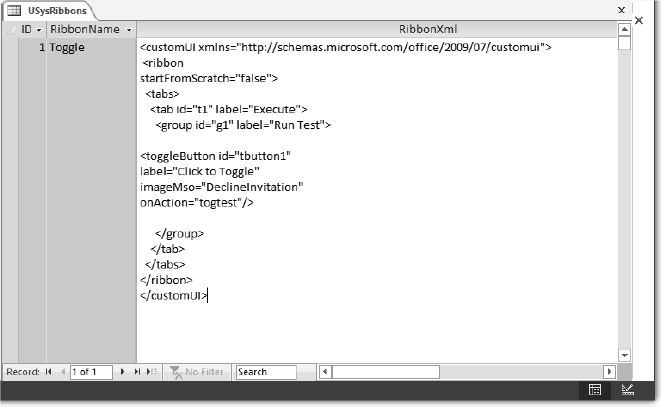
- Now that you've designed the structure of this special table, it's time to add the data that modifies the Ribbon. Locate on your hard drive the .accdb file you just created and double-click it to open it in Access. Double-click UsysRibbons in the left pane. Then right-click the USysRibbons tab and select Datasheet View.
- Ignore the ID field; it will automatically generate ID numbers for you.
- Click the RibbonName cell and type Toggle—this is the name that will identify your custom Ribbon (you can choose any name that you wish, but for the purpose of this example, use Toggle).
- Enlarge the row both vertically and horizontally to make enough room to view the XML code you'll add to the RibbonXml cell. (See Figure 31.6.) This step isn't absolutely necessary, but it makes it easier for you to test and modify the XML code. So, in the title bar between the labels RibbonXml and Click To Add, drag to the right to widen the RibbonXml column.
- Right-click the record selector (the yellow area just to the right of the Navigation pane and just above an asterisk symbol). Choose Row Height from the context menu. Type 300 and click OK to close the Row Height dialog box.
- Type the following code into the RibbonXml cell:
<customUI xmlns="http://schemas.microsoft.com/office/2009/07/customui"> <ribbon startFromScratch="false"> <tabs> <tab id="t1" label="Execute"> <group id="g1" label="Run Test"> <toggleButton id="tbutton1" label="Click to Toggle" imageMso="DeclineInvitation" onAction="togtest"/> </group> </tab> </tabs> </ribbon> </customUI>FIGURE 31.6 Here's the special table you can use in Access to store your XML code when modifying the Ribbon.
Note that in Access, unlike in other applications, it is necessary to set the startFromScratch attribute to false in the XML code. (This attribute specifies whether you're creating a brand-new Ribbon or modifying the default Ribbon.)
- Right-click the table's tab (it reads USysRibbons in boldface) and choose Close. Answer Yes when asked if you want to save changes to the layout.
- Click the File tab and choose Close.
Testing Your New Ribbon
Now you're ready to choose your new Ribbon as the default Ribbon for this database. You have to specifically select the custom Ribbon you named Toggle. Follow these steps:
- Open the database that you closed in step 19 in the previous exercise.
- Click the File tab, and then choose Options to open the Access Options dialog box.
- Click the Current Database button.
- Scroll down until you locate the Ribbon And Toolbar Options section in the dialog box.
- Open the Ribbon Name drop-down list box and select Toggle. (If you didn't name your table USysRibbons in step 11 in the previous exercise, the Toggle option will not appear in the drop-down list.)
- Click OK to close the dialog box.
- A message informs you that you must close then reopen this database for this new option to take effect. Do so.
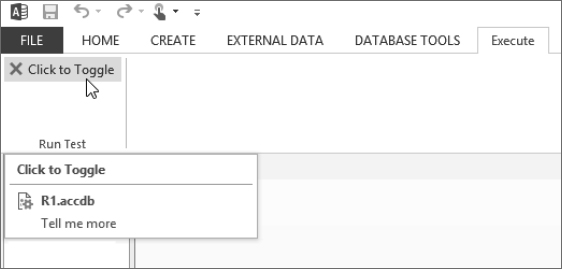
- Now you should see a new tab named Execute on the Ribbon, as shown in Figure 31.7.
FIGURE 31.7 Now you've modified the Access Ribbon, adding a new tab named Execute.
- Click the Execute tab. You should then see the Run Test group and your Click To Toggle button. You can look, but don't touch. Don't click the button yet—you've not yet provided a macro named togtest that will act as an event handler (a callback) for this button. Recall that you have this line of code in your XML: onAction="togtest". That means When I'm clicked, execute the VBA procedure named togtest. But you haven't yet created that procedure in a VBA module. You'll do that in the next section.
Adding a Callback in Access
In the previous section, you modified the Ribbon by adding three elements to it: a tab, a group, and a control. Now it's time to see how to add a callback. Follow these steps:
- Open the database that contains your special Execute tab on its Ribbon that you used in the previous step-through.
- Press Alt+F11 to open the VBA Editor in Access. Before you can communicate from the Ribbon's controls to a VBA procedure in Access, you must specify a reference to an object library (this step is not required in the other Office 2013 applications).
- Choose Tools References in the VBA Editor. Notice that the Microsoft Office 15.0 Access database engine Object Library is by default selected. However, you must scroll down until you find Microsoft Office 15.0 Object Library and select its check box. Fail to take this step, and your VBA callbacks will not work—you'll see the error message “Microsoft Office cannot run the macro or callback function ‘togtest’. Make sure the macro or function exists and takes the correct parameters.”
I'm harping on this because not adding the Office 15.0 Object Library is an easy mistake to make (at least it was for me—it took me hours to figure this one out). I read that a reference to that library was necessary, but when I opened the References dialog box and glanced at it, I saw Microsoft Access 15.0 Object Library and thought that was it. So I just closed the dialog box without adding the essential reference to the Office 15.0 library.
- Click OK to close the References dialog box.
- Double-click Module1 in the VBA Editor Project Explorer. If there is no Module1, choose Insert Module.
- Type this procedure into the module:
Sub togtest(control As IRibbonControl, down As Boolean)

  If down Then
     MsgBox "Button Down"
  Else
     MsgBox "Button Up"
  End If

End Sub
This procedure looks at the argument named down, and if it returns a value of True, that means the toggle button has been pressed on the Ribbon. If a value of False is returned, that means the toggle button has popped back out. The code If down Then is just a shorter version of If down = True Then.
- Now click your Click To Toggle toggle button on the Execute tab of the Access Ribbon. You should see a message box saying “Button Down.”
You may recall from Chapter 28, “Understanding the Access Object Model and Key Objects,” that the user can't directly execute a VBA procedure from a button on the Quick Access Toolbar. Instead, you must first create an old-style Access “macro” that employs the RunCode command to execute the VBA procedure. However, the callback technique you learned in this section permits the user to click a button (or other control) on the Ribbon that directly executes a VBA function—without going through an old-style Access “macro.”
What to Look For If Things Go Wrong
Ribbon customization—though useful and important—is new territory for many programmers. You have to deal with XML as a code platform, some unusual programming techniques (such as writing descriptive “markup” code in the XML and traditional programming code in VBA), communication between the XML and VBA via callbacks, new controls, new enumerations (such as the set of icons you can use with ImageMso), and so on.
Bugs happen even when writing code in a technology that you may have been using for decades, such as Visual Basic. So it's no surprise that Ribbon programming—with its several unique features—is pretty much guaranteed to bother you with bugs. The following sections describe some strategies for dealing with common Ribbon-related bugs.
Employ Error-Message Tools
Here are two preliminary steps to take in your effort to avoid, or cure, bugs.
First, turn on an error-reporting feature that's off by default. It allows you to see certain kinds of error messages if something is wrong with your Ribbon customization. Click the File tab on the Ribbon, then choose Options to open the application's Options dialog box. Click the Advanced button (or if you're working in Access, click the Client Settings button). Scroll down to the General section and ensure that the Show Add-in User Interface Errors check box is selected. XML itself doesn't display error messages or crash—it just does nothing if there's a problem. In other words, whatever effect you're after doesn't happen: a new tab doesn't appear, a built-in tab isn't hidden, and so on. But if you turn on the Show Add-in User Interface Errors feature, you'll see a descriptive explanation of why the Ribbon was not modified. It will look something like the message displayed in Figure 31.8.
FIGURE 31.8 Error messages are your first line of defense against bugs.
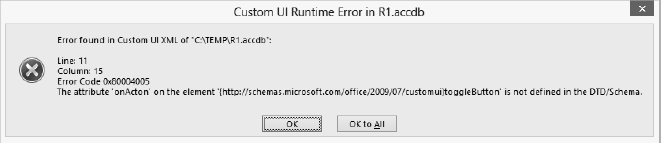
This error message tells you that your error in the XML is located in line 11 in the following code:
1. <customUI xmlns="http://schemas.microsoft.com/office/2009/07/customui">
2. <ribbon>
3.    <tabs>
4.       <tab id="t1" label="Execute">
5.          <group id="g1" label="Run Test">
6.
7.          <toggleButton id="tb1"
8.                  label="Change me."
9.                  supertip="Dynamically changes this button's label"
10.
11.                 onActon="tix"
12.                 />
13.          </group>
14.       </tab>
15.    </tabs>
16. </ribbon>
17. </customUI>
The message also says that the toggleButton element has no attribute named onActon, which indeed it doesn't. You meant to type onAction, so this a typo. However, most often this error message is caused by improper case. For example, you've spelled the attribute or other code element correctly, but you typed OnAction rather than the “proper” onAction. Remember that XML cares about capitalization and insists that it be exactly as expected. Recall that this irrational case sensitivity is the source of a great many XML bugs. Always check capitalization when you're tracking down an XML problem. A case issue is easily overlooked.
The second preliminary step to take when fixing bugs is to use an XML editor capable of validating XML code. Such an editor is included with some versions of Visual Basic (such as VB 2012, which is not the VBA built into Office applications, but rather the stand-alone version of the Basic programming language in Microsoft's Visual Studio).
You can also find free XML editors for download from places like MajorGeeks.com. Or just use the Custom UI Editor for Microsoft Office tool you downloaded earlier in this chapter. XML editors can give you useful error messages if your XML code is faulty—the specific line where a problem is and, sometimes, a good description of the error. There is overlap between XML- validation error messages and those displayed by the Show Add-in User Interface Errors option you turned on in the previous step. But when it comes to fixing bugs, the more assistance the merrier.
Cure Common User-Interface Programming Problems
Now let's explore some common error messages and what you can do about them.
CALLBACK PROBLEMS: BAD REFERENCE, MISSING VBA PROCEDURE, OR SECURITY ISSUES
The first error message we'll look at tells you that there's a problem with a callback you're attempting. The XML code can't execute the onAction attribute (see Figure 31.9). This error message can be caused because you haven't set a reference to the Microsoft Access 15.0 Object Library, as described in step 3 in the section “Adding a Callback in Access” earlier in this chapter (a variation on this error message is described in that section).
FIGURE 31.9 When you click your new button on the Ribbon to test it, you might see this error message.
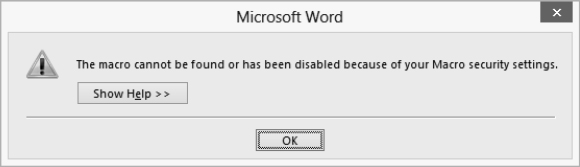
This error message can also be caused by the two problems mentioned in the error message. First, you either mistyped or never wrote the procedure that you're referencing. For example, there is no procedure named tix:
onActon="tix"
Or, second, you need to enable macros by clicking the File tab on the Ribbon, clicking Options, then clicking the Trust Center button in the dialog box, clicking the Trust Center Settings button, and clicking one of the check boxes that permit macros.
OTHER CALLBACK PROBLEMS
The next error message (see Figure 31.10) means either one of two things. First, you've neglected to put in the required argument IRibbonControl.
You've put in
Sub trigger()
rather than
Sub trigger(IRibbonControl)
FIGURE 31.10 This error message results when you don't provide necessary arguments.
Or, second, you've neglected to provide additional required arguments. For example, the Toggle Button control passes two arguments to VBA, the IRibbonControl (which all callbacks always pass) and the status of the button, up or down, a Boolean value, like this:
Sub test(control As IRibbonControl, down As Boolean)
XML MISTAKES
The next error I'll describe is easy to make. If you violate the XML nesting structure—by putting a group tag outside a tab tag, for example—you'll get the error message shown in Figure 31.11:
FIGURE 31.11 When XML tags aren't in the proper order, you'll see this error message.

The group is supposed to be inside a tab, not vice versa. Or if you leave out one of the closing tags (signified by the />), you'll get the same error message. Here the closing </tab> tag is missing:
     </group>
</tabs>
However, if you validate your XML code in an XML editor like the Custom UI Editor for Microsoft Office, the editor itself will flag certain problems such as this incorrect nesting.
Where to Go from Here
As you've seen, the Ribbon can be customized programmatically in a variety of ways. This chapter shows you the essential techniques. However, there's more to explore. You can experiment with the interesting Gallery control or create dynamic Ribbon effects, such as disabling, hiding, or changing the label on a control during runtime, as conditions warrant. In fact, you can create an entirely new Ribbon from scratch using the startFromScratch attribute.
If you're interested in going deeper into Ribbon programming, here are some useful online resources:
Download the RibbonX Visual Designer This powerful utility can assist you in all types of modifications to the Ribbon. Take a tour of its features at
www.andypope.info/vba/ribboneditor.htm
Try MSDN white papers Take a look at Microsoft's online help system for developers—MSDN. It includes a lengthy, three-part tutorial on Ribbon programming, which can be found at
http://msdn2.microsoft.com/en-us/library/aa338202.aspx
This helpful tutorial covers advanced topics such as using COM add-ins and dynamic Ribbon updating; a helpful FAQ; and a complete reference to the many attributes, callbacks, and child elements involved in Ribbon programming. Or take a look here:
http://msdn.microsoft.com/en-us/library/office/ff862537.aspx
Read all about RibbonX RibbonX for Dummies (Wiley) is a solid introductory book to all aspects of Ribbon programming, and it covers advanced topics as well.
Visit the Windows Ribbon Development Forum The Windows Ribbon Development Forum is filled with questions and answers on Ribbon programming. If you run into a roadblock, post your question here and experts will respond.
http://social.msdn.microsoft.com/Forums/en-US/windowsribbondevelopment
Explore Microsoft's Access Team's blog The following web page and its links focus on Access, and it includes information useful to beginners as well as more advanced Access programmers. It's written by Microsoft's own Access Team, and you can also post questions at this blog:
http://blogs.office.com/b/microsoft-access/archive/tags/access+2013/default.aspx
The Bottom Line
Hide a tab on the Ribbon. Modifying the Ribbon involves employing XML attributes—similar to methods and properties—of various Ribbon elements such as tabs, groups, and buttons.
Master It Some Ribbon-related attributes include the suffix Mso. Examples include idMso and imageMso. What does the Mso mean, and what kind of attributes' names are appended with Mso?
Hide a group. You might want to make an entire Ribbon group invisible. For example, the Editing group on the Home tab includes three options that most people launch via shortcut keys: Find, Replace, and Select. So what's the point of having this group take up space on the Ribbon?
Master It What XML attribute of a group do you set to false to remove that group from the Ribbon?
Create callbacks for event handling. To execute VBA code, you insert a callback in the XML code that will run whatever VBA macro you specify. When the user clicks a control, such as a button, the XML code that services this control sends a message to the Office application, telling it that a response is needed.
Master It What XML attribute do you use to create a callback?
Manipulate the Access Ribbon. Access often does things differently from the majority of Office applications, and Ribbon programming is no different. You can manipulate the Access Ribbon as freely as in the other applications, but several of the programming techniques differ.
Master It Where can you store the XML code when programming the Access Ribbon?
Debug Ribbon programming. Most Ribbon programming involves writing two types of code: XML and VBA. Strategies for fixing bugs in XML include validation.
Master It What is XML validation?