
Chapter 2
Getting Started with the Visual Basic Editor
In this chapter, you'll start learning how to use the Visual Basic Editor, a powerful tool bundled with Office 2013 for working with VBA. This programming editor is the culmination of more than 18 years of modifications and improvements. It is highly effective.
All applications that host VBA use the Visual Basic Editor, so the environment looks much the same no matter which application you're using.
This chapter covers the fundamentals of the Visual Basic Editor: its components, what they do, and how you use them. You'll learn more advanced maneuvers as you work with VBA later in this book.
This chapter also shows you how to customize the Visual Basic Editor to make it more comfortable, more in tune with your preferences. This customization doesn't take long, and you'll find the resulting ease of use more than worth the amount of time you invest.
In this chapter you will learn to do the following:
- Open the Visual Basic Editor
- Open a macro in the Visual Basic Editor
- Understand the Visual Basic Editor's main windows
- Set properties for a project
- Customize the Visual Basic Editor
Opening the Visual Basic Editor
You open the Visual Basic Editor from the host application you're using. For example, if you're working in Word, you open the Visual Basic Editor from Word. The instance of the Visual Basic Editor that you open is then associated with Word.
However, you can open two or more instances of the Visual Basic Editor. For example, if you've already opened an instance of the Visual Basic Editor in Word, you could open another instance in Excel, and then another in Access.
You can open the Visual Basic Editor in two ways:
- Select a macro that you want to edit. The host application then opens the Visual Basic Editor and displays that macro so that you're ready to work with it.
- Open the editor directly, and then locate the macro code you want to work with.
The next two sections demonstrate the two ways of opening the Visual Basic Editor, and the third section shows you how to navigate to a macro.
Opening the Visual Basic Editor with a Macro Selected
If you know the name of the macro you want to work with, use this method to open the Visual Basic Editor and the macro at the same time. This example uses Word to open the Transpose_Word_Right macro that you recorded in Chapter 1, “Recording and Running Macros in the Office Applications”:
- Open Word if it's not already running.
- Press Alt+F8 to display the Macros dialog box.
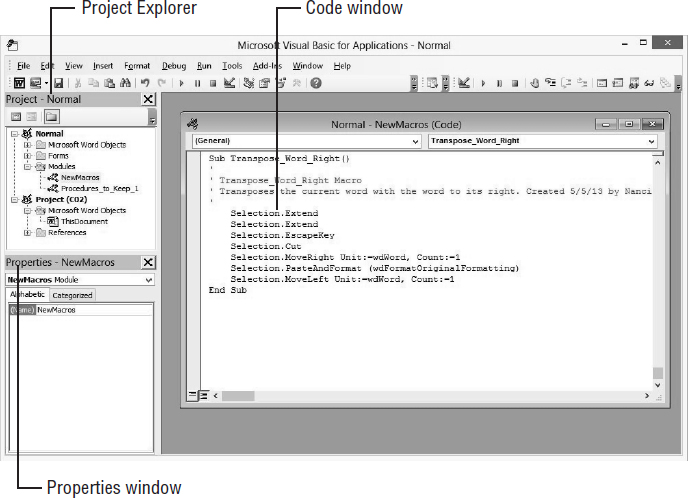
- Select the Transpose_Word_Right macro and click the Edit button. Word opens the Visual Basic Editor with the macro displayed and ready for editing, as shown in Figure 2.1.
FIGURE 2.1 The Visual Basic Editor with the Transpose_Word_Right macro open in the Code window
- Choose File
 Close and return to Microsoft Word to close the Visual Basic Editor for the moment so that you can open it using the method described in the next section.
Opening the Visual Basic Editor Directly
To open the Visual Basic Editor directly, follow these steps:
- Open or activate the host application. In this case, open or switch to Word.
- Press Alt+F11. The Visual Basic Editor opens.
THE VISUAL BASIC EDITOR REMEMBERS ITS CODE WINDOW
Depending on the state of the Visual Basic Editor the last time it was closed, you may see one or more Code windows open. For example, if you left the Code window for the NewMacros module open in the previous section, the Visual Basic Editor will display this Code window again.
If you don't see the Properties window (see Figure 2.1), press F4. More on this important window shortly.
Navigating to a Macro
After opening the Visual Basic Editor directly, use the Project Explorer pane (shown on the left side in Figure 2.1) to navigate to your macro. You also use the Project Explorer to navigate among open projects and modules when you're working in the Visual Basic Editor.
THE PROJECT EXPLORER RESEMBLES WINDOWS EXPLORER FOLDER VIEW
The Project Explorer pane works like a standard Windows Explorer tree when you're viewing folders and subfolders. Depending on the application you're using, you'll see different projects displayed in the tree (more on this later in the chapter).
To navigate to the Transpose_Word_Right macro, follow these steps:
- In the Project Explorer pane in the upper-left corner of the Visual Basic Editor, expand the entry for Normal (which represents Normal.dotm, the Normal template) by clicking the + sign to the left of its name. (If the Normal entry is already expanded, skip this step.)
- Double-click the Modules entry to expand it.
- Double-click the NewMacros module. (This is the global module in which Word automatically stores the macros you record unless you specify a different location in the Record Macro dialog box.) The Visual Basic Editor displays the contents of the module in the Code window on the right side, as you can see in Figure 2.1.
If the module contains more than one macro, you'll also need to select the macro you want to work with—in this case, the Transpose_Word_Right macro. (If you've recorded only the Transpose_Word_Right macro, only this macro appears in the Code window.) To select a macro, use one of these methods:
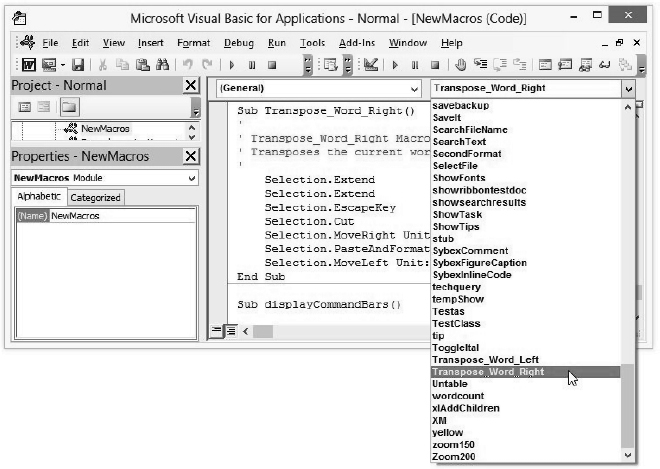
- In the Code window, select the macro from the Procedure drop-down list, as shown in Figure 2.2. (If you hover the mouse pointer over the list before dropping it down, you'll see a tooltip that gives its name: Procedure.)
- Use the scroll bar to scroll to the macro you want to edit, which is identified by the word Sub, the name you gave it, and a pair of parentheses—in this case, Sub Transpose_Word_Right().
FIGURE 2.2 If the module contains two or more macros, scroll to the macro you want to edit, or select it from this Procedure drop-down list.
MAXIMIZE YOUR CODE WINDOW
Eagle-eyed readers will notice a difference between Figures 2.1 and 2.2. By default, the Code window is displayed in “normal” window size. In other words, there is a gray background around it, as you can see in Figure 2.1. This allows you to open other code windows in the same area. However, that's a bit too much micro-multitasking for me, so from now on, I'll display the Code window maximized, as shown in Figure 2.2. This makes it easier to see your code. To do this, click the Code window's Maximize button, just to the left of the red X button that closes the window.
Using the Visual Basic Editor's Main Windows
In the following sections, you'll learn how to use the main windows of the Visual Basic Editor to get your work done.
The Project Explorer
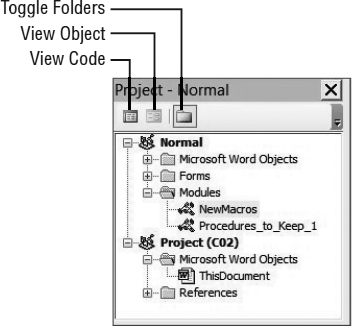
The Project Explorer is the tool for navigating among the various objects in the Visual Basic Editor. Figure 2.3 shows the Project Explorer for a Visual Basic Editor session with Word as the host application.
Depending on the host application and its capabilities, each project can contain some or all of the following elements. (But don't worry about such items as class modules, link libraries, and so on—we'll explore them in later chapters.)
FIGURE 2.3 Use the Project Explorer to navigate to the module you want to work with.
- User forms (windows that make up part of the macro's user interface, such as a custom dialog box that accepts user input).
- Modules containing macros, procedures, and functions.
- Class modules (modules that define objects, their properties, and their values).
- References to other projects or to library files (such as DLLs—Dynamic Link Libraries).
- Objects related to the application. For example, each Word document and template contains a Microsoft Word Objects folder that holds a class object named ThisDocument. ThisDocument gives you access to the properties and events (actions the object can react to, such as a click event) for the document or template. Each Excel workbook contains a class object named ThisWorkbook that gives you access to the properties and events for the workbook and a Sheet object (named Sheet1, Sheet2, and so on) for each worksheet.
For most host applications, each open document and template is considered a separate project and is displayed as a root in the project tree. The project tree also contains any global macro storage container—such as the Normal.dotm template in Word or the Personal Macro Workbook in Excel—and any add-ins that are loaded.
As an example, in Figure 2.3, Normal.dotm is identified as Normal, and the active document is identified as Project (C02): a document named C02.
CHANGE A PROJECT'S NAME AT ANY TIME
You can change the name of a project by using the Project Properties dialog box (discussed later in this chapter) or by selecting the project and entering a new name in the Properties pane, shown directly below the Project Explorer pane (as seen earlier in Figure 2.1).
Once you change the name, the project is identified by that name in the Project Explorer, followed by the name of the document or template. For example, if you change the project name of document 2 to Testing, the document project is identified as Testing(2) in the Project Explorer rather than Project(2).
You navigate the Project Explorer in the same way that you navigate the Windows Explorer folder tree: Click the boxed plus sign to the left of a project item to expand the view and display the items contained in the project, and click the resulting boxed minus sign to collapse the view and hide the items again. Double-click a module to display its code in the Code window. Double-click a user form to display it in the Code window.
The Visual Basic Editor displays the Project Explorer by default, and because the Project Explorer provides fast and efficient navigation among the various elements of your VBA projects, it's usually easiest to keep it displayed unless you're short on screen space or you're working for long periods in the Code window and don't need to switch to other elements. However, most people don't create document-specific macros or large, complicated programs spanning multiple projects. As a result, they just leave all their macros in the NewMacros module.
To close the Project Explorer, click its close button (the x button in its title bar). To display the Project Explorer again, press Ctrl+R or choose View ![]() Project Explorer. As you'll see later in this chapter, you can also undock the Project Explorer. This lets you push it aside when you need more room. But it doesn't take up much room, so, again, many people just leave it tucked up there in the upper left.
Project Explorer. As you'll see later in this chapter, you can also undock the Project Explorer. This lets you push it aside when you need more room. But it doesn't take up much room, so, again, many people just leave it tucked up there in the upper left.
In Figure 2.3, three buttons appear on a toolbar at the top of the Project Explorer:
View Code Displays the Code window for the selected object. For example, if you select a user form in the Project Explorer and click the View Code button, the Visual Basic Editor displays a Code window containing any code attached to the user form. If you select a module or a class module in the Project Explorer and click the View Code button, the Visual Basic Editor displays a Code window containing the code in the module. You can also right-click an item in the Project Explorer and choose View Code from the context menu.
Code is merely a synonym for programming — the series of commands you type in (or record) to make the computer behave a certain way. Code is sometimes called programming code or source code.
Note that the words used in programming—the terms such as Selection or End Sub employed by a computer-programming language such as VBA—are referred to by a variety of synonyms: statements, keywords, commands, and so on. In this book, I'll frequently simply use the generic term commands.
DOUBLE-CLICK MODULES TO VIEW THEIR CODE
For a module or a class module, you can also double-click the object to view its code. This is usually faster than selecting it and then clicking the View Code button. For a user form or a file, however, double-clicking displays the View Object option (discussed next) rather than the View Code option.
View Object Displays a window containing the selected object. The View Object button remains dimmed and unavailable until you select an object (such as a user form or a file or object within a file) that can be displayed. If the selected object is a user form, clicking the View Object button displays the user form; if the selected object is a file or an object within a file, clicking the View Object button displays that object in the host application's window.
For example, selecting the ThisDocument object for a Word document and clicking the View Object button displays the actual Word document in the Word window. Selecting the Sheet1 object in an Excel workbook and clicking the View Object button displays that worksheet in the Excel workbook in the Excel window.
VIEWING AN OBJECT
You can also trigger the View Object mode by right-clicking an object and choosing View Object from the shortcut menu or by double-clicking an object that supports the View Object feature. (If the object doesn't support the View Object feature, double-clicking it triggers the View Code mode instead.)
Toggle Folders Toggles the view of the objects in the Project Explorer between folder view (a view that shows the objects grouped within their projects and folders) and contents view (which displays only the objects within their projects—no folders are shown).
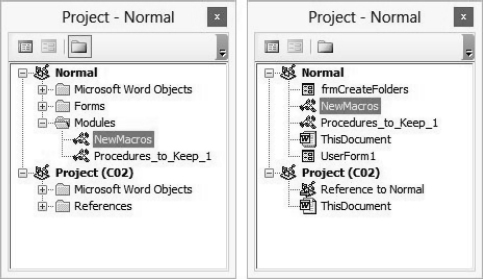
The left part of Figure 2.4 shows the Project Explorer for an application session sorted by folder view, and the right part shows the Project Explorer for the same situation in contents view. Whether you spend more time in folder view or contents view will depend on the size of your screen, the number of objects you put in any given project, and the way your mind works, not necessarily in that order. For many purposes, you'll want to toggle between folder view and contents view to locate objects most easily.
FIGURE 2.4 Folder view (left) displays the objects separated into folders beneath the projects that contain them. Contents view (right) displays only the objects and the projects that contain them.
The Project Explorer has several uses, which is another reason to keep it open all the time. Apart from navigating to the items you need to work with, you can perform the following additional tasks with the Project Explorer:
- Add components to or remove them from a project. For example, you can use the Project Explorer to add a module or a user form to a project.
- Compare the components of one project to the components of another project. Such a comparison can be useful when you need to establish the differences between two or more projects quickly (for example, your reference copy of a company template and the copies users have been adding to).
- Move or copy items from one project to another. You can drag a code module, class module, or user form from one project to another in the Project Explorer to copy it or from the Project Explorer in one instance of the Visual Basic Editor to a project in the Project Explorer in another instance. For example, you could drag a user form from a Visual Basic Editor instance hosted by Excel to a Visual Basic Editor session hosted by PowerPoint to copy the user form. You can't, however, copy or move objects that are specific to a particular application's object model; for example, you can't drop an Excel sheet into Word's Project Explorer because Word doesn't support that type of object.
- Import or export a code module or a user form to or from a project.
THE PROJECT EXPLORER IS YOUR BEST VIEW
Many actions that you can perform through the Project Explorer you can also perform through the Visual Basic Editor's menu items. In general, though, the Project Explorer provides the easiest way to navigate from module to module in the Visual Basic Editor, especially if you ever have several complex projects open at the same time. You can access the most commonly used features for an object by right-clicking it in the Project Explorer to display the shortcut menu.
The Object Browser
The Visual Basic Editor provides a full Object Browser for working with objects in VBA. You'll look at the Object Browser in detail in Chapter 8, “Finding the Objects, Methods, and Properties You Need,” and when you examine the object models for the various Office applications in the final part of the book. But in the meantime take a quick look at Figure 2.5, which shows the Object Browser for a Word VBA session. The Document object is selected in the left-hand panel, and a list of its properties appears in the right-hand panel. (To see this in your VBA Editor, press F2.)
FIGURE 2.5 The Object Brows provides a quick way to look up objects and their properties. Here, you can see the properties contained in the Document object.
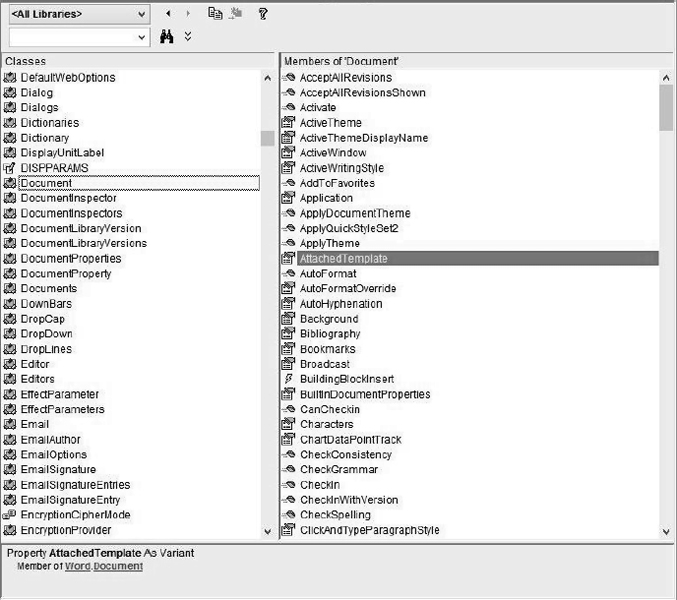
You'll find that a number of these properties immediately make sense from your general knowledge of Word documents. For example, as you would expect, the AttachedTemplate property tells you which template the document is currently attached to. Likewise, the Bookmarks property contains information on any bookmarks in the document. The property information is displayed at the bottom of the Object Browser. One of the great things about the BASIC language, of which VBA is a variant, and the libraries of objects underlying the Office applications is that they generally use ordinary English terminology.
The Code Window
You'll do most of the actual work of testing and editing your macros in the Visual Basic Editor's Code window. (Since code is written in plain text, you could simply write it in Notepad, then paste it into the code editor for testing and debugging. But the Visual Basic Editor offers so many useful programming tools that only the brilliant few can easily get good results by trying to wing it without any assistance from the editor.)
The Visual Basic Editor provides an individual Code window for each open project, for each document section within the project that can contains code, and for each code module and user form in the project. Each Code window is identified by the project name, the name of the module within the project, and the word Code in parentheses. Figure 2.6 shows the Visual Basic Editor Code window with the Transpose_Word_Right macro open in it.
FIGURE 2.6 You edit macros in the Code window.

As you can see from the figure, two drop-down list boxes appear just below the title bar of the Code window:
- The Object drop-down list box at the upper-left corner of the Code window provides a quick way of navigating between different objects.
- The Procedure drop-down list box at the upper-right corner of the Code window lets you move quickly from procedure to procedure within the current module. Click the down arrow button to display the drop-down list of procedures. You'll see that the first procedure is (Declarations). Clicking this item in the list takes you to the Declarations area at the top of the current code sheet, which is where you declare public variables and other VBA information that multiple procedures need to know.
The Visual Basic Editor Code window provides a half dozen features that help you edit code efficiently and accurately, as discussed in the following sections.
COMPLETE WORD
The Complete Word feature can complete the word you're typing into the Code window, once you've typed enough letters to distinguish that word from any other. If you haven't typed enough letters to distinguish the word, the Visual Basic Editor gives you the closest possibilities (see Figure 2.7). You can either “type down” (continue typing to narrow the selection) or scroll through the displayed list to find the one you want.
FIGURE 2.7 The Complete Word feature automatically completes a term when you've typed enough to identify it. If you haven't typed enough, you can choose from a short list.
The easiest way to activate Complete Word when you're typing code is to press Ctrl+spacebar. You can also choose Edit ![]() Complete Word or click the Complete Word button on the Edit toolbar (see Figure 2.8). Note that the Edit toolbar isn't visible by default. Open it by choosing View
Complete Word or click the Complete Word button on the Edit toolbar (see Figure 2.8). Note that the Edit toolbar isn't visible by default. Open it by choosing View ![]() Toolbars
Toolbars ![]() Edit or by right-clicking the toolbar area in the editor, then choosing Edit from the shortcut menu that appears.
Edit or by right-clicking the toolbar area in the editor, then choosing Edit from the shortcut menu that appears.
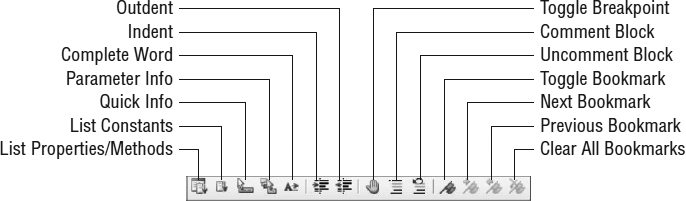
FIGURE 2.8 The Edit toolbar contains features used when working in the Code window.
QUICK INFO
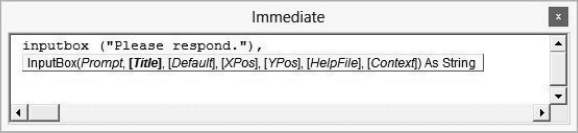
The Quick Info feature displays a ScreenTip showing syntax information about the currently selected variable, function, method, statement, or procedure. (Selected here just means the word in the code that's under or adjacent to the blinking cursor insertion point.) If you type in a command like MsgBox and then press the spacebar, the ScreenTip pops up to help you complete typing in the command. The tip shows both the required and optional elements of that command. Optional elements are enclosed in square brackets.
Figure 2.9 shows an example of a Quick Info ScreenTip.
FIGURE 2.9 Use the Editor's Quick Info feature to see a VB language command's syntax or a quick readout of status.
To display Quick Info, use one of these methods:
- Just type a space following a VB command. For example, type msgbox (space).
- Click the Quick Info icon on the Edit toolbar.
- Right-click a VB command and choose Quick Info from the shortcut menu.
- Position the insertion point in the command and press Ctrl+I.
- Position the insertion point in the term and choose Edit Quick Info.
- If you're typing in actual commands from the VBA language (as opposed to, say, variables or objects), the easiest way to see Quick Info is just to type the command's name (such as MsgBox), then press the spacebar key. Note that VB doesn't pay any attention to capitalization, so you can type in msgbox or MsgBox or whatever variation you wish. Once you finish typing in the line of code (by pressing Enter), the editor will automatically capitalize the command the standard way: MsgBox.
AUTO LIST MEMBERS
Many VB commands have properties (qualities) and methods (behaviors). Taken together, the properties and methods of an object are called its members.
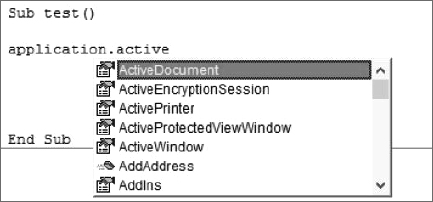
For example, a message box can display various icons (such as question mark, exclamation point, and so on) to cue the user about the purpose of the message (question, warning, etc.). This icon is called the Buttons property of the message-box object. And this property is specified right after the text message in the line of code. Therefore, when I type a comma to indicate that I'm now going to specify the icon for my message box, the Auto List Members feature opens a dropdown list of the choices available. As you can see in Figure 2.10, I'm choosing vbOKOnly, but there are a number of other possible choices, such as vbOKCancel, vbQuestion, and so on.
FIGURE 2.10 Use the Auto List Members command to enter code items quickly and accurately.
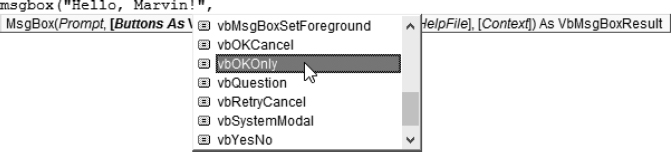
The Auto List Members list allows you to quickly complete the line of code. Auto List Members is switched on by default and is automatically displayed when you type a period in an object description or a comma, parentheses, or other punctuation in a line of code. Notice in Figure 2.10 that I've typed in a message-box command followed by the text Hello, Marvin! and then a comma. As soon as I typed the comma, the list of settings for the Buttons appeared. (These settings are called constants.)
Alternatively, you can display the list box by clicking the List Properties/Methods button on the Edit toolbar.
To use Auto List Members to insert your choice into your code, follow these steps:
- Press the down arrow key to scroll down to the property or method, or scroll down with the mouse (see Figure 2.10). You can also type the first few letters of the property or method's name to jump to it.
- Enter the property or method into the code by doing one of the following:
- Press Tab, or double-click the property or method, if you want to continue adding to this line of code after entering the property or method. (There might be additional optional properties you want to specify on this line.)
- Press Enter if you want to start a new line after entering the property or method.
LIST CONSTANTS
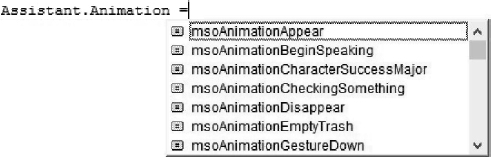
The List Constants feature displays a pop-up list box containing constants for a property you've typed so that you can quickly complete the expression. List Constants is switched on by default. Alternatively, you can display the list box by clicking the List Constants button on the Edit toolbar.
To use List Constants (see Figure 2.11), follow these steps:
- Press to scroll down to the constant, type its first letter (or first few letters), or scroll down with the mouse.
- Enter the constant in the code by doing the following:
- Press Tab, or double-click the constant, if you want to continue working on the same line after entering the constant.
- Press Enter if you want to start a new line after entering the constant.
FIGURE 2.11 The List Constants feature saves you time and effort, especially when typing complex constant names.
DATA TIPS
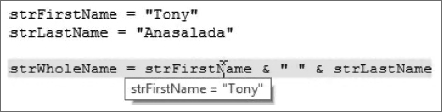
The Data Tips feature displays a ScreenTip containing the value of a variable the mouse pointer moves over when the Visual Basic Editor is in Break mode (a mode you use for testing and debugging macros, described later in this book). Figure 2.12 shows an example. The Data Tips feature is switched on by default, but you can switch it, and other features, off by choosing Tools ![]() Options.
Options.
FIGURE 2.12 Use the Data Tips feature to check the value of a variable when you're running or stepping through code.
MARGIN INDICATORS
The Margin Indicators feature lets you quickly set a breakpoint, the next statement, or a bookmark by clicking in the margin of the Code window. You'll look at setting breakpoints, setting the next statement, and setting bookmarks later. (You can just right-click the gray margin on the left side of the Code window, then choose Toggle from the shortcut menu to manipulate breakpoints or bookmarks. You can also just left-click to toggle breakpoints.)
OTHER EDITING FEATURES
Apart from these features, the Code window includes standard Office editing features such as copy and move, cut and paste, and drag and drop. You can drag code from one procedure or module to another.
The Properties Window
The Visual Basic Editor provides a Properties window you can use to view and modify the properties of an object in VBA, such as a project, a module or class module, a user form, or a control (a button or check box in a dialog box, for example). If the Properties window isn't visible in the Editor, press F4.
In the drop-down list at the top of the Properties window you can select the object whose properties you want to view or modify. The Alphabetic option displays an alphabetical list of the properties in the item, and the Categorized option presents a list of the properties broken down into categories. Generally, I find the categorization less than useful because many properties don't really fit neatly into any particular category.
Figure 2.13 shows the Alphabetic option with the properties for an Excel workbook on the left and the Categorized page on the right. (Showing the Categorized page for the Excel workbook or worksheet isn't very helpful because all of the properties belong to a Misc category—miscellaneous. There's no categorization here at all.)
FIGURE 2.13 Use the Properties window to view the properties of a project, user form, module, class module, or control.
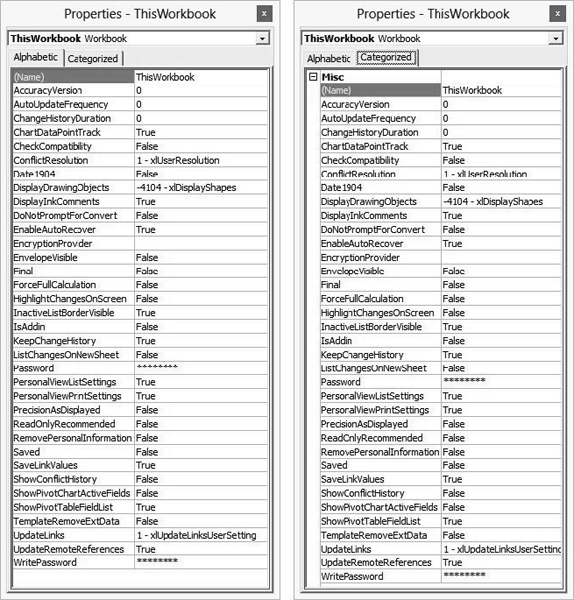
The purpose of most of the workbook properties is easy to grasp. For example, if the HasRoutingSlip property is set to False, it means the workbook does not have an email routing slip attached to it, and if the Saved property is set to True, that indicates that the workbook does not contain any unsaved changes. You'll learn about the properties for user forms in Chapter 14, “Creating Simple Custom Dialog Boxes,” and Chapter 15, “Creating Complex Forms.”
UNDERSTANDING DESIGN MODE, RUN MODE, AND BREAK MODE
The Visual Basic Editor can be in one of three modes, reflecting three fundamental phases of programming—writing, locating a bug, and fixing a bug:
Design mode Also known as design time. Anytime you're working in the Visual Basic Editor on your code, you're in Design mode. You don't have to be actively designing anything visually—such as a user control or form—although you often will be. You will also often just be typing in source code—the commands that Visual Basic will execute when you switch to Run mode. Or you might be editing code you've recorded.
Run mode Also known as runtime. When code is running, you're in Run mode. The macro will be executed just as if it had been launched from within an application like Word (using a shortcut key combination or via clicking a Quick Access Toolbar button). The purpose of Run mode in the Visual Basic Editor is to allow you to test and observe the code's behavior and interact with it if necessary, to see that it works as it's supposed to. This is known as debugging. If you do find any problem during runtime testing, you can stop the execution by pressing Ctrl+Break and then check the values in variables or otherwise attempt to track down where in your code the error is located. VBA itself can also throw you into Break mode if it detects an error condition.
Break mode When code is running but execution is temporarily suspended, you're in Break mode. Among other things, Break mode lets you step through your code one command or one procedure at a time (rather than running all the commands at once at full speed). Stepping is a very handy tool when you're debugging or otherwise critiquing your code. You'll explore debugging techniques in detail in Chapter 17, “Debugging Your Code and Handling Errors.”
The Visual Basic Editor displays the Properties window by default, but you can close it by clicking its close button (the x button). To display the Properties window again, press F4 or choose View ![]() Properties Window.
Properties Window.
To change a property, click the cell containing the property's name. If a down arrow button appears in the value cell, click it to choose a new value from a drop-down list. If no button appears, click the value cell to display the blinking insertion cursor and type in a new value.
You'll be able to choose different values from drop-down lists, depending on the type of property. For a True/False property, you'll be limited to those two choices in the drop-down list. For a text property such as Name, you can enter any valid VBA name.
By default, the Properties window is docked below the Project Explorer. You can adjust the relative heights of the Properties window or the Project Explorer window by dragging the border between them. Or you can widen both at once by dragging the border to their right. If you undock the Properties window (drag it), you can resize it by dragging its borders or corners to display more properties or to shrink the window so it takes up less space in the Visual Basic Editor. Undock interior windows (also called panes, such as the Properties pane) by dragging them by their title bar or by double-clicking their title bar. Redock by double-clicking their title bar or dragging them back into position.
The Immediate Window
Beyond the Project Explorer, the Code window, and the Properties window, the Visual Basic Editor includes a number of other windows that it doesn't display by default. Two of the key windows are the Object Browser (described earlier in this chapter) and the Immediate window, which you'll use during the discussion of the VBA language in Chapter 5, “Understanding the Essentials of VBA Syntax.”
The Immediate window, shown in Figure 2.14, is a small, unadorned window you can use as a virtual scratch pad to enter lines of code you want to test without entering them in an actual macro. When you type a line of code into the Immediate window and press the Enter key, the Visual Basic Editor executes that code.
FIGURE 2.14 Use the Immediate window for on-the-fly work and information.
To display the Immediate window, press Ctrl+G or choose View ![]() Immediate Window.
Immediate Window.
DISPLAY VARIABLES' STATUS DURING DEBUGGING
You can also use the Immediate window to display information to help you check the values of variables and expressions while code is executing. That is done by using the Debug.Print command, as in this example, which displays the value of the variable x in the Immediate window:
Sub ShowDebug()

Dim x As Integer
x = 12

Debug.Print x

End Sub
Setting Properties for a Project
Each VBA project has several properties of its own that you can set, including its project name, its description, and whether it is locked against viewing. To examine or set the properties for a project, right-click the project or one of its components in the Project Explorer and choose the Properties item in the context menu to display the Project Properties dialog box.
Both the menu item and the resulting dialog box are identified by the description of the project—for example, the properties dialog box for a template in Word is identified as TemplateProject – Project Properties, and the properties dialog box for an Excel workbook is identified as VBAProject – Project Properties. Figure 2.15 shows the Project Properties dialog box for an Excel workbook project.
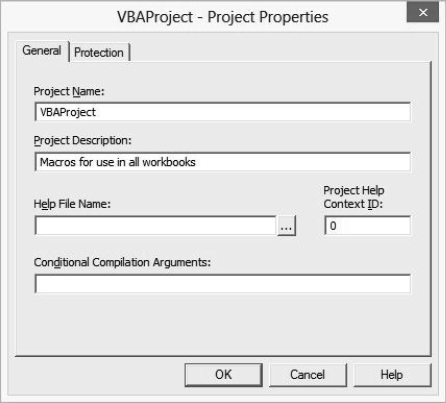
Here's what you can do on the General tab of the Project Properties dialog box:
- Set the project name in the Project Name text box. This name identifies the project in the Object Browser and, when necessary, in the Windows Registry. Make sure the name is unique to avoid confusion with any other project. Technically, the project name is the name of the type library for the project (a type library describes the objects—such as modules and user forms—that the project contains); it is used to build the fully qualified class name of classes in the project (more on this later in the book). The project name can contain underscores but cannot contain spaces.
- Enter a description of the project in the Project Description text box. This description appears in the Description pane in the Object Browser to help the user understand what the project is. So be as concise, yet descriptive, as possible.
FIGURE 2.15 Use the Project Properties dialog box to view and set the properties for a project and to lock a project against change.
- Designate the Help file for the project by entering the name and path of the Help file in the Help File Name text box. Click the button marked with the ellipsis (…) to the right of the Help File Name text box to display the Help File dialog box. Then select the file and click the Open button to enter the name of the Help file in the text box. (Alternatively, you can type or paste in the name and path.)
- Specify the Help context for the project in the Project Help Context ID text box. The Help context refers to a location in the Help file. The default Help context is 0, which causes the Help file to display its opening screen (the same screen you'll see if you run the Help file from the Run dialog box or by double-clicking the file in Explorer). You can specify a different help context to take the user to a particular topic—for example, one more relevant to the project on which they're seeking help.
- Specify any conditional compilation arguments needed for the project.
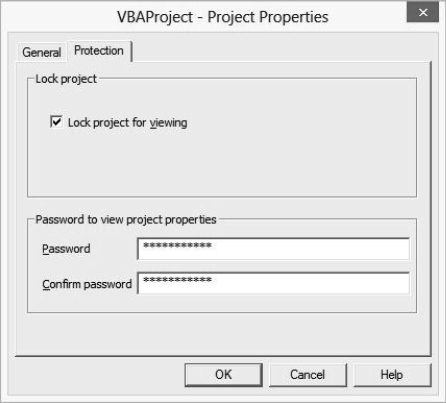
Here's what you can do on the Protection tab of the Project Properties dialog box, shown in Figure 2.16:
- Select the Lock Project For Viewing check box to prevent other people from opening the project, viewing it, and changing it without knowing the password.
- In the Password To View Project Properties group box, enter a password for the project in the Password text box, and then enter the same password in the Confirm Password text box. Click the OK button and then close the project. Now nobody can open and view (let alone change) the project if they don't know the password. That said, Office's password security has been weak and was easily cracked prior to Office 2007. Now superior encryption techniques are used, but the password is still crackable, albeit with far greater difficulty. More on this in Chapter 19, “Securing Your Code with VBA's Security Features.”
FIGURE 2.16 The Protection page of the Project Properties dialog box lets you lock your project with a password so that nobody can view or edit it
SELECT LOCK PROJECT FOR VIEWING IF YOU WANT TO PREVENT OTHERS FROM OPENING IT
If you enter a password in the Password text box and the Confirm Password text box but you don't select the Lock Project For Viewing check box, the Visual Basic Editor will prompt you for the password the next time you try to display the Project Properties dialog box. However, you'll be able to open and view the project and its contents without supplying the password.
Customizing the Visual Basic Editor
Given how much time you're likely to spend in the Visual Basic Editor, you ought to customize it so you can work as efficiently and comfortably as possible. You can customize it as follows:
- Choose editor and view preference settings in the Visual Basic Editor to control how it interacts with you
- Choose which windows to display in the Visual Basic Editor, and organize their layout so you can use your workspace as effectively as possible
- Customize the toolbar and menus in the Visual Basic Editor so the commands you need are at hand (without cluttering up your workspace)
- Customize the Toolbox so it contains the tools you need to build your user forms
The following sections explain your options.
CUSTOMIZATION IS GLOBAL ACROSS APPLICATIONS
Any customizing you do to the VBA Editor applies across all Office applications using the version of VBA you are customizing. For example, if you change the font in an instance of the Visual Basic Editor hosted by Excel, the font also changes for Editor instances hosted by Word, PowerPoint, Outlook, and so on.
Choosing Editor and View Preferences
To begin choosing editor and view preferences, choose Tools ![]() Options to open the Options dialog box (see Figure 2.17).
Options to open the Options dialog box (see Figure 2.17).
FIGURE 2.17 The Editor page of the Options dialog box
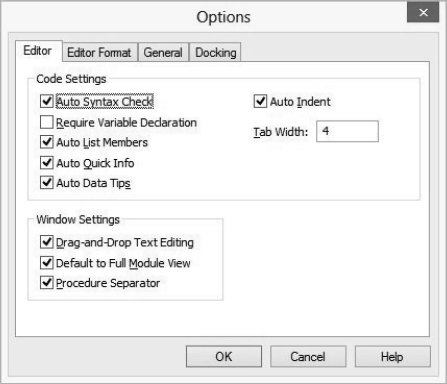
EDITOR PAGE OPTIONS
The Editor page of the Options dialog box includes the following settings:
Auto Syntax Check Controls whether VBA displays warning message boxes when it discovers errors while automatically checking your syntax as you type lines of code. Some people find this feature helpful because VBA instantly points out errors that could otherwise remain unnoticed until you tried to run or debug your code. But if your style is to move from one unfinished line of code to another (and ultimately finish all the lines at your convenience), you may want to turn off this feature to prevent the Visual Basic Editor from bombarding you with message boxes for errors you're aware of but prefer to fix later. This choice is similar to the difference between writers who like to fix spelling errors while they're typing (and thus leave Word's Check Spelling As You Type option active) and those who prefer to keep their eye on the ball and deal with minutia such as spelling after finishing their thoughts.
YOU'LL ALWAYS GET A CODE RED ON LINES WITH ERRORS
Even if you turn off Auto Syntax Check, the Visual Basic Editor still turns any offending lines of code red to draw your attention to them. It simply stops interrupting you with message boxes displaying error warnings each time you mistype something.
Require Variable Declaration Governs whether you must declare variables explicitly. Declaring variables explicitly is a little more work than declaring them implicitly, but many people believe that it's a good practice and will save you time down the road—so make sure that this check box is selected unless you have a strong preference otherwise. (Chapter 6, “Working with Variables, Constants, and Enumerations,” discusses how to work with variables.)
Auto List Members Described earlier in this chapter, this option controls whether the Auto List Members and List Constants features automatically suggest properties, methods, and constants as you work in the Code window. Most people find these features helpful, but some experienced programmers turn these features off because they know pretty much all the properties, methods, and constants they need and prefer not to be distracted by a busy interface.
Auto Quick Info This option controls whether the Quick Info feature automatically displays information about functions and their parameters as you work with functions in the Code window.
Auto Data Tips This option controls whether the Visual Basic Editor displays ScreenTips when you hover the mouse pointer over a variable or expression in Break mode, enabling you to check the value of a variable or expression quickly. (Alternatively, you can use the Locals, Immediate, or Watch window, but these take up more screen space.)
Auto Indent Determines whether the Visual Basic Editor automatically indents subsequent lines of code after you've indented a line. When Auto Indent is switched on, the Visual Basic Editor starts each new line of code indented to the same level (the same number of tabs or spaces or the same combination of the two) as the previous line. When Auto Indent is switched off, the Visual Basic Editor starts each new line of code at the left margin of the Code window. Usually, automatic indentation is a time-saver, although it means that each time you need to decrease a new line's level of indentation, you must press Shift+Tab, click the Outdent button on the Edit toolbar, or delete the tabs or spaces.
Tab Width Sets the number of spaces in a tab. You can adjust this setting from 1 to 32 spaces. The default setting is 4 spaces, which works well for the default font. If you choose to use a proportional font (such as Times or Arial) rather than a monospaced font (such as the default New Courier) for your code, you may want to increase the number of spaces a tab represents in order to clarify the levels of indentation in your code.
Drag-And-Drop Text Editing Controls whether the Visual Basic Editor supports drag-and-drop. Most people find this feature helpful. You can drag portions of your code around the Code window or from one Code window to another. You can also drag code into the Immediate window or drag an expression into the Watch window.
Default To Full Module View Controls whether the Visual Basic Editor displays all the procedures in a module in one list (Full Module view) or displays them one at a time (Procedure view). If you're working with short procedures, you may find Full Module view useful. However, the individual view can provide a less cluttered and more workable context for lengthy procedures. When working in Procedure view, you open the procedure you want to work with by choosing it from the Procedure drop-down list at the top of the Code window. To toggle between Full Module view and Procedure view, click the Full Module View button or the Procedure View button in the lower-left corner of any Code window.
USE A DROP-DOWN LIST TO QUICKLY MOVE PROCEDURES
You can also use the Procedures drop-down list when working in Full Module view to quickly move to a procedure by name.
Procedure Separator Controls whether the Visual Basic Editor displays horizontal lines to separate the procedures within a module shown in Full Module view in the Code window. Usually these lines are helpful, providing a quick visual cue showing where one procedure ends and the next begins. (If you're using Procedure view, this check box has no effect.)
EDITOR FORMAT PAGE OPTIONS
The Editor Format page of the Options dialog box, shown in Figure 2.18, controls how code appears in the Visual Basic Editor.
FIGURE 2.18 The Editor Format page of the Options dialog box
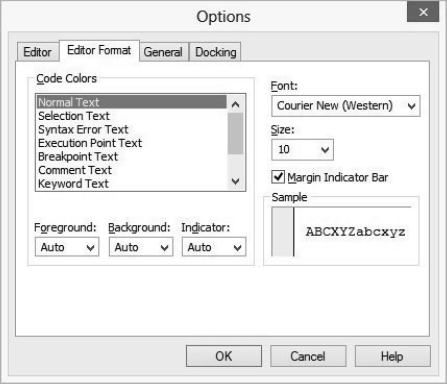
By default, comments in your code are rendered in green. This helps you easily recognize that type of text in the code window. You can change the default colors for various types of text by choosing a type of text in the Code Colors list box and then specifying its colors and typeface (font). You have control over Foreground, Background, and Indicator options via drop-down lists. However, I find the default choices sensible, so I don't change them.
Here's what the Code Colors choices mean:
Normal Text Takes care of much of the text in a typical procedure. You'll probably want to make this a conventional color (such as black, the default).
Selection Text Affects the color of selected (highlighted) text.
Syntax Error Text Affects the color VBA uses for offending lines. The default color is red.
Execution Point Text Affects the color VBA uses for the line currently being executed in Break mode. You'll usually want to make this a highlighter color (like the fluorescent yellow the Visual Basic Editor uses as the default) so you can immediately see the current line.
Breakpoint Text Affects the color in which VBA displays breakpoints (points where code execution is forced to stop).
Comment Text Affects the color of comment lines. The default color is dark green.
Keyword Text Affects the color of keywords (words recognized as part of the VBA language). Recall that in this book I'm using the term command for the words in the VBA language.
Such text accounts for a sizable portion of each procedure. You may want to display keywords in a different color than normal text because some people find it helpful to be able to distinguish keywords without needing to read the entire code. The default color is dark blue, which is a good choice—not so intrusive that the characters look like confetti, yet not so hard to see that you can't quickly visualize the underlying syntax of a line of code.
Identifier Text Affects the color VBA uses for identifiers. Identifiers include the names of variables, constants, and procedures you define.
Bookmark Text Affects the color VBA uses for the bookmarks in your code.
Call Return Text Affects the color VBA uses for calls to other procedures. By default, the Visual Basic Editor uses lime green for call return text.
You can change the font and size of all the types of text in the Code window by using the Font and Size drop-down lists on the Editor Format page. You can also prevent the display of the margin indicator bar (the zone in which items such as the Next Statement and Breakpoint icons appear) by clearing the Margin Indicator Bar check box. (Usually, these icons are helpful, but removing this bar slightly increases the code area onscreen.)
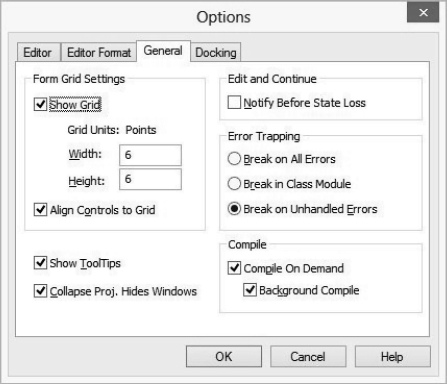
GENERAL PAGE OPTIONS
The General page of the Options dialog box contains several categories of settings. The following sections discuss them in groups. I always leave these options set to the default settings, which are shown in Figure 2.19.
FIGURE 2.19 The General page of the Options dialog box
Form Grid Settings Group Box
The Form Grid Settings options control how the Visual Basic Editor handles user forms:
- The Show Grid check box controls whether the Visual Basic Editor displays a grid pattern of dots on the user form in Design mode to help you place and align controls. This check box is selected by default.
- The Width and Height text boxes set the spacing of the dots that make up the grid. You can set any value from 2 points to 60 points (the default setting is 6 points). If you display the grid onscreen, you'll see the dots; if you don't display the grid, it still affects the Align Controls To Grid feature, discussed next. Experiment and find the coarseness of grid that you find easiest to work with.
- The Align Controls To Grid check box governs whether the Visual Basic Editor automatically snaps the edges of controls you place or move to the nearest grid line. This option lets you place controls in approximately the right positions rapidly and easily, but it prevents you from making extremely fine positional adjustments. The grid enforces certain positions, and you might find it frustrating when trying to improve the layout of controls you've already placed on a user form. (If so, one option is to clear the Align Controls To Grid check box; another is to leave it selected but to decrease the size of the grid—to allow finer adjustments.)
The Edit and Continue Group Box
The Edit And Continue group box contains only one control—the Notify Before State Loss check box. This option controls whether the Visual Basic Editor warns you, when you're running code, if you try to take an action that requires VBA to reset the values of all variables in the module.
Error Trapping Group Box
The Error Trapping group box contains three option buttons you use to specify how VBA handles errors that occur when you're running code:
Break On All Errors Tells VBA to enter Break mode when it encounters any error, no matter whether an error handler (a section of code designed to handle errors) is active or whether the code is in a class module. Break On All Errors is useful for pinpointing where errors occur, which helps you track them down and remove them. But if you've included an error handler in your code, you probably won't need this option.
Break In Class Module This is arguably the most useful option for general use. When VBA encounters an unhandled error in a class module (a module that defines a type of object), VBA enters Break mode at the offending line of code.
Break On Unhandled Errors The default setting, this is useful when you've constructed an error handler to deal with predictable errors in the current module. If there is an error handler, VBA allows the handler to trap the error and doesn't enter Break mode, but if there is no handler for the error generated, VBA enters Break mode on the offending line of code. An unhandled error in a class module, however, causes the project to enter Break mode on the line of code that invoked the offending procedure of the class, thus enabling you to identify (and alter) the line that caused the problem.
Compile Group Box
The Compile group box controls when VBA compiles the code for a project into executable code. Before any code can be executed, it needs to be compiled, but not all the code in a project must necessarily be compiled before the Visual Basic Editor can start executing the first parts of the code.
You can select the Compile On Demand check box if you want VBA to compile the code only as needed. VBA compiles the code in the procedure you're running before starting to execute that procedure, but it doesn't compile code in other procedures in the same module unless the procedure you're running calls them (transfers execution to them, a technique you'll learn later in this book).
As a result, execution of the procedure you run first in a module can begin as soon as VBA finishes compiling the code for that procedure. If the procedure then calls another procedure in the module, VBA compiles the code for the second procedure when the first procedure calls it, not when you begin running the first procedure.
Compile On Demand is usually a good choice. It's especially useful when you're building a number of procedures in a module and have unfinished code lying around in some of them. In contrast, if you clear the Compile On Demand check box, VBA compiles all the code in all the procedures in the module before starting to execute the procedure you want to run. This means that not only does the procedure start a little later (more code takes more time to compile, though most computers today are so fast you won't notice), but any language error or compile error in any procedure in the entire module prevents you from running and testing the current procedure, even if the code in that procedure contains no errors. This is a problem when you've only sketched in some of the procedures, so they remain unfinished.
Suppose you have a module named Compilation that contains two procedures, GoodCode and BadCode, which look like this:
Sub GoodCode()
  MsgBox "This code is working."
End Sub

Sub BadCode()
  Application.Delete
End Sub
GoodCode simply displays a message box to indicate that it's working, whereas BadCode contains an invalid statement (Application objects don't have a Delete method). GoodCode runs without causing a problem, but BadCode causes an error every time.
If you try to run GoodCode with Compile On Demand switched on, the procedure runs fine: VBA compiles only the programming in the GoodCode procedure, finds no errors, and runs it. But if you try to run GoodCode with Compile On Demand switched off, VBA also compiles the code in BadCode before starting to run GoodCode—and VBA stops with a compile error at the bogus Application.Delete statement. This thorough checking before running any code is good for finished modules that work together, but it can slow you down and be annoying when you're just “sketching” code—experimenting with code in a module.
On the other hand, you can see the advantage of compiling all the code in the module when GoodCode calls BadCode, as in the third line of this version of the procedure:
Sub GoodCode()
  MsgBox "This code is working."
  BadCode
End Sub
Here, compiling the code in BadCode before starting to run GoodCode is a good idea because doing so prevents GoodCode from running if BadCode contains an error. If you run this version of GoodCode with Compile On Demand switched on, VBA compiles GoodCode and starts to run it, displaying the message box in the second line. The BadCode call in the third line then causes VBA to compile BadCode, at which point VBA stops with the compile error. You don't want this to happen in the middle of a complex procedure; in such a case, you'd want Compile On Demand switched off.
The Background Compile check box, which is enabled only when the Compile On Demand check box is selected, controls whether the Visual Basic Editor uses idle CPU time to compile further code while it's running the code that it has already compiled. Keep Background Compile switched on unless you notice and are bothered by any slowing of the execution of your code. With current computer speeds, and if your projects aren't huge, you'll likely be unaware of any bothersome difference in execution rate.
Show ToolTips and Collapse Proj. Hides Windows
The final two options on the General page of the Options dialog box are Show ToolTips and Collapse Proj. Hides Windows. Also known as ScreenTips, ToolTips are text descriptions that appear when you hover the mouse pointer over a button or icon. The Show ToolTips check box controls whether the Visual Basic Editor displays ToolTips for its toolbar buttons. ToolTips tend to be useful unless you're desperate to save the memory and processor cycles they consume—which is very unlikely.
The Collapse Proj. Hides Windows check box controls whether the Visual Basic Editor hides the Code window and other project windows that you collapse in the Project Explorer's tree. This check box is selected by default, and in general it's a useful choice. When you collapse a project in the Project Explorer, the Visual Basic Editor hides any Code windows or user form windows belonging to that project and removes them from the list that appears on the Window menu. When you expand the project again, the Visual Basic Editor displays the windows in their previous positions and restores them to the Window menu's list.
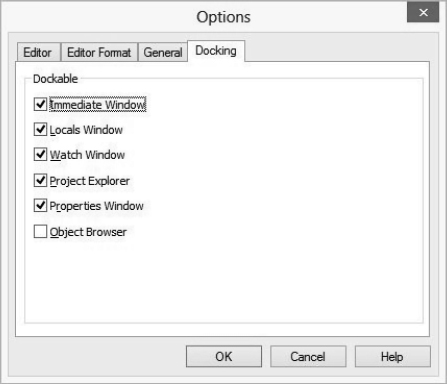
DOCKING PAGE OPTIONS
The Docking page of the Options dialog box, shown in Figure 2.20, controls whether the various windows in the Visual Basic Editor are dockable—that is, whether they snap automatically and magnetically to a side of the window when you move them there. Keeping windows dockable usually makes for a more organized interface. However, you may want to make the windows undockable so you can drag them off the edge of the Visual Basic Editor if necessary and arrange them as you like on the screen. Contemporary monitors are becoming quite large, so you might have plenty of room to display various windows outside the primary editor window.
FIGURE 2.20 The Docking page of the Options dialog box
Choosing and Laying Out the Editor Windows
You can reposition the various windows (or panes) within the Visual Basic Editor. Your choice of layout depends largely on the size and resolution of your screen and your personal preferences, but here are a couple of suggestions:
- Always make the Code window large—maximize it. If you write long lines of code, you'll want to have as much space in the Visual Basic Editor window as possible. That way your lines won't wrap and the code will be easier to read.
- Some people find that much of the time they're actively writing code, they can dispense with the Project Explorer, displaying it only when needed. As a handy way of restoring it, you can put the Project Explorer display command on the Code window, Code window break, Watch window, Immediate window, and Locals window context menus. (You'll learn how to customize the editor's menus in the next section.) You can also quickly display the Project Explorer by pressing its shortcut key, Ctrl+R.
- If you're using a multimonitor arrangement, you'll wish you could drag the child windows outside the Visual Basic Editor parent window and onto the second monitor. Unfortunately, they won't go far beyond the boundaries of the parent window. But you can achieve a similar effect by expanding the Visual Basic Editor window from your right-hand monitor onto the left-hand monitor and then docking the Properties window and the Project Explorer on the left-hand monitor. The appearance of the menu bar and toolbar will suffer, but you'll have more space for the Code window, and all three windows will be available.
Customizing the Toolbar and Menu Bar
The Visual Basic Editor supports the same toolbar and menu bar customizations as the classic, pre-Ribbon Microsoft applications used to offer, such as those found in Office 2003.
However, since the Ribbon was introduced in Office 2007, the lone toolbar is the Quick Access Toolbar, and there are no menus at all in the main application. But the Visual Basic Editor retains the older interface style—enabling you to customize its menus and toolbars in the classic fashion.
To customize the Visual Basic Editor, choose View ![]() Toolbars
Toolbars ![]() Customize (or right-click a displayed toolbar or the menu bar and choose Customize from the context menu) to display the Customize dialog box, shown in Figure 2.21.
Customize (or right-click a displayed toolbar or the menu bar and choose Customize from the context menu) to display the Customize dialog box, shown in Figure 2.21.
FIGURE 2.21 Use the Customize dialog box to customize the Visual Basic Editor's menus, toolbars, and context menus.
LIMITATIONS OF MENU AND KEYBOARD SHORTCUTS
The Visual Basic Editor doesn't let you create new menus of your own or customize its keyboard shortcuts.
You can customize the Visual Basic Editor's toolbars, menus, and context menus to suit the way you work. Above all, if you use the context menus, be sure to customize them so they provide the commands you need.
In particular, you may want to add two key commands to the context menus: Comment Block and Uncomment Block. The Comment Block command adds a comment apostrophe (') to the beginning of each line of code in a multiline block of text you select. This transforms these lines into a multiline comment that VBA won't execute.
The Uncomment Block command reverses the process. It removes the first comment apostrophe from each command in the selected block. This makes the lines executable. (Any line that was commented before you employed the Comment Block command helpfully remains commented after you run the Uncomment Block command. Run the Uncomment Block command again, and you remove further commenting.)
These commands are available from the Edit toolbar in the normal configuration of the Visual Basic Editor, but you'll probably find it more convenient to make them available at all times from the Code window's context menu.
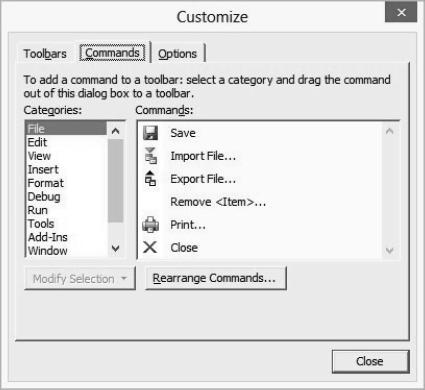
The Visual Basic Editor offers the context menus listed in Table 2.1. To customize a context menu, right-click anywhere within the toolbars and menus area. Then choose Customize from the shortcut menu. Now click the Toolbars tab in the Customize dialog box.
Select the Shortcut Menus check box in the Toolbars list on the Toolbars page of the Customize dialog box. Then click the Commands tab in the Customize dialog box and drag the command you want from the Commands page to the context menu (see Figure 2.22).
FIGURE 2.22 Use the Shortcut Menus toolbar to put key commands on the context menus in the Visual Basic Editor.
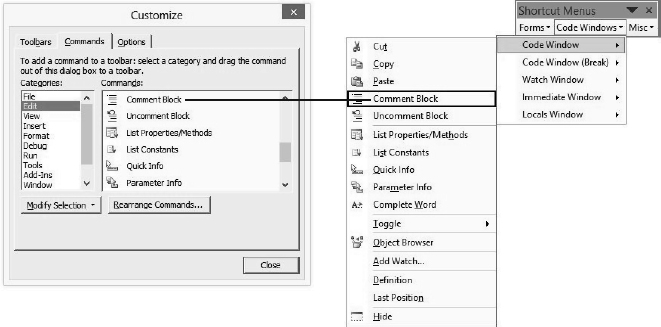
TABLE 2.1: Context menus in the Visual Basic Editor
Here are some suggestions for customizing the Visual Basic Editor:
- If you use the Locals window often to track the value of variables when stepping through your code to debug it, place a button for that window on a toolbar that you always keep displayed (the default button for Locals is located by default only on the Debug toolbar), or place an item for it on the context menus for the Code window (both in Design mode and in Break mode), Watch window, and Immediate window.
- Put the Watch window and the Immediate window options on the context menus for the windows from which you'll invoke them.
- If you have a medium-sized monitor, consider grouping all the toolbar buttons you commonly use on one toolbar so that you don't waste space by displaying multiple toolbars horizontally.
Customizing the Toolbox
You can also customize the Toolbox, a special pane that contains controls for building user forms. It can be made visible only when a user form is visible in the Code window. (Chapters 14 and 15 show you how to build user forms.)
You can customize this Toolbox by adding and removing controls and adding new Toolbox pages of your own. Some programmers put their most-used controls on the Toolbox, all on one page, to save themselves time. These controls can include customized variations on the regular Toolbox controls, and by putting them on the Toolbox, you avoid having to customize them again.
For example, many dialog boxes you create need an OK button that dismisses the dialog box, implements some code, and then continues execution of the procedure. Each OK button needs its Name property set to cmdOK, its Caption property set to OK, its Default property set to True, and its Height and Width properties set to a size smaller than the clunky dimensions the Visual Basic Editor assigns by default. Once you've thus customized a command button by modifying all these properties, you can place a copy of the special button on the Toolbox and easily just reuse it for subsequent forms. This saves time. Another candidate for this kind of customization is the TextBox. The default TextBox displays only a single line and uses a nearly unreadable font size of 8. To avoid having to modify these default properties each time you use a TextBox, create a custom TextBox that has multiple lines and is set to a font size of 11.
Another reason to customize the Toolbox is to add advanced controls that extend the things you can do with dialog boxes and user forms.
ADDING CONTROLS TO THE TOOLBOX
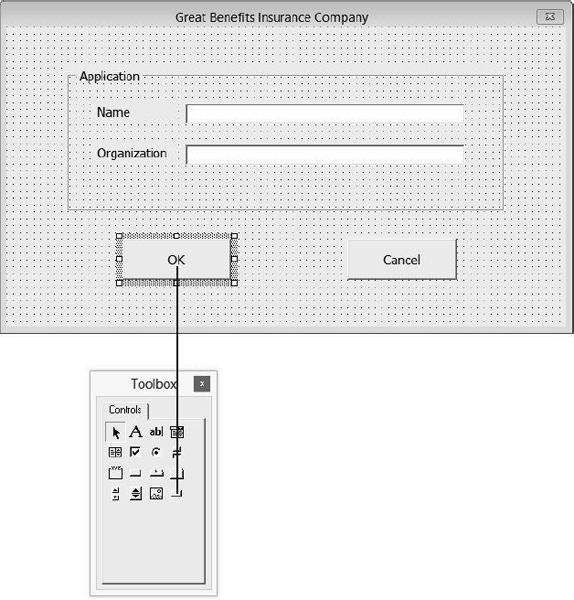
The first way you'll probably want to add controls to the Toolbox is directly from a user form. For example, once you've created your custom OK and Cancel buttons, or a TextBox, you can copy them from the user form to the Toolbox so you can reuse them in any user forms you subsequently create.
To copy one of your custom controls from a displayed user form to the Toolbox, just drag it and drop it, as shown in Figure 2.23. (Chapter 14 shows you how to put controls onto user forms you create yourself.)
FIGURE 2.23 The quickest way to add a control to the Toolbox is to drag it there from a user form.
Microsoft and other vendors also provide a variety of prewritten controls you can add to your Toolbox. To add these controls, follow these steps:
- Right-click in the Toolbox page where you want to add controls. (You'll learn how to add new pages to the Toolbox in the section “Adding Pages to the Toolbox” a little later in this chapter.)
- Choose Additional Controls from the context menu to display the Additional Controls dialog box shown in Figure 2.24.
- In the Available Controls list box, click the check boxes for the controls you want to add to the Toolbox, and then click the OK button.
FIGURE 2.24 In the Additional Controls dialog box, select the check boxes for the controls you want to add, and then click the OK button.
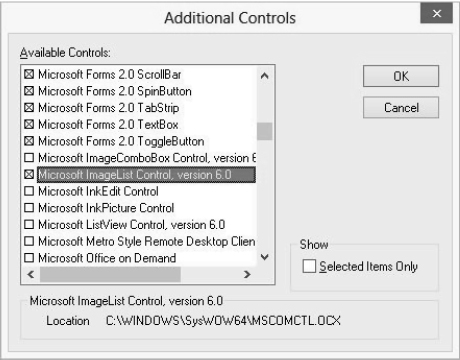
Once you are finished, if you would like to collapse the list to only the currently selected items, click the Selected Items Only check box in the Show group box.
Depending on your computer and what software is installed on it, you may find a variety of interesting and useful controls. There are numerous controls, but these are among the most noteworthy:
- A set of Microsoft Outlook controls
- A control for Apple's QuickTime
- A status-bar control
Some of these controls can add important functionality to your macros. You can also search the Internet for additional specialized controls like calendars, security locks, and so on. Adding prebuilt controls can save you time because you simply drag and drop functionality onto your user forms—functionality that doesn't require you to spend days writing code.
You can move a control from one page of the Toolbox to another by dragging it from the page it's on and moving the mouse pointer (still dragging) over the tab of the destination page to display that page. Then, move the mouse pointer down (again, still dragging) into the body of that page and drop the control.
RENAMING A TOOLBOX CONTROL
When you move the mouse pointer over a control in the Toolbox, a ScreenTip appears, showing the name of that control. To rename a control, right-click it in the Toolbox and choose the Customize option from the context menu to display the Customize Control dialog box.
Type the name for the control in the Tool Tip Text box in the Customize Control dialog box (delete or change the existing name as necessary). This name appears as a ScreenTip when the user moves the mouse pointer over the control in the Toolbox. Then, if you wish, assign a different picture to the control's Toolbox icon, as described in the next section. Otherwise, click the OK button to close the Customize Control dialog box.
ASSIGNING A PICTURE TO A CONTROL'S TOOLBOX ICON
Each control in the Toolbox is identified by a picture. You can assign a new picture to the control by displaying the Customize Control dialog box, clicking the Load Picture button, and selecting the picture or icon in the resulting dialog box.
You can edit the picture assigned to some controls by displaying the Customize Control dialog box, clicking the Edit Picture button, and using the Edit Image dialog box to color the pixels that make up the picture.
REMOVING CONTROLS FROM THE TOOLBOX
To remove a control from the Toolbox, right-click it and choose Delete from the context menu. The item is identified by the name of the control—for example, if you right-click a control named Company Name Combo Box, the menu item is named Delete Company Name Combo Box.
If the item is a custom control you created, this action gets rid of the control and you can't restore it (unless you have a copy elsewhere). If the item is one of the Microsoft-supplied controls that come with the Microsoft Forms 2.0 package (which is part of VBA), you can restore it to the Toolbox using the Additional Controls dialog box. Just select the check box for the appropriate object (for example, Microsoft Forms 2.0 CommandButton).
You can also remove controls from the Toolbox by deleting the entire page they're on. See “Removing Pages from the Toolbox,” later in this chapter.
ADDING PAGES TO THE TOOLBOX
To add a page to the Toolbox, right-click the tab at the top of a page (or the label on the tab) and choose New Page from the context menu. The Visual Basic Editor adds a new page named New Page, to which it adds the Select Objects control. You'll probably want to rename the new page immediately.
By the way, the Select Objects control (its icon is a black arrow) appears on every page in the Toolbox, and you can't remove it. This is strange since you can go years without ever clicking it. This “control” is unlike others. It isn't added to a form. Instead, it must be selected in the Toolbox when you're resizing or repositioning, or when you otherwise need to select a true control on the form. However, when you merely click a control (and following many other actions), VBA automatically activates this “select object” feature—so you'll find that you never actually click it.
RENAMING PAGES IN THE TOOLBOX
To change the name of a Toolbox page, right-click its tab or label and choose Rename from the context menu to display the Rename dialog box. Type the name in the Caption text box, type any control tip text in the Control Tip Text box, and click the OK button to close the dialog box.
REMOVING PAGES FROM THE TOOLBOX
To remove a page from the Toolbox, right-click its tab or label and choose Delete Page from the context menu. The Visual Basic Editor removes the page from the Toolbox without any confirmation, regardless of whether the page contains controls.
IMPORTING AND EXPORTING TOOLBOX PAGES
If you want to share Toolbox pages, you can save them as separate files and distribute them to your colleagues. Toolbox pages have a .pag filename extension.
To import a Toolbox page, right-click the tab or label on an existing page in the Toolbox and choose Import Page from the context menu to display the Import Page dialog box. Select the page you want to import and click the Open button in the dialog box. The Visual Basic Editor adds the new page after the last page currently in the Toolbox and names it New Page.
Right-click the page's tab or label, choose Rename, type a new name and description, and then click the OK button.
Likewise, you can export a Toolbox page by right-clicking its tab or label and choosing Export Page from the context menu to display the Export Page dialog box. Type a name for the page, choose the folder in which to save it, and then click the Save button to save it. Now anyone can import your page into their editor as described previously.
MOVING PAGES IN THE TOOLBOX
To move a page in the Toolbox, right-click its tab or label and choose Move from the context menu to display the Page Order dialog box. In the Page Order list box, select the page or pages you want to move (Shift+click to select multiple contiguous pages, Ctrl+click to select multiple pages individually) and use the Move Up and Move Down buttons to rearrange the pages as desired. Click the OK button to close the Page Order dialog box when you've finished.
The Bottom Line
Open the Visual Basic Editor. When you want to create a new macro by hand-programming (as opposed to recording) or need to modify or test a macro, the Visual Basic Editor is a powerful tool.
Master It Open the Visual Basic Editor in Word and create a simple macro.
Open a Macro in the Visual Basic Editor. You edit and test macro code in the Code window of the Visual Basic Editor.
Master It Open the Visual Basic Editor and display a particular macro in the Code window.
Understand the Project Explorer's two views. The Project Explorer window displays a tree of current projects. You can choose between viewing only the files or the folders and files.
Master It Switch between folder and contents view in the Project Explorer.
Set properties for a project. You can specify a project's name, an associated Help file, and other qualities of a project.
Master It Lock a project so others can't modify or even read its contents.
Customize the Visual Basic Editor. The Visual Basic Editor can be customized in many ways, including personalizing classic menus and toolbars.
Master It Undock the Properties window and change its size. Then redock it.