
Chapter 14
Creating Simple Custom Dialog Boxes
In this chapter, you'll start looking at Visual Basic for Applications' tools for creating custom dialog boxes that interact with the user. The terms dialog box and form (or user form) are generally used interchangeably. Technically, a dialog box is a quite simple, small window, such as a message box or input box. Forms, generally, are larger windows featuring more rich and complex interaction with the user. These terms, though, are equivalent in common usage.
Dialog boxes and forms are among the most powerful and feature-packed elements of VBA. We will spend quite a bit of time exploring their uses as the primary communication path between users and procedures.
This chapter covers the most straightforward form components and how to manipulate them. The next chapter shows you how to create more elaborate forms, such as those with tabbed pages and those that update themselves when the user clicks a control.
In this chapter you will learn to do the following:
- Understand what you can do with a custom dialog box
- Create a custom dialog box
- Add controls to a dialog box
- Link dialog boxes to procedures
- Retrieve the user's choices from a dialog box
When Should You Use a Custom Dialog Box?
You'll often want to use a form (another word for dialog box or window) when simpler methods of interacting with the user fall short. Sometimes, because of the limited selection, the buttons provided in message boxes are insufficient for getting needed information from the user. Similarly, the single text field available in an input box would be inadequate if you need the user to provide multiple data (name, address, phone number, and so on). In other words, sometimes you need the user to fill in a form.
You'll also want to use a custom dialog box for specialized input: when you need the user to choose nonexclusive options by selecting or clearing check boxes, to choose from among mutually exclusive choices via option buttons (also called radio buttons), or to select an item within a list displayed in a list box. Or perhaps you need to show users a picture. In other words, simple message boxes or input boxes cannot handle complex user input.
Custom dialog boxes can include the full range of interface elements the user is probably familiar with from working with Windows applications. You can create custom dialog boxes that look and function almost exactly like the dialog boxes built into applications (such as the File Save dialog box). Or you can create even larger constructions that approach the sophistication of typical application windows.
You'll use forms often in your more sophisticated macros. For example, when the user starts a procedure, you can have the procedure display a form presenting options—such as choosing the files for the procedure to manipulate. The user's choices determine what the procedure will then do.
You can also create dialog boxes that VBA triggers in response to events in the computer system: for example, an event that runs at a specific time or runs when the user takes a specific action (such as creating, opening, or closing a document).
Making your own dialog boxes is not that hard, but it can be time-consuming if you're building a complicated form. Because creating forms is not the fastest programming job, you might want to consider any practical alternatives to using them.
You've already looked at message boxes and input boxes, which provide a simple alternative for some of the relatively easy tasks for which you might want to create a custom dialog box.
Also, some applications, such as Word and Excel, even let you use their built-in dialog boxes for your own purposes. If users are familiar with the application, they're probably familiar with these built-in dialog boxes and can immediately use them to perform standard actions—for example, to open or save files. These are called common dialog boxes. How to use common dialog boxes in your macros is demonstrated briefly in the Real World Scenario titled “Control a For…Next Loop with User Input via a Dialog Box” in Chapter 12, “Using Loops to Repeat Actions,” and more fully later in this chapter in the section titled “Using an Application's Built-in Dialog Boxes from VBA.”
Creating a Custom Dialog Box
If you want to employ a custom dialog box or window in VBA, you use a visual object called a user form. A user form (also sometimes just referred to as a form) is a blank sheet on which you can place controls (such as check boxes, buttons, and text boxes) to create a made-to-order dialog box.
As you'll see, a user form contains its own code page where you, the programmer, write code to manage the various controls in the form. You can attach code to any of the controls, or to the user form itself, and that code is stored in the user form's code sheet. You can display the user form's code sheet in the Code window of the Visual Basic Editor and work with it as you would any other code. You can also run and test a user form as you would any other procedure (for example, by pressing F5 with the user form selected), and the VBA Editor will execute the code behind the form.
You can display a user form (a dialog box) for the user to interact with, and you can then retrieve information from the user form and manipulate it with VBA code. It's in this sense that code supporting a form is said to be behind a form. The user sees and interacts with a form, but behind the scenes you have written code to intelligently react to whatever the user might input.
USER FORMS AREN'T ALWAYS DIALOG BOXES
You can also create user forms that aren't dialog boxes. The distinction between a dialog box and a full window is imprecise, but it's usually easiest to define a resizable form as a window (you can resize it by dragging its borders or by clicking its Maximize button), while a dialog box has a fixed size. Some dialog boxes, such as the Find And Replace dialog box in Word, have an initially hidden part that the user can display (in the case of the Find And Replace dialog box, by clicking a More button).
But apart from this simple resizing, the bounds of the dialog box are fixed—you can't grab the corner of the dialog box with the mouse and drag it to enlarge it. But remember that you, the programmer, can create very large user forms that have the complexity and dimensions of a typical application window.
Each user form is itself an object and can contain a number of other objects that you can manipulate individually.
For example, you could create a simple dialog box with two option buttons, an OK button, and a Cancel button. Each option button would be an object, the OK button would be a third object, and the Cancel button would be a fourth object. You could set properties individually for each object—such as the action to take when the Cancel button was clicked or the ScreenTip (also called a ToolTip) to display when the user moved the mouse pointer over each of the option buttons. (ToolTips help make the components of your form understandable for the user.) The point is to consider the components of a form—the controls you place on the form—as objects. This is another use of the concept of objects. Controls are visual objects, but like purely programmatic objects, controls have members such as properties.
You can specify most properties of an object either at design time (when you're creating the user form) or at runtime (while the code is executing, either before or after you display the user form). For example, you can set the Value property of a check-box control to True to display the check box in its selected state or to False to display the check box in its cleared state. You can set the Value property three different ways:
- When building the user form, you can use the Editor's Properties window to specify values. For example, you can make a check box that will default to its selected (checked) state each time the user form is displayed.
- You can write code that sets the check box before the form gets displayed to the user while the macro is running.
- You can write code that sets the check box while the user is interacting with the form. Note that the user can click the check box to toggle it between its selected and deselected states. But your code can also do this.
The next sections explain the process of creating a dialog box. Later in this chapter, you'll find examples that step through creating a procedure and adding a dialog box to it.
Designing a Dialog Box
It's possible to whip together a half-decent dialog box without much planning. Some programmers like to just “sketch” the user interface in a dialog box by dragging and dropping controls onto it, then positioning them so they look good and modifying their properties.
Other programmers prefer to adopt a more methodical approach and plan what they need to include in the dialog box before they start creating it. If you fall into this latter category, consider the intended purpose of the dialog box and list the elements it will need in order to achieve this goal. Then sketch on paper a rough diagram of the dialog box to get an approximate idea of where you'll want to locate each of the elements (the controls you place on the form).
TRY BASING CUSTOM DIALOG-BOX DESIGNS ON EXISTING DIALOG BOXES
Another option is to base the design for your custom dialog box on an existing dialog box—either a dialog box built into an application (called a common dialog box) or a custom dialog box that your company or organization has already implemented. Leveraging previous development efforts can not only help you avoid reinventing the wheel, but also produce a custom dialog box that users find familiar and intuitive.
Inserting a User Form
Once you have a design in mind, the first step in creating a custom dialog box is to insert a user form in the appropriate template or document:
- Press Alt+11 to display the Visual Basic Editor if it's not already open.
- In the Project Explorer window, right-click the appropriate project and choose Insert
 UserForm from the context menu.
OTHER WAYS TO ADD A USER FORM
You can also insert a user form by clicking the Insert UserForm button on the far left of the Editor's Standard toolbar.
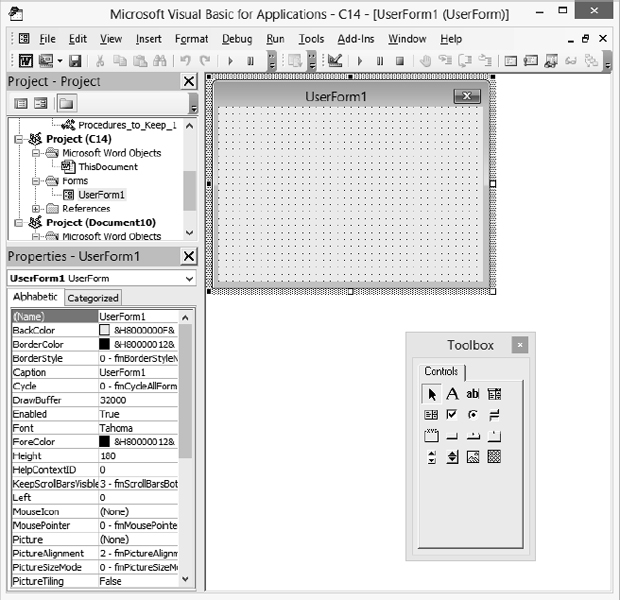
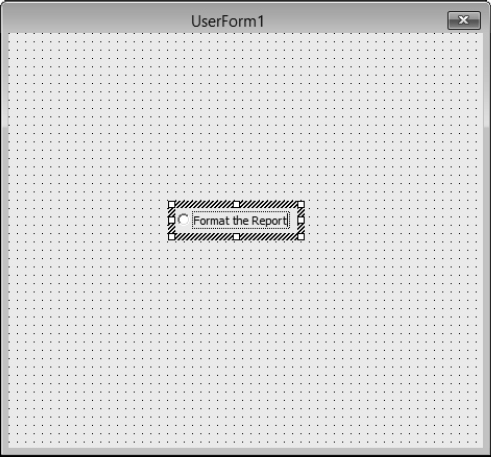
The Visual Basic Editor opens a new user form like that shown in Figure 14.1, named UserForm1 (or the next available number if the project already contains other user forms).
The Visual Basic Editor also displays the Toolbox. (If you've previously hidden the Toolbox while working on a user form, the Visual Basic Editor doesn't display it. Choose View ![]() Toolbox or click the Toolbox button on the far right of the Standard toolbar.)
Toolbox or click the Toolbox button on the far right of the Standard toolbar.)
FIGURE 14.1 The first step in creating a new dialog box is to start a new user form. The Visual Basic Editor displays the Toolbox when a user form is the active window.
VBA automatically inserts the user form in the Forms object (the collection of forms) for the project. If the project you chose didn't already contain a Forms collection, VBA adds one to contain the new user form. You'll see the Forms object displayed in the Project Explorer.
CHOOSING USER-FORM GRID SETTINGS
The Visual Basic Editor displays a grid in each user form to help you place controls relative to the dialog box and to align controls relative to each other so they look neat instead of random.
I don't know why you would want to do this, but to switch off the display of this grid or to switch off the Visual Basic Editor's automatic alignment of controls to the grid, follow these steps:
- Choose Tools Options to display the Options dialog box.
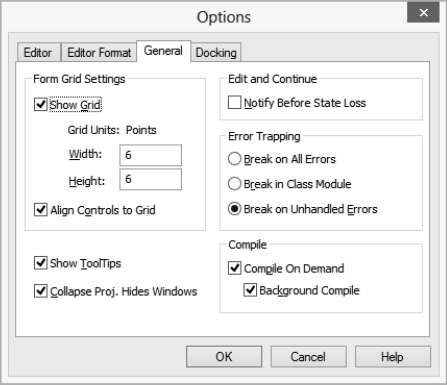
- Click the General tab to display the General page (see Figure 14.2).
FIGURE 14.2 The General page of the Options dialog box includes options for toggling the display of the grid, resizing the grid, and toggling whether VBA aligns the controls to the grid.
- Choose the settings you want:
- Clear the Show Grid check box if you want to turn off the display of the grid. (The grid continues to function, but the dots are not displayed.)
- Clear the Align Controls To Grid check box if you want to stop using the grid whether it's visible or not. This feature is usually a timesaver, but if the grid is too coarse for the layout you're trying to achieve, just reduce the sizing of the grid from the default 6 to perhaps 3 or 4.
- Change the number of points in the Width and Height text boxes to adjust the sizing of the grid's units.
- Click the OK button to close the Options dialog box and apply your choices.
NAMING CONVENTIONS IN VISUAL BASIC FOR APPLICATIONS
Naming controls in VBA is similar to naming variables. Names for controls can be up to 40 characters long, must begin with a letter, and after that can be any combination of letters, numbers, and underscores. You can't use spaces or symbols in the names, and each name must be unique in its context—for example, each user form must have a unique name within a project, but within any user form or dialog box, a control can have the same name as another control in a different form.
Those are the rules; you can also use conventions to make the names of your VBA objects as consistent and easy to understand as possible. Recall the conventions you've used in previous chapters for identifying the variable type with a prefix: str, bng, int, and so on. The prefixes widely used when naming controls identify the control. For example, by using the convention of prefixing a text box control's name with txt, you can be sure that anyone else reading your code will immediately identify the name as belonging to a text box—and that you yourself will easily identify the name when you revisit your old code.
Here's an example showing conventional prefixes for several controls:
Private Sub cmbSelectEmployee_Change()
  lblEmployeeName = cmbSelectEmployee.Text
  fraStep2.Enabled = True
  lblInstructions = "Enter text in the Step 2 text box. " & _
  "For example, you might include brief biographical " & _
  "information on the employee, details of their position, " & _
  "or your hopes for their contribution to the company."
 cmdClearEmployeeName.Enabled = True
End Sub
Some popular naming conventions for the most-used VBA objects are shown in the following list. You'll encounter the naming conventions for other VBA objects later in the book. This list includes the control's name, the standard prefix, and finally an example showing how the control can be named in code:
Check box The standard prefix is chk, as in chkReturnToPreviousPosition.
Command button The standard prefix is cmd, as in cmdOK.
Form (user form) The standard prefix is frm, as in frmMoveParagraph.
Frame The standard prefix is fra, as in fraMovement.
List box The standard prefix is lst, as in lstConferenceAttendees.
Combo box The standard prefix is cmb, as in cmbColor.
Menu The standard prefix is mnu, as in mnuProcedures.
Option button The standard prefix is opt, as in optSpecialDelivery.
Label The standard prefix is lbl, as in lblUserName.
Text box The standard prefix is txt, as in txtUserDescription.
Just as with variable names, the naming convention for controls begins with three lowercase letters and then starts the rest of the object's name with an uppercase letter to make it a little easier to read. For example, a text box in which the users are to type their last names might be named txtLastName.
Naming conventions tend to seem awkwardly formal at first, and there's a strong temptation to avoid them. But if you plan to distribute your macros or expect others to work with them, it's usually worth the trouble to follow the naming conventions. Plus they help you when debugging. It's just another way to make reading code easier for everybody.
Renaming a User Form
Next, change the user form's name property from the default (UserForm1) to a more descriptive name. The following steps show how to do this. (For advice on choosing names, refer to the sidebar “Naming Conventions in Visual Basic for Applications” in this chapter.)
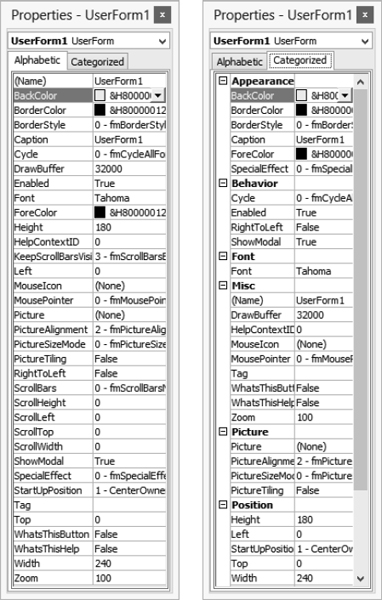
- If the Properties window isn't displayed, press F4 to display it. Figure 14.3 shows the two pages of the Properties window: Alphabetic and Categorized. Alphabetic displays an alphabetical listing of the properties of the currently selected object; Categorized displays the same properties but separated into categories, such as Appearance, Behavior, Font, Misc., Picture, and Position. (Some controls have more categories than those listed here.) You can expand a category by clicking the plus (+) sign beside it to display the properties it contains, and collapse it by clicking the resulting minus (−) sign. If the Alphabetic tab isn't selected, click it to select it.
FIGURE 14.3 You can choose either an alphabetized or a categorized list in the Properties window.
The Categorized option is not, in my view, very helpful because many of the properties are simply too difficult to fit into categories that make any sense. The Caption property, for example, is assigned to the Appearance category, but the (Name) property is contained in the Misc. collection. The very existence of a “miscellaneous” category demonstrates that the categorization effort has broken down. I suggest you stick with the default Alphabetic option instead.
- Make sure the drop-down list (at the top of the Properties window) is displaying the default name of the user form. If it isn't, select the user form from the drop-down list.
- Select the user form's default name (such as UserForm1 or UserForm2) in the cell to the right of the Name cell (you can double-click the name to select it quickly). Now type a new, more descriptive name for the user form. This name can be anything you want, with the standard VBA limitations:
- It must start with a letter.
- It can contain letters, numbers, and underscores but no spaces or symbols.
- It can be up to 40 characters long.
- Click the Caption cell to select the user form's default name and type the caption for the user form—that is, the text label that you want the user to see in the title bar of the dialog box. This name has no restrictions beyond the constraints imposed by the length of the title bar. You can enter a name longer than will fit in the title bar, but VBA truncates it with an ellipsis at its maximum displayable length. As you type, the name appears in the user-form title bar as well, so it's easy to see what's an appropriate length—at least, for the current size of the user form.
- Press Enter or click elsewhere in the Properties window (or elsewhere in the Visual Basic Editor) to set (make official) the user form's name. (Naming controls works the same way as naming forms.)
DEALING WITH THE “NAME CONFLICTS WITH EXISTING MODULE” ERROR
If you run into the “Name name conflicts with existing module, project, or object library” error (shown here), chances are you've just tried to give a user form the same name already assigned to something else.
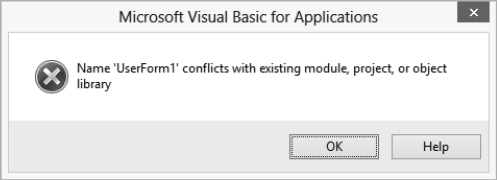
You've tried to reuse the name of a VBA project or object library.
Adding Controls to the User Form
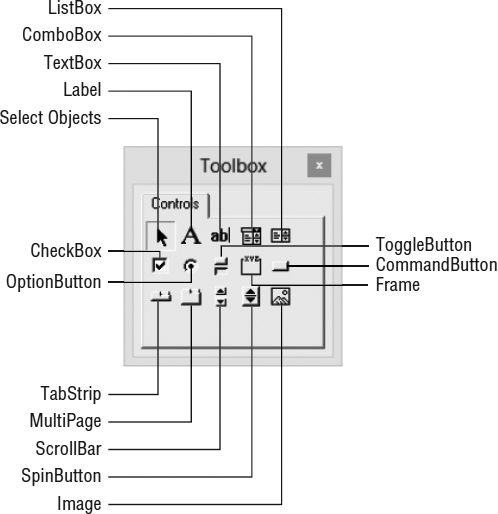
Now that you've renamed the user form, you're ready to add controls to it from the Toolbox, shown in Figure 14.4. VBA automatically displays the Toolbox when a user form is active, but you can also display the Toolbox when no user form is active by choosing View ![]() Toolbox.
Toolbox.
FIGURE 14.4 Use the Toolbox to add controls to the user form.
REMOVING THE “ROAMING OFFICE” CONTROL
Obviously an oversight on Microsoft's part, they've included in the VBA 2013 Toolbox an obscure and—even in MSDN—essentially ignored control called the RoamingOffice control (not shown in Figure 14.4). Its use is beyond the scope of this book, not to mention beyond the scope of the VBA Help system and even Google. Perhaps Microsoft intends to make it useful in the future. For now, though, it clearly doesn't belong among the default controls on the Toolbox. It's the small gray crosshatched square icon next to the Image control. If you wish, you can remove the RoamingOffice control from your Toolbox by right-clicking its crosshatched icon, then choosing Delete RoamingOffice from the context menu.
Here's what the buttons on the Toolbox do:
Select Objects This first control has a very specialized purpose, and you might never need to use it. First, it's not an ordinary control (it doesn't appear on a form; you can't drag and drop it onto a form). Its job is to restore the mouse pointer to selection mode. However, the mouse pointer automatically returns to selection mode after you've dropped a control onto a form. So usually you'll need to click the Select Objects button only when you've selected another control and then changed your mind and decided not to use it. So you need to restore the pointer to its normal state. Alternatively, if you double-click a control (such as the check box), you trigger a technique that allows you to quickly add multiple versions of the same control repeatedly. (Every time you click in the form, a new check box is added to it, for example, while the Editor is in this state. To stop this repetitive behavior, you click the Select Objects button.
Label Creates a label, which is text used to identify a part of the dialog box or to explain information the user needs to know in order to use the dialog box effectively.
TextBox Creates a text box (also sometimes called an edit box), a field into which the user can type text. You can also use a text box to display text to the user or to provide text for the user to copy and paste elsewhere. A text box can contain either one line (the default) or multiple lines and can display a horizontal scroll bar, a vertical scroll bar, or both.
ComboBox Creates a combo box, a control that combines a text box with a list box. The user can either choose a value from the list box or enter a new value in the text box.
ListBox Creates a list box, a control that lists a number of values. Users can pick one value from the list but can't enter a new value of their own (unlike with a combo box). The list box is good for presenting closed sets of data.
CheckBox Creates a check box and an accompanying label. The user can select or clear the check box to turn the associated action on or off.
OptionButton Creates an option button (also known as a radio button) and an accompanying label to identify the purpose of the button. This button is usually a circle that contains a black dot when selected. The user can select only one option button out of any group of option buttons. (The name radio button comes from radios with push buttons for stations; you can select only one button at a time. Push one, and the others pop out.)
ToggleButton Creates a toggle button, a button that shows whether or not an item is selected. A toggle button can be defined with any two settings, such as On/Off or Yes/No. You can add a picture to a toggle button, which provides a graphical way of letting a user choose between options.
Frame Creates a frame, an area of a user form or dialog box surrounded by a thin line and an accompanying label. You can use frames (also known as group boxes) to group related elements in your forms. As well as cordoning off elements visually, frames can separate elements logically. For example, VBA treats a group of option buttons contained within a frame as separate from option buttons in other frames or option buttons loose in the dialog box. This separation makes it easier to use multiple sets of option buttons in a form.
CommandButton Creates a command button. This is the typical, ordinary Windows button that users click to communicate their wishes. Most dialog boxes contain command buttons such as OK and Cancel, or Open and Cancel, or Save, or Apply and Close.
TabStrip Creates a tab strip for displaying multiple sets of data in the same set of controls. Tab strips are especially useful for presenting records in a database for review or modification: Each record in the database contains the same fields for information, so they can be displayed in the same group of controls. The tab strip provides an easy way of navigating between records.
MultiPage Creates a multipage control for displaying multipage dialog boxes that have different layouts on each of their tabs. An example of a multipage dialog box is the Options dialog box (Tools ![]() Options), which has multiple pages (often referred to incorrectly as tabs) in most of the Office applications.
Options), which has multiple pages (often referred to incorrectly as tabs) in most of the Office applications.
ScrollBar Creates a stand-alone scroll bar. Stand-alone scroll bars are of relatively little use in dialog boxes. Combo boxes and list boxes have built-in scroll bars.
SpinButton Creates a spin-button control for attaching to another control. Spin buttons (also known as spinners) are typically small, rectangular buttons with one arrow pointing up and one down (or one arrow pointing left and the other pointing right). Spin buttons are useful for presenting sequential values with consistent intervals within an understood range, such as times or dates. For example, if you want the user to increment or decrement a price in a text box in 25-cent steps, you could use a spinner to adjust the price rather than letting the user type directly into the text box.
Image Creates an image control for displaying a picture within a form. For example, you might use an image control to show a corporate logo or a picture of some sort. (If you want to display a photo, texture, or other graphic on the background of the form itself, set the form's Picture property.)
ADDING CONTROLS TO THE VISUAL BASIC EDITOR TOOLBOX
The Toolbox shown in Figure 14.4 contains the basic set of tools provided by VBA. As discussed in “Customizing the Toolbox” in Chapter 2, “Getting Started with the Visual Basic Editor,” you can customize the Toolbox in various ways: by adding other controls to it, creating additional pages for the controls, moving controls from page to page, and creating customized controls of your own making so that you can avoid having to repeatedly adjust properties each time you add those controls.
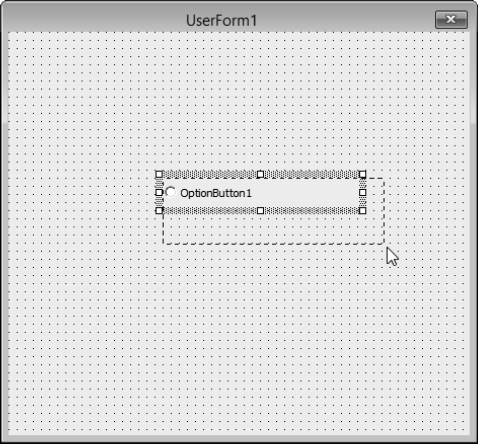
Click one of the controls in the Toolbox to select it. Then click in the user form to insert the control on the form, as illustrated in Figure 14.5. VBA places the top-left corner of the control where you click. As you place a control, it snaps to the grid on the user form (unless you've turned off the Align Controls To Grid feature as described in “Choosing User-Form Grid Settings,” earlier in this chapter).
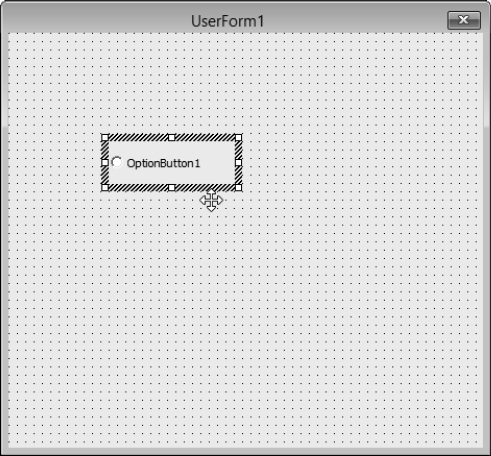
You can resize the control as desired by selecting it and then clicking and dragging one of the selection handles (the white squares) that appear around it, as shown in Figure 14.6. The mouse pointer changes to a double-arrow icon when you've correctly positioned it to drag. When you drag a corner handle, VBA resizes the control on both sides of the corner; when you drag the handle at the midpoint of one of the control's sides, VBA resizes the control only in that dimension. In either case, VBA displays a dotted outline indicating the size that the control will be when you release the mouse button.
To resize the user form itself, click its title bar, or click in any blank space in the form (anywhere outside a control). This selects the user form. Then click and drag one of the selection handles that appear around the form.
To delete a control, right-click it in the user form and choose Delete from the context menu. Alternatively, click it to select it and then press the Delete key or choose Edit ![]() Delete. Restore it by pressing Ctrl+Z.
Delete. Restore it by pressing Ctrl+Z.
FIGURE 14.5 When you click in the user form, VBA places a standard-size control of the type you chose. If the Align Controls To Grid feature is switched on (as it is by default), VBA automatically aligns the control with the grid on the user form.

FIGURE 14.6 Once you've placed a control, you can resize it as necessary by dragging one of its selection handles.
RANDOM ADDITIONAL DEFAULT TOOLBOX CONTROLS
Now and then Microsoft adds application-specific or novel controls to the default Toolbox. This not only causes confusion, but it also means that the VBA Editor's Toolboxes are not standardized across the Office applications. This is a recent development, and unwelcome. Word 2013 arbitrarily includes a “Roaming Office” control. For more on this peculiar feature, see the sidebar “Removing the ‘Roaming Office’ Control” earlier in this chapter.
Excel's VBA Editor includes a RefEdit control that mimics Excel's reference-edit boxes.
Nobody objects to Microsoft providing additional controls to we programmers. (You can easily add controls to the Toolbox by right-clicking within the Toolbox and choosing Additional Controls from the context menu.) What's problematic is the randomness of what's now being included in the default Toolboxes.
Grouping Controls
Sometimes it's quite efficient to temporarily select several controls as a group in the Editor. This allows you to manipulate all the grouped controls as a unit. For example, if you want to change the font size of three text boxes, two option buttons, and four labels, just group them and change the font-size property in the Properties window only once. The whole group will have all their font sizes changed automatically. (This trick is not related to grouping controls within a Frame control as described earlier in this chapter.)
We'll explore this useful grouping technique later in this chapter in the section titled “Working with Groups of Controls.” For now, I'll just briefly introduce the concept.
To delete, move, resize, or change the properties of multiple controls at once, first select them into a group. You can then delete them all at once by using the methods just described. Or you can move, resize, or modify the properties of the group as a whole.
Here's how to group controls:
- To select multiple contiguous controls, click the first control, hold down Shift, and then click the last control in the sequence.
- To select multiple noncontiguous controls—or to add additional controls to a group after you've selected multiple contiguous controls by using the Shift key—hold down the Ctrl key as you click each additional control. (With the Ctrl key pressed, you can deselect any control in a group by clicking it a second time.)
- To select multiple controls in the same area of the user form, click in the form's background outside the controls and drag the resulting selection box until it encompasses at least part of each control. When you release the mouse button, the Visual Basic Editor selects the controls as a group.
Renaming Controls
As with user forms, VBA automatically gives each control that you add to a form a default name consisting of the type of control plus a sequential number. When you add the first text box in a user form, VBA names it TextBox1; when you add another text box, VBA names it TextBox2; and so on. (Each control in a dialog box must have a unique name so that you can refer to it specifically in code.)
You'll usually want to change the controls' default names to names that describe their purpose so you can remember what they do for the macro.
For example, if TextBox2 is used for entering the user's organization name, you might want to rename it txtOrganizationName, txtOrgName, txtO_Name, or something similar.
To rename a control, follow these steps:
- Click the control in the user form to select it and thereby display its properties in the Properties window.
- If the Properties window is already displayed, you can, if you prefer, select the control from the drop-down list at the top of the Properties window instead of selecting it in the user form. VBA then visually highlights (selects) the control in the user form, which helps you make sure that you've selected the control you want to affect.
- If the Properties window isn't displayed, you can quickly display it with the properties for the appropriate control by right-clicking the control in the user form and choosing Properties from the context menu.
- In the Properties window, double-click to select the default name in the cell to the right of the Name property.
- Type the new name for the control.
- Press Enter to set the control name, or click elsewhere in the Properties window or in the user form.
IF YOU RENAME A CONTROL, YOU MAY HAVE TO MODIFY YOUR CODE
You can rename a control anytime. But if you do, you must also change any existing references to it in the code that drives the user form. This gives you a strong incentive to choose suitable names for your controls before you write the code.
Moving a Control
To move a control, click anywhere in it to select it, and then drag it to where you want it to appear, as shown in Figure 14.7.
FIGURE 14.7 If a control isn't currently selected, you can move it by clicking it and dragging it.

To move a selected control, move the mouse pointer over the selection border around it so that the mouse pointer turns into a four-headed arrow (as shown in Figure 14.8), and then click and drag the control to where you want it to appear.
FIGURE 14.8 If a control is selected, move the mouse pointer over its selection border, and then click and drag the control.
 Real World Scenario
USEFUL COPY-AND-PASTE TECHNIQUES WITH CONTROLS
You can use the Copy and Paste commands (from the Standard toolbar, the Edit menu, or the context menu or by using the easiest approach, the keyboard, such as pressing Ctrl+X and Ctrl+V) to move a control.
Copy and Paste isn't that efficient when moving a single control; the Paste command places the control right in the middle of the user form, so you have to drag it to its new position anyway.
However, when creating multiple, similar control sets—such as a group of text boxes with accompanying labels—copying and pasting can be quite useful. It's a quick way to build a whole set of fields for the user to fill in, for example. This way, you don't have to position and align each label/text box pair. Nor do you have to adjust each control's properties, because they are copied too. Align the first label/text pair, set the Font property the way you want it (usually larger, changing it from the default 8 pt. size to 11), resize the controls as you want them, change any other properties to suit yourself, and then copy and paste (clone) the pair as often as necessary by repeatedly pressing Ctrl+V.
Be aware, though, that the VBA Editor unfortunately places each new clone directly on the center of the form, thereby hiding any other clones you've just added. In other words, when you paste, you can't actually see the new clone—it's in a pile on the center of the form. So you have to drag the clones away from the center to reveal the others beneath.
Here's a related technique: Sometimes you want to copy the entire set of controls from one form to another. Select all the controls on Forml, then press Ctrl+C to copy them, then click Form2 to select it, and press Ctrl+V to paste the entire set of controls into the new form.
The advantage of using Copy and Paste for creating new controls is that the new controls inherit all the characteristics of the original controls, so you can save time by creating a control, setting its properties, and then cloning it.
You don't even need to change the names of the copies you paste to another user form—they just need to be named suitably for the code with which they work.
As an alternative to using the Copy and Paste commands, you can also copy a control by holding down the Ctrl key as you click and drag the control. VBA displays a + sign attached to the mouse pointer to indicate that you're copying the control rather than moving it. Drop the copy where you want it to appear on the user form.
Changing the Caption on a Control
Some controls—such as option buttons and check boxes—have built-in text captions to let the user understand their purpose. You can change these captions like this:
- Click the control to select it.
- Click the caption itself to select it. VBA displays the blinking insertion cursor and a faint dotted border around the text, as shown in Figure 14.9.
FIGURE 14.9 To change the caption on a control, select the control, and then click in the text so that it displays this faint dotted border.
DOUBLE-CLICKING OPENS THE CODE WINDOW RATHER THAN SELECTS A CONTROL
When you click a label to select it and click again to position the insertion point to change the caption, make sure you click slowly enough that Windows doesn't interpret this as a double-click. A double-click displays the code sheet for the user form and automatically adds a procedure for the Click event of the control. If this happens, you can easily get back to viewing the form (it's called Design view, as opposed to Code view). Just press Shift+F7, double-click the module's name in the Project Explorer, or choose View
 Object to view the form again.
 - Now click in the label to position the insertion point for editing it, or drag through the label to select all of it.
- Edit the text of the label as desired.
- Press Enter or click elsewhere in the user form to effect the change to the label. (You can alternatively change the label by changing its Caption property in the Properties window.)
WHEN SHOULD YOU SET PROPERTIES OF A CONTROL?
You can set (specify) many properties of a control either at design time (while you're creating the user form) or at runtime (while the form's code is executing). There's a time and a place for each approach, a time when either is a reasonable course of action.
Generally speaking, the more static the property, the more likely you'll want to set it at design time. Some properties, such as the Name property of a user form, have to be set at design time—you can't change such properties at runtime for a user form. You'll also usually want to name your controls at design time, though you can add controls at runtime and set their Name properties during execution.
In most cases, you'll want to set the properties that govern the position and size of the user form itself and its controls at design time. The advantages are clear: you can make sure that the user form looks as you intend it to, that it's legible, and so on.
Occasionally, you may want to change the properties of a user form or the size or position of some of the controls on it at runtime. For example, you might need to add a couple of option buttons to the form to take care of eventualities not included in the basic design of the form. Alternatively, you might create a form that had two groups of option buttons sharing the same space—one group, in effect, positioned on top of the other. At runtime, you could modify their Visible properties in your code and thus display one group and hide the other group. If each group contained the same number of option buttons, you could even make do with only one group of option buttons, assigning the appropriate properties to each at runtime. However, there's no particular advantage in trying to simultaneously make just the one group do double duty like that. It can make your code more confusing.
Given the flexibility that many properties of controls provide, you can often design your user forms to handle several circumstances by displaying and hiding different groups of controls at runtime rather than having to add or remove controls at runtime. Creating the complete set of controls for a user form at design time avoids most of the difficulties that can arise from adding extra controls at runtime. That said, you may sometimes need to create a user form on the fly to present information about the situation in which users have placed themselves.
As you'll see as you continue to work with controls, you have to set values for some controls at runtime. For example, you sometimes can't assign the list of items to a list box or combo box at design time. If a list displays items from a database, the list can vary depending on which data set the user selects. So you would have to write code that fills the list box during execution. (Often, you'll fill a list box during a UserForm_Initialize procedure that runs as the user form is being initialized for display.) The set of items in some lists can be known in advance and specified in your code during design time, such as a list box displaying all the countries in the world, from which the user selects the country of residence.
Key Properties of the Toolbox Controls
The following sections discuss the key properties of the controls in the default Toolbox.
First, I'll explain the common properties used to manipulate many of the controls effectively. After that, I'll go through the controls one by one, listing the properties particular to each control.
If you're new to VBA and find this section heavy going, just skip it for the time being and return to it when you're creating code and need to reference information about the properties of the controls.
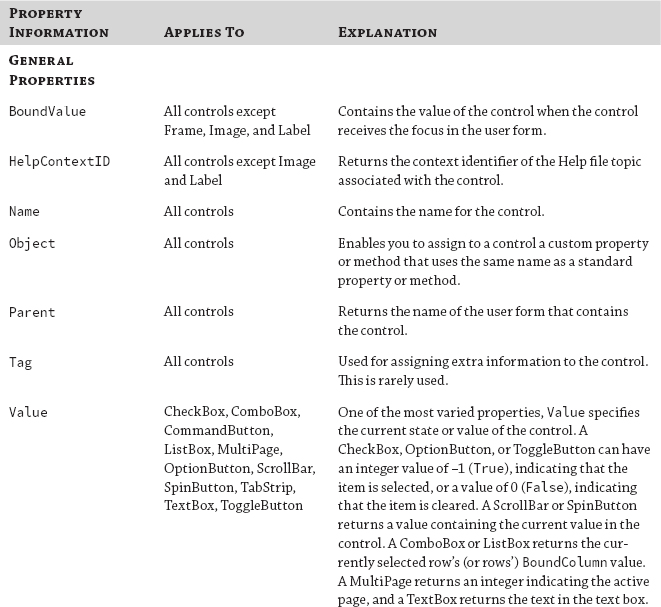
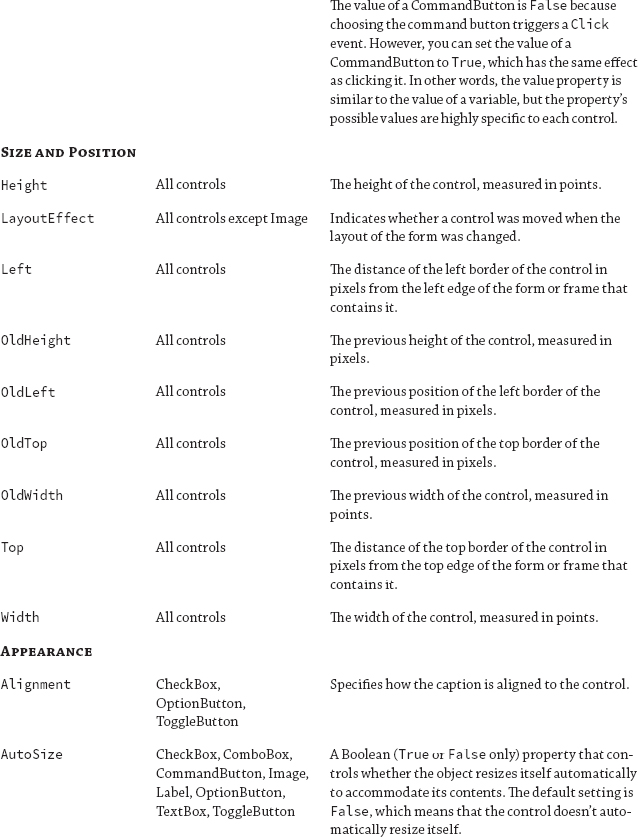
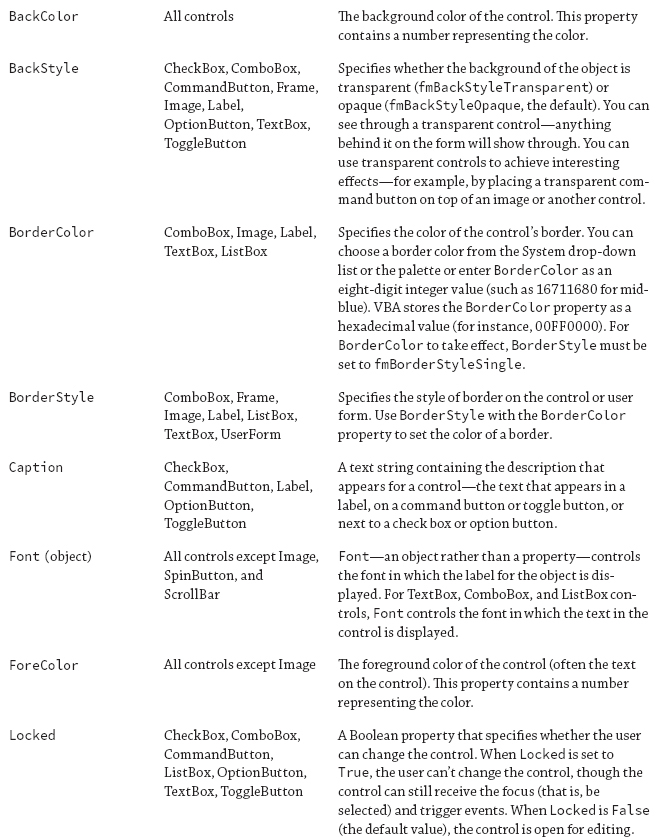
COMMON PROPERTIES
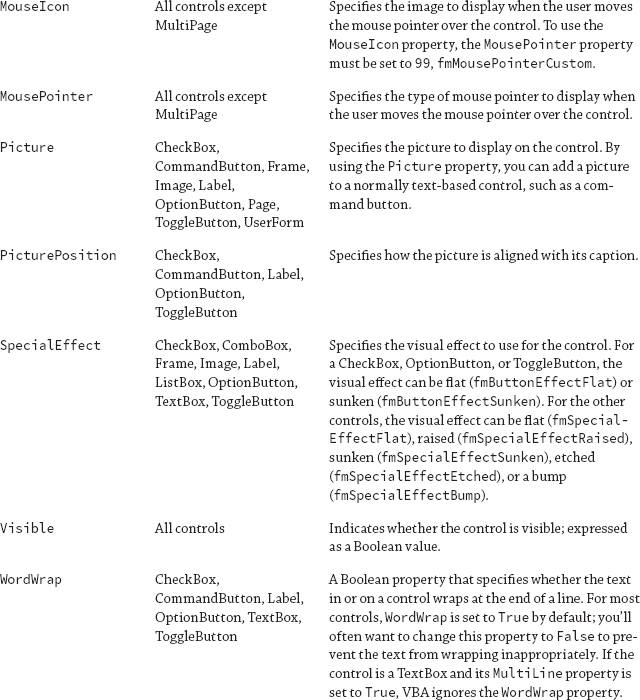
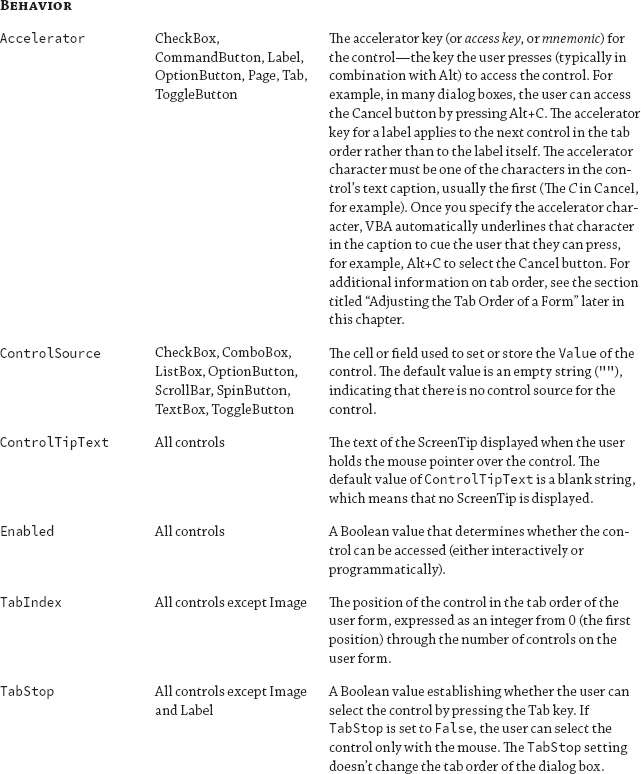
Table 14.1 lists the properties shared by all or most controls, grouped by category.
LABEL
The Label control simply displays text on the screen. It's most often used to identify the purpose of another control, so you frequently see a Label control placed on a form to the left of a textbox whose purpose the label describes. Use the Caption property to type in the text that you want the label to display. Use the TextAlign property as shown in Table 14.2 to align the text of the label with the borders of the Label control.

TEXTBOX
The TextBox is one of the most common controls. Recall that it can be a single-line control (often employed to display a field the user must fill in) or a multiline control, for displaying lots of text, as in a diary program where the user determines how much they want to write. Adjust this feature with the MultiLine property. Also, the defaults for a TextBox are a size of 8 pt. (too small usually) and a sans-serif font called Tahoma (sans-serif type is generally thought more appropriate for headlines than body text). So you'll usually find yourself employing the Font property to choose a larger font size and more readable font (such as Times New Roman).
Table 14.3 lists the key properties of the TextBox control.
TABLE 14.3: Key properties of the TextBox control
COMBOBOX AND LISTBOX
From the user's point of view, a key distinction is that a list box simply provides a list of options the user can choose from, whereas a combo box offers that list and also includes a field where the user can type in items.
Table 14.4 shows the key properties of the ComboBox control and the ListBox control. These two controls are similar and share many properties. They do, however, differ somewhat in behavior and features; these differences are described in the entries marked “List box only” and “Combo box only” in the table.
TABLE 14.4: Key properties of the ComboBox and ListBox controls
| PROPERTY | DESCRIPTION |
| AutoTab | See Table 14.3. |
| AutoWordSelect | See Table 14.3. |
| BoundColumn | A Variant property that determines the source of data in a combo box or a list box that has multiple columns. The default setting is 1 (the first column). To assign another column, specify the number of the column (columns are numbered from 1, the leftmost column). To assign the value of ListIndex to BoundColumn, use 0. |
| ColumnCount | A Long (data type) property that sets or returns the number of columns displayed in the combo box or list box. If the data source is unbound, you can specify up to 10 columns. To display all available columns in the data source, set ColumnCount to −1. |
| ColumnHeads | A Boolean property that determines whether the combo box or list box displays headings on the columns (True) or not (False). |
| ColumnWidths | A String (data type) property that sets or returns the width of each column in a multicolumn combo box or list box. |
| ListRows | (Combo box only.) A Long (data type) property that sets or returns the number of rows displayed in the combo box. If the number of items in the list is greater than the value of ListRows, the combo box displays a scroll bar so that the user can scroll to the unseen items. |
| ListStyle | Determines the visual effect the list uses. For both a combo box and a list box, fmListStylePlain displays a regular, unadorned list. For a combo box, fmListStyleOption displays an option button to the left of each entry, allowing the user to select one item from the list. For a list box, fmListStyle-Option displays option buttons for a single-select list and check boxes for a multiselect list. |
| ListWidth | (Combo box only.) A Variant property that sets or returns the width of the list in a combo box. The default value is 0, which makes the list the same width as the text area of the combo box. |
| MatchEntry | Determines which type of matching the combo box or list box uses when the user types characters with the focus on the combo box or list box. fmMatchEntry-FirstLetter (0) matches the next entry that starts with the letter or character typed: if the user types t twice, VBA selects the first entry beginning with t and then the second entry beginning with t. fmMatchEntryComplete (1) matches each letter the user types: if the user types te, VBA selects the entry that starts with te. fmEntryMatchNone (2) specifies no matching: the user can't select an item by typing in the list box or combo box but must use the mouse or the arrow keys instead. The default MatchEntry setting for a combo box is fmMatchEntryComplete. The default setting for a list box is fmMatchEntryFirstLetter. |
| MatchRequired | (Combo box only.) A Boolean property determining whether the user must select an entry from the combo box before leaving the control (True) or not (False). This property is useful for making sure that if the user types a partial entry into the text-box area of the combo box, they don't forget to complete the selection in the drop-down list area. |
| If MatchRequired is True and the user tries to leave the combo box without making a selection, VBA displays an “Invalid Property Value” message box. | |
| MultiSelect | (List box only.) Controls whether the user can make a single selection in the list or multiple selections. fmMultiSelectSingle (0) lets the user select only one item. fmMultiSelectMulti (1) lets the user select multiple items by clicking with the mouse or by pressing the spacebar. fmMultiSelectExtended (2) lets the user use Shift+click, Ctrl+click, and Shift with the arrow keys to extend or reduce the selection. |
| RowSource | A String property that specifies the source of a list to be displayed in a combo box or a list box. |
| SelectionMargin | See Table 14.3. |
| ShowDropButtonWhen | See Table 14.3. |
CHECKBOX
Check boxes are similar to option buttons—a set of choices presented to the user. However, option buttons permit the user to select only one from among the displayed options (like a set of radio pushbuttons). By contrast, users can select as many check boxes as they wish.
Most of the properties of the CheckBox control have been discussed already. The key property of the CheckBox that you haven't come across yet is TripleState, which is a feature of the OptionButton and ToggleButton controls as well.
TripleState is a Boolean property that determines whether the check box, option button, or toggle button can have a null state as well as True and False states. When a check box or other control is in the null state, it appears with a small black square in its box.
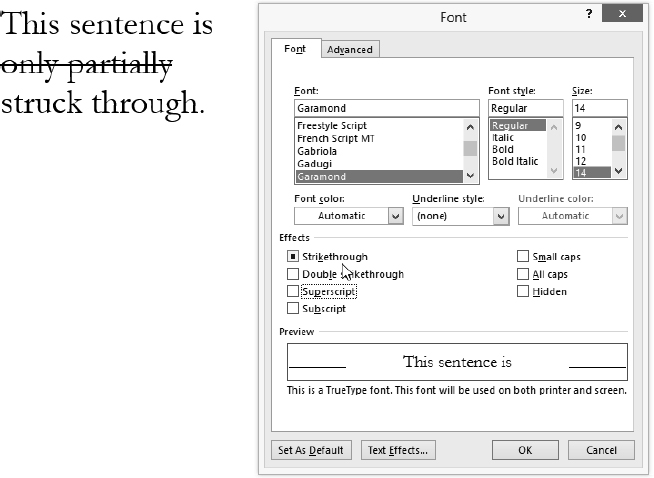
You can see the null state in the Font dialog box in Word when one of the check-box-controlled properties—such as the Strikethrough check box in Figure 14.10—is true for some but not all of the current selection. For example, select a word (or any amount of selected text) that is only partly struck through, and you trigger the null state for the Strikethrough check box, as shown in Figure 14.10. Normally, a check box is either checked or not, but when in a null state, it contains a small black square, indicating it's neither true nor false. (In earlier versions of Office, the null state in a check box was indicated by filling the box with gray or black.)
FIGURE 14.10 By setting the TripleState property of a check box to True, you can display a check box in a null state. Here Word's Font dialog box shows the Strikethrough check box in a null state (containing a small black square, but not checked).
A couple of properties described briefly in the context of other controls deserve more detail here:
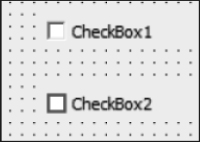
- The SpecialEffect property controls the visual appearance of the check box. The default value is fmButtonEffectSunken (2), which displays a sunken box—the norm for 3D Windows dialog boxes. You can also choose fmButtonEffectFlat(0) to display a box with a flat effect, but why? To me, it doesn't look as good as the default 3D, shadowed box. The flat version is less subtle, crude actually. But, it fits in well with the new “Modern” aesthetic promoted by Microsoft in Windows 8—no gradients, opacity, dimensional effects, shadows, subtle colors, highlights, reflections, serif typefaces, and so on. In other words, flatland.
Figure 14.11 shows a sunken check box and a flat check box. The Value property, which indicates whether the check box is selected (True) or cleared (False), is the default property of the check box. Recall that the default property need not be specified in code; it's assumed. Thus, you can either write CheckBox1.Value or just CheckBox. The following three statements have the same effect:
If CheckBox1.Value = True Then
If CheckBox1 = True Then
If CheckBox1 Then
FIGURE 14.11 Use the SpecialEffect property to display a flat check box (bottom) rather than the traditional sunken check box.
- The Accelerator property provides quick access to the check box. Assign a unique accelerator key to check boxes so that the user can swiftly toggle them on and off from the keyboard.
OPTIONBUTTON
A group of OptionButtons provides a set of mutually exclusive options from which the user can choose. Only one of the buttons in a group can be selected. For instance, you could have two OptionButtons under the heading Sex: Male and Female. (Recall that a set of CheckBoxes permits multiple options to be chosen simultaneously. CheckBoxes are useful for choosing more complex options. For example, under the heading Typeface, you could have Italic, Bold, and Underlined options, all of which could be selected simultaneously.)
Like the CheckBox, the OptionButton control has a straightforward set of properties, almost all of which you've seen already in this chapter. This section shows you the GroupName property, which is unique to the OptionButton, and some of the key properties for working with option buttons.
The GroupName property is a String data type that assigns the option button to a group of option buttons. Alternatively, you can create a group by placing a set of option buttons on a Frame control. The key idea here is that, once grouped, the buttons become mutually exclusive. However, there can be more than one group (or set) on a form—as long as you employ a Frame control or the GroupName property to isolate the various groups of buttons.
The default setting for GroupName is a blank string (""), which means that an option button isn't assigned to a group until you explicitly assign it. When you enter the group name, the group is created. By using the GroupName property, you can have multiple groups of option buttons on the same form without using frames to specify groups, but you must somehow distinguish the logical groups of option buttons from each other so that the user can tell which option buttons constitute a group. Using a Frame control is the easiest way of segregating groups of option buttons both visually and logically—but it's useful to have the flexibility that GroupName provides when you need it. Also, a Frame has a built-in Caption property you can use to describe the group's purpose.
These are the other key properties of the OptionButton control:
- The Value property, which indicates whether the option button is selected (True) or cleared (False), is the default property of the option button. So you can set or return the state of the option button by setting either the OptionButton object or its Value to True or False, as appropriate. Setting the Value of one OptionButton to True sets the Value of all other OptionButton controls in the same group or frame to False.
- The Accelerator property provides quick access to the option button. Assign a unique accelerator key to each option button so that the user can toggle it on and off from the keyboard.
- The SpecialEffect property controls the visual appearance of the option button. The default value of fmButtonEffectSunken (2) displays a sunken button, while fmButtonEffectFlat (0) displays a flattened button. Figure 14.11 shows a sunken option button and a flat option button.
- The TripleState property (discussed in the previous section, “CheckBox”) lets you create an option button that has three states: selected (True), cleared (False), and null (which appears selected but grayed out). The TripleState property is disabled so that the user can't set the null state interactively, but you can set it programmatically as needed.
TOGGLEBUTTON
When it's not selected, the ToggleButton control appears raised, but it looks pushed in when it's selected. The key properties for the ToggleButton control are the same as those for the CheckBox and CommandButton:
- The Value property is the default property of the ToggleButton.
- The TripleState property lets you create a ToggleButton that has three states: selected (True), cleared (False), and null. The user can set a triple-state ToggleButton to its null state by clicking it. In its null state, a ToggleButton appears selected, but gray.
- The Accelerator property provides quick access to the toggle button.
FRAME
The Frame control is relatively straightforward, but it has several properties worth mentioning; they're shown in Table 14.5. The Frame control shares a couple of these properties with the Page object.
TABLE 14.5: Properties of the Frame control
COMMANDBUTTON
The CommandButton is used quite often. This control has three unique properties, listed in Table 14.6.
TABLE 14.6: Unique properties of the CommandButton control
| PROPERTY | DESCRIPTION |
| Cancel | A Boolean property that determines whether the command button is the Cancel button for the user form (True) or not (False). The Cancel button for a user form can bear any name; what distinguishes it is that its Cancel property is set to True. The Cancel button is activated by the user's pressing Esc, or clicking the button, or putting the focus on the button and pressing Enter. Only one command button on a form can be the Cancel button at any given time. Setting the Cancel property for a command button to True causes VBA to set the Cancel property to False for any button for which it was previously set to True. |
| Default | A Boolean property that determines whether the command button is the default button for the user form (True) or not (False). Only one command button on a form can be the default button at any given time. Setting the Default property for a command button to True causes VBA to set the Default property to False for any button for which it was previously set to True. The default button is activated by the user pressing Enter when the focus isn't on any other command button. |
| TakeFocusOnClick | A Boolean property that determines whether the command button takes the focus when the user clicks it (True) or not (False). The default setting for this property is True, but you may want to set it to False when you need the focus to remain on another control in the user form even when the user clicks the command button. However, if the user uses the Tab key or the arrow keys to move to the command button, the command button will take the focus even if the Take FocusOnClick property is set to False. |
Note that it's useful to set the Accelerator property for each command button on a form. This way, the user can quickly access it from the keyboard.
SOMETIMES THE CANCEL BUTTON SHOULD BE THE DEFAULT BUTTON
Sometimes you'll be tempted to make the Cancel button the default on a form. This offers an obvious benefit for forms that offer irreversible actions, such as deleting text or deleting a file, but it can confuse accessibility aids (such as screen readers) and make it difficult for users with cognitive difficulties to work with the form. For these reasons, it's usually best to make the default button on a form a different button than the Cancel button.
TABSTRIP AND MULTIPAGE
TabStrip controls allow you to create a multipage dialog box. Click the Home tab in Word and then click the small arrow icon in the lower-right corner of the Font area on the Ribbon. Word's Font dialog box will open and you'll see a two-tab dialog box. One tab is labeled Font and the other tab is labeled Advanced. This is a good way to organize a dialog box when you have quite a few options to present to the user.
The TabStrip control has several unique properties and a number of properties that it shares with the MultiPage control. Table 14.7 lists these properties.
TABLE 14.7: Properties of the TabStrip and MultiPage controls
| PROPERTY | DESCRIPTION |
| ClientHeight | (Tab strip only.) A Single (data type) property that sets or returns the height of the display area of the tab strip, measured in points. |
| ClientLeft | (Tab strip only.) A Single property that returns the distance, measured in points, between the left border of the tab strip and the left border of the control inside it. |
| ClientTop | (Tab strip only.) A Single property that returns the distance, measured in points, between the top border of the tab strip and the top border of the control inside it. |
| ClientWidth | (Tab strip only.) A Single property that sets or returns the width of the display area of the tab strip, measured in points. |
| SelectedItem | Sets or returns the tab currently selected in a tab strip or the page currently selected in a MultiPage control. |
| TabFixedHeight | A Single property that sets or returns the fixed height of the tabs, measured in points. Set TabFixedHeight to 0 to have the tabs automatically size themselves to fit their contents. |
| TabFixedWidth | A Single property that sets or returns the fixed width of the tabs, measured in points. Set TabFixedWidth to 0 to have the tabs automatically size themselves to fit their contents. |
| TabOrientation | Determines the location of the tabs in the tab strip or multipage. fmTabOrientationTop (0), the default, displays the tabs at the top of the tab strip or multipage. fmTabOrientationBottom (1) displays the tabs at the bottom of the tab strip or multipage. fmTabOrientationLeft (2) displays the tabs at the left of the tab strip or multipage, and fmTabOrientationRight displays the tabs at the right of the tab strip or multipage. |
SCROLLBAR AND SPINBUTTON
A SpinButton allows the user to easily increment or decrement numbers, dates, and so on. The ScrollBar and SpinButton share a number of properties that you haven't yet encountered. Table 14.8 lists these properties.
TABLE 14.8: Properties of the ScrollBar and SpinButton controls
| PROPERTY | DESCRIPTION |
| Delay | A Long (data type) property that sets the delay in milliseconds between clicks registered on the control when the user clicks and holds down the mouse button. The default delay is 50 milliseconds. The control registers the first click immediately, the second click after Delay x 5 (the extra delay is to assist the user in clicking only once), and the third and subsequent clicks after Delay. |
| LargeChange | (Scroll bar only.) A Long property that determines how much the item is scrolled when the user clicks in the scroll bar between the thumb (the small square within the scroll bar) and the scroll bar's arrow. Set the LargeChange property after setting the Max and Min properties of the scroll bar. |
| SmallChange | A Long property that determines how much movement occurs when the user clicks a scroll arrow in a scroll bar or spin button. SmallChange needs to be an integer value; the default value is 1. |
| Max | A Long property that specifies the maximum value for the Value property of the scroll bar or spin button. Max must be an integer. The default value is 1. |
| Min | A Long property that specifies the minimum value for the Value property of the scroll bar or spin button. Min must be an integer. The default value is 1. |
| ProportionalThumb | (Scroll bar only.) A Boolean property that determines whether the thumb is a fixed size (False) or is proportional to the size of the scrolling region (True), thereby giving the user an approximate idea of how much of the scrolling region is currently visible. The default setting is True. |
IMAGE
By now, you've seen all the properties of the Image control. Most of the time when you use an Image control, you'll want to adjust the following properties:
- Use the Picture property to assign the picture file you want to appear in the Image control. Click in the Picture row in the Properties window, and then click the ellipsis button (…) that the text box displays. In the Load Picture dialog box, select the picture and click the OK button to add it. The Image control can display .BMP, .CUR (cursor), .GIF, .ICO (icon), .JPG, and .WMF files, but not other graphics files, such as .TIF. Most graphics applications, however, can easily convert one graphics file type into another.
AN EASY WAY TO CAPTURE A GRAPHIC IMAGE
The easiest way to display part of a Windows screen in an Image control is to capture it by pressing the Print Screen key (to capture the entire screen) or the Alt+Print Screen key combination (to capture the currently active window). Then paste it into an application such as the Windows Paint accessory, trim (crop) it there as necessary, and save it as a .BMP file. Windows 8 provides a third option: Press the Windows key plus the Print Screen key to capture and automatically save the screen to disk. The captured image will be saved in your Libraries folder in a subfolder named Screenshots. The image is saved as a .PNG graphics filetype—widely considered to be the best way to grab screen images.
- Use the PictureAlignment property to set the alignment of the picture.
- Use the PictureSizeMode property to set whether the picture is clipped, stretched, or zoomed to fill the Image control. Adjust the height and width of the Image control as necessary.
- Use the PictureTiling property if you need to tile the image to take up the full space in the control.
PAGE
The Page object is one of the pages contained within a MultiPage object. You've already seen all its properties (in the context of other controls) except for the Index property, which it shares with the Tab object.
The Index property is an Integer data type that determines the position of the Page object in the Pages collection in a MultiPage control or the position of a Tab object in the Tabs collection in a TabStrip. The first Page object or Tab object is numbered 0 (zero); the second Page or Tab object is numbered 1; and so on. You can change the Index property of a tab or page to change the position in which the tab or page appears in the collection.
TAB
The Tab object is one of the tabs contained within a TabStrip object. You've already learned about all its properties in the context of other controls.
Working with Groups of Controls
As mentioned briefly earlier in this chapter, when you are designing a form, it's often handy to group controls. By grouping two or more controls, you can work with them as a single unit to size, reposition, format, or delete them. (Recall that this form-design grouping technique has nothing to do with creating a set of option buttons within a Frame control. That creates a mutually exclusive collection of radio buttons to display to the user during runtime.)
GROUPING CONTROLS
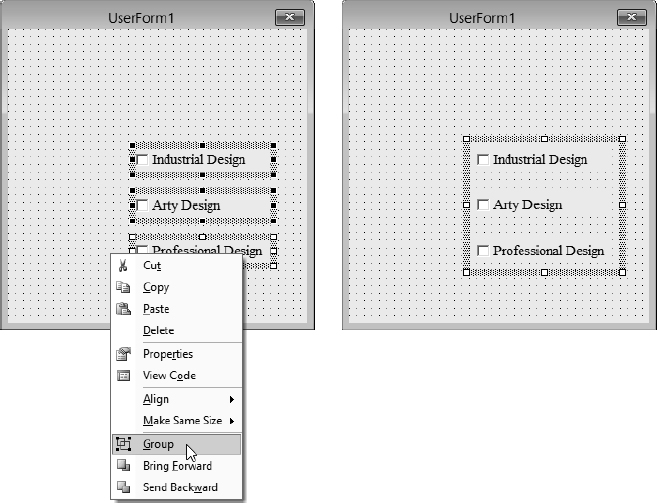
To group controls, select them by Shift+clicking, Ctrl+clicking, or dragging around them, and then right-click and choose Group from the context menu. Alternatively, select the controls, and then click the Group button on the UserForm toolbar (you'll need to display this toolbar—it's not displayed by default) or choose Format ![]() Group. VBA creates a new group containing the controls and places a shaded border with handles around the whole group, as shown on the right in Figure 14.12.
Group. VBA creates a new group containing the controls and places a shaded border with handles around the whole group, as shown on the right in Figure 14.12.
FIGURE 14.12 You can work with multiple controls simultaneously by grouping them. VBA indicates a group of controls by placing a border around the entire group, as shown on the right.
When you merely select a set of controls (by Shift+clicking, Ctrl+clicking, or dragging around them), you have only temporarily grouped them. You can still manipulate them as a group, but as soon as you deselect them—by, for example, clicking the background of the form itself—the grouping disappears. However, when you right-click and choose Group from the context menu, they will remain grouped until you right-click and choose Ungroup.
UNGROUPING CONTROLS
To ungroup controls, right-click any of the controls contained in the group and then choose Ungroup from the context menu. Alternatively, select the group of controls by clicking in any control in the group and then click the Ungroup button on the UserForm toolbar, or choose Format ![]() Ungroup. VBA removes the shaded border with handles from around the group and displays the normal border and handles around each individual control.
Ungroup. VBA removes the shaded border with handles from around the group and displays the normal border and handles around each individual control.
SIZING GROUPED CONTROLS
You can quickly size all controls in a group by selecting the group and then dragging the sizing handles on the surrounding border. For example, you could select the middle handle on the right side and drag it inward to shorten the controls, as shown in Figure 14.13. The controls will be resized proportionately to the change in the group outline.
FIGURE 14.13 You can resize all the controls in a group by dragging a sizing handle on the surrounding border.
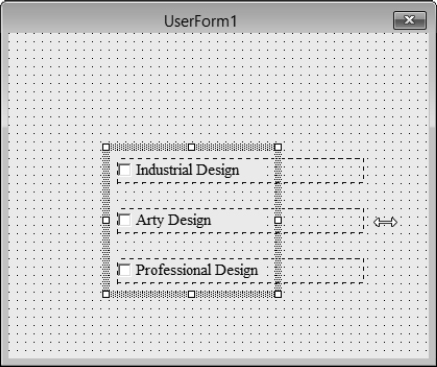
When the controls are grouped, you can then use the Properties window to quickly modify any properties they have in common (such as Font). But resizing a group can present problems—the results can be ugly. Generally speaking, resizing works fine when you've grouped a number of controls of the same type, as in Figure 14.13. For example, sizing a group that consists of several command buttons or option buttons works well, whereas sizing a group that consists of a text box, a command button, and a combo box is seldom a good idea.
DELETING GROUPED CONTROLS
You can quickly delete a whole group of controls by right-clicking any of them and choosing Delete from the context menu or by selecting the group and pressing the Delete key.
WORKING WITH ONE CONTROL IN A GROUP
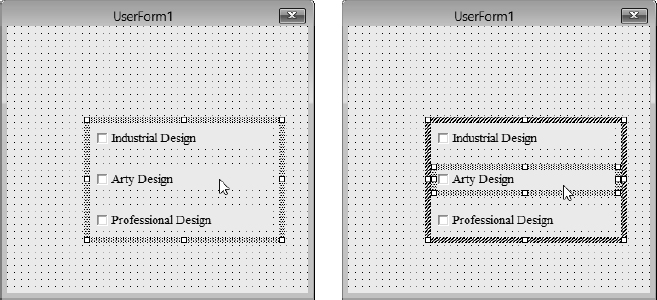
Even after you've grouped a number of controls, you can still work with them individually if necessary. To do this, first click any control in the group to select the group as a whole, as shown on the left in Figure 14.14. Then click the control you want to work with. As shown on the right in Figure 14.14, VBA displays a dark shaded border around the group (indicating that the group still exists) and displays the lighter shaded border around the individual control, indicating that that control is selected.
FIGURE 14.14 To work with one control in a group, start by selecting the group (as shown on the left) and then select the control (as shown on the right).
You can then modify the selected individual control as if it were not grouped. Change its ForeColor property to blue, for instance, and only the caption in that particular control will turn blue. When you've finished working with it, click another control in the group to individually select it, or click elsewhere in the user form to deselect all individual controls and restore the group.
Aligning Controls
Even if you use the Snap To Grid feature, you'll often need to align controls manually. They must be ungrouped for this feature to work. The easiest way to align controls is to select two or more, then right-click in any one of them and choose an option from the Align submenu: Lefts, Centers, Rights, Tops, Middles, Bottoms, or To Grid. These options work as follows:
Lefts aligns the left borders of the controls.
Centers aligns the horizontal midpoints of the controls.
Rights aligns the right borders of the controls.
Tops aligns the tops of the controls.
Middles aligns the vertical midpoints of the controls.
Bottoms aligns the bottoms of the controls.
To Grid aligns the controls to the grid.
VBA aligns the borders or midpoints to the current position of that border or midpoint on the dominant control—the control that has white sizing handles around it rather than black sizing handles. After selecting the controls you want to align, make dominant the one that is already in the correct position by clicking it so that it takes on the white sizing handles. Then choose the alignment option you want.
Make sure the alignment option you choose makes sense for the controls you've selected. VBA will happily align controls in an inappropriate way if you tell it to. For example, if you select a number of option buttons or text boxes and choose Tops from the Align submenu, VBA will obligingly stack all the controls on top of each other, rendering them unusable. (To recover from such minor mishaps, press Ctrl+Z.)
Placing Controls
The VBA Editor offers several placement commands on the Format menu:
- On the Format Make Same Size submenu, use the Width, Height, and Both commands to make two or more controls the same size in one or both dimensions.
- Use the Format Size To Fit command to have VBA decide on a suitable size for an element based on the size of its label. This works well for, say, a toggle button with a medium-length label, but VBA will shrink an OK button to a size so small as to be unusable.
- Use the Format Size To Grid command to increase or decrease the size of a control to the nearest gridpoints.
- On the Format Horizontal Spacing and Format Vertical Spacing submenus, use the Make Equal, Increase, Decrease, and Remove commands to set the horizontal spacing and vertical spacing of two or more controls. The Remove option removes extra space from between controls, which works well for, say, a vertical series of option buttons (which look good close together) but isn't a good idea for command buttons (which need a little space between them).
- On the Format Center In Form submenu, use the Horizontally and Vertically commands to center a control or a group of controls in the form. Centering controls vertically is seldom a good idea, but you'll often want to center a frame or a group of command buttons horizontally.
- On the Format Arrange Buttons submenu, use the Bottom and Right commands to reposition command buttons in a form quickly.
Adjusting the Tab Order of a Form
The tab order of a user form (or of a frame control within a form) is the order in which VBA selects controls in the form or frame when the user moves through them by pressing the Tab key (to move forward) or the Shift+Tab key combination (to move backward).
Put another way, it's a Windows convention that when the user presses the Tab key, the focus moves to the next control in a window.
Only one control at a time can have the focus. For example, if a form has five text boxes, only one of these text boxes, the one that currently has the focus, will display characters as the user types. In addition, a button in a set of buttons can also have the focus, and when the user presses the Enter key, the button with the focus will be triggered. Or the user can click a different button to move the focus to that button.
VBA displays a visual cue to indicate which control currently has the focus. You'll see a dotted frame around a button or option button and a blinking insertion cursor in a text box.
Each frame you add to a user form has a separate tab order for the controls it contains: The frame itself appears in the tab order for the form, and the controls within the frame appear in the tab order for the frame.
Set the tab order for a form or a frame to make it as easy as possible for the user to work with your form. Generally, for English-speaking users, it's best to arrange the tab order from left to right and from top to bottom in the dialog box or frame. For international users, you may want to arrange the tab order from right to left. You may also need to arrange the tab order to move from one control to a related control that would not normally be next in the tab order.
The whole point of managing the tab order is that you simplify things for your user. Employing the Tab key in this way allows the user to fill in a whole form without once having to move their hand off the keyboard to keep selecting, with a mouse click, each next text box.
This kind of tabbing is particularly useful when the user is asked to fill in several fields by typing into multiple text boxes (such as Name, Address, Phone, and so on). As soon as users finish filling in one field, they can press Tab to move on to the next. (Even easier, pressing the Enter key while in a text box moves users to the next control in the tab order.) At the end, after they've filled in the last field, they can quickly close the dialog box if you make the OK button the next control in the tab order.
VBA assigns the tab order to the controls in a dialog box or frame on a first-come, first-served basis as you add the controls. Unless you add all the controls in perfect order, this default order will seldom produce the optimal tab order for a dialog box, so usually you'll want to adjust the tab order—or at least check to ensure that it's right. You're likely to place fewer controls on a frame than on a form, so you have a better chance of adding them in a suitable order, but you should check these controls too before unleashing the dialog box on users.
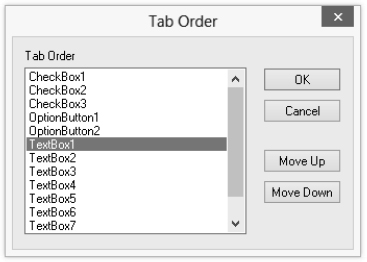
Just press F5 and then repeatedly press the Tab key to examine your current tab order. Alternatively, you can open a Tab Order dialog box (shown in Figure 14.15) by right-clicking in the open space in the background of the form or frame and choosing Tab Order from the context menu. Or select the user form or frame and then choose View ![]() Tab Order.
Tab Order.
FIGURE 14.15 Use the Tab Order dialog box to arrange the controls in your user form or frame into a logical order for the user.
The time to adjust the tab order is after you've finished creating your form (adding a control later will require that you go back and modify the tab order). Here's how to change the tab order in a dialog box or frame:
- Rearrange the controls into the order in which you want them to appear by selecting them in the Tab Order list box and clicking the Move Up button or Move Down button as appropriate. You can Shift+click or drag to select a range of controls, or Ctrl+click to select two or more noncontiguous controls. (Or just change the controls' TabIndex properties in the Properties window.)
- Click the OK button to close the Tab Order dialog box.
Linking a Form to a Procedure
Designing a custom form is only the first step in getting it to work in a procedure. The other step is writing the code to display the form to the user and make it perform its tasks.
Typically, the code for a form consists of the following:
- A macro procedure that displays the dialog box by loading it and using the Show method. Usually, this procedure can be assigned to a Quick Access Toolbar button or to a shortcut key combination so that the user can conveniently invoke it. However, a procedure can also be designed to run automatically in response to a system event (such as running at a specified time or when a worksheet is opened).
- The user form that represents the form and its controls.
- The code attached to the user form. This code consists of procedures for designated controls. For example, for a simple dialog box containing two option buttons and two command buttons (an OK button and a Cancel button), you'd typically write one procedure for the OK button and one for the Cancel button. The procedure for the OK button is executed when the user either clicks the button with the mouse or presses the Enter key while the focus is on that button. Either of these user actions triggers the button's Click event, and whatever code you, the programmer, have written within this event is then executed. Remember that the easiest way to create an event (procedure) for a control is to just doubleclick the control on the form. The editor then switches to Code view and writes the necessary Sub…End Sub envelope for that event, like this:
Private Sub btnOK_Click()

End Sub
Notice that the Editor automatically combines the Name property of the control with the name of the event as the procedure's name, separated by an underscore character: btnOK_Click.
IN STATIC DIALOG BOXES, CLICK EVENTS ARE USUALLY EMPLOYED WITH COMMAND BUTTONS
Most controls have quite a few events. Some of them might seem inappropriate or useless at first. For example, option buttons have a Click event. But why? It makes sense to trap (to respond in code to an event such as a user's mouse click) using command buttons in a static dialog box. (A static dialog box is the most common type. The controls don't change or move.) However, as you'll see in the next chapter, in a dynamic dialog box, you may want to trap the click on an option button and display further controls to get additional input from the user.
Once the code attached to a button has run, execution returns to the form (if it's still displayed) or to the procedure that called the form.
Note that code that runs directly in response to an event is called an event procedure or event handler. An event procedure can call other procedures as necessary, so multiple procedures can be run indirectly when a single event handler Sub is triggered.
Loading and Unloading a Form
You load a form by using the Load statement, and unload it by using the Unload statement. The Load statement loads the form into memory so that it's available to the program but doesn't display the form; for that you use the Show method (discussed in the next section). The Unload statement unloads the form from memory and releases any memory associated with that object. If the form is displayed when the Unload statement runs, VBA removes the form from the screen.
The syntax for the Load and Unload statements is straightforward:
Load UserForm1
Unload UserForm1
Here, UserForm1 is the name of the user form or dialog box. For example, the following statement loads the dialog box named frmMyDialog:
Load frmMyDialog
Displaying and Hiding a Form
To display a form, you use the Show method; to hide a form, you use the Hide method. For example, the following statement displays the form named frmMyDialog:
frmMyDialog.Show
If you execute a procedure containing this line, the frmMyDialog form appears onscreen so the user can interact with it: enter text in its text boxes, select or clear its check boxes, use its drop-down lists, click its buttons, and so on.
When the user closes the form (by clicking the Close button on its title bar or by clicking a command button that dismisses it), the form disappears from the screen and the procedure continues to run. But until you retrieve settings from the form and take action on them, the form has no effect beyond its graphical display.
You can display a form by using the Show method without explicitly loading the form with a Load command first; VBA takes care of the implied Load command for you. There's no particular advantage to including the Load command, but it might make your code easier to read and to debug. For example, the two procedures shown here have the same effect:
Sub Display_Dialog()
    Load frmMyDialog 'loads the form into memory
    frmMyDialog.Show 'displays the form
End Sub

Sub Display_Dialog()
    frmMyDialog.Show 'loads the form into memory and displays it
End Sub
If you run a Hide method without having loaded the form into memory by using the Load statement or the Show method, VBA loads the form but does not display it onscreen.
Once you've displayed the form, take a moment to check its tab order by pressing F5 and then moving through it using the Tab key. When you first open the form, is the focus on the appropriate control, the control the user is most likely to want to interact with first? When you move forward from that control, is the next control that is selected the next control that the user will typically need to use? Adjust the tab order as necessary, as described in “Adjusting the Tab Order of a Form” earlier in this chapter.
Setting a Default Command Button
To specify a default command button in a form, set that command button's Default property to True. VBA selects the default button when it displays the form so that if the user simply presses the Enter key to dismiss the dialog box, this button receives the keystroke.
Only one button can be the default button at any given time. If you set the Default property of any button to True, VBA automatically changes to False the Default property of any other button previously set to True.
Retrieving the User's Choices from a Dialog Box
To make a form do something, your code will usually respond to the user's input. The following sections first cover the VBA commands for retrieving information from a dialog box. Then you'll see an example of how to retrieve the user's choices from both a relatively simple dialog box and then a more complex form.
Returning a String from a Text Box
To return (retrieve) a string from a text box, your code can check its Value property or Text property after the user has clicked an OK or Cancel button or otherwise dismissed the dialog box.
For example, if you have a text box named txtMyText, you could return its value and display it in a message box by using the following line:
MsgBox txtMyText .Value
THE TEXT PROPERTY OF A TEXT BOX IS UNIQUE
For a text box, the Value property and the Text property return the same information; for most other VBA objects, the Value property and the Text property return different information.
Recall that VBA supports both one-line and multiline text boxes. To create a multiline text box, select the text box in the user form or in the drop-down list in the Properties window and set its MultiLine property to True. The user can then enter multiple lines in the text box and start new lines by pressing Shift+Enter.
QUICK CHANGES FOR TWO-STATE PROPERTIES
Here's a tip: If you're changing a Boolean (two-state, True versus False) property—like Enabled, Visible, or Multiline—just double-click the value in the Properties window. For example, to change the default False setting for Multiline, double-click False in the Properties window. It changes to True. (This doesn't work with the Value property.)
To add a horizontal or vertical scroll bar to a text box, set its ScrollBars property to 1 - fmScrollBarsHorizontal (for a horizontal scroll bar), 2 - fmScrollBarsVertical (for a vertical scroll bar, which is usually more useful), or 3 - fmScrollBarsBoth (for both).
Returning a Value from an Option Button
A regular option button is a binary control, so it can have only two values: True and False. True indicates that the button is selected, False that it's unselected. You can check an option button's value with a simple If… Then structure. For example, if you have two option buttons, named optSearchForFile and optUseThisFile, you can check their values and find out which was selected by using the following code:
If optSearchForFile = True Then
   'optSearchForFile was selected; take action on this
Else 'optSearchForFile was not selected, so optUseThisFile was
  'take action for optUseThisFile
End If
Remember that Value is the default property of the OptionButton control. The previous code checks the value of the default property of the control, so you need not specify the property in your code. Default properties can be omitted as a kind of shorthand programming. The first line of code could be written out more fully as If optSearchForFile.Value = True Then. But in the code example, I chose to write it more succinctly, with = True implied: If optSearchForFile Then.
With more than two option buttons, use an If… Then… ElseIf condition or a Select Case statement to determine which option button is selected.
YOU CAN'T DIRECTLY TEST FOR A NULL VALUE
This is a bit esoteric, but as you saw earlier in this chapter, an option button or a check box can also have a null value if its TripleState property is set to True. Null means basically “neither completely true nor false”—the selected paragraph is partially boldface, so its FontStyle is both bold and regular. If you allow your option buttons or check boxes to have a null state, you'll need to check for that as well in your procedures. You can't directly check for the control's value being Null (for example, If opt1.Value = Null causes an error), so use an If statement or Select Case statement to test True and False first. If the Value of the control is neither True nor False, it Else must be Null.
Returning a Value from a Check Box
Like an option button, a regular check box can only be either True or False, so you can use an If… Then structure to check its value. Here's an example:
If chkDisplayProgress = True Then
   'take actions for chkDisplayProgress
End If
Again, you're checking the default property of the control here—the Value property. The first line of code could also be written as If chkDisplayProgress.Value = True Then.
Sometimes you'll need to take an action if the check box was cleared (deselected) rather than selected. For example, if the user clears the check box, you may need to turn off a configuration option.
Returning a Value from a List Box
List boxes start out empty. So, before you can ask the user to choose an item in a list box, you must first fill the box with items from which the user can choose—you must tell VBA which items to display. To do so, you create a procedure to initialize (prepare) the user form and add the items to the list box before displaying it:
- Right-click the name of the user form in the Project Explorer and choose View Code from the context menu to display (in the Code window) the code for the controls assigned to the dialog box. Or you can just double-click somewhere in the background on the user form to go to Code view. Recall that you can toggle between the Code window (press F7) and the form-design window (Shift+F7).
- In the Object drop-down list (on the top left of the Code window), make sure UserForm is selected.
- Choose Initialize from the Procedure drop-down list (on the top right of the Code window). The Visual Basic Editor creates a new procedure named Private Sub UserForm_Initialize for you, inserting it at the end of the procedures currently displayed in the code window:
Private Sub UserForm_Initialize()
End Sub
Here's a tip: VBA runs a UserForm_Initialize procedure every time the user form is brought to life. This procedure is a good place to add items to a list box or combo box or to set properties of other controls on the user form. In other words, this Initialize event is where you write code to do any necessary preliminary housekeeping before displaying the form to the user.
- To add items to a list box, you can use the AddItem method for the list box object (here the box is named lstBatteries) with a text string in quotation marks to display the ID number of each battery in the list box:
lstBatteries.AddItem "Battery #A4601"
lstBatteries.AddItem "Battery #A4602"
lstBatteries.AddItem "Battery #A4603"
lstBatteries.AddItem "Battery #A4604"
THE INITIALIZE EVENT IS FLEXIBLE
By adding items when you initialize the form, you can add different numbers of items as appropriate. For example, if you wanted the user to pick a document from a particular folder, you could create a list of the documents in that folder on the fly in your code during runtime and fill the list box with the documents' names.
To retrieve the user's choice from a single-select-style list box, check the Value property in your code, as in this example:
MsgBox "You chose this entry from the list box: " & lstBattery.Value
Single-select list boxes are like a set of option buttons—the user is allowed to select only one of them.
When you use the MultiSelect property to create a list box capable of multiple selections, you can no longer use the Value property to return the items selected in the list box. When MultiSelect is set to True, Value always returns a null value. Instead, you use the Selected property to determine which rows in the list box are selected and the List property (it's an array) to return the contents (the values) of each selected row.
The following statements use a For… Next loop to build a string named strMsg containing the entries selected from a multiselect list box:
strMsg = "You chose the following entries from the list box: " & vbCr
For i = 1 To lstBatteries.ListCount
  If lstBatteries.Selected(i - 1) = True Then
    strMsg = strMsg & lstBatteries.List(i - 1) & vbCr
  End If
Next i
MsgBox strMsg
Returning a Value from a Combo Box
To return a value from a combo box (a control that is, in effect, a combination list box and text box), you add items to the combo box list in an Initialize procedure and then check the Value of the combo box after the user has dismissed the dialog box. (The combo box control doesn't offer multiple-selection capabilities, so Value is the property to check.)
For example, you would use the following code to add items to a combo box named cmbColor :
Private Sub UserForm_Initialize()
  cmbColor.AddItem "Red"
  cmbColor.AddItem "Blue"
  cmbColor.AddItem "Yellow"
End Sub
To return the item the user chose in the combo box, retrieve the Value property:
Result = cmbColor.Value
The item retrieved from a combo box can be either one of the items assigned in the Initialize procedure or one that the user has typed into the text-box portion of the combo box.
Examples of Connecting Forms to Procedures
The following sections show you two examples of how you can create a procedure and then design a form that works with it to make the procedure more useful and powerful. In the first example, you'll record a macro in Word and then link a form to that code. In the second example, which will work with any VBA-enabled application, you'll create a user form and its associated code from scratch.
Word Example: The Move-Paragraph Procedure
This first example moves the current paragraph up or down within the document by one or two paragraphs in Word.
RECORDING THE PROCEDURE
Start by recording a procedure in Word to move the current paragraph. In the procedure, you need to record the commands for the following actions:
- Selecting the current paragraph
- Cutting the selection and then pasting it
- Moving the insertion point up and down the document
- Inserting a bookmark, moving the insertion point to it, and then deleting the bookmark
We want our finished procedure to display a dialog box with option buttons for moving the current paragraph up one paragraph, up two paragraphs, down one paragraph, or down two paragraphs. The dialog box should also include a check box that indicates the user wants the insertion point returned to its original position at the end of the procedure. Because this is presumably desirable default behavior for the procedure, this check box is selected by default. Users can clear the check box if they don't want to return the insertion point to its original position.
First, start Word and create a new, blank, scratch document (press Ctrl+N), and enter three or four paragraphs of text—just about anything will do, but it'll be easier to have recognizable text so that you can make sure the procedure is moving paragraphs as it should. Then place the insertion point in one of the paragraphs you've just entered and start recording a macro as discussed in Chapter 1, “Recording and Running Macros in the Office Applications”:
- Click the Record Macro icon on the status bar or the Record Macro icon in the code section of the Ribbon's Developer tab. Either way, you see the Record Macro dialog box.
- Type the name for the macro, Move_Paragraph, in the Macro Name text box and a description in the Description text box.
- Choose a template or document, if necessary, in the Store Macro In drop-down list. (You probably don't want to add this to the global NewMacros module in the Normal.dotm file. Why clutter it up with practice macros?)
- If you want, use the Button or Keyboard button to create a Quick Access Toolbar button or keyboard shortcut for the macro.
- Click the OK button to start recording the macro.
Record the following actions in the macro:
- Insert a bookmark at the current position of the insertion point by clicking the Bookmark icon in the Links section of the Ribbon's Insert tab. This displays the Bookmarks dialog box. Enter a name for the bookmark, and click the Add button. In this example, the bookmark is named Move_Paragraph_Temp to indicate that it's a temporary bookmark used for the Move_Paragraph procedure.
- Select the current paragraph by pressing F8 four times. The first press of F8 activates Extend mode, the second selects the current word, the third selects the current sentence, and the fourth selects the current paragraph. Press the Esc key to turn off Extend mode once the paragraph is selected.
- Cut the selected paragraph by using one of the variations of the Cut command (for example, press either Ctrl+X or Shift+Delete, or click the Cut icon in the Ribbon's Clipboard section).
- Move the insertion point up one paragraph by pressing Ctrl+.
- Paste the cut paragraph back in by using a Paste command (for example, press Ctrl+V or Shift+Insert, or click the Paste button on the Home tab of the Ribbon).
- Move the insertion point down one paragraph by pressing Ctrl+ ↓.
- Move the insertion point up two paragraphs by pressing Ctrl+ ↑ twice.
Note that if you started with the insertion point at the beginning of the first paragraph in the document, you'll only be able to move the insertion point up one paragraph. This doesn't matter—press the keystroke anyway to record it. If Word beeps at you, ignore it.
- Move the insertion point down two paragraphs by pressing Ctrl+ ↓ twice. (If in doing so you hit the end of the document after the first keystroke, don't worry—perform the second keystroke anyway to record it. Word may sound a beep.)
- Open the Bookmarks dialog box again (click the Bookmark icon in the Links section of the Ribbon's Insert tab), select the Move_Paragraph_Temp bookmark, and click the Go To button to go to it. Then click the Delete button to delete the Move_Paragraph_Temp bookmark. Click the Close button to close the Bookmarks dialog box.
- Stop the Macro Recorder by clicking the Stop Recording icon on the status bar or the Stop Recording icon in the code section of Ribbon's Developer tab.
Open the recorded macro in the Visual Basic Editor by pressing Alt+F8, selecting the macro's name in the Macros dialog box, and clicking the Edit button.
You should see a macro that looks something like this:
 1. Sub Move_Paragraph()
 2. '
 3. ' Move_Paragraph Macro
 4. ' Move a paragraph up or down
 5. '
 6.     With ActiveDocument.Bookmarks
 7.         .Add Range:=Selection.Range, Name:="Move_Paragraph_Temp"
 8.         .DefaultSorting = wdSortByName
 9.         .ShowHidden = False
10.     End With
11.     Selection.Extend
12.     Selection.Extend
13.     Selection.Extend
14.     Selection.Extend
15.     Selection.EscapeKey
16.     Selection.Cut
17.     Selection.MoveUp Unit:=wdParagraph, Count:=1
18.     Selection.Paste
19.     Selection.MoveDown Unit:=wdParagraph, Count:=1
20.     Selection.MoveUp Unit:=wdParagraph, Count:=2
21.     Selection.MoveDown Unit:=wdParagraph, Count:=2
22.     Selection.GoTo What:=wdGoToBookmark, Name:="Move_Paragraph_Temp"
23.     ActiveDocument.Bookmarks("Move_Paragraph_Temp").Delete
24.     With ActiveDocument.Bookmarks
25.         .DefaultSorting = wdSortByName
26.         .ShowHidden = False
27.     End With
28. End Sub
You can probably read this macro code easily enough by now:
- Line 1 starts the macro, and line 28 ends it. Lines 2 and 5 are blank comment lines around the comment lines showing the macro's name (line 3) and description (line 4).
- Lines 6 through 10 contain a With statement that adds the Move_Paragraph_Temp bookmark. Lines 7 and 8 are unnecessary here, but the Macro Recorder records all the settings in the Bookmarks dialog box, including the setting for the Sort By option button and the Hidden Bookmarks check box.
- Lines 11 through 15 use the Extend Selection feature to select the current paragraph.
- Lines 17, 19, 20, and 21 record the syntax for moving the insertion point up and down one paragraph and two paragraphs, respectively.
- Line 16 records the Cut command and Line 18 the Paste command.
- Line 22 moves the insertion point to the Move_Paragraph_Temp bookmark, and line 23 deletes the bookmark. Lines 24 through 27 again record the settings in the Bookmarks dialog box, which you don't need here either.
If you wish, you can quickly delete unnecessary lines of code, and collapse the first With structure, to create a more succinct, more easily understood, version of the code:
 1. Sub Move_Paragraph()
 2.     ActiveDocument.Bookmarks.Add Range:=Selection.Range, _
            Name:= ="Move_Paragraph_Temp"
 3.     Selection.Extend
 4.     Selection.Extend
 5.     Selection.Extend
 6.     Selection.Extend
 7.     Selection.EscapeKey
 8.     Selection.Cut
 9.     Selection.-MoveUp Unit:=wdParagraph, Count:=1
10.     Selection.Paste
11.     Selection.-MoveDown Unit:=wdParagraph, Count:=1
12.     Selection.-MoveUp Unit:=wdParagraph, Count:=2
13.     Selection.-MoveDown Unit:=wdParagraph, Count:=2
14.     Selection.GoTo What:=wdGoToBookmark, _
          Name:= ="Move_Paragraph_Temp"
15. End Sub
CREATING THE DIALOG BOX
Next, create the dialog box for the procedure (see Figure 14.16):
FIGURE 14.16 The Move Current Paragraph dialog box that you will connect to the Move_Paragraph
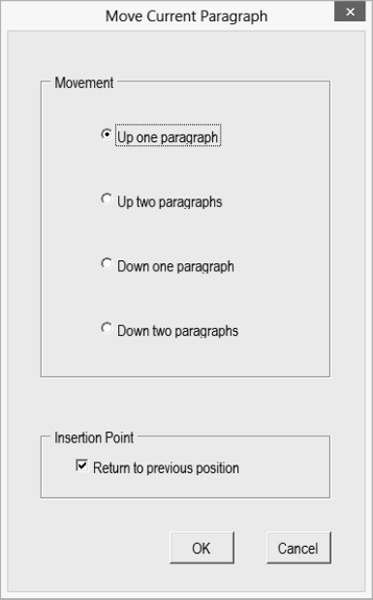
- Start a user form in the Visual Basic Editor by clicking the Insert button's drop-down list and choosing UserForm (or just click the Insert button if it's already showing the UserForm icon) or by choosing Insert UserForm.
- Use the Properties window for the user form to set its Name and Caption properties. Click in the cell next to the Name cell and enter the Name property there, and then click in the cell next to the Caption cell and enter the Caption property. The example user form is named frmMoveParagraph and has the caption Move Current Paragraph so that the name of the form is closely related to the text the user will see in the title bar of the dialog box but different from the procedure name (Move_Current_Paragraph).
- Place two frames in the user form, as shown in Figure 14.17, to act as group containers in the dialog box:
- Double-click the Frame tool in the Toolbox, and then click and drag in the user form to place each frame.
- Align the frames by selecting them both and choosing Format Align Lefts.
- With the frames still selected, verify that they are the same width by choosing Format Make Same Size Width. (Don't choose Format Make Same Size Height or Format Make Same Size Both. The top frame will need to be taller than the bottom frame.)
- Caption the top frame Movement and the bottom frame Insertion Point by selecting each in turn and then setting the Caption property in the Properties window. Then name the top frame fraMovement and the bottom frame fraInsertionPoint.
FIGURE 14.17 Start by placing two frames in the user form.
- Place four option buttons in the Movement frame, as shown in Figure 14.18:
FIGURE 14.18 Place four option buttons in the Movement frame like this.
- Double-click the OptionButton tool in the Toolbox, and then click in the Movement frame to place each option button. This time, don't click and drag—just click to place a normal-width option button.
- When you've placed the four option buttons, click the Select Objects button in the Toolbox to restore the selection pointer. Then select the four option buttons and align them with each other by choosing Format Align Lefts. Even out any disparities in spacing by choosing Format Vertical Spacing Make Equal. If necessary, use the other items on the Format Vertical Spacing submenu—Increase, Decrease, and Remove—to adjust the amount of space between the option buttons. (You can do all these things freehand if you prefer by just eyeballing. Drag them around until you have them neatly positioned and sized.)
- Change the caption for each option button by setting the Caption property in the Properties window. Caption them as illustrated in Figure 14.18: Up one paragraph, Up two paragraphs, Down one paragraph, and Down two paragraphs. These option buttons will control the number of paragraphs the procedure moves the current paragraph.
- If you need to resize the option buttons to make all the text in the captions visible, select them and group them by right-clicking and choosing Group from the context menu, by choosing Format Group, or by clicking the Group button on the UserForm toolbar. Then select the group and drag one of the handles to resize all the option buttons evenly. For example, to reveal hidden text that's cut off on the right side, drag the handle at the right midpoint of the group outward.
- Name the option buttons optUpOne, optUpTwo, optDownOne, and optDownTwo, respectively, by changing the Name property of each in turn in the Properties window.
OPTION BUTTONS ARE MUTUALLY EXCLUSIVE
By default, all the option buttons on a user form (if they're not contained within a frame) are part of the same option group. This means that only one of these option buttons can be selected at any given time. If you want to provide more than one group of option buttons on a user form, you need to specify the separate groups. The easiest way to do this is to position each group within a separate Frame control as you did in this example. Alternatively, you can specify a different GroupName property for each option button.
- Next, set the first option button's Value property to True by selecting the default False value in the Properties window and entering True instead. Doing so will select the option button in the user form you're designing, and when the dialog box is displayed, that option button will be selected as the default choice for the option group. Set its accelerator key to U by entering U as its Accelerator property. Set the Accelerator property of the second option button to t, the third to D, and the fourth to w. The Accelerator property is case sensitive only when the caption for the control contains both the uppercase and lowercase versions of the same letter.
- Place a check box in the Insertion Point frame, as shown in Figure 14.19:
FIGURE 14.19 Place a check box in the Insertion Point frame.
- Click the CheckBox tool in the Toolbox and then click in the Insertion Point frame in the user form to place a check box of the default size.
- In the Properties window, set the name of the check box to chkReturnToPreviousPosition (a long name but a descriptive one). Then set its Caption property to Return to previous position. Set its accelerator key to R by entering R as its Accelerator property. Finally, set the check box to be selected by default by entering True as its Value property.
- Next, insert the command buttons for the form (see Figure 14.20):
FIGURE 14.20 Add two command buttons and set their properties.
- Double-click the CommandButton tool on the Toolbox and click to place the first command button at the bottom of the user form. Click to place the second command button, and then click the Select Objects button to restore the selection mouse pointer.
- Size and place the command buttons by using the commands on the Format menu. For example, group the buttons, and then use the Format Center In Form Horizontally command to center the pair horizontally. You must group the buttons before doing this—if you simply select both of them, VBA centers one button on top of the other so that only the uppermost button is visible.
- Set properties of the command buttons as follows: For the left-hand button (which will become the OK button), set the Name property to cmdOK, the Caption property to OK, the Accelerator property to O (that's O as in OK, not a zero), and the Default property to True. For the right-hand button (which will become the Cancel button), set the Name property to cmdCancel, the Accelerator property to A, the Caption property to Cancel, and the Cancel property to True. Leave the Default property set to False.
- Now we attach our code to this form. Dive down into the Code window by double-clicking the Cancel button to display a procedure associated with it:
Private Sub cmdCancel_Click()

End Sub
Recall that the Editor chooses to create a procedure for the most common event for whatever control (or the form) you double-click to get down into the code window. For most controls, this will be the Click event, as it is for the CommandButton control.
Type an End statement between the lines:
Private Sub cmdCancel_Click()
    End
End Sub
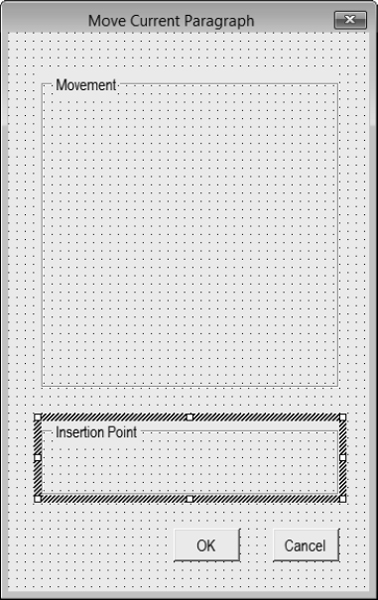

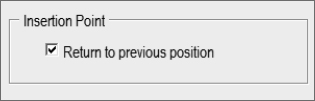

This End statement removes the form from the screen and ends the current procedure—in this case, the Move_Current_Paragraph procedure.
Now you'll attach code to the OK button, which is where things get interesting. When the user clicks the OK button, the procedure needs to continue executing and do all of the following:
- Remove the dialog box from display by hiding it or by unloading it (or, preferably, both). As discussed earlier in the chapter, the choice is yours, but using both commands is usually clearest.
- Check the Value property of the check box to see whether it was selected or cleared.
- Check the Value property of each option button in turn to see which of them was selected when the OK button was clicked.
Now continue creating the Move Current Paragraph dialog box:
- 8. Double-click the OK button to display the code attached to it. (If you're still working in the Code window, select cmdOK in the Object drop-down list (on the top left of the Code window). The editor automatically creates the Click event procedure for this button.
First, enter the following two lines between the Private Sub and End Sub lines:
frmMoveParagraph.Hide
Unload frmMoveParagraph
The frmMoveParagraph.Hide line activates the Hide method for the frmMoveParagraph user form, hiding it from display on the screen. The Unload frmMoveParagraph line unloads the dialog box from memory.
REMOVING A FORM CAN PREVENT CONFUSION
It isn't necessary to hide or unload a form to continue execution of a procedure, but if you don't, users may become confused. For example, if you click the OK button on a Print dialog box in a Windows application, you expect the dialog box to disappear and the Print command to be executed. If the dialog box didn't disappear (but it launched the printing job in the background), you'd probably think it hadn't registered your click, so you'd click again and again until it went away. Then you'd print multiple copies, which is so wrong.
- 9. Next, the procedure needs to check the Value property of the chkReturnToPreviousPosition check box to find out whether to insert a bookmark in the document to mark the current position of the insertion point. To do this, enter a straightforward If… Then statement:
If chkReturnToPreviousPosition = True Then
End If
If the chkReturnToPreviousPosition statement is set to True—that is, if the check box is selected—the code in the lines following the Then statement runs. The Then statement consists of the lines for inserting a bookmark that you recorded earlier. Cut these lines from the procedure and paste them into the If… Then statement like this:
If chkReturnToPreviousPosition = True Then
   With ActiveDocument.Bookmarks
       .Add Range:=Selection.Range, Name:=" Move_Paragraph_Temp"
   End With
End If
If the check box is selected, the procedure inserts a bookmark; if the check box is cleared, the procedure passes over these lines.
- 10. Next, right after the End If, paste in the code for selecting the current paragraph and cutting it to the Clipboard:
Selection.Extend
Selection.Extend
Selection.Extend
Selection.Extend
Selection.Cut
- 11. After this, you need to retrieve the Value properties from the option buttons to see which one was selected when the user chose the OK button in the dialog box. For this, you can again use an If condition—this time, an If… Then ElseIf… Else condition, with the relevant insertion-point-movement lines from the recorded procedure pasted in:
If optUpOne = True Then
    Selection.MoveUp Unit:=wdParagraph, Count:=1
ElseIf optUpTwo = True Then
    Selection.MoveUp Unit:=wdParagraph, Count:=2
ElseIf optDownOne = True Then
    Selection.MoveDown Unit:=wdParagraph, Count:=1
Else
    Selection.MoveDown Unit:=wdParagraph, Count:=2
End If
Selection.Paste
Here, optUpOne, optUpTwo, optDownOne, and optDownTwo (which uses the Else statement here and therefore isn't specified by name in the listing) are the four option buttons from the dialog box, representing the choice to move the current paragraph up one paragraph, up two paragraphs, down one paragraph, or down two paragraphs, respectively.
The condition is straightforward: If optUpOne is True (that is, if the option button is selected), the first Then condition runs, moving the insertion point up one paragraph from its current position (after the current paragraph is cut, the insertion point will be at the beginning of the paragraph that was after the current one). If optUpOne is False, the first ElseIf condition is evaluated; if the condition evaluates to True, the second Then condition runs; and if the condition evaluates to False, the next ElseIf condition is evaluated. If that conditiona, too, turns out to be False, the Else code is run. In this case, the Else statement means that the optDownTwo option button was selected in the dialog box, so the Else code moves the insertion point down two paragraphs.
Wherever the insertion point ends based on which option button the user chose, the next line of code (Selection.Paste) pastes in the cut paragraph from the Clipboard.
- 12. Finally, the procedure must return the insertion point to where it was originally if the chkReturnToPreviousPosition check box is selected. Again, you can test for this with a simple If… Then condition that incorporates the go-to-bookmark and delete-bookmark lines from the recorded procedure:
If chkReturnToPreviousPosition = True Then
    Selection.GoTo What:=wdGoToBookmark, _
        Name:=" Move_Paragraph_Temp"
    ActiveDocument.Bookmarks("Move_Paragraph_Temp").Delete
End If
If the chkReturnToPreviousPosition check box is selected, VBA moves the insertion point to the temporary bookmark and then deletes that bookmark.
Listing 14.1 shows the full listing for the cmdOK button.
LISTING 14.1: The full listing
 1. Private Sub cmdOK_Click()
 2.     frmMoveParagraph.Hide
 3.     Unload frmMoveParagraph
 4.     If chkReturnToPreviousPosition = True Then
 5.        With ActiveDocument.Bookmarks
 6.            .Add Range:=Selection.Range, _
                   Name:="Move_Paragraph_Temp"
 7.        End With
 8.   End If
 9.   Selection.Extend
10.   Selection.Extend
11.   Selection.Extend
12.   Selection.Extend
13.   Selection.Cut
14.   If optUpOne = True Then
15.       Selection.MoveUp Unit:=wdParagraph, Count:=1
16.   ElseIf optUpTwo = True Then
17.   Selection.MoveUp Unit:=wdParagraph, Count:=2
18.   ElseIf optDownOne = True Then
19.       Selection.MoveDown Unit:=wdParagraph, Count:=1
20.   Else
21.       Selection.MoveDown Unit:=wdParagraph, Count:=2
22.   End If
23.   Selection.Paste
24.   If chkReturnToPreviousPosition = True Then
25.       Selection.GoTo What:=wdGoToBookmark, _
              Name:="Move_Paragraph_Temp"
26.       ActiveDocument.Bookmarks("Move_Paragraph_Temp").Delete
27.     End If
28. End Sub
Go ahead and try it. To test this example properly, you should remove the bookmark you inserted while recording the macro earlier in this chapter. To remove it, click the Bookmark item in the Links section in the Insert tab on Word's Ribbon. In the Bookmarks dialog box that opens, select Move_Paragraph_Temp and click the Delete button.
Now open the scratch document in Word that you created earlier in this chapter and filled with several paragraphs of text. Press Alt+F11 to open the Visual Basic Editor. Double-click frm-MoveParagraph in the Project Explorer to display the user form. Press F5 to run this procedure. Click the OK button in your user form and observe that the paragraphs were rearranged in the document.
General Example: Opening a File from a List Box
This next example displays a user form that employs a list box from which the user can select a file to open. The user form is simple, as is its code. The macro includes a loop and an array to gather the names of the files in a folder and then displays the filenames in the list box. The user gets to select a file and click the Open button to open it. Figure 14.21 shows the user form in action, displaying Excel files.
FIGURE 14.21 The user form you'll build in this example contains a list box that gives the user quick access to all current files.
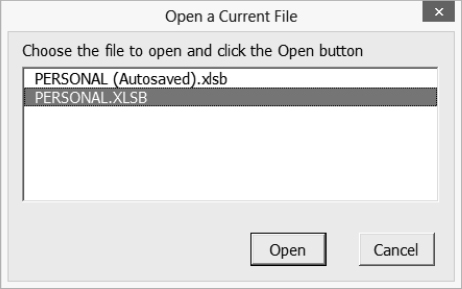
You can adapt this example to any of the Office 2013 applications discussed in this book by changing the filename to an appropriate type for that application and also modifying a couple of the key statements. The version of this example we'll look at now shows you how to create the procedure in Excel.
BUILDING THE USER FORM
Follow these steps to build the user form:
- Start the application you want to work in. The example uses Excel.
- Display the Visual Basic Editor by pressing the Alt+F11 key or by clicking the Visual Basic icon in the Ribbon's Developer tab.
- In the Project Explorer, right-click the project to which you want to add the user form and choose Insert UserForm from the context menu to insert a default-size user form in the project.
- Drag the handle at the lower-right corner of the user form to the right to make the user form a bit wider.
- Set the Name property of the form to frmOpen_a_Current_File and its Caption to Open a Current File. Check the Width property. You want it to be about 350 pixels wide.
- Click the Label button in the Toolbox, and then click in the upper-left corner of the user form to place a default-size label there. Activate the Properties window and set the properties of the label as shown in Table 14.9.
- Click the ListBox button in the Toolbox, and then click below the label in the user form to place a default-size list box there. Set its properties as shown in Table 14.10.
- Double-click the CommandButton button in the Toolbox, and then click twice at the bottom of the user form to place two default-size command buttons there. Set their properties as shown in Table 14.11.
- Arrange the command buttons as follows:
- Click the cmdCancel button to select it, and then drag it close to the cmdOK button.
- With the cmdCancel button still selected, Ctrl+click the cmdOK button to add it to the selection.
- Choose Format Group to group the buttons.
- Choose Format Center In Form Horizontally to center the buttons horizontally in the form.
- Drag the group up or down as necessary.
(Or just drag them around and eyeball them into a pleasing position.)
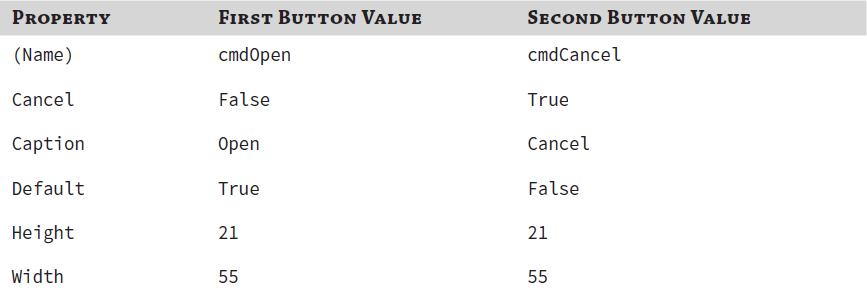
Creating the Code for the User Form
Follow these steps to create the code for the user form:
- With the user form selected, press the F7 key to display the user form's code sheet.
- In the declarations portion of the code sheet (just keep pressing the up-arrow key until you move to the very top of the Code window), enter an Option Base 1 statement to make the array numbering start at 1 instead of at 0:
Option Base 1
- Make sure that UserForm is selected in the Object drop-down list (top left of the code sheet), and then pull down the Procedure drop-down list (top right) and choose Initialize from it. The Visual Basic Editor enters the stub of an Initialize procedure in the code sheet, like this:
Private Sub UserForm_Initialize()

End Sub
- Enter the statements for the Initialize procedure shown in Listing 14.2.
- In the Object drop-down list, select cmdCancel. The Visual Basic Editor enters the stub of a Click procedure, as shown here. (Click is the default event for the CommandButton control, so the Visual Basic Editor assumes that you want to create a Click procedure.)
Private Sub cmdCancel_Click()

End Sub
- Enter the statements for the cmdCancel_Click procedure shown in Listing 14.2.
- In the Object drop-down list, select cmdOpen. The Visual Basic Editor enters the stub of a Click procedure.
- Enter the statements for the cmdOpen_Click procedure shown in Listing 14.2.
- Customize line 9 (in the Initialize procedure) and line 32 (in the cmdOpen_Click procedure) so that the code will work with the application you're using, as shown in the following list. The procedure as shown is set up to run for Excel, but you'll probably need to change the path to reflect where the target files are on your computer.
- For Word, change theWorkbooks.Open statement to Documents.Open:
If lstFiles.Value <> "" Then Documents.Open _ Filename:="c: ransfer" & lstFiles.Value - For PowerPoint, change the Workbooks.Open statement to Presentations.Open:
If lstFiles.Value <> "" Then Presentations.Open _
   Filename:="c:	ransfer" & lstFiles.Value
- For Word, change theWorkbooks.Open statement to Documents.Open:
Listing 14.2 shows the full version of the code behind the Open a Current File user form.
LISTING 14.2: Using a ListBox to open a file
 1. Option Base 1
 2.
 3. Private Sub UserForm_Initialize()
 4.
 5.     Dim strFileArray() As String
 6.     Dim strFFile As String
 7.     Dim intCount As Integer
 8.
 9.     strFFile = Dir("c:	ransferspreads*.xlsb")
10.     intCount = 1
11.
12.     Do While strFFile <> ""
13.        If strFFile <> "." And strFFile <> ".." Then
14.            ReDim Preserve strFileArray(intCount)
15.            strFileArray(intCount) = strFFile
16.            intCount = intCount + 1
17.            strFFile = Dir()
18.        End If
19.     Loop
20.
21.     lstFiles.List() = strFileArray
22.
23. End Sub
24.
25. Private Sub cmdCancel_Click()
26.     Me.Hide
27.     Unload Me
28. End Sub
29.
30. Private Sub cmdOpen_Click()
31.     Me.Hide
32.     If IstFiles.Value <> "" Then Workbooks.Open _
            Name:="c:	ransferspreads" & lstFiles.Value
33.     Unload Me
34. End Sub
Listing 14.2 contains all the code that appears on the code sheet for the frmOpen_a_Current_File user form: a declarations section and three event procedures.
In the declarations section, line 1 contains the Option Base 1 statement, which makes any array used on the code sheet begin at 1 rather than at 0. Line 2 is a spacer.
Here's what happens in the UserForm_Initialize procedure (lines 3 to 23):
- Line 3 begins the Initialize procedure for the user form. Line 4 is a spacer.
- Line 5 declares the String array variable strFileArray. Line 6 declares the String variable strFFile. Line 7 declares the Integer variable i ntCount. Line 8 is a spacer.
- Line 9 assigns to strFFile the result of a directory operation on the designated folder (here, c: ransferspreads), but substitute your own path to a folder on your computer that contains files with an .xlsb filename extension. Enter your own path in line 32 as well.
- Line 10 sets the intCount counter to 1. Note that if you don't use the OptionBase 1 declaration for this procedure, you need to set Count to 0 (or the corresponding value for a different option base that you use). The first call to Dir, which specifies the pathname in an argument, returns the first file it finds in the folder (assuming it finds at least one file). Each subsequent call without the argument returns the next file in the folder, until Dir finds no more files.
- Line 11 is a spacer. Lines 12 through 19 contain a Do While…Loop loop that runs while strF-File isn't an empty string (""):
- Line 13 makes sure that strFFile isn't a folder by comparing it to the single period and double period used to denote folders. If strFFile isn't a folder, line 14 uses a ReDim Preserve statement to increase the dimensions of the strFileArray array to the number in intCount while retaining the current information in the array, thus building the list of files in the folder.
- Line 15 assigns to the intCount index of the strFileArray array the current contents of strFFile.
- Line 16 then adds 1 to intCount, and Line 17 sets strFFile to the result of the Dir function (the first filename matching the *.xlsb pattern in the designated folder).
- Line 18 ends the If condition. Line 19 contains the Loop keyword that will continue the loop as long as the Do While statement is True.
- When the loop ends, line 21 sets the List property of the lstFiles list box in the dialog box to the contents of strFileArray, which now contains a list of all the files in the folder.
- Line 22 is a spacer, line 23 ends the procedure, and line 24 is another spacer.
Here's what happens in the cmdCancel_Click procedure (lines 25 through 28):
- Line 25 starts the cmdCancel_Click procedure, and line 28 ends it.
- Line 26 hides the user form, using the Me keyword to reference it.
- Line 27 unloads the user form from memory.
Here's what happens in the cmdOpen_Click procedure (lines 30 through 34):
- Line 30 starts the cmdOpen_Click procedure, and line 34 ends it.
- Line 31 hides the user form, again by using the Me keyword.
- Line 32 checks to make sure the Value property of the lstFiles list box is not an empty string ("") and, if it is not, uses the Open method of the Documents collection to open the file selected in the list box. The statement adds to the path (c: ransfer spreads) the Value property of the list box to produce the full filename. Substitute your own path for c: ransferspreads.
- Line 33 unloads the user form from memory.
Remember that to test this example, you'll need to adjust lines 9 and 32 to include a file path on your machine where some XLSB files are stored. For Excel 2013, try this location: C:UsersYourNameAppDataRoamingMicrosoftExcelXLSTART.
Using an Application's Built-in Dialog Boxes from VBA
Some applications, such as Word and Excel, let you use their built-in dialog boxes via VBA. If a built-in dialog box offers the functionality you need, using it can be a great solution: you don't have to build a custom dialog box, just reference the built-in dialog box in your code.
You shouldn't even need to debug the dialog box, and users of your procedures will probably be familiar with the dialog box from their work in the application. These built-in dialog boxes are called common dialog boxes, and we explored them briefly in the sidebar titled “Control a For… Next Loop with User Input via a Dialog Box” in Chapter 12.
Displaying a Built-in Dialog Box
To display a built-in dialog box, you need to know its name and constant. You also must decide which method to use to display the dialog box.
FINDING THE DIALOG BOX NAME AND CONSTANT
Although Office 2013 no longer uses menus (with some exceptions, such as the Visual Basic Editor), built-in dialog boxes (in Word and other applications) are still identified by constants derived from the older, pre-Ribbon menu-style interface. These constants start with the letters wdDialog (as in Word Dialog), followed by the name of the dialog box.
The name of the dialog box is derived from the pre–Office 2010 menu commands that displayed the dialog box prior to the introduction of the Ribbon interface (with Office 2007). For example, to refer to the Open dialog box, you use the constant wdDialogFileOpen, because in previous versions of Word, you would have chosen File ![]() Open to display that dialog box.
Open to display that dialog box.
Or to display the Print dialog box (the old File ![]() Print options), you use the constant wdDialogFilePrint, and to display the Options dialog box (Tools
Print options), you use the constant wdDialogFilePrint, and to display the Options dialog box (Tools ![]() Options), you use the constant wdDialogToolsOptions.
Options), you use the constant wdDialogToolsOptions.
So, although the user interface has evolved beyond classic menus, the menu structure itself remains as part of the classification system for internal objects—such as these constants used to identify various dialog boxes.
Excel follows a similar but less rigid taxonomic convention. Built-in Excel dialog boxes are (for backward compatibility with older macro code) still identified by constants starting with the letters xlDialog followed by the name of the dialog box. The name of the dialog box is derived either from the classic menu commands that were required to display it or from the dialog box's title. For example, to refer to the Open dialog box, you use the constant xlDialogOpen (rather than xlDialogFileOpen).
Anyway, the easiest way to find the name for the built-in dialog box you need is to search the Visual Basic Editor's Help system for “Built-in Dialog Box Argument Lists” in Word or Excel. (Access employs a whole different system for common dialog boxes, requiring the importation of object libraries using its Visual Basic Editor's Tools ![]() References menu and the employment of specialized objects.)
References menu and the employment of specialized objects.)
You can also view a list of Word or Excel built-in dialog boxes by displaying the Object Browser (press F2 in the Editor) and typing wddialog (for Word) or xldialog (for Excel) in the Search textbox.
You use these constants with the Dialogs property, which returns the Dialogs collection object, which in turn contains all the built-in dialog boxes in the host application.
For example, to display Word's Save As dialog box, you use the Show method, as illustrated in the following statement:
Dialogs(wdDialogFileSaveAs).Show
It's as simple as that. To display Word's Replace dialog box, just substitute wdDialogEditReplace for wdDialogFileSaveAs.
THE Dialogs COLLECTION IS CREATABLE IN WORD, BUT NOT IN EXCEL
In Word, the Dialogs collection is a “creatable object,” meaning you can access it directly without going through the Application object. In Excel, however, the Dialogs collection is not creatable, so you must always add the Application object to this code, like this:
Application.Dialogs (xlDialogOptionsGeneral).Show.
CHOOSING BETWEEN THE SHOW METHOD AND THE DISPLAY METHOD
VBA provides two methods of displaying built-in dialog boxes onscreen: Show and Display:
- The Show method shows the specified Dialog object and then uses functions built into the Dialog object to carry out the user's requests. You don't need to write any code of your own. For example, if you use the Show method to display the wdDialogFileSaveAs dialog box and the user enters a name for the file in the File Name box and clicks the Save button, VBA itself automatically saves the file with the given name in the specified folder (and with any other options the user chose). You didn't write any programming to save this file.
- The Display method merely displays the dialog box onscreen, but it does not execute the actions the user requests in the dialog box. Instead, it allows you to fetch the settings (the user's requests and selections) from the dialog box once the user dismisses it, but then you must write your own code to carry out what the user requested.
DISPLAYING A PARTICULAR TAB OF A WORD DIALOG BOX
If the dialog box you want to display has tabs, you can display the tab of your choice by specifying the DefaultTab property. You refer to a tab by the name of the dialog box plus the word Tab and the name of the tab. For example, the constant for the Bullets And Numbering dialog box is wdDialogFormatBulletsAndNumbering, and the constant for its Outline Numbered tab is wdDialogFormatBulletsAndNumberingTabOutlineNumbered. Likewise, the Font dialog box is referred to as wdDialogFormatFont, and its Character Spacing tab is referred to as wdDialogFormatFontTabCharacterSpacing. You could display this tab by using the following statements:
With Dialogs(wdDialogFormatFont)
    .DefaultTab = wdDialogFormatFontTabCharacterSpacing
    .Show
End With
To get a list of all the tab constants, search for wdWordDialogTab in the Object Browser.
USING THE SHOW METHOD TO DISPLAY AND EXECUTE A DIALOG BOX
The Show method displays the specified dialog box and automatically responds to whatever actions the user takes in it. Show is useful when your user is merely going to perform a conventional interactive action. As a simple example, in a procedure that's supposed to perform certain formatting tasks on the current document, you could check to make sure a document was open before attempting to perform the formatting; then, if no document was open, you could display the built-in Open dialog box so that the user could open a file. (You might precede the Open dialog box with a message box explaining the problem.) Listing 14.3 shows the code for this part of the procedure.
LISTING 14.3: Using a common dialog box
 1. If Documents.Count = 0 Then
 2.     Proceed = MsgBox("There is no document open."
            & vbCr & vbCr & _
            "Please open a document for the procedure to work on.",
            vbOKCancel + vbExclamation, "Format Report")
 3.     If Proceed = vbOK Then
 4.         Dialogs(wdDialogFileOpen).Show
 5.         If Documents.Count = 0 Then End
 6.     Else
 7.         End
 8.     End If
 9. End If
10. 'rest of procedure here
- Line 1 checks the Count property of the Documents collection to see if no documents are open; if that's the case, the statements in lines 2 through 8 run.
- Line 2 displays a message box informing users that no document is open and asking them to open one for the procedure to work on. The message box has OK and Cancel buttons and stores the button chosen in the variable Proceed.
- Line 3 checks to see if the OK button was chosen; if it was, line 4 displays the Open dialog box so that users can select the file, which VBA will open when they click the Open button in the Open dialog box.
- Users can cancel the procedure at this point by clicking the Cancel button in the Open dialog box, so line 5 checks the Count property of the Documents collection again and uses an End statement to terminate execution of the procedure if there is still no document open.
- If the OK button was not chosen, execution moves from line 3 to the Else statement in line 6, and the End statement in line 7 ends execution of the procedure.
- Line 8 contains the End If statement for the nested If statement, and line 9 contains the End If statement for the outer If statement.
- Line 10 contains a comment to indicate that you'd write more code here—the rest of the procedure would run from this point, which is reached only if a document is open.
USING THE DISPLAY METHOD TO DISPLAY A DIALOG BOX
Remember that unlike the Show method, the Display method displays a built-in dialog box but doesn't respond to any actions the user takes in the dialog box. Instead, you must write code that checks the settings that the user chose in the dialog box and then write more code to carry out the user's wishes. When you use the Display method, the user gets to work with familiar dialog boxes, but you totally control the behavior that results from that interaction.
For example, you'll often need to find out which folder a procedure should be working in, such as when you need the location of a number of documents that the user wants to manipulate. To get the folder, you could display a straightforward input box and prompt the user to type in the correct path to the folder—if the user knows the path and can type it in correctly.
Perhaps a better solution is to display a list box containing the tree of drives, folders, and files on the user's hard drive, but to do this you need to dimension an array and fill it with the folders and filenames, and you need to refresh the display every time the user moves up or down the tree—quite a lot of programming work.
So why not just borrow all this functionality from a built-in common dialog box? It's already part of the Office applications. You can achieve the same result much more easily by using a built-in dialog box that has the tree built in (for example, the Open dialog box) and then retrieving the user's responses for your own purposes.
If you need to execute the settings (user choices) in a built-in dialog box, you can use the Execute method. But you might want to check the user's selections in the dialog box before implementing them. If you find a problem, you could then, for example, display a dialog box of your own, such as an Input Box, asking for clarification.
Setting and Restoring Options in a Built-in Dialog Box
Most of the built-in Word and Excel dialog boxes have arguments that you can use for retrieving or setting values in the dialog box. For example, the Open dialog box in Word has arguments for Name, ConfirmConversions, ReadOnly, LinkToSource, AddToMru (adding the document to the Most Recently Used document list on the Recent section of the File tab on the Ribbon), PasswordDoc, and more. Some of these are options that you'll see in the Open dialog box itself; others are associated options that you'll find on the various tabs of the Options dialog box. You can guess some argument names from the names of the corresponding controls in the dialog box, but other names aren't directly related. To learn the names, search for “Built-in Dialog Box Argument Lists” in the VBA Editor's Help system (choose MSDN on the Web, then search with Bing).
For example, the following statements set the contents of the File Name text box in the Save As dialog box in Word and then display the dialog box:
With Dialogs(wdDialogFileSaveAs)
    .Name = "Yellow Paint Primer"
    .Show
End With
Be aware that some arguments that applied to dialog boxes displayed by Office 2003 no longer apply to Office 2007, 2010, or 2013 dialog boxes. So you may need to experiment a bit to see if a particular legacy argument is still useful in the Office 2013 interface.
If you change the settings in a dialog box that uses sticky (persistent) settings, it's a good idea to change them back at the end of your procedure so that users don't get unexpected results the next time they open the dialog box.
Which Button Did the User Choose in a Dialog Box?
To find out which button the user clicked in a dialog box, check the return value of the Show method or the Display method. The return values are shown in Table 14.12.
TABLE 14.12: Click return values
| RETURN VALUE | BUTTON CLICKED |
| −2 | Close |
| −1 | OK |
| 0 | Cancel |
| 1 | The first command button |
| 2 | The second command button |
| >2 (greater than 2) | Subsequent command buttons |
For example, you might want to cancel your whole procedure if the user clicks the Cancel button in a dialog box, like this:
If Dialogs(wdDialogFileOpen).Show = 0 Then End
Specifying a Time-Out for a Dialog Box
In some applications, including Word, you can display some built-in dialog boxes for a specified time rather than having them stay open until the user dismisses them by clicking OK or Cancel or some other button. To do so, you use the TimeOut Variant argument with the Show method or the Display method. You specify TimeOut as a number of units, each of which is approximately a thousandth of a second. (If the system is busy with many other tasks, the actual result might be a slightly longer delay.) So you could display the General page of the Word Options dialog box for about 10 seconds—long enough for the user to check the Name setting and change it if necessary—by using the following statements:
With Dialogs(wdDialogToolsOptions)
    .DefaultTab = wdDialogToolsOptionsTabUserInfo
    .Show (10000)
End With
THE TIMEOUT ARGUMENT DOESN'T WORK WITH CUSTOM DIALOG BOXES
TimeOut doesn't work with custom dialog boxes you create, only with the built-in Word dialog boxes. Also, some built-in Word dialog boxes—such as the New dialog box (wdDialogFileNew) and the Customize dialog box (wdDialogToolsCustomize)—don't recognize the TimeOut option either.
Timing out a dialog box is especially useful for noncritical information like the username in this example because it allows the procedure to continue even if the user has left the computer. Likewise, you might want to TimeOut a Save As dialog box in which the procedure suggested a viable filename but allowed users to override it if they were present. However, for a procedure in which the user's input is essential, you won't want to use the TimeOut argument. You want to compel the user to respond by at least clicking a button; in this context, the dialog box should not disappear all by itself via this timeout technique.
The Bottom Line
Understand what you can do with a custom dialog box. Custom dialog boxes—user interfaces you design as forms in the Visual Basic Editor—are often needed in macros and other kinds of Office automation. You might, for example, want to display a dialog box that allows the user to specify whether to let a macro continue beyond a certain point in its code or cease execution. Perhaps your macro is searching through a document for a particular phrase; then when it finds that phrase, it displays a dialog box to users asking if they want to continue further.
Master It Which VBA statement would you use to stop a macro from continuing execution?
Create a custom dialog box. You use the Visual Basic Editor to both design a custom dialog box (form) and write code for macros. You can attach the various controls to a form and then enter code behind the dialog box.
Master It How do you switch between the form-design window (sometimes called the object window) and the Code window in the Visual Basic Editor?
Add controls to a dialog box. It's easy in the Visual Basic Editor to add various controls—such as command buttons and text boxes—to a user form (a custom dialog box).
Master It How do you add a command button to a custom dialog box?
Link dialog boxes to procedures. Buttons, check boxes, option buttons—displaying various controls to the user is fine, but unless you write some code behind these various user-interface objects, what's the point? Your macro's user shouldn't discover that clicking a button does nothing.
Dialog boxes often display objects with which users can communicate their wishes to your code. Therefore, you write code that explores the values the user enters into controls and responds to whatever buttons the user might click.
Master It Create a small custom dialog box that displays a message in a label control saying, “Would you like to know the current date and time?” Put an OK button and a Cancel button on this form. Write code that simply ends the procedure if the user presses the Cancel button but that displays the date and time in the label if the user clicks the OK button. If the user clicks OK a second time, end the procedure.
Retrieve the user's choices from a dialog box. A major task of most dialog boxes is retrieving values that the user has specified in various controls by selecting check boxes and so on. Then you write code to carry out the user's wishes based on these retrieved values. This interaction via dialog box is the typical way that a user communicates with your procedures, and vice versa.
Master It Create a new dialog box that contains three option buttons captioned Small, Medium, and Large and named optSmall, optMedium, and optLarge. Write code in each option button's Click procedure to change the button's caption to boldface when the button is clicked.