
Chapter 17
Debugging Your Code and Handling Errors
In this chapter, you'll learn some of the things that can go wrong in your VBA code and what you can do about them. You'll examine the types of errors that can occur, from simple typos to infinite loops to errors that occur only once in a while (intermittent bugs are usually the hardest to locate).
The chapter starts by explaining the basics of debugging. Then you'll work with the tools that VBA offers for debugging VBA code and use them to get the bugs out of some examples. The end of the chapter discusses the various ways to have your program itself respond to errors that happen during runtime.
In this chapter you will learn to do the following:
- Understand the basic principles of debugging
- Recognize the four different types of errors you'll create
- Employ VBA's debugging tools
- Deal with runtime errors
Principles of Debugging
A bug is an error in hardware or software that causes a program to execute other than as intended. Debugging means removing the bugs from hardware or software.
WHERE DID THE TERM BUG COME FROM?
There are various explanations of the etymology of the word bug as used in computer programming, ranging from apocryphal stories of moths being found in the circuit boards of malfunctioning computers to musings that the word came from the mythological bugbear, an unwelcome beast. But in fact, the term bug has been used to mean something troublesome for centuries. For more information, see the “bug” entry in the Free On-line Dictionary of Computing at a site such as http://foldoc.org/.
Your goal when debugging should be to remove all bugs from your code. Your order of business will probably go something like this:
- First, test your code to see whether it works as it should. Put it through its paces. Test it by running the procedure once or twice using suitable files or other appropriate data. Try all the options the macro makes available to the user. Even if it seems to work, continue testing for a reasonable period with various data from various sample documents before unleashing the procedure on the world (or your colleagues).
- If your code doesn't work as you expected it to, you'll need to debug it. That means following the techniques described in this chapter to locate the bugs and then remove them. Once you've removed all the bugs that you can find, retest the code as described in the first step. This is important, because sometimes the act of debugging itself introduces new bugs.
- When testing your code, try to anticipate unusual, perhaps exotic ways that users might employ your code. For example, you might write a sophisticated procedure for manipulating a Word document on the (perfectly reasonable) assumption that the document will be open when the user starts the procedure running. You can test it on sample documents until you're blue in the face and it'll work fine every time. But if a user tries to run the procedure without first opening a document, it crashes.
And don't make fun of this user. It might seem sensible to users that the procedure should be launched before a file is loaded. Users might expect the procedure to display an input box asking them which document they want to manipulate. And more important, users also expect that you will anticipate and handle unexpected errors without crashing your programming. There are ways to trap unanticipated user behavior or other runtime errors and respond to them gracefully. What does your program do if the user attempts to save a file to a disk that's full, for example? Just crash and thereby lose all the information they've spent time typing in?
- When you're ready to distribute your procedure, you may want to write instructions for its use. In these instructions, you may also need to document any bugs that you can't squash or circumstances under which the procedure shouldn't be run. But it's better to build instructions, responses to unanticipated problems, and other kinds of error trapping into the macro itself Try to make your code bulletproof.
Debugging a procedure tends to be idiosyncratic. There's no magic wand that you can wave over your code to banish bugs (although the VBA Editor does its best to help you eliminate certain types of errors from your code as you create it). Moreover, such simple things as forgetting to initialize a variable can wreak havoc on your code.
You'll probably develop your own approach to debugging, partly because your programming will inevitably be written in your own style. But when debugging, it helps to focus on understanding what the code is supposed to do. You then correlate this with your observations of what the code actually does. When you reconcile the two, you'll probably have worked out how to debug the procedure.
Also, the longer and more complex your code, the higher the probability that it will contain bugs. Certain kinds of bugs occur because of interactions among the parts of a project. And obviously the larger the project, the more parts with potential side effects. So keep your code as simple as possible by breaking it into separate procedures and modules, as discussed in Chapter 16, “Building Modular Code and Using Classes.” Small code sections, with distinct, small tasks to accomplish, are almost always easier to debug than large lumps of code that try to do several things all at once. Remember that most debugging is a matter of locating where in your code the problem occurs. If you're testing a small module of code with a very easily specified objective, locating a bug is that much easier.
The Different Types of Errors
You'll encounter four basic kinds of errors in your programming:
- Language errors
- Compile errors
- Runtime errors
- Program logic errors
The following sections look at these kinds of errors in turn and discuss how to prevent them. After that, you'll examine the tools VBA provides for debugging.
Language Errors
The first type of error is a language error (also known as a syntax error). When you mistype a word in the Code window, omit a vital piece of punctuation (and in programming, all punctuation is vital), scramble a statement, or leave off the end of a construction, that's a language error. If you've worked your way through the book to this point, you've probably already made dozens of language errors as part of the learning process and through simple typos.
VBA helps you eliminate many language errors as you create them, as you'll see later in this chapter. Those language errors that the VBA Editor doesn't catch as you type them in usually show up as compile errors during runtime testing, so the next section shows you examples of both language errors and compile errors.
Compile Errors
Compile errors occur when VBA can't compile a statement correctly—that is, when VBA can't turn a statement that you've entered into viable code.
For example, if your programming tells VBA to use a certain property for an object that doesn't have that property, a compile error results. Compilation is the act of turning your source code (the programming you type into the Editor) into the lower-level commands understandable by the computer. For example, when you press F5 to execute your program, VBA starts off by compiling your programming. If it finds a problem during compilation, it displays an error message.
The good news is that the VBA Editor detects many language errors and some compile errors as soon as you move the insertion point from the offending line. You don't even have to press F5 in many cases. For example, try typing the following statement in the Code window and pressing Enter to create a new line (or pressing ↑or ↓ to move to another line, or clicking the mouse in another line in the macro):
If X > Y
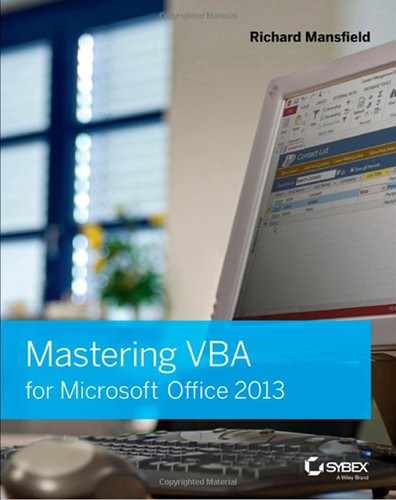
The VBA Editor displays the compile error “Expected: Then or GoTo” (see Figure 17.1) to tell you that the statement is missing a vital element: it should say If X > Y Then or If X > Y GoTo. (If you don't see the error message, there are two possibilities: Either you have turned off the Auto Syntax Check option [Tools ![]() Options] or you didn't actually type it in by hand and press Enter.)
Options] or you didn't actually type it in by hand and press Enter.)
FIGURE 17.1 The VBA Editor helps debug your code by identifying many compile errors as it checks the statements you enter.
Every time you enter a line of code, the Editor examines that line for completeness and accuracy. In this example, VBA knows that when the code contains an If command, there must be a subsequent Then or Goto command. And so the Editor rejects the line and informs you what the problem is.
This vigilance on the part of the VBA Editor prevents you from running into this type of error deep in the execution of your code.
 Real World Scenario
DECIDE FOR YOURSELF IF YOU LIKE THE AUTO SYNTAX CHECK FEATURE
This chapter assumes that you're keeping VBA's Auto Syntax Check feature and other features switched on. If you have Auto Syntax Check turned off (Tools ![]() Options
Options ![]() Editor tab), you won't see the error message displayed in Figure 17.1. Instead, the only warning you get about that incomplete line of code is that the VBA Editor turns the line red. Code turned red is the Editor's way of telling you that it's choking on your inadequate programming. You can either try to fix the error right then or keep on coding—putting off the debugging process until you've sketched in more code in the procedure.
Editor tab), you won't see the error message displayed in Figure 17.1. Instead, the only warning you get about that incomplete line of code is that the VBA Editor turns the line red. Code turned red is the Editor's way of telling you that it's choking on your inadequate programming. You can either try to fix the error right then or keep on coding—putting off the debugging process until you've sketched in more code in the procedure.
Some developers choose to turn off Auto Syntax Checking because they don't want to be nagged as they type in their code—it can interfere with their focus on the larger goals of the program they're writing. Working without automatic, immediate syntax checking can prove a cure worse than the disease for some programmers. But others find error message interruptions about typos annoying.
Ultimately, whether you use the Auto Syntax Check feature is a matter of personal taste. For example, some people like to be told right away if they make a spelling error in a Word document; others consider spelling errors rather tedious issues best left for later during an editing phase. They write, focusing on the main points they're trying to make, then at some later time they turn on the spell checker and fix any typos and punctuation blunders. You find a similar choice when you work at most any task. Consider woodworking: Should you hang each tool back on the wall in its appropriate place when you finish using it, or is it better to just let the saws and screwdrivers pile up around you, putting them away all at once after the coat rack is finished?
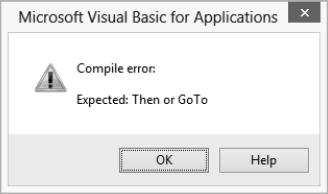
The VBA Editor notices blunders like the previous If X > Y problem easily enough, but you can also make language errors that the VBA Editor cannot identify when you move the insertion point from the line in which the blunder resides. Instead, VBA identifies these errors as compile errors later when you press F5 and it compiles the code. For example, if you enter the following statement in the Code window when working with Word, the VBA Editor doesn't detect anything wrong. But when you run the procedure by pressing F5, VBA compiles the code, discovers the error, and objects to it (see Figure 17.2):
ActiveDocument.SaveAs FileMame:="My File.docm"
FIGURE 17.2 Other errors appear only when you try to run the code.
This error is a straightforward typo—FileMame instead of FileName—but VBA won't see this particular kind of problem until it runs the code and fails to find any FileName property.
The VBA Editor sometimes indirectly helps you to notice errors of this kind while you're writing code. Say you're trying to enter a Documents.Close statement in Word and mistype Documents as Docments. In this case, the VBA Editor doesn't display the Properties/Methods list (Auto List Members) as it normally does if you have this feature turned on. You haven't entered a valid object. VBA doesn't therefore have a members list to display.
Not seeing the Properties/Methods list should alert you that something is wrong. If you continue anyway and enter the Docments.Close statement, the VBA Editor doesn't spot the mistake—it shows up as a “Run-time error 424: Object required” message (if you don't have Option Explicit on) when you try to run the procedure. (If you do have Option Explicit on, you get a “Variable not defined” compile error instead.)
The Editor gives you yet another clue that Docments.Close is an error. When you press Enter to leave this line of code, you see this:
docments.Close
Does anything here look odd to you? VBA will automatically capitalize valid objects names. But docments is not capitalized.
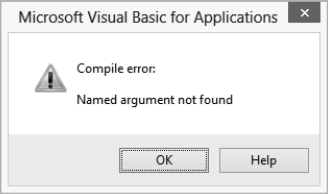
Another kind of problem is caused if you specify a property or method for an object to which that property or method doesn't apply. In this situation, VBA displays a compile error. For example, say you forget that the proper method here is Add and you enter Documents.Create instead. VBA highlights the offending word and gives the compile error “Method or data member not found” (see Figure 17.3), which tells you there's no Create method for the Documents collection. This message is displayed only during runtime, not design time (design time means when you're typing in code lines).
FIGURE 17.3 The “Method or data member not found” error tells you that you've used a method or property that isn't available for the object in question.
Runtime Errors
The third type of error is the runtime error, which occurs while code is executing. You will cause a runtime error if you write code that forces VBA to try to perform an impossible operation, such as opening a document that doesn't exist, closing a file when no file is open, or performing something mathematically impossible, such as dividing by zero.
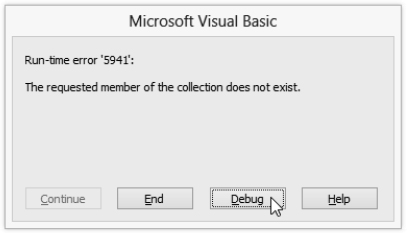
The diction, punctuation, and syntax of your code is error-free, but you're asking VBA to do something that can't be done. An unhandled runtime error results in a crash that manifests itself as a Microsoft Visual Basic dialog box displaying a runtime error number, such as the one shown in Figure 17.4.
FIGURE 17.4 An unhandled runtime error causes VBA to display a message box such as this one.

As an example of an impossible operation, consider the archetypal division by zero. The following statements give a “Run-time error ‘11’: Division by zero” message:
Dim x As Integer
x = 1 / 0
You're unlikely to enter anything as obviously wrong as this in your code (you're not nuts). A line of code like this will inevitably produce a division-by-zero error because the divisor is zero. But it's easy to enter a valid equation, such as MonthlyPay = Salary/Months, and forget to assign any value to Months (if a numeric variable is empty, it counts as a zero value) or to produce a zero value for Months by addition or some other math. Or the user can type zero into a dialog box, then your code later tries to use that as a divisor. And so on.
One way to check for runtime errors is to track the values of your variables by using the Watch window (discussed later in this chapter). To avoid possible user-input errors, have your code check their input after they close a dialog box. You can, for example, display a message explaining that zero isn't an acceptable input for their age, then display the dialog box again, expecting valid input this time around.
Program Logic Errors
The fourth type of error is the program logic error, which is characterized by valid code that nonetheless produces incorrect results. With program logic errors, the code is technically fine. VBA is able to compile and run it without noticing any errors—but you get a different result than you intended.
Program logic errors range in scope from the relatively obvious (such as performing manipulations on the wrong workbook in Excel because your code doesn't check which window is active) to the subtle (such as extending a range to the wrong character or cell). In the first example, the procedure is likely to run perfectly, but the resulting workbook will bear little resemblance to what you were trying to accomplish. In the second example, you might get a result that is almost correct—or the error might cause you to get perfect results sometimes and slightly wrong results at other times.
Program logic errors tend to be the hardest errors to fix. To nail them down, you need to trace the execution of your code and pinpoint where things start to go wrong. To do that, you almost always need to employ the debugging tools discussed in the next section.
A friend of mine wrote a very nice program to format and print forms. But while he was testing it he noticed that after working fine about five times, it suddenly sent only one-third of the form to the printer during a trial run. He couldn't get it to repeat this behavior. So he surrounded the code with a loop and let it run continuously (dumping the sample form repeatedly into a log file rather than wasting paper printing it over and over). He discovered that the error only occurred once every 256 times the program ran. He never did locate the bug, but when he gave the program to other people, he just told them that it worked “almost always.”
WHEN ERRORS AREN'T YOUR FAULT
There are two other types of errors that you may run into—even though perhaps you shouldn't. The first type is where Microsoft has documented a VBA item differently than it actually works. This shouldn't happen, but because of the complexity of VBA, it does. If you find that your code absolutely won't work even though it follows the Microsoft documentation to the letter, consider the possibility that the documentation may be incorrect. Search the Web using the VBA keywords involved to find if others have encountered this problem and learn how they've worked around it. The second type of error, a distant relation of the first type, is where one version of VBA behaves differently than another version. For example, you might create a procedure that works perfectly in Word 2010, but you have to change it to make it work with Word 2013. In an ideal world, this shouldn't happen—but as you know, this world is far from ideal. These two errors are blessedly quite rare. For one thing, VBA has been extensively used for decades, so it's a very mature language with few surprises.
VBA's Debugging Tools
VBA provides a solid assortment of debugging tools to help you remove the bugs from your procedures. The main windows you'll employ for debugging are the Immediate window, the Locals window, and the Watch window. You can access these tools in various ways, one of which is by using the Debug toolbar (shown in Figure 17.5). Four of the buttons—Design Mode, Run Sub/UserForm, Break, and Reset—are shared with the Standard toolbar. You'll learn about most of the others later in this chapter.
FIGURE 17.5 The Debug toolbar provides 13 commands for debugging your procedures.

HEISENBUGS, BOHR BUGS, AND OTHER UNCATCHABLE CRITTERS
The more complex and lengthy your code, the more likely you are to create bugs that are exceptionally difficult to catch. Usually, with determination and ingenuity, you can track down even the tougher bugs located in a single procedure. But bugs that depend on several unforeseen and improbable circumstances occurring simultaneously can be tough to isolate.
For example, an error that occurs in a procedure when the user makes a certain choice in a dialog box is relatively easy to catch. But if the error occurs only when the user has made two particular choices in the dialog box, it's much harder to locate. And if the error is contingent on a particular combination of three choices the user has made in the dialog box, or if it depends on an element in the particular file from which the procedure is getting its data, you'll likely have a much harder time pinpointing it.
Programmer folklore defines various kinds of rare bugs by assigning them names derived from such disciplines as philosophy and quantum physics. For instance, a heisenbug is defined as “a bug that disappears or alters its behavior when one attempts to probe or isolate it.” Heisenbugs are frustrating, as are Bohr bugs and mandelbugs (search online for details if you're curious). But the worst kind of bug is the schroedinbug, which is a design or implementation bug that remains quiescent until someone reads the code and notices that it shouldn't work, whereupon it stops working until the code is made logically consistent.
These bugs are, of course, ridiculous—until you start to discover bit rot at work on your code and have to explain the problem to your superiors.
Break Mode
Break mode is a vital tool for debugging your procedures because it lets you watch your code execute step by step—line by line—in the Code window (by repeatedly pressing F8). This technique is called single-stepping.
For example, if an If…Then…ElseIf…Else statement appears to be executing incorrectly, you can step through it in Break mode and watch exactly which statements are executing, and which are being skipped, to produce the bad result.
These are the easiest ways to enter Break mode:
- Click to place the blinking insertion cursor in the procedure you want to run in the Code window and press the F8 key (or click the Step Into button on the Debug toolbar, or choose Debug
 Step Into) to start stepping through it. Repeatedly press F8 to step down through the code.
 - Set one or more breakpoints in the procedure to cause VBA to halt execution and enter Break mode when it reaches one of the marked lines. A breakpoint allows you to stop execution at a particular point in your code. The easiest way to set a breakpoint is to click beside the line where you want to stop. You click in the gray margin-indicator bar to the left of the Code window. (You could also right-click in the line of code and choose Toggle Breakpoint from the context menu.) You can set any number of breakpoints. They're especially useful when you need to track down a bug that you suspect is located in a particular procedure because a breakpoint allows you to run the parts of a procedure that have no problems at full speed and then stop the procedure where you think there might be problems. From there, you can step through the suspicious statements and watch closely how they execute.
You can also enter Break mode in a couple of other ways:
- Interrupt your code by pressing Ctrl+Break and then click the Debug button in the resulting dialog box (see Figure 17.6). Normally, the only reason to enter Break mode this way is if your code gets stuck in an endless loop (which you'll typically recognize when the code appears to be doing nothing for a long time or repeating itself when you think it shouldn't be). VBA highlights the statement that was executing when you pressed Ctrl+Break, but (depending on your timing) it's unlikely to be the statement that's causing the problem in your code—it'll just be one of the statements in the offending loop. You'll then need to step through the loop to identify the aberrant statement.
FIGURE 17.6 You can enter Break mode by pressing Ctrl+Break and then clicking the Debug button in this dialog box.
- Click the Debug button in a runtime-error dialog box such as the one shown in Figure 17.7. In the Code window, VBA highlights the statement that caused the error. (You can also click the Help button in the runtime-error dialog box to get an explanation of the error before clicking the Debug button.)
FIGURE 17.7 Entering Break mode from a runtime error dialog box like this one takes you straight to the offending statement in your code. The problem code will be highlighted in yellow.

ACCESS'S SINGLESTEP METHOD
In addition to hosting a full version of VBA, Access includes a unique, legacy macro-design tool called the Macro Builder. This book doesn't spend much time with the Builder feature because Access's VBA offers much more capability and flexibility than its Builder. However, if you want to experiment with the Macro Builder, in Access click on the Ribbon's Create tab, then click the Macro icon on the far right. One interesting command (added to the Builder in Access 2007) is the SingleStep method of the DoCmd object. This operates somewhat like a breakpoint, dropping you into Break mode during execution and displaying Access's specialized Macro Single Step dialog box. You can insert DoCmd.SingleStep into a VBA macro as well. VBA recognizes it as a legitimate line of code. However, VBA just ignores this statement during runtime. Only macros created in the Access Builder will respond to this SingleStep method.
The Step Over and Step Out Commands
In Chapter 3, “Editing Recorded Macros,” you learned how to step through a procedure by repeatedly pressing the F8 key to issue the Step Into command, going down the lines one at a time. (You can also issue this command by clicking the Step Into button on the Debug toolbar or choosing Debug ![]() Step Into, but F8 is ever so much more efficient.)
Step Into, but F8 is ever so much more efficient.)
Stepping into lets you see exactly what each statement in your code does, but you'll often find that you need to get past sections of code that you're sure are working fine so that you can step through a section that seems suspicious. This situation is particularly true of loop structures, which can have you going round and round—a real time-waster if you know the bug you're tracking down isn't within the loop.
Break mode offers three features to speed up stepping through your code: the Step Over command, the Step Out command, and the Run To Cursor command. The Step Over and Step Out commands aren't available until you enter Break mode (for example, by using the Step Into command).
The Step Over command (which you can trigger by pressing Shift+F8, clicking the Step Over button on the Debug toolbar, or choosing Debug ![]() Step Over) executes the whole Sub or function called from the current procedure instead of stepping through the called procedure statement by statement as the Step Into command would do. (It “steps over” that procedure or function.) Use the Step Over command when you're debugging a procedure that calls another procedure or function that you know to be error-free and that you don't need to test step by step.
Step Over) executes the whole Sub or function called from the current procedure instead of stepping through the called procedure statement by statement as the Step Into command would do. (It “steps over” that procedure or function.) Use the Step Over command when you're debugging a procedure that calls another procedure or function that you know to be error-free and that you don't need to test step by step.
The Step Out command (which you can issue by Ctrl+Shift+F8, clicking the Step Out button on the Debug toolbar, or choosing Debug ![]() Step Out) runs the rest of the current procedure at full speed. Use the Step Out command to quickly execute the rest of a procedure once you've gotten through the part that you needed to watch step by step.
Step Out) runs the rest of the current procedure at full speed. Use the Step Out command to quickly execute the rest of a procedure once you've gotten through the part that you needed to watch step by step.
The Run To Cursor command (which you can issue by pressing Ctrl+F8 or choosing Debug ![]() Run To Cursor) runs the code at full speed until it reaches the statement where the blinking cursor currently is in the Code window, whereupon it enters Break mode. Click to position the cursor in the appropriate statement before invoking this command.
Run To Cursor) runs the code at full speed until it reaches the statement where the blinking cursor currently is in the Code window, whereupon it enters Break mode. Click to position the cursor in the appropriate statement before invoking this command.
The Locals Window
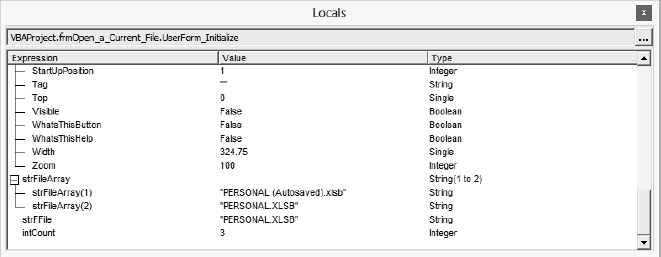
The Locals window provides a quick readout of the values and types of all variables or expressions in the currently active procedure. It displays a collapsible tree view (see Figure 17.8).
FIGURE 17.8 Use the Locals window to see at a glance all the expressions in the active procedure.
An expression is a combination of keywords, operators, variables, and/or constants. Variables are one kind of expression; but more complex expressions involve more than a single variable: x > y, for example, is an expression stating that x is greater than y. This expression might be True or False, depending on what's happening during runtime.
The Expression column displays the name of each expression, listed under the name of the procedure in which it appears. The Value column displays the current value of the expression (including Empty if the expression is empty, or Null or Nothing as appropriate). And the Type column displays the data type of the expression, with Variants listed as “Variant” along with their assigned data type (for example, “Variant/String” for a Variant assigned the String data type).
To display the Locals window, click the Locals Window button on the Debug toolbar or choose View ![]() Locals Window. To hide the Locals window, click its close button.
Locals Window. To hide the Locals window, click its close button.
From the Locals window, you can also click the button marked with an ellipsis (…) to display the Call Stack dialog box, discussed later in this chapter. This button is available only in Break mode.
HOW TO FLOAT AND DOCK WINDOWS
Remember that you can make panes (interior windows such as the Locals window) float by either dragging them or double-clicking their title bar. Restore them to their default docking location by double-clicking their title bar a second time.
The Watch Window
The Watch window (identified as Watches in Figure 17.9) is a separate window that you use to track the values of variables and expressions as your code executes. To display the Watch window, click the Watch Window button on the Debug toolbar or choose View ![]() Watch Window in the VBA Editor. To hide the Watch window again, click its close button (clicking the Watch Window button or choosing View
Watch Window in the VBA Editor. To hide the Watch window again, click its close button (clicking the Watch Window button or choosing View ![]() Watch Window again doesn't hide it).
Watch Window again doesn't hide it).
FIGURE 17.9 Use the Watch window to track the values of variables and expressions in your code.

The Watch window displays watch expressions—expressions in your code that you specify ahead of time. You want to view a dynamic display of the values in these variables or expressions.
Watch-expression information can help you to pinpoint where an unexpected value for a variable or an expression occurs as your code executes. The Watch window lists the names of the watched expressions or variables in the Expression column, their values in the Value column, their type (Integer, Byte, String, Long, and so on) in the Type column, and their context (the module and procedure in which they're operating) in the Context column. So to track the value of a given variable, you need only look at the Watch window at any given point while in Break mode.
If a variable or expression listed in the Watch window hasn't been initialized, the Watch window displays “< Out of Context >” in the Value column and “Empty” (for a variable other than a Variant) or “Variant/Empty” (for a Variant) in the Type column.
The VBA Editor updates all watch expressions in the Watch window whenever you enter Break mode and whenever you execute a statement in the Immediate window. So if you step through a procedure in the Code window by pressing the F8 key (which keeps you in Break mode), you can watch the value in a variable, or of an expression, as each statement executes. This is a great way to pinpoint where an error or an unexpected value occurs—and is much easier than moving the mouse over each variable or expression in question to check its value by using the Auto Data Tips feature.
Here's a typical debugging scenario. Let's say your code is producing a preposterous result, such as asserting that your annual salary is $2,200,000. As usual with most debugging, you're trying to figure out where in your code this sudden and massive gain in income is being calculated. Observe the Watch window while single-stepping through your code to see in which line of code the variable MySalary goes from 50,000 to 2,200,000. Now you're right there close to where the bug is and you can examine the preceding lines of code very carefully to see what's impacting the MySalary variable.
Because watch expressions slow down execution of your code, the VBA Editor doesn't save them with the code—you need to redo them for each editing session. However, the Editor does store watch expressions during the current editing session, so you can move from procedure to procedure without losing your watch expressions.
SETTING WATCH EXPRESSIONS
Sometimes referred to as conditional breakpoints, watch expressions give you considerable flexibility when debugging. You can ask the VBA Editor to halt execution on most any kind of situation you can think up, such as break on any line that causes a variable to exceed a certain value, go below zero, change to a shorter string length, and so on. In other words, you specify a condition, an expression such as MySalary > 50000, and the VBA Editor automatically halts execution and displays the line where your salary increases beyond the expected 50,000. As you can imagine, the conditional breakpoint is one of the best tools a debugger has.
To set a watch expression, add it to the list in the Watch window by following these steps:
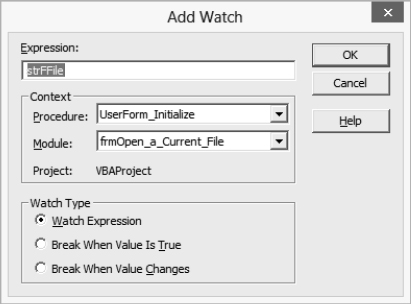
- Select the variable or expression in your code, right-click it, and choose Add Watch from the context menu to display the Add Watch dialog box (see Figure 17.10). The variable or expression in which you right-clicked appears in the Expression text box.
FIGURE 17.10 In the Add Watch dialog box, specify the watch expression you want to add.
You can also select the variable or expression you're interested in and choose Debug
Add Watch to display the Add Watch dialog box. If you choose Debug Add Watch without selecting the variable or expression, you must type it in the Expression text box, which is a waste of time. - If necessary, adjust the settings in the Context group box. The Procedure drop-down list is set to the current procedure, and the Module drop-down list is set to the current module.
- In the Watch Type group box, adjust the option-button setting if necessary:
- The default setting—Watch Expression—adds the variable or expression in the Expression text box to the list in the Watch window. However, conditional breakpoints are more useful if you do more than merely observe the status of variables or expressions. The following two list items describe the true benefit of these breakpoints.
- Break When Value Is True causes VBA to enter Break mode whenever the value of the variable or expression changes to True.
- Break When Value Changes causes VBA to enter Break mode whenever the value of the watch expression changes. Use this setting when dealing either with a watch expression whose value you don't expect to change but that appears to be changing (such as MySalary in the previous example) or with a watch expression whose every change you need to observe.
- Click the OK button to add the watch expression to the Watch window.
USE THESE TWO IMPORTANT CONDITIONAL BREAK TECHNIQUES
The Break When Value Is True option button allows you to run your code without stepping through each statement that doesn't change the value of the watch expression to True. This allows you to specify that Break mode should be entered, for example, when your variable exceeds a certain value (such as X > 10000) or equals another variable (such as x = y). Employing this kind of conditional break can be extremely helpful when tracking down elusive bugs.
The Break When Value Changes option button allows you to run your code and stop at each location where the value changes in the code.
You can also drag a variable or an expression from the Code window to the Watch window; doing so sets a default watch expression in the current context. To set Break When Value Is True or Break When Value Changes, edit the watch expression after dragging it to the Watch window.
EDITING WATCH EXPRESSIONS
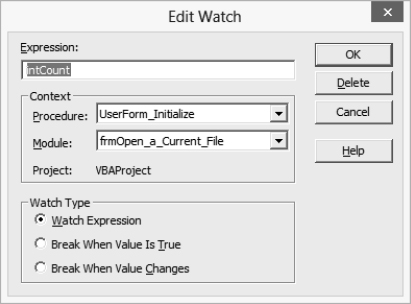
To edit a watch expression, right-click it in the Watch window and choose Edit Watch from the context menu, or select it in the Watch window and choose Debug ![]() Edit Watch. Either action will display the Edit Watch dialog box with the watch expression selected in the Expression box, as shown in Figure 17.11. Change the context or watch type for the watch expression by using the settings in the Context group box and the Watch Type group box, and then click the OK button to apply your changes.
Edit Watch. Either action will display the Edit Watch dialog box with the watch expression selected in the Expression box, as shown in Figure 17.11. Change the context or watch type for the watch expression by using the settings in the Context group box and the Watch Type group box, and then click the OK button to apply your changes.
FIGURE 17.11 You can edit your watch expressions in the Edit Watch dialog box.
DELETING WATCH EXPRESSIONS
To delete a watch expression, right-click it in the Watch window and choose Delete Watch from the context menu. You can also delete the current watch expression by clicking the Delete button in the Edit Watch dialog box.
USING THE QUICK WATCH FEATURE
For those times when you don't need to create a watch expression for an expression or a variable, when you merely want to observe the value, you can use the Quick Watch feature, which displays the Quick Watch dialog box (see Figure 17.12) containing the context and value of the selected expression.
To use Quick Watch, while in Break mode select the expression or variable in the Code window and then click the Quick Watch button on the Debug toolbar, choose Debug ![]() Quick Watch, or press Shift+F9. (If you're already working in the Quick Watch dialog box, you can click the Add button to add the expression to the Watch window.)
Quick Watch, or press Shift+F9. (If you're already working in the Quick Watch dialog box, you can click the Add button to add the expression to the Watch window.)
FIGURE 17.12 Use the Quick Watch dialog box to get quick information on a variable or expression for which you don't want to set a watch expression in the Watch window.

The Immediate Window
One use for the Immediate window is as a virtual scratchpad. In the Immediate window you enter lines of code that you want to test quickly, without having to enter them in a procedure and then test the entire procedure. A second major use of the Immediate window is to display information to help you check the values of variables while a procedure is executing.
In the first case, you type code into the Immediate window, then press Enter to see the results immediately (get it?). In the second case, you insert in your code Debug.Print statements that display information in the Immediate window, where you can easily view it. We'll explore both of these techniques in the following sections.
To display the Immediate window, click the Immediate Window button on the Debug toolbar, choose View ![]() Immediate Window, or press Ctrl+G. To hide the Immediate window again, click its close button. (Clicking the Immediate Window button, choosing View
Immediate Window, or press Ctrl+G. To hide the Immediate window again, click its close button. (Clicking the Immediate Window button, choosing View ![]() Immediate Window, or pressing Ctrl+G when the Immediate window is displayed does not hide the Immediate window.)
Immediate Window, or pressing Ctrl+G when the Immediate window is displayed does not hide the Immediate window.)
You can execute code in the Immediate window in both Break mode and Design mode.
WHAT YOU CAN'T DO IN THE IMMEDIATE WINDOW
There are a number of restrictions on the code you can use in the Immediate window:
- You can't use declarative statements (such as Dim, Private, Public, Option Explicit, Static, or Type) or control-flow statements (such as GoTo, Sub, or Function). These statements cause VBA to return an “Invalid in Immediate Pane” error.
- You can't use multiline statements (such as block If statements or block For… Next statements) because there's no logical connection between statements on different lines in the Immediate window: Each line is treated in isolation.
- You can't place breakpoints in the Immediate window.
ENTERING CODE IN THE IMMEDIATE WINDOW
The Immediate window supports a number of standard Windows editing keystrokes and key combinations, such as Ctrl+X (Cut), Ctrl+C (Copy), Ctrl+V (Paste), Ctrl+Home (move the insertion point to the start of the window), Ctrl+End (move the insertion point to the end of the window), Delete (delete the current selection), and Shift+F10 (display the context menu).
The Immediate window also supports the following VBA Editor keystrokes and key combinations:
- F5 continues running a procedure.
- Alt+F5 runs the error-handler code for the current procedure.
- F8 single-steps through code (executing one statement at a time).
- Shift+F8 procedure-steps through code (executing one procedure at a time).
- Alt+F8 steps into the error handler for the current procedure.
- F2 displays the Object Browser.
Finally, the Immediate window has a couple of commands of its own:
- Pressing Enter runs the current line of code.
- Pressing Ctrl+Enter inserts a carriage return.
PRINTING INFORMATION TO THE IMMEDIATE WINDOW
As well as entering statements in the Immediate window for quick testing, you can use this window for a different debugging technique. To include in your procedures statements that print information to the Immediate window, use the Print method of the Debug object. Printing like this allows you to create a log during execution, a log you can later examine for errors or strange behavior. You don't single-step or display message boxes containing the value of a variable. Instead you print data for later study.
The syntax for the Print method is as follows:
Debug.Print [outputlist]
outputlist is an optional argument specifying the expression or expressions to print. You'll almost always want to include outputlist—if you don't, the Print method prints a blank line, which is of little use. Construct your outputlist using the following syntax:
[Spc(n) | Tab(n)] expression
Here, Spc(n) inserts space characters and Tab(n) inserts tab characters, with n being the number of spaces or tabs to insert. Both are optional arguments, and for simple output, you'll seldom need to use them.
expression is an optional argument specifying the numeric expression or String expression to print:
- To specify multiple expressions, separate them with either a space or a semicolon.
- A Boolean value prints as either True or False (as appropriate).
- If outputlist is Empty, Print doesn't print anything. If outputlist is Null, Print prints Null.
- If outputlist is an error, Print prints it as Error errorcode, where errorcode is the code specifying the error.
As an example, you could log the contents of the String variables (expressions) CustName, Address1, Address2, City, State, and Zip to the Immediate window in an address format by using the following statements:
Debug.Print CustName
Debug.Print Address1 & "," & Address2
Debug.Print City & "," & State & " " & Zip
As another example, the following procedure prints the names and paths of all open workbooks in Excel to the Immediate window:
Sub See_All_Workbook_Names()
    Dim oBook As Workbook
    For Each oBook In Workbooks
        Debug.Print oBook.FullName
    Next
End Sub
In practice Debug.print is used by many programmers as a sometimes-quick, efficient alternative to debugging with the Watch windows, message boxes, or breakpoints. You need to see if something is going wrong with a variable (its value is wrong, but where does it go wrong?). So you insert some Debug.Print statements to display the variable's value while executing a procedure. Then you can see if the value is wrong in that location or somewhere else in the code.
If your program contains multiple procedures, you might also want to debug.print the name of the procedure. This example identifies both the procedure and variable name within the Debug.Print statement:
Debug.Print "In the Sub Add_Tax the variable intLocal is: " & intLocal
This results in the following line in the Immediate window:
In Sub Add_Tax the variable intLocal is: 7
The Call Stack Dialog Box
When working in Break mode, you can summon the Call Stack dialog box (see Figure 16.1 in Chapter 16) to display a list of the active procedure calls—the outside procedures being triggered by the current procedure. It shows the history of your code's execution path.
When you begin running a procedure, that procedure is added to the call-stack list in the Call Stack dialog box. If that procedure then calls another procedure, the name of the second procedure is added to the call-stack list, but only while the procedure is executing; it's then removed from the list. By using the Call Stack dialog box in Break mode, you can find out what procedures are being called by another procedure; this can help you establish which parts of your code you need to check for errors.
To display the Call Stack dialog box, click the Call Stack button on the Debug toolbar, press Ctrl+L, or select View ![]() Call Stack. To display one of the procedures listed in the Call Stack dialog box, select it in the Project.Module.Function list box and click the Show button.
Call Stack. To display one of the procedures listed in the Call Stack dialog box, select it in the Project.Module.Function list box and click the Show button.
Dealing with Infinite Loops
You'll probably find it easy to tell when a procedure gets stuck in an infinite loop: You'll notice that the procedure simply doesn't stop executing. If you open Windows's Task Manager, it will report that your application has “stopped responding.” To interrupt an infinite loop, press Ctrl+Break. The VBA Editor then displays a Code Execution Has Been Interrupted dialog box. Infinite loops are also known as endless loops.
There are several ways to get stuck in infinite loops, such as using GoTo statements without If conditions or Do loops without While or Until constraints. These are easy enough to avoid, but even if you do, it's still possible for infinite loops to occur in your code because of conditions you haven't been able to anticipate.
The best way to approach detecting and eliminating an infinite loop is to use breakpoints or a watch expression to pinpoint where the procedure enters the infinite loop. Once you've reached it, use the Step Into command to step into the procedure. Then use the Watch window or the Locals window to observe the variable and expressions in the loop, which should indicate when something is going wrong and causing the loop to be endless.
If your code contains a loop that should execute only a set number of times but you suspect it's running endlessly, you can insert a counter variable in the loop in an If… Then structure that triggers either an Exit For statement or an Exit Do statement to exit the loop if it runs more than a certain number of times.
Dealing with Runtime Errors
Despite the help that VBA provides by checking for language errors and compile errors, runtime errors remain an unpleasant fact of life. Sooner or later, you will get runtime errors in your code, but you don't have to take them lying down. Just add error handlers, pieces of code that trap errors, analyze them, and take action if they match given error codes.
An error handler is a preventative measure, allowing your code to manage problems gracefully rather than crashing in front of a user's alarmed or bemused face.
When Should You Write an Error Handler?
Consider writing an error handler in the following circumstances:
- When a runtime error can cause your code to fail disastrously. For a procedure that tweaks a couple of objects on a slide in PowerPoint, you're unlikely to need an error handler. By contrast, for a procedure that creates, deletes, or moves files, you'll probably want an error handler.
- When your program accesses peripherals or objects outside the application itself—the status of which is unpredictable during design time. In this situation, you can identify particular errors that are likely to occur and that can be trapped. For example, when the user tries to open a file, certain well-known errors can occur—perhaps the file doesn't exist, or is currently in use by another computer, or is on a network drive, floppy drive, CD-ROM drive, or removable drive that isn't available at the time. You'll also run into errors if the user tries to use a printer or other remote device (say, a scanner or a digital camera) that's not present, not connected, turned off, or not configured correctly. Similarly, any procedure that deals with a particular object in a document (for example, a chart in Excel) will run into trouble if that object is not available.
CONSIDER TRAPPING ERRORS RATHER THAN ANTICIPATING THEM
In some instances, you may find it simpler to trap a resulting error from a procedure than to anticipate and try to forestall the many and various conditions that might lead to the generation of the error. For example, instead of checking to make sure a file exists before you try to open or manipulate the file, just trap any kind of error that results if the file isn't detected.
Trapping an Error
Trapping an error means catching it in your code during runtime so that you can write programming that handles the error.
VBA's On Error statement triggers when there is a runtime error, allowing you to write code that responds to the error.
Usually, you'll want to prevent an error from stopping your VBA code, but you can also anticipate particular errors and use them to determine a suitable course of action to follow from the point at which they occur.
To trap an error, you use the On Error statement. The usual syntax for On Error is as follows:
On Error GoTo line
Here, line is a label specifying the line to which execution is to branch when a runtime error occurs. For example, to branch to the label named ErrorHandler, you could use a structure like this:
Sub ErrorDemo()
    On Error GoTo ErrorHandler
    'ordinary code statements here

Exit Sub
ErrorHandler:
            'error-handling statements here
End Sub
The label you use to identify the error handler can be named with any valid label name—you don't have to call it ErrorHandler or anything similar. Some people find that a descriptive label (perhaps one that identifies the type or types of error expected, such as HandleErrorNoFileOpen) is clearer in the long run than a generic name; others prefer to go with a generic name such as HandleErr.
Usually, you'll want to place the error trap early, near the top of a procedure so that it's active and ready to trap errors for all the lines of code below it throughout the whole procedure. If necessary, you can place several different error traps in a procedure by entering multiple On Error statements where they're needed—but only one can be enabled at a time. (Enabled means that an error trap has been switched on by an On Error statement. When an error occurs and execution branches to the error handler, that error handler is active.)
Inserting multiple error handlers in a procedure can be useful when you're dealing with statements that can cause different types of errors that may need to be trapped. In the following example, the first On Error statement directs execution to ErrorHandler1, and the second On Error statement directs execution to ErrorHandler2:
Sub ErrorDemo2()
    On Error GoTo ErrorHandler1
    'statements here
    On Error GoTo ErrorHandler2
    'statements here
    Exit Sub
ErrorHandler1:
    'statements for first error handler here
ErrorHandler2:
    'statements for second error handler here
End Sub
Each error handler is limited to the procedure in which it appears, so you can create different error handlers for different procedures and have each enabled in turn as the procedures run.
Because the error handler appears as code in the procedure, you need to make sure that it doesn't run when no error has occurred. You can do this by using either an Exit Sub statement in the line just above the error-handler statement (this ends execution of the procedure) or a GoTo statement that directs execution to a label beyond the error-handling code. The Exit Sub statement is better if you choose to place your error handler at the end of its procedure, which is standard practice and usually makes sense. The GoTo statement may prove easier to use if you choose to place your error handler elsewhere in the procedure.
For a function, use an Exit Function statement rather than an Exit Sub statement. For a property in a class module, use an Exit Property statement.
The following example uses an Exit Sub statement to cause execution to end before the error handler if no error occurs:
Sub ErrorDemo3()
    On Error GoTo ErrorHandler
    'statements that might cause an error
    Exit Sub
ErrorHandler:
    'statements that handle the error
End Sub
This next example uses a GoTo statement to skip the error handler—which is placed within the code of the procedure—unless an error occurs. When execution reaches the GoTo SkipErrorHandler statement, it branches to the SkipErrorHandler label, thus bypassing the code in the error handler:
Sub ErrorDemo4()
    On Error GoTo ErrorHandler
    'statements that might cause an error
    GoTo SkipErrorHandler
ErrorHandler:
    'statements that handle the error
SkipErrorHandler:
    'statements
End Sub
You read earlier in this book that some people don't like GoTo statements for uses such as the second example here. Given that this GoTo statement makes the flow of the procedure a little harder to follow, you may be inclined to agree with them in this case. (The use of GoTo in the On Error statement itself is, however, unavoidable.)
Disabling an Error Trap
Recall that an error trap works only for the procedure in which it appears, and VBA disables it when the code in the procedure has finished executing. You can also disable an error trap before the end of a procedure in which it appears if you wish by using the following statement:
On Error GoTo 0
Why would you do this? You might want to disable an error trap while testing a procedure to enable yourself to pinpoint errors that occur after a certain point while at the same time retaining error trapping for the first part of the procedure.
Resuming after an Error
You use the Resume statement to resume execution of a procedure after trapping an error or handling an error with an error-handling routine. The Resume statement takes three forms: Resume, Resume Next, and Resume line.
USING A RESUME STATEMENT
The Resume statement causes execution to resume with the line that caused the error. Use Resume with an error-handling routine that detects and fixes the problem that caused the offending statement to fail. For example, look at the error handler in Listing 17.1, which runs when VBA is unable to apply a specified style in Word.
LISTING 17.1: Trapping a style error
 1.  Sub StyleError()
 2.
 3.      On Error GoTo Handler
 4.
 5.      Selection.Style = "Executive Summary"
 6.
 7.      'the rest of the procedure happens here
 8.
 9.      'exit the procedure once execution gets this far
10.      Exit Sub
11.
12.  Handler:
13.
14.      If Err = 5834 Then
15.          ActiveDocument.Styles.Add _
                 Name:="Executive Summary", Type:=wdStyleTypeParagraph
16.          Resume
17.      End If
18.
19.  End Sub
Here's how the StyleError procedure in Listing 17.1 works:
- Line 1 starts the procedure, and line 19 ends it. Lines 2, 4, 6, 8, 11, 13, and 18 are spacers.
- Line 3 uses an On Error statement to enable the imaginatively named error handler, which is identified by the Handler label in line 12.
- Line 5 applies the style named Executive Summary to the current selection. If this operation succeeds, execution will continue at line 7, which in this example contains only a comment indicating that this is where the rest of the procedure would take place.
- Line 9 is a comment introducing line 10, which holds the Exit Sub statement to end execution of the procedure before the error handler.
- If the Selection.Style statement in line 5 causes an error, execution branches to the Handler label in line 12, and the error handler is activated. Line 14 compares the error value to 5834, the error that occurs if the specified style doesn't exist. If it matches, line 15 then adds the missing style to the document, and the Resume statement in line 16 causes execution to resume where the error occurred, on line 5. Because the specified style is now available, the Selection.Style statement runs without an error.
HOW TO FIND VBA ERROR NUMBERS AND THEIR EXPLANATIONS
To find error numbers, here are three approaches:
- Go to this Web page:
http://msdn2.microsoft.com/en-us/library/Aa264975(VS.60).aspx.
- Search the VBA Help system for trappable errors.
- Deliberately cause the error yourself and note the number and description in the resulting error-message dialog box that VBA displays.
USING A RESUME NEXT STATEMENT
Resume Next causes execution to resume with the next statement after the statement that caused the error. You can use Resume Next in either of the following circumstances:
- With an error-handling routine that ignores the error and allows execution to continue without executing the offending statement
- As a straightforward On Error Resume Next statement that causes execution to continue at the next statement after the statement that caused an error, without using an error handler to fix the error
As an example of the first circumstance, if the style specified in the previous example isn't available, you can use a Resume Next statement to skip applying it:
Sub StyleError2()
    On Error GoTo Handler

    Selection.Style = "Executive Summary"
    'the rest of the procedure happens here

    'exit the procedure once execution gets this far
  Exit Sub

Handler:
    Resume Next

End Sub
The descriptions of Resume and Resume Next apply if the error occurred in the procedure that contains the error handler. But if the error occurred in a different procedure from the procedure that contains the error handler, Resume causes execution to resume with the last statement that transferred execution (called) out of the procedure where the handler is located; Resume Next causes execution to resume with the statement after the last statement to call out of the procedure that contains the error handler.
USING A RESUME LINE STATEMENT
Resume line causes execution to resume at the specified line. Use a label to indicate the line, which must be in the same procedure as the error handler.
For example, if a procedure tried to open a particular file, you could create a simple error handler that uses a Resume line statement, as shown in Listing 17.2. This procedure works with Word. To make it work with other applications, substitute the appropriate error numbers in line 15.
LISTING 17.2: Resuming execution at a specified line
 1.  Sub Handle_Error_Opening_File()
 2.
 3.      Dim strFName As String
 4.
 5.  StartHere:
 6.
 7.       On Error GoTo ErrorHandler
 8.       strFName = InputBox("Enter the name of the file to open.", _
              "Open File")
 9.       If strFName = "" Then End
10.       Documents.Open strFName
11.       Exit Sub
12.
13.  ErrorHandler:
14.
15.     If Err = 5174 Or Err = 5273 Then MsgBox _
              "The file " & strFName & " does not exist." & vbCr & _
              "Please enter the name again.", _
              vbOKOnly + vbCritical, "File Error"
16.       Resume StartHere
17.
18.  End Sub
Here's how Listing 17.2 works:
- Line 1 starts the procedure, and line 18 ends it.
- Line 2 is a spacer. Line 3 declares the String variable strFName. Line 4 is another spacer.
- Line 5 contains the StartHere label, to which execution will return from the Resume statement in line 16. Line 6 is a spacer.
- Line 7 uses an On Error statement to enable the error handler ErrorHandler.
- Line 8 displays an input box prompting users for the name of the file they want to open, and stores the name in the variable strFName, which line 9 then tries to open. Line 10 checks strFName against an empty string and ends execution if it matches.
- If the file exists and can be opened, execution passes to line 11, where an Exit Sub statement exits the procedure, ending its execution. Otherwise, an error is generated, and execution branches to the ErrorHandler label in line 13, where the error handler becomes active.
- Line 14 is a spacer. Line 15 then compares the value of the error to 5174 (the error that occurs if VBA can't find the file) and to 5273 (the error that occurs if the document name or path isn't valid in Word). If either of these comparisons matches, line 15 displays a message box advising users of the error and prompting them to enter the correct filename.
- The Resume statement in line 16 then returns execution to the StartHere label in line 5. Line 17 is a spacer.
TRY INSERTING A COUNTER VARIABLE TO DEAL WITH REPETITIOUS USER ERRORS
For some procedures, you may want to build in a counter mechanism to prevent users from repeating the same error endlessly because they don't grasp what's wrong. By incrementing a counter variable each time the error handler is invoked and checking the resulting number, you can choose to take a different action after a number of unsuccessful attempts to execute a particular action.
You can't use a Resume statement anywhere other than in an error-handling routine (or an On Error Resume Next statement). If you do, VBA reports an error.
Getting a Description of an Error
To see the description of the current error, return the Description property of the Err object:
MsgBox Err.Description
In general, operating-system and programming-language error messages tend to be terse, cryptic, and of less help to the end user than to the people who built the OS or language. Think twice before displaying one of these error messages to an end user. The error message shown in Figure 17.7 says “Run-time error ‘5941’: The requested member of the collection does not exist.” As you can imagine, most users would be baffled by this message; some would panic.
Usually, it's more effective, not to mention kinder, to write and display a more verbose error message of your own devising. It should explain in ordinary English what the problem is—and, preferably, what (if anything) the user can do to solve it.
Raising Your Own Errors
As part of your testing, you may want to deliberately simulate errors so that you can see how well your error handler handles them. (Programming lingo sometimes substitutes the word raise for cause or trigger. Nobody knows why.)
To cause an error to be triggered, use the Raise method of the Err object, specifying only the number argument. number is a Long argument giving the number of the error that you want to cause. For example, the following statement “raises” error 5121:
Err.Raise 5121
Suppressing Alerts
Many of the procedures you build will use message boxes or dialog boxes to allow the user to choose options for the procedure. In some applications—such as Word, Excel, PowerPoint, and Access—you can use the DisplayAlerts property of the Application object to suppress the display of message boxes and errors while a procedure is running:
- In Word, DisplayAlerts can be set to wdAlertsNone (0) to suppress alerts and message boxes, wdAlertsMessageBox (−2) to suppress alerts but display message boxes, or wdAlertsAll (−1, the default) to display all alerts and message boxes. DisplayAlerts is a sticky setting. You need to set DisplayAlerts explicitly back to one of four things: to True or to wdAlertsAll when you want to see alerts again after setting it to False, to wdAlertsNone, or to wdAlertsMessageBox. VBA resets the default value when you restart Word.
- In Excel, DisplayAlerts is a read/write Boolean property that can be set to True to display alerts and False to suppress them. The setting sticks until you change it or restart Excel, at which point VBA resets it to True.
- In PowerPoint, DisplayAlerts is a read/write property that can be set to ppAlertsAll to display all alerts and ppAlertsNone to suppress all alerts. The setting sticks until you change it or until you restart PowerPoint, at which point VBA resets it to ppAlertsNone.
- In Access, you use the pervasive DoCmd object's SetWarnings method, like this:
DoCmd.SetWarnings False
Handling User Interrupts in Word, Excel, and Project
Errors may seem quite enough of a problem, but you also need to decide what will happen if a user tries to interrupt your code by pressing Ctrl+Break during execution. Some VBA hosts, including Word and Excel, offer you three options:
- You can allow a user interrupt to stop your code. This is the easy way to proceed (and, as the default condition, needs no effort on your part), but in complex procedures, it may cause problems. For example, the user may have spent five minutes typing in data, only to lose it because the data wasn't saved due to the early termination of the program.
- You can prevent user interrupts by disabling user input while the procedure is running. This is simple to do, but you run the risk of creating unstoppable code if a procedure enters an endless loop. The user would have to power down the machine or, at least, invoke Task Manager and kill your task. Any unsaved work in the procedure or even the host application will be lost. The user might have been typing for hours without saving their work. Losing this much…it can send some people right over the edge.
- As a compromise between the first two options, you can allow user interrupts during certain parts of a procedure and prevent user interrupts during more critical parts of a procedure.
Disabling User Input While a Procedure Is Running
To disable user input while a procedure is executing, disable the Ctrl+Break key combination by setting the EnableCancelKey property of the Application object to wdCancelDisabled (in Word) or xlDisabled (in Excel):
Application.EnableCancelKey = wdCancelDisabled    'Word
Application.EnableCancelKey = xlDisabled          'Excel
VBA automatically enables user input again when the procedure stops executing. You can also reenable user input during a procedure by setting the EnableCancelKey property to wdCancelInterrupt (in Word) or xlInterrupt (in Excel):
Application.EnableCancelKey = wdCancelInterrupt   'Word
Application.EnableCancelKey = xlInterrupt         'Excel
Excel offers a third setting, xlErrorHandler, that traps the Ctrl+Break keystroke as error 18. You can deal with this error as you would any other error. Here's a quick example:
Sub CancelKey_Example()
    Dim i As Long
    On Error GoTo EH
    Application.EnableCancelKey = xlErrorHandler
    For i = 1 To 100000000 ' time-consuming loop
        Application.StatusBar = i
    Next i
EH:
    If Err.Number = 18 Then
        If MsgBox("Do you want to stop the procedure?" _
            & vbCr & vbCr & "If not, stop pressing Ctrl+Break!", _
            vbYesNo + vbCritical, "User Interrupt Detected") = vbYes Then End
    End If
End Sub
Disabling User Input While Part of a Procedure Is Running
You may want to temporarily disable user input while a procedure is executing a sensitive task that must not be interrupted. Then when the task is complete, you can reenable user input because it's safe for the user to stop the procedure again.
For example, say you have a procedure in which a section of code moves a number of files from one folder to another. You don't want the user to prevent the code that executes the move operations from being interrupted. That could cause problems because if the user stopped the procedure in mid-task, it might leave some files still in the source folder and some in the destination folder.
'interruptible actions up to this point
Application.EnableCancelKey = wdCancelDisabled
For i = 1 to LastFile
     SourceFile = Source & "Section" & i
    DestFile = Destination & "Section" & i
    Name SourceFile As DestFile
Next i
Application.EnableCancelKey = wdCancelInterrupt
'interruptible actions after this point
Documenting Your Code
Some musicians can read a symphonic score and more or less “hear” the music. Likewise, some programmers can read raw code and visualize what it does. But most programmers need comments to help them understand what code is doing, particularly if they wrote the code months before or if it was written by another programmer.
Many programmers also find it easier to debug their procedures by documenting their code. The best way to document your code is to add comments to it, either as you create the code or after you've finished creating it: This procedure does this. It expects this data as input and provides this as its output. This line does this. And so on.
Some experts advise that you document your code as you create it in any procedure in which you're exploring your way and trying different methods to reach your goal. Add comments to explain what action each group of statements is trying to achieve. Once you've gotten the procedure to work, go through the code and delete the statements you didn't use, using the comments to identify which sections are now useless and which are still worthwhile and leaving only the comments that are relevant to how the remaining code functions.
Also consider adding comments when you're modifying an existing procedure so that you don't lose track of your changes. Once you have the procedure working to your liking, remove any unnecessary comments and reword any verbose or unclear comments.
Other experts suggest documenting your code when you've finished writing it. This allows you to enter only the comment lines that you want to be there permanently. This is the way to go when you're fairly sure of the direction of your code when you start writing the procedure and the procedure needs only a few pointers to make its code clear once it's complete.
To document your code, use comments prefaced by either the single quote (') or the Rem keyword (short for remark).
USE BLOCK-COMMENTING AS A DEBUGGING TOOL
Remember that commenting can also be employed as a debugging technique–when you want to see how code runs with some lines inactivated. In other words, does the bug disappear when the commented-out lines are not executed? If so, the bug is probably located somewhere in those lines of code. You can “comment out” a group of lines, a whole line, or part of a line: anything to the right of an apostrophe or the Rem keyword is commented out. See the section in Chapter 3 titled “Commenting Out Lines” for details on this tactic.
Few programmers use Rem anymore. When you're trying to comment out only a part of a line, the apostrophe is usually the better choice anyway. If you do choose to use the Rem keyword, you'll need to add a colon before it to make it work consistently (some statements accept a Rem without a colon at their end; others generate a compile error):
Rem This is a comment line.

Documents.Add: Rem create a document based on Normal.dotm
Generally, apostrophe-commented remarks are separated by a few spaces or tabs from any statement the line contains (as in the second line here). This makes the code and comments easier to read than comments using Rem:
'This is a comment line

Documents.Add     'create a document based on Normal.dotm
It's tempting to think that you don't need to document your code because you'll be able to recall what it does. But once you've written a lot of code, you probably won't be able to remember. Coming back to a procedure six months after writing it, you'll find it as unfamiliar as if someone else had written it. And if you've become a VBA whiz, you may even find it hard to visualize the clumsy techniques you were using at that time.
Most programmers have a distinct aversion to documenting their code; for some, the dislike of documenting is almost pathological. You can see why: When you're writing the code, documenting what each line does slows you down and distracts you from your larger purpose. And documenting after the code is finished and tested is tedious work. Besides, anyone that's competent should be able to read the code and see what it does…shouldn't they?
Maybe so, but consider this: It's likely that you won't always be the person working with your code—at times, others may work with it too, and they'll appreciate all the help they can get in understanding its purposes and behaviors. Likewise, the code on which you work won't always be your own—you may at times have to debug code that others have written, and in this case, you'll be the one grateful for comments.
The Bottom Line
Understand the basic principles of debugging. A major aspect of programming is testing your code. Debugging can be enjoyable if you think of it as a puzzle that you can solve. But whether or not you enjoy it, debugging is essential if you want to preserve a reputation as a professional.
Master It When testing your code, try to imagine ways that the code could fail. Describe a situation that can produce unanticipated results.
Recognize the four different types of errors you'll create. Experts have concluded that there are four primary categories of error in programs.
Master It Name two of the four basic types of programming errors.
Employ VBA's debugging tools. The VBA Editor and VBA include a generous assortment of debugging tools to help you track down and remove bugs from your procedures. The main windows you'll employ for debugging are the Immediate window, the Locals window, and the Watch window.
Master It The Watch window is especially useful because you can set watch expressions (also known as conditional breakpoints). Describe this debugging tactic.
Deal with runtime errors You can trap some runtime errors (errors that show up while a procedure is executing) while debugging your code. But others show up only while your user is interacting with your program—and you're probably not there to help them. There is a way, though, to soften the blow and, in some cases, even fix a problem by adding error handlers to your programs.
Master It Error handlers are special statements and sections of code that detect and then manage runtime errors. What VBA statement detects a runtime error?