
Chapter 19
Securing Your Code with VBA's Security Features
This chapter discusses how to use the security tools that VBA provides for distributing and implementing macros and VBA code. VBA security falls into three categories: securing your applications against rogue VBA code; establishing that your VBA code isn't itself rogue so that it can be run; and securing your code against theft, alteration, or snooping.
In this chapter you will learn to do the following:
- Understand how VBA implements security
- Sign a macro project with a digital signature
- Get a digital certificate
- Choose the appropriate security level
- Lock your code
Understanding How VBA Implements Security
Macros, dialog boxes, and user forms that you write are computer programs, albeit usually rather small ones. But because macros, like any other computer program, can access the user's hard drive and exploit other features of a computer, macros can do damage.
Office and the operating systems Vista, Windows 7, and Windows 8 include a variety of security features designed to protect the user from malicious code—macro, virus, Trojan horse, bot, or whatever. But some security features are specific to Office documents and the macros, dialog boxes, and user forms they can contain.
Scary but true: An evil macro can do its damage automatically. It's not necessary for the user to deliberately launch a macro from the Macros dialog box or from within the VBA Editor. Some procedures (with certain special names such as Open) automatically launch themselves. For example, if you name one of your procedures Document_Open Sub, all the code within that sub executes spontaneously when the user opens its host document:
Private Sub Document_Open()
This can be handy, of course. Perhaps you'll want to write some code in this procedure that automatically sets up your preferred zoom level or completes some other housekeeping task that you always perform when opening any document. But the fact that the user doesn't need to specifically choose to run this macro means that a virus can be put into this procedure. And whammo—your computer is infected.
Malicious code can enter a user's Office applications via three primary vehicles: macros, ActiveX controls, and add-ins. Microsoft provides users with various approaches to VBA security, including the following:
- Certain Office document file types that simply cannot contain any embedded macros at all. That's the difference between, for example, saving a file using the Word .docx option, which cannot contain macros, and the .docm file type, which can.
- Documents that are loaded from a trusted area on the hard drive.
- Trust Center settings the user can specify, such as completely preventing the execution of any ActiveX controls, macros, or add-ins without even notifying or querying the user. Alternatively, the user can be prompted for permission before potentially dangerous code is allowed execute.
- A list of user-modifiable “trusted publishers”—companies whose documents are considered safe.
- The ability to digitally sign your own documents or templates, thereby making you a “trusted publisher.”
Office 2007 introduced the concept of two types of documents. For the first time, the user could save documents that simply cannot contain any macros or other potentially malicious code. By default, any new Word document is of the .docx type, not the .docm (macro-enabled) type. In other words, a document must be deliberately created as a macro-enabled document. And because it also must have a .docm filename extension, everybody else (including Word when opening the document) knows that it contains possibly dangerous code. Administrators can use Group Policy to enforce rules concerning which file types are permitted. But the default .docx file type is free of potentially risky executables (files or procedures that can execute).
Other Office applications also have pairs of macro-disabled, macro-enabled file types. Excel has .xlsx and .xlsm files, and PowerPoint has .pptx and .pptm files.
Office includes various security tools and features that ordinary users, administrators, and IT professionals can employ to further safeguard Office applications from attack:
- An Office ActiveX kill bit that allows administrators to forbid certain ActiveX controls from executing.
- File-type blocking that can be implemented via Group Policy settings or individually via the Office Trust Center. The types of files that an application can access can be specifically controlled.
- A Trusted Documents feature that allows users to specify individual documents as reliable, thereby obviating whatever macro settings the user has enforced in the Trust Center.
- A scanning feature that searches for format exploits before a file can be opened by an Office application.
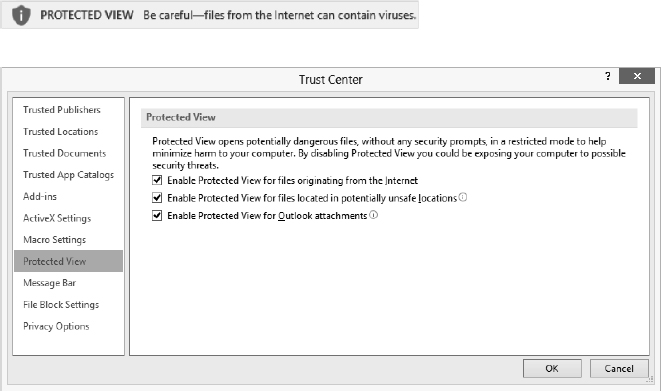
- A sandbox named Protected View. A sandbox isolates an executing program so it can't damage other programs, introduce viruses into the operating system, or store nasty surprises on the hard drive. Figure 19.1 shows the warning you get if you're about to open a document from a potentially dangerous source, and the Protected View options. This is similar to starting Windows in Safe Mode. In Protected View, executables are disabled. The protected document is in effect quarantined, so it theoretically can't do any harm to your computer or its contents. I say theoretically because as we all know, no security is perfect. Note that in its description of Protected View in Figure 19.1, Microsoft carefully states that this mode will “help minimize harm”—no claim of invulnerability. All the Protected View options are turned on by default, so files you get from the Internet and Outlook attachments, for example, are automatically tossed into the sandbox when opened.
FIGURE 19.1 Suspect sources trigger this security warning when opened in Office applications.
Also, the user can deliberately choose to open a file in sandbox mode by selecting the file's name in an Office application's Open dialog box, clicking the Open drop-down box in the lower-right corner of the Open dialog, then choosing Open In Protected View.
- Various under-the-hood features, including password security and encryption to protect the privacy of user information.
Doubtless there are additional hardening tactics that Microsoft is not mentioning. After all, why tell the bad people everything that's being done to prevent their incursions?
 Real World Scenario
REAL SECURITY IN AN INSECURE WORLD
All the virus-detection software, firewalls, digital signatures, and other security efforts in the world won't protect you or your colleagues if somebody on your network opens email attachments, downloads dodgy executables, or otherwise invites trouble into your environment.
Even if everybody is aware of the dangers and follows the best security practices, viruses and other troubles can still get in. After all, antivirus applications are always playing catch-up. A new virus is released, and then the antivirus forces identify it and send out a new update.
On the plus side, currently it's pretty rare to find macros employed as a vehicle for spreading viruses. And, of course, if you're writing the VBA code yourself—as a reader of this book—you can certainly trust the source of your macros. It's you!
Because threats are constant, and because it's ultimately impossible to guarantee that you will never get a virus (in spite of taking great pains to prevent them), you should ensure that you are taking additional precautions to at least mitigate damage.
Malicious software falls into two broad categories:
- Code that attempts to do damage to you by, for example, erasing files or slowing your computer down so much that it becomes painful to use. The goal here is to create a mess you have to clean up.
- Code that attempts to find out your secrets to do damage to you by, for example, stealing your identity to ruin your credit or to drain your bank account. The issue here is violation of your privacy, a different kind of mess you have to clean up.
If you're concerned about privacy, you should encrypt any documents containing sensitive information. Fortunately, with Office 2007 the formerly weak Office encryption scheme was replaced with a highly secure one. And Microsoft continues to toughen built-in encryption schemes and has added integrity-checking technologies for encrypted files. PowerPoint, Word, and Excel all permit you to encrypt files and then decrypt them by providing a password. Click File on the Ribbon, then in the Info page click Protect Document and then Encrypt With Password.
If you're worried about a virus attack, be sure to back up your documents (you should do this anyway, in case of a drive crash, fire, theft, or other havoc). These days, with three-terabyte external drives selling for around $100, it's practical to store your entire computer system (a “system image”)—documents, programs, inbox email, everything—as an image on an external drive. That way, you wouldn't even have to reinstall applications in the event of a serious problem. You can use third-party backup systems. Or if you use Windows 7, you can use Windows's built-in backup system by choosing Start ![]() Control Panel, then clicking Backup And Restore.
Control Panel, then clicking Backup And Restore.
If you use Windows 8 and just want to back up your data files, press Windows key+W and type Save Backup to use the new File History utility. If you want to use the traditional Windows backup, it's possible even in Windows 8. To invoke this utility, press Windows key+W and type Windows 7 File Recovery. From there you can create an image, a repair disk, or a traditional Windows-style backup.
To secure an application against rogue VBA code, you can use the Office Trust Center to choose the level of security that you want the application to use when running VBA code. Click the File tab, then choose Options. Click the Trust Center button in the left pane, and click the Trust Center Settings button.
You can also specify which sources to trust and how much to trust them. A trusted source might be someone who works for the same company as you, or someone who has a digital certificate from a third party you trust, such as the VeriSign certification authority. Because you (in this example) trust VeriSign, you therefore trust the third party to whom VeriSign has issued a digital certificate. Office also has a trusted time-stamping feature with the digital signature technology.
To establish that your own code is fine for the Office applications to trust, you can sign a document or template project that contains customizations or macro project items (code modules, class modules, or user forms) with a digital signature generated by a digital certificate that uniquely identifies you or your company. We'll look at this technique first because it sets the stage for specifying the level of security to use.
You can also lock a macro project with a password so that nobody can open the code. This both prevents anyone from tinkering with your code and either stopping it from working or rendering it harmful, and protects your intellectual property: If nobody can see your code, they can't steal your ideas. The section “Locking Your Code” shows you how to do this.
Signing Your Macro Projects with Digital Signatures
VBA provides a security mechanism for securing macro projects with digital signatures. The digital signatures provide a means of establishing the provenance of the projects, which should help you decide whether to trust the code. If you trust the source of the code to produce benevolent programming, you can open the project and run the code. If you suspect the source or the information of being malignant, you can either avoid opening the project or open the project with the code disabled.
The same goes for other people: If others are concerned about your macros, you may need to sign your projects so that other people know where they come from and who created them. Once you've signed the projects, the code is available to any application that has specified you as a trusted source for macro projects. (This assumes users have chosen one of the Disable options in the Macro Settings dialog box. You'll see how to set the security level later, in the section “Specifying a Suitable Security Setting.”)
The following sections discuss what digital certificates are, what they mean in practical terms, how you obtain them, and how you use them to create digital signatures.
TRUSTING A PUBLISHER IS GLOBAL FOR VBA-ENABLED APPLICATIONS
VBA's security mechanism, and the list of certificates, is shared across the range of VBA-enabled applications on your computer. So if you designate a trusted publisher in one application, all the other applications that support VBA security will trust that source as well. For example, if you open a document that contains code in Word and choose to trust the source of the code, Excel and Outlook also gain that trust and open projects from that source without having to prompt you.
What Is a Digital Certificate?
A digital certificate is an encrypted datum that uniquely identifies its holder. Rather like a driver's license, it provides a level of trust that you are who you say you are and that your code can be trusted.
You use your digital certificate to create a digital signature for a project. This project can be a document project, a template project, or an add-in. The project doesn't have to contain macros, procedures, user forms, classes, or VBA code for you to sign it, although these contents are the usual reason for signing a project.
A digital signature applies to a whole macro project, typically a document project or a template project. You can't apply a digital signature to just part of a project—say, just to one module of code or to one user form. Each macro project item in that macro project—each module, user form, class, and reference—is covered by the digital certificate.
But digital signatures, while usually reliable, have sometimes been compromised.
Getting a Digital Certificate
There are three types of digital certificates: those you create yourself (“self-signed”), those you get from your company or organization, and those you get from a commercial certification authority, or certificate authority (CA).
A digital certificate you create yourself is the weakest form of identification and is of little use to people beyond you and those who use your machine, whereas a certificate from a commercial certification authority should be good enough for general use in the world. Self-signed code will generate a security warning if someone opens a file containing this code. Office applications will not allow this code to run on any but the machine on which the certificate was created.
A certificate issued by your company falls in the middle range of trustworthiness: In many cases, the company will have obtained the certificate from a commercial certification authority, which means the commercial certification authority has established to its satisfaction that the company is trustworthy. Whom the company chooses to trust with the certificate is another matter and introduces another complicating link into the chain of trust. However, server software such as Windows Server includes independent certification-authority services that do not require a certificate from a commercial certification authority, so you should be careful which certificates you trust. See the section “Whose Certificate Is It, and What Does It Mean?” later in this chapter for a discussion of how to discern a certificate's provenance and meaning.
CREATING A DIGITAL CERTIFICATE OF YOUR OWN
The quickest and easiest way of getting a digital certificate is to create one yourself. It's easy, but its usefulness is very limited. Remember that this kind of certification only works on the computer on which the certificate was created.
To understand how digital certificates work, you'll probably want to create several of your own and practice with them on sample files. By designating some of your files as originating from trusted publishers and leaving others untrusted, you can get a clear idea of how digital certificates work without having to actually mess around with suspect code on your system.
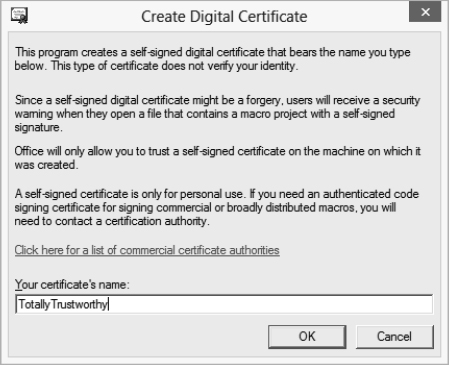
To open the Create Digital Certificate dialog box (see Figure 19.2), from the Desktop in Windows 8, press the Windows Key and type digital certificate. Press Enter when you see Digital Certificate for VBA projects. You'll see the form you can “sign,” as shown in Figure 19.2.
If you're using Windows 7, choose Start ![]() All Programs
All Programs ![]() Microsoft Office
Microsoft Office ![]() Microsoft Office 2013 Tools
Microsoft Office 2013 Tools ![]() Digital Certificate For VBA Projects.
Digital Certificate For VBA Projects.
Type the name for the certificate in the text box, and then click the OK button. The SelfCert application creates the certificate and installs it automatically.
FIGURE 19.2 You can self-sign a certificate, but Office only permits such certification to be trusted within the computer where the certificate was created.
GETTING A DIGITAL CERTIFICATE FROM YOUR COMPANY
Your second option is to get a digital certificate from a digital certificate server that your company has. The details of this procedure vary from company to company. The certificates the company provides via its digital certificate server are generated in the same fashion as the digital certificates distributed by the commercial certification authorities discussed in the next section. However, a company distributes the certificates from a pool that it has allocated, without needing to apply to the certification authority for each certificate as it's needed, or creates the certificates of its own accord without getting them from a certification authority. Clearly this isn't all that safe. A rogue employee can pose as trustworthy, obtain a company certificate, and then run totally wild. Totally.
GETTING A DIGITAL CERTIFICATE FROM A COMMERCIAL CERTIFICATION AUTHORITY
Your third choice is to get a digital certificate from a commercial certification authority such as these:
- VeriSign (www.verisign.com). This, the most famous code-signing company, is now owned by Symantec.
- Go Daddy (www.godaddy.com) is the new kid on the block. Offers bargain code certification and other security products.
- Thawte, Inc. (www.thawte.com, a VeriSign company).
- GeoTrust (www.geotrust.com, another VeriSign company).
- DigiCert (www.digicert.com).
VeriSign's computers handle four trillion lookups per day, but the company plans to spend $300 million over the next several years to increase that capacity to four quadrillion.
Several types of certificate are available, depending on what you want to do. If you're creating and distributing software, you'll probably want to consider one of the certificates targeted at developers.
The procedure for proving your identity varies depending on the CA and the type of certificate you want. Generally speaking, the greater the degree of trust that the certificate is intended to inspire, the more proof you'll need to supply. For example, you can get a basic certificate on the strength of nothing more than a verifiable email address, but this type of certificate is unlikely to make people trust you. Other certificate types require you to appear in person before a registration authority with full documentation (such as a passport, driver's license, or other identity documents). Such certificates obviously inspire more trust.
INSTALLING A DIGITAL CERTIFICATE
Once you have a digital certificate, you need to install it so that Windows and the applications that will use it know where it's located.
SELF-CERTIFICATIONS ARE AUTOMATICALLY REGISTERED
The Office SelfCert program automatically registers the certificates it creates on the computer on which it creates them. If you created a digital certificate for yourself, you shouldn't need to install it on the same computer. If you want to practice installing it, you'll need to use a different computer.
To install a digital certificate, follow these steps (you must be logged on as Administrator to view the Certificates dialog box):
- In Windows 8, from the Desktop, press the Windows Key and type certmgr.msc.
In Windows 7, click the Start button. A Search Programs And Files field opens just above the Start button. In the Search Programs And Files field, type certmgr.msc.
- When certmgr.msc appears in the Programs list, click it. You'll possibly be asked if you want to give yourself permission to take this step. Unless you are not you, go ahead and grant the permission by clicking the Continue button. (From this point on, Windows 7 will take a different path and display different dialogs than those shown here.)
You now see the Certificates dialog box shown in Figure 19.3.
FIGURE 19.3 Windows provides the Certificates dialog box to manage digital certificates.
As you can see in Figure 19.3, I, identifying myself as an entity named TotallyTrustworthy, granted code-signing certification to myself, also TotallyTrustworthy, as described earlier in this chapter in the section “Creating a Digital Certificate of Your Own.”
- Click the Trusted Publishers folder in the left pane of the Certificates dialog box.
- Choose Action
 All Tasks Import from the Certificates dialog box's menu. The Certificate Import Wizard opens, as shown in Figure 19.4.
FIGURE 19.4 Windows includes the Certificate Import Wizard to manage digital certificates.
- Click the Next button in the wizard to locate the file you want to import. You can search your hard drive for filenames ending in .cer or .crt.
- Click Next to display the Certificate Store page of the wizard, shown in Figure 19.5.
- Choose how to store the certificate:
- To have Windows store each certificate automatically in the default certificate store for the certificate's type, select the Automatically Select The Certificate Store Based On The Type Of Certificate option button.
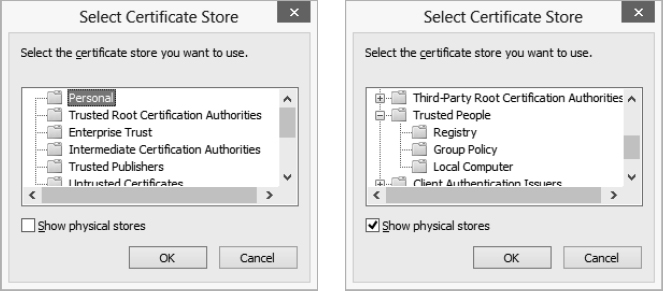
- To control where Windows stores the certificates, select the Place All Certificates In The Following Store option button. To specify the store, click the Browse button to display the Select Certificate Store dialog box, shown in Figure 19.6. Choose the certificate store (for example, Personal) and click the OK button. To specify a particular location within a certificate store, select the Show Physical Stores check box, and then click the plus (+) sign next to the store in question to display its subfolders. Select the folder you want, and then click the OK button.
- Click the Next button to finish setting up the import procedure. The Completing The Certificate Import Wizard dialog box is displayed to confirm the choices you've made.
- Review your choices, and then click the Finish button. The Certificate Import Wizard imports the certificate and then confirms that the operation was successful.
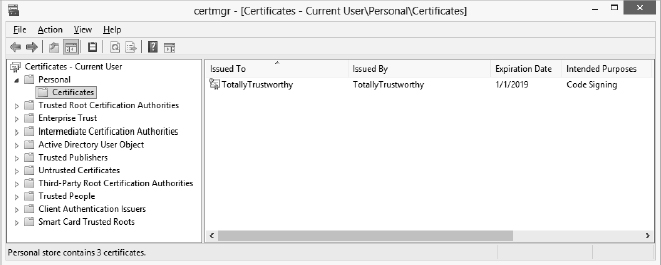

FIGURE 19.5 On the Certificate Store page of the Certificate Import Wizard, choose the certificate store in which to store the certificate you're importing.
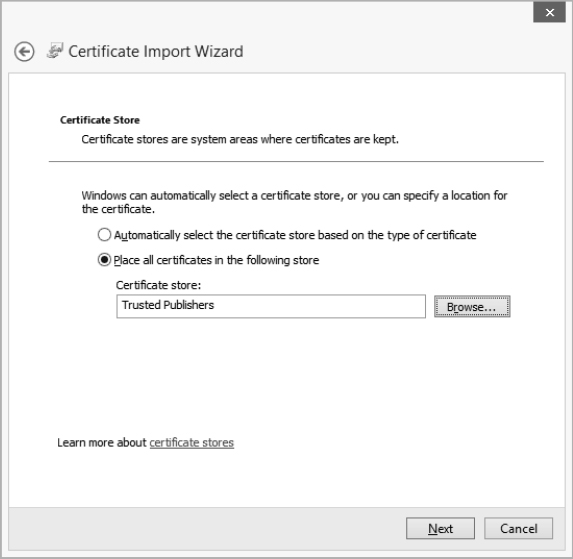
FIGURE 19.6 Use the Select Certificate Store dialog box to specify the certificate store in which you want to keep the certificate. The screen on the left shows the categories of stores; the screen on the right shows the physical stores.
Now that you've imported the certificate, it appears in the Certificates dialog box on the appropriate page.
EXPORTING A DIGITAL CERTIFICATE
You may need to export a certificate for backup so that you can keep it safely on removable media away from your computer or so that you can install it on another computer. For security, you should not store the digital certificate on your hard drive after you install it, because storing it there is an unnecessary security risk.
To export a certificate, right-click it in the Certificates dialog box, then choose All Tasks ![]() Export. Windows starts the Certificate Export Wizard, which walks you through the process of exporting the certificate. If you choose to export the private key with the certificate, be sure to protect it with a password.
Export. Windows starts the Certificate Export Wizard, which walks you through the process of exporting the certificate. If you choose to export the private key with the certificate, be sure to protect it with a password.
REMOVING A DIGITAL CERTIFICATE
To remove a digital certificate from Windows's digital certificate store, follow these steps:
- Display the Certificates dialog box (follow steps 1 and 2 in the section earlier in this chapter on installing a certificate).
- Click the folder in the left pane that contains the digital certificate in question, and then select the certificate you want to remove.
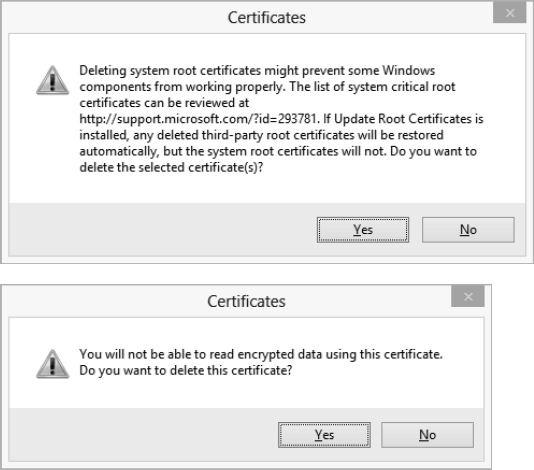
- Click the red X icon, or choose Action Delete. Windows displays a dialog box warning you of the consequences of deleting the digital certificate and asking you to confirm the deletion. Figure 19.7 shows the warning you get when removing a certification authority certificate (top) or a personal certificate (bottom). Click the Yes button to delete the certificate.
FIGURE 19.7 Two of the warnings the Certificate Manager displays when you're about to remove a digital certificate
SIGNING A MACRO PROJECT WITH A DIGITAL SIGNATURE
Once you've completed a macro project and have it ready for distribution, you sign it with a digital signature so that applications that use a high level of security can use it.
To sign a macro project digitally, follow these steps:
- In the VBA Editor, navigate to the document or template project that contains the macro project you want to sign.
- Select the project in the Project Explorer.
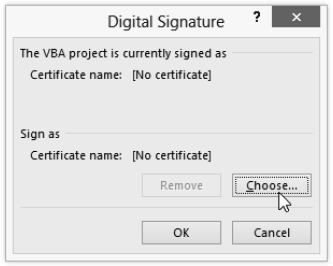
- Choose Tools Digital Signature to display the Digital Signature dialog box (see Figure 19.8).
FIGURE 19.8 Use the Digital Signature dialog box to specify the digital signature for a macro project.
If the Digital Signature dialog box lists the certificate you want in the Sign As area, simply click the OK button to use that certificate.
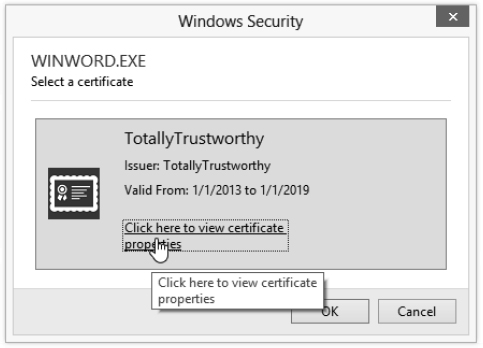
- Click the Choose button. If you have more than one certificate, you'll see a Select Certificate dialog box. (If you have only one certificate, you'll see the Windows Security dialog box where you can confirm your choice, as shown in Figure 19.9. You should then skip to step 7.)
FIGURE 19.9 Use this Windows Security dialog box to confirm your choice of certificate with which to sign the macro project.
- Click the certificate you want to use for the macro project.
- Click the OK button to apply the selected certificate and close the Select Certificate dialog box.
- Click the OK button to close the Digital Signature dialog box.
- Click the Save button on the Standard toolbar, press Ctrl+S, or choose File Save to save the document or template project with the digital signature applied to it.
REMOVING A DIGITAL SIGNATURE FROM A MACRO PROJECT
To remove a digital signature from a macro project, follow these steps:
- In the VBA Editor, navigate to the document or template project that contains the macro project.
- Select the project in the Project Explorer.
- Choose Tools Digital Signatures to display the Digital Signature dialog box.
- Click the Remove button. Both the Certificate Name readout in the area labeled The VBA Project Is Currently Signed As and the Certificate Name in the Sign As area of the Digital Signature dialog box will display [No Certificate] to indicate that the project no longer has a digital certificate assigned to it.
- Click the OK button to close the Digital Signature dialog box.
You can always reapply the digital signature to the project whenever you wish, as described earlier in this chapter.
WHOSE CERTIFICATE IS IT, AND WHAT DOES IT MEAN?
When you receive a digitally signed project, you'll probably want to find out just who has signed it and just what type of digital certificate they used. To view the details of a digital certificate, follow these steps:
- In the VBA Editor, navigate to the document or template project that contains the macro project.
- Select the project in the Project Explorer.
- Choose Tools Digital Signature to display the Digital Signature dialog box.
- For an official (VeriSign or other) certification, click the Details button to see information about the source.
If you want to view the details of one of your own, dodgy, self-signed certificates, click the Choose button in the Digital Signature dialog box, and click the Click Here To View Certificate Properties link to display the Certificate Details dialog box shown in Figure 19.10.
By examining Figure 19.10 close up, you'll see the Official Certificate icon with the Gold Seal and the Blue Ribbon (they inspire trust), but there is, alas, also a Red X symbol! Chilling. This X means that the project in question cannot be trusted whatsoever.
FIGURE 19.10 Use the Certificate Details dialog box to examine the properties of a certificate.
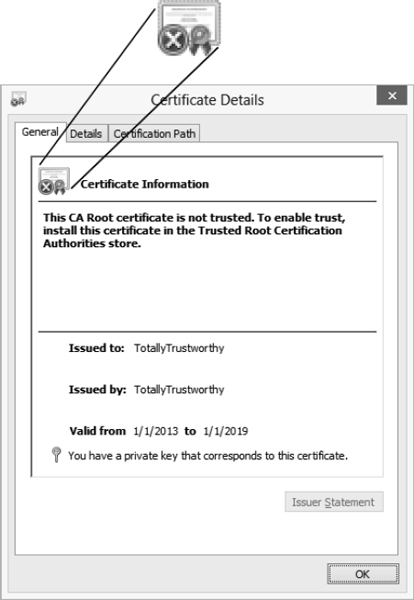
The Certificate Details dialog box has three pages:
- The General page displays basic information about the certificate: for what purpose the certificate is intended, to whom it's issued, by whom it's issued, and the period for which it's valid.
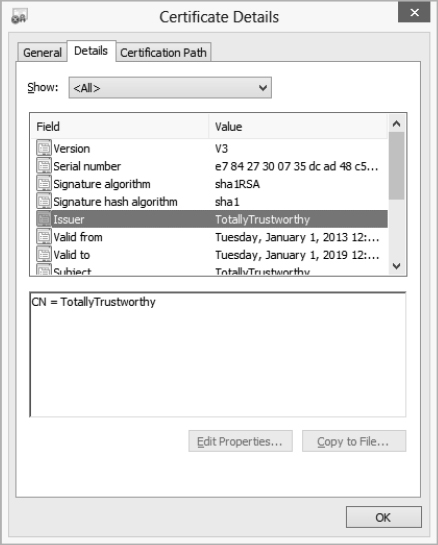
- The Details page of the Certificate Details dialog box, shown in Figure 19.11, contains specifics about the certificate. Click one of the fields in the list box to display its value in the text box below.
- The Certification Path page of the Certificate Details dialog box shows the path by which the certificate has been issued from the issuing authority to the current holder. To check one of the links in the chain, select it in the Certification Path list box and click the View Certificate button (if it's available). You'll see the Certificate Details dialog box for the certificate in question. You can then follow the certification path for that certificate if you choose or click the OK button to dismiss the second (or subsequent) Certificate Details dialog box and return to the previous one.
FIGURE 19.11 The Details page of the Certificate Details dialog box contains a host of details about the certificate.
Choosing a Suitable Level of Security
To use VBA macros safely, you or a user of your code must open the Office Trust Center and choose a suitable level of security—high enough to avoid the threats posed by malicious or incompetent code but low enough that it doesn't prevent you from running useful, safe code.
Understanding the Security Threats Posed by VBA
The VBA macro language is formidable. It can accomplish sophisticated and valuable tasks. But its capabilities also pose a threat when misused. Using relatively simple VBA commands, you can create files, delete files, manipulate existing data, and even control other applications.
Also, code developed with the best of intentions can damage a computer when run under unsuitable circumstances. For example, a procedure might delete valuable data or delete critical files, making the computer crash. Such unintentional damage happens frequently enough, but what tends to make the headlines is damage caused intentionally by malicious code in macro viruses and other malicious software (or malware).
A macro virus is simply a computer virus written in a macro language such as VBA.
Protecting against Macro Viruses
Protecting your computer (and computers connected to it in a network) against macro viruses requires three main steps:
- Install and run antivirus software, such as Malwarebytes (www.malwarebytes.org/) on your computer. And use the Windows Defender that's built into Windows. Update the antivirus software frequently and regularly with the latest virus definitions. (Most antivirus software offers automatic updating.)
- Configure suitable security settings in the applications you use, especially in those applications that host VBA or other programming languages or scripting languages. For example, configure VBA security settings as described in the next section.
- Be careful when opening any file that might contain code or an email attachment. Most modern applications warn you when there might be a problem with a file. Many macro viruses attempt to outwit such warnings by social engineering—conning the user—rather than by sophisticated programming.
For example, a macro virus may transmit itself as an email attachment to all the addresses in a friend's email application. The message and attachment suggest that the contents of the attachment are interesting or amusing—for example, jokes or compromising pictures. Because the file comes from a friend, someone known and trusted, and because the contents seem compelling, many users will open the file and ignore any security warnings. The action of simply opening the file can cause the code within the file to execute. Similarly, simply opening a Word .docm file can execute a macro. And by then it could be too late. Creepy code robots could be multiplying exponentially throughout your system.
Specifying a Suitable Security Setting
First, set a suitable level of security for your purposes. To open the Options dialog box in Access, Word, Excel, or PowerPoint, click the File tab, then choose Options. Click the Trust Center button in the left pane. Then click the Trust Center Settings button, and click Macro Settings (see Figure 19.12).
The various macro security settings are self-explanatory. However, if you are working in documents that you've created yourself and saved as the .docm type, having written your own macros you can temporarily choose the Enable All Macros option. At least while you're practicing with the examples in this book, you can trust your own documents. However, if you are opening macro-enabled document files (.docm or the other files from PowerPoint or Excel with an m appended to the filename extension), you should specify a less risky setting in your Trust Center macro settings.
There's an easier way to deal with this problem, though. You can alternatively (and more safely) employ one of the disable options shown in Figure 19.12, but while doing development work with VBA (such as experimenting with the code in this book), just ensure that you save your .docm documents in one of the trusted locations. You can see the list of trusted locations by clicking the Trusted Locations button shown in the left pane in Figure 19.12.
FIGURE 19.12 On the Macro Settings page of the Trust Center dialog box, choose the level of security you want to use when running macros.

If you choose the Disable All Macros Except Digitally Signed Macros option, any unsigned macros in your documents won't work. They are blocked from executing. However, you can get them to work again by simply moving the document files to a trusted location.
Additional Trust Center Settings
Microsoft is currently encouraging (by the pricing structure if nothing else) that its Office customers move from one-purchase, disk-based Office installation to a downloaded, pay-yearly subscription model called Office 365.
What's more, there are seven versions of Office 365, each with its own variations on security features, such as whether or not it supports Group Policy settings. To see the variations, visit this page:
http://technet.microsoft.com/en-us/library/jj851145.aspx
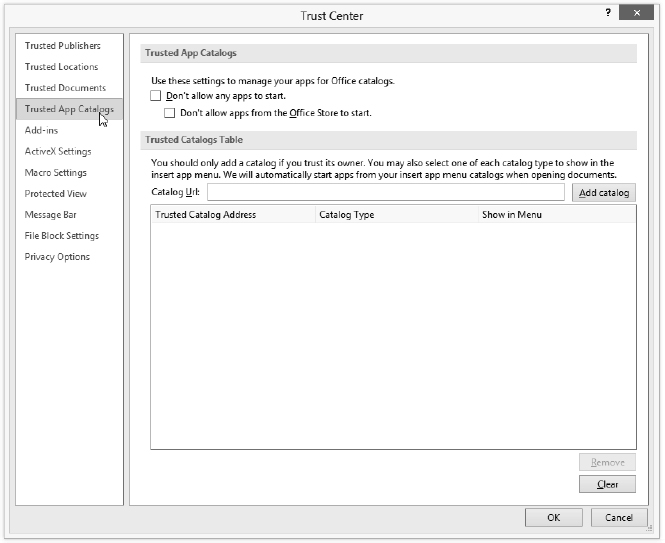
Notice also a security feature listed in the left pane in Figure 19.12 that is new in Office 2013: Trusted App Catalogs.
Open the Trusted Application Catalogs page in the Trust Center dialog box and you'll see the options illustrated in Figure 19.13.
FIGURE 19.13 On this page of the Trust Center dialog box, choose whether you want to trust app catalogs.
THE NEW OFFICE APPS
What is an Office app? Microsoft describes the new apps like this: “An app for Office is a region inside an Office application that contains a web page that can interact with the document to augment content and provide new interactive content types and functionality. apps [sic] for Office can be obtained by users from the new Office marketplace or from a private catalog in the form of stand-alone apps or subcomponents of a document template solution, or a SharePoint application.” In other words, an online image-search tool or grammar checker could be embedded in Word as a command-bar pane, like Word's own built-in Navigation or Thesaurus command bars.
At the time of this writing, the kinks have not yet been ironed out of all apps for Office, but if you're interested, you can try some free apps that are available in the Office Store. Click the Insert tab on the Ribbon, then click Apps For Office. Click See All. Click the Find more apps at the Office Store link. Your browser opens showing various apps you can add to whatever Office application you happen to be working in currently.
The apps for Office technology is, to be polite, still being refined at this time. For a sad example, try adding the Merriam-Webster dictionary to Word. Word 2013 has no built-in dictionary, presumably to encourage you to use an app instead. But this dictionary may not be the best. It doesn't have an entry for normally, for example. Worse, if you look up normal, the first definition given is perpendicular. A superior dictionary app for Office is the Bing dictionary, found here:
http://office.microsoft.com/en-us/store/results.aspx?vtags=Reference&av=zwd150
Alas, the person who wrote the interface for the Bing dictionary seems to think that the adjective lookup is interchangeable with the verb look up. But don't blame Bing. On the plus side, the Bing dictionary does have a good definition of the word naturally.
A key feature of the new Office apps is that they cannot be written in VBA. You must use “web technologies like HTML5, XML, CSS3, JavaScript, and REST APIs” instead.
When you trust a catalog of Office apps, you're telling Office that it can stop notifying you or otherwise blocking executable content (such as macros or ActiveX controls) from this source. Thus you can override on a case-by-case basis the macro and other security settings that have been specified (see Figure 19.12 and Figure 19.13).
FILE BLOCK SETTINGS
The File Block Settings page, shown in Figure 19.14, gives you the ability to block individual file types from opening or to open them in Protected View. Here you can also specify which types of files can be saved. Notice at the bottom of this page that you specify what choosing the Open option means:
- Do Not Open Selected File Types means documents are totally blocked.
- Open Selected File Types In Protected View means you can open documents in the sandbox for reading only.
- Open Selected File Types In Protected View And Allow Editing means you can open documents in the sandbox for editing.
FIGURE 19.14 File Block Settings specify what types of documents you want blocked or sandboxed.

If you want to delve more deeply into Office 2013 security features, take a look at these web pages and the links therein:
http://technet.microsoft.com/en-us/library/cc179050.aspx
http://technet.microsoft.com/en-us/library/cc179171.aspx
CAN EVEN A SIMPLE .txt FILE HARBOR A VIRUS?
You might wonder why the Plain Text Files option is included in the File Block Settings page shown in Figure 19.14. It would seem that a simple Notepad .txt file couldn't contain any dangerous executable code (any more than a stop sign could fire a bullet at you). After all, text is just words, right?
Nope. Even opening simple .txt files can install a virus. How? The bad guys use trick filename extensions. Even though it says .txt, it might only be masquerading as a text file. Executable files (programs or viruses) usually have a .exe filename extension, but by default Windows hides filename extensions. So you see Word, not Word.exe in Windows Explorer. Also, Windows files can be named with multiple extensions. So, you can have a dangerous file named OpenMe.txt.exe, but thanks to Windows's default extension-hiding, the filename that you actually see in this case is OpenMe.txt. You go ahead and double-click it thinking it will open in Notepad like most .txt files. Your hard drive explodes. Well, maybe not a detonation, but all your files could be wiped or there could be some other nasty virus surprise. OpenMe.txt was merely posing as a .txt file, and inside was a monster.
Locking Your Code
To prevent anyone from viewing the contents of a macro project, you can lock it with a password. You'll usually want to do this before distributing a project to your colleagues. If your workplace is particularly volatile, you might even want to lock projects while they are merely under development on your own desktop. The argument against locking a project on which you're still actively working is that the lock adds a step to accessing the modules and forms in the project—but if you need the security, it's well worth the small amount of effort involved.
Follow these steps to lock a document or template project:
- Press Alt+F11 to display the VBA Editor.
- In the Project Explorer, right-click the project that you want to lock, and choose Project Properties from the context menu to display the Project Properties dialog box. Alternatively, select the project in the Project Explorer and choose Tools Project Properties.
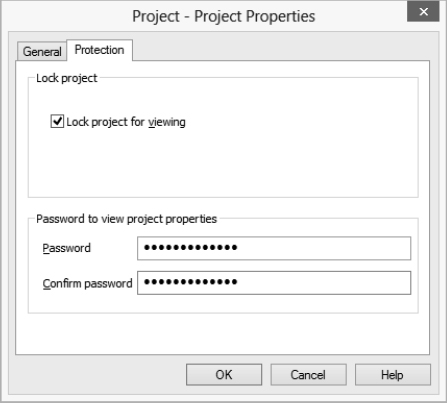
- Click the Protection tab to display the Protection page (see Figure 19.15).
- Select the Lock Project For Viewing check box in the Lock Project group box.
- In the Password To View Project Properties group box, type a password in the Password text box and the same password in the Confirm Password text box. Setting a password is compulsory: You can't lock a project without specifying a password. Without a password, how could you unlock it?
FIGURE 19.15 Use the Protection page of the Project Properties dialog box to lock the project.
- Click the OK button to apply the locking to the project. The VBA Editor closes the Project Properties dialog box but leaves the contents of the project open for you to view and work with.
- Switch back to the application, save your work, and close the application.
Once you've done that, the project is locked and can't be viewed or edited without the password. When you choose to edit a procedure in the project from the application or try to expand the project in the Project Explorer in the VBA Editor, the Project Password dialog box appears, as shown in Figure 19.16 (unless you have macros disabled in the Trust Center settings).
FIGURE 19.16 When you open a locked project, you need to enter the password for the project in this Project Password dialog box.

Type the password in the Password text box and click the OK button to display the contents of the project. (If you enter the wrong password, the application or the VBA Editor displays a Project Locked message box followed by the Project Password dialog box for you to try again.)
To unlock a project, open it in the VBA Editor (supplying the password), display the VBA Project Properties dialog box (by right-clicking the project's name in the Project Explorer, then choosing the Project Properties option from the context menu), clear the Lock Project For Viewing check box on the Protection page, and click the OK button. Save the file that contains the project.
The Bottom Line
Understand how VBA implements security. Microsoft takes a multipronged approach to protecting users from malicious VBA code embedded in documents and capable of launching itself when the user simply opens the document.
Master It Name two ways that users are protected from malicious VBA code.
Sign a macro project with a digital signature. You can add a digital signature to your projects by creating your own certification, getting it from your company, or getting it from certification authorities such as VeriSign.
Master It Describe the limitations of certifying a VBA macro project for yourself—without obtaining a certificate from your company or a commercial certification authority.
Get a digital certificate. Commercial certification authorities provide the greatest level of security, but their certification is also more difficult to attain than self-certification or certification from your company.
Master It Name some of the ways you may be required to prove your identity when obtaining a digital signature from a commercial certification authority.
Choose the appropriate security level. When choosing the right security level to use VBA macros safely, you or a user of your code must achieve a balance. The security level must be set high enough to avoid malicious or incompetent code but low enough that it doesn't prevent you from running useful, safe code.
Master It To set a suitable level of security for your purposes, open the Trust Center in Access, Word, Excel, or PowerPoint. You'll see four settings. Which one of the following five settings is not available:
- Disable All Macros Without Notification
- Disable All Macros With Notification
- Disable All Macros Except Digitally Signed Macros
- Enable All Macros With Notification
- Enable All Macros
Lock your code. You can protect your source code in the VBA Editor from others. You add a password to a project (projects are in boldface in the Project Explorer), and others can't open your VBA procedures for reading or modifying.
Master It What is the one drawback to locking your code?