Chapter 5
Establishing Your Calling Card
IN THIS CHAPTER
![]() Adding and editing your name
Adding and editing your name
![]() Selecting your field of business
Selecting your field of business
![]() Adding your contact information
Adding your contact information
Think of the top part of your LinkedIn profile as your calling card. This upper most section of your profile gives your reader a quick overview of who you are and what you do. This area also provides the information a person needs to reach out to contact you. In a single glance, your reader sees:
- Your profile picture
- Your background photo
- Your headline
- Whether you are a premium LinkedIn member
- Your location
- Your industry
- Your current company
- The last school you attended
- The number of first-degree connections you have
- Your contact information
In this chapter, I show you how to set up this section of your LinkedIn profile in the most optimized manner to ensure the right people are able to find and contact you. Let’s start with your name.
Using the Name Field Correctly
What can be easier than adding your name to your LinkedIn profile? Turns out, the name field is an area where people repeatedly make mistakes.
 First, when adding your name to your profile, you don’t need to use your full, official name. Instead, use your nickname. If your name is Christopher, but everyone knows you as Chris, use Chris on your profile.
Imagine going to a networking event or conference. You meet a man named Ricky. He hands you a business card that states his name is Rick. Later that evening, you log in to LinkedIn to connect with the people you’ve met, working off the business cards you collected. You type in “Rick” and click through pages of results to no avail. You try Ricky. It, too, yields no results. You try Richard and still nothing. You take a stab in the dark and try Ricardo and bingo!
Don’t let this happen to you. Few people are as persistent as our example. Make it easy for people to connect with you by using the name you are known by on your LinkedIn profile.
A good rule of thumb is to make sure your name is consistent across your resume, business cards, website, email signature, and other social media profiles. Make it easy for people to find you by keeping a consistency with your name.
If you have a common name and want to differentiate yourself from others with the same name, adding a middle initial works great. However, don’t just add the middle initial to your LinkedIn profile. Make sure you add it everywhere your name is used. It’s a Google world out there, and you want to make sure you are easily found.
Editing your name
First things first, check out your LinkedIn profile. How does your name appear? I can’t tell you how many times I see profiles that have the first and last name reversed. Once you see how it appears, decide if you want to change it. You may decide to add your maiden name or update your first name to your nickname. Whatever your need, here’s how to change your name on LinkedIn:
- Open your LinkedIn profile.
Click the pencil (edit) icon located just below your profile background photo.
Your profile opens in edit mode, as shown in Figure 5-1.
Type your first and last names in the name fields.
If you have a former name, such as a maiden name, add it to the former name section and then choose who sees it by selecting My Connections, My Network, or Everyone. The former name field displays on your LinkedIn profile encased in parenthesis between your first and last name. It does not display on your public profile, however.
- Click Save.
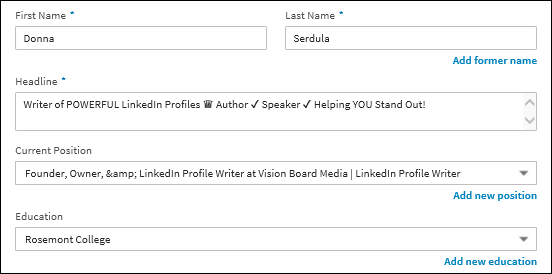
FIGURE 5-1: Editing your name.
Adding prefixes to your name
Do you have certifications that you want to highlight on your profile? Lots of LinkedIn members like to add “MBA” or “SHRM” as a prefix to their last names. At one time, this was the only way to highlight your credentials on your profile. Now there is a Certifications section of the profile to display this information.
I recommend keeping your name field clean. I know you want to shout your MBA from the rooftops, but hold off on putting it in the name field. When people search for you on LinkedIn, they aren’t including prefixes. And because LinkedIn is matching the searched name with the name of a member, you want to make it match as best you can.
Keeping your profile confidential
Do you want to maintain your privacy and keep your LinkedIn profile confidential? There is an option that allows you to include only your first name and the first initial of your last name on your LinkedIn profile. Your first-degree connections see your full name, but everyone else sees your first name and last initial.
To access this option, you must first turn off your public profile. Once your public profile is turned off, the option to display your name with only your last initial appears within your Name field.
If you are on LinkedIn only to connect with a select few individuals and not looking for additional opportunities, displaying just the first initial of your last name may work for you. However, most people use LinkedIn to network and connect with people and to forge business opportunities. Displaying your full name shows you are serious in these goals. Unless you are using LinkedIn under confidential circumstances, my recommendation is to display your full name.
I often hear from people who want to turn their profile off entirely while they work on their profile. Unfortunately, LinkedIn doesn’t provide the option to hide your profile. You can turn off your public profile so people outside of LinkedIn can’t see your profile. You can hide your last name so people searching for you can’t find you. You can turn off your activity feed so people aren’t notified that you made changes, prompting them to check out your profile. However, those who are already first-degree connections with you will see your profile if they seek your profile out.
Filling Out Location and Industry
At the top of your public profile, right below your headline, LinkedIn displays your location and industry. This information also shows up in search result listings. Location and industry also are used in advanced search. When recruiters search for a candidate, they often filter the search results by location or industry.
If you were sourcing a position located in Texas that doesn’t come with a relocation package, why see results with people located in Maine? When searching for a Medical Device Account Manager, a recruiter will narrow the results by industry to ensure they are not looking at Account Managers with backgrounds in Automotive, Telecommunications, or Machinery.
Although these fields would seem easy to fill out, I can’t tell you how many times people forget to update their locations when they move or choose the first industry that looks good to them. Medical device sales reps often choose Hospital and Healthcare because it’s the first choice they see. Rarely do they scroll down to Medical Devices.
Because the location and industry fields are front and center and play a big role in search, you want to make sure they are absolutely accurate.
Choosing your location
LinkedIn uses postal codes to determine your location. If you live just outside a major city, LinkedIn provides a couple options. You can choose the actual town and state or the closest major city. When I enter postal code 08075, I can choose Riverside, New Jersey or Greater Philadelphia Area, as shown in Figure 5-2.
Determining which location to choose, think in terms of your market and audience. A small business owner who services clients in a town may prefer to list the town and state. A professional who commutes to the city to work, might prefer to list the greater city location.
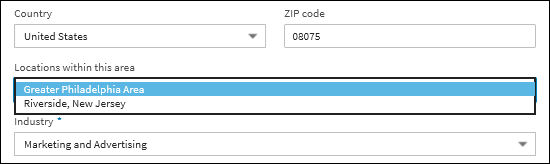
FIGURE 5-2: Choosing your location.
What do you do if you commute farther than LinkedIn assumes? There are many professionals who take the express train into New York City but live in the northern outskirts of Philadelphia. In this situation, use the zip code where your office is located. Here’s how to fill out the location field:
- Open your LinkedIn profile.
Click the pencil (edit) icon just below your profile background photo, as show in Figure 5-3.
Your profile’s intro section opens in edit mode.
Scroll down to the Zip code field and enter your ZIP code, as shown earlier in Figure 5-2.
Depending on your location, LinkedIn may offer alternative locations. Choose the most apt location from the “Locations within this area” drop-down list.
- Click Save.
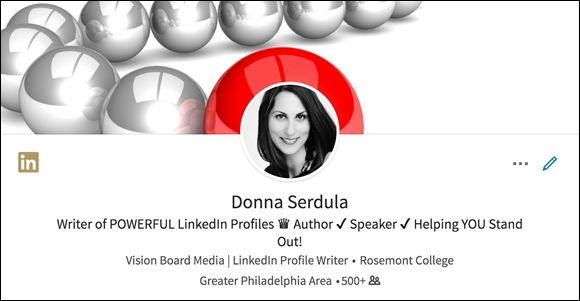
FIGURE 5-3: Getting location and industry into edit mode.
Choosing your industry
The industry section of your LinkedIn profile enables you to choose the industry that most aligns with your career. Remember, this area is used to filter searches, so when you select your industry, think in terms of the person searching for you. What industry would that person choose?
LinkedIn provides a long list of industries from which to choose. To select your industry, follow these steps:
- Open your LinkedIn profile.
Click the pencil (edit) icon just below your profile background photo.
Your profile opens in edit mode.
- Scroll down to the “Industry” section and select your industry from the drop-down list, as shown in Figure 5-4.
- Click Save.
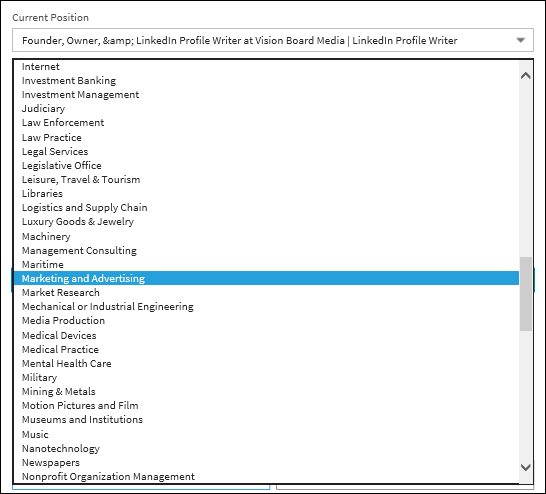
FIGURE 5-4: Choosing your industry by scrolling through the drop-down list.
If you are a job seeker looking to make a career transition, you may wonder, “Do I choose my current industry or my desired industry?” When recruiters and other hiring professionals search LinkedIn to find potential candidates, the industry field is one area they often target, as it’s a great way to narrow results and drill down to the right people. To get found, choose the industry you are targeting in your job search. This way, you can collide with the right opportunities.
What happens if your work bridges two industries? Sadly, you must make a choice. LinkedIn doesn’t allow you to select more than one industry. And no, you can’t create a second profile for the other industry. LinkedIn’s user agreement forbids more than one profile per user. When you need to choose between two industries, imagine your target audience and what they would choose for you when searching.
Scrolling through the list, don’t stop at the very first matching industry you find. Keep scrolling through until you view the entire list. Most professionals find that they fit into multiple industries. Just because you found one industry that matches, that doesn’t mean it’s the best one. For example, if you are a resume writer, you may notice that there is a Marketing and Advertising industry as well as a Writing and Editing industry. Which one do you choose? You might think, “Well, I help professionals market themselves, so Marketing and Advertising is the best one for me.” Instead, think like your target audience. Most regular Joes would categorize a resume writer as a writer and editor, not as a marketer, so Writing and Editing is what you want to use. Don’t get too fancy or over-think the industry.
Still not sure what industry to choose? Visit the profiles of colleagues and competitors to see what they list on their profiles. If you are seeing two different industries listed, go with the one the most successful person has chosen.
Suggesting a missing industry
LinkedIn’s industry list is finite, and your industry may not yet be listed. In this situation, LinkedIn welcomes suggestions. To suggest an industry to LinkedIn, follow these steps:
- Open your LinkedIn profile.
Scroll to the bottom of the profile page and click the Send Feedback link (see Figure 5-5).
The Send Feedback dialog box appears with two options: Go to Help Center and Send Us Feedback.
- Click the Send Us Feedback button.
Enter your feedback in the Send Feedback field.
You may write something like:
Dear LinkedIn,
Please include the missing industry, Super Villainy in the industry list of the LinkedIn profile. Thank you!
—Lex L.
- Click Send.
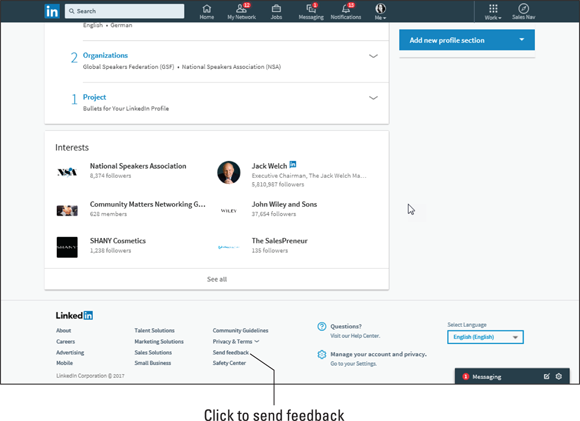
FIGURE 5-5: Finding the link to send feedback to LinkedIn.
If you do send LinkedIn a request to add a missing industry, don’t expect to get notification that it was added. LinkedIn receives zillions of requests to add industries. After making the request to add an industry, check the industry drop-down list to see if it was added. If after a few weeks it hasn’t appeared, LinkedIn may not agree that it makes sense to add it. Go back through the industry drop-down list and see if there is another industry that applies.
Including Your Contact Information
The LinkedIn profile has a dedicated section for your contact information. The Contact Information section is located at the top right of the LinkedIn profile on the desktop version and at the very bottom of the mobile version. Clicking the Contact Information box expands the section to reveal the full card of information, as shown in Figure 5-6.
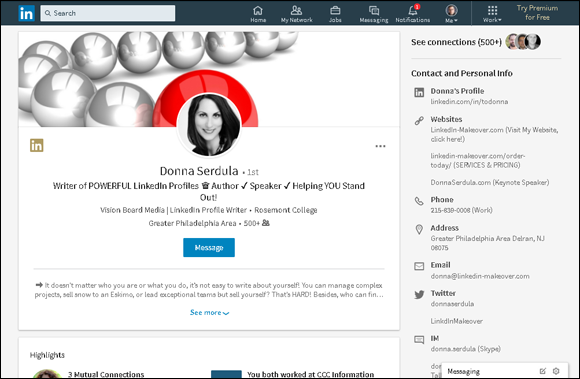
FIGURE 5-6: The Contact Information section expanded on your desktop.
The area that contains your email address, phone number, instant messaging (IM) address, and mailing address is only visible to your first-degree connections. This means that people who are not directly connected to you cannot see your phone number or email address within the Contact Information section of your profile.
You can also add your Twitter handle, birthday, and three website links. This portion (minus your birthday) of the Contact Information section is visible to everyone on LinkedIn. The only part of the Contact Information section that shows on your public profile (which is visible to people outside of LinkedIn) are the website links, as shown in Figure 5-7.
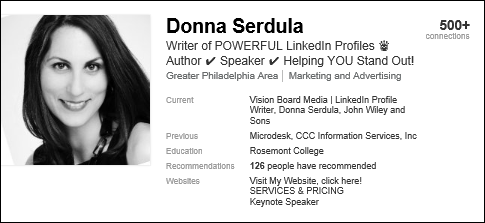
FIGURE 5-7: The Contact Information section on the Public profile. Notice only websites are listed.
Adding your email addresses
It’s important to add the email addresses you use on a frequent basis to your LinkedIn account. Whatever you do, don’t just add your work email address. Work email addresses are rarely permanent. You can easily get locked out of your LinkedIn account if you forget your password and the only email they have on file for you is the work address that was turned off when human resources handed you a cardboard box.
Alternately, you don’t want to just add your personal email address. When people upload their email address books to have LinkedIn autoconnect for them, you want to make sure that whatever email address they have listed for you matches your LinkedIn profile. If you list your personal email address but the person uploading his or her email address book only has your work email, you won’t be matched and you will have missed an opportunity to connect. Instead, add all of the email addresses you use frequently, which for most people are their work addresses and personal addresses.
To add your email address, follow these steps:
- Open your LinkedIn profile.
Click the pencil (edit) icon next to the Contact and Personal Info section located on the right side of your profile.
You are now in edit mode.
Under “Email address,” click your hyperlinked email address.
You are now in LinkedIn’s privacy and settings section.
- Click Add email address.
Add your email address in the open field and click Send verification.
LinkedIn sends a verification email to the new address.
- Open your email client and check for an email from LinkedIn.
- Confirm your email address by clicking the link in the LinkedIn email.
Go back to LinkedIn and click Done.
Within the list of addresses, note that the Send verification link has changed to Make Primary, as shown in Figure 5-8.
Select Make Primary next to the email address you want displayed and at which you want to receive email from LinkedIn.
If you have additional email addresses, add them by following Steps 4–7.
- Click the Back to LinkedIn.com link in the upper-right corner of the page when you have finished adding all of the email addresses you wish to add.
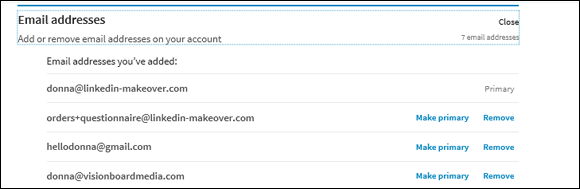
FIGURE 5-8: List of email addresses associated with your LinkedIn account.
LinkedIn allows people to upload their email address books to find potential connections. Rather than connecting one by one, uploading your address book is a quick way to connect with many people all at once. However, you need to make sure you add all of your email addresses in your LinkedIn Contact Information section. When a person uploads his or her email address book, the email address he or she has for you might be an old or personal email address. If you don’t have that email address associated with your LinkedIn account, LinkedIn will not make the match, and you will lose out on that connection request.
This might seem strange but this is exactly the reason why I also do not recommend removing past work-related email addresses. Sure, that old work email might not work, but that email address may still reside in someone’s email address book. Keep it attached to your profile as a secondary email address, not primary. By doing so, people from your past work lives are still able to find you.
 Strong networks = a successful LinkedIn experience. Make it easy for LinkedIn to suggest you as a contact to others by including all your email addresses.
Adding a phone number
LinkedIn provides one field for your phone number. You can designate it as home, work, or mobile. Enter the phone number you want displayed on your profile and accessible to your first-degree connections. To add a phone number to your profile, follow these steps:
- Open your LinkedIn profile.
Click the pencil (edit) icon next to the Contact and Personal Info section on the right side of your profile.
You are now in edit mode.
- Enter your phone number in the Phone text field.
- Select whether the phone number is Home, Work, or Mobile from the drop-down list.
- Click the Save button.
LinkedIn can be compared to an old fashion Rolodex. People used a Rolodex to store their contacts’ contact information. Nowadays, many people hop over to LinkedIn to find contact information. For this reason, it’s imperative to include your phone number.
Believe it or not, there are some people who have concerns about adding their phone numbers on their profiles. You might think their concern is rooted in a fear of identity theft, but instead they are more scared of telemarketers!
Yes, by listing your phone number on your profile you may receive a cold call from a salesperson, but you may also receive a call regarding your dream position or an amazing partnership. Are you willing to dismiss potential opportunity because you would prefer to not get bothered by a salesperson?
Success on LinkedIn is getting off LinkedIn. Strong relationships are forged in the real world. Don’t be afraid to leave the digital comfort of LinkedIn for a real-world connection. Add your phone number to your profile and make it easy for people to contact you.
There is another option if you aren’t comfortable putting forth your phone number. Consider registering for a Google Voice number and listing that number on your profile instead. Google Voice (www.google.com/voice) is a free service that provides you with a virtual phone number. You may have it forward to your actual phone number or go straight to voicemail. It’s an easy way to provide a number while still maintaining your privacy.
Adding your IM address
The next information field is IM, which stands for instant messaging. Instant messaging is a way to send and receive short text-based messages instantly either by phone or by using a chat client on your computer. The instant messaging types that LinkedIn accepts are:
- Skype
- Yahoo! Messenger
- ICQ
- Google Hangouts
You may choose up to three IM addresses to list. If you have an old AIM username but never use it, don’t add it. If you don’t IM, leave the field blank.
Skype is a great IM to add. Not only is it free, but many companies use Skype as an integral part of the hiring process. Skype is used for virtual job interviews. By including a Skype username, you are showing that you are easily available to recruiters and hiring managers and you won’t require much help to get up and running. That’s definitely a bonus for busy recruiters or human resources professionals. If you don’t have a Skype account, don’t worry. It’s easy to register. Simply visit www.Skype.com and register for a free account.
To add an IM address, follow these steps:
- Open your LinkedIn profile.
Click the pencil (edit) icon next to the Contact and Personal Info section located on the right side of your profile.
You are now in edit mode.
- Select “Add instant messenger,” which appears under your email address.
- Add your handle or username in the open field in the instant messenger field that appears.
Select the IM type from the drop-down list.
Repeat Steps 3–5 to add up to two more IM addresses.
- Click the Save button.
Adding your work address
The Address field in the Contact Information section is for your work or office address. If you work from home, omit the street address and enter just your city, state, and zip. This way people can't get door-to-door directions to your house, but they will know where you are generally located.
If you work from an office complex, but are still hesitant to enter your address on your LinkedIn profile, you may leave the address field empty. However, I’ve found that the people who hate to add their office address on LinkedIn somehow have no problem tossing their business card into a fish bowl to win a golf club raffle.
To add your work address, follow these steps:
- Open your LinkedIn profile.
Click the pencil (edit) icon next to the Contact and Personal Info section on the right side of your profile.
The Contact Information section expands to show the contact information fields.
- Enter your office address information in the Address field.
- Click the Save button.
Adding your Twitter account
Not only can you add your Twitter account so people know how to find you on Twitter, you can also enable cross-posting between these two awesome social networks. By linking your Twitter account with your LinkedIn account, you are able to kill two birds with one stone. When you post a LinkedIn status update, you can have that status message go to both LinkedIn and Twitter.
This cross-posting only goes in one direction: from LinkedIn to Twitter. If you want LinkedIn to post your Twitter updates, you need to use a third-party social media aggregator such as Hootsuite (www.hootsuite.com).
To set up this cross-posting ability, you must have a Twitter account already established. If you have more than one Twitter account, you are in luck — LinkedIn allows you to add multiple Twitter accounts.
If you use Twitter for primarily personal reasons, you should opt not to connect it to your LinkedIn profile. LinkedIn is a professional network. You don’t want to lead professional connections to your Twitter account where they can read your tweets about television programs, sports teams, or see pictures of your kitten. On the other hand, if you are tweeting your knowledge, providing advice, directing people to interesting articles, and adding value, absolutely connect your Twitter feed to LinkedIn. Here’s how:
- Click the Me icon from LinkedIn’s main navigation bar.
- Click Settings & Privacy from the drop-down menu that appears.
- Click Partners and Services, which is located on the left side of the page under the Account tab.
- Locate Twitter settings and click Change.
- Click “Add your Twitter account.”
Click the Authorize App button to allow LinkedIn to access the Twitter account you are already currently logged into.
Once your Twitter account is successfully linked, you may need to provide your Twitter username and password. You will see it listed in the Contact Information section.
Choose who can see your Twitter account by clicking the drop-down list under your Twitter account name and choosing Everyone or No One, as shown in Figure 5-9.
I strongly recommend selecting Everyone unless your Twitter account is used for personal activity. In that situation, choose No One.
- If you add more than one Twitter account, select the preferred account LinkedIn uses to share status updates from the drop-down list.
- Click Save Changes.
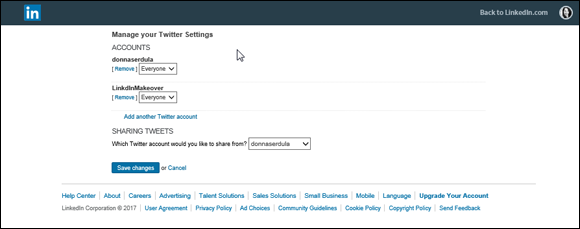
FIGURE 5-9: Managing your Twitter settings within LinkedIn.
Adding WeChat
I had never heard of the WeChat chat client until LinkedIn added it as an option within the Contact Information section. WeChat is popular in China; it’s one of the few mobile chat clients the government allows. If you are not familiar with WeChat and don’t want or have a WeChat account, feel free to skip this section. If you are already a WeChat user, you can link your WeChat username and QR code to your LinkedIn profile. Here’s how:
- Click the Me icon at the top of your LinkedIn homepage and select Settings & Privacy from the drop-down menu.
Scroll down to the Partners and Services section of the Account tab, click Change next to WeChat settings.
You are now at the Manage your WeChat Settings page, as shown in Figure 5-10.
Click Add WeChat account with QR code.
A QR code displays on your screen.
- From the WeChat app on your mobile device, tap Discover and select Scan QR Code.
Scan the QR code displayed on your LinkedIn profile screen.
You will see a confirmation message appear across the top of your Settings page that you’ve successfully connected your WeChat username with your LinkedIn profile.
- Click Save Changes.
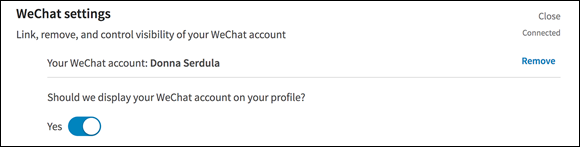
FIGURE 5-10: Managing WeChat visibility.
Adding websites
In addition to all of the other types of contact information, you can also add three website links to your LinkedIn profile. If you have a blog, a company website, an online portfolio, or some other Internet destination, this is the place to add the URL (see Figure 5-11).
When you get into the edit mode of the website area, you see there are two fields: a text field to enter the website’s URL and a drop-down for the anchor text. Anchor text refers to the hyperlinked words on a web page. These are the underlined words you click that link you to another website. The drop-down list choices for the anchor text are:
- Personal
- Company
- Blog
- RSS Feed
- Portfolio
- Other

FIGURE 5-11: An empty website section.
You could choose from LinkedIn’s drop-down list — it makes sense to choose Personal, Company, or Blog — but how boring and non-descriptive is that? Instead of accepting the default choices, my recommendation is to ignore all of those choices and instead go with Other. By choosing Other, you are able to enter in more descriptive text to customize your anchor text. Customizing the hypertext helps your reader identify the link easily and makes the link more attractive to click.
Instead of choosing Company, type in the name of the company. For example:
Vision Board Media’s Website
Instead of choosing Portfolio, describe exactly what the person will find when clicking the link:
Portfolio of Business Headshots
Instead of choosing Blog, get more descriptive:
Supply Chain Mgmt Articles
Notice how I abbreviated Management? You only have 30 characters available for anchor text so you must be brief.
Check out Figure 5-12 to see how an optimized website section appears in edit mode.
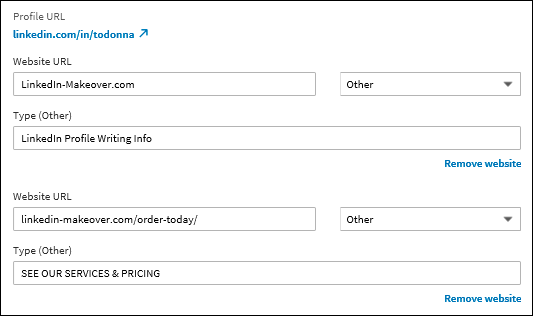
FIGURE 5-12: This is how an optimized website section appears in edit mode.
To enter up to three website URLs to your LinkedIn profile, follow these steps:
- Open your LinkedIn profile.
- Click the pencil (edit) icon next to the Contact and Personal Info section located on the right side of your profile.
- Click “Add website.”
- In the URL text field, enter the URL of the website.
Click the down arrow next to the drop-down list and choose Other.
An additional text box to enter your website title appears. If you enter the full URL including
http://www., LinkedIn will strip it upon saving. You only need to enter the actual domain without thehttp://or thewww.- In the Type (Other) text field below the Website URL field, enter the hyperlinked text.
- Repeat Steps 3–6 for up to two additional websites and then click Save.
In the next chapter, get ready to vogue! I show you everything you need to know to take a professional profile picture that impresses. Let’s go!