Chapter 4
Optimizing the “Behind the Scenes” Sections
IN THIS CHAPTER
![]() Keeping your profile changes a secret
Keeping your profile changes a secret
![]() Knowing when LinkedIn sends out an activity update on your behalf
Knowing when LinkedIn sends out an activity update on your behalf
![]() Creating a customized link to your profile for marketing
Creating a customized link to your profile for marketing
![]() Marketing your profile for more profile views
Marketing your profile for more profile views
Not every part of your LinkedIn profile is there for the whole wide world to see. In this chapter, I take you behind the scenes of your profile to make sure every invisible nook and cranny is optimized for success. You learn how not to bombard your LinkedIn connections with notifications that you updated your profile. You also discover when and how to turn notifications back on and how that helps you rank higher in LinkedIn search.
Managing Profile Changes
When you make changes to your LinkedIn profile, a notification may be sent out alerting your network. Activity updates may get broadcast to your connections’ LinkedIn home page newsfeeds and appear on your profile’s Recent Activity page. By seeing your profile updates on their newsfeeds, your connections are reminded of you and they may find themselves compelled to click on your profile to learn more.
LinkedIn updates may be broadcast to your connections if you perform the following changes to your profile:
- Upload or edit your profile picture
- Add a new link to a website
- Add a new job position
- Edit the title of your current position
- Add additional skills to your profile
LinkedIn also sends notifications if you perform any of the following additional activities:
- Recommend someone
- Add a connection
- Follow a LinkedIn university page
- Follow a LinkedIn company page
- Join a LinkedIn Group
- Post or comment on discussions within a LinkedIn Group
- Have a current work experience anniversary
- Upgrade to a premium account (with the exception of Job Seeker)
- Follow an influencer, channel, or publisher
- Share content on your newsfeed or as a published post
- Comment on or like connections’ shared content
Turning off update alerts
Regardless of the benefits, there may be times when you don’t want people to know you are making changes to your LinkedIn profile. For example, if you are updating your LinkedIn profile in preparation of a new job search, it’s best your employer isn’t notified of such a change. Or you may be giving your profile page a complete overhaul, and you don’t want to bombard your network with information about each and every change. Luckily, LinkedIn provides the ability to turn off the activity updates associated with profile changes and even delete your recent activity notifications.
To turn off LinkedIn update alerts, follow these steps:
- Click the Me icon from LinkedIn’s main navigation bar.
- Click Settings & Privacy from the drop-down menu that appears.
- Click the Privacy tab.
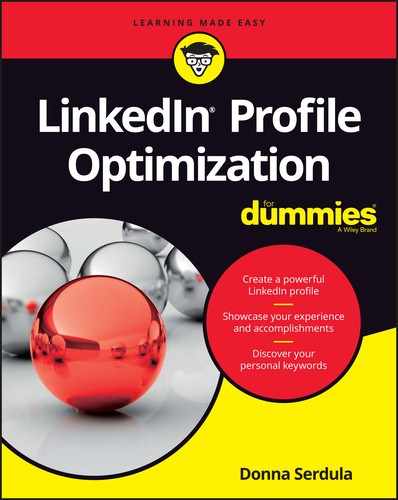
- Click “Change” next to Sharing profile edits, as shown in Figure 4-1.
- Toggle the Yes/No button so that it reads, “No.”
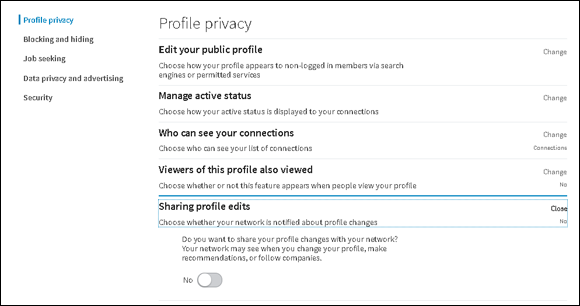
FIGURE 4-1: Select No to turn off update alerts.
 Turning off profile updates doesn’t turn off your profile visibility. It’s the notification of your edits that is turned off; your profile is still on and any changes that you save are visible to visitors of your profile.
Manually removing updates
Did you get excited and start updating your LinkedIn profile without turning off your activity update notifications? Now these changes are on your recent activity screen and quickly hitting your connections’ newsfeeds. Don’t worry! You can manually remove these updates even after they are broadcast out. Here’s how:
- Click the Me icon from LinkedIn’s main navigation bar.
Under Manage in the drop-down menu that appears, click Posts & Activity.
Your recent activity appears.
- Hover your mouse pointer over the update you want to delete and click the More Options icon (the three dots located in the upper-right corner of the update).
Click Delete post, as shown in Figure 4-2.
The selected update is deleted from the Recent Activity log on your profile.
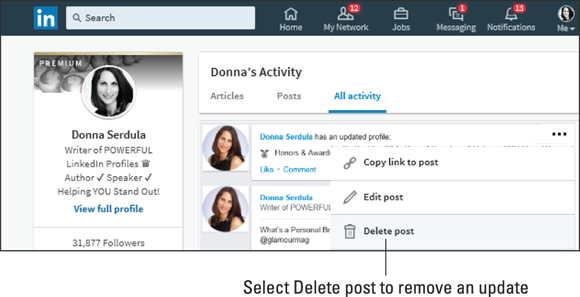
FIGURE 4-2: Manually remove an update by selecting Delete post.
Knowing when to allow update alerts
Once your profile is optimized and you are ready to unleash it into the world, go back to Privacy & Settings and toggle the Sharing profile edits button to Yes. Don’t worry; all of the updates that you recently made to your profile are not broadcasted out to your connections. Only new changes to your profile since toggling the Sharing profile edits option to Yes appear on your connections’ LinkedIn home page newsfeeds and your Recent Activity page.
You may feel the temptation to keep those update notifications set to No all the time, but I highly suggest allowing update alerts. Often when people see you made changes to your profile, they are compelled to visit your profile. Most people want more views to their LinkedIn profile, and this is such an easy way to drive traffic to it. Don’t feel shy. Your network wants to stay up to date on your professional career.
Once you are finished updating your profile, toggle the Notify Your Network button to Yes. Go back to your profile and make a single change to trigger an update. My suggestion is to edit the title of your current position. This way you are now alerting your network that a change has occurred, but you are not inundating them with a lot of changes.
Turning On Your Public Profile
Your LinkedIn profile is not just visible within LinkedIn. You can allow the world the ability to see your profile by turning on public version of your profile. Once your public profile is turned on, it is indexed by search engines and returned as a search result for pertinent searches. Anyone can view your public profile regardless of whether they are logged in to LinkedIn or not.
Your profile on LinkedIn is your outpost on LinkedIn. Not everyone is on LinkedIn, and your public profile acts as your outpost on the entire World Wide Web.
If you want your public profile to be found and seen outside of LinkedIn, follow these steps to turn it on:
- Open your LinkedIn profile.
- Click “Edit your public profile & URL” located in the right sidebar (see Figure 4-3).
- Under the section, “Customize Your Public Profile” located in the right column, select the radio button next to “Make my public profile visible to everyone,” and next to “Public,” as shown in Figure 4-4.
Scroll down and click Save.
Your LinkedIn profile now appears in search engines and is visible to non-LinkedIn members.

FIGURE 4-3: Click “Edit your public profile & URL” to customize your public profile URL.
FIGURE 4-4: You can control how your profile appears outside of LinkedIn.
In addition to controlling whether your profile is visible by the public, you determine the profile sections that appear for public consumption. Depending on your privacy needs, you choose what sections appear and which remain hidden.
As shown in Figure 4-4, some sections can be toggled on or off like honors and awards, organizations, interests, and so on. Other sections have enhanced controls. For example, you can turn off your current experience but leave your past experiences on. You may choose to show your current or past job titles but not the job description details. This works well when you want to show your career trajectory, but not allow the public to see every accomplishment and responsibility.
 Although you can toggle sections off, remember, this is only your public profile. Logged-in LinkedIn members see all completed profile sections.
Here’s how to preview your public profile and turn sections on and off:
- Open your LinkedIn profile.
- Click “Edit your public profile & URL” located in the right sidebar.
In the “Customize Your Public Profile” section, use your mouse to select each checkbox next to the sections you wish to appear in your public profile.
Clicking a checked box removes the check and prevents that section from appearing. As you add and remove sections, you can preview what your public profile looks like to the outside world.
- Scroll down to see a preview of your profile.
- When you are satisfied with your choices, click Save.
You may feel compelled to turn off your public profile and prevent people from outside LinkedIn to view it. Your LinkedIn profile is intended to tell your story and control how others see you. I strongly advise you to take a deep breath and leave your public profile on and visible.
It’s a different world out there, and people are interested in learning more about you. By providing them with your LinkedIn profile — your story told your way — you are allowing them to find something out about you on your own terms. By preventing this information, the person looking to learn more about you may decide to dig even deeper and find information about you that you cannot control.
Creating a Personalized URL
There may be times you want to send people directly to your LinkedIn profile. Most people include a link to their profiles in their resume letterhead, email signatures, website bios, or even on business cards. Providing a link to your profile is even more important when you have a common name. Without a link, a person wanting to connect to you on LinkedIn must perform a name search. It’s not easy finding the right John Smith or Peter Jones in 10 pages of search results. Alternately, it’s hard to find the right Charles or Jennifer. Did they list their name as Chuck, Charlie, Charles, Jenna, Jen, Jenny, or Jennifer?
Whatever you do, don’t copy the URL in the address bar of your browser while in edit mode. It looks something like this:
https://www.linkedin.com/profile/edit?trk=nav_responsive_sub_nav_edit_profile
A person who uses that URL in hopes to find yours will visit their own LinkedIn profile instead. LinkedIn uses dynamic URLs that pull content from their database depending on user input. That dynamic URL works for you now, but it’s not static and won’t necessarily work in the same way if you copy it and paste it for someone else’s use.
Instead, you want to provide a direct link to your public profile with a customized URL. LinkedIn automatically assigns your profile a static web address link. However, this default address is a jumble of letters and numbers that is not easy to remember or market. Luckily, LinkedIn gives you the ability to change this URL to one that is easy to remember and easy to promote, something that looks like this:
https://www.linkedin.com/in/firstnamelastname
Here’s how you create a customized link to your LinkedIn profile:
- Open your LinkedIn profile.
- Click “Edit your public profile & URL” located in the right sidebar.
- Under the section, “Your public profile URL,” which appears in the right column, click the pencil (edit) icon next to your URL, as shown in Figure 4-5.
Type your new customized URL in the text box that appears (see Figure 4-6).
Your custom URL can have 5 to 30 letters or numbers. Spaces, symbols, or special characters are not allowed. The customizable part of the URL is case insensitive. This means DavidJones or davidjones take you to the same profile.
- Click Save.

FIGURE 4-5: Click the pencil icon to edit your URL.
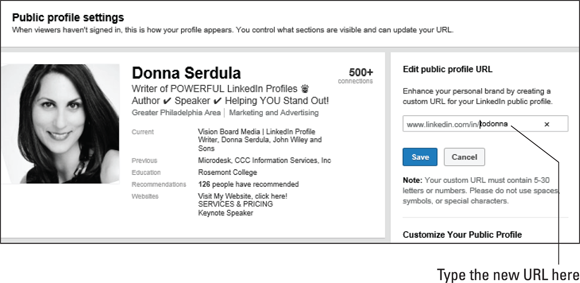
FIGURE 4-6: Customize your public profile URL to one that is easy to remember.
Recruiters often tell me that a personalized URL is a sign that the person has kept up with technology and is a true professional. Recruiters won’t pass by a profile because of a non-customized URL, but they may pass silent judgment on that candidate.
Using your name
When choosing the text for your customized URL, don’t worry about getting creative. Choose your name because it is your profile. Whatever you do, do not use your company’s name for the URL. Your public URL is a permanent link to your LinkedIn profile. Companies are not permanent, and although you can change your URL, old links with the old URL may exist for some time. Create a URL that is permanent by using the one thing that is permanent for you: your name.
Oh no, my name is taken!
Unfortunately, most common names are already taken. When this happens, you simply must find an alternative way of stating your name.
Pretend your name is David Jones. Here are some ideas of re-phrasing your name that might not yet be taken:
- First initial and last name: DJones
- First name, middle initial, and last name: DavidXJones
- First and middle initial and last name: DXJones
I highly discourage users from adding numbers to the end of their customized URLs. When I see a number at the end of a URL, I think the person is just one of many. A number gives the feeling of an assembly line of professionals rather than a unique brand. When your name is taken and there is no other way of stating it, utilize a prefix rather than a numerical suffix.
Here are some ideas:
- ToDavidJones
- GoDavidJones
- ImDavidJones
- theDavidJones
- SeeDavidJones
- YourDavidJones
- VisitDavidJones
Marketing your public profile URL
The beauty of your LinkedIn profile is that when people visit, they can connect with you. By connecting with you, they are subscribing to your activity feed. When you post an activity update or blog, they receive a notification. By driving people to your profile and asking them to connect, you are ensuring a long relationship with them rather than a once-and-done visit.
There are a number of areas you can place your public profile link:
- Brochures
- Business cards
- Email signature
- Facebook profile
- Letterhead
- Resume
- Sales literature
- Tattoo across your forehead (just teasing!)
- Twitter bio
- Website
Improving Your Profile’s Strength
LinkedIn cares about your profile. It wants you to take your profile seriously and update it regularly. LinkedIn even provides a rating to your profile to show you how well you are doing. The Profile Strength meter, shown in Figure 4-7, sits on the top of your profile. This meter measures how well you optimized your profile.
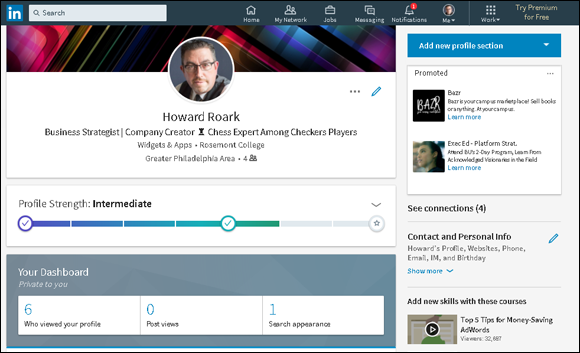
FIGURE 4-7: Your profile strength meter rates the effectiveness/robustness of your profile.
There are five levels of profile strength:
- Beginner
- Intermediate
- Advanced
- Expert
- All-Star
The stronger your profile, the more successful your profile. LinkedIn has stated, All-Star profile are “27 times more likely to be found in recruiter searches” and will gain “up to 3 times more profile traffic from Search, Feed, and My Network.” LinkedIn hasn’t revealed its search engine algorithms, but knowing how important it is for LinkedIn to provide relevant and complete profiles in search results, it would make sense that stronger profiles are rewarded with high placement on search result listings.
It’s worth noting that your profile strength is not broadcast out for everyone to see. Only you, logged in and looking at your profile in edit mode, can see it.
Your profile strength increases as you add more content to your profile. All-Star is the highest level of strength. In order to achieve a perfect LinkedIn profile that ranks as an All-Star, you must have the following sections completed on your profile:
- Your industry and location
- An up-to-date current position (with a description)
- Two past positions
- Your education
- Your skills (minimum of five)
- A profile picture
- At least 50 connections
Unfortunately, some of the items that increase your profile strength are outside of your control. If you are a displaced worker looking for your next opportunity, your profile will only rate Expert because you do not have a current experience. Likewise, if you are an entrepreneur who dropped out of college to create a startup, you too are out of luck. Without a college to list on your profile, the highest strength your profile can obtain is Expert.
Dealing with a lack of a current position
When you are out of work and looking for a new job, having a strong, complete LinkedIn profile is important. You want your profile to rank high in search results when a recruiter or hiring manager is looking for candidates.
Having a profile that is at Expert level and not an All-Star won’t decimate your chances of getting found or finding a new job, but it is certainly annoying. I often hear from job seekers wanting to know what they can do to obtain a 100% complete, All-Star profile.
In this situation, you may decide to add a current position that states you are looking for your next job opportunity. In Figure 4-8, you can see what adding a “seeking new opportunity” experience looks like.
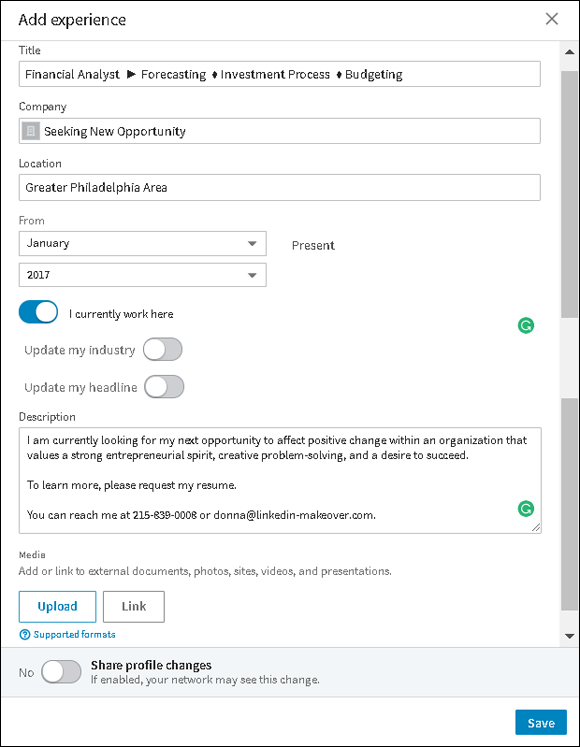
FIGURE 4-8: Adding an experience if you are currently out of work.
 Adding a current experience works fabulously; however, I must caution you that adding a current experience also cloaks your unemployed status. I have found that recruiters are divided. Some don’t mind seeing a current experience reading “Unemployed.” Others find an unemployed current experience devious. Ultimately, there is no right or wrong answer; you must decide what makes the most sense for you.
Additionally, LinkedIn sends work anniversary notifications to your network. Be warned; there is a chance that if you are unemployed for a year, your network will be prompted to congratulate you for your one-year anniversary at “Looking for my next opportunity.”
Adding a school without a degree
Whether you opted to not attend college or decided instead to hire someone who did, your profile is also stuck at the Expert strength level. Luckily, there are a few things you can do. My recommendation is to bypass the school list LinkedIn provides and write in your own. If you want to stay on the up and up, enter your high school information. On the other hand, you can get a little cheeky and add a school where you took a class. I have had clients list Sur La Table, Sip and Paint, and The Esteemed School of Hard Knocks. When adding a non-accredited institution of higher learning, leave the degree field empty; it’s not a required field.
Expanding your network
The area of the LinkedIn profile that causes the most difficulty in getting to All-Star status is connecting with 50 people. It’s important to have a strong network so you can earn an All-Star profile, but a strong network is also the backbone of the site.
Connections are key to your success on LinkedIn. When you search LinkedIn for people, the results are comprised of people within your LinkedIn network who meet your search criteria. When people search for you or someone like you, you will appear in their search results as long as you reside within their LinkedIn network. The more people you have in your network, the higher you rank in LinkedIn search, and the more often you are found.
LinkedIn uses connections to provide additional insight unlike any other social network. LinkedIn doesn’t just show with whom you are directly connected. LinkedIn unveils how you are connected to other people.
Your LinkedIn Network consists of first-, second-, and third-degree connections. These degrees describe how a person is connected to another person. A first-degree connection is someone you have added to your network or someone who has added you to their network. A second-degree connection is a person connected to your first-degree connection but not directly connected to you. If a person is a second-degree connection, that means you have a mutual connection in common. A third-degree connection is someone who is connected to a second-degree connection. If a person is a third-degree connection, they know someone who knows a person you know directly. A person is considered outside of your network if you do not share any connections within three degrees of that person.
To truly leverage LinkedIn and get to All-Star profile strength, you must get your online network to reflect your offline network. Here are some ideas of people you can invite to connect on LinkedIn:
- Alumni
- Current colleagues
- Current employer
- Family
- Friends
- Past colleagues
- Past employers
LinkedIn provides a tool to make connecting easy. It’s called People You May Know. Rather than wracking your brain trying to come up with people to connect, the People You May Know screen provides suggestions based upon commonalities.
LinkedIn shows you the name, current job title, and profile picture of people who you may know. They base these suggestions off of similar profile information such as working at the same company or going to the same school. LinkedIn also looks at the contacts you’ve imported from your email and mobile address books and offers profiles with the same contact information.
To use People You May Know to help expand your network, follow these steps:
- Open your LinkedIn profile.
- From LinkedIn’s main navigation bar click My Network.
- Scroll down to “People you may know” to view the connection suggestions, as shown in Figure 4-9.
When you see someone you know and would like to add to your network, click the Connect button.
Clicking the Connect button immediately sends a default LinkedIn connection request.
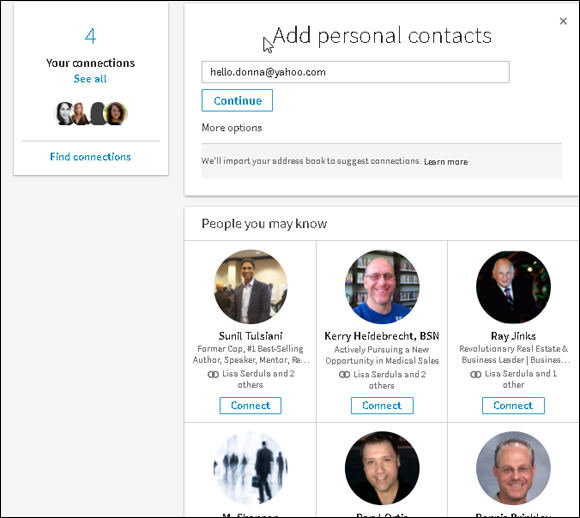
FIGURE 4-9: The “People you may know” section suggests profile connections.
You cannot personalize the invitation to connect message from the People You May Know page. If you would like to personalize your invitation to connect message, do the following:
Hover your mouse pointer over the person’s name and click.
This takes you to that person’s LinkedIn profile.
Click the Connect button.
A pop-up menu appears prompting you to either add a note or send the invitation immediately without a personalized note.
If the Connect button doesn’t appear in the profile introduction section, you may have to click the More Options button located below the background photo and then choose Connect from the drop-down list, as shown in Figure 4-10.Click Add a note.
Although you can send an invitation to connect, it’s best to always add a personalized note.
- In the “You can customize this invitation” field, personalize the invitation as you wish (see Figure 4-11).
- Click the Send Invitation button.
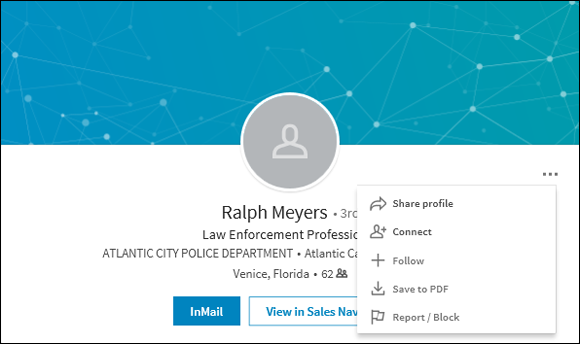
FIGURE 4-10: To send a personal connection invitation, you need to go to that person’s profile directly.
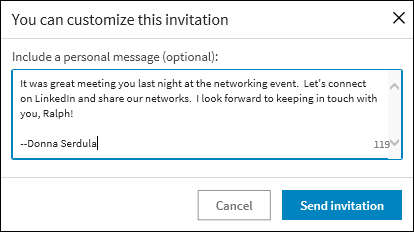
FIGURE 4-11: Customizing your connection request.
By expanding your network, you will turn up more often in searches, have more views to your profile, and find more opportunities via LinkedIn. Next, we take a look at setting up your digital calling card.