Chapter 11
Creating a PowerPoint Presentation
IN THIS CHAPTER
Designing a presentation
Creating a PowerPoint presentation
Using different views to create a presentation
Adding text
PowerPoint works as a visual aid for giving presentations. (If you never give presentations, you probably don’t need PowerPoint.) Instead of fumbling around creating, organizing, and displaying transparencies with an overhead projector, you can use PowerPoint on your computer to create, arrange, and display slides that organize information as text and graphics.
Besides displaying slides on the screen, PowerPoint also lets you add notes and turn your entire slide-show presentation into printed handouts so the audience can review your presentation with a printed copy of each slide. The next time you need to convince or inform an audience, use PowerPoint to create and deliver your presentation. (Just make sure that you never use PowerPoint to propose marriage, though.)
Defining the Purpose of Your Presentation
PowerPoint can make creating and delivering a presentation easy, but before you start creating fancy visuals with eye-popping graphics and colors, step away from your computer, put down your copy of PowerPoint, and place your hands in the open where anyone can see them.
Rushing into PowerPoint to create a presentation is likely to create a dazzling array of colors, fonts, and graphics that may look interesting but won’t convey your message effectively. The best way to create an effective presentation is to take some time to think about the following:
- What is your point? Define the single most important idea of your presentation.
- Who is the target audience? A presentation given to engineers and scientists will look different from the same presentation given to CEOs and venture-capital executives.
- What do you want the audience to do? A speaker may present new ideas to a conference, while a politician may present ideas designed to sway the audience to take certain actions, such as voting a specific way.
After you understand the purpose of your presentation, your audience, and what you hope your presentation will do, you’re ready to go through the physical steps of creating a presentation in PowerPoint.
 To avoid confusing or boring your audience, keep each slide in your presentation simple in a way that enhances your talk. Don’t cram lots of text on a slide; people will read the text without listening to your presentation.
Creating a PowerPoint Presentation
A PowerPoint presentation consists of one or more slides where each slide can display text and graphics. Creating a presentation means adding slides and typing text or pasting graphics on each slide.
If you’ve been working on another presentation in PowerPoint and you need to start a new, blank presentation from scratch, follow these steps:
- Click the File tab.
-
Click New.
PowerPoint displays different templates you can choose.
-
Click Blank Presentation.
PowerPoint displays a blank slide with a title and subtitle box, as shown in Figure 11-1.

FIGURE 11-1: A new presentation consists of a single blank slide.
After you create a new presentation, you need to fill it with content (text and graphics). PowerPoint gives you two ways to view, edit, and design your presentation:
- Normal
- Outline view
Both views let you add, delete, rearrange, and edit slides. The main difference is that Normal lets you add graphics and modify the visual appearance of a slide. Outline view displays your entire presentation as an outline in which each slide appears as an outline heading, and additional text on each slide appears as a subheading. Outline view makes it easy to focus on the text of your presentation without the distraction of the visual appearance of your slides.
 You can create an entire presentation using Normal without ever using Outline view at all (or use Outline view without ever using Normal at all). Outline view is most useful for creating and organizing a presentation. Normal is most useful for viewing the appearance of multiple slides at once.
Designing a presentation with the Normal view
Slide view shows your entire slide show as thumbnails in the left pane and the currently selected slide in full-size view in the right pane, as shown in Figure 11-2.

FIGURE 11-2: Slide view lets you edit a single slide at a time.
Creating a new slide
To create a new slide within Slide view, follow these steps:
- Click an existing slide in the thumbnail pane.
-
Click the Home tab.
The New Slide icon also appears on the Insert tab.
-
Click the New Slide icon in the Slides group.
PowerPoint inserts your new slide after the slide you selected in Step 1.
If you click the top half of the New Slide icon, PowerPoint creates a blank slide based on the slide you selected in Step 1. If you click the bottom half of the New Slide icon, a menu appears; you can choose from a variety of different slide designs based on the current template you’re using (as shown in Figure 11-3).

FIGURE 11-3: Clicking the bottom half of the New Slide icon displays a menu of slide layouts.
Rearranging slides
You can rearrange the order of your slides by following these steps:
- In the thumbnail pane, click the slide that you want to move to a new position in your presentation.
-
Hold down the left mouse button and drag (move) the mouse up or down within the thumbnail pane.
PowerPoint displays a horizontal line between slides to show you where your slide will appear. If you drag the mouse to the top or bottom of the thumbnail pane, PowerPoint automatically scrolls up or down the list.
- Release the left mouse button when you’re happy with the slide’s new position.
Hiding or deleting a slide
If you have a slide that you no longer want in your presentation, you can either hide or delete it. Hiding a slide keeps the slide but doesn’t display that slide when you give your presentation. You may want to hide a slide in case you need it later or so you can reference the information on this slide with the rest of your presentation.
To hide a slide, follow these steps:
- In the thumbnail pane, click the slide that you want to hide.
- Click the Slide Show tab.
-
Click Hide Slide in the Set Up group.
PowerPoint dims your chosen slide and highlights the Hide Slide icon.
To unhide a slide, repeat the preceding steps.
If you’re sure that you want to get rid of a slide, you can just delete it. To delete a slide, follow these steps:
- In the thumbnail pane, click the slide that you want to delete.
-
Press the Delete key.
PowerPoint deletes your chosen slide.
If you press Ctrl+Z or click the Undo icon right away, you can recover a deleted slide.
Designing a presentation with Outline view
In the Outline view, each slide appears with one or more of the following:
- A title (appears to the right of a slide icon)
- A subheading (appears to the right of a number in a small box)
- Text (appears without any icon next to it)
The Outline pane only displays the text on each slide. Clicking a slide in the Outline pane displays the entire slide, including graphics, as shown in Figure 11-4.

FIGURE 11-4: Outline view lets you view just the titles and subtitles of your entire presentation.
The biggest advantage of Outline view is that it lets you rearrange and organize your slides by focusing on their content (title, subtitles, and text). To switch from Slide view to Outline view, click the View tab and then click the Outline View icon. To switch from Outline view to Slide view, click the View tab and then click the Normal icon.
Creating a new slide
In Outline view, each outline heading represents a slide. To create a new slide in Outline view, follow these steps:
- Click a slide title in the Outline pane.
- Choose one of the following:
- Press Home to move the cursor to the front of the outline heading. This creates a new slide before the currently displayed slide.
- Press End to move the cursor to the end of the outline heading. This creates a new slide after the currently displayed slide.
-
Press Enter.
PowerPoint adds a new, blank slide to your presentation.
Creating subtitles on a slide
Outline view lets you create slides and add subtitles to each slide as well. To add a subtitle to a slide, follow these steps:
- Click a slide title and then press End to move the cursor to the end of the slide title.
-
Press Enter.
PowerPoint creates a blank slide title underneath.
-
Press Tab.
PowerPoint indents your slide title and turns it into subtitle text under the preceding outline heading.
Collapsing and expanding subtitles
A large presentation consisting of multiple slides with subtitles can be hard to read. To simplify the appearance of your outline, PowerPoint lets you collapse or expand outline headings. To collapse or expand an outline heading, double-click the slide icon of a slide title in the Outline pane.
PowerPoint collapses any subtitles that appear under your chosen outline heading and displays a gray wavy line under your outline heading to let you know that its subtitle text is collapsed (hidden), as shown in Figure 11-5.
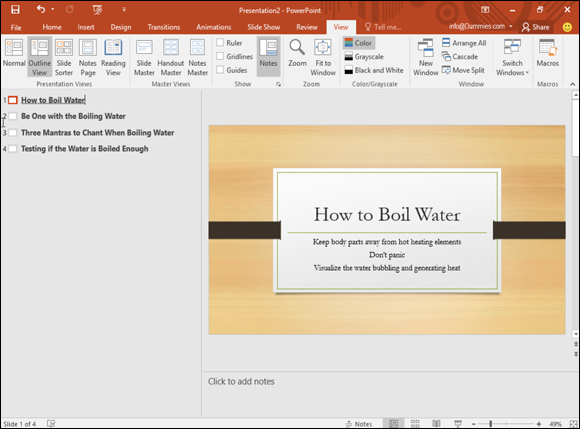
FIGURE 11-5: Outline view lets you collapse or expand subtitle text.
To expand a collapsed slide title, just double-click its slide icon.
Rearranging slides
Outline view makes it easy to rearrange slides just by moving slide titles up or down. To move a slide title, follow these steps:
-
Move the mouse pointer over the slide icon that appears to the left of the slide title (or slide subtitle) that you want to move.
The mouse turns into a four-way-pointing arrow.
-
Hold down the left mouse button and drag (move) the mouse up or down.
PowerPoint displays a horizontal gray line to show where the new position of the slide will appear in your presentation.
-
Release the left mouse button.
PowerPoint moves your outline heading to its new position in your presentation.
Deleting a slide
To delete a slide in Outline view, follow these steps:
- Click the slide icon that appears to the left of the slide title (or subtitle) you want to delete.
- Press Delete.
Working with Text
Most slides contain exactly one title and one subtitle text box. The title text box typically defines the information that the slide presents, while the subtitle text box displays supporting information.
When you create a new slide, both the title and subtitle text boxes will be empty, although they’ll both display the message Click to add title or Click to add text. (This text won’t appear on your slides if you don’t type anything there.)
If you delete all the text inside a title or subtitle text box, PowerPoint automatically displays the Click to add title or Click to add text text in the empty text boxes.
To add text inside a title or subtitle text box, follow these steps:
-
Click in the title or subtitle text box, directly on the slide.
PowerPoint displays a cursor in your chosen text box.
- Type your text.
You can also create title and subtitle text in Outline view, as explained in the earlier section, “Designing a presentation with Outline view.”
Typing text in a text box
A typical PowerPoint slide lets you type text in the Title text box or the Subtitle text box. When you type text in the Title or Subtitle text box, the contents appear as slide titles and subheadings within Outline view.
However, PowerPoint also offers you a third option for displaying text on a slide: You can create your own text box and place it anywhere on the slide.
To create and place a text box on a slide, follow these steps:
- Click the Insert tab.
-
Click the Text Box icon in the Text group.
The mouse pointer turns into a downward-pointing arrow.
- Move the mouse pointer over the area on the slide where you want to create a text box.
- Hold down the left mouse button and drag (move) the mouse to draw a text box on a slide.
-
Release the left mouse button.
PowerPoint displays a text box, as shown in Figure 11-6.
- Type your text inside the text box.

FIGURE 11-6: PowerPoint lets you draw text boxes directly on a slide.
Any text you type into a text box will not appear in Outline view.
Formatting text
You can format text that you type on a slide by choosing different fonts, font sizes, and colors. To change the appearance of text, follow these steps:
- Click the Home tab.
- Click in a text box and select the text you want to format.
- Click one of the following font tools, as shown in Figure 11-7:
- Font list box
- Font Size list box
- Increase Font Size
- Decrease Font Size
- Clear All Formatting
- Bold
- Italic
- Underline
- Shadow
- Strikethrough
- Character Spacing
- Change Case
- Font Color

FIGURE 11-7: The Home tab contains various font tools for formatting text.
Aligning text
PowerPoint can align text both horizontally and vertically inside a text box. To align text, follow these steps:
- Click the Home tab.
- Click in a text box and select the text you want to align.
- Click one of the following text-alignment tools in the Paragraph group:
- Align Left
- Center
- Align Right
- Justify
- Align Text (Top, Middle, Bottom)
-
Click the Align Text icon in the Paragraph group.
A pop-up menu appears, as shown in Figure 11-8.
- Click a vertical alignment option, such as Top or Middle.

FIGURE 11-8: The Align Text icon displays different ways to align text vertically within a text box.
Adjusting line spacing
Line spacing defines the space that appears between each line in a text box. To define the line space in a text box, follow these steps:
- Click the text box that contains text.
- Click the Home tab.
-
Click the Line Spacing icon in the Paragraph group.
A pull-down menu appears, as shown in Figure 11-9.
-
Select a line spacing value, such as 1.5 or 2.
PowerPoint adjusts line spacing in your chosen text box.
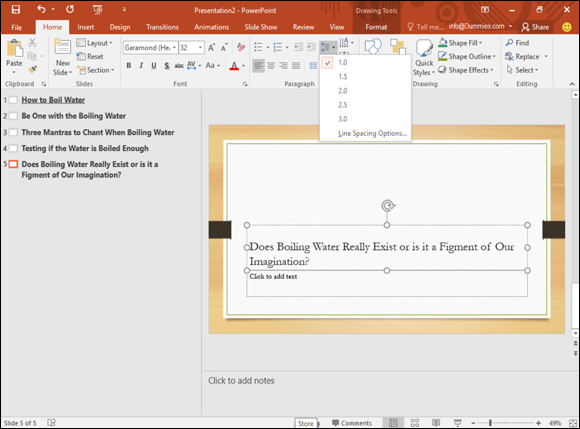
FIGURE 11-9: The Line Spacing icon displays different line spacing options.
Making numbered and bulleted lists
PowerPoint can display text as bulleted or numbered lists. The two ways to create such a list are before you type any text or after you’ve already typed some text.
To create a bulleted or numbered list as you type new text, follow these steps:
- Click in a text box.
- Click the Home tab.
-
Click the Bullets or Numbering icon in the Paragraph group.
A pull-down menu appears, as shown in Figure 11-10.
-
Click a bullet or numbering option.
PowerPoint displays a bullet or number.
-
Type any text and press Enter.
As soon as you press Enter, PowerPoint displays a new bullet or number.

FIGURE 11-10: The Bullets and Numbering icons let you create lists as you type.
If you have existing text, you can convert it to a bulleted or numbered list. To convert existing text into a list, follow these steps:
- Click in the text box that contains the text you want to convert into a bulleted or numbered list.
- Select the text you want to convert into a list.
- Click the Home tab.
-
Click the Bullets or Numbering icon in the Paragraph group.
PowerPoint converts your text into a list.
PowerPoint displays each paragraph as a separate item in a bulleted or numbered list. A paragraph is any amount of text that ends with a paragraph mark (![]() ), which is an invisible character that you create when you press the Enter key.
), which is an invisible character that you create when you press the Enter key.
Making columns
You can divide a text box into multiple columns, which can be especially useful if you need to display large lists on a slide. To divide a text box into columns, follow these steps:
- Click in the text box that you want to divide into columns.
- Click the Home tab.
-
Click the Columns icon in the Paragraph group.
A menu appears, as shown in Figure 11-11.
-
Click a column option, such as Two Columns or Three Columns.
PowerPoint divides your text box into columns.

FIGURE 11-11: You can divide any text box into multiple columns.
Moving and resizing a text box
PowerPoint lets you move text boxes anywhere on a slide. To move a text box, follow these steps:
-
Move the mouse pointer over the edge of the text box that you want to move.
The mouse turns into a four-way-pointing arrow.
- Hold down the left mouse button and drag (move) the mouse to move the text box.
- Release the left mouse button when you’re happy with the new location of the text box.
To resize a text box, follow these steps:
-
Click the text box you want to resize.
PowerPoint displays handles around your chosen text box, as shown in Figure 11-12.
-
Move the mouse pointer over a handle.
The mouse pointer turns into a two-way-pointing arrow.
-
Hold down the left mouse button and drag (move) the mouse.
PowerPoint resizes your text box in the direction you move the mouse.
- Release the left mouse button when you’re happy with the size of the text box.

FIGURE 11-12: Handles let you resize a text box.
Rotating a text box
After you type text in a title or subtitle text box, you can rotate the text box on your slide. To rotate a text box, follow these steps:
-
Click the text box you want to rotate.
PowerPoint displays a rotate handle at the top of your text box, as shown in Figure 11-13.
-
Move the mouse pointer over the rotate handle.
The mouse pointer turns into a circular arrow.
-
Hold down the left mouse button and drag (move) the mouse to rotate your text box.
If you hold down the Shift key while dragging the mouse, you can rotate the text box in 15-degree increments. - Release the left mouse button when you’re happy with the rotated position of your text box (or press Esc to cancel the rotation).

FIGURE 11-13: The rotate handle lets you rotate a text box on your slide.
You can still edit and format text in a text box that appears rotated. If you want to cancel the rotation of a text box altogether, either press Ctrl+Z or click the Undo icon on the Quick Access toolbar.