Chapter 13
Showing Off a Presentation
IN THIS CHAPTER
Spell-checking a presentation
Organizing slides
Adding visual transitions
Adding hyperlinks on a slide
Viewing a presentation
Printing handouts
The whole point of creating a PowerPoint presentation is to show it off to an audience. To help you keep an audience’s attention, PowerPoint provides Hollywood-style special effects to make your presentation look more interesting.
PowerPoint also provides features for creating handouts for your audience. Because people often want to take notes during an interesting presentation (or just doodle during a really boring presentation), PowerPoint can create handouts that you can print and distribute.
Spell-Checking Your Presentation
You can have the best presentation in the world, but it will look like the worst presentation in the world if you have misspellings and typos on your slides for everyone to snicker at. To prevent this problem from occurring, PowerPoint can spell-check your entire presentation.
 PowerPoint automatically underlines all misspelled words with a red squiggly line. If you right-click any word underlined with a red squiggly line, a pop-up menu appears with a list of correctly spelled alternatives that you can choose from.
To spell-check your entire presentation, follow these steps:
- Click the Review tab.
-
Click the Spelling icon in the Proofing group.
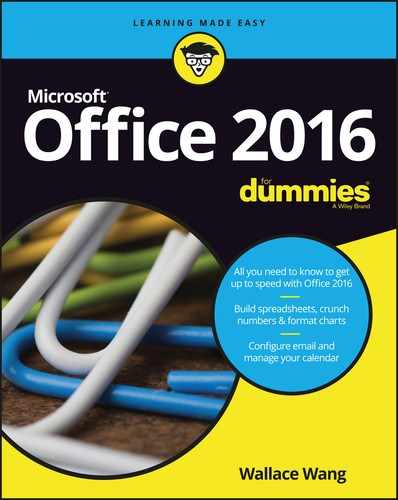
PowerPoint displays the Spelling pane when it finds a misspelled word, as shown in Figure 13-1.
- Choose one of the following for each word that PowerPoint highlights as misspelled:
- Change: Click the correct spelling of the word and then click Change. (Click Change All to change all identical misspellings throughout your presentation.)
- Ignore: Click Ignore to ignore this one instance of that word throughout your presentation.
- Ignore All: Click Ignore All to ignore all instances of that word throughout your presentation.
- Add: Click Add to add the word to the PowerPoint dictionary so it won’t flag the word as misspelled again.
- Click the Close icon in the Spelling pane to stop spell-checking.
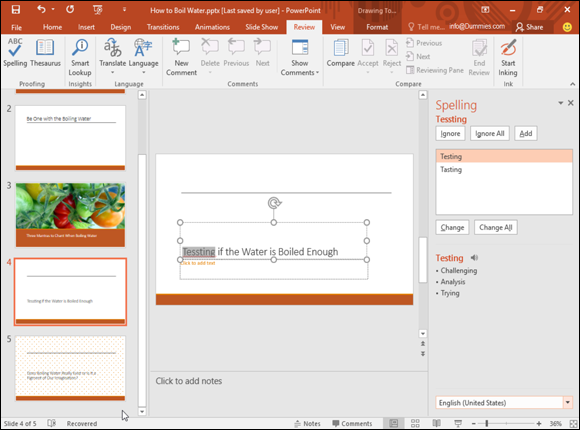
FIGURE 13-1: The Spelling pane can identify potential misspellings and offer corrections.
 PowerPoint won’t recognize technical terms, proper names, or correctly spelled words used incorrectly, such as using the word there instead of their, so it’s important to also proofread your presentation yourself.
Organizing Slides in Sections
PowerPoint displays all the slides of your presentation in the Slides or Outline view. While this makes it easy to see all the slides that make up your presentation, such a long list of slides can make it hard for you to find any particular slide.
To help you avoid searching for a single slide among a huge list, PowerPoint gives you the option of organizing in groups called sections. You may group the first slides in one section (labeled “Problems”), the next 7 slides in a second section (labeled “Consequences”), and the last 13 slides in a third section (labeled “My Solutions”).
After grouping slides into sections, you can selectively hide or display all slides in a section. Sections simply help you organize a large presentation of slides so you can find and edit particular slides at any given time.
Adding a section
By default, presentations don’t contain any sections. When you add a section, PowerPoint groups all slides in that section, starting with the first slide you picked all the way to the end of your presentation or the next section heading, whichever comes first.
To add a section to a presentation, follow these steps:
- Click the slide that you want to define the beginning of a section.
-
Click the Home tab and click the Section icon under the Slides group.
A pull-down menu appears, as shown in Figure 13-2.
-
Choose Add Section.
PowerPoint displays a section heading (named Untitled Section) above the slide you selected in Step 1.
-
Click the selection heading, click the Section icon in the Slides group, and choose Rename Section.
The Rename Section dialog box appears, as shown in Figure 13-3.
-
Click in the Section Name: text box and type a descriptive name for your section. Then click Rename.
PowerPoint renames your chosen section.

FIGURE 13-2: The Section menu lets you group slides together.

FIGURE 13-3: The Rename Section dialog box.
When you add a section to a presentation, PowerPoint automatically creates a Default Section that contains the first slide and all additional slides up to the section heading you just created.
Expanding and collapsing a section
After you’ve created at least one section, you can collapse and expand it. Collapsing a section temporarily hides those slides in that section from view so you can focus on the rest of your slides. Expanding a section makes the slides in that section appear again.
To expand and collapse a section, follow these steps:
-
Click the Collapse Section arrow that appears to the left of the section name, as shown in Figure 13-4.
PowerPoint collapses your chosen section and displays the number of slides (in parentheses) hidden in that collapsed section, as shown in Figure 13-5.
-
Click the Expand Section arrow that appears to the left of the collapsed section name.
The section expands, displaying all slides within that section.

FIGURE 13-4: The Collapse Section arrow appears next to the section name.

FIGURE 13-5: A collapsed section displays the number of slides hidden.
Deleting a section
Sections can help divide a large presentation into more manageable chunks, but you may eventually decide you don’t need a section anymore. When you delete a section, you have the option of just deleting the section (and leaving the slides intact) or deleting both the section and all slides inside that section.
To delete a section, follow these steps:
-
Right-click the section name that you want to delete.
PowerPoint displays a pop-up menu, as shown in Figure 13-6.
You can’t delete the first section without also removing all of its slides. -
Choose Remove Section (to remove your chosen section), Remove All Sections (to remove all sections), or Remove Section & Slides (to remove your chosen section and all the slides in that section).
PowerPoint deletes your section (or sections).

FIGURE 13-6: Right-clicking a section displays a pop-up menu.
If you accidentally delete a section and/or slides, either click the Undo icon in the Quick Access toolbar, or press Ctrl+Z, to reverse the delete command and recover your deleted section and slides.
Adding Visual Transitions
Transitions define how slides or part of a slide (text or graphics) appear during your presentation. By default, slides appear one at a time with all the text and graphics displayed at once, which can get monotonous.
To spice up your presentation, PowerPoint offers two types of transitions:
- Slide transitions (these occur between two different slides)
- Text and picture animations (these occur on a single slide)
Use transitions sparingly. Transitions may be visually interesting, but too many transitions can be distracting.
Adding slide transitions
Slide transitions can make a slide appear to melt or break into multiple pieces that slip away, revealing the next slide underneath.
When creating a transition, you need to define the following:
- The actual visual appearance of the transition
- The speed of the transition (Slow, Medium, or Fast)
- Any sound effects you want to play during the transition (these can get really annoying, so use them sparingly)
- When to display the transition (after a certain time period or when you click the mouse)
To create a slide transition, follow these steps:
-
Click a slide (in the Normal or Outline view pane).
Any transition you choose will end by displaying the slide you choose in this step.
-
Click the Transitions tab.
PowerPoint displays the different animation (transition) tools, as shown in Figure 13-7.
-
Click the More button of the Transition To This Slide group.
A pull-down menu appears, listing all the different transitions available, as shown in Figure 13-8.
-
Click the transition you want.
PowerPoint shows you how your transition will look.
-
(Optional) Click in the Sound list box in the Timing group.
A pull-down menu appears, listing all the sound effects you can choose, as shown in Figure 13-9.
-
(Optional) Select the On Mouse Click or After check box in the Timing group of the Transitions tab.
If you select the After check box, you have to specify a time to wait before running the transition.
You can select both the On Mouse Click and the After check boxes, so the slide transition waits until you click the mouse or until a specified amount of time passes. - (Optional) Click Apply to All to apply your transitions to every slide in your presentation.

FIGURE 13-7: The Transitions tab displays all the tools you need to create a slide transition.

FIGURE 13-8: The More button displays all transitions available.

FIGURE 13-9: The Sound list box shows available sound effects.
Applying the same transition throughout your presentation can give your slide show a consistent look, but it’s best for only simple, visual transitions and not for transitions that involve noisy sound effects that get tedious after awhile.
Text and graphic transitions
Besides animating how your slides appear and disappear, you can also add transitions to your text boxes or graphics so they fly or drop into place across a slide.
Use text and graphic transitions sparingly. Transitions can get distracting when people just want to read your presentation without having to watch letters zoom around the screen.
To create a simple text or graphic transition, follow these steps:
-
Click a text box or picture on a slide.
PowerPoint displays handles around your chosen item.
- Click the Animations tab.
- Click the More button in the Animations group to display a menu of options, as shown in Figure 13-10.
-
Click an animation, such as Fly In or Wipe.
PowerPoint displays a number near your chosen item. These numbers define the order that your transitions will appear.
- Click the Preview icon to see how your animation will look.
FIGURE 13-10: The Animations menu displays various ways to animate text or graphics.
To remove an animation, select that text box or graphic, click the Animations tab, and choose None from the Animation group.
Using the Animation Painter
If you create an animation that you want to apply to other text boxes or graphic objects, you can tediously re-create that transition all over again. However, it’s much simpler to use the Animation Painter, which lets you copy animations from one object to another.
To use the Animation Painter, follow these steps:
-
Click a text box or picture that contains the animation you want to copy.
PowerPoint displays handles around your chosen item.
- Click the Animations tab.
- Click the Animation Painter icon under the Advanced Animation group.
-
Click a text box or picture.
PowerPoint applies the transition, from the object you selected in Step 1, to the object you selected in Step 4.
Adding Hyperlinks
For greater flexibility in presenting information, PowerPoint lets you add hyperlinks to your slides. Hyperlinks let you open a web page (provided you have an Internet connection) or a file (such as a Word document). By adding hyperlinks to your slides, you can display additional information stored outside of your PowerPoint presentation.
Creating web page hyperlinks
A web page hyperlink lets you convert text into a hyperlink that can load your default browser and display any website. When you exit the browser (or switch back to PowerPoint), you can see your slide again and continue with your presentation.
By accessing a website, you can avoid copying data and pasting it on a slide. For example, if you’re giving a presentation about advertising, you can create web page hyperlinks to show how your competitors use the Internet to advertise and sell their products.
To create a web page hyperlink, follow these steps:
- Highlight the text in a title or subtitle text box that you want to turn into a web page hyperlink.
- Click the Insert tab.
-
Click the Hyperlink icon in the Links group.
The Insert Hyperlink dialog box appears, as shown in Figure 13-11.
- Click Existing File or Web Page.
- Click in the Address text box and type a website address, such as
www.dummies.com. -
Click OK.
PowerPoint underlines the text you selected in Step 1. When you view your presentation, PowerPoint turns the mouse pointer into a hand icon when you move the pointer over the hyperlink. Clicking your hyperlink loads the default browser.

FIGURE 13-11: The Insert Hyperlink dialog box lets you type in a website address.
Hyperlinks to websites only work if you have Internet access.
Creating hyperlinks to external files
You may have data stored in another file that you want to include in your PowerPoint presentation. Rather than copy the data and paste it in your presentation, it may be easier just to display the file itself. That way you can update the file, and PowerPoint will always link to the updated file.
When you create a hyperlink to a file, PowerPoint opens that file by loading the program that created it. For example, if you want to view a Microsoft Word file, make sure that you have a copy of Microsoft Word installed on your computer.
To create a hyperlink that opens an external file, follow these steps:
- Highlight the text in a title or subtitle text box that you want to turn into an external file hyperlink.
- Click the Insert tab.
-
Click the Hyperlink icon in the Links group.
The Insert Hyperlink dialog box appears (refer to Figure 13-11).
- Click Existing File or Web Page.
-
Click in the Look In list box and choose a drive and folder that holds the file you want to use.
You may need to click through several folders to find the file you want.
- Click the file you want to use and then click OK.
Running a program through a hyperlink
A PowerPoint hyperlink can also run any program from within a presentation. For example, you can create a presentation that explains how to market a new computer program, and then create a hyperlink to that same program so you can demonstrate how that program actually works. When you exit that program, you return to your PowerPoint presentation again.
Make sure that your computer has enough memory to run both PowerPoint and any other program you want to run.
To create a hyperlink that runs a program, follow these steps:
- Highlight the text in a text box that you want to turn into a program hyperlink.
- Click the Insert tab.
-
Click the Action icon in the Links group.
The Action Settings dialog box appears.
- Select the Run Program radio button.
-
Click Browse.
The Select a Program to Run dialog box appears.
-
Click the program you want to run.
You may have to open multiple folders to find the program you want to run.
-
Click the program you want to run and then click OK.
The Action Settings dialog box appears again.
-
Click OK.
When you run your presentation and click your link to run an external program, PowerPoint displays a Security Notice dialog box, as shown in Figure 13-12. This dialog box gives you the option of letting any presentation run external programs (Enable All), just letting the current presentation run an external program (Enable), or blocking all external programs from running at all (Disable).

FIGURE 13-12: When you run your presentation, PowerPoint gives you several options for running external programs within a slide show.
Removing a hyperlink or action
After you’ve set a PowerPoint hyperlink or action, you can remove that hyperlink or action at any time. To remove a hyperlink, follow these steps:
- Highlight the text in a text box that contains a hyperlink.
- Click the Insert tab.
-
Click the Hyperlink icon in the Links group.
The Edit Hyperlink dialog box appears.
- Click the Remove Link button.
To remove an action, follow these steps:
- Highlight the text in a text box that contains an action link.
- Click the Insert tab.
-
Click the Action icon in the Links group.
The Action Settings dialog box appears.
- Click the None radio button.
- Click the OK button.
Viewing a Presentation
After you finish arranging your slides, adding transitions, and adding hyperlinks, you’re ready to test how your entire presentation looks. To view your entire presentation, follow these steps:
- Click the Slide Show tab.
-
Click the From Beginning icon in the Start Slide Show group, as shown in Figure 13-13.
PowerPoint displays the first slide of your presentation.
You can also choose the From Beginning command by pressing F5. - Choose one of the following:
- Click the mouse or press the spacebar to view the next slide.
- Press Esc to exit your presentation.

FIGURE 13-13: The Slide Show tab lists tools for helping you view your presentation.
If you have a large presentation consisting of 300 slides, you may not want to view the first 290 slides just to test how your last 10 slides look. To avoid this problem, click the slide you want to view and then click the From Current Slide icon in Step 2.
Creating a custom slide show
You may have a presentation organized for one audience (engineers and scientists) but need to give the same presentation to a different audience (sales executives). Although you can copy your original presentation and then modify it, now you’ll be stuck with two copies of the same information. And, if you modify the information in one presentation, you have to modify the same information in the second (or third or fourth) presentation.
To avoid this problem, PowerPoint lets you create custom slide shows based on an existing presentation. Such a custom slide show can selectively show slides in a different order. To create a custom slide show, you need to define the order you want to display the slides.
To arrange the order of a custom slide show, follow these steps:
- Click the Slide Show tab.
-
Click the Custom Slide Show icon in the Start Slide Show group.
A pull-down menu appears.
-
Choose Custom Shows.
The Custom Shows dialog box appears, as shown in Figure 13-14.
-
Click New.
The Define Custom Show dialog box appears, as shown in Figure 13-15.
- Click in the Slide Show Name: text box and type a name for your custom slide show.
-
Click the check box for a slide in the Slides In Presentation: list box and then click the Add button.
This tells PowerPoint which existing slides you want to use in your custom slide show.
- Repeat Step 6 for each slide you want to include in your custom slide show.
- (Optional) Click a slide in the Slides In Custom Show: list box and click the Up or Down arrow button to rearrange their order.
- Repeat Step 8 for each slide you want to rearrange in your custom slide show.
-
Click OK.
The Custom Shows dialog box appears again.
- Click the name of your custom slide show and then click Close.

FIGURE 13-14: The Custom Shows dialog box lets you define a name for your custom slide show.

FIGURE 13-15: Customize your slide show by reordering slides.
To present a custom slide show, follow these steps:
- Click the Slide Show tab.
-
Click the Custom Slide Show icon in the Start Slide Show group.
A pull-down menu appears that lists the names of all the custom slide shows you’ve created.
- Click the name of the custom slide show you want to view.
- Choose one of the following:
- Click the mouse or press the spacebar to view the next slide.
- Press Esc to exit your presentation.
Eventually you may need to delete a custom slide show. When you delete a custom slide show, you don’t delete any slides used in your original presentation.
To delete a custom slide show, follow these steps:
- Click the Slide Show tab.
-
Click the Custom Slide Show icon in the Start Slide Show group.
A pull-down menu appears, listing the names of all the custom slide shows you’ve created.
-
Click Custom Shows.
The Custom Shows dialog box appears.
- Click the name of the custom slide show you want to delete and click the Remove button.
- Click the Close button.
Hiding a slide
PowerPoint can hide a slide, which lets you keep your slide but not display it during a presentation. Hiding a slide can be especially handy when you need to create a custom slide show and need a slide to appear only in the custom slide show but not the original presentation (or vice versa).
To hide a slide, follow these steps:
- Click the slide that you want to hide (in Slide or Outline view).
- Click the Slide Show tab.
-
Click the Hide Slide icon in the Set Up group.
PowerPoint dims your selected slide.
To unhide a slide, just repeat the preceding three steps.
Organizing with Slide Sorter view
After you view your presentation, you may want to rearrange slides. To help you organize your presentation, switch to Slide Sorter view, which numbers each slide to show you the order that they appear, as shown in Figure 13-16.
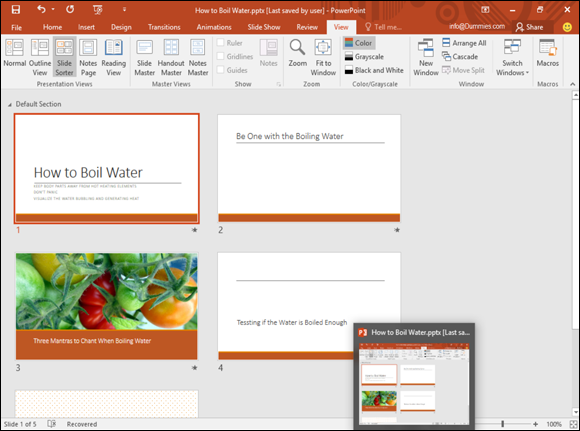
FIGURE 13-16: Slide Sorter view lets you rearrange the order of your slides.
To use Slide Sorter view, follow these steps:
- Click the View tab.
-
Click the Slide Sorter view icon in the Presentation Views group.
You can also click the Slide Sorter icon in the bottom-right corner of the PowerPoint window. - (Optional) To delete a slide, click a slide and press Delete.
- (Optional) To hide a slide, click a slide, click the Slide Show tab, and click Hide Slide.
- (Optional) To move a slide:
- Move the mouse pointer over a slide.
-
Hold down the left mouse button and move (drag) the mouse.
PowerPoint displays a vertical line where it will place your slide.
- Release the left mouse button.
- Click the Normal icon on the View tab to switch out of Slide Sorter view.
Creating Handouts
When people view a particularly interesting presentation, they often want copies of that presentation so they can review the information later or have a place to jot down notes during the presentation itself. For that reason, PowerPoint lets you create handouts from your presentation.
Handouts typically contain a thumbnail of each slide along with blank space for jotting down notes about the information presented by that slide. To create a handout, follow these steps:
- Click the File tab.
-
Choose Print.
The middle pane displays a variety of print options, as shown in Figure 13-17.
-
Click the Full Page Slides button in the middle pane under the Settings heading.
A menu appears, showing different ways to print slides (as shown in Figure 13-18).
- Choose the print option you want, and then click the Print button in the top of the middle pane when you’re ready to start printing.

FIGURE 13-17: The middle pane displays print settings.

FIGURE 13-18: You can choose to print a single slide per page or multiple slides per page.