Chapter 2
Selecting and Editing Data
IN THIS CHAPTER
Selecting data
Using the pop-up toolbar
Copying, cutting, and pasting
Copying and cutting with the mouse
Sharing data within Office 2016
Although you create a file only once, you can edit it many times. Editing can add, rearrange, or delete data, such as text, numbers, or pictures. All Office 2016 programs work in similar ways to edit data, so whether you use Word, Excel, PowerPoint, or Access, you’ll know the right commands to edit data, no matter which program you may be using.
 Whenever you edit a file, save your file periodically by clicking the Save icon in the Quick Access toolbar, pressing Ctrl+S, or clicking the File tab and choosing Save. That way if your computer crashes or the power goes out, you won’t lose all the editing changes you made.
Adding Data by Pointing
When you enter data into a file, your data appears wherever the cursor appears on the screen. The cursor appears as a blinking vertical bar, which basically says, “Anything you type now will appear right here!”
Because the cursor won’t always magically appear exactly where you want to type data, you must move the cursor by using either the mouse or the keyboard. To move the cursor by using the mouse, follow these steps:
- Move the mouse pointer where you want to move the cursor.
-
Click the left mouse button.
The cursor appears where you click the mouse pointer.
To move the cursor by using the keyboard, you can use one of these cursor movement keys:
- The (up/down/left/right) arrow keys
- The Home/End keys
- The Page Up/Page Down keys
Use the up/down/right/left arrow keys when you want to move the cursor a small distance, such as up one line or right to the next cell in an Excel spreadsheet.
 To move the cursor faster, hold down the Ctrl key and then press the arrow keys. If you hold down the Ctrl key, the up-arrow key moves the cursor up one paragraph, the down-arrow key moves the cursor down one paragraph, the left-arrow key moves the cursor left one word, and the right-arrow key moves the cursor right one word.
Pressing the Home key moves the cursor to the beginning of a sentence (or a row in a spreadsheet), and pressing the End key moves the cursor to the end of a sentence (or a row in a spreadsheet).
Pressing the Page Up/Page Down keys moves the cursor up or down one screen at a time.
Using any of the cursor-movement keys puts the cursor in a new location. Wherever the cursor appears will be where you can enter new data. Table 2-1 lists ways to move the cursor in each Office 2016 program.
TABLE 2-1 Moving the Cursor in Office 2016 Programs
|
Keystroke |
Word |
Excel |
PowerPoint |
Access |
|
Home |
Beginning of the line |
Column A of the current row that the cursor appears in; (Ctrl+Home moves to cell A1) |
Displays first slide; beginning of the line (when text box is selected) |
First field of the current record |
|
End |
End of the line |
NA; (Ctrl+End moves to last cell) |
Displays last slide; end of the line (when text box is selected) |
Add New Field of current record |
|
Page Up |
Half a page up |
Up 23 rows |
Displays preceding slide |
Up 25 records |
|
Page Down |
Half a page down |
Down 23 rows |
Displays next slide |
Down 25 records |
|
Up/Down arrow |
Up/down one line |
Up/down one row |
Next/previous slide; up/down one line (when text box is selected) |
Up/down one record |
|
Left/Right arrow |
Left/right one character |
Left/right one column |
Next/preceding slide; left/right one character (when text box is selected) |
Left/right one field |
Selecting Data
To modify data, you must tell Office 2016 what you want to change by selecting it. Then choose a command that changes your data, such as underlining text or deleting a picture.
To select anything in Office 2016, you can use either the mouse or the keyboard. Generally the mouse is faster — but getting used to coordinating the motion of the mouse with the movement of the mouse pointer onscreen takes some time. The keyboard is slower but much simpler and more precise to use.
Selecting data with the mouse
The mouse provides two ways to select data. The first way involves pointing and dragging the mouse:
- Point the mouse pointer at the beginning or end of the data you want to select.
- Hold down the left mouse button and drag (move) the mouse pointer over the data to select it.
When you drag the mouse, hold down the left mouse button. If you don’t hold down the left mouse button as you move the mouse, you won’t select any data when you move the mouse pointer across the screen.
You can also select data by clicking the mouse. To select a picture, such as a chart in Microsoft Excel or a photograph added to a Microsoft Word document, just click the picture to select it. Office 2016 displays rectangles, called handles, around the border of any selected picture, as shown in Figure 2-1.

FIGURE 2-1: When you select a picture, handles appear around it.
To select text with the mouse, you can click the mouse in one of three ways:
- Single-click: Moves the cursor
- Double-click: Selects the word that you click
- Triple-click: Selects the entire paragraph that contains the word you click
 Office 2016 defines a paragraph as any chunk of text that begins on a separate line and ends with a Return character (
![]() ), created by pressing the Enter key.
), created by pressing the Enter key.
Selecting data with the keyboard
To select data with the keyboard, you use the following keys:
- The cursor movement keys (up/down/left/right arrow keys, Home/End keys, or Page Up/Page Down keys)
- The Shift key
To select all the data in a file, press Ctrl+A.
The cursor movement keys simply move the cursor. When moving the cursor, you can also hold down the Shift key to tell Office 2016 what to select. To select data, follow these steps:
- Move the cursor to the beginning or end of the data you want to select.
- Hold down the Shift key. (Keep it pressed down.)
- Move the cursor by using any of the cursor movement keys, such as the up-arrow key or the End key.
- Release the Shift key.
Instead of dragging the mouse to select data, you may find it easier to place the cursor by using the mouse and then hold down the Shift key while pressing a cursor movement.
Selecting multiple chunks of data with the mouse and keyboard
For greater flexibility in selecting data, you can use both the mouse and the keyboard to select multiple chunks of data that are not located next to each other. To select two or more chunks of data, follow these steps:
- Select a picture or chunk of text, using either the keyboard or the mouse.
- Hold down the Ctrl key.
- Select another picture or chunk of text, using either the keyboard or the mouse.
- Repeat Step 3 for each additional item you want to select.
- Release the Ctrl key when you’re done selecting data.
Editing Text with the Pop-up Toolbar
As soon as you select text with the mouse, Office 2016 displays a pop-up toolbar that displays the most commonly used commands (displayed as icons). The closer you move the mouse toward this pop-up toolbar, the darker and sharper the toolbar appears, as shown in Figure 2-2. The farther you move away from the toolbar, the fainter it appears.

FIGURE 2-2: Whenever you select text with the mouse, Office 2016 displays a pop-up toolbar above the selected text.
The pop-up toolbar appears only if you select text by using the mouse. If you select text by using the keyboard, this pop-up toolbar will not appear.
To use this pop-up toolbar, follow these steps:
-
Select data by using the mouse.
The pop-up toolbar appears.
The closer you move the mouse to the toolbar, the more visible the toolbar will appear. - Click a command (icon) on the pop-up toolbar.
Deleting Data
The simplest way to edit a file is to delete your existing data. If you just need to delete a single character, you can use one of two keys:
- Backspace: Deletes the character immediately to the left of the cursor
- Delete: Deletes the character immediately to the right of the cursor
If you need to delete large chunks of text, follow these steps:
- Select the data you want to delete, using either the keyboard or the mouse. (See the earlier section, “Selecting Data.”)
-
Press the Delete (or Backspace) key.
Office 2016 wipes away your data.
If you select text and start typing, your newly typed text will replace all your selected text. This can be a quick way to delete text and replace it with new text in one step.
Cutting and Pasting (Moving) Data
Moving data in Office 2016 requires a two-step process: cut and paste. When you cut data, you delete it but save a copy in a special area of the computer’s memory known as the Clipboard. When you paste data to a new location, you copy the data from the Clipboard and paste it into your file.
To move data, follow these steps:
- Select the data you want to move, using the keyboard or mouse as explained in the earlier section, “Selecting Data.”
- Choose one of the following:
- Click the Cut icon (on the Home tab).
- Right-click the mouse; when the pop-up menu appears, choose Cut.
- Press Ctrl+X.
- Move the cursor to a new location.
- Choose one of the following:
- Click the Paste icon (on the Home tab).
- Right-click the mouse; when the pop-up menu appears, choose Paste.
- Press Ctrl+V.
If you select data in Step 3, you can replace that selected data with the pasted data you selected in Step 1.
Copying and Pasting Data
Unlike the Cut command, the Copy command leaves your selected data in its original location but places a second copy of that data somewhere else. To copy and paste data, follow these steps:
- Select the data you want to copy, using the keyboard or mouse, as explained in the earlier section, “Selecting Data.”
- Choose one of the following:
- Click the Copy icon (on the Home tab).
- Right-click the mouse; when the pop-up menu appears, choose Copy.
- Press Ctrl+C.
- Move the cursor to a new location.
- Choose one of the following:
- Click the Paste icon.
- Right-click the mouse; when the pop-up menu appears, choose Paste.
- Press Ctrl+V.
Using Paste Options
Cutting, copying, and pasting text from one location to another is easy. However, a problem can occur when you paste formatted text from one location to another. When you paste formatted text, you have several choices, depending on the Office 2016 program you’re using. Three common choices include:
- Paste the text with the original formatting of the copied or cut text.
- Merge the pasted data with the formatting of the current text.
- Paste the text but strip away the formatting.
Each Office 2016 program displays slightly different options for Paste Options.
To use the Paste Options feature, follow these steps:
-
Select text.
You can select text by either dragging the mouse over text or holding down the Shift key and pressing an arrow key.
-
Click the Home tab and click the Cut or Copy icon.
If you select the Cut icon, your selected text disappears.
- Move the cursor to where you want to paste your cut or copied text.
-
Click the Home tab, and then click the downward-pointing arrow at the bottom of the Paste icon.
The Paste Options menu appears, displaying the different ways you can paste, as shown in Figure 2-3.
-
Move the mouse pointer over each Paste Options icon to see how your pasted text will look in the file.
Each time you move the mouse pointer over a different Paste Options icon, the appearance of the pasted text will change.
- Click the Paste Options icon that you want to use.
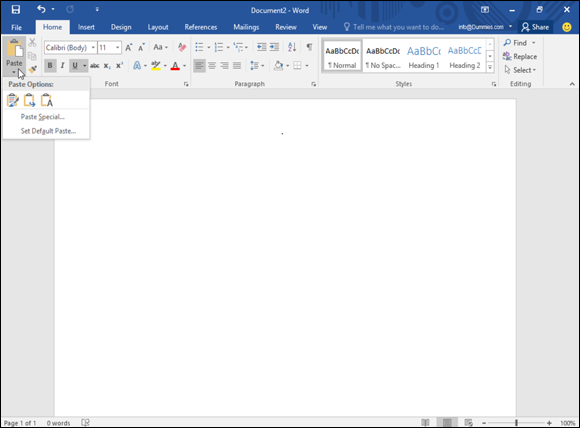
FIGURE 2-3: The Paste Options menu appears when you click the bottom half of the Paste icon.
If you right-click in Step 3, a pop-up menu appears with the Paste Options displayed, as shown in Figure 2-4.

FIGURE 2-4: Right-clicking can also display the Paste Options.
Dragging with the Mouse to Cut, Copy, and Paste
The mouse can also cut/copy and paste data. To move data with the mouse, follow these steps:
- Select the data you want to move by using the methods described in the earlier section, “Selecting Data.”
- Move the mouse pointer over the highlighted data.
-
Hold down the left mouse button and drag (move) the mouse.
The mouse pointer displays an arrow and a box while the cursor turns into a dotted vertical line.
Alternatively, to copy data, hold down the Ctrl key while holding down the left mouse button and dragging (moving) the mouse. The mouse pointer displays an arrow and a box with a plus sign while the cursor turns into a dotted vertical line.
- Move the dotted vertical line cursor where you want to place the data you selected in Step 1.
-
Release the left mouse button.
Your data appears in its new location.
Undo and Redo
To protect you from mistakes, Office 2016 offers a special Undo command, which essentially tells the computer, “Remember that last command I just gave? Pretend I never chose it.”
You can use the Undo command any time you edit data and want to reverse your changes. The two ways to choose the Undo command are
- Click the Undo icon on the Quick Access toolbar.
- Press Ctrl+Z.
Sometimes you may make many changes to your file and suddenly realize that the last five or ten changes you made messed up your data by mistake. To undo multiple commands, follow these steps:
-
Click the downward-pointing arrow that appears to the right of the Undo icon.
A list of your previously chosen commands appears.
- Move the mouse pointer to highlight all the commands that you want to undo, as shown in Figure 2-5.
-
Click the left mouse button.
Office 2016 undoes your chosen commands.

FIGURE 2-5: The downward-pointing arrow to the right of the Undo icon lets you view a list of your last commands.
The Redo command lets you reapply the last command you chose to undo. To choose the Redo command, press Ctrl+Y.
Each time you choose the Redo command, you reverse the effect of the last Undo command. For example, if you use the Undo command four times, you can choose the Redo command only up to four times.
Sharing Data with Other Office 2016 Programs
Cutting, copying, and pasting data may be handy within the same file, but Office 2016 also gives you the ability to cut, copy, and paste data between different programs, as when you copy a chart from Excel and paste it into a PowerPoint presentation.
Using the Office Clipboard
When you cut or copy any data, Windows stores it in a special part of memory called the Clipboard. This Windows Clipboard can only hold one item at a time, so Office 2016 comes with its own Clipboard called the Office Clipboard, which can store up to 24 items.
Whereas the Windows Clipboard works with any Windows program (such as Microsoft Paint or OneNote), the Office Clipboard works only with Office 2016 programs (such as Word, Excel, PowerPoint, Access, and Outlook). To store data on the Office Clipboard, you just need to use the Cut or Copy command, and Office 2016 automatically stores your data on the Office Clipboard.
The two big advantages of the Office Clipboard are
-
You can store up to 24 items.
The Windows Clipboard can store only one item.
-
You can select what you want to paste from the Clipboard.
The Windows Clipboard lets you paste only the last item cut or copied.
Viewing and pasting items from the Office Clipboard
After you use the Cut or Copy command at least once, your data gets stored on the Office Clipboard. You can then view the Office Clipboard and choose which data you want to paste from the Clipboard into your file.
To view the Office Clipboard and paste items from it, follow these steps:
- Move the cursor to the spot where you want to paste an item from the Office Clipboard.
- Click the Home tab.
-
Click the Show Dialog Box icon in the bottom-right corner of the Clipboard group.
The Office Clipboard pane appears on the left side of the screen, as shown in Figure 2-6. The Office Clipboard also displays an icon that shows you the program where the data came from, such as Word or PowerPoint.
-
Click the item you want to paste.
Office 2016 pastes your chosen item into the file where you moved the cursor in Step 1.
- Click the Close box of the Office Clipboard window to tuck it out of sight.

FIGURE 2-6: The Office Clipboard pane lets you view the current contents of the Office Clipboard.
If you click the Paste All button, you can paste every item on the Office Clipboard into your file.
Deleting items from the Office Clipboard
You can add up to 24 items to the Office Clipboard. The moment you add a 25th item, Office 2016 deletes the oldest item from the Office Clipboard to make room for the new cut or copied item.
You can also manually delete items from the Office Clipboard, by following these steps:
- Click the Home tab.
-
Click the Show Dialog Box icon in the bottom-right corner of the Clipboard group.
The Office Clipboard appears.
-
Move the mouse pointer over an item on the Office Clipboard.
A downward-pointing arrow appears to the right.
-
Click the downward-pointing arrow to the right of an item.
A pop-up menu appears, as shown in Figure 2-7.
-
Click Delete.
Office 2016 deletes your chosen item.
- Click the Close box to tuck the Office Clipboard out of sight.

FIGURE 2-7: To remove an item from the Office Clipboard, click the downward-pointing arrow and click Delete.
If you click the Clear All button, you can delete every item currently stored on the Office Clipboard.
Make sure that you really want to delete an item from the Office Clipboard before you do so, because after you delete it, you can’t retrieve it.