Chapter 3
Modifying Pictures
IN THIS CHAPTER
Adding (and deleting) pictures
Modifying pictures
Altering the appearance of pictures
One way to spice up your Word documents, Excel spreadsheets, or PowerPoint presentations is to add photographs that you’ve captured through a digital camera. Adding photographs is simple enough, but Office 2016 also includes different ways to manipulate your picture by using special visual effects.
One common problem with photographs is that they may appear too light or too dark. In the past, the only way to correct these types of problems was to edit the picture in a photo-editing program like Adobe Photoshop. Because not many people have Photoshop or know how to use it, Office 2016 now contains simple photo-editing tools that anyone can use to correct minor flaws.
After you’ve corrected any flaws, Office 2016 also lets you turn your photographs into art by adding frames, tilting the picture sideways, or adding a visual effect that makes the picture look more like a painting.
With Office 2016, you can add photographs, correct them, and modify them to give all your Word, Excel, or PowerPoint files that extra bit of color and showmanship.
Adding (and Deleting) Pictures
To add a picture to a file, follow these steps:
- Click the Insert tab.
-
Click the Pictures icon.
The Insert Picture dialog box appears.
-
Select the picture file you want to insert.
You may need to select a different folder or drive that contains the picture you want to insert.
- Click the Insert button.
- In Word, your picture appears wherever the cursor appears.
- In Excel, the upper-left corner of your picture appears in the cell where the cursor appears.
- In PowerPoint, your picture appears in the center of the currently displayed slide.
To delete a picture in a file, follow these steps:
-
Select the picture that you want to delete.
Handles appear around your selected picture.
- Press the Delete or Backspace key.
Getting pictures from the Internet
Every Office 2016 application can retrieve images from the Internet (if your computer has Internet access).
 Many images on the Internet are copyrighted. You can’t legally use them without written permission. When retrieving images from the Internet, look for public domain images, such as pictures captured by government agencies or sites that collect public domain images.
To retrieve an image from the Internet, follow these steps:
- Click the Insert tab.
-
Click the Online Pictures icon.
An Insert Pictures dialog box appears, as shown in Figure 3-1.
- Click in the Bing Image Search text box and type a descriptive name for the image you want to find, such as cat or rose.
-
Press Enter.
The Insert Pictures dialog box displays a list of images, as shown in Figure 3-2.
-
Click an image that you want to use and click the Insert button.
Office 2016 inserts your chosen picture in your file.

FIGURE 3-1: The Insert Pictures dialog box lets you search for images using Bing.

FIGURE 3-2: The Insert Pictures dialog box displays images found on the Internet.
Capturing screenshots
Many times, you may run programs on your computer that contain images you’d like to insert into an Office 2016 document, such as how a web page appears in a browser or how a particular program looks. Fortunately, Office 2016 includes a handy feature for capturing screenshots that you can insert into any Office 2016 file.
To capture a screenshot, follow these steps:
- Display the image on your monitor that you want to capture.
-
Click the Insert tab and click the Screenshot icon.
The Screenshot icon displays a menu of currently open programs, as shown in Figure 3-3.
-
Capture the image you want:
- To capture a whole program window, click on the window in the Screenshot menu.
- To capture part of the screen, click Screen Clipping. When the mouse pointer turns into a crosshair, drag the mouse to select the part of the screen you want to capture.
Office 2016 inserts your chosen image in your file.

FIGURE 3-3: The Screenshot icon menu of currently open windows.
Manipulating Pictures
After you add a picture to a file, it may not be in the correct position or be the right size. As a result, you may want to move, resize, or rotate it.
Moving a picture
To move a picture, follow these steps:
-
Select the picture that you want to move.
Handles appear around your selected picture, as shown in Figure 3-4.
- Move the picture, using one of the following methods:
- Move the mouse pointer over the picture and drag the mouse.
- Press the up/down or left/right arrow keys.

FIGURE 3-4: Handles appear to show that you selected a picture.
 You can’t easily move a picture anywhere in a Word 2016 document. To get around this limitation, use a text box. Click the Insert tab, click the Text Box icon, and choose Draw Text Box to draw a text box anywhere in your document using the mouse. If you paste a picture inside a text box, you can move the text box anywhere in your document; any image inside the text box moves at the same time.
Resizing a picture
To resize a picture, follow these steps:
-
Select the picture that you want to move.
Handles appear around your selected picture.
- Move the mouse pointer over a handle and drag the mouse.
If you drag a corner handle, you can change the height and width of a picture at the same time.
If you click the Format tab, you can type a precise width and height for your picture in the Height and Width text box displayed in the Size group.
Rotating a picture
To create an interesting effect, you may want to rotate a picture in a file. To rotate a picture, follow these steps:
-
Select the picture that you want to rotate.
Handles appear around your selected picture. Note that the rotate handle appears to be sticking up from the top of the picture, as shown in Figure 3-5.
-
Move the mouse pointer over the rotate handle and drag the mouse.
The mouse pointer turns into a circular arrow icon when you move it over the rotate handle.

FIGURE 3-5: The rotate handle appears at the top of a picture.
Enhancing Pictures
Sometimes a picture may look almost perfect, but still need some minor corrections. Other times a picture may look plain, but by adding some visual effects, you can turn a plain picture into a work of art.
To help you make your pictures look prettier and more visually engaging, Office 2016 lets you choose different effects, colors, frames, and styles.
Choosing visual effects
Office 2016 offers several different ways to alter a picture’s visual appearance:
- Corrections: Sharpens or softens a picture, or adjusts the brightness or contrast.
- Color: Adjusts the tone or saturation of a picture’s color, or lets you change the color of a picture altogether.
- Artistic Effects: Makes a picture appear as different styles, such as a mosaic or watercolor painting.
- Picture Effects: Lets you add visual effects to a picture, such as shadows, glows, or rotation.
To choose a visual effect for a picture, follow these steps:
-
Click the picture that you want to modify.
The Format tab appears on the Ribbon.
-
Click the Corrections icon.
When you click the Corrections icon, a menu of correction options appears, as shown in Figure 3-6.
- Select a Corrections option from the menu.
-
Click the Color icon.
A menu of color options appears, as shown in Figure 3-7.
- Select a Color option from the menu.
-
Click the Artistic Effects icon.
A menu of visual effects options appears, as shown in Figure 3-8.
- Select an Artistic Effects option from the menu.
-
Click the Picture Effects icon.
A menu of color options appears. You may need to click a submenu to display additional options, as shown in Figure 3-9.
- Click a Picture Effects submenu, and then select an option.

FIGURE 3-6: The Corrections icon displays different ways to fix a picture.
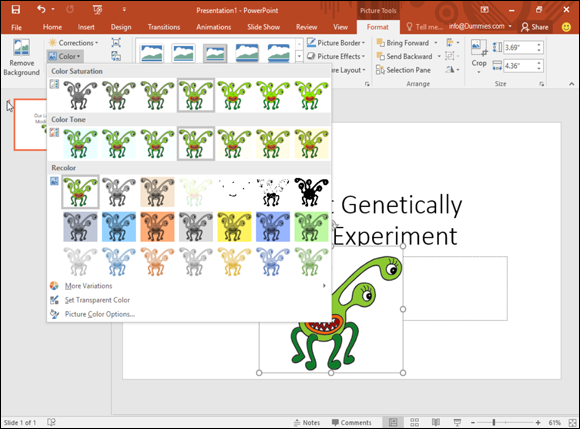
FIGURE 3-7: The Color icon displays different types of color options.

FIGURE 3-8: The Artistic Effects icon displays unique visual effects.
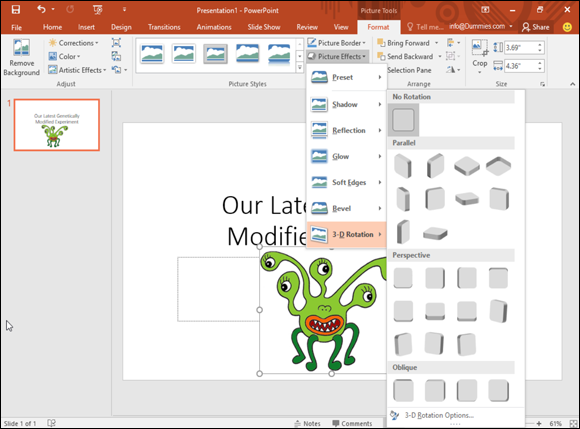
FIGURE 3-9: The Picture Effects icon displays different ways to enhance your picture.
Choosing a picture style
Rather than force you to make individual changes to a picture, Office 2016 provides a collection of predefined picture styles that you can apply to any picture added to a file. To choose a picture style, follow these steps:
-
Click the picture that you want to modify.
The Format tab appears on the Ribbon.
-
Click a style displayed in the Picture Styles group.
The Picture Styles group contains multiple options: - To view these options one row at a time, click the up/down arrows in the Picture Styles group, as shown in Figure 3-10.
- To view all picture styles at once, click the More button, which displays all picture styles, as shown in Figure 3-11.

FIGURE 3-10: The up/down arrows and More button in the Picture Styles group.
FIGURE 3-11: The More button displays all available picture styles.
Adding a border around a picture
To help make your picture stand out, you may want to add a border. A border can appear in different colors, thicknesses, and styles (such as a solid line or a dotted line).
To add or modify a border around a picture, follow these steps:
-
Click the picture that you want to modify.
The Format tab appears on the Ribbon.
-
Click the Picture Border icon.
A pull-down menu of different colors and options appears, as shown in Figure 3-12.
- Choose a color that you want for your border.
- Click the Weight submenu and choose a weight (thickness), as shown in Figure 3-13.
- Click the Dashes submenu and choose the type of line to use as the border, as shown in Figure 3-14.

FIGURE 3-12: The Picture Border icon displays a menu.
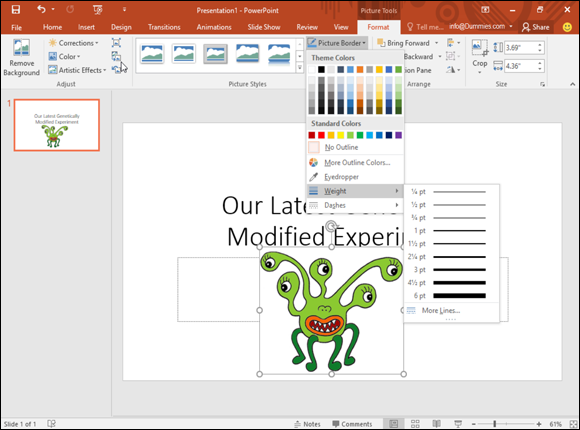
FIGURE 3-13: The Weight submenu lets you define the thickness of a border.

FIGURE 3-14: The Dashes submenu lets you define the line used to create a border.