
Chapter 8
Rollouts and Refreshes with Configuration Designer and Autopilot
At this point in the book, you’ve got a pretty nice layer cake:
- You’re enrolled in MDM, which gets you the ability to remotely manage the machine.
- You’ve got computers automatically putting themselves into dynamic groups.
- You’ve got applications of all kinds downloading automatically.
- You’ve got scripts running when needed.
- You’re using MDM to deliver the in-box policies for Windows and some applications.
- You’ve got users’ data stored nicely in OneDrive.
Everything is going great.
Until…Jack leaves his PC in the back of a taxi on the way to the airport.
Crap.
Now what?
The way I see it, there are four scenarios:
Scenario 1 After Jack lands, let Jack run to the electronics store and buy his own machine.
Scenario 2 After Jack lands, he can go into a nearby branch office that your company has, and someone there can just give him a machine (which, conveniently, already has Windows 10 on it).
Scenario 3 You can drop-ship a new, but unconfigured, PC to Jack (which you happen to have in your office). He’ll get it the next day.
Scenario 4: You can work with an OEM partner like Dell, Lenovo, and others to drop-ship a new machine to Jack.
In all cases, Jack’s new machine will have to be configured to your corporate standards. Of course we want to configure as much as possible to be automated.
There are a few more scenarios to contemplate along the way; for instance, if Jack leaves the company and you want to give Jack’s perfectly good computer to someone else. How can you quickly clean up the Jack-specific stuff and get it ready for Tom? And, yet another thing to consider: Jack’s perfectly good machine just ups and dies. Well, the hard drive does.
For all of the above scenarios, we’ll be using two methods to do as much automation as possible in this chapter: the Windows Configuration Designer (WCD) and Autopilot.
The goals of both of these technologies is ostensibly the same: Instead of wiping and reloading a machine with a perfectly good operating system already on it, you get to use what the OEM shipped in the box. Then get close to your desired configuration goals…faster.
This ends up being way faster than wiping and reloading, plus avoiding all the pre-game time to stage the “perfect golden image.”
Windows Configuration Designer
So let’s pretend we have scenario 1 first. That is, Jack lost his laptop, and he just has to go to Best Buy or gets a new laptop from Amazon or otherwise acquires a new machine.
This machine likely already has Windows 10 on it, but maybe not the right version of Windows 10. For instance, Pro and not Enterprise.
And, we definitely want Jack to be up and running right away. Having someone rip and replace the image that came on the machine from the manufacturer is super time consuming, that’s for sure. Yes, you could argue that ripping and replacing will get rid of “bloatware” and unnecessary items, but you can already do that when you buy PCs with the “signature” edition. Signature edition PCs come liberated without the bloatware and cruft of old. But with what we’ll do together, you can also blow the unwanted junk off the machine.
 You can learn more about these Signature edition machines here:
https://www.microsoft.com/en-us/store/b/pcsignatureedition
And here:
https://www.laptopmag.com/articles/microsoft-signature-edition-windows-10-analysis
But even then, it could be argued that the PC as it comes from the factory is often the best from a performance perspective: You’ll get the fastest speeds and the best battery life if you don’t mess too much with what came in the box.
Get WCD from the Windows Store
How do we take an existing PC with Windows 10 already on it and transform it to our will? Get Wicked! Well, it’s really called Windows Configuration Designer, or WCD, but sometimes I’ve heard it pronounced wicked.
WCD comes in two forms:
- Part of the Windows ADK (Assessment and Deployment Kit)
- Downloadable in the Windows Store as a Store app
In this book, we’ll use the Windows Store app. Why? Well, it’s always kept up-to-date and it’s a lot easier to install, that’s for sure.
Well why would you ever need the ADK version then? Only if you needed to go backward and teach an older machine, say, a Windows 1803 or 1709 or 1703 or similar machine, how to be reconfigured.
If you use the Windows Store WCD, it’s always up-to-date, lockstep with whatever the most current version of Windows is. You can acquire WCD on your management station. Just head over to the Windows Store and search for it, and then get it as shown in Figure 8.1.

Figure 8.1 Getting the Windows Store version of the WCD
What Can You Do with WCD? (And What Shouldn’t You Do with WCD?)
In this scenario, where Jack gets a new Windows machine, it has to be the latest version of Windows to work with what we’ll do here with the Windows Store WCD. If Jack is handed an older Windows machine, he has to get it upgraded to the latest version of Windows (using Windows’s auto-update) before the Windows Store WCD will reconfigure it to your liking.
But then after that, what can you do with WCD? Here are some big wins:
- Install Win32 applications.
- Enroll device in Active Directory.
- Join Azure AD.
- Add certificates.
- Change product versions.
- Specify Wi-Fi parameters.
- Email profiles.
- Run PowerShell scripts.
- Configure “Always on VPN” client.
- Remove OEM bloatware.
Can you do everything that you could do if you were using an imaging process? No not everything, but a lot of things—typically the most important things.
I wouldn’t recommend you try to configure anything you’re also going to be dictating through MDM, like policies or certificates. But I could see a world where maybe you need to provision some items to be guaranteed right away, or items that are somehow particular to these machines and not something that would come down from MDM.
And that’s the point of the WCD.
WCD Example
In this example using WCD, we’ll install an application Jack needs right away as well as remove any bloatware, also known by the more “politicially correct” name of pre-installed software.
Start out by running WCD and then selecting “Provision desktop devices,” the first tile in the upper-left corner as seen in Figure 8.2. As you can see, there are a lot of other things the WCD can do, like provision HoloLens and Surface Hubs, but we’ll just skip over all that stuff.

Figure 8.2 WCD main screen enabling you to perform provisioning tasks
In Figure 8.3 you’ll see the steps you’ll take before a provision file, known as a .PPKG file is finalized. I’m going to demonstrate some, but not all, of these steps. Note also that at the bottom the page (not shown), there’s a way for you to “Switch to advanced editor,” which we’ll talk about a little later.

Figure 8.3 The WCD navigation for “Provision desktop devices”
Let’s go through each major page, one by one (briefly).
Set Up Device Page
When you’re in the “Set up device” page, you’ll see what’s in Figure 8.4. You can specify a device name after the machine accepts the package. The format might be something like Fabrikam%RAND:4%, which would make a machine name something like Fabrikam0001.
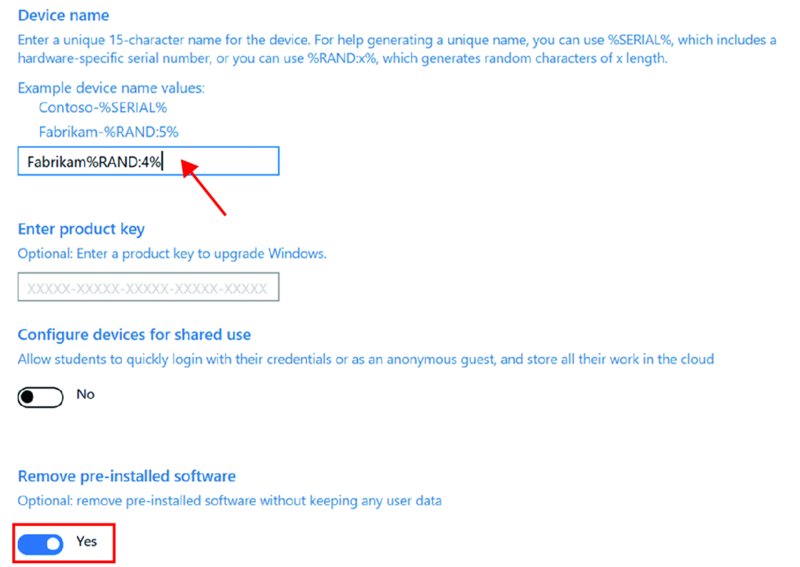
Figure 8.4 The “Set up device” page of WCD
Additionally, my favorite feature is on this page, the “Remove pre-installed software” switch, which will remove darn near everything in the box and do a Windows reset. In other words, it will automatically get rid of bloatware and junk someone might have had in the box and make it spring-fresh! Yes, this adds some more time, but who wouldn’t want the cleanest machine to get started with?
Also on this page, but not used in my example, is a way to just throw in a product key for your enterprise, and if a machine starts out life as Windows 10 Pro and you put in a key for Enterprise or Business, then…bingo. Your machine will be re-born as that machine type when this is all over. That’s amazing.
Set Up Network Page
If you know you have Wi-Fi on the target, you can prefill in a network SSID to connect to. I didn’t try this end to end, but to me it looks like only Open and WPA2 Personal password types are supported.
You can also click this to Off, which will ensure that you must use hardwired Ethernet to continue.
Account Management Page
The Account Management page can be seen in Figure 8.5. On this page you’ll select if the machine should enroll into on-prem Active Directory (provided you also have a VPN connection), enroll in Azure AD (which we’ll set up), or just have a local admin. I’ll select Enroll in Azure AD. You’ll also set a Bulk Token Expiry date, which is how long you will allow this package to enroll machines. Maybe you want to set this for 30 or 90 days, or even maybe 10 years in the future. It’s your choice. Note that as far as I know, you cannot revoke an enrollment token once it’s baked into the .PPKG file. But each time you create a token, it creates an account in AAD that corresponds with that token. If you can figure out which account is used to create that token, just delete that account and that would effectively deactivate the token.
In Figure 8.5, you can see my success after providing Frank Rizzo’s Azure admin credentials and setting the date into the future.
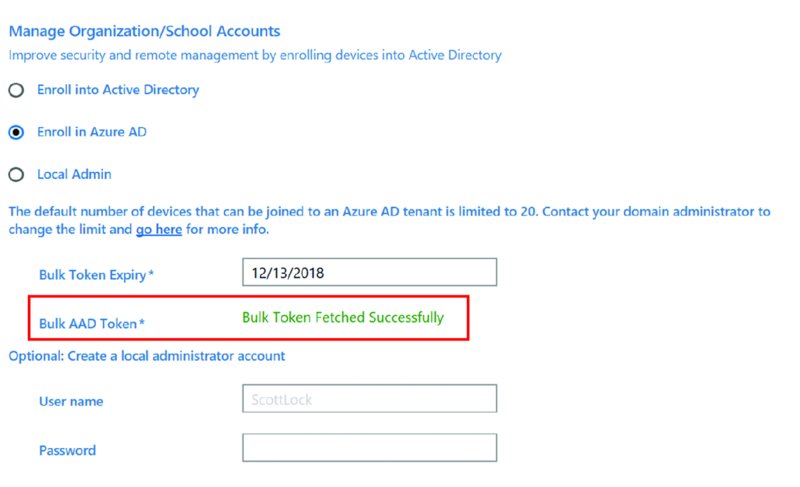
Figure 8.5 Result of supplying credentials and creating a bulk token
Add Applications Page
The “Add applications” page, seen in Figure 8.6, is useful if you have some package that might not be deployed automatically through MDM. In this example, I’m adding PuTTY (www.putty.org), a common networking application. After selecting it, the command-line arguments are nicely already put in for me, a nice touch.
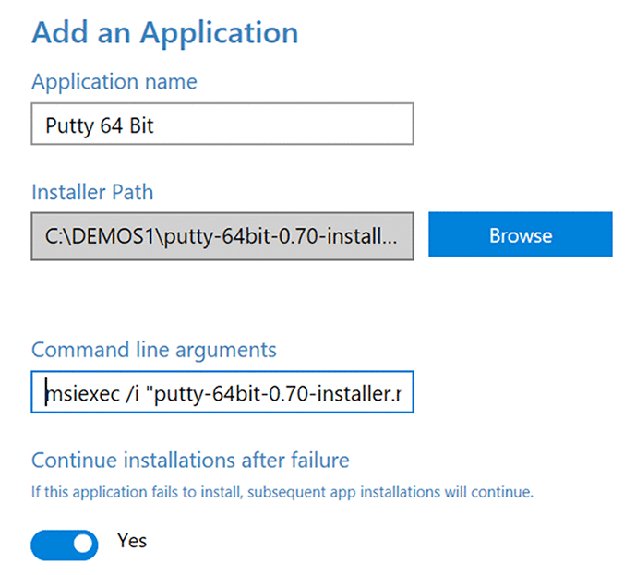
Figure 8.6 Adding applications through the WCD
Note that the actual application itself is embedded into the .PPKG file. So the more applications you add, the bigger and badder this file gets. Note that there is a catch with this: you can only have one file for each app, along with a command line to install that one file. So if you have an installer that consists of multiple files, you’ll have to bundle those that are utilizing some kind of self-extracting installer, which isn’t hard, but it’s not really fun either.
Remember, at some point you’re going to have to get this .PPKG file over to the user, usually on a USB stick or a DVD or something. So just be cognizant of that. Additionally, as I said, there’s no need to deliver stuff through the .PPKG file that you’re also going to be deploying over the Internet via MDM anyway, so also keep that in mind.
Add Certificates Page
The “Add certificates” page is useful too. There are lots of times you may need to pre-populate a certificate into the machine’s brain, so it starts to immediately trust resources. In Figure 8.7, I’m feeding it a certificate in .CER format.
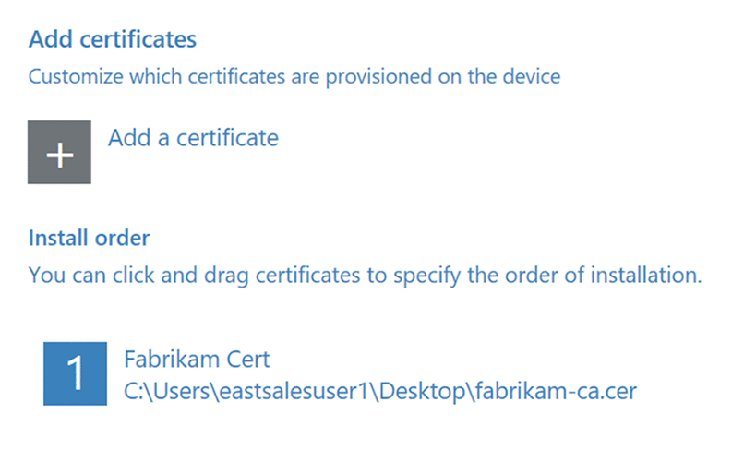
Figure 8.7 The PPKG file can contain certificates.
You can click Finish and see a review of the .PPKG file before you save. You can optionally protect the package with a password, which isn’t a bad idea, but for this example, I’m not going to.
The Advanced Editor
Additionally, I noted earlier that there is the Advanced editor within the WCD (which I won’t be using, but did want to show you). You can see this in Figure 8.8.

Figure 8.8 WCD advanced configuration options
The WCD Advanced pane opens up even more possibilities of knobs and things to do. Some are pretty awesome and important, like turning on BitLocker, DeviceGuard, and Defender. And some are just fun, like Desktop background and other look-and-feel items (that could be covered in MDM-land).
I have two warnings about the advanced editor though:
- The Simple editor we’ve been using then becomes unavailable for the same .PPKG file. That is, going forward, if you use the Advanced editor for the advanced stuff, you cannot use the Simple editor again.
- When you save your packages out using the Advanced editor, you need to expressly specify that you are an IT admin and not an OEM or other vendor type. You can see this in Figure 8.9. You’ll also need to update the Version number in case you make any updates later, or else existing machines will ignore any files (with the same version) they’ve seen before.
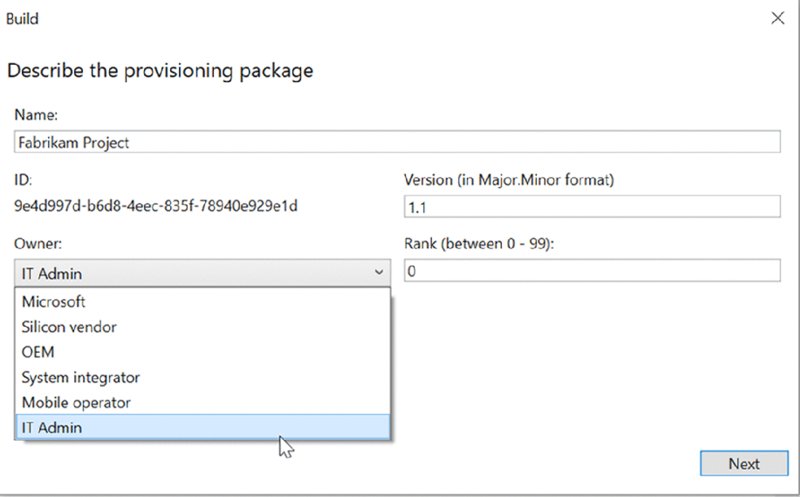
Figure 8.9 Exporting packages in the Advanced view requires you to specify that you’re an IT admin and specify the version.
Implementing the .PPKG File
There are three ways to get the .PPKG file implemented to the box.
Way #1: When Windows is just getting started with the out of box Experience, or OOBE (automatically)
Way #2: When Windows is partway through the OOBE (manually)
Way #3: When Windows is already up and running on the machine, and you need to feed it the .PPKG file
Let’s briefly explore all three.
Implementing the .PPKG File Automatically during OOBE
Back to Jack. Remember Jack? He just went to Best Buy and bought a new laptop. And you’ve got him a USB stick with the .PPKG file.
All Jack has to do is put in the USB stick with the .PPKG file in the machine and turn on the machine when it starts the first time.
That’s it.
When he uses the USB stick, Windows OOBE will open the .PPKG file and just ask him if he wants to set up the device (not shown in any screen shot). Jack simply says yes, and then…Jack gets some coffee while Windows does its thing.
Implementing the .PPKG File Manually during OOBE
What if Jack already turned on the machine because he couldn’t wait a second longer? But he didn’t know all the answers, and now Windows is not quite ready but still in the OOBE. In this case, Windows started to take care of some initial housekeeping items and Jack missed the window to get the OOBE to see the USB stick automatically and start to use it.
No problem. Tell Jack to hit the Windows key five times. Then it will wake up and see the USB stick with the .PPKG file on it. Jack then says yes to use the file, and Jack will see what’s in Figure 8.10.

Figure 8.10 The .PPKG file is consumed during OOBE.
Implementing the .PPKG File after Windows Is Already on the Machine
What if Jack didn’t know you were going to send him a USB stick with a .PPKG file and finished OOBE and now Windows is running? Or, similarly, what if Jack was handed a machine from the supply closet, with Windows already running?
In this case, Jack will need to feed Windows the .PPKG file on the USB stick. It’s as simple as double-clicking on the .PPKG file. The person doing it will need local admin rights, but that’s all there is to it. When they double-click on the file, they’ll get what’s in Figure 8.11.

Figure 8.11 Selecting the .PPKG file after Windows is running
Results from Using a .PPKG File
When the .PPKG file runs (from any of the aforementioned techniques), the final result is the same. In my WCD example, I made a .PPKG file where I wanted the following things to occur:
- I wanted to reset the machine, to remove any kind of bloatware. This is done and seen when the machine is reset, as seen below.

- I wanted to join Azure AD and auto-enroll in to MDM and download all my policies. This is done, but not shown.
- I wanted the machine to get the name FabrikamNumber. This is done, but not shown.
- I wanted to install a special application, PuTTY, right away. This is done, and shown in Figure 8.12.
- I wanted to put a special certificate on the machine, right away. This is done, but not shown.
Final Thoughts about WCD
I like WCD. I think it’s a big step forward in provisioning a machine without having to rip and replace what’s already on the machine in order to make it immediately useful for “the next guy.”
WCD’s Simple editor gets the job done for the basics, and the Advanced editor has a lot of awesome configuration options in there as well.
As I said a few times already, I wouldn’t try to do things in WCD that you’re also going to do with MDM. Just pick one method. And if you can pick the MDM method, then I would just do that, because it’s more policy-based than WCD. In other words, remember that WCD is a one-time action, where MDM is about setting the settings you’ll get now, plus the ongoing settings and policies you want people to get tomorrow.

Figure 8.12 PuTTY is installed via the .PPKG file, before the rest of the items come down from MDM.
The official docs on WCD can be found here:
And a good YouTube video on the subject can be found by searching for “BRK3393.”
Autopilot
Autopilot is getting a lot of buzz. Like if you ask 100 admins why MDM is a “cool thing,” almost all of them would say, “Autopilot!” But then ask an IT admin how Autopilot changes the game, you might get a variety of stories.
Here’s the point of Autopilot: Instead of taking a nice, brand-new machine from the factory and ghosting it, MDT-ing it, or otherwise nuking it to overwrite it with your “unique snowflake” image, you can stop all that madness.
You can take the device right from the manufacturer and transform it immediately into something ready for productive use. G’bye wipe and reload, and hello immediately useful.
As a bonus, Autopilot enables you to pre-answer the questions that would occur when the machine is started up for the first time and runs the OOBE. The user needs only to specify the language and keyboard, connect to Ethernet or Wi-Fi, and provide their credentials.
Then the machine is enrolled into your MDM service, like Intune, and…a machine with the operating system, your customizations, policies, and your installed applications is ready to rock.
Just drop-ship the machine, turn it on, wait a little bit. And bingo. New machine, let’s get to work!
Autopilot is a cloud-based service, run by Microsoft, that stores hardware IDs (more in a minute). When a machine turns on for the first time and is registered in your Autopilot, something magical happens. Autopilot will dictate a few final setup instructions, reducing the interaction by the end user to a few, or even zero, clicks before the machine is ready to be used by the end user.
So, let me break down what Autopilot is in simple terms as seen in Figure 8.13.
- A Windows 10 device has a unique hardware identifier (also known as a hardware hash). I’ll just call this the hardware ID. If you own and want to then manage the device, you (or an OEM hardware vendor or IT service provider) would pre-stuff that hardware ID into the Autopilot service. (I’ll explain later how to do that.) A Windows machine gets shipped to an end user. The Windows 10 machine can be delivered directly from an OEM like Lenovo, HP, or Dell, or you can do the work yourself on existing machines (after a little preparation).
- The admin configures the Autopilot profile for machines. This tells the computer how to act when it first starts up.
- The machine gets shipped from the OEM (or possibly by you) to the end user.
- User gets the new machine, opens it up, turns it on, and connects it to a network. The machine contacts the Windows Autopilot service. When Windows 10 starts outs in the OOBE as we already talked about, it asks the servers at the Microsoft mothership if the machine’s hardware ID is pre-enrolled (registered) in your Azure AD tenant. Specifically, your Azure AD tenant and not, say, someone else’s Azure AD tenant.
- If the machine’s hardware ID is detected in Autopilot, the machine enrolls into your Azure Active Directory (AAD).
- If you have enabled automatic enrollment to an MDM service (say, Intune) after AAD enrollment, your device will be enrolled to Intune.

Figure 8.13 The Autopilot infrastructure
Then after a while, it gets all the stuff Mr. or Ms. User needs to be productive: apps, policies, scripts, Windows updates, Windows features, and so on from the MDM service.
And, the beauty of Autopilot is that when the machine is done enrolling into MDM, the end user can be just a standard end user and not an administrator (it is configurable if you’d like it to be a local admin). If you’ll remember back in Chapter 2, “Set Up Azure AD and MDM,” when we hand-enrolled a machine to MDM via the out of box experience, the person doing the enrollment became a local admin. And likewise, also in Chapter 2, when we hand-enrolled a machine to MDM via the “Set up a work or school account” option, that person also became a local admin.
Not good. You don’t want that.
Autopilot nicely tidies up this “local admin” problem for us when a user gets a new computer. Or, if for some strange reason you want your user to have admin rights after you drop a machine into their lap, you can also do that with Autopilot.
That’s the basic summary of Autopilot for new device deployment.
But Autopilot is also useful after the device is deployed.
Autopilot also has hooks to remotely reset a device, which we’ll also explore later. This is super handy when it comes to resetting a machine to basically wipe it down to the studs. Then, next time it connects during the (now) “born again” out of box experience, it then connects back to Autopilot, reregisters in MDM, and once again the computer then gets all the stuff Mr. or Ms. User needs to be productive: apps, policies, scripts, Windows updates, Windows features, and so on. All of that configuration just drops onto the device, and, oh yeah, all their documents are happy and secure in OneDrive because you did that already.
Autopilot does have some prerequisites. And if you’re following along in the book examples, you’ve already got them. But to put a fine point on it, Autopilot will work with the following subscriptions. You only need one:
- Microsoft 365 Business
- Microsoft 365 F1
- Microsoft 365 E3
- Microsoft 365 E5
- Enterprise Mobility + Security E3
- Enterprise Mobility + Security E5
- Azure Active Directory Premium P1 or P2 and Intune or another MDM service
- Intune for Education Subscriptions
- Microsoft 365 Academic A1, A3, or A5 subscriptions
More could also be available by the time you read this. You can see this list at:
Why these subscriptions? Well, first you need MDM auto-enrollment after AAD enrollment, which is an AAD Premium feature. I said right in Chapter 2, before you decided on what to buy (or even what to investigate), that auto-enrollment was a “must-have.” The second reason is that you get custom branding; that is, using your own company name, company logos, custom help text, and so on; we’ll explore this a bit later.
Also, normally it doesn’t make any sense to buy AAD Premium and Intune separately, because Enterprise Mobility + Security E3 is cheaper than AAD Premium and Intune.
Getting Devices Registered into Autopilot
The first and most important step in Autopilot is to get devices’ Hardware IDs tucked away inside your Autopilot. Not some other guy’s Autopilot instance.
Yours.
That way when your machines turn on, they wake up, see their hardware ID in your Autopilot, and get your directives.
The easiest way to get devices registered into your Autopilot is to have an OEM do it for you or have the OEMs give you a list of devices you’re about to buy in a CSV file. Participating OEMs include Dell, HP, Lenovo, Microsoft (Surface devices), Toshiba, Panasonic, and Acer. Check the list of participating manufacturers at http://aka.ms/WindowsAutopilot.
Basically, there’s some magic under the hood where, when you buy a slew of new machines, and tell them your Azure AD tenant name (e.g., fabrikam1000.onmicrosoft.com) and tenant ID (your Azure GUID). There is an approval process that you have to go through for each OEM, which enables them to add devices on your behalf. After that, they will then auto-plunk the hardware IDs of the machines you’re about to buy directly into your Autopilot service. Or, you can opt to have them give you a list of the devices in a CSV file, which you can upload yourself.
Additionally, you can work with the OEMs to start out with the most stripped-down Windows possible, free from as much bloatware as possible to make this go well.
I haven’t done this myself, so I cannot speak to the process. I suspect it’s a little different for each vendor. And if you buy a gaggle of machines from an OEM vendor, I’m sure you’ll get nice, white-glove service for getting those hardware IDs into your Autopilot.
Beyond the idea of OEMs automatically putting hardware IDs into your Autopilot service, there are other ways you can place them into your Autopilot service. Indeed, there are multiple portals for defining where Autopilot hardware IDs can be stored. Four portals, in fact, where hardware IDs can be stored. Why four? Let’s check each one out.
Microsoft Store for Business This was the original place Autopilot hardware IDs were stored. This is still valid, but it’s only needed if you use an MDM provider other than Intune.
Microsoft Intune Intune has an Autopilot blade where you can just put in your IDs. This is where we’ll be doing our registrations in this chapter.
Partner Center You might partner with a reseller or integrator who sells you hardware and needs to add devices on your behalf. I’m not going to worry too much about this portal in this chapter, but you should know it exists. There’s a good write-up on this here if this is your scenario:
https://osddeployment.dk/2017/07/07/how-to-use-windows-Autopilot-from-microsoft-partner-center-csp/
Microsoft 365 Business This is for small and medium-size businesses, usually fewer than 300 seats. Organizations with this subscription can partake in the fun as well.
As I said, Autopilot is really is its own service, but there’s a place inside Intune to manage it. The fastest way to get there inside Intune is Device enrollment ➢ Windows Enrollment, where you can then see a section entitled Windows Autopilot Deployment Program, as seen in Figure 8.14.

Figure 8.14 The Autopilot section within Windows Intune
In the next few sections, we’ll spend time within these areas (in the following order):
- Devices
- Deployment profiles
- Enrollment status page (often abbreviated ESP)
- Intune Connector for Active Directory
You’re welcome to poke around for a second, but I recommend holding off configuring anything until we’re ready to do so.
Manually Getting a Hardware ID into Autopilot
What we’ll do in this section is an excellent “walk before you run” with Autopilot. We’ll grab one machine’s hardware ID and put it into Autopilot.
We’ll use a PowerShell script running upon an existing, “up and running” Windows 10 machine (1703 or higher). The script outputs a CSV file that we’ll then have Autopilot consume.
Why would you want to do this with an “up and running” Windows 10 machine? Well, normally you wouldn’t. Remember, the core scenario of Autopilot is “you buy a bunch of machines from Dell or Lenovo and then ship them to your end users.”
But you’re going to need to pre-flight-test Autopilot so you know it’s working perfectly. So when you get the ID of a test system or two or three, you can then keep trying and retrying. Nuking the box, and restarting the out of box experience. Try and try again until you know you’ve got it right.
Then you’ll have it down to a science with your test machines, so that your real “bulk purchased” machines will correctly check in to Autopilot and get bootstrapped and get started with the experience I outlined earlier.
So this is going to be the best first steps and first experiences with Autopilot. But you would have to touch each machine in order to utilize this method, which is not handy…not at all. But don’t panic. In the next sections you’ll learn how to mass-gather device hardware IDs.
In this example, I’m using a machine with Windows 1809 on it that is not domain-joined, not enrolled in MDM. It just exists. And one I plan to blow away again and again, so it has nothing particularly useful on it. If you’re following along, for this chapter, I highly recommend bringing up a brand-new VM you’ve never registered into Intune before. In this way you won’t run into any problems where your hardware ID is already preassigned to some computer name in Azure and/or Intune.
Once your newly created test Windows 1809 machine is running, there’s a script we can leverage from the PowerShell gallery. You can get it the hard way directly from the PowerShell gallery at www.powershellgallery.com/packages/Get-WindowsAutopilotInfo/. Or, you can get it the easy way. Let’s go with the easy way.
To use it, start out by running an Admin PowerShell prompt. Then run:
Install-Script -name Get-WindowsAutopilotInfo
Say yes to any prompts (see Figure 8.15).
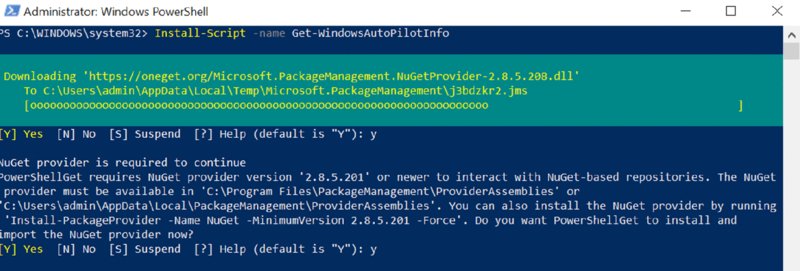
Figure 8.15 Running the Get-WindowsAutopilotInfo PowerShell script
When done, you’re almost ready to use the script. You’ll need to tell Windows it’s A-OK to run scripts. Then run the script and save the hardware ID as a CSV file someplace handy.
Set-ExecutionPolicy Unrestricted
Get-WindowsAutopilotInfo -outputfile c:out1.csv
Then open the file with Notepad, as shown in Figure 8.16, to check it out.
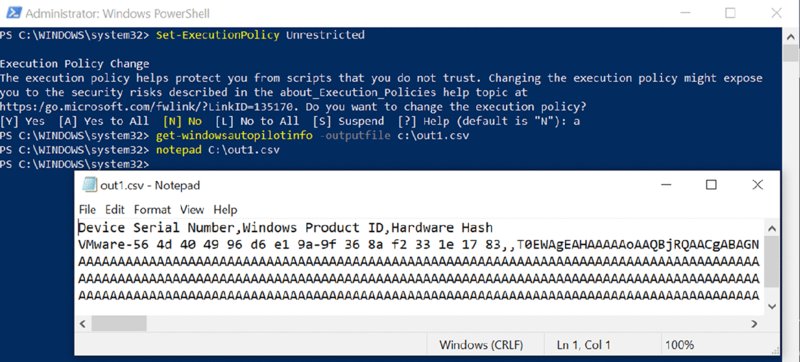
Figure 8.16 Examining an Autopilot hardware ID
Get this file over to your management station and keep it handy. In the next step, you’ll upload the CSV file into Autopilot (through the Intune console).
Uploading Your Device CSV File into Autopilot
Back in the screen shown in Figure 8.14, look for, and then click upon the Devices category.
Next you’ll be able to click Import and then feed it your CSV file. You can see this in Figure 8.17.

Figure 8.17 Feed Autopilot your CSV file.
In this example I’m feeding one hardware ID, but you can feed it up to 175 IDs at a time. Then sit back and wait. This process takes a while to complete.
When done it will look similar to what’s seen in Figure 8.18.
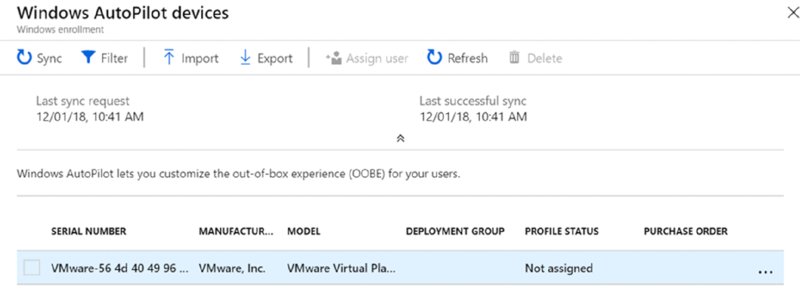
Figure 8.18 Your device shows up as registered in Autopilot.
You can come back here in a bit to verify that the hardware ID is A-OK.
In the meantime, you can continue onward and make your Intune Autopilot profile. Before I forget, here are some more resources about getting the hardware ID manually:
Windows Subscription Activation
When you buy a palate of machines from Dell or Lenovo or whomever, they might not ship you Windows 10 Enterprise. Instead, they might sell you Windows 10 Pro, which you’ll then drop-ship to your end users.
But, wait! You don’t want to use Windows 10 Pro; you want to use Windows 10 Enterprise. What are you going to do?
Windows Subscription Activation to the rescue!
You assign a Windows 10 E3 or E5 license in Azure AD to a user or a group of users. Then, when the user logs on, it immediately transforms the machine from Windows Pro to Windows Enterprise…bingo…just like that. And, yes, every time a user touches another machine, re-bingo. He would just keep transforming every Pro machine he touches to Enterprise.
Learn more about Windows Subscription Activation at https://docs.microsoft.com/en-us/windows/deployment/windows-10-enterprise-subscription-activation.
Edition Upgrade and S Mode Switch
You might be familiar with Windows 10 in S Mode. We talked about this ever-so-briefly in Chapter 1. Windows 10 in S mode is a way you can buy a machine that will be very secure (hence, the S) and only trust applications downloaded and purchased via the Windows Store, and not those attempted to be installed on the machine like a Win32 app.
This is great, until you run into some showstopper where, at least on some machines, it turns out you do need to have, say, Windows 10 Pro or Enterprise instead. This can happen if your application is absent from the Windows Store, or needs a driver to drive some kind of unusual hardware. As I stated in Chapter 1, a one-way upgrade path is possible from Windows S to Windows Pro or Enterprise.
And, you can do this with Intune to one or more machines.
You do this with an Edition Upgrade Profile, as seen here.

Then, you select the version (seen here) and give it a key (not shown).

Finally, you can specify to No Configuration, “Keep in S mode,” or Switch.

Note that the Windows S Mode switch only works for Windows 10 1809 and later.
Remember though, this really is a one-way trip. If you wish to go backward again to Windows 10 in S mode, you need to format the hard drive and reinstall Windows 10 in S mode.
For more information on edition upgrades and switching away from Windows 10 S mode, see https://docs.microsoft.com/en-us/intune/edition-upgrade-configure-windows-10.
Creating Groups for Your Autopilot Machines
Remember the idea of creating groups back from Chapter 3, “MDM Profiles, Policies, and Groups”?
Well, they’re about to come in really handy here. (And don’t worry if you cannot remember anything about them, or if you skipped it. We’ll do it together here.)
In short, the idea is that you will need to have your computers plunked into groups (manually or dynamically). That way, in the next big thing we do together (when we set up Autopilot deployment profiles), you can have different profiles (potentially) hit different groups.
But here’s the thing: You don’t have computers you can put into groups.
You appear to have an amorphous blob of uploaded hardware IDs, which, ultimately, are just a gaggle of serial numbers that are registered in Autopilot. Technically, what’s really happening is that each of these machines really does have an Azure AD object for each imported device. But those Azure AD objects are named using the device serial number (since there is nothing better to use for a name at that point).
What’s next? You need to get these serial numbers into groups! You need a serial number to group converter! Do not despair.
As a refresher, you can create two kinds of groups:
- Assigned groups (where you can cherry-pick specific serial numbers)
- Dynamic groups (where you can automatically sweep in Autopilot serial numbers)
Creating an Assigned Group for Autopilot
Creating an assigned group is the quickest way to get started.
But I recommend you read through this section and the next section, because ultimately you might want to just create and use dynamic groups.
If you want to create an assigned group, go back to the Azure Active Directory console and create an assigned group and pick one or more serial numbers, as seen in Figure 8.19. I’m calling my group Autopilot Assigned.
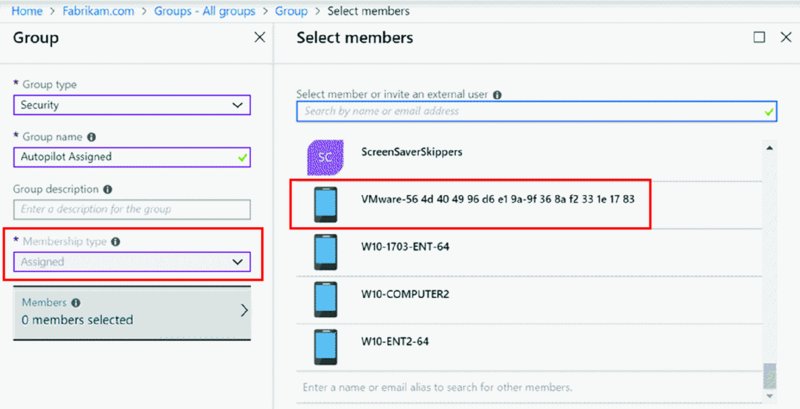
Figure 8.19 You can make a direct assignment to Autopilot serial numbers.
As you can see in Figure 8.19, you can assign and click upon very specific serial numbers, which adds them to a group. And then (a little later) you’ll associate this group to a profile.
Note that after the machine is used for Autopilot, magically the display of the machine will change from the serial number to the assigned computer name.
This tripped me up the first time.
So, if you don’t see serial numbers here after you uploaded the hardware IDs to Autopilot, chances are you already enrolled the system into Intune, and the amorphous blob in Autopilot (which has the computer’s serial number embedded within it) has already been converted into a real computer name. As a little side note, to be honest, discovering which computer names have come from what serial numbers is really, really hard. I expect this to change in the future.
Creating Dynamic Groups for Autopilot
Alternatively, you might want to just sweep 100% of Autopilot devices into one big ol’ group, to manage en masse. You likely don’t want to do this in the real world, but this is a good exercise to get you up and going right away.
To do this, you’ll use Azure AD groups and create a Dynamic Device group as seen in Figure 8.20.
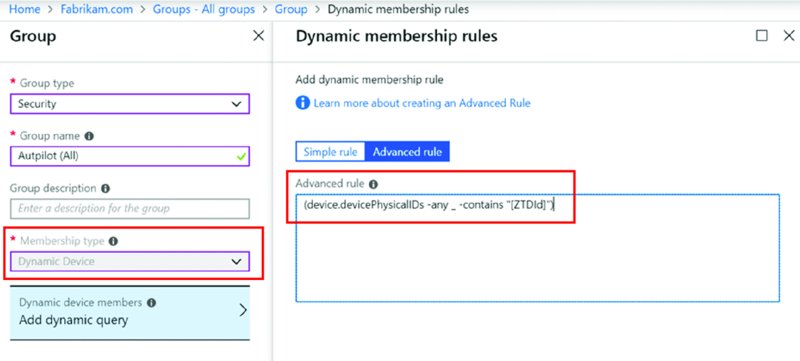
Figure 8.20 Creating a dynamic group for all Autopilot devices
The secret sauce to sweep all Autopilot devices in is:
(device.devicePhysicalIDs -any _ -contains "[ZTDId]")
In case you’re having a little trouble reading this, after the -any there’s a space, an underscore, another space, then the -contains.
You can see me use this dynamic query in Figure 8.20.
You can also have queries specific to the PurchaseOrder:
(device.devicePhysicalIds -any _ -eq "[PurchaseOrderID]:24601")
Same idea here with the syntax. After -any, add a space, an underscore then another space before the -eq.
You can also make a query which discovers computers by OrderID. OrderID is a generic field you can use for, say, expressing Sales machines versus Marketing machines versus Human Resources machines. If you decide to use the OrderID field, your query might be something like this:
(device.devicePhysicalIDs -any _ -eq "[OrderID]:Marketing")
Later on, if you follow all the examples in this chapter, you’ll be using this exact query in a different way; to automatically sweep in machines that will have no human interaction (also called self-deploying machines). So, stay tuned for that.
I made mention about the weird syntax in the preceding examples with the -any, the space, then an underscore, then another space before the -eq. The unusual syntax means to enumerate all the values for that property. The devicePhysicalIDs property is a multi-valued property and, as such, the unusual syntax.
A good blog entry on dynamic groups with Autopilot can be found at Using:
https://blogs.technet.microsoft.com/mniehaus/2018/06/13/Autopilot-profile-assignment-using-intune/
And, I also got a little help from the man himself, Michael Niehaus, to get this information. Thanks Michael!
Setting Up Your Autopilot Deployment Profile
Next it’s time to set up your Autopilot deployment profile. You can see the link for Deployment Profiles in Figure 8.14. Click there and then click “Create profile.” When you do you’ll be presented with the Create profile blade like what’s seen in Figure 8.21.

Figure 8.21 The “Create profile” and “Out-of-box experience (OOBE)” blades
Here’s the items you will see in the “Create profile” blade:
- Name: Anything you like
- Description: Optional
- “Convert all targeted devices to Autopilot”: This is a one-time, one-way switch that will take existing Windows 10 (1709 and later) devices and send their IDs to Autopilot on your behalf. For now, leave this set to No. You manually uploaded the CSV file with the hardware ID, so you should be okay.
- “Deployment mode”: Can be User-Driven or Self-Deploying. We’ll do User-Driven in this first attempt. We’ll do Self-Deploying later in the chapter.
- “Join to Azure AD as”: Can be Azure AD joined or Hybrid Azure AD Joined. We’ll do Azure AD joined in this first attempt.
In the OOBE blade, also seen in Figure 8.21, you’ll be able to do the following:
- “End user license agreement (EULA)”: Show or Hide
- Privacy Settings: Show or Hide
- “Hide change account options”: Show or Hide
- “User account type”: Administrator or Standard
- “Apply computer name template”: No or Yes
As you can see in Figure 8.21, I’ve decided to hide everything, make the user a Standard user and give a name in the format resulting in something like Fabrikam2898. Click Save (not shown) before continuing.
The next and last stop before trying this out is to marry up your Autopilot profile with a group that you want to target. Click Assignments and pick one of the device groups you created earlier. I’m going to pick my Autopilot (All) group, which will always have every Autopilot device (see Figure 8.22).

Figure 8.22 Make the Autopilot profile assignment to an Azure AD group.
For good measure you can click “Assigned devices” and see which devices should get this profile, as seen in Figure 8.23.
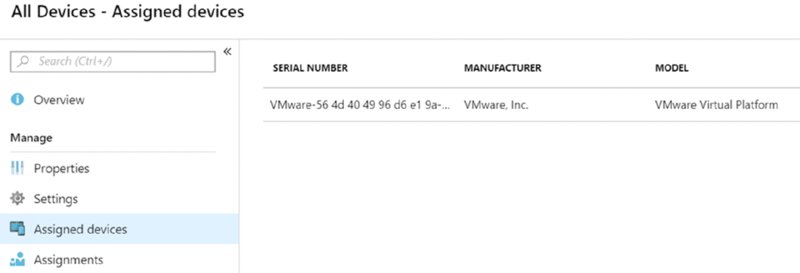
Figure 8.23 See which devices will get the Autopilot profile you created.
I’m sure you’re ready to nuke a machine and get started with testing our Autopilot.
Don’t.
Don’t do it yet.
Just…don’t.
I recommend you continue onward, and I’ll tell you when to hit the “nuke button.”
Setting Up Enrollment Options and Setting Up Branding
At this point you can dictate more of the Autopilot user experience via the enrollment options and (optionally) the Azure AD branding.
Both of these hone and craft the look and feel and user experience when users kick off the OOBE. So let’s get these out of the way before we even attempt our first Autopilot dry run.
Setting Up Enrollment Options
In Intune you’ll want to express the look and feel of the user experience when the machine is getting all its brains downloaded from Autopilot.
To do this, click on the Device Enrollment ➢ Windows enrollment ➢ Enrollment Status Page.
Then click on the Default profile, which affects all users and devices. Note that you could create a new profile and be selective, but I’m not going to do that here.
In the Default profile, select Settings, as seen in Figure 8.24.
You can poke around here if you like, but for now, I would keep the defaults for your initial test flight. You can make it such that the machine waits for certain conditions to be true before releasing control to the end users to start working. Those options are seen in Figure 8.25, but again, I don’t recommend you turn them on right now.

Figure 8.24 The default “All users and all devices” settings, which I recommend you use in the chapter

Figure 8.25 Additional enrollment options (which I don’t recommend for the chapter, but useful in real deployments)
Let’s take a look at some of the policies seen in Figure 8.25.
Block device use until all apps and profiles are installed When this item is selected, you get the remainder of the options. As expected, the entirety of all the applications and profiles must be downloaded before the machine is ready for the end user to use.
Note that any problems in downloading any applications at all could also hang up the installation.
Allow users to reset device if installation error occurs It might be a good idea to set this to Yes. In this way, a user can click the Reset button at the end of a failed OOBE and at least try again and maybe contact Autopilot and then the MDM service and succeed the second time.
Allow users to use device if installation error occurs You can get hard core and block the use of the Windows PC if any installation problems occur with this option set to No.
Block device use until these required apps are installed if they are assigned to the user/device This is a nifty feature you can use to guarantee that maybe one or two key applications are installed first on the machine and then control is released to the user. And then, later, in the background, the other nonessential applications are installed. This gets the user to work more quickly and defers the installation of lesser-used applications to a later time. You can learn more about this particular nuanced feature here:
There are some other settings here as well, but again, I suggest you use the defaults as seen in Figure 8.24.
Azure AD Branding for Autopilot
A completely optional step, which is neither Autopilot-nor Intune-related, is to update the branding of your Azure AD. But when you’re done in this area, users utilizing Autopilot will see a visual difference from the defaults.
We call this “the warm fuzzies” in the IT business. Users really like this stuff. They know they’re on the right track after they get the machine out of the box; it’s a gentle reminder they’re going to be alright.
To get to Azure AD branding, click Azure ➢ Azure Active Directory ➢ Company Branding. There are really two fields you might want to populate: the square logo field and the rectangular logo field. The square one can be seen in various areas, but it’s the rectangular logo field that you pretty much must populate. Self-deploy mode actually requires the rectangular logo! The square logo should be 240×240. The rectangular logo should be 280×60. Also, you might need to tweak and tinker with your logos to reduce the size. Use a tool like Paint.Net or GIMP or Snag-It to reduce the physical size and on-disk size to get these small enough to be accepted.
In Figure 8.26, you can see I’ve added a bunch of logos, square and rectangular. If I took a little more time, I could make it perfect, but for my purposes, these are good enough and we’ll see them later.
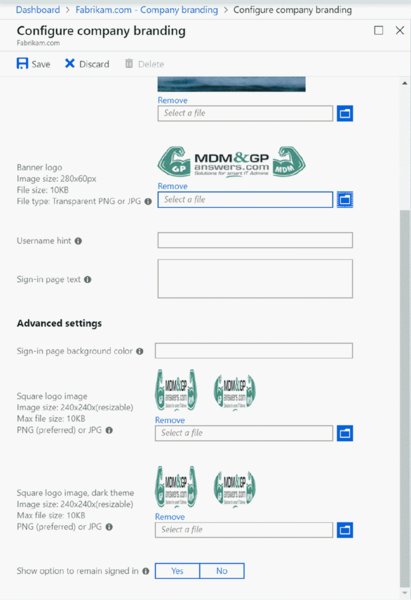
Figure 8.26 Configuring Azure AD branding, which you’ll see in Autopilot
Additionally, beyond the use of branding for Autopilot, branding has a handful of other functions. For instance, from this point onward, when people go to log on to, say, the Azure portal (like Frank Rizzo), they’ll also see these graphics to let them know they’re on the right track.
A great and detailed blog entry about which branding elements will appear in Autopilot as well as other areas of Azure can be found at:
https://blogs.technet.microsoft.com/mniehaus/2017/12/22/windows-Autopilot-azure-ad-branding/
Final Preparation for Autopilot: Reset, Sysprep, or Reinstallation
At this point, you now have one hardware ID in Autopilot. You have set up an Assigned or Dynamic group and the Autopilot deployment profile. You’ve set up enrollment options and optional Azure AD branding.
Now you need to get a machine ripped down to the (almost) bare metal and start the out of box experience. There are three main ways to accomplish that goal:
- Sysprep a machine (not recommended; but we’ll go through it anyway).
- Reset a machine.
- Reinstall a machine.
Let’s explore all those options here.
Sysprep an Existing Machine
Now, you’ve likely used Sysprep before, but here are some quick notes:
- Sysprep can now be run 99 times before the whole Windows image needs to be replaced. So if you’re using a virtualized machine (say, VMware Workstation or Hyper-V), I recommend you take a snapshot before the Sysprep. Then tell Sysprep to perform a Shutdown option. Then take another snapshot when the machine is powered down. (Then you’ll be ready to test and retest Autopilot.)
- The Generalize flag seen in Figure 8.27 can be problematic. If you have any downloaded Windows Store apps, you have to uninstall them first before this will work.
- If Sysprep just doesn’t want to cooperate, then don’t spend an hour on it. Just move on. As I said, there are other ways to flatten a machine.
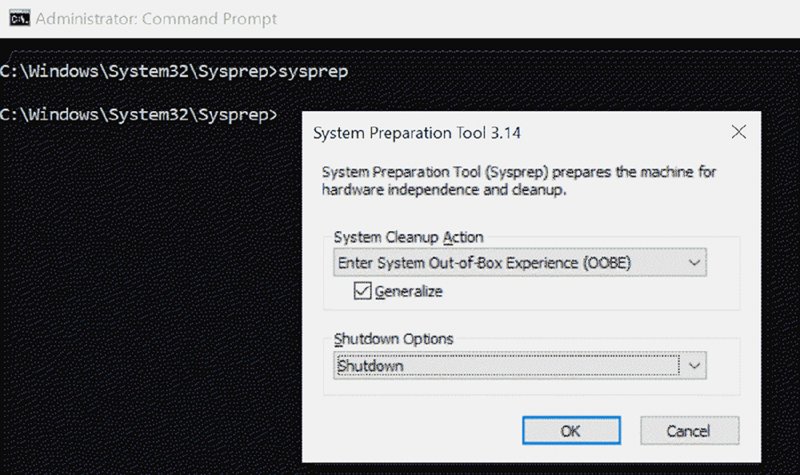
Figure 8.27 Using Sysprep to get back to the OOBE
Some quick side notes if Sysprep just doesn’t want to work for you:
- Try rebooting the Windows 10 PC; then try Sysprep again.
- You can try the steps in this article, which is kind of like a Sysprep “mind erase.”
Resetting the PC
You can use the “Reset this PC” feature in the Settings application to initiate a full PC reset. This takes longer than Sysprep, but you can do it an unlimited amount of times. You can see the button to kick this off in Figure 8.28.

Figure 8.28 Click “Get started” to reset this PC and provide admin credentials; then follow the prompts.
Reinstalling Windows on the PC
If neither Sysprep nor “Reset the PC” is to your liking, you can always just reinstall Windows 10 1809 or later on the same machine or virtual machine (wiping out what’s there and literally just reinstalling Windows 10).
Remember, the hardware ID is the same no matter how Windows OOBE gets launched. A Windows Reset, Sysprep, or fresh Windows 10 install will do the trick.
Once you’ve decided on a method, you can make a strategic snapshot (if you’re using VMware Workstation or Hyper-V) after the machine is reset and just before OOBE is about to start. This will come in handy as you try and retry Autopilot settings.
Make Sure Your Users Have Rights to Join Azure AD
Before we get started, the user (and any user) you want to perform this experience must have the right to join devices to Azure AD. In my example, I’ll be using Jack Tors, a regular user (and not an admin like Frank Rizzo).
So, if Autopilot isn’t working for you as you give it credentials to join Azure AD, check out the sidebar in Chapter 2, “Restricting Users and Devices in Azure and Intune,” where in the screen shot, you can see and verify that a particular user (or all users) has the ability to join devices to Azure AD. Additionally, in that same sidebar, you can see where a user has a maximum number of devices they can register. The same deal applies: Be sure they’re not bumping up against that limit.
Gotcha about Autopilot (1809 and Later vs. 1803 and Earlier)
There’s a small variation between Windows 1809 and later and, say, Windows 1803 and earlier.
If you connect a device to the Internet before it’s been registered with Autopilot, it will download a “not an Autopilot device” profile. On Windows 10 1809 and later, rebooting the computer will cause it to attempt to download the Autopilot profile settings again to succeed.
But on Windows 10 1803 and earlier, you would need to reset, Sysprep generalize, or reimage again.
Stepping through a Sample Autopilot Experience
The first three screens after the OOBE starts are not that interesting, and as of this writing, in user-deployed mode, you cannot turn them off. Those initial screens are as follows:
- Pick your region.
- Pick your keyboard layout.
- Pick your second keyboard layout.
Booooring. So I’m not going to show them.
The interesting stuff happens immediately after that where, if you’re paying close attention and can catch it, you’ll see a very, very brief “Connecting to Microsoft.” This is the Autopilot handshake. After that, a reboot occurs to provide the computer with its new name.
Then you’ll know you got it all right when you see a screen similar to Figure 8.29. You’ll see your company name and company logo (mine is super-duper small—sorry).
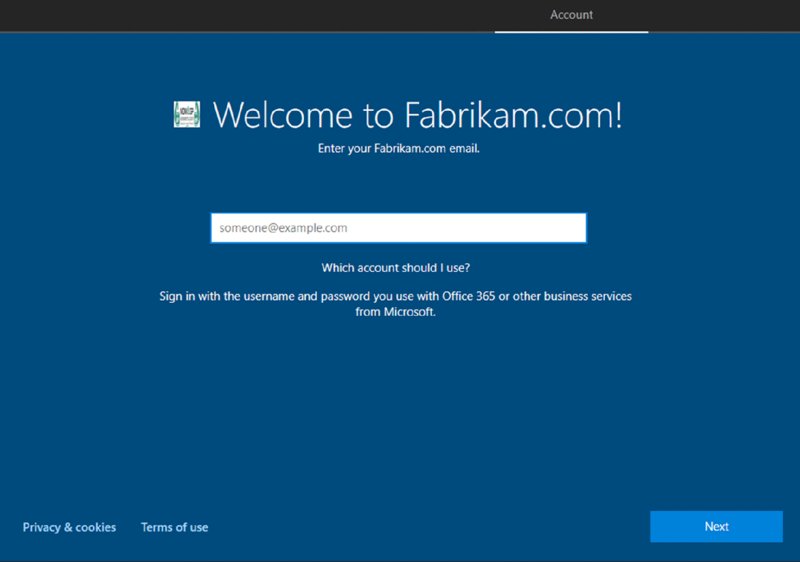
Figure 8.29 You can see Autopilot is working when you see your company’s custom welcome.
Then, give it the credentials for Jack Tors. As you’ll remember, he is not an admin, just a standard user. You’ll see Autopilot do its thing (Figure 8.30). If you’d like to also, you can expand the categories by clicking “Show details” and see some more details (Figure 8.31).
The final results of Autopilot are…a beautiful new Desktop:
- You should see your OneDrive data in place.
- You should see your deployed applications from Chapter 6, “Deploying Software and Scripts,” in place (like VLC Media Player).
- You should have your policies in place. For example, when you open Edge, you should have your desired tabs always open.

Figure 8.30 Waiting for Autopilot to finish configuring the machine

Figure 8.31 Autopilot details expanded
And, remember what happens if this machine needs to get reset?
It just gets reset and it’s back in business.
Note for fun that you may want to go back into Azure AD Groups and see that the groups you created, which originally only showed serial numbers instead of computer names, will now show the actual computer name, like Fabrikam7542.
Automatically Harvesting Hardware IDs into Autopilot
Okay: Autopilot is working; life is good.
But remember, you’ve already got machines out in the field enrolled in Intune. And those machines’ hardware IDs are not in Autopilot.
I’ll tell you what not to do: Don’t run around from machine to machine to collect those IDs with the PowerShell script we created earlier. That’s crazy.
Instead, you’re going to harvest those IDs. I wish I came up with this term, but I didn’t. I’ve heard Microsoft use the term harvest a few times and I like it.
Here’s the gist: You’ll link an Autopilot profile to an existing Azure AD group that contains computers. Or you’ll link an Autopilot profile to a dynamic Azure AD group that meets specific criteria (you’ll see what I mean in a moment). But before you do this linking, you’ll flip a special switch in the Autopilot profile to say “Harvest the IDs of the machines in the Azure AD group if they’re not already in Autopilot (and, of course, running Windows 1703 and later).”
Let’s first take a look at a group we created back in Chapter 2, the dynamic group where the word Computer is in the name. You can see it in Figure 8.32.

Figure 8.32 Seeing your existing dynamic group
For me:
- Computer10 is one I joined to on-prem AD and used Group Policy to auto-enroll in MDM.
- W10-Computer2 is one I enrolled directly to Azure AD and Intune.
- Computer7542 is the one that got born from Autopilot after I uploaded only the hardware ID and let Autopilot complete the installation.
Next, let’s go back to the Autopilot profile. That would be Intune ➢ Device enrollment ➢ Windows Enrollment ➢ Windows Autopilot deployment Profiles and then the device profile you created earlier.
Inside Assignments, in addition to the Autopilot (All) group you targeted earlier, also add in the “Computers with ‘Computer’ in the Name” group, as seen in Figure 8.33, and click Save.
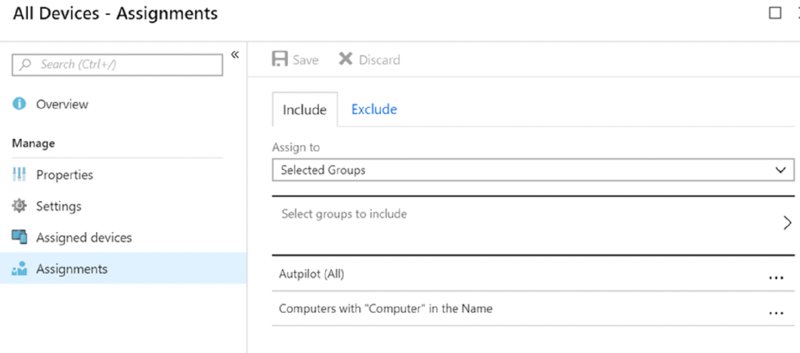
Figure 8.33 Assigning Autopilot to the “Computers with ‘Computer’ in the Name” group
“But wait!” you think to yourself. “This can never work! Those devices in the other group aren’t preregistered in Autopilot.”
“But wait!” I interject!
Click on the Properties and then select Yes next to “Convert all targeted devices to Autopilot” as seen in Figure 8.34. Then click Save.
Autopilot and Intune will then talk with each other, but only about this specific group. After they have their discussion (whatever two cloud services talk about), the goal is to take the computers in the dynamic group, and read their hardware IDs and shuttle them over to Autopilot.
Then, if these computers ever do need to get nuked, well then you’re holding all the aces, because the computers’ hardware IDs are already in Autopilot!
In some future world, the machine in the group gets nuked, goes through OOBE, and Autopilot takes over and answers all the OOBE questions.
As expected, this handshake can take some time. I waited overnight but it could be quicker. After some time, you should see new devices appear in Autopilot that match the criteria. In my case, computers with Computer in the name are those that are enrolled in my Intune MDM.
After a sync and a refresh in the “Windows Autopilot devices” blade, you can see the results in Figure 8.35.
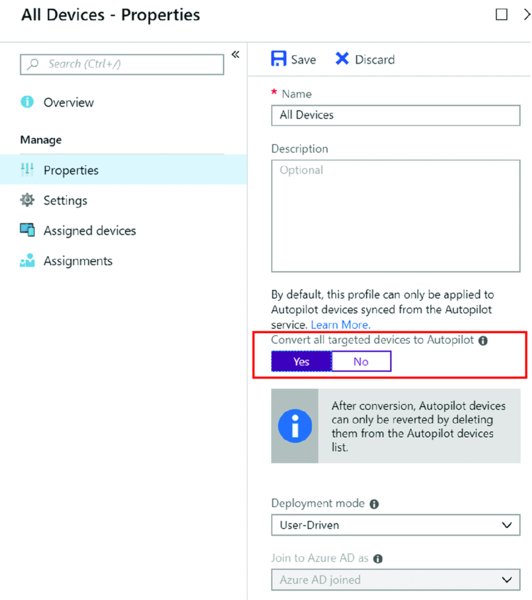
Figure 8.34 Converting targeting devices for Autopilot.
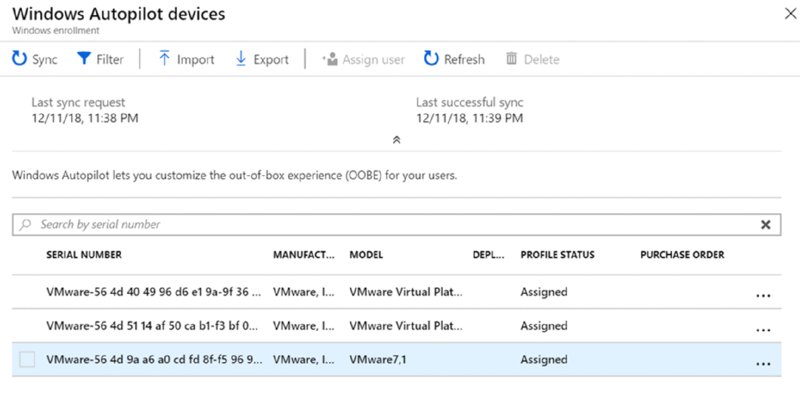
Figure 8.35 Seeing newly imported devices in Autopilot
Autopilot: Resets, Retire, Wipes, and Fresh Starts
Machines. Slow down. Over. Time.
My favorite term for this is Winrot. Hey, it’s made it into the Urban Dictionary (www.urbandictionary.com/define.php?term=Winrot), so it has to be a thing, right?
And you can implement various kinds of resets to bring the machine back to ground-level state and then have it re-get all the stuff from your MDM service. There are other reasons you might want to reset a computer. The most common one is resetting classrooms at the end of the semester or when you give students loaner computers and you have no idea what they did with them. Then when the semester or summer break is over, you can just initiate a mass reset against the machine, and bingo: fresh installs.
Additionally, machines might get lost. Sally left her laptop in the back of the Uber again!?? Time to just “Nuke it from the sky!!”
So in the following sections, we’ll check out “Resets, Retire, Wipe, and “Fresh Starts.”
Autopilot Resets: Local Reset and Remote Reset
The two Autopilot Reset types are local reset, and remote reset.
Both reset types have the same gist and provide the same benefits. Here are the basics of what occurs:
- All the apps, settings, and personal files are nuked. If it’s not on a network or external disk, it’s nuked.
- The Azure AD join and MDM enrollment are preserved and reused. In other words, when this process is over, you’re not going to see another phantom record in either AD or MDM.
- If you happened to apply a provisioning package using the Configuration Designer, those settings are maintained.
- Language and keyboard settings are maintained.
- Wi-Fi settings are maintained with any pre-known and stored passwords.
Local Autopilot Reset This doesn’t perform a full OOBE reset. What this will do is discard all the apps, and data. It will also preserve the MDM enrollment, Azure AD join, and the languages.
This is awesome in school scenarios where you just want to nuke a machine from the dirty work of those mischievous kids and return a machine back to a baseline.
Then it will connect back to MDM and get anything new to reload and or download.
But you might also want to walk up to a machine and perform this local reset. This is initiated by the keystroke Windows+Ctrl+R at the login screen, except that it won’t work unless it’s first enabled by MDM.
In Intune, you’ll find the setting called Automatic Redeployment under “Device restrictions” ➢ General, as seen here. (Don’t forget to associate a profile to a computer group.)

This is really setting the PolicyCsp, namely PolicyCSP/CredentialProviders/DisableAutomaticReDeploymentCredentials, and setting it to 1. You may need this information for troubleshooting or if your MDM service is not Intune and you need to set this up by hand.
Then to try this out: At the login screen, press Windows+Ctrl+R. Then when you give it admin credentials (local or Azure), as seen in Figure 8.36, the machine will immediately start to reset.
Remote Autopilot Reset Another choice is to nuke a machine, or multiple machines from your cozy console, all from afar using the Internet.
Just for a moment, you can feel like Dr. Evil.
So, how do you do it? Use Intune’s Devices ➢ “All devices” and click on the device. Select More and then find Autopilot Reset as seen noted with (1) in Figure 8.37.

Figure 8.36 Use Windows+Ctrl+R at the login screen to start a reset there.

Figure 8.37 The different kinds of wipes and resets in Intune
Note that Autopilot Reset requires Windows 1809 or later; if you see this option grayed out, that means the machine is not likely Windows 1809 or later.
When you remotely reset a PC, you’ll get a notification that’s it been initiated, like this:

Then, on the endpoint, the end user will get a message like this:
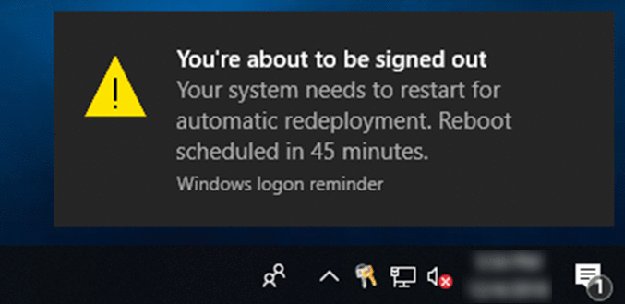
The machine will restart in 45 minutes and be totally reset again and rejoin Autopilot.
The end user doesn’t get the out of box experience (OOBE); it’s just ready to go because it maintains its MDM enrollment.
Then when the machine is done, end users see the normal login page. But before you press Ctrl+Alt+Del, in verrrrry small letters, you’ll see “Success! Windows is set up and ready to go.” If you squint, you’ll see what’s seen here.

Retiring a PC
The Retire button can be seen in Figure 8.37 noted with (2).
Retiring a PC basically removes it from Intune. This doesn’t perform a wipe of the PC. You just won’t see it in Intune anymore because you’re not managing it anymore. Any MDM policies on the machine are removed; some settings will peel back, others may stick. Software that is on the machine will usually stick around. The user’s personal data that is stored on the device is maintained.
Wiping a PC (Previously Known as Factory Reset)
The Wipe button can be seen in Figure 8.37 noted with (3).
The MDM Wipe feature has two methods: Retain enrollment state and user account…nor not. I’ll call this Wipe + Retain and Wipe-Retain to keep it simple.
In both cases the wipe will remove user accounts, user data, user-installed apps, and OEM-installed apps and reset the operating system to the default.
Wipe + Retain will maintain Intune enrollment.
Wipe-Retain will remove Intune enrollment (but it could be reenrolled if the device’s hardware ID is in Autopilot).
The docs on this function are at https://docs.microsoft.com/en-us/intune/devices-wipe.
MDM Fresh Start (aka Clean PC)
The Fresh Start button can be seen in Figure 8.37 noted with (4).
This is a way to mini-nuke a machine, but not fully. You can see Fresh Start in Intune’s Devices ➢ “All devices.”
Fresh Start (also known as Clean PC) will remove any Win32 or UWP applications on the machine and upgrade them to the latest version of Windows. The device can be told to preserve (or nuke) the user’s data.
And, if you choose not to preserve the user’s data, you’re actually un-enrolling it from Azure AD and your MDM service as well, so be careful using this feature.
Only if the device is established in Autopilot will it magically reconnect and still be managed by MDM.
When you log back in, you can see an HTML document on the Desktop called “Removed apps,” which express which applications were in fact, cleaned off.
A good blog entry with a lot of nice screenshots about Clean PC can be found at
https://osddeployment.dk/2017/05/13/windows-10-1703-cleanpc-csp-with-intune-1704/
If your head is spinning from all the options, please take a look at Table 8.1. That said, it’s good to pre-try your Wipe, Reset, or Fresh Start option and make sure you get the expected result in the test lab, before your real emergency is nipping at your heels.
Table 8.1 Windows Wipe, Reset and Fresh Start (Clean PC) options
| Option | Description | Intune Action |
| Wipe | Original, wipe and reapply OEM provisioning packages | Wipe |
| Wipe but keep provisioning data | Original, wipe and reapply user/IT and OEM provisioning packages | Wipe |
| Wipe protected | Same as wipe, but with protections to prevent it from being stopped | Wipe |
| Wipe retaining user data | Same as wipe, but retains user data | Wipe (retain) |
| Autopilot Reset | Wipe, keep provisioning packages, AAD join, MDM enrollment, OOBE settings, some Wi-Fi connections | Autopilot reset |
| Clean PC without retaining data | Wipe, discard provisioning packages | Fresh start |
| Clean PC retaining user data | Wipe, discard provisioning packages, retain user data | Fresh start |
Linking a Specific User to a Specific Hardware ID
One little Autopilot magic trick is to marry a particular user to a particular hardware ID or multiple hardware IDs, as seen in the example in Figure 8.38.

Figure 8.38 How to marry a user to a specific hardware ID
What this doesn’t do is reduce those initial boring screens like Region, Keyboard, and so on. Maybe in the future there will be a way to do that, but it’s not available right now.
But look what does happen. In Figure 8.39, you can see that once you’ve married a user to a hardware ID, only that user (in this case, Jack Tors) can log on to this machine initially.
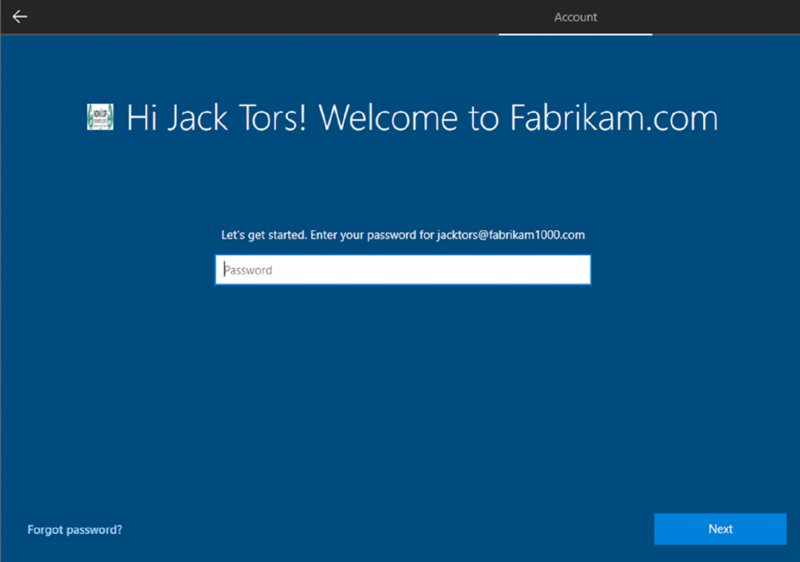
Figure 8.39 The result when a machine starts up with Autopilot and a user is married to a hardware ID
Autopilot Self-Deploying Mode
Another very interesting and useful Autopilot scenario is called self-deploying mode. Self-deploying mode is mostly meant for the times when you don’t have a specific user on the device. There could be multiple anonymous users. Or the scenario in which you have maybe no users at all. The following kinds of devices usually fit into this category:
- Digital signage, like airport monitors and those signs outside of meeting rooms
- Single-app kiosk, like a test-taking application at a school
- Multi-app kiosk, like an app that might be in a store. One app for sales, one for inventory, and so on. Just what someone would need to do their job, and nothing else.
There could be other scenarios for Autopilot self-deploying mode, but these are the most usual candidates.
Even though Autopilot self-deploying mode would work for all kinds of scenarios, I want to focus on just one to keep our eye on the ball. Imagine the perfect setup scenario for a digital sign:
- It gets shipped from the manufacturer.
- A facilities worker unboxes and mounts the thing onto the wall.
- The worker plugs it into Ethernet.
- The worker turns it on, and then does absolutely nothing.
- The machine then shows a single app, like an airport flight board, meeting room information, or interactive application.
In other words: you didn’t have to fly to Podunk, Iowa, to click next-next-next on Windows and configure one stinkin’ app just to stand up one lousy digital sign. So this is awesome. But in these cases there are two problems that Microsoft had to overcome:
- These machines might not have any keyboards or mice, so literally all the answers to the OOBE questions have to be pre-populated in Autopilot profiles.
- This issue (no keyboard) is reasonably easy to overcome. The profiles for Autopilot self-deploying mode handily deal with all the OOBE questions.
- Remember, there is no user on the machine (and again, maybe no keyboards to even do this even if you wanted to specify a user). Therefore, an alternative mechanism was needed to do the authentication.
- This issue (no user) is a little thornier to deal with. So since you aren’t using a user to authenticate the box to Azure, the box has to authenticate itself. And it does this with a very secure mechanism. But how? Normally, as a user you would use a username and password (or similar password replacement credential).
- A computer doesn’t really have a password. So what can you use?
- You use a computer’s TPM 2.0 chip of course!
The TPM 2.0 chip is used when Autopilot needs to prove that the device is not an imposter (it uses TPM attestation). And once the TPM has a handshake with Autopilot, then and only then is it allowed to join the organization’s AAD tenant without providing any credentials. Remember the hardware ID? The TPM identifying information is embedded inside it, and then that’s used for device matching.
Now a quick note here: If you want to try out these steps all the way through, you’re welcome to. But know that it will fail (by design) if you use any virtual machine type, like Hyper-V or VMware Workstation, even though those virtual machines use (virtual) TPM 2.0 chips. This is a “by-design” limitation in Autopilot self-deploy.
Said another way, you’ll have to crack open a laptop or PC—yes, a real actual laptop or PC with a TPM 2.0 chip—to test this all the way though. For this test, you’ll want to have Windows 10 1809 or later preinstalled and then verify that the TPM 2.0 chip is ready.
 Note that not all machines with a TPM chip come with TPM 2.0 chips or even properly-ready TPM 2.0 chips. First of all, many machines come with TPM 1.2. Some can be upgraded to TPM 2.0, with a lot of work. Trust me, I tried it and couldn’t make a Lenovo T430 TPM 1.2 chip upgrade to TPM TPM 2.0. And, also, as a side note, some TPM 2.0 chips don’t support TPM attestation at all. Some have attestation disabled by default,. And yet others must be flash-upgraded to support it. I found this out the hard way with a Lenovo V330 that has a TPM 2.0 chip but then wouldn’t play ball until I flash upgraded it. Then, bingo…TPM 2.0, which properly showed it was ready for attestation.
You can see this in the Settings app within Windows Security, in the Security processor details section as seen in Figure 8.40.
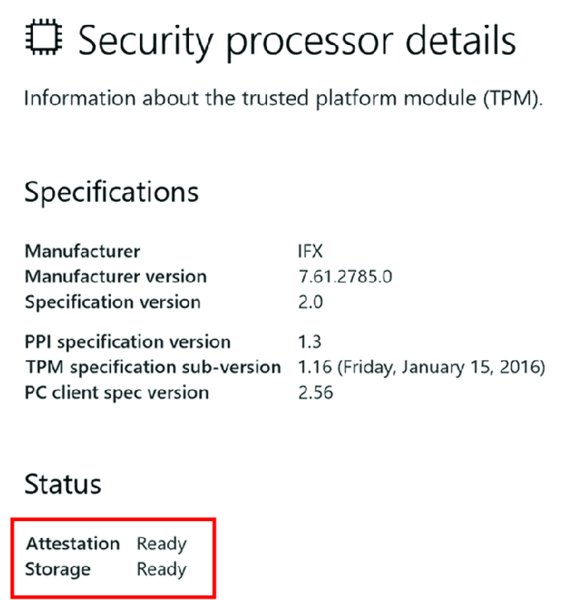
Figure 8.40 Autopilot self-deploying mode requires a TPM 2.0 chip which is capable of attestation.
Also, if you really want no screens of questions at all, then this is best used with Ethernet connectivity. When you do use Ethernet, this kind of deployment from Autopilot really is zero touch. On the other hand, if at setup time you have no hardwired Ethernet and therefore you must pick a Wi-Fi network, you are then prompted to do so, and thus a keyboard and mouse are required.
Turning Off Warnings for Self-Deployed Devices
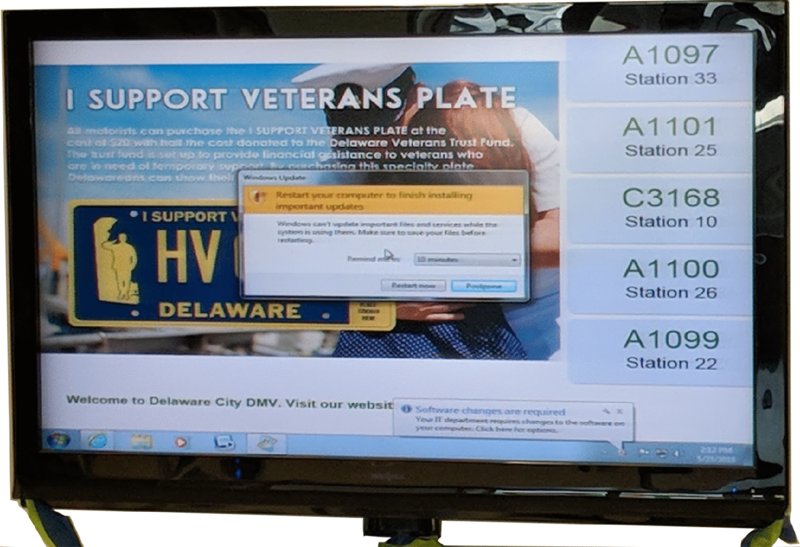
Positively everyone in IT has seen it: Some poor machine at the airport, train station, or other public place prompting for an update, or otherwise begging to be put out of its misery and rebooted after it got some Windows update. Here’s an example my friend Matt sent me showing a helpless Windows 7 machine sitting at the Department of Motor Vehicles in Delaware. (Don’t your friends send you pictures of goofed-up Windows computers?)
Starting in Windows 1809, there is a Group Policy setting and an MDM setting you can use to squelch these messages. In Group Policy-land, the setting is found in Computer Configuration ➢ Policies ➢ Admin Templates ➢ Windows Components ➢ Windows Update ➢ Display options for update notifications. Once it’s enabled, you can further specify to disable all notifications, including or excluding restart warnings.
The same setting is available via ADMX-backed MDM policy. It’s in the Policy CSP and called Update/UpdateNotificationLevel. You might have to make a custom OMA-URI for it (as described in Chapter 3, in the section titled “Custom URIs for Any PolicyCSP Items without a GUI”).
One note about using this setting: Once it’s set, you really don’t get notified about updates or that a reboot is required. You will need to use other Group Policy or MDM settings to specify Windows Update settings that specify "Active Hours" such that the computer can reboot itself when no one is there.
The Group Policy setting for that, in case you’re curious, is found at Computer Configuration ➢ Policies ➢ Admin Templates ➢ Windows Components ➢ Windows Update ➢ Turn off auto-restart for updates during active hours. And the ADMX-backed MDM setting is called Update/ActiveHoursEnd.
Preparing for Autopilot Self-Deploy Devices
In the real world, you would likely buy a gaggle of machines and then have them shipped where you need for them to be. And as I explained in the section “Creating Dynamic Groups for Autopilot,” hardware IDs can be associated with an order ID, which in turn you can use as a generic tag for similar devices (Sales machines, Marketing machines, and so on).
Additionally, when you buy machines from Dell or Lenovo, and so on, you could get the OrderID (or the PurchaseOrderID) fields pre-populated.
Well, for this test, you won’t be ordering anything, but you will pretend to buy and deploy a machine where the OrderID field is pre-populated. The OrderID will be like a tag we use to know, “Okay, these machines are all our self-deploy machines.”
To do this, you’ll need to acquire the hardware ID and get it into CSV format as we did earlier in the section “Manually Getting a Hardware ID into Autopilot.” Then, before you upload to Autopilot, I want to show you how to add an OrderID as if you were buying 100 of these systems with the OrderID pre-populated.
If you look at the CSV file for this machine, you’ll see the following items (which represent columns):
Device Serial Number,Windows Product ID,Hardware Hash
I want you to add a column so it looks like this instead:
Device Serial Number,Windows Product ID,Hardware Hash,OrderID
Then, at the very end of the CSV file, add in a comma and enter in a bogus OrderID. In my example, I just put in ORDER1.
Then I uploaded the file to Autopilot. The result can be seen in Figure 8.41. Note that this screen shot shows a virtual machine’s ID uploaded, which won’t work in real life. So remember, Autopilot self-deploying mode only works for real machines.

Figure 8.41 The OrderID is seen in the Deployment Group field in Autopilot.
Next stop is to create a dynamic membership rule to sweep in all the machines with the ORDER1 tag into one place. The advanced dynamic membership rule would be this, and it’s seen in Figure 8.42. I’ve called my group “Self Deploy Dynamic Group.”
(device.devicePhysicalIds -any _ -eq "[OrderID]:Order1")
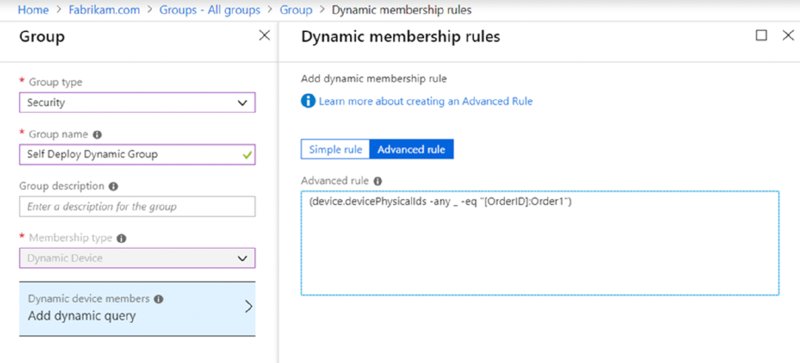
Figure 8.42 Creating a dynamic group to capture a specific OrderID (ORDER1 in this case)
You might not want to continue until you can see that your device automatically shows up in the dynamic group as seen in the Members section. When the group membership goes from 0 to 1, you’re ready to continue.
Next stop is to create a profile, similar to what we did earlier. This time though, we’ll specify the deployment mode as Self-Deploying, as seen in Figure 8.43.
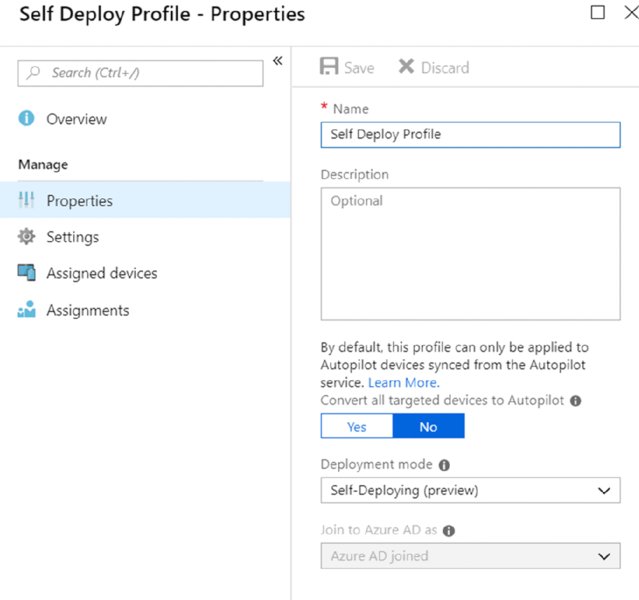
Figure 8.43 Select Self-Deploying as the deployment mode within the profile.
The settings of the profile are reasonably self-explanatory and can be seen in Figure 8.44. Of course, you want this to be as optimal as possible, pre-answering all the questions you can, as seen in Figure 8.44.
Next, you’ll assign the profile to the group you created just before, as shown in Figure 8.45. This then marries the Autopilot profile to the Self Deploy Dynamic Group.

Figure 8.44 Pre-answering the OOBE questions for self-deploying devices

Figure 8.45 Specifying the dynamic group to which the Autopilot profile will apply
One more thing: You don’t want the general “catchall” Autopilot profile we created in the first part of the chapter to collide with the self-deploying profile for these specialized machines. As such, you can (and should) go back into your original Autopilot profile (which was called All Devices - Assignments) and exclude your newly created dynamic group.
In Figure 8.46, you can see the first Autopilot profile, and where I’ve clicked on the Exclude tab and selected Self Deploy Dynamic Group, thus keeping the user-driven and the self-deploy worlds separate.

Figure 8.46 Specifically excluding the self-deploy devices from the user-driven devices
Testing Self-Deploying Autopilot Devices
Testing a device like this is similar to the testing we did earlier. You’ll need to nuke the machine via reset, Sysprep, reinstall, or maybe you took a snapshot before OOBE started.
When OOBE starts, you’ll see something like the screen in Figure 8.47.
And with that, you’ve accomplished the goal: A device self-enrolling device to Autopilot.
Remember, if you get 95% of the way through, and this catches fire, chances are there is some problem with the TPM 2.0 chip (not ready, not initialized, and so on).
Remember again, the machine you’re testing on might not have the “right” TPM chips at all. Many, many devices are using TPM 1.2 chips. And those are simply the wrong kind and won’t work. And what’s more, just because a chip is labeled as a TPM 2.0 chip doesn’t mean it performs the attestation part of the equation, which is necessary for the handshake to occur. When I tested this on a few laptops with TPM 2.0 chips, I got 95% through with the process only to realize the laptops didn’t have the right kind of TPM 2.0 chips. The attestation simply didn’t work as expected. Frustrating! If you get this far, and it’s not working, again, try to flash-upgrade your TPM chip to get it to support attestation. In these cases, go back to the screen in Figure 8.40 on an example machine and reinspect: Do I have TPM 2.0? Does it support attestation? Am I using a real machine and not a VM?
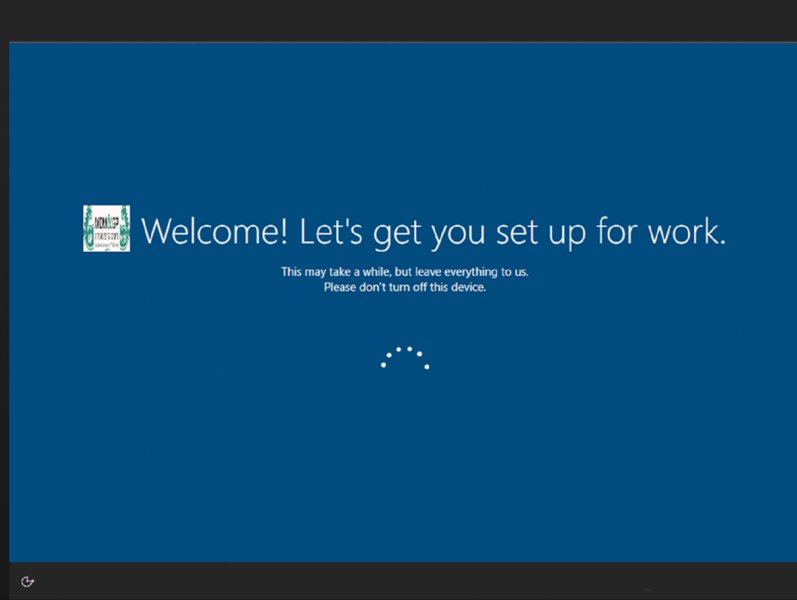
Figure 8.47 Autopilot asks no questions to self-deploy machines when Ethernet is used.
The official docs on Autopilot with self-deploy devices are at:
https://docs.microsoft.com/en-us/windows/deployment/windows-Autopilot/self-deploying
And a good blog is found at:
https://www.petervanderwoude.nl/post/windows-Autopilot-self-deploying-mode/
Bonus Points: Making Self-Deploying Kiosk Machines
So having machines that self-deploy is pretty nifty. But it’s what you do with it that counts.
Two good options for self-deploying kiosk machines would be:
- Anything that uses a webpage (airline display at the airport, stock ticker, etc.)
- A specific application you want to lock users into using
If you’re going to use a web page, you want to use what’s called Edge Kiosk mode. This is a pretty involved topic that has a lot of particulars and options. It’s just too many pages, so you’ll have to check this out yourself here:
The second option I mentioned would be to use an application from the Windows Store. Well, not the Windows Consumer Store, no no. You’ll have to pre-stage that app in your Windows Store for Business as we did back in Chapter 6.
In a moment, I’ll give you a URL for the lash-up of how to do that. But note that this blog entry is a bit out-of-date. It recommends using the Kiosk browser application, which is downloadable from the Consumer Windows store (and, of course, which you could then stage in your Windows Store for Business).
But there’s another choice as well.
As I said two paragraphs ago, Edge (now) comes with its own Kiosk modes, which opens up some enhanced scenarios like multi-tab, printing, and more. It’s somewhat more complicated to set up than the Kiosk browser application found in the Windows Store.
But if you wanted to set up a simple web page to show on your kiosk, the Kiosk browser application still works and is a perfectly fine choice.
So, if you want to, you can follow these directions and pick…well, any application from the Windows Consumer Store and get it into your Windows Store for Business, then tell that self-deploying machine to run that Windows app. Here’s some handy URLs:
https://blogs.technet.microsoft.com/mniehaus/2018/06/07/deploying-a-kiosk-using-windows-Autopilot/
https://docs.microsoft.com/en-us/microsoft-edge/deploy/microsoft-edge-kiosk-mode-deploy
https://www.petervanderwoude.nl/post/single-full-screen-kiosk-browser-app-in-kiosk-mode/
Additionally, a good speech on this topic can be found at YouTube by searching for BRK3016 for a talk titled, “Shared Devices for Kiosk and Firstline workers (with Windows 10 and Intune)” and THR3003 for a talk entitled “Specialized device deployments for Windows 10 with Microsoft Intune.”
Autopilot Hybrid Azure AD Join
There’s one final Autopilot scenario I want to set up with you.
For me, this functionality underscores that Microsoft gets that many organizations will want to do many things with cloud and also maintain (at least for some period of time) a foot in the on-prem world.
Back in Chapter 4, we bootstrapped our already Active Directory-joined, on-prem machines (using Group Policy) to auto-enroll themselves into MDM.
Now, in this section, you’ll kind of do the reverse.
That is, you’ll tell a totally fresh machine, one that is new in the box, or one that has maybe been reset, to enroll in MDM (using Autopilot) and then, also magically, join your on-prem Active Directory.
How is this done? With a little help from some friends, of course.
Let’s start with understanding the flow of how this is going to work. Refer to Figure 8.48 as I explain all the steps.
- A new machine shows up at the user’s door.
- As a machine starts up OOBE, it will contact the Autopilot service. (You’ve done this like 18 times now.)
- The profile type is a new special Autopilot type called “Hybrid Azure AD Joined, which we’ll investigate in this section.
- Device enrolls into MDM, in this case Intune.
- Intune then reaches out to your on-prem AD with a new thing called the Offline Domain Join connector, or ODJ connector, which we’ll also investigate in this section.
- Intune then pushes down a thing called an Offline Domain Join Blob, or ODJ blob; yet another thing we’ll investigate in this section.
- The computer does the join using the ODJ blob.
- You are now joined and can get, say, Group Policy or other on-prem or AD specific stuff.

Figure 8.48 Flow diagram of Hybrid Azure AD Join
Let’s get this set up, and you can see it working for yourself.
What Is an ODJ Blob?
How can you join a machine if the machine isn’t connected (right now) to the LAN such that the computer can be joined by a technicion?
The truth is, you can’t. But you can do the next best thing.
So this idea has existed for a long time in on-prem AD-land (since Windows 7 to be precise) and it’s called Offline Doman Join, or ODJ for short.
With ODJ you can create a reservation for a computer in Active Directory. Then you can tell a computer to consume that reservation.
It’s easy to try yourself, just to get the hang of what’s about to go on automtically in a few minutes when we add Intune to the mix. On any AD-joined machine at all, run the following command to reserve the space for the “not yet joined” computer named testjoin01:
djoin /provision /domain fabrikam.com /machine testjoin01 /savefile provision.txt
This is the output file, provision.txt, which is technically known as an ODJ blob, and you can just check it out in Notepad. You can see the command and the file in Figure 8.49.

Figure 8.49 Creating and inspecting an Offline Domain Join (ODJ) blob
Then go over to a machine that is not domain-joined but is on the same network as your Active Directory. And, of course, get your ODJ blob file over there. Then, using an elevated command prompt, let’s claim the reservation. Use the following command:
djoin /requestodj /loadfile provision.txt /windowspath c:windows /localos
You can see the command run in Figure 8.50.

Figure 8.50 Performing a by-hand domain-join with an ODJ blob
After the client reboots, the first time the client can make contact to on-prem Active Directory, they sync up and magic happens: The machine is now really domain-joined.
The full docs on Offline Domain Join can be found here (but you won’t really need them for what we’re going to do):
The takeaway here is that Intune is going to do all the hard work to make the reservation and the ODJ blob for you, then download it and apply it on a target machine, thus joining a computer to Active Directory automatically.
But there is a catch with Intune. Hang tight for the reveal in a moment.
Preparing Active Directory for Hybrid Azure AD Join
There’s a little pregame setup involved in Hybrid Azure AD Join.
One of the optional steps in Chapter 2 was to set up AAD synchronization using the Azure AD Connect tool. If you didn’t do this, and want to get your on-prem AD married to your Azure AD, then you can flip back to Chapter 2 and see the section titled “Syncing Your On-Prem AD to Azure AD Automatically.”
Then, after that, you need to first tell your on-prem Active Directory that it’s A-OK for some computer on your network to add other computers to your domain.
Your on-prem Active Directory doesn’t usually work like that; people usually do the joining of computers to your Active Directory. But you can gently explain to Active Directory that, yes, it really is okay for another computer to create computer records and do the joining of other computers.
Really Active Directory, it’s going to be okay.
To teach Active Directory about this, you’ll delegate the ability to create computer objects as well as manage their properties and permissions. In most Active Directories, the place where new computers magically show up when joined is the Computers container (and yes, I did mean container…it is not an OU).
This is typically where you’d start your delegation. It is possible that this is not your default location (this is changeable via the old and crusty (but it still works) command redircmp). If you’re unsure if the Computers folder is where computers appear when you join one to Active Directory, then just join one. Then find it. Once you know your default location, right-click over it and select Delegate Control as seen in Figure 8.51.
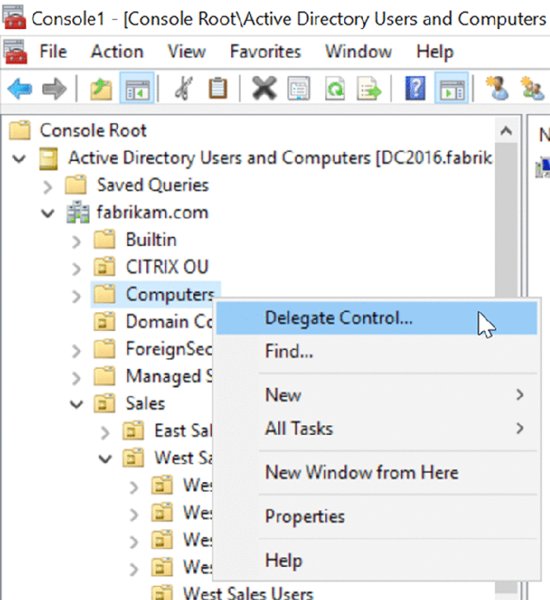
Figure 8.51 Delegate Control over your known default location. If it’s not the Computers folder, then be sure to do it on your redirected location.
Then once inside the Delegation of Control Wizard, you need to change the view such that it lets you look for computers. (Again, this is unusual for Active Directory, so the default is that it doesn’t show you computers.) In the screen shown in Figure 8.52, you’ll click Object Types and then click to check on Computers.

Figure 8.52 Enable Computers as an Object Type.
Then, as seen in Figure 8.53, search for the computer name where you plan to install the Intune Connector for Active Directory. This can be a Domain Controller or member server within Active Directory. I’m picking my DC.

Figure 8.53 Specify the computer where you plan to install the Intune Connector for Active Directory.
Then, in the Delegation of Control Wizard, select “Computer objects” as seen in Figure 8.54 along with “Create selected objects in this folder” and “Delete selected objects in this folder” and click Next.

Figure 8.54 Specify that the computer can perform the selected delegated items.
Last, you’ll specify that the computer can manipulate the Permissions. In the next page of the wizard, select Full Control as seen in Figure 8.55. This will automatically check every other box.

Figure 8.55 Select Full Control on the Permission page.
The final page is a review from the wizard. Click Finish and you’re all set.
Installing the Intune Connector for Active Directory
Now, let’s flip back to Intune. This is where you’re going to find and then download the Intune Connector for Active Directory. Head over to Intune ➢ Device Enrollment ➢ Windows Enrollment ➢ Intune Connector for Active Directory. Then click the link in Step 2 as seen in Figure 8.56.

Figure 8.56 Downloading the Intune Connector for Active Directory
Back on your on-prem server, it’s time to install it. You can do this upon a DC or a member server. It’s a simple MSI and doesn’t take very long. You can see the MSI and opening screen in Figure 8.57.
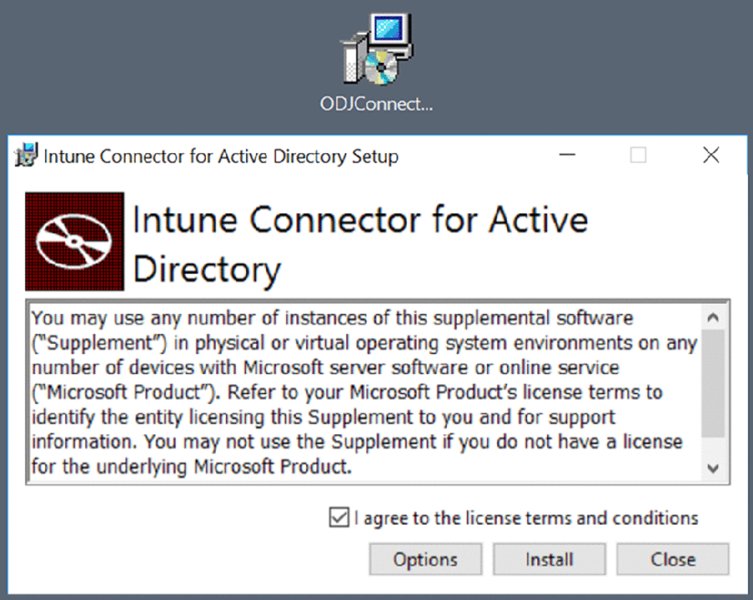
Figure 8.57 Installing the Intune Connector for Active Directory
After clicking through the installation, you should see an “Installation Successfully Completed” message (not shown) and a “Configure now” button (also not shown). Also, if needed there is a Start Menu item if you need to re-access it.
Simply click the Sign In button (seen in Figure 8.58), and then give it the credentials for the main Global Azure Administrator, Frank Rizzo (who also needs an Intune license for this to work). When it’s all done, you should see what’s seen in Figure 8.58.
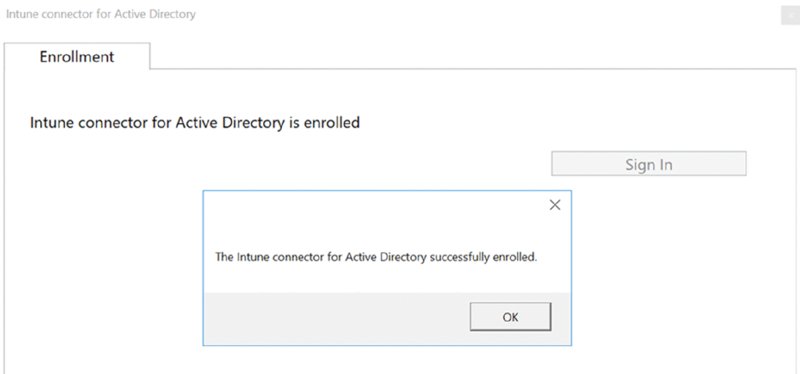
Figure 8.58 After you give the Global Admin’s credentials, you will get a success message from the connector.
At this point we’re almost ready to try this out.
Verifying the Installation of the Intune Connector for Active Directory
Once you’ve installed the Intune Connector, as we just did, you can take a moment to look inside Windows’s Services and see that it’s present and running. It’s called the Intune ODJConnector Service and can be seen in Figure 8.59.
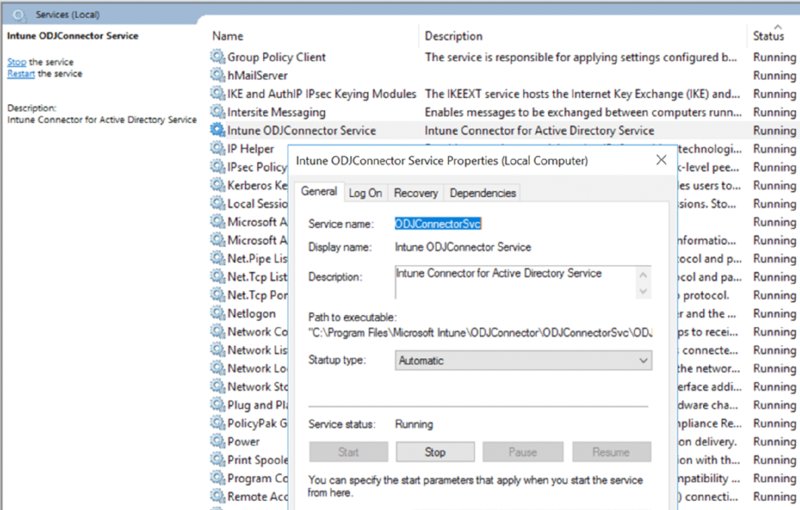
Figure 8.59 Inspecting the Intune ODJConnector Service
You can also see logs for the ODJConnector Service on this same machine. You would look in Windows’s Event Viewer ➢ Applications and Services Logs then ODJ Connector Service as seen in Figure 8.60.
You can see interesting event logs from the ODJ Connector Service, like the one in Figure 8.61, in case you need to do any troubleshooting.
Finally, back in Intune, you should (eventually) see the computer you’re using notated as performing a sync, as seen in Figure 8.62. This took about 10 minutes for me, and the Refresh button didn’t actually refresh it for me. I had to press F5 to refresh to the actual page.
Figure 8.60 Finding the ODJ Service event log
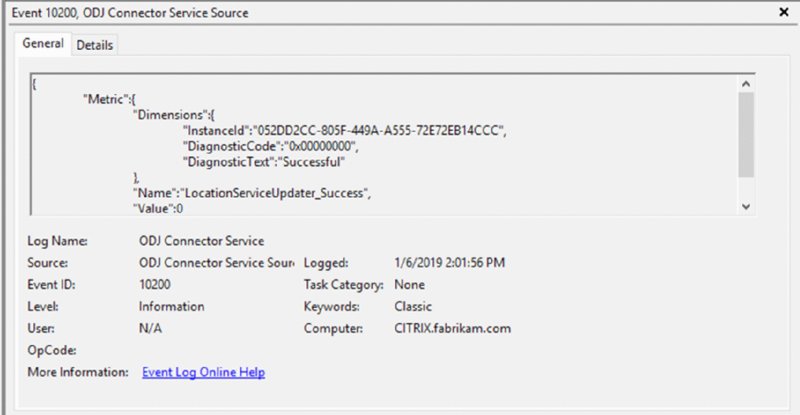
Figure 8.61 An event log item from the ODJ Connector Service

Figure 8.62 The Intune Connector should show you the connection, if it’s active, and last sync time.
Note that you can have multiple connectors if you anticipate a huge onslaught of computers attempting to do this. For instance, if you were doing a company-wide refresh and expected everyone to get new computers within the same few days, you might want multiple connectors to shoulder the load. Note that at this time, there’s no way to delete a connector. You would simply uninstall the on-prem component you installed a little earlier, and the Intune Connector pane will realize the sync time has not updated and will stop attempting to use the connector.
Create and Use an Autopilot Hybrid AD Join Profile
Next, you’ll create a Windows Autopilot profile specifically for machines for which you wish to perform an MDM enrollment and the on-prem Active Directory join. In Intune ➢ Device Enrollment ➢ Windows Enrollment ➢ Windows Autopilot deployment profiles, you’ll create a new profile. Then, as shown in Figure 8.63, you’ll select User-Driven and “Hybrid Azure AD joined.”
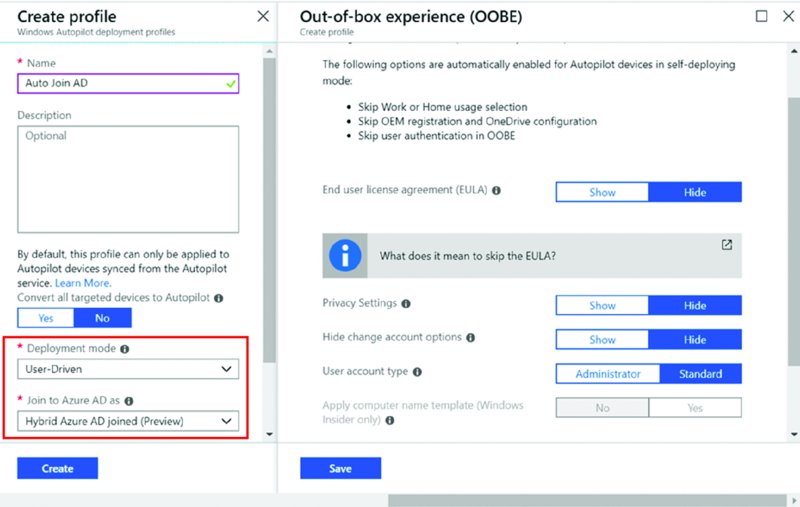
Figure 8.63 You can select User-Driven and “Hybrid Azure AD joined” to enroll in both MDM and on-Prem Active Directory at the same time.
In this scenario, we’re applying the ODJ scenario to all machines. If you wanted to go the extra mile, you could assign Autopilot profiles by exception with Include and Exclude groups. The basic gist can be found here:
https://blogs.technet.microsoft.com/mniehaus/2018/12/30/assigning-Autopilot-profiles-by-exception/
A little warning about the field “Apply computer name template,” which is seen grayed out in Figure 8.63. It’s possible to save, then come back to this field and try to use this to auto-name the computer. Do not attempt to use it. There’s another place for that, which is right around the corner, in the Domain Join profile.
Create and Use a Domain Join Device Profile
Creating the Autopilot piece of the profile is only a part of it.
There’s a second part. It’s called the Domain Join profile. This is back in Intune’s device configuration, something you’ve done a few times now. Head over to Intune ➢ Device Configuration ➢ Profiles and then “Create profile.”
Put in a name of your choice, like Offline Domain Join Policy, and for Platform, pick “Windows 10 and later,” and finally, select Domain Join in “Profile type,” as shown in Figure 8.64.

Figure 8.64 Create a Domain Join profile to tell the machine how to connect to your Active Directory.
Next you’ll have to click the Settings category (see Figure 8.64), and the resultant window is shown in Figure 8.65. The settings express the Computer name prefix (I’ve picked DJPP-, meaning Domain-Joined Plus Plus) and the on-prem AD domain name, Fabrikam.com.
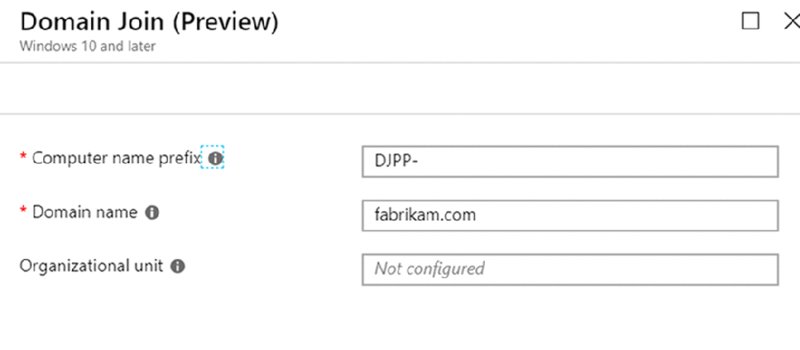
Figure 8.65 The Domain Join settings for the device configuration profile
I’m leaving “Organizational unit” blank because I’m using the Computers folder as the drop-in point after they join on-prem AD.
And with that, you’re ready to test!
Performing Your Hybrid AD Join
So, earlier I said there was a catch to using the ODJ blobs with Intune.
The catch is that the machine must actually be available with “line of sight” connectivity to a Domain Controller to complete the ODJ blob to Active Directory handshake. If that Windows 10 machine cannot see the DC, the handshake doesn’t happen, and the Autopilot process doesn’t complete.
So practically this cannot be done just “over the air,” say at Starbucks or via VPN connection (because there isn’t one yet). If I had to guess, this might be something that I could foresee changing in the future, but that’s not the story as I write this.
So before you start your test, be sure your machine has access to the Internet (for Intune enrollment) and to the DC for Active Directory joining. Before you roll back your snapshot, reset the machine, or reinstall Windows, you can do two itty-bitty little tests to give yourself the best chance of this working.
- Test 1: Ping the DC by NETBIOS and fully qualified DNS names.
- Test 2: Map a share (net use) from the Windows client to Domain Controller (and also to the machine running the Intune connector).
By testing the connectivity on your test system, you’re ensuring that you really do have line of sight from your endpoint to the DC.
Okay. Now if you created a snapshot of your Autopilot machine before it started OOBE, then reset to that or otherwise nuke the machine such that OOBE is restarted.
OOBE will start, and you will give it credentials like [email protected], one of your on-prem accounts that is auto synchronized to Azure AD.
When you do, it won’t look a lot different than usual, but if you interact with the setup page, you can see what’s in Figure 8.66.
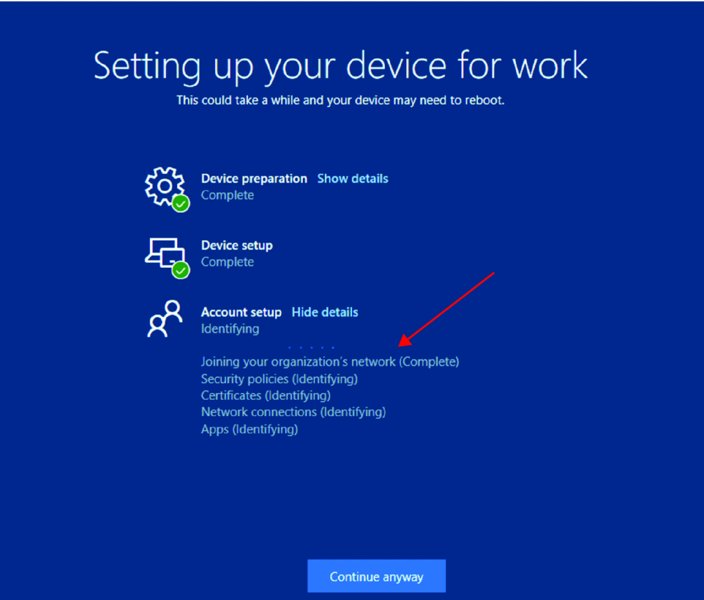
Figure 8.66 You can see that you’ve joined Active Directory here.
The next time you start the machine, you should be able to log on as any Active Directory user (like EastSalesUser1) but not any “only born in the cloud” Azure Active Directory user (like Jack Tors). The usual screen can be seen in Figure 8.67.
At this point your computer will go through some gyrations getting set up and trying to make connection to your MDM service to enroll.
The computer then downloads any new policies and software from MDM, as you’ve seen before. Then, you have a happy full Desktop as you expect for EastSalesUser1.
Back in on-prem AD, you should see your computer show up in the Computers folder, as seen in Figure 8.68.
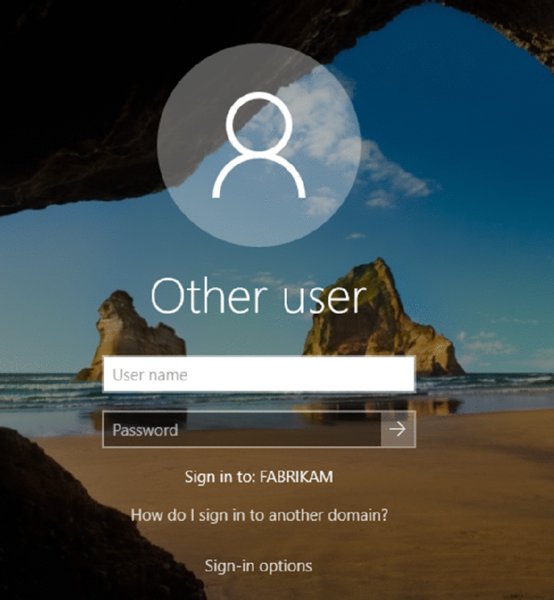
Figure 8.67 With Hybrid joined Windows 10 machines, you must log on with an on-prem Active Directory account; an Azure AD account won’t work.

Figure 8.68 Computers appear in the Computers folder after they join Active Directory.
Troubleshooting Hybrid AD Join
There are a handful of problems you may encounter when performing the Hybrid AD Join. The number one problem you’re most likely to encounter is that the endpoint cannot reach a Domain Controller to perform the final handshake.
Again: The endpoint computer needs “line of sight” connectivity to a Domain Controller—right now, right during OOBE. It cannot happen later.
When this occurs, the machine keeps trying for about 30 minutes, and then you’ll see an 80070774 message like the one in Figure 8.69.
I also got the 80070774 when I failed to realize I needed a device configuration profile; I thought just having the Autopilot profile was enough. It isn’t. So make sure you have both.
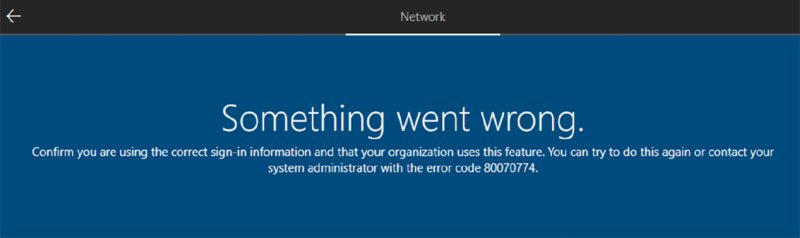
Figure 8.69 The 80070774 message means the computer cannot complete the ODJ handshake with a DC.
The other common occurrence is that the machine is already MDM enrolled. When this happens, you’ll see a similar, but different error message, like the one in Figure 8.70.
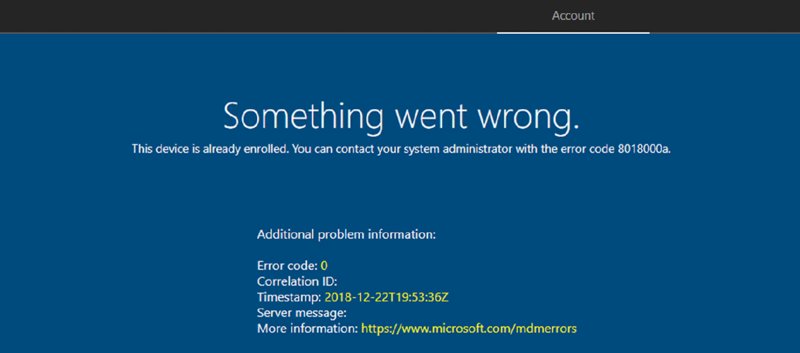
Figure 8.70 Error message when the computer is already MDM enrolled
If you want to check out the docs on Windows Autopilot Hybrid AD Join, the official docs can be found at:
https://docs.microsoft.com/en-us/intune/windows-Autopilot-hybrid
And the blog from the man himself can be found at:
A good third-party MVP post on this subject can be found at:
https://www.petervanderwoude.nl/post/hybrid-azure-ad-join-with-windows-Autopilot/
Final Thoughts on Hybrid AD Join
You might think that someone like Jack Tors, who is born “only in the cloud,” could magically use the machine we just utilized with the Hybrid AD Join.
But that’s not how it works.
Devices can only be joined to one or the other: either to Active Directory or Azure Active Directory.
If the computer is joined to Active Directory, the device can also register with Azure AD to get that Hybrid Azure AD Join state. Again, this happens via the Azure AD Connect you set up in Chapter 2. When using a hybrid AD-joined computer, a user still always signs on with their on-prem AD credentials. And when they do, they will simply also get their on-prem Kerberos token plus an Azure AD token. The Azure AD token enables single sign-on to AAD-protected resources and additional benefits.
Conversely, if the computer is joined strictly to Azure Active Directory (and not to on-prem Active Directory), the user must sign in with cloud-only Azure AD credentials and can thus access cloud-based resources. But if Windows sees that there is an AD Domain Controller available, my understanding is that it also gets a Kerberos ticket, which it can use to access on-prem resources.
So, the summary here is as follows:
- AD-joined computers can access on-prem resources but still get access to cloud resources.
- AAD-joined computers can naturally access cloud services but still get to on-prem resources.
Amazing how that works.
If you want to read more about this magic trick, here are the write-ups for that:
https://docs.microsoft.com/en-us/azure/active-directory/devices/azuread-join-sso
Autopilot White Glove
So far in all the scenarios we’ve seen, the gist is the same: New PC is born from the factory. The machine comes with all it needs for Windows to be happy. But it has no applications, settings, or policies. All of that stuff comes down after Autopilot has done its thing and Intune kicks in and downloads those pieces from the Internet.
Okay, great. But what if you have 900MB of applications to install?
That could take … a long time. Especially when you ship laptops to field offices or unusual remote places with slow Internet connectivity.
As we saw earlier, one of the options is to block the user from being productive until all (or some) applications are downloaded from the cloud. Or, you can enable them to trod ahead, wondering where the applications are.
Maybe there’s a third choice.
There is, and it’s called Autopilot White Glove.
The idea of White Glove is that after the machine is born, it’s physically intercepted before it gets to the end user. This interception can be done by the IT department, partners, or the OEM itself (before it leaves the premises and goes onto the loading dock).
Now instead of the user opening up the box, connecting to Autopilot, and waiting two hundred years for apps to install, that portion of the work has been pre-performed. In the end, the user gets the same experience we’ve already talked about, except it’s just faster, because the long, boring parts have already been pre-done (mostly) by someone else.
Now the process looks like this:

Another bonus for using White Glove is around the Hybrid Azure AD Join function we explored in the last section. It removes one of the big, big problems with that scenario: If a user was drop-shipped a new PC from the manufacturer and then, say, tried to do Autopilot at Starbucks, how could he join his on-prem AD domain? Answer: He could not. With White Glove though, because the machine is provisioned, then intercepted, this is a perfect time to join it to an on-prem AD before shipping it back out to users. Of course, this means that in all likelihood you have to be the one intercepting the machine (and not your OEM), then making sure it has line-of-sight ability to join your on-prem AD. And, when the user receives the machine, they will also need line of sight to an on-prem DC in order to log on to on-prem AD.
White Glove is available in Windows 10 1903 and later.
To use White Glove, you already need to understand and use either the user-driven and Hybrid Azure AD scenarios we set up earlier. It works alongside those and is just another check box to enable the scenario.
White Glove has some requirements:
- Like the Autopilot “self-deploying” scenario, it uses the same attestation handshake. That means it needs a TPM 2.0 chip, and one that supports attestation.
- White Glove requires physical hardware and will not work on virtual machines.
- The machine must have physical Ethernet connectivity during the White Glove process. Wi-Fi cannot be used because otherwise it would have to prompt the user to select a language, locale, and keyboard, something that can only be chosen by the final end user.
To set up White Glove, you will need to set up an item in the deployment profile called, “Allow White Glove OOBE” (not shown.).
When the machine is intercepted after being provisioned and turned on, it begins to go through the normal Windows Autopilot routine and looks to see if it’s hardware hash is registered in a tenant…your tenant. If for some reason the machine isn’t intercepted, that’s fine. Things just work normally. But upon the desired interception, the operator (again, that’s you, or your OEM or partner) would press the Windows key five times, then select Windows Autopilot provisioning as seen in Figure 8.71.

Figure 8.71 Autopilot provisioning after OOBE starts and the Windows key is pressed five times
At this point, the machine can be looked up via a QR code shown on the screen (sorry, no screen shot to show you). And then the operator clicks Provision and the long and boring download starts.
Success? You get a nifty green screen and see a button to click labeled Reseal which will shut the device down. Time to get it to FedEx, DHL, or “inter-office mail it” to that end user.
Fail? A red status screen appears with the problem details. You can grab logs and/or restart the process and hope the next attempt goes better.
Remember, too, this intercept point is the perfect opportunity for the machine to perform the hybrid domain join, which absolutely must have direct connectivity to a Domain Controller. Of course, you’ll need some way to get those on-prem AD creds to your users, or maybe they already have them.
The official docs on White Glove can be found at https://docs.microsoft.com/en-us/windows/deployment/windows-autopilot/white-glove.
Final Autopilot Resources
Clearly Microsoft is investing a lot in Autopilot. It’s a big, big deal and a nice game changer and articulates a bunch of scenarios that cannot be done with on-prem infrastructure alone.
If you want to see some of this in action, let me recommend some videos. An awesome two-part talk on Autopilot was at Ignite 2018. Go to YouTube and watch BRK3014 and BRK3015.
Autopilot may be a moving target for the next few years. That said, here’s what I plan to do to keep up-to-date on Autopilot.
The documentation is found here:
https://docs.microsoft.com/en-us/intune/enrollment-Autopilot
But for generally staying up-to-date in Autopilot happenings, I recommend subscribing to Mike Niehaus’s blog, which has an RSS feed (if you’re into that sort of thing).
https://blogs.technet.microsoft.com/mniehaus/
And, of course, I’ll keep you up-to-date as fast as I can at MDMandGPanswers.com.
Now that you made it all the way through this chapter, tweet me @jeremymoskowitz and let me know what you learned in Chapter 8 with hastag #mdmbook. Thanks !