
Chapter 2
Set Up Azure AD and MDM
In this chapter, we have three main goals:
- Checking out the major players and choices in the MDM space
- Getting started with one of them
- Getting Azure AD set up and having Windows 10 machines auto-enroll to our MDM service
Optionally:
- Use a custom domain name (instead of Microsoft’s default one).
- Connect our on-prem AD and have those users sync to Azure AD.
So, let’s get started.
Comparative Analysis of Different MDM Services
The following services are the biggest MDM services out there:
- Office 365 with its own “micro” MDM management
- Microsoft Intune
- VMware Workspace ONE
- MobileIron
There are others you might want to check out; I know some organizations using SOTI as an alternative (www.soti.net/solutions/enterprise-mobility-management/), and some using on-prem deployed Meraki (https://meraki.cisco.com/solutions/mobile-device-management), which isn’t a cloud service at all. There’s also Citrix Endpoint Management (it was called Citrix XenMobile), which I hear is pretty good, but I haven’t personally used it.
There’s also a “Free for 25 devices” solution from ManageEngine called Mobile Device Manager Plus (www.manageengine.com/mobile-device-management/).
In other words; you might want to find one that makes sense for you, your company, your needs, and your budget…not simply going with the big gorillas on the block because you see other people doing it.
That said, I will be showing screen shots and scenarios from only the big guys, mostly Intune. But the concepts you learn with what I show should translate to most MDM solutions because they all, by definition, are driven by what’s possible with the MDM guts within Windows 10, which every MDM vendor must use.
Azure AD Premium, Enterprise Mobility + Security, and Microsoft 365
Remember, your MDM management system might or might not be able to do it alone. By that I mean an MDM service might rely on you having an identity service to house your user accounts and create some identity around who is who at your company.
Microsoft’s cloud-based identity service is Microsoft Azure AD, which comes in four flavors: Free, Basic, Premium P1, and Premium P2. And a fifth, which can be used exclusively with Office 365 (though that one may be upgraded to one of the Premium versions if needed).
Cutting right to the chase, to do MDM “right” (what we’ll learn a little bit later), the only Azure AD flavors that matter are Premium P1 and Premium P2. This is because only the P1 and P2 account types do what’s called MDM “auto-enrollment.” This (as you’ll see) is the magic when a user goes to enroll their device in MDM and that request is forwarded from Azure AD to your MDM service. Additionally, Dynamic Groups—that is, the ability for computers or users to meet criteria and magically get into groups—is also only available in P1 or P2.
So for me, the other Azure AD account types are literally nonstarters with regard to working with MDM. You really must get an Azure AD P1 or P2 account type in order to be successful with MDM. You can see Microsoft’s chart at https://azure.microsoft.com/en-us/pricing/details/active-directory/.
Maybe in some future world, there will be more offerings to choose from. But as of this writing, if you zip down to the last row comparing all the features and versions, you should see the feature “MDM auto-enrollment, Self-Service Bitlocker recovery, Additional local administrators to Windows 10 devices via Azure AD Join, Enterprise State Roaming.”
If Microsoft changes its Azure AD plans in the future, by the time you read this, that’s fine. Here’s Jeremy’s MDM Rule #1:
To do MDM right, always get an Azure AD plan that provides MDM auto-enrollment and enables Dynamic Groups.
The end.
Meanwhile, you might be curious about how to buy Azure AD Premium and/or start a free trial. Indeed, to make the most out of the examples in this book, you’ll need to start an Azure AD Premium trial. Don’t buy or do anything with Azure AD just yet! But if you wanted to, just look at the trial page at https://azure.microsoft.com/en-us/trial/get-started-active-directory/. Again, don’t do this now, but if and when you’re ready to purchase Azure AD, I recommend you work with your Microsoft licensing person to help you set an Enterprise Agreement. Or you can work with a reseller or partner. Microsoft is pushing a new idea, which can make sense if you’re starting to get “all in” on the cloud and want to use Microsoft as the one-stop shop for modern management. Microsoft 365 is a “meal combo” that comes with the following offerings:
- Azure AD Premium. (Again, the Premium part is what’s needed to do the auto-enrollment.)
- Enterprise Mobility + Security, which in and of itself contains a huge gaggle of cloud services:
- Microsoft Intune (Manage PCs and phones; this is the product we’ll be using the most in this book.)
- Azure Information Protection (Prevent Sally in HR from sending out confidential information.)
- Microsoft Cloud App Security (Know which cloud services like Dropbox and Salesforce are being used and set policies about who can do what.)
- Microsoft Identity Manager (Synchronize on-prem AD to Azure AD and let users reset their own passwords.)
- Azure Advanced Threat Analytics (Detect suspicious activity, such as if someone just logged in while in New York and also somehow magically in Helsinki within 2 minutes.) This is sometimes called “impossible travel.”
- Azure Advanced Threat Protection (detects abnormal behavior like Pass-the-Hash attacks and various brute force attacks against your on-prem and cloud)
- Office 365
- Windows 10 Enterprise use rights
So, my plan in this book is not to go into all these things. But I want you to be able to start talking about, and making the right decisions about, what to buy.
If this Microsoft 365 “all in/meal combo” sounds appetizing, I would actually start out by taking a step back and analyzing only the Enterprise Mobility + Security features and pricing plans, since that’s the most germane to the focus of what we’re doing together.
As of this writing, there are only two Enterprise Mobility + Security options: the E3 plan and the E5 plan. For me, the E5 plan is stronger, but more expensive. You can see the plan comparisons at www.microsoft.com/en-us/cloud-platform/enterprise-mobility-security-pricing.
Remember, if you like the idea of being “all in” with Microsoft’s cloud services, then you shouldn’t really be gunning to buy Enterprise Mobility + Security alone (even though it includes Azure AD). But rather, you would be researching Enterprise Mobility + Security plans to then guide your decision about which Microsoft 365 plan you wish to purchase, because Microsoft 365 plans contain Office 365 and Enterprise Mobility + Security.
The rundown of major items can be seen in Figure 2.1.
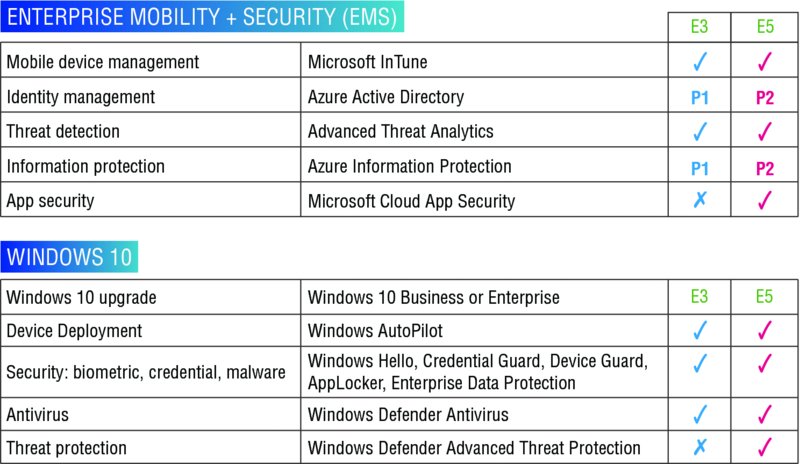
Figure 2.1 Features and options with E3 vs. E5
Then after you make that decision, you can work with your partner or reseller, and get an Enterprise Agreement (EA) for Microsoft 365 that suits your needs. And it should be cheaper overall to buy a Microsoft 365 subscription than to buy all the parts separately (as with any good deal).
Again, though, for the “base hit” exercises in this book, you don’t need to go bananas or even buy anything at all.
Just get the Azure AD Premium trial, again, from here: https://azure.microsoft.com/en-us/trial/get-started-active-directory/.
If you wish to follow along with the exercises, do this step before continuing.
Office 365’s Built-In MDM Management
If your company is already an Office 365 customer, then you already have some degree of MDM built in. Cutting to the chase, the Office 365’s built-in MDM management has a single goal: to replace Exchange ActiveSync and try to get into the twenty-first century.
And it does.
It’s a perfectly fine MDM for phones, tablets, and so on.
It’s not really trying to be a “grown up” version of MDM like Microsoft Intune is trying to be. But it’s free, and it’s built into all business and enterprise versions of Office 365.
By default, the MDM features of Office 365 are not active; you must manually activate them. After you do, it takes between zero minutes and a few hours before they are actually ready to use.
The step-by-steps of setting up Office 365 MDM can be found here:
I’ve shortened the link to https://bit.ly/2ttf3bc if you want to use that.
You can see the device security policies that are available in Figure 2.2.
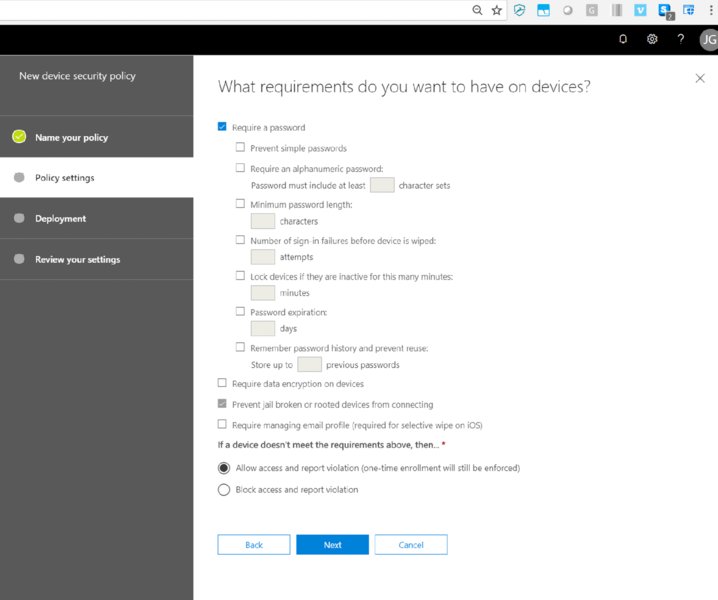
Figure 2.2 Office 365’s built-in MDM
And, it’s really not that much. Fine for small needs, and “basically okay” for phones and general protection.
But it’s Intune, which is Microsoft’s stronger way to manage Windows 10, and that’s where I’m going to focus my attention.
Microsoft Intune
Intune is Microsoft’s premier cloud way to manage Windows 10 and other MDM-capable devices. From a Windows 10 perspective, you get the following items, which are not present in the Office 365 MDM (many of these topics we will cover in subsequent chapters):
- Deploying applications (like MSI, MSIX, etc.)
- Securing content with MAM (mobile application management)
- Running PowerShell commands
- More PC management and policies, including ADMX-backed policies
- Connect to SCCM for co-management (explained later in the chapter).
- Company self-service portal to let users enroll and install corporate apps
- Provision Wi-Fi and VPN profiles
And more.
Again, for me, and you, and this book, my goal is to stick mostly to Windows 10 management and not really talk too much about the phone stuff. And there’s a lot of phone stuff in Intune.
As I stated earlier, the Microsoft 365 bundle includes Intune. And this Microsoft 365 bundle makes a lot of sense if you’re “all in” with Microsoft and want it all, with one price tag.
But, hey, maybe you don’t need, say, Office 365 because you’ve already got Google’s G Suite or, heaven forbid, Lotus Notes or something. Okay, then you wouldn’t want to buy Microsoft 365 because it comes bundled with Office 365, which is something you just said you didn’t need.
 Additionally, Microsoft 365 also includes rights to use Win10 Enterprise and Office 365 ProPlus. It could even be cost effective if you don’t need Office 365 or OneDrive for Business. You would have to check out the pricing on that with your Microsoft sales rep.
Therefore, you can buy Intune alone, all by itself.
You can also buy Intune bundled with the Enterprise Mobility + Security suite I mentioned earlier. To see the rundown of the differences in just Intune alone or Intune along with the Enterprise Mobility + Security suite, there’s a good chart here: www.microsoft.com/en-us/cloud-platform/microsoft-intune-pricing.
So, to recap:
- You can buy Intune alone. At the time of this writing it’s US$6 per user. There’s a special “per device” license (when no users are on the machine, like digital signs) for US$2 per device.
- You can buy it as part of the Enterprise Mobility + Security E3 suite.
- You can buy it as part of the Enterprise Mobility + Security E5 suite.
- You can buy it as part of Microsoft 365.
I found two ways to try Windows Intune.
- Way #1: Find the Microsoft Enterprise Mobility + Security pricing page I noted earlier, and in the E5 block, click Try Now.
- Way #2: Go to the “Sign up for a Microsoft Intune free trial” page:
https://docs.microsoft.com/en-us/intune/free-trial-sign-up.
For this book, I am going to use Way #1 and sign up for an E5 trial and connect it to my Azure AD trial that I made in the previous step. So, again, go here: www.microsoft.com/en-us/cloud-platform/enterprise-mobility-security-pricing.
Just look for Try Now. I did create a fake Outlook.com address to get started, and that took about 80 seconds. After that, the basic steps I used can be seen in Figure 2.3 to get started.

Figure 2.3 The signup page for EMS E5
Then, it’s time to create your first user and company name. What I used can be seen in Figure 2.4. Note that the company name must be unique across all the special “.onmicrosoft.com” domains in the world. I’m claiming Fabrikam1000.onmicrosoft.com as my domain name to use throughout this book and my ongoing examples at www.MDMandGPanswers.com.

Figure 2.4 Create your first user and company name.
Then just sit back and wait a moment or two, and…bingo. You’re ready to rock, like what’s seen in Figure 2.5.

Figure 2.5 EMS E5 trial success message
ActiveSync, Office 365 MDM, and Intune MDM Feature Comparison
You might be wondering what features are available in what product. To that end, I found and re-created a public Microsoft document that spells out the major differences.
You can see that in this table here if the boss ever asks why the MDM for Office 365 isn’t enough and you have to start spending on Intune or another MDM service instead.

Additionally, this was the latest page where I found the side-by-side comparisons of MDM for Office 365 and Intune:
Another ugly link, so I made a short link at https://bit.ly/2E20PWe.
Intune for Education
There’s another version of Windows Intune that should be mentioned here, in case this is your scenario. There is Windows Intune for Education, which has a special superpower.
That is, it can read data from Microsoft School Data Sync (https://sds.microsoft.com/) and automatically create and keep groups of users and computers up-to-date.
The other interesting part of Windows Intune for Education is that it has two licensing methods.
- Method #1 is that you can buy it outright for $30 per device. This includes unlimited users on the devices you license.
- Method #2 is that you can pay per user at $8.28 per year. Before you flip out, students are free! You only count staff and faculty.
The sweetheart part of the deal is the included Azure AD type that comes with Windows Intune for Education. It’s got its own flavor called Azure AD EDU, but it hits the mark with the most needed features you’ll need, including auto-enrollment.
You can always upgrade to Azure AD Premium and get some additional AD security features, like two-factor authentication, which is only available there. But, Azure AD EDU hits the mark for what I think most schools would need to marry up with Intune.
Start out by reading
https://www.microsoft.com/en-us/education/intune/default.aspx and https://blogs.windows.com/windowsexperience/2017/01/24/announcing-intune-education-new-windows-10-pcs-school-starting-189
Last, and I think it’s worth mentioning, in the same way that there’s a full bore bundle of stuff for businesses called Microsoft 365, there’s also a full bore bundle of stuff for education (Office 365, Azure, Intune) and some other stuff like Mindcraft.
And, no surprise, it’s called Microsoft Education. So if you wanted to try out Windows Intune for Education in conjunction with the other pieces of the Microsoft Education suite, the trial page for the whole enchilada can be found here:
https://docs.microsoft.com/en-us/education/get-started/get-started-with-microsoft-education
Note that once you sign up for a Microsoft Education trial, they do some verifications to see that, yes, you really are a school, so you cannot just start a trial without some scholastic affiliation.
VMware Workspace ONE
VMware is also in the game for MDM management with its product called VMware Workspace ONE. It used to have the catchy name “AirWatch,” and now it has a more boring name with Workspace ONE, and it’s harder to type.
That said, it’s the same product, and a solid MDM solution. You have to pick the edition of VMware Workspace ONE to use. There’s a medium-long comparison chart at www.vmware.com/products/workspace-one.html, but if you dig for it, there’s a PDF you can download when you click on View Complete Feature Comparison.
In checking out the table, there is one line item row that sticks out. “Advanced Desktop Management” which touts “Includes custom scripting, BitLocker encryption, desktop /Win32 app management, Windows 10 Enterprise polices (including Credential Guard Device Guard).” And for those features, it’s going to be Advanced Edition, Enterprise Edition, and Enterprise for VDI Edition.
Computers managed with Workspace ONE can also auto-enroll in Azure AD when taught to do so. but Azure AD is not strictly required if you want to experiment with VMware Workspace ONE. VMware also has its own identity service in VMware Identity Manager, which you can learn about here: www.vmware.com/products/workspace-one/identity-manager.html.
If you want to get started, as of this writing, the AirWatch brand is transitioning to Workspace ONE. As such, the way to get started with AirWatch, I mean, Workspace ONE, might be different by the time you read this. I was able to find a 30-day trial at www.air-watch.com/lp/free-trial/. But then trying to find a Workspace ONE trial, I could only find a hands-on lab, which is fine, but not really what I was after. Anyway, you can try that out here if you like: https://www.vmware.com/go/workspace-hol.
Since it’s a sandboxed hands-on lab, I didn’t try to connect it to a real Azure AD, which might or might not work. The step-by-steps for marrying Workspace ONE (still called AirWatch on this page) to Azure AD can be found at https://docs.microsoft.com/en-us/azure/active-directory/saas-apps/airwatch-tutorial.
For me, I have a full account for Workspace ONE, and that’s what I’m going to use for any examples in the book. If I have my story straight, you can get your own full account through a VMware reseller or account manager.
MobileIron
MobileIron’s website is the most confusing of the bunch. It took me a while to find their page talking about Windows 10 management. But I did, and it’s here: www.mobileiron.com/en/unified-endpoint-management/operating-systems/windows-10.
Then, if you want to start a 30-day trial of MobileIron, you can do so here: https://info.mobileiron.com/30DayTrial.
To connect MobileIron to Azure AD, complete step-by-steps are on Microsoft’s website here: https://docs.microsoft.com/en-us/azure/active-directory/saas-apps/mobileiron-tutorial.
Setting Up Auto-Enrollment and Enrolling Your First Machines
Okay. Let’s recap:
- You signed up for a free Outlook account.
- You signed up for a free Enterprise Mobile Suite + Security E5 plan.
- You got Azure AD Premium P2 at the same time.
Now it’s time to turn on your Intune inside your Azure AD.
Start out by signing out of everything: Outlook, Azure AD, and/or any other Microsoft services you might have open.
Then, head over to portal.office.com and you might be prompted as shown in Figure 2.6. Pick the one with the .onmicrosoft.com address and log in.
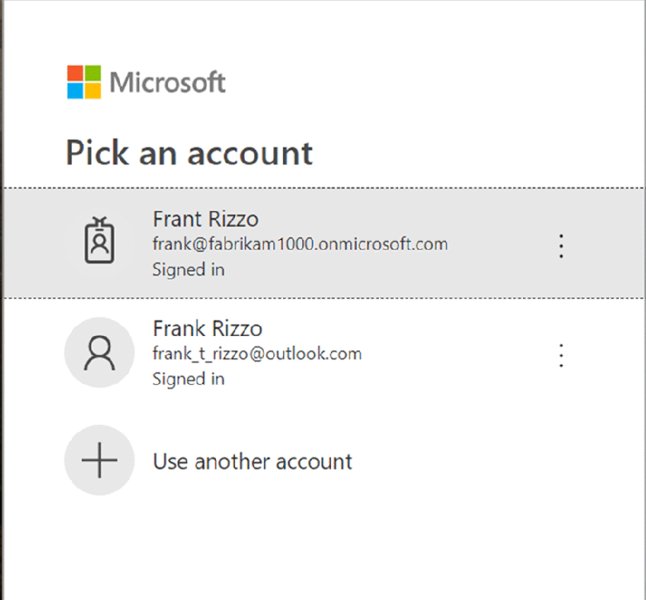
Figure 2.6 Log on using your onmicrosoft.com account.
Turning On MDM Enrollment
There are two steps to MDM Enrollment:
- Users
- Computers
Let’s do the user side first and the computer side second.
MDM Enrollment for Users
Click Azure Active Directory as seen in Figure 2.7.

Figure 2.7 Click to open Azure Active Directory.
In a new tab, you’ll be seeing Azure AD and can click Mobility (MDM and MAM), then Microsoft Intune, as seen in Figure 2.8. Then, in the Configure Microsoft Intune dialog box that appears next, as seen in Figure 2.9, you specifically need to enable MDM user scope. For our examples, I recommend selecting All (also seen in Figure 2.9).

Figure 2.8 This is where you click to turn on Intune.
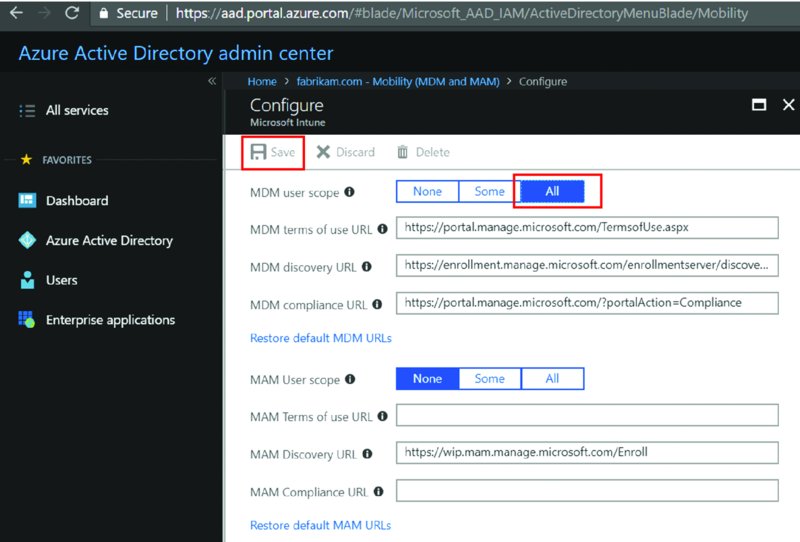
Figure 2.9 Turn on MDM and, optionally, MAM for all users.
Then, back at the Mobility (MDM and MAM) page (again, Figure 2.8), you’ll click Microsoft Intune Enrollment. This gets you to the “Microsoft Intune Enrollment” page seen on Figure 2.10. For MDM user scope, click All again and click Save.
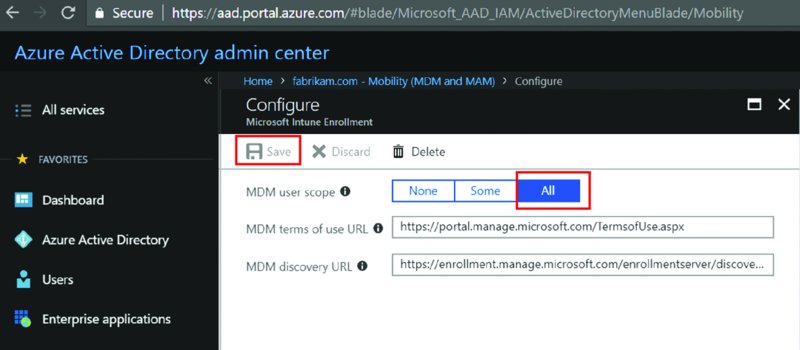
Figure 2.10 Turn on MDM for Intune Enrollment.
What you just configured was the user side of the MDM equation. Users need to be prompted to acknowledge the terms of use and so on.
But the real magic is in devices. You need to configure the device registration authority.
MDM Enrollment for Computers
Just 10 seconds ago you were in the Azure AD Console. Now it’s time to get into Intune and tell it that you wish to have it accept requests and perform auto-enrollment.
As I write this, there are three ways to jump into Intune. Way #1 is from the main Admin center, as seen in Figure 2.7. within the Admin center, you could click Intune.
But if you’re still in Azure’s portal, you might not see a link to Intune.
My favorite way to just “go to Intune” is just to search as shown in Figure 2.11. Just click the search spyglass, type Intune, and click the word Intune when it pops up, like I’m doing in Figure 2.11.
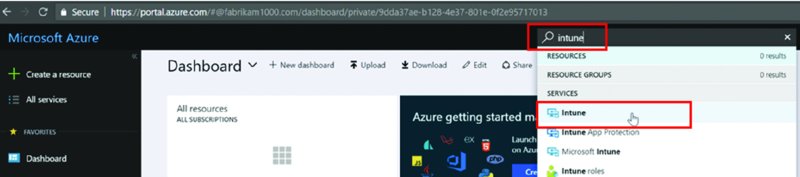
Figure 2.11 If you ever get lost in the Azure portal, just search for Intune.
So if you ever get lost and just want to go to Intune (or you cannot find Intune), use the spyglass as seen in Figure 2.11.
Bingo.
Another way to add Intune to the list of Azure resources is to click “All services” (seen also in Figure 2.11). Then find Intune and click the star next to it. This will magically add it to the long menu list on the left. This then puts it (basically) on every page, and makes it much easier to just click on to jump to Intune.
Some Notes and Tips about the Intune UI
I suspect that in the coming months, Intune might just be a nice easy-to-find clickable thing in the Azure main page. After I wrote this chapter, Microsoft already came back and announced a preview of a new page to help you zip toward Intune and device management even faster once you’re logged on: https://devicemanagement.microsoft.com.
So, be on the lookout for that. I likely won’t be able to retake screen shots for the book before it goes to press.
But, again, the methods here should continue to work alongside any new method as well. Going forward, in the book, I might just say, “Go to the Intune console” and I’ll assume you can find your way there: from the Azure portal, a nifty new icon on the Azure portal (if they do that), or at https://devicemanagement.microsoft.com.
Additionally, and unrelated, each little window that slides to the right as you expand to do something interesting in Azure or Intune has a nifty name.
It’s called a blade.
Doesn’t it feel so super cool saying that?
Say it again: blade.
Not a window, not a pane. No, no. Those terms are so retro.
Now it’s a blade.
Ahem. Okay. Sure. I’ll call it a blade.
Once you’re in Intune, the first stop will be “Device enrollment,” as seen in Figure 2.12. This is where you’ll explain to Intune what’s allowed and not allowed. For instance, if you wanted to allow Apple phones and Windows devices but disallow Android devices, this is the right place.
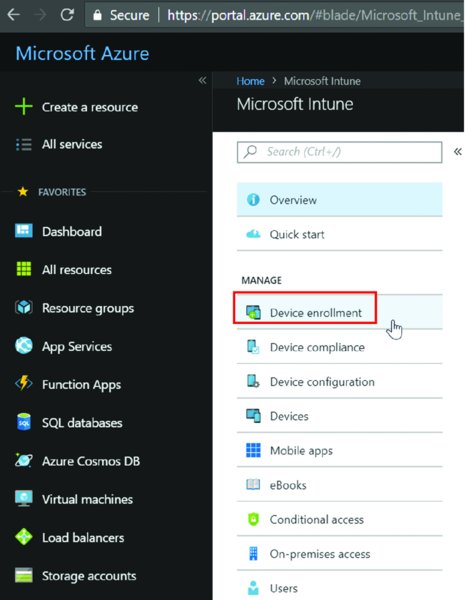
Figure 2.12 In Intune, use “Device enrollment” to specify the MDM authority.
Then, you’ll see the Choose MDM Authority blade, shown in Figure 2.13. You will only see Choose MDM Authority if you have not done this step ever before.
The correct option to select is Intune MDM Authority as I’ve selected here. Configuration Manager MDM Authority would enable what’s known as Hybrid Intune + SCCM and is going away. (I talk more about Hybrid Intune and SCCM, why it’s going away, and what replaces it in Chapter 4.)

Figure 2.13 Choose Intune MDM Authority to manage devices.
If you want to learn more about the MDM authority, there is a detailed article here: https://docs.microsoft.com/en-us/intune/mdm-authority-set. For instance, you may want to later set it to SCCM or some other MDM service.
When you do you’ll get a toast notification that it was set correctly.
 What is toast? It’s like a pop-up. Read this if you never heard that term before:
 https://ux.stackexchange.com/questions/11998/what-is-a-toast-notification.
Add Your First User to Azure AD
Adding your first user to Azure AD, manually, takes just a moment.
Back in the Azure portal, start out by clicking Users or “Add a user” as seen in Figure 2.14. If you’re lost, and cannot find Azure AD, just type in aad.portal.azure.com. and you should be teleported back to Azure land.
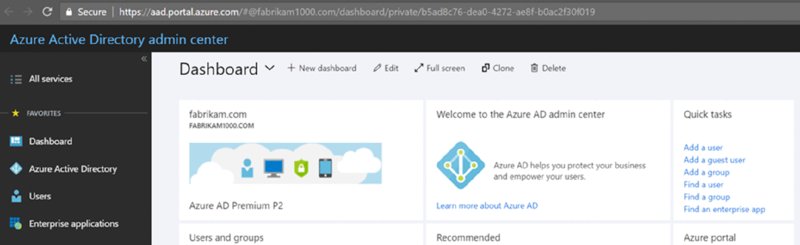
Figure 2.14 Adding a user by hand to Azure Active Directory
Then, enter information for a user. I’ll be adding someone named Jack Tors as seen in Figure 2.15. Note that I have to explicitly spell out his username, which must (for now) end in fabrikam1000.onmicrosoft.com. Later, we’ll set up optional custom domain names.
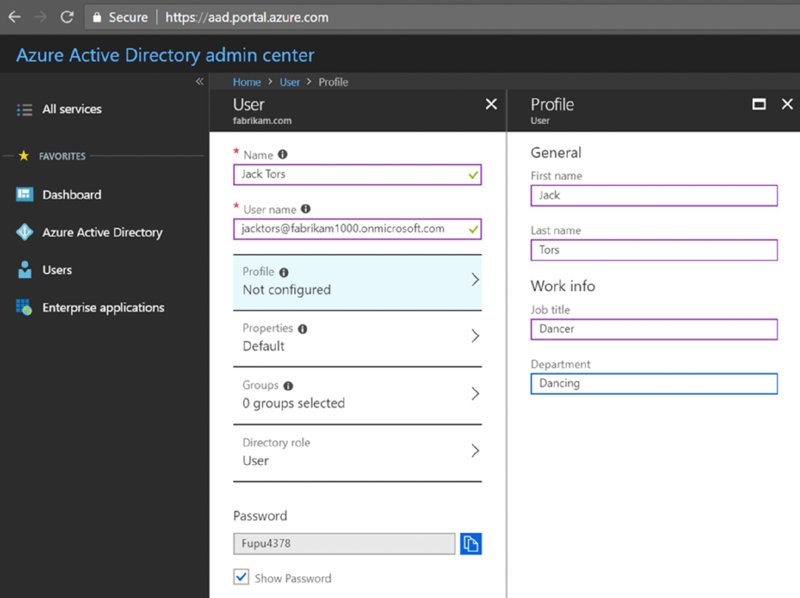
Figure 2.15 Create your first user in Azure AD.
Jack is now created but has no licenses. To assign him licenses, click back to Users ➢ Active Licenses and find the user you just created, Jack Tors. Then specify a location and that he gets a license, as seen in Figure 2.16.

Figure 2.16 Each user needs a license.
Enroll Your First Windows 10 Machine into MDM
Here’s the kind-of bad news. You might, yes might, have to (gasp!) actually teach users how to do something called MDM enrollment. Technically, you join Azure AD, and the MDM enrollment is happening for you automatically in the background.
Hence the term auto-enrollment.
There are two situations in which this can occur:
- When a Windows machine is fresh out of the box, also called the out of box experience, or OOBE
- When a Windows machine is already up and going and has been used for a while
OOBE is…pretty easy. As seen in Figure 2.17, just provide the user with a username and password, and a few clicks later (not shown), Windows is done and ready to rock.
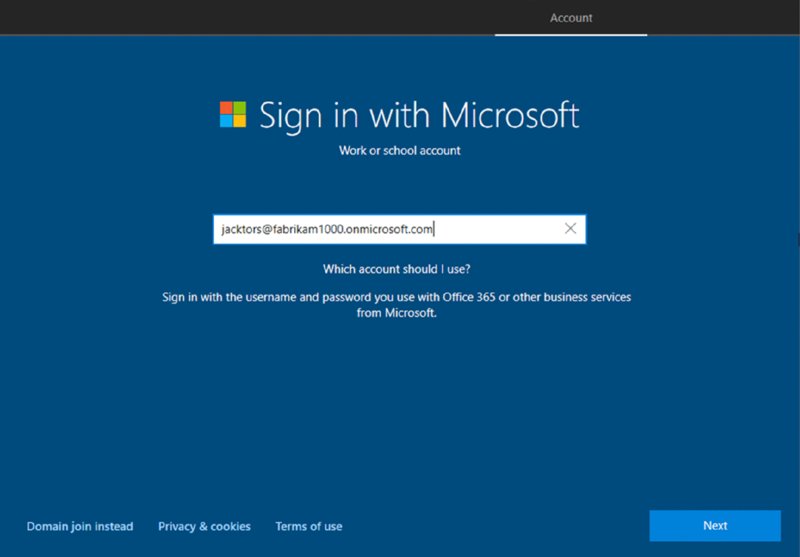
Figure 2.17 You can give someone a username and password to enroll a machine “out of the box” aka OOBE.
But after this is over (don’t shoot the messenger), the person who enrolls the machine becomes a local admin. Wait, wait…don’t panic. You can change this behavior if you want; see the sidebar “Restricting Users and Devices in Azure and Intune.”
And, additionally, we will overcome this problem when we talk about distributing new machines using Autopilot. But that’s all the way in Chapter 8! But for now, it’s true: If someone enrolls the machine in this way using the out of the box experience, they become the local admin on the box.
Okay. Take a deep breath and let’s move onward.
Now, the next methods I want to show you will be for when the Windows 10 machine is already up and running, maybe having been used for some time. I’m going to teach you three things in this scenario:
- The first thing is what not to teach your users. Yep, what not to do comes first.
- The second thing is “all the manual clicks” a user would have to do in order to get MDM enrolled.
- The third thing would be a little shortcut method to minimize the steps a user would have to perform.
Restricting Users and Devices in Azure and Intune
Having anyone who just enrolls a machine with their username and password automatically become a local admin of the Windows 10 machine: crazy bad idea.
Crazy good news: You can fix this with Azure’s Device settings, in a section called device type restrictions.
First, in Azure’s portal (not in Intune), when you click Devices and then “Device settings,” there are a handful of interesting options you may want to know about. You can see them here.

You can use the items on this page as follows:
- To limit which users may join devices to Azure AD
- To add which Azure users will also be local administrators on your AAD joined devices
- To specify how many devices a user can have. Could be handy to set it to 1 or 2 instead of 50 or unlimited.
The second, related idea is how you can use the Intune console to prevent personally owned devices from being able to make their way into Intune. When you do this, you ensure that devices you know about are coming into Intune and not random machines purchased at Best Buy or Amazon.
Okay then, if you block personally owned devices, then what is the definition of personally owned, versus, say, corporate owned?
The web page on the subject is here: https://docs.microsoft.com/en-us/intune/enrollment-restrictions-set#set-device-type-restrictions, and here are the relevant characteristics:
- The enrolling user is using an admin style account, also known as a device enrollment manager account. A nice step-by-step is found at
https://prajwaldesai.com/adding-microsoft-intune-device-enrollment-manager/. - The device is enrolled through Windows Autopilot (discussed in Chapter 8).
- The device enrolls through a bulk AAD Token via a provisioning package (also discussed in Chapter 8).
- The device enrolls through automatic enrollment via SCCM for co-management.
There are some other restrictions too, but these are the big ones.
If you want to tweak Intune to block personally owned devices, which would then prevent (what should be) standard users from becoming local admins on the Windows 10 machine, then in Intune, go to Device Enrollment ➢ Enrollment Restrictions. Inside Device Type Restrictions, you can click Properties and select the “Configure platforms,” then within the “Personally Owned” column, click Block upon the type of device you want to restrict; in our case Windows 10, as seen here.

What Not to Do: Azure AD Join, but No MDM Enrollment
Why am I showing you what not to do first? Because, it seems like the most obvious path you (or your users) would take. Trust me, you’ll see what I mean.
These examples are using a Windows 10 1809 machine; your experience may be a little different in future versions of Windows. But this is what I’ve got to show you today.
Pretend to be a Standard User (that is, one without any local admin rights), and go to the Start bar and type in MDM. For me, and I swear I’m not making this up, I also got some nice recommendations about the mind-altering drug MDMA. But, erasing the recommended A in MDMA will get you what you see in Figure 2.18.

Figure 2.18 Using Windows search to look for MDM settings
This enables the user to click either “Enroll in MDM only” (two choices) or “Access work or school.”
Again, maybe it’s just me, but in 1809, clicking “Enroll in MDM only” (the left side or the big right-side link) actually did nothing at all except bring me to the Windows Settings page (yippee). (I even tried this as a local admin, and nothing occurred at all.)
Now as this pretend user, inside Windows Settings I have to type MDM again, where you’ll see what’s in Figure 2.19.

Figure 2.19 Use the Settings app
Once again, trying “Enroll in MDM only” again from here gives me…exactly nothing again. Literally. It goes nowhere at all.
Okay. (Remember, you’re trying to think like the user, and a Standard User at that.) So let’s try “Access work or school.” Okay! That works. On that page is a big + (plus) with the word Connect. Great, let’s click on that.
Then the big, beautiful dialog box you’ll see next is seen in Figure 2.20, where you would expect a user to put in their Azure AD account information.
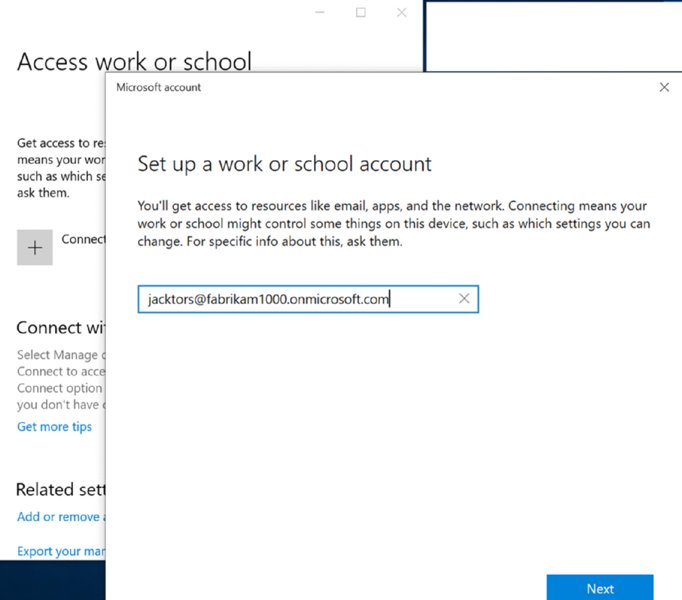
Figure 2.20 The “Set up a work or school account” dialog box. Just waiting to eat your end users for lunch.
Then, they log on with the username and password they got from email.
As it’s cooking, it will look like Figure 2.21.

Figure 2.21 As the connection to Azure AD occurs, you’ll see something like this.
You’ll get an “All set” message and a chance to click Done. When you do, you’ll fall right, directly, squarely into the snake pit, like Indiana Jones does in Raiders of the Lost Ark.
Here’s an example of the wrong icon, seen in Figure 2.22. It looks like the Windows flag icon. This is not what you want to see if you wish to be MDM enrolled.
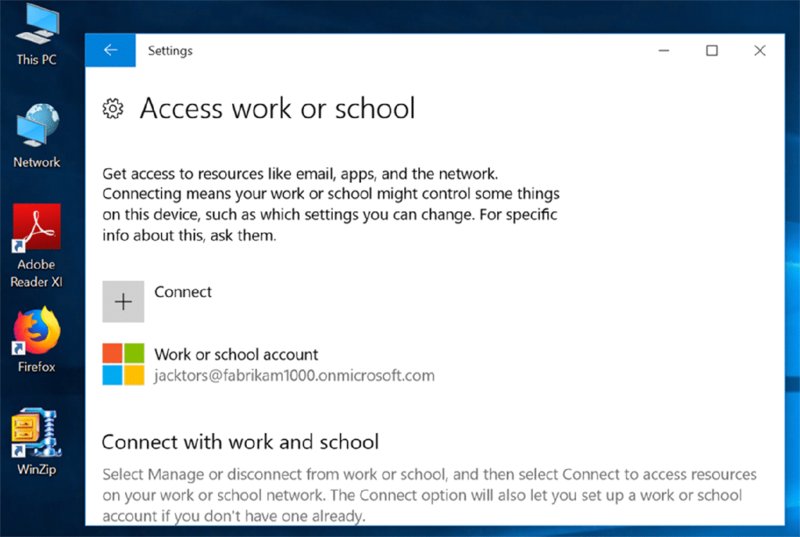
Figure 2.22 The Windows icon after enrollment means you’re “Workplace joined” and not really MDM enrolled.
How do you know you are not actually MDM enrolled? Only because you’re reading this book of course. Because to me, a nice Windows flag seems like a good thing. But it’s actually wrong and not enough for MDM.
But you can see for yourself if you click on the flag, click “Manage your account,” and open the page in a browser, like Edge. You’ll see in Figure 2.23 where the computer is merely Workplace joined and not MDM enrolled.
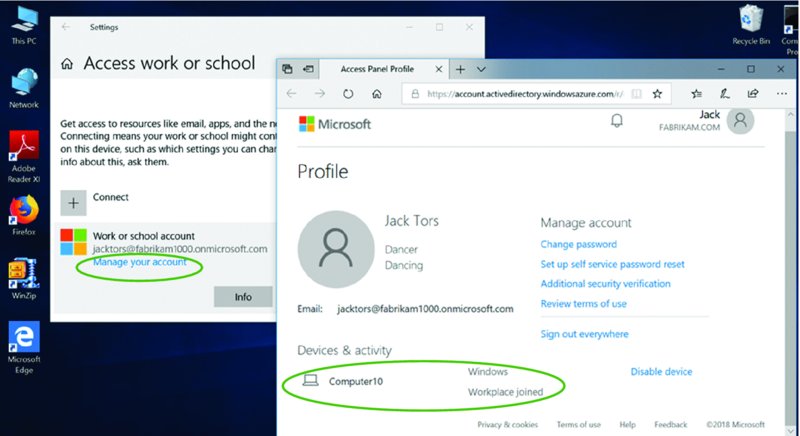
Figure 2.23 You don’t want to be Workplace joined. You want to be MDM enrolled, which is explained next.
To understand what you’ve just done, which, again, is called Workplace Join, see the sidebar “What Is Workplace Join?”
What Is Workplace Join
If you’re not MDM enrolled in Figure 2.22, then what have you done there?
As you can see in Figure 2.23, after you click into it for further inspection, it’s called Workplace Join and it’s really part 1 of the 2 part process to really be MDM enrolled. Said another way, there are two parts to MDM enrollment: joining Azure AD (aka Workplace Join) and Enrollment into MDM.
That big, inviting window is where you put in the username, that literally only takes care of part 1, the Workplace Join part and not the MDM enrollment part.
So what is Workplace Join and why would you want it?
Again, for clarity, it’s not MDM, so for the purposes of this book, you really don’t want it. But its function is to enable people who bring their own device to join your Azure AD, where you can then provide single sign-on to apps like Box, Salesforce, and so on.
And that’s it.
With Workplace Join, you’re not able to deliver applications, manage settings, or perform any other MDM function.
It’s really there just to, well, join your Azure AD, and then when you provide access to resources, you can dictate who can get what resources.
The other upside of Workplace Join is that anyone can do it. By that I mean Standard Users (aka non-admins) can do it. So if you’ve already got 300 contractors working for you and you want them to now magically get access to your Salesforce data, you just spin up Azure AD accounts, marry Azure AD to Salesforce, and set the permissions and…bingo.
You don’t have to magically figure out how to get them local admin rights to MDM enroll, and besides, those 300 contractors wouldn’t want you to manage their machines with your MDM service anyway.
So Workplace Join has its place, but it doesn’t enable you to actually control, manage, or lock down a machine or deploy Windows applications. But it does give you the ability to marry people (that is, their identity) to services you provide through Azure AD.
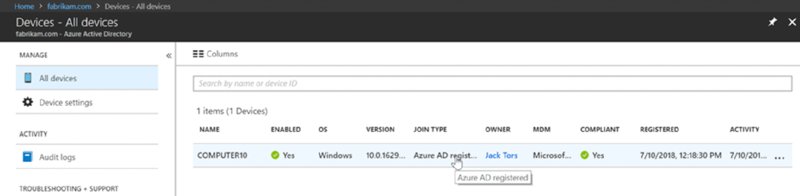
If you go into Azure AD portal and look at Devices ➢ All devices, you will see the computer “registered” to AD, and even the MDM field might light up saying your MDM service, like Microsoft Intune. But, oh no. You are not MDM enrolled, you are “Azure AD registered.”
If you followed me down the snake hole, let’s get a clean slate. First, back at the client, click the Windows flag icon, like what you saw in Figure 2.22 (and 2.23). Then click Disconnect and then Yes. Then, here inside the Azure AD portal, click on the computer itself, then click Delete and say Yes.
Poof. Out of the snake pit.
What to Do: MDM Enroll
Snake pits: bad. Treasure: good.
To get to the MDM treasure you need to knock on the secret door.
And, Indiana Jones is no regular user, he’s a hero…a Local Admin. (I’ll just call him an Admin, but you’ll know I mean Local Admin.)
So, log off the machine as a Standard User and back in on as an Admin. When you do, you’ll be able to knock three times and find the secret door. Indeed, Figure 2.24 is the secret door and the X marks the spot. Well, not an X, but an oval.

Figure 2.24 Just click “Join this device to Azure Active Directory” for MDM enrollment.
Before you continue, take a look at the difference between Figure 2.24 and Figure 2.20. See that as a Standard User, you don’t even get the chance to find the treasure (labeled as “Join this device to Azure Active Directory.”
Now, because you’re an Admin, click on the treasure “Join this device to Azure Active Directory.”
Then, and only then, on the next page (not shown), you will put in Jack’s username and password. Once you do, you’ll get a pre-confirmation of what is about to occur as seen in Figure 2.25. Click Join to enroll.

Figure 2.25 The pre-confirmation for MDM enrollment
Then a confirmation page can be seen in Figure 2.26.
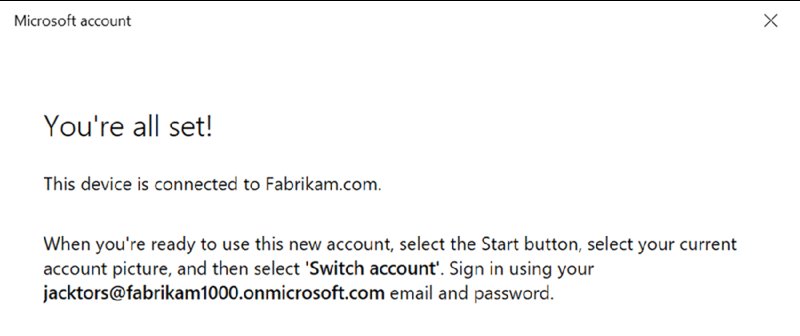
Figure 2.26 Explanation that you can now use the onmicrosoft.com account to log on directly to this machine
And, finally, your MDM gold awaits. You can see the briefcase icon, as seen in Figure 2.27, showing a proper MDM enrollment.
If you get the Windows icon and not the briefcase icon showing true MDM enrollment, try waiting a day and retrying. Sometimes after telling Azure AD who the MDM authority is takes some time. Like 24–48 hours.
Now on your Windows 10 machine, log off, and log on as [email protected] as seen in Figure 2.28.
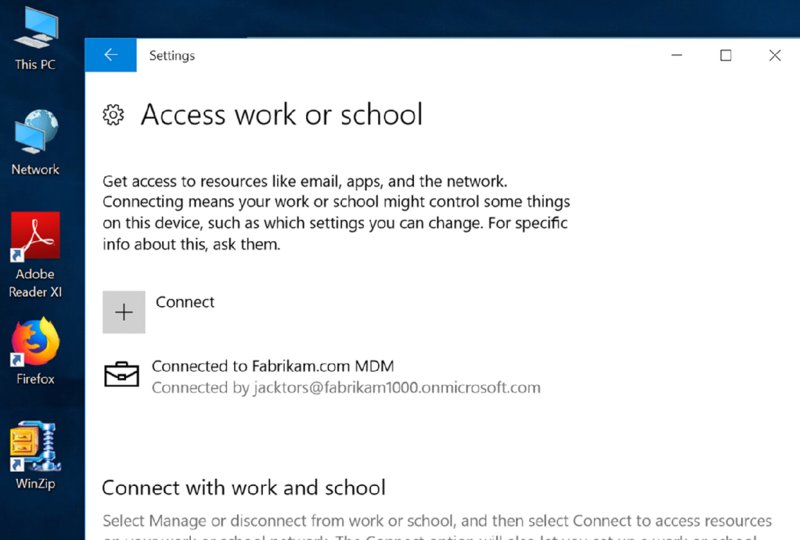
Figure 2.27 The briefcase icon means you are successfully enrolled in MDM.

Figure 2.28 Now you can sign on with your Azure AD credentials to this machine.
Remember when enrolling using the “out of the box experience” made the person a local admin?
Bam. Same problem here too: The user who just enrolled the machine is automatically a local admin on the box. That’s bad. I get that. But hang tight; we’ll rectify this situation when we talk about using Group Policy to bootstrap existing machines to enroll into MDM as the system in Chapter 4 in the section entitled “Auto-Enroll in Your MDM Service Using Group Policy.”
Killing Windows Hello and PINs (Just for This Book)
Additionally, during the enrollment, you might have been prompted for a device PIN (not shown in the walk-through or screen shots). This is actually Windows Hello, a mechanism to help you walk away from passwords. I like Windows Hello, but you won’t need PINs for this book. And if you’re enrolling lots and lots of machines for testing, it could slow your testing down but decrease security in your test computers.
That said, you might want to kill Windows Hello…just for this book.
For clarity: I am not anti–Windows Hello.
But when you enroll a machine, there are several extra steps asking users to provide a PIN (which can replace a password), and it just generally takes longer to perform your test enrollments.
Counterintuitively, using PINs instead of passwords is safer, because the PIN is bound only to the device. On the other hand, if someone has eight devices, they may have to remember eight unique PINs instead of one password. If you want to read a good article on the subject, check out:
http://www.brucebnews.com/2016/08/logging-in-with-a-pin-is-easier-than-a-password-and-safer-too/
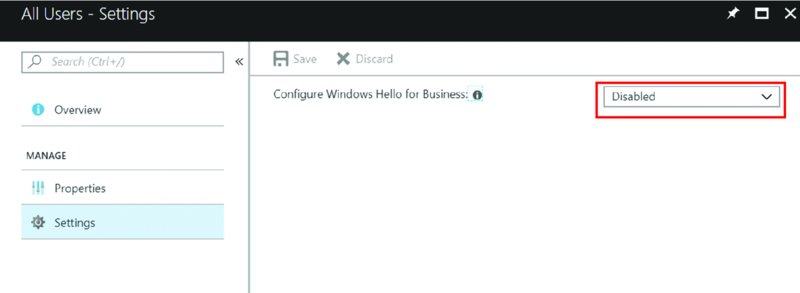
For our purposes, if you wish to turn it off, just for now, the global way to do this would be Intune ➢ Device Enrollment ➢ Windows Enrollment ➢ Windows Hello for Business. Then click the one entry in there for All Users, then Settings.
You can, if you want to, have multiple Windows Hello for Business profiles. It means that you can disable Windows Hello from your test users but enable it for your real users.
But, since this whole book will be about testing, go forth and disable Windows Hello for Business, as shown in the following image.
MDM Enrollment via Shortcuts (aka Deep Links)
In the previous example, we used the Windows 10 Settings app to find the Azure AD/MDM enrollment section of the universe.
But what if you wanted to:
- pre-create the Azure AD accounts, and
- email everyone with step-by-step join directions, and
- pray to the universe people follow your steps correctly, and not Azure Workplace join, but actually perform the MDM enrollment?
There’s a better way. Again, though, MDM enrollment can only be done by Admins and not Standard Users.
That said, you can use a magical shortcut, also known as a deep link. There are a few ways to do this. You can send your people (the people who have Azure AD accounts now) an email telling them to click on a link, say, in an email specified like this:
ms-device-enrollment:?mode=mdm
You can copy and paste that string into a browser (as seen in Figure 2.28), or use Windows + R (to bring up the Run dialog box) and type it in directly like what’s seen here.
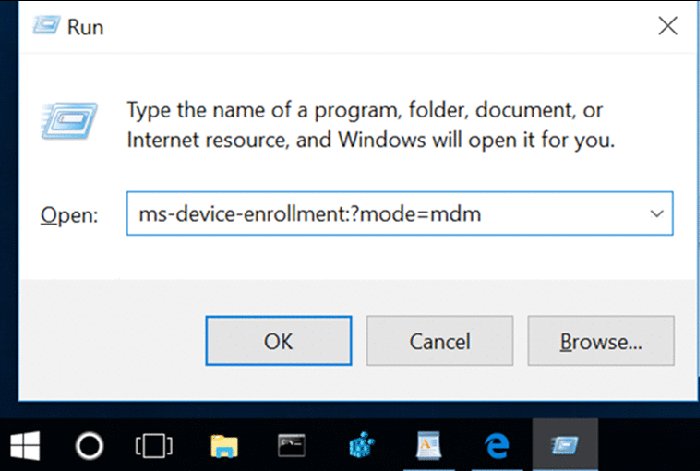
When you do, you’re bypassing all the steps to find the Settings app, know what to type to discover the MDM section within the Settings app, and also avoid the snake pit. Basically: Let’s get people directly to the MDM enrollment treasure. As you can see in Figure 2.29, just put in the magic syntax into a Microsoft Edge browser window, and… poof. You’re off to the races.
 You are likely still using the
 onmicrosoft.com usernames instead of custom names. If so, you may be prompted for a server name which you don’t really want to deal with. A little later, in the “Custom Domain Names” section, we’ll bypass this by fixing the CNAME records and leveraging our own custom domain name.
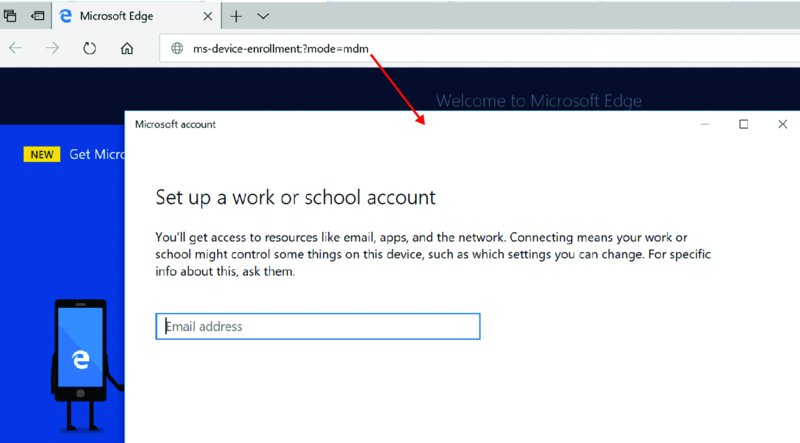
Figure 2.29 Using the special syntax in a browser will open the correct MDM enrollment dialog box.
Then the user must know their account information.
What’s that I hear you cry? Users shouldn’t even need to know that much? No problem. You can embed their username into the deep link like this.
ms-device-enrollment:?mode=mdm&[email protected]
And when you do, that information is automatically filled out, as seen in Figure 2.30.
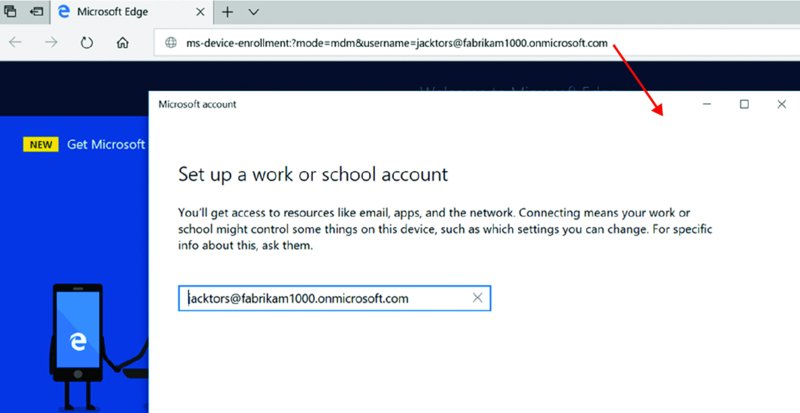
Figure 2.30 Using MDM deep links to pre-fill in user information
And, for some MDM systems, like Workspace ONE, you might be required to enter in a specific server name (if you’re doing all the steps manually). You can bypass all that as well, by entering in the server name inside the deep link like this:
ms-device-enrollment:?mode=mdm&[email protected]&servername=https://techp-ds.awmdm.com
The result might look like Figure 2.31 where the user’s name and server, which is pre-placed on the special link, can be seen in the dialog box.

Figure 2.31 When you specify both the username and server in the deep link, then both are shown to the user during enrollment.
Optional Steps: Custom Domain Names and AD to AAD Synchronization
These next two walk-throughs are completely optional and not required.
But highly recommended.
The first item would be to say goodbye to the goofy “onmicrosoft.com” domain name you got, and convert that to a custom domain. You could do most of the work in the book if you didn’t want to do this step. In real life though, chances are you don’t want your users walking through life having to remember this domain name. Instead, you’ll likely want them to remember your real domain name, whatever that is.
The second item would be to connect and sync your existing on-prem AD to Azure AD. The goal here is to sync existing on-prem AD user accounts to Azure AD because it’s likely you already have an on-prem process to create on-prem AD user accounts, and you want to get those AD accounts magically synchronized to Azure AD so you don’t have to keep adding them manually.
Again, neither is required, but I will recommend you do them, and I will be doing them here and continue onward with the book assuming you did do them. In real life, if you have no on-prem AD, or plan to walk away completely from on-prem AD, then maybe you really don’t need to sync any on-prem AD to Azure, because…well, in your case there would be no point.
For me, in these next steps, I’m going to do the following:
- Change over my
fabrikam1000.onmicrosoft.comdomain to simplyfabrikam1000.com. - Sync my on-prem AD, which is named
Fabrikam.com, to my Azure AD world, which is (about to be called)fabrikam1000.com.
Custom Domain Names: Goodbye to “onmicrosoft.com” Names
For me, I went to my domain registrar (like GoDaddy) and purchased the rights to own Fabrikam1000.com.
Once you buy your real domain name, then come back to Azure AD and select “Custom domain names,” then “Add custom domain” as seen in Figure 2.32. At this moment, you’ll only see your onmicrosoft.com domain name until you do these next steps.
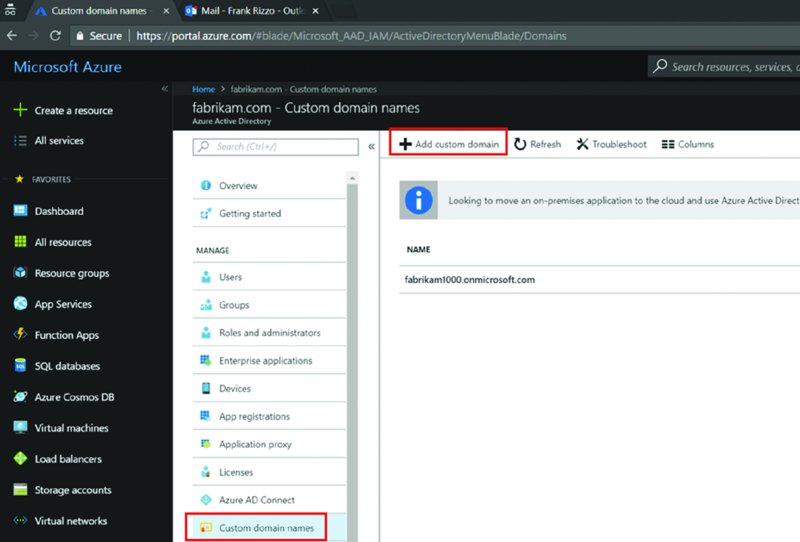
Figure 2.32 Use Azure AD to see and add custom domain names.
After you click Add, enter in your purchased name as seen in Figure 2.33.
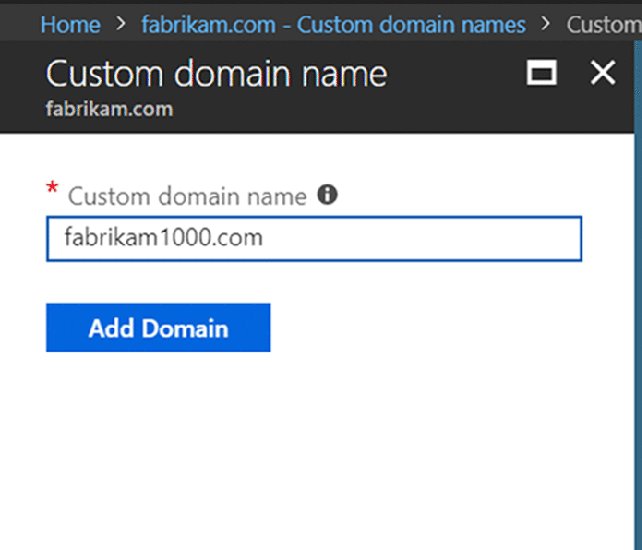
Figure 2.33 Adding a custom domain name into Azure AD
Next, you’ll be instructed how to configure your domain name registration so the whole marriage works. You’ll see something like what’s seen in Figure 2.34 from Azure AD.
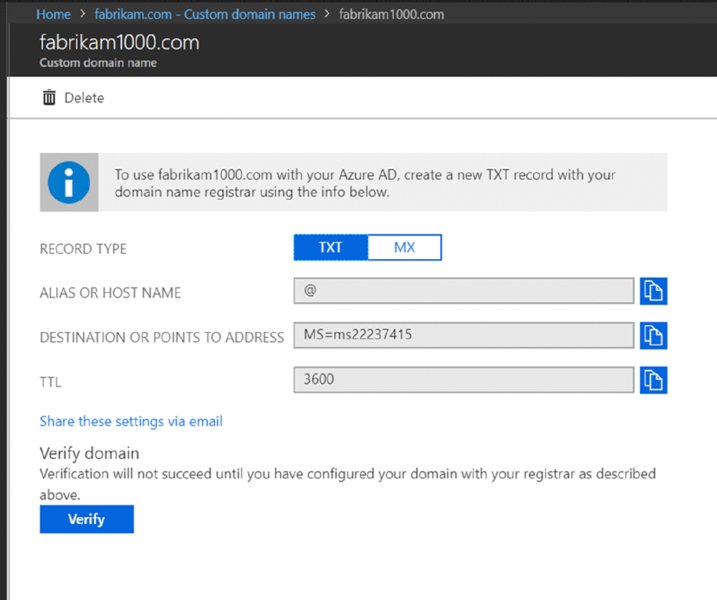
Figure 2.34 The parameters you’ll need to inject into your domain registrar about your custom domain
Then, within the record inside your domain registrar, you’re going to plunk in that same information. You can see I did exactly that in Figure 2.35 using GoDaddy.
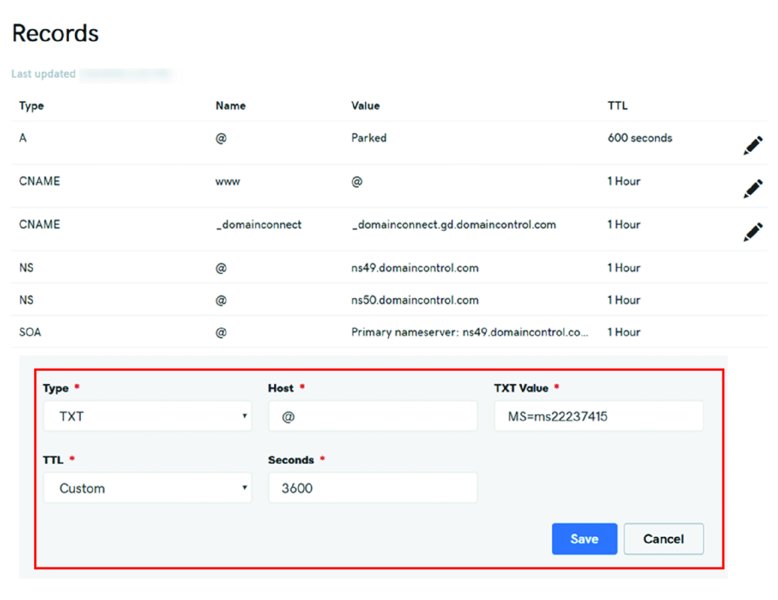
Figure 2.35 Using GoDaddy to place your Azure AD custom information
There are also two entries that should be present so auto-enrollment is perfectly smooth, first time, every time. Without these entries, it might not be perfect. Users may be prompted for a server name during enrollment, which is not optimal and just another thing to remember, explain, and go wrong.
You can see the basic gist of the CNAME adds in two places. The official docs are here:
And a good blog entry on the subject is here:
In short, you’re going to create two entries in your registrar. See the following table for the essentials.
| Type | Host name from your domain (like Fabrikam1000.com) |
Points to | TTL |
| CNAME | EnterpriseEnrollment | EnterpriseEnrollment-s.manage.microsoft.com |
1 hour |
| CNAME | EnterpriseRegistration | EnterpriseRegistration.windows.net |
1 hour |
The final result will look like what’s seen in Figure 2.36.
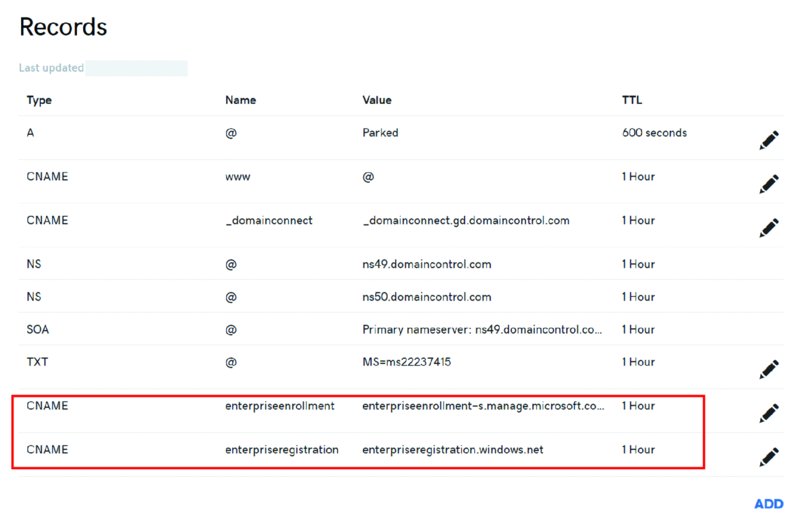
Figure 2.36 Adding the CNAME records for smooth auto-enrollment
Now, here’s a big, huge warning about what not to do.
If you look at the Microsoft documentation, they might say to put EnterpriseEnrollment.company_domain.com into the CNAME host field. This is totally wrong. That’s more than you need to put into the field. Because at GoDaddy (or whatever), you’re already editing the domain itself, say Fabrikam1000.com. So you don’t need to enter the full FQDN of EnterpriseEnrollment.fabirkam1000.com into the CNAME host field; just enter in EnterpriseEnrollment. Likewise for the guidance saying to put in EnterpriseRegistration.company_domain.com. Again, wrong. Just put EnterpriseRegistration into the CNAME host field. Not understanding this cost me many hours the first time I set this up.
You might need to wait a few minutes before this propagates, but I found it took effect right away once I got it right. Then you’re ready to test.
Going in reverse order, you’ll first want to run the CNAME tests first.
This is found in the Intune portal ➢ Device enrollment ➢ Windows enrollment ➢ CNAME Validation as seen in Figure 2.37.
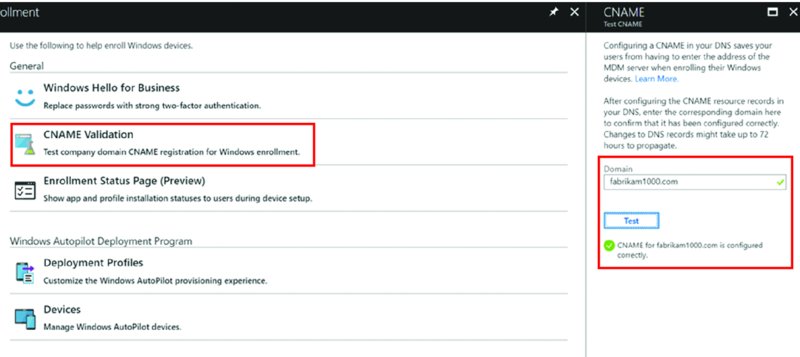
Figure 2.37 Testing the CNAME before continuing
Back in Azure AD ➢ “Custom domain names” and then your domain, like Fabrikam1000.com, click the Verify button (not shown). In Figure 2.38 (left), you should see “Verification succeeded” but Primary Domain is set to No. Simply click on Make Primary and you’ll get what’s seen in Figure 2.38 (right).

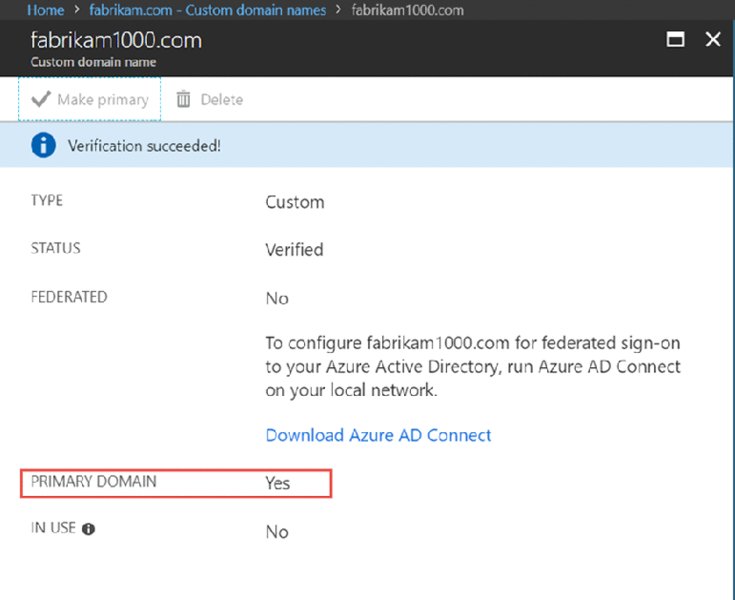
Figure 2.38 The goal is to validate the domain first (left). Then change the default primary domain to the custom domain (right).
Now when you go to manually enter a new person into Azure AD, the custom domain name (in my case @fabrikam1000.com) will be accepted into the person’s username as seen in Figure 2.39. Feel free to add a new user like Anthony Kissel ([email protected]) as also seen in Figure 2.39.
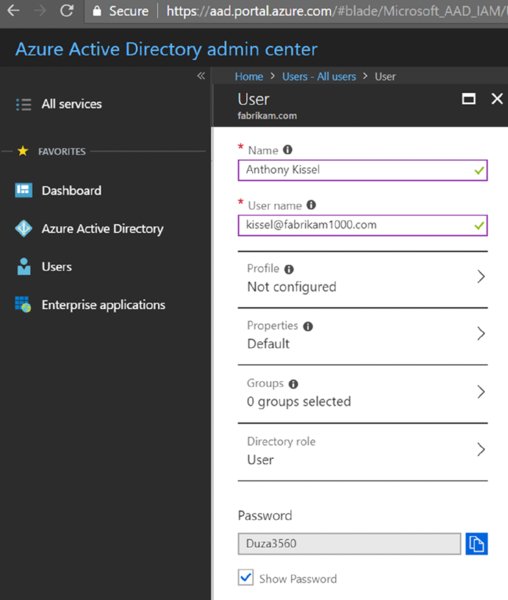
Figure 2.39 The user name field will not permit you to add a domain you don’t own. You’ll see the check box light up green if you have correctly made the custom domain.
After saving the user, you’ll see the user list, las seen in Figure 2.40.
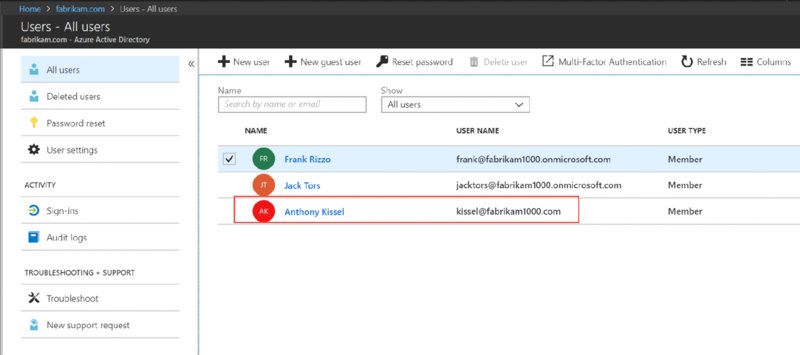
Figure 2.40 You can see your new user with the custom domain name.
Note that Frank and Jack are still using fabrikam1000.onmicrosoft.com email addresses. But Anthony Kissel is now using a spiffy new fabrikam1000.com address!
At this point if you wanted to change [email protected] to [email protected] as well as Jack’s account to use fabrikam1000.com, you certainly could, and that’s what I’ll be doing right now myself. Just click the name, and change their username. It will accept the new custom domain name you’ve picked.
Remember that even though you added the new person to Azure AD, they are still not licensed to use any services. I find it easiest to just type in https://portal.office.com to jump to the place user licenses are configured. Then click Users ➢ Active Users then select a user to edit. ➢ Edit a User, then click on “Licenses and Apps.” You will see something like what’s seen in Figure 2.41 (although yours could be different). Then pick a location (like United States), and assign a license to the new person.
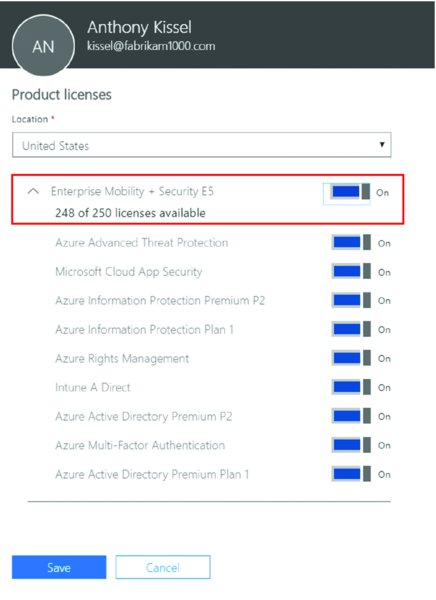
Figure 2.41 Assign your new user a license.
After you do this, I suggest you wait like three minutes. For some reason it can take a while for the license grant to take effect. But then after three minutes, you’re clear for takeoff.
After your small three minute coffee break, retry to enroll a computer to your Azure AD and MDM service. (Remember to avoid the snake pit, and go for the gold, and only Admins can go for the gold.)
I suggest you just open Edge or Windows + R and type in:
ms-device-enrollment:?mode=mdm
Now, this time, enroll as Anthony Kissel, who is now using a fabrikam1000.com account, as seen in Figure 2.42.
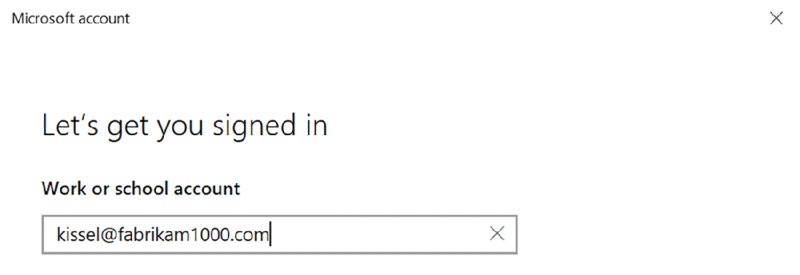
Figure 2.42 Now you can have local Windows admins enroll users using your custom domain name!
Syncing Your On-Prem AD to Azure AD Automatically
If you’re already in the Office 365 club and have an on-prem AD as well, chances are you know about this tool I’m about to talk about. The goal is simple: If you’ve got a zillion on-prem users in on-prem AD, how do you auto-generate accounts for them in Azure AD (so you can do stuff to them, like settings management or offer them Office 365, and so on)?
Simple: Use Azure AD Connect to perform the synchronization.
And know the health/status of these syncs if things go wrong.
Azure AD Connect
Again, the tool you want to find is called Azure AD Connect.
There have been a lot of iterations of this tool, with several versions and name changes. But this is it, this is the tool now: Azure AD Connect. Said another way, if you have or had the old DirSync or Azure AD Sync…those tools are toast, and it’s now only Azure AD Connect. The good news is that if you had these old tools, there are upgrade options from them to Azure AD Connect.
The basics of the tool can be found at https://docs.microsoft.com/en-us/azure/active-directory/connect/active-directory-aadconnect, including advice for those who are upgrading from one of the older tools.
In this example, I’m going to assume you have a single on-prem domain, named Fabrikam.com (as I recommended in the opening pages of this book). If you have something more complex in real life, that’s fine; you can use the aforementioned URL to find your scenario and give it a go.
Do not start out by downloading the Azure AD Connect tool. No. Don’t. Don’t start there. Instead, inside your on-prem AD, run the Active Directory Domains and Trusts tool. Then right-click over the root node and select Properties. Then in the UPN Suffixes tab, add the name of your (now verified) Azure AD domain. In Figure 2.43, I added fabrikam1000.com and clicked OK.
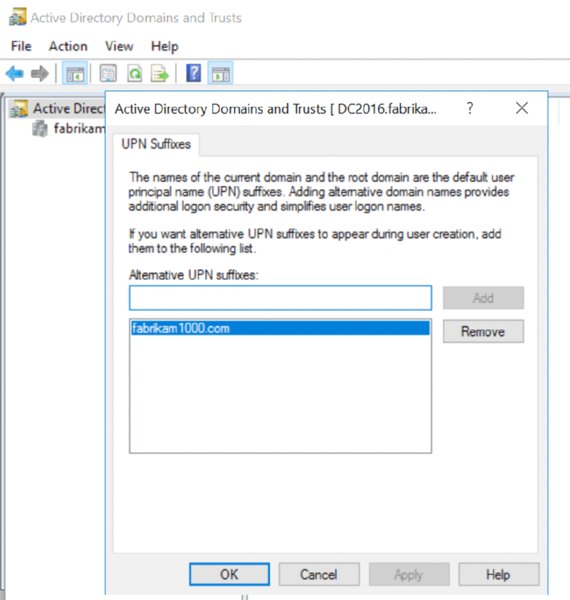
Figure 2.43 You need to add the name of your verified Azure AD domain here in on-prem AD Domains and Trusts. It took me eight hours to figure this out, and I could find no documentation on this. So, I hope this step saves you those eight hours.
Alternatively, you could have added your onmicrosoft.com name, like fabrikam1000.onmicrosoft.com. That would work as well, but since I went to the trouble to purchase and verify Fabrikam1000.com, I’m using that.
Next, after adding the UPN suffix, you can now continue by downloading Azure AD Connect and installing it directly upon the DC of your on-prem AD domain. You can use a spare server as well, but for me, and this book, I’m installing it right onto the Domain Controller. The download can be found at http://go.microsoft.com/fwlink/?LinkId=615771.
After you run it, you’ll start out with a welcome screen. The next screen can be seen in Figure 2.44 explaining Express Settings.
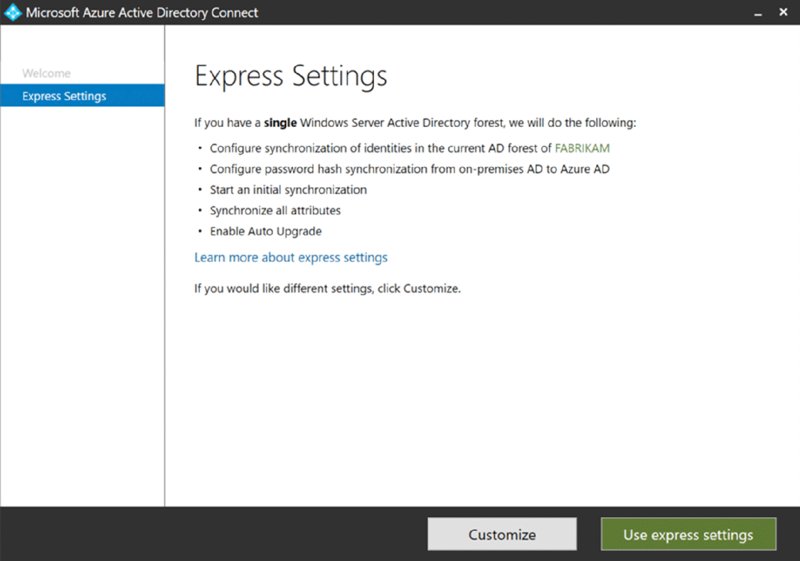
Figure 2.44 Use Express Settings to connect your (simple) on-prem AD to Azure AD.
I would also say that Express settings are good for the book exercises and to get you up and running but might be suboptimal for “real life.” Typically you want to point it toward specific OUs, so you don’t sync all accounts to Azure AD, like your admin and/or service accounts.
That said, so I don’t have to go down every rat hole with the tool, and I can get you on the road with examples quickly, the Express Ssettings should be fine for our use.
On the next screen, you’ll provide your Azure AD creds (as seen in Figure 2.45); this is what you used to set up your E5 trial. Then you’ll provide your on-prem AD creds as seen in Figure 2.46.
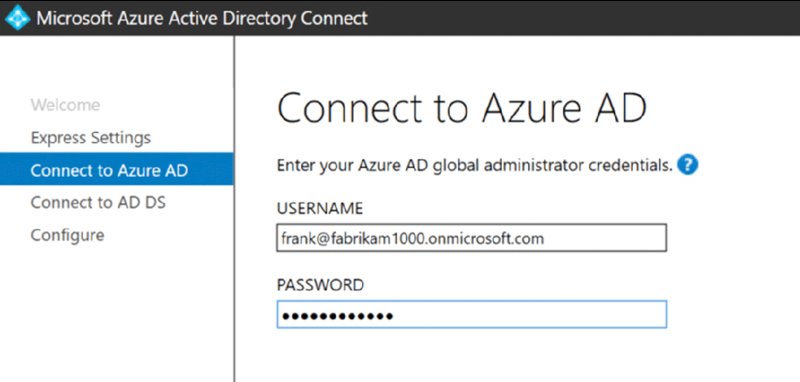
Figure 2.45 Give it the credentials you used when setting up your E5 account.

Figure 2.46 Provide the on-prem AD domain administrator credentials.
Now when you get to the Azure AD sign-in configuration page, you should see the UPN name you added to on-prem AD marry up to the Azure AD domain name as seen in Figure 2.47. Also in Figure 2.47, a small bug in the Azure AD Connect program requires you to select the “Continue without any verified domains” check box, even though you do have a verified domain. It might be fixed by the time you read this.
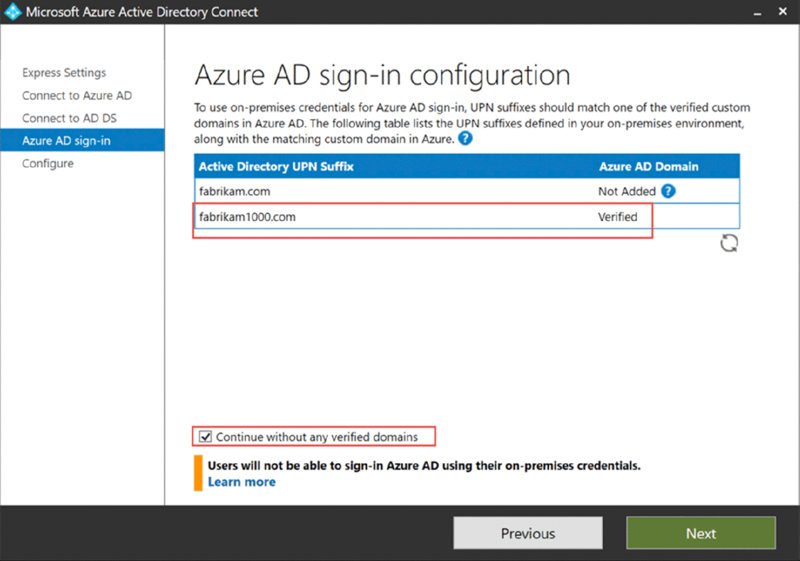
Figure 2.47 Be sure your UPN and Azure names match as Verified.
Click Next and then start the process going. You will be notified when the process is complete, as seen in Figure 2.48.
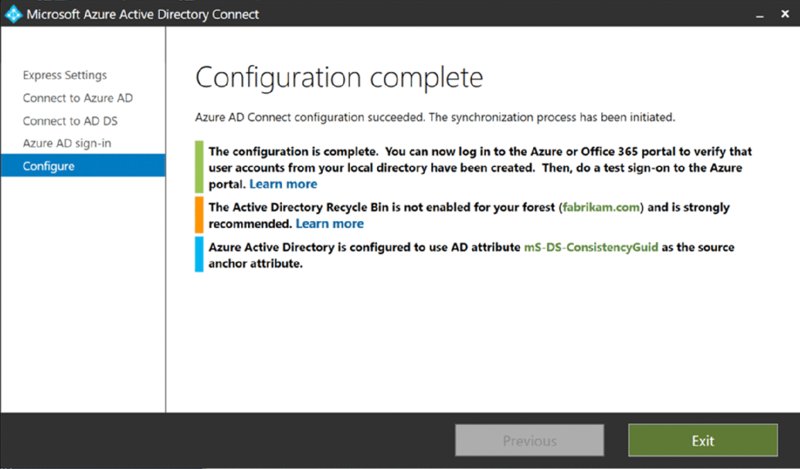
Figure 2.48 The AD Connect sync wizard is complete.
Wait a few minutes. Then, you can refresh the Azure AD Admin Center and see the results. I found that the best way to get results was not to hit the refresh button, circled as seen in Figure 2.49, but rather to refresh the whole page (see the arrow), then click Users then “All users.” And, bingo.
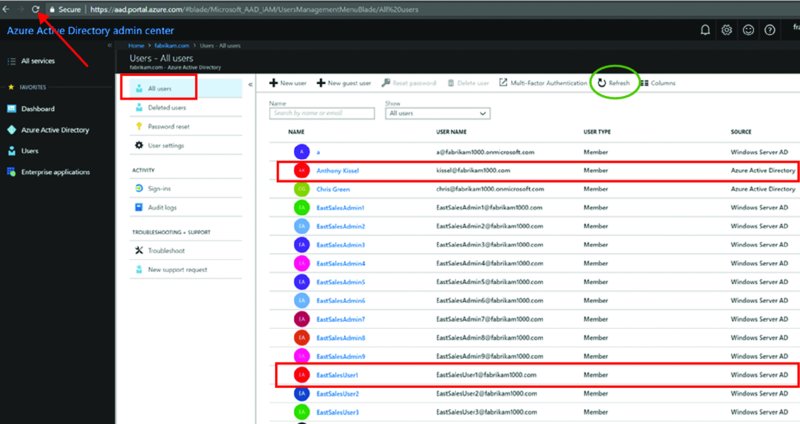
Figure 2.49 Refresh the page to see the newly synced users. Note new users are coming from Windows Server AD.
You’ll also see in Figure 2.49 in the Source column which users were created from which source: Azure Active Directory versus Windows Server AD.
Changing Over the Users’ Suffixes
But, wait a second! After the synchronization occurs, synchronized users from on-prem AD will not have the the nice, pretty fabrikam1000.com as part of their username but instead still have the ugly fabrikam1000.onmicrosoft.com as part of their username.
Why would this be? Because your on-prem AD users need to already be expressly using the suffix, and only then will you see it after synchronization.
To change it, for one user, use Active Directory Users and Computers, find an account, like EastSalesUser1, like what’s seen in Figure 2.50. Then click the Account tab so you can perform two steps:
- Step 1: Actually enter in a name in the “User logon name” field. Usually this will be the name they already use, know, and love.
- Step 2: Pull down and select the custom domain name you specified within Active Directory Domains and Trusts earlier. In my case, it’s
Fabrikam1000.com.

Figure 2.50 Each user needs to have the correct suffix in on-prem AD for it to be synchronized to Azure AD.
You can wait a while, and the changes will naturally occur.
Or you can see the changes happen in real time. To see them, find the Azure AD Connect folder and launch Synchronization Service as seen in Figure 2.51.
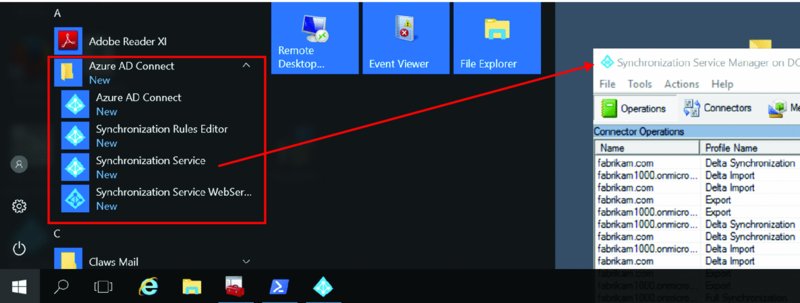
Figure 2.51 Launching the Synchronization Service
Then, the tool itself doesn’t seem to have a big “Click Here to Sync” button. But there’s a PowerShell way to do it.
You should be able to push up just the changes, or deltas. That command is:
Start-AdSyncSyncCycle -policytype delta
If that doesn’t do the trick, wait until the first command finishes and just try pushing it all up again. That command is:
Start-AdSyncSyncCycle -policytype initial
You can see the result of these two commands running in Figure 2.52.

Figure 2.52 Using PowerShell to force an AD to AAD sync
When it’s complete, refresh Azure AD and look again at all users. Carefully notice that the one user you specified now has the right username: [email protected] and not the onmicrosoft.com one any longer, as shown in Figure 2.53.
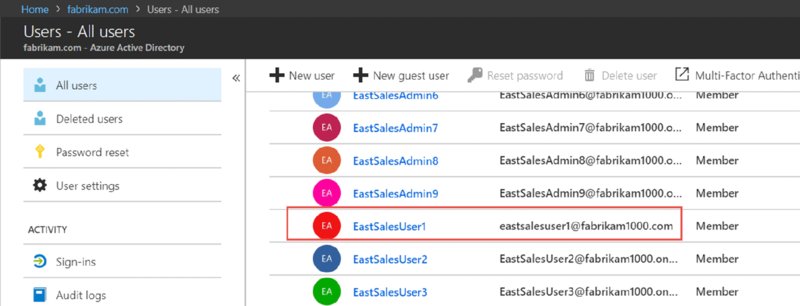
Figure 2.53 See that your one user has successfully come over from on-prem AD to Azure AD.
Mass Updating the UPN for On-Prem AD (Instead of Clicking Through to Each User)
Of course you don’t want to spend your whole weekend updating each and every user’s UPN name by hand just so it synchronizes correctly to Azure AD.
The secret to mass updating all users’ UPN names is quickly revealed in a blog entry here:
If you named your on-prem domain fabrikam.com, and if your custom Azure name is say, Fabrikam.com, then this one-line script ought to populate each user’s UPN attributes in a jiffy. In my case, specifically in the Sales OU.
Get-ADUser -Filter * -SearchBase 'ou=Sales,dc=fabrikam,dc=com'
-Properties userPrincipalName | foreach
{ Set-ADUser $_ -UserPrincipalName
(“{0}@{1}” -f $_.name,“fabrikam1000.com”)}
Then, use the technique earlier to re-sync on-prem AD to Azure AD, and bingo.
Everyone now has the exact right username in Azure AD, populated from on-prem AD, as seen in Figure 2.54.

Figure 2.54 After the on-prem AD PowerShell command, then a sync to Azure AD, all accounts now show your custom domain name.
Deleting Accounts in Azure AD
For fun, inside the Azure AD Admin Center try to click on an existing Windows Server AD user and click Delete user from the menu command bar.
Spoiler alert: you cannot.
The synchronized user is born, lives, and dies inside on-prem AD and is only synchronized here. And you can try this yourself. Create a new user in on-prem Active Directory Users and Computers. Then wait a while, and bingo. You should see it in Azure AD.
And nothing ever, ever goes wrong when syncronizing things. Not ever. Ahem. So, if you do get caught in a jam, I learned a little PowerShell trick that can nuke a record inside Azure AD. The commands are:
Install-Module msonline
Connect-MSolService.
This will prompt you for your Azure admin creds; in our case, [email protected].
Remove-MsolUser -userprincipalname [email protected]
The result can be seen in Figure 2.55.
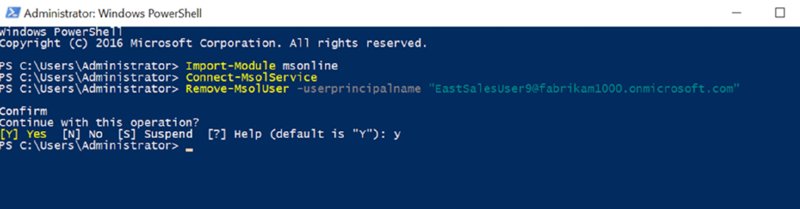
Figure 2.55 How to nuke a user who is syncronized from on-prem AD
Then a refresh of Azure AD will show the user now nuked but remaining in on-prem AD.
A good article on removing objects synchronized from on-prem AD can be found at:
Yep, this URL just ends in the word the.
Get Windows 10 to Automatically Join Azure AD (Hybrid Azure AD-Joined Devices)
Again, All the steps in this section are optional, but over the long run you might want to consider this interesting idea. That is, you can teach your on-prem AD to synchronize all the existing Windows 10 accounts from on-prem AD, and push them up to Azure AD.
Big, big sort-of warning here: While this gets all your Windows 10 computers registered into Azure AD, it doesn’t magically also get them enrolled into your MDM service. Don’t worry: We set that up in Chapter 4 (and, ironically, we use Group Policy to do it).
And, speaking of Group Policy, you can use it to pre-block some Windows 10 machines from being synchronized from on-prem AD to Azure AD. The policy setting is Computer ➢ Policies ➢ Admin Templates ➢ Windows Components ➢ Device Registration ➢ Register domain-joined computers as devices (as seen in Figure 2.56). When you set this policy to Disabled (yes, Disabled), then computers that pick up this policy will ignore the magic trick we’re about to perform.
So, I suggest you pre-deliver the Register domain-joined computers as devices Group Policy setting to the machines you want to exclude before performing the next steps. (And, as another blatant plug, if you wanted to know and verify the setting made it to all your intended machines, you could utilize the paid version of the PolicyPak Group Policy Compliance reporter, which tells you which on-prem machines got which GPOs and settings, so the guesswork is removed…but I digress.)
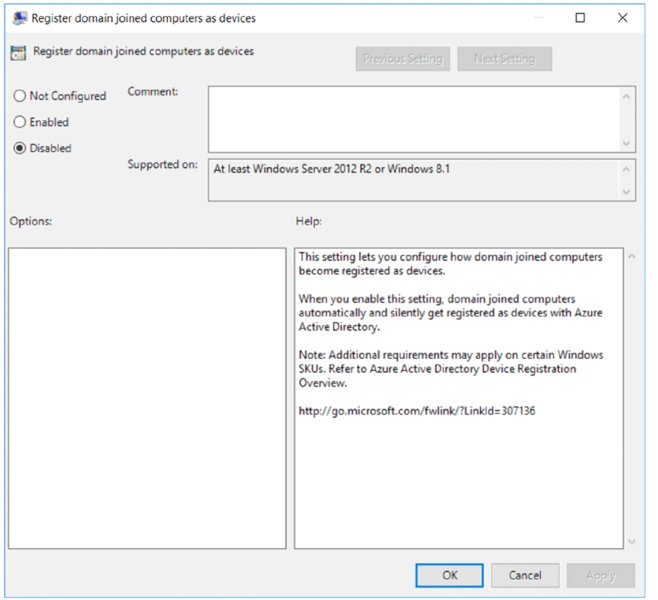
Figure 2.56 Use the Register domain-joined computers as a devices’ policy to prevent Windows 10 computers from being synced from on-prem AD to Azure AD.
Anyway, when you’re ready to start the Vulcan mind-meld between on-prem Azure AD and Azure AD, here is each PowerShell command to type, one on each line. You’ll do this on the machine running the Azure AD Connect program.
In case you want to copy and paste these, instead of typing them in, I’ll tell you where I found them, which is this URL (which I’ll mention again a little later): https://docs.microsoft.com/en-us/azure/active-directory/devices/hybrid-azuread-join-manual-steps.
Here are the PowerShell lines of code:
Import-Module -Name "C:Program FilesMicrosoft Azure Active Directory ConnectAdPrepAdSyncPrep.psm1";
$aadAdminCred = Get-Credential;
Initialize-ADSyncDomainJoinedComputerSync –AdConnectorAccount [email protected] -AzureADCredentials $aadAdminCred;
The result of these PowerShell commands can be seen in Figure 2.57 in the first section. Then, if you want to see that it really took effect, you could run a sort of verification check, which would be the following PowerShell commands (again, these lines are also in the aforementioned URL at Microsoft):
$scp = New-Object System.DirectoryServices.DirectoryEntry;
$scp.Path = "LDAP://CN=62a0ff2e-97b9-4513-943f-0d221bd30080,CN=Device Registration Configuration,CN=Services,CN=Configuration,DC=fabrikam,DC=com";
$scp.Keywords;

Figure 2.57 You need to specifically set up Azure AD to also sync Windows 10 computers.
You can see the result of that in the second block in Figure 2.57, where it spits out some stuff, including my domain name fabrikam1000.onmicrosoft.com!
Now your Windows 10 machines (1607 and later) on your network will automatically get the memo and self-register in Azure…when they’re domain-joined fresh, or existing Windows 10 machines, when they’re rebooted and/or logged into.
And you can see it happen too. After your Windows 10 systems are rebooted, and after some synchronizations happen naturally using Azure AD Connect, you should see new Windows 10 computers pop into Azure AD when you examine all devices, as seen in Figure 2.58 with a W10-1703-PRO-64 computer. If you look at Join Type, it says “Hybrid Azure AD joined.”
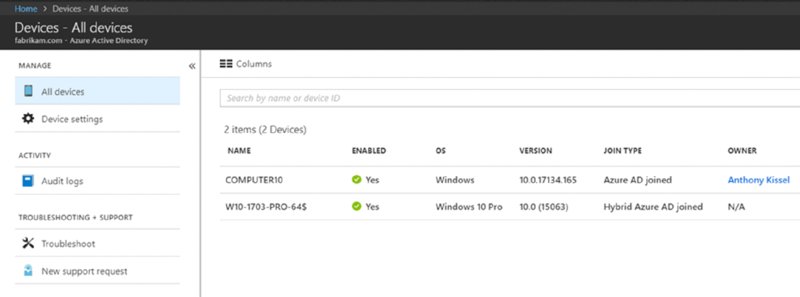
Figure 2.58 How to see Hybrid Azure AD joined machines
Back on the Windows 10 machines, you need to see if they get the signal to magically perform their Azure AD join. When you go to a Windows 10 machine and run the command dsregcmd /status, you might see what I have in Figure 2.59, where it clearly shows AzureADJoined is NO.
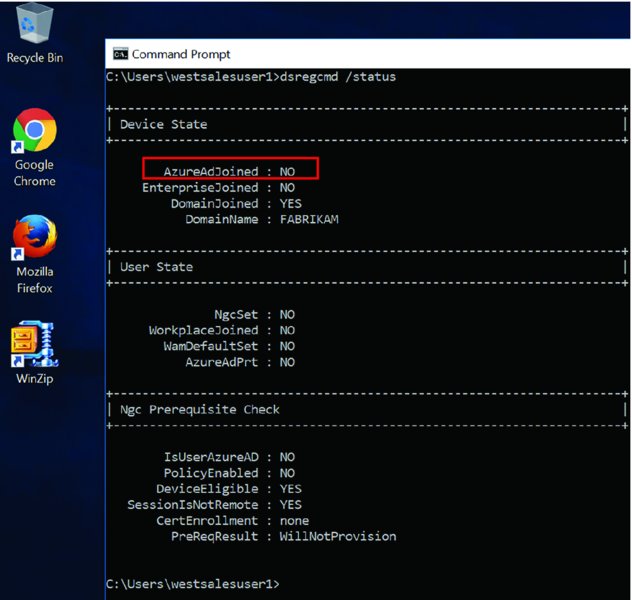
Figure 2.59 Before a machine is automatically Azure AD joined
Then, after some time, the change occurs on the Windows 10 machine.
You can see the change in Figure 2.60 as you keep running and rerunning dsregcmd /status. The command will show you a ton of information you don’t care about. But it’s the first line that counts: AzureADJoined is set to YES as seen in Figure 2.60.
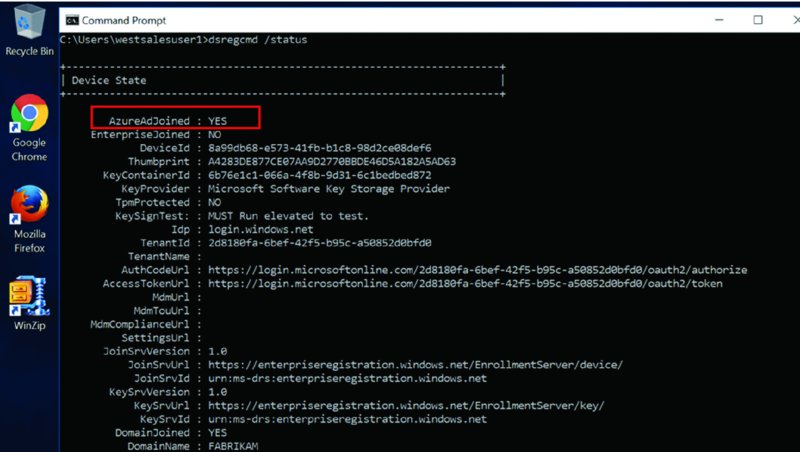
Figure 2.60 After a machine is automatically Azure AD joined
Again, this only happens after the Azure AD sync happens once or twice. If you want to goose it, then see the earlier commands on how to run a delta sync. That worked for me to “rush” things.
Additionally, if you want to see all the computers that are now joined to Azure AD, you can use a few PowerShell commands.
Install-Module msonlineConnect-msolservicethen give Frank’s admin credentials when prompted.Get-MSoLDevice -allwill show you the machines joined in Azure AD.- Or use
Get-MSOLDevice -all | Select displayname, objectidfor a prettier view, like what’s seen in Figure 2.61.
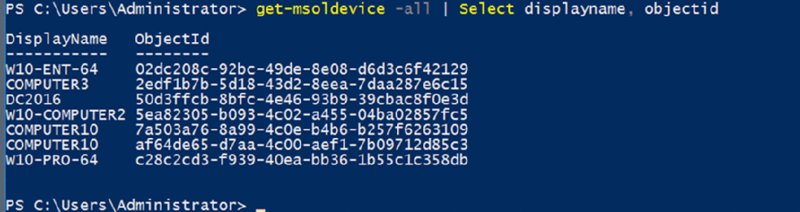
Figure 2.61 You can see computers joined to Azure AD through the get-msoldevice PowerShell cmdlet.
That’s the basics, and that’s how you get machines to be both AD joined and Azure AD joined. Again, that’s got a nifty lingo we call DJ++. You can drop that acronym at a cocktail party now that you’re badass and got it set up.
That said, there is more information, including all sorts of additional magic tricks like the following:
- Dealing with multiple forests syncing to Azure AD
- Using older 2008 Domain Controllers instead of Server 2016 and later
- Including Windows 7 machines into Azure AD
Then that guidance (again) can be found at:
https://docs.microsoft.com/en-us/azure/active-directory/devices/hybrid-azuread-join-manual-steps
Azure AD Connect Health
If you’d like, you can also do nice, ongoing monitoring of the synchronization. This is beyond the scope of the book, but if you wanted to check it out, it’s included in the Azure AD subscription.
Here are three good links on the subject:
https://docs.microsoft.com/en-us/azure/active-directory/connect/active-directory-aadconnect
And
And finally, the most important one:
Final Thoughts
Okay. You did it. Let’s recap all you did:
- You got your Azure AD account, either stand-alone or with Enterprise Mobility + Security or with Microsoft 365.
- You got your MDM service and married it to Azure AD.
- You set up all the pieces to enable auto-enrollment to MDM.
- You went down into the snake pit with Workplace join and learned it wasn’t really MDM.
- You actually enrolled some machines with MDM, the long manual method or with deep links.
- And optionally, you…
- Got out of the “
onmicrosoft.com” name business and into custom names. - Synchronized on-prem AD to Azure AD.
- Got your Windows 10 machines to automatically do a DJ++ join.
- Got out of the “
I think it’s fair to say you did a lot in this chapter. And we’re just getting started.
Tweet me @jeremymoskowitz with the hashtag #mdmbook and tell me what you got out of this chapter. I love getting your tweets !