
Chapter 1
Unveiling the iPad
IN THIS CHAPTER
![]() Looking at the big picture
Looking at the big picture
![]() Touring the outside of the iPad
Touring the outside of the iPad
![]() Checking out the iPad’s apps
Checking out the iPad’s apps
Congratulations! You’ve selected one of the most incredible handheld devices we’ve ever seen. The iPad is a killer audio and video player, a great e-book reader, a powerful Internet communications device, a superb handheld gaming device, a still and video camera, and a platform for more than 4 million apps at the time this was written — and probably more by the time you read this.
 Following are all the iPad models covered in this book — because they all run iPadOS!
- iPad: iPad Air 2 (2014), iPad 9.7-inch (2017), iPad 10.2-inch (2019)
- iPad mini: iPad mini 4 (2015), iPad mini (2019)
- iPad Pro: iPad Pro 12.9-inch (2015), iPad Pro 9.7-inch (2016), iPad Pro 2nd generation 12.9-inch (2017), iPad Pro 10.5-inch (2017), iPad Pro 12.9-inch 3rd generation (2018), and iPad Pro 11-inch (2019)
Note that because the five original full-sized iPads and the first three iPad mini models do not support iPadOS, they're not covered in this book. If you’re the owner of one of those models, you can still find a lot of handy information here, but some things might look or work differently. You might want to rummage around for a previous edition of this book.
Moving right along, in this chapter, we offer a gentle introduction to all the pieces that make up your iPad, plus overviews of its revolutionary hardware and software features.
Exploring the iPad’s Big Picture
The iPad has many best-of-class features, but perhaps its most notable feature is that it doesn't come with a physical keyboard or stylus. You can get them as options (Apple’s first-generation $99 Apple Pencil, the second-generation $129 Apple Pencil, and the Smart Keyboard, which starts at $159), but they aren’t required to use your iPad. Instead, every iPad requires a pointing device you’re intimately familiar with: your finger.
Every iPad ever built has a beautiful Retina screen, easily the most beautiful screen we’ve ever seen on a tablet.
 The screen rotates — that is, unless the screen orientation is locked. We tell you more about this feature shortly.
And we love the iPad’s plethora of built-in sensors. It has an accelerometer that detects when you rotate the device from portrait to landscape mode — and instantly adjusts what’s on the display.
A light sensor adjusts the display’s brightness in response to the current ambient lighting conditions. Then there’s a three-axis gyro that works with the accelerometer and built-in compass. And most models — since the iPad Air 2, iPad mini 4, 9.7-inch iPad, and all iPad Pro models — also include Apple’s Touch ID sensor or Face ID. These features let you unlock your iPad with your fingerprint (Touch ID) or just by looking at it (Face ID)! We talk about both in detail later.
Last, but definitely not least, all iPads since the third generation include Siri, a voice-controlled personal assistant happy to do almost anything you ask (as long as your iPad is running iOS 6 or later).
In the following sections, we’re not just marveling about the wonderful screen and sensors. Now it’s time to take a brief look at the rest of the iPad’s features, broken down by product category.
The iPad as a media player
We agree with the late Steve Jobs on this one: The iPad is magical — and without a doubt the best iPod (that is, media player) Apple has ever produced. You can enjoy all your existing media — music, audiobooks, audio and video podcasts, iTunes U courses, music videos, television shows, and movies, all on the gorgeous Retina display.
If you can get a media file — be it video, audio, or whatever — on your iPad, you can watch or listen to it on your iPad. And, of course, you can always buy or rent content on your iPad in the iTunes Store. You can also watch streaming content from Netflix, Hulu, Apple’s own Apple TV+ streaming service, and a host of others through apps.
The iPad as an Internet communications device
But wait — there’s more! Not only is the iPad a stellar media player, it’s also a full-featured Internet communications device with — we’re about to drop some industry jargon on you — an email client that’s compatible with most POP and IMAP mail services, plus it has support for Microsoft Exchange ActiveSync. (For more on this topic, see Chapter 5.) Also onboard is Safari, a world-class web browser that makes web surfing fun and easy on the eyes. Chapter 4 explains how to surf the web using Safari.
Another cool Internet feature is Maps, a killer mapping app that’s improved in iPadOS. By using GPS or triangulation (Wi-Fi–only models), the iPad can determine your location, let you view maps and satellite imagery, and obtain driving directions and traffic information regardless of where you happen to be. You can also find businesses (such as gas stations, pizza restaurants, hospitals, and Apple Stores) with just a few taps.
Maps is useful over Wi-Fi but more useful and more accurate on cellular iPads.
We dare say that the Internet experience on an iPad is far superior to the Internet experience on any other handheld device.
The iPad as an e-book reader
Download the free Books app if you don’t already have it, or any of the excellent (and free) third-party e-book readers such as the Kindle app from Amazon, and you’ll discover a new way of finding and reading books. The Apple Book Store and News app (covered in Chapter 10) are chock-full of good reading at prices that are lower than what you’d pay for a printed copy. Better still, when you read an e-book, you’re helping the environment and saving trees. Furthermore, some (if not many) titles include audio, video, or graphical content not available in the printed editions. Plus, a great number of good books are free. And best of all, you can carry your entire library in one hand. If you’ve never read a book on your iPad, give it a try. We think you’ll like (or love) it.
The iPad as a multimedia powerhouse
The Retina display on all iPads since the third generation makes the experience even more extraordinary. You can use AirPlay to send your video out to Apple TV, too, and your iPad turns into a superb device for watching video on a TV, with support for output resolutions up to 4K.
And iPads include a pair of cameras and the FaceTime video-chatting app, taking the iPad’s multimedia acumen to new heights. Chapter 8 gets you started with FaceTime.
The iPad as a platform for third-party apps
At the time of this writing, there were more than 4 million apps in the App Store, with hundreds of billions of downloads to date in categories such as games, business, education, entertainment, healthcare and fitness, music, photography, productivity, travel, and sports. The cool thing is that most of them, even ones designed for the iPhone, also run flawlessly on the iPad. And more than a million are designed specifically for the iPad’s larger screen.
Chapter 10 helps you fill your iPad with all the cool apps your heart desires. We share our favorite free and for-pay apps in Chapters 18 and 19, respectively.
The iPad as a multitasking content production device
Apple has made the iPad more and more of a device for creating content as opposed to only consuming it. Writing, taking and editing pictures, recording and editing music or videos, and even putting together full-scale presentations — all of these tasks are even easier with iPadOS, especially on the iPad Pro. Split-screen views, support for the Files app, and the fastest processors in mobile computers have made the iPad a beast of a machine. We talk more about multitasking in Chapter 13.
What do you need to use an iPad?
To use your iPad, only a few simple things are required. Here’s a list of everything you need:
- An iPad
- An Apple ID (assuming that you want to acquire content such as apps, TV shows and movies, music, books, and podcasts, which you almost certainly do)
- Internet access — broadband wireless Internet access is recommended
Several years ago, we said you needed a computer with iTunes to sync your iPad. That’s no longer true; these days you can activate, set up, update, back up, and restore an iPad wirelessly without ever introducing it to a computer.
If you do decide to introduce your iPad to your computer (and we think you should), you need one of the following for syncing (which we discuss at length in Chapter 3):
- A Mac with a USB 2.0, 3.0, or C port, macOS version 10.8.5 or later, and iTunes 12.7 or later (for macOS Mojave and earlier) or Finder (macOS Catalina)
- A PC with a USB 2.0 or 3.0 port, Windows 7 or later, and iTunes 12.7 or later
iTunes is a free download, available at www.itunes.com/download.
Touring the iPad Exterior
The iPad is a harmonious combination of hardware and software. In the following sections, we take a brief look at the hardware — what’s on the outside.
On the top
On the top of your iPad, you find the sleep/wake button, headphone jack, and microphone, as shown in Figure 1-1. iPad Pro models have no headphone jack but do have two of their four speakers on top:
-
Sleep/wake button: This button is used to put your iPad’s screen to sleep or to wake it up. It’s also how you turn your iPad on or off. To put it to sleep or wake it up, just press the button. To turn it on or off, press and hold down the button for a few seconds.
Your iPad’s battery will run down faster when your iPad is awake, so we suggest that you make a habit of putting it to sleep when you’re not using it.To wake it up, merely press the sleep/wake button again, or press the Home button on the front of the device (as described in a moment), or on iPad Pro, tap the screen.
If you use an Apple Smart Cover or Smart Case (or any third-party case that uses the Smart Cover mechanism), you can just open the cover to wake your iPad and close the cover to put it to sleep.
In Chapter 15, you can find out how to make your iPad go to sleep automatically after a period of inactivity.
-
Headphone jack: This jack lets you plug in a headset. You can use pretty much any headphone or headset that plugs into a 3.5-mm stereo headphone jack. Apple no longer makes headphones with a headphone jack, but it does sell EarPods ($29), which connect via a Lightning connector, and AirPods (starting at $159), which connect via Bluetooth.
Throughout this book, we use the words headphones, earphones, and headset interchangeably. Strictly speaking, a headset includes a microphone so that you can talk (or record) as well as listen; headphones and earphones are for listening only. Either type works with your iPad, as do most wireless Bluetooth headsets such as Apple’s AirPods and newer headsets with Lightning connectors.
- Microphone: The tiny dot — or two dots on some iPad Pro models — in the middle of the top is a pretty good microphone. (Hint: You’ll sound better if you use a headset — any headset.)
- Speakers (iPad Pro only): iPad Pro has four speaker vents, two on the top and two on the bottom.

FIGURE 1-1: iPad Pro models have speaker ports on the top, as well as the sleep/wake button. Some models have a headphone jack, too.
On the bottom
On the bottom of your iPad are the speakers (two of the four speakers on iPad Pro models) and Lightning connector or USB-C connector, as shown in Figure 1-2:
- Speakers: The speakers plays audio — music or video soundtracks — if you don't have a headset plugged in.
-
Lightning or USB-C connector: This connector has three purposes:
- Recharge your iPad’s battery: Simply connect one end of the included cable to the iPad’s Lightning or USB-C port and the other end to a USB or USB-C port, where appropriate.
- Synchronize your iPad: Connect one end of the same cable to the Lightning or USB-C connector and the other end to a USB or USB-C port on your Mac or PC.
- Connect your iPad to a camera or television: Make sure to use an adapter that works with the Lightning connector or the USB-C connector, depending on your iPad.
If you connect your iPad to a USB port and get a Not Charging message, the USB port doesn't have enough power. Generally speaking, USB ports built into recent Macs and PCs, on powered hubs, or on the USB charging brick that came with your iPad will charge your iPad properly. Any USB data port connected to your Mac or PC will allow you to sync your iPad, whether or not it's charging.

FIGURE 1-2: All full-size iPad models have speaker ports and a connection port on the bottom.
On the right side of your iPad are the volume up and volume down buttons, as shown in Figure 1-3. Press the upper button to increase the volume; press the lower button to decreases the volume.
The Camera app uses either volume button as an alternative shutter release button to the on-screen shutter release button. Press any of them to shoot a picture or start and stop video recording.

FIGURE 1-3: The right side of the iPad features volume buttons, and some feature a SIM tray, too.
On older iPads with cellular capabilities, you’ll find the SIM card tray. On newer iPads and iPad Pro with cellular capabilities, the SIM card tray is on the right side. Wi-Fi-only models do not have a SIM card tray.
Apple used to include a SIM card eject tool with iPads and iPhones. If you don’t have one lying around, you can straighten a paper clip and use it as a faux SIM card eject tool.
On the front and back
On the front and back of your iPad, you find the following (labeled in Figure 1-4):
- Touchscreen: You find out how to use the iPad’s gorgeous high-resolution color touchscreen in Chapter 2. All we have to say here is: Try not to drool all over it.
- Home button, Touch ID sensor, or Face ID: No matter what you’re doing, you can press the Home button at any time to display the Home screen, as shown in Figure 1-4. The Home button also doubles as a Touch ID sensor on most iPads, so you can use your fingerprint (or a passcode) to unlock your phone and authenticate purchases. Recent iPad Pro models do not have a Home button and rely on Face ID, not Touch ID. For iPads with Face ID, swipe up from the bottom of the screen to go back to the Home screen.
- Front (FaceTime) camera: The front camera is serviceable and delivers decent-enough video for video chats and such, but it’s not particularly good for taking still photos. That is, unless your iPad is a Pro model, which offers 7-megapixel front camera photos (versus 1.2 megapixels on all other models).
- App icons: Each of the icons shown on the screen (see Figure 1-4) launches an included iPad app. You read more about these apps later in this chapter and throughout the rest of the book.
- Rear camera: The camera on the back, just below the sleep/wake button, is better than the one in front. Pro models have a 12-megapixel rear camera with an f/1.8 aperture; other iPads have an 8-megapixel rear camera with f/2.4 apertures. All iPads can record HD video at 1080p; Pro models can record video at up to 4K.
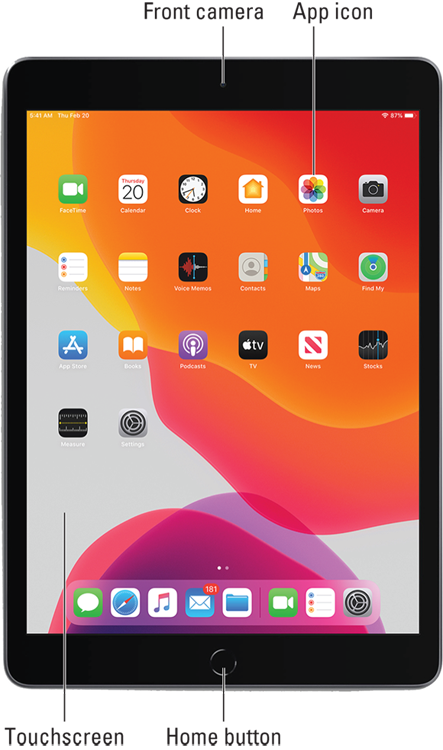
FIGURE 1-4: The front of the iPad 10.2-inch: a study in elegant simplicity.
Status bar
The status bar, which is at the top of the screen, displays tiny icons that provide a variety of information about the current state of your iPad:
 Airplane mode: Airplane mode should be enabled when you fly. It turns off all wireless features of your iPad — the cellular, 5G, 4G, LTE, 3G, GPRS, and EDGE networks; Wi-Fi; and Bluetooth — so you can enjoy music, video, games, photos, or any app that doesn’t require an Internet connection while you’re in the air.
Tap the Settings app and then tap the airplane mode switch on (so green is displayed). The icon shown in the margin appears on the left side of your status bar when airplane mode is enabled. You can also pull Control Center down from the top-right corner and tap the airplane mode icon to turn airplane mode on (the icon turns orange).
Disable airplane mode when the plane is at the gate before takeoff or after landing so you can send or receive email and iMessages.There’s no need to enable airplane mode on flights that offer onboard Wi-Fi unless you have a cellular-equipped iPad. On such flights, it’s perfectly safe to use your iPad’s Wi-Fi while you’re in the air (but not until the captain says so).
To use Wi-Fi in flight with a cellular iPad, first enable airplane mode and then reenable Wi-Fi.
 Wi-Fi: If you see the Wi-Fi icon, your iPad is connected to the Internet over a Wi-Fi network. The more semicircular lines that are lit (up to three), the stronger the Wi-Fi signal. If your iPad has only one or two semicircles of Wi-Fi strength, try moving around a bit. If you don’t see the Wi-Fi icon on the status bar, Internet access with Wi-Fi is not currently available.
 Personal hotspot: You see this icon when you’re sharing your Internet connection with computers or other devices over Wi-Fi. Personal hotspot is available for every iPad except the iPad 2 but may not be available in all areas or from all carriers. Additional fees may apply. Contact your wireless carrier for more information.
 Syncing: This icon appears on the status bar when your iPad is syncing with iTunes on your Mac or PC.
 Activity: This icon tells you that some network or other activity is occurring, such as over-the-air synchronization, the sending or receiving of email, or the loading of a web page. Some third-party apps use this icon to indicate network or other activity.
 VPN: This icon shows that you’re currently connected to a virtual private network (VPN).
 Lock: This icon tells you when your iPad is locked. See Chapter 2 for information on locking and unlocking your iPad.
 Screen orientation lock: This icon appears when the screen orientation lock is engaged.
 Location Services: This icon appears when an app (such as Maps; see Chapter 6 for more about the Maps app) is using Location Services (GPS) to establish the location of your iPad.
 Do not disturb: This icon appears whenever do not disturb is enabled, silencing incoming FaceTime calls and alerts. See Chapter 15 for details on do not disturb.
 Play: This icon informs you that a song is currently playing. You find out more about playing songs in Chapter 7.
 Bluetooth: This icon indicates the current state of your iPad’s Bluetooth connection. If you see this icon on the status bar, Bluetooth is on and a device (such as a wireless headset or keyboard) is connected. If the icon is gray, Bluetooth is turned on but no device is connected. If the icon is white, Bluetooth is on and one (or more) devices are connected. If you don’t see a Bluetooth icon, Bluetooth is turned off. Chapter 15 goes into more detail about Bluetooth.
 Bluetooth battery: This icon displays the battery level of supported Bluetooth devices (while paired). Only certain devices — mostly headsets and speakers — support this feature. If you see this icon in your status bar, it’s telling you the approximate battery level of whichever supported device is currently paired with your iPad.
 Battery: This icon shows the level of your battery’s charge and also indicates when your device is connected to a power source. It’s completely filled when your device isn’t connected to a power source and your battery is fully charged. It then empties as your battery becomes depleted. You see an on-screen message when the charge drops to 20 percent or below, and another when it reaches 10 percent.
Discovering the Delectable Home Screen and Dock Icons
The iPad Home screen and dock display as many as 45 icons, with each icon representing a different built-in app or function. Because the rest of the book covers each and every one of these babies in full and loving detail, we provide brief descriptions here.
To get to your Home screen, tap the Home button or swipe up from the bottom of your display. If your iPad is asleep when you tap, the unlock screen appears. After your iPad is unlocked, you see whichever page was on the screen when it went to sleep. If that happens to have been the Home screen, you’re golden. If it wasn’t, merely tap the Home button or swipe up from the bottom of the screen again to summon your iPad’s Home screen.
In the following sections, we tell you briefly about the icons preloaded on your iPad’s first Home screen page, as well as the icons you find on the dock that are always accessible from each Home screen.
Home is where the screen is
If you haven’t rearranged your icons, you see the following apps on the first Home screen, starting at the top left:
- FaceTime: Use this app to participate in FaceTime video chats, as you discover in Chapter 8.
- Calendar: No matter what calendar program you prefer on your Mac or PC (as long as it’s iCal, Calendar, Microsoft Entourage, or Microsoft Outlook or online calendars such as Google or iCloud), you can synchronize events and alerts between your computer and your iPad. Create an event on one device, and the event is automatically synchronized with the other device the next time the two devices are connected. Neat stuff. You learn more about Calendar in Chapter 11.
- Clock: The Clock app includes alarm clocks, timers, and more. You hear more about this nifty app in Chapter 12.
- Home: The Home app is where you access and control your HomeKit smart home devices. Almost like a sci-fi movie, you can control lights, appliances, and surveillance cameras from an app or with your voice using Siri. You’ll read much more about this great app, but you have to wait until Chapter 12.
- Photos: This app is the iPad’s terrific photo manager, which just keeps getting better. It lets you view and edit pictures in your library as well as from a camera or SD card (using the optional camera connection kit). You can zoom in or out, create slideshows, email photos to friends, crop, do a bit of image editing, and much more. And it’s where you’ll find the For You section, with photos intelligently grouped by Apple machine learning into relevant time and place groupings. To get started, see Chapter 9.
- Camera: You use this app to shoot pictures or videos with your iPad’s front- or rear-facing camera. You find out more in Chapters 8 (videos) and 9 (camera).
- Reminders: With Reminders, you can, well, remind yourself to do something. If you ask Siri to remind you, it’s added as a reminder in this app, too. You can even do location- and time-based reminders, which will be synced to your other Apple devices. Learn more about Reminders in Chapter 12.
- Notes: This program enables you to type notes while you’re out and about. You can send notes to yourself or to anyone else through the Sharing pane, or you can just save them on your iPad until you need them. For help using Notes, flip to Chapter 13.
- Voice Memos: The Voice Memos app is a great way for you to talk to yourself. Have a thought for the next best-selling novel? Did inspiration just strike for your presentation at next week's meeting? Record anything you want in this app quickly and easily. For more about the Voice Memos app, turn to Chapter 12.
- Contacts: This handy little app contains information about the people you know. Like the Calendar app, it synchronizes with the Contacts app on your Mac or PC (as long as you keep your contacts in Address Book, Contacts, Microsoft Entourage, Microsoft Outlook, or Google). If you create or edit a contact on one device, the contact is automatically synchronized with the other device the next time your devices are connected. Chapter 11 explains how to use the Calendar and Contacts apps.
- Maps: View street maps, satellite imagery, transit information, and more for locations around the globe. Or ask for directions, traffic conditions, or even the location of a nearby pizza joint. We show you more about Maps in Chapter 6.
- Find My: If your iPad (or iPhone, AirPods, or Mac) goes missing, use this app to determine its last known location. We look more closely at Find My in Chapter 15.
- iTunes Store: Tap this puppy to purchase music, movies, TV shows, audiobooks, and more. You find more info about iTunes (and the Music app) in Chapter 7.
- App Store: This icon enables you to connect to and search the App Store for iPad apps you can purchase or download for free. Chapter 10 is your guide to buying and using apps from the App Store.
- Books: You use Books to read books, which you can buy in the Book Store. We love the Books app and discuss it more deeply in Chapter 7.
- Podcasts: Use the Podcasts app to listen to your favorite podcasts, which you download and subscribe to in the Podcast app itself. Learn more about the Podcasts app in Chapter 8.
- TV: This handy app is the repository for your movies, TV shows, and music videos. You add videos via iTunes on your Mac or PC or by purchasing them directly in the TV app. Check out Chapter 8 to find out more.
- News: This app is where you can find news from magazines, newspapers, and websites, and subscribe to Apple News+ for access to paid content from many mainstream sources. You read more about News in Chapter 7.
- Stocks: Long a staple on the iPhone, the Stocks app is now on the iPad too. Track AAPL and any other stock you want to follow using the app's clean and informative interface. You can also get news articles about the companies you're following.
- Measure: Use this app and the camera in your iPad to measure distances in the real world. Seriously, try it! Turn to Chapter 12 for more on the Measure app.
- Settings: Tap this icon to change settings for your iPad and its apps. With so many settings in the Settings app, you’ll be happy to hear that Chapter 15 is dedicated exclusively to Settings.
Sittin’ on the dock of the iPad
At the bottom of the iPad screen are the final five icons, sitting on the left side of a special shelflike area called the dock.
Suggested apps appear on the right side of the dock. These are apps you’ve used recently or apps that are open on your iPhone or Mac. In Figure 1-4, for example, the three suggested apps (from left to right) are App Store, Settings, and iTunes Store.
The icons on your dock are special because they are available on every Home screen.
By default, the five icons on the left side of the dividing line on the dock are as follows:
- Messages: The Messages app is a unified messaging platform for all Apple devices. You can exchange free, unlimited text or multimedia messages with any other device running iOS 5 or later or Mac OS X Mountain Lion or later. Find out more about Messages in Chapter 6.
- Safari: Safari is your web browser. If you’re an iPhone or Mac user, you know that already. If you’re a Windows user who hasn’t discovered the wonderful Safari for Windows, think Internet Explorer or Edge on steroids. Chapter 4 shows you how to start using Safari on your iPad.
- Music: This icon unleashes all the power of an iPod right on your iPad so you can listen to music or podcasts. You discover how the Music app works in Chapter 7.
- Mail: This app lets you send and receive email with most POP3 and IMAP email systems and, if you work for a company that grants permission, Microsoft Exchange. Chapter 5 helps you start emailing from your iPad everyone you know.
- Files: This app (if enabled in Settings ⇒ iCloud ⇒ iCloud Drive) contains all documents you’ve saved to your iCloud Drive. Apple apps as well as many third-party apps know how to use it.
Feel free to add icons to or remove icons from the left side of the dock until it feels right to you. You can even remove the default apps Apple included. To add or remove dock icons, press and hold down on any icon and tap Rearrange Apps on the menu that appears. Your app icons will begin wiggling. Tap and drag a wiggling app icon to move it to or from the dock. When you’re satisfied, press the Home button to exit wiggly mode and save your arrangement.
You can add many app icons to the dock. The first 12 will line up in the dock as you add them. If you add a 13th app to the dock, the number of recent and suggested apps on the right side of the dock will be limited to 2. And if you want still more apps on the dock, go to Settings ⇒ General ⇒ Multitasking & Dock and turn off Show Suggested and Recent Apps by tapping the toggle and turning it from green to white. You can now add up to 15 apps to the dock.
Two last points:
-
Notifications keep getting better with the updated iPadOS. We wanted to mention them even though they don’t have an icon of their own. You hear much more about notifications in Chapter 12. To see them now (we know you can’t wait), swipe from the top of your screen to the middle to make them appear. Then swipe from the bottom to put them away again.
This gesture works anytime — even when your iPad is locked. If it’s locked, you’ll see your most recent notifications when you swipe down. Then swipe up to see your older notifications. - We’d be remiss not to mention the even more useful Control Center, with controls for Wi-Fi, Bluetooth, audio playback, and more, all available from any screen in any app. You discover much more about Control Center in Chapter 14, but if you can’t stand the suspense, put your finger in the top-right corner of your iPad screen and swipe down to check out Control Center (and then tap the Home button or swipe up from the bottom to put it away).