
Chapter 4
Going on a Mobile Safari
IN THIS CHAPTER
![]() Navigating the web
Navigating the web
![]() Searching the World Wide Web
Searching the World Wide Web
![]() Securing Safari
Securing Safari
You feel like you’re holding the web right in the palm of your hand.
Sure, that's something Apple might say, but a lot of truth is behind it. The spectacular Retina display combined with Apple's snappy AX family of chips makes browsing on Apple’s tablets an absolute delight. With the 64-bit A12X Fusion chip and embedded M10 coprocessor in the newest iPad Pro models, browsing on an iPad has never been better.
In this chapter, you discover the pleasures — and the few roadblocks — in navigating cyberspace on your iPad.
Surfin’ Dude
The Apple Safari web browser is a major reason that the Internet on the iPad is every bit the Internet you’ve come to expect on a more traditional computer. Safari for the Mac and for Windows are two of the very best web browsers in the business. In our view, Safari on the iPhone has no rival as a smartphone browser. Safari on the iPad is even more appealing.
Exploring the browser
We start our cyberexpedition with a quick tour of the Safari browser. Take a gander at Figure 4-1. Not all browser controls found on a Mac or a PC are present, but Safari on the iPad still has a familiar look and feel. We describe these controls and others throughout this chapter.

FIGURE 4-1: The iPad’s Safari browser.
Blasting off into cyberspace
Surfing the web begins with a web address, of course.
 Here are a few tips for using the keyboard in Safari (see Chapter 2 for more help with using the virtual keyboard):
- Because so many web addresses end with the suffix .com (pronounced dot com), the virtual keyboard has a few shortcuts worth noting. Press and hold your finger against the .? key, and you’ll see that .com option as well as other common web suffixes (.us, org, .edu, and .net). Some options appear only if you’ve selected an international keyboard (as discussed in Chapter 2).
- The moment you tap a letter, you see a list of web addresses that match that letter. For example, if you tap the letter E (as we did in the example shown in Figure 4-2), you see web listings for eBay, ESPN, and others. Tapping U, H, or M instead may display listings for USA TODAY, The Houston Chronicle, or The Mac Observer (shameless plugs for the publications where Ed, Bob, and Bryan, respectively, write).
- In iPadOS, each key on the virtual keyboard has two values. Tap, and you get the darker letter, number, or symbol. Swipe down on a key, and you get the letter, number, or symbol in gray, at the top of the key.
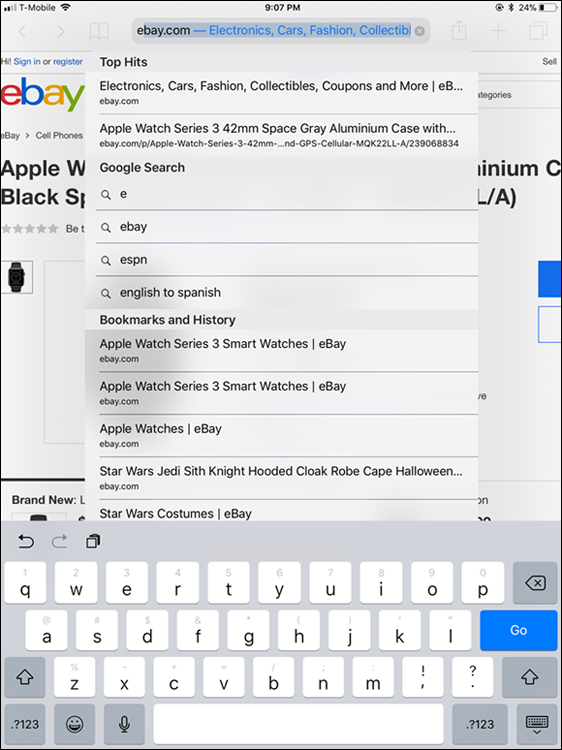
FIGURE 4-2: Web pages that match your search letter.
Siri can lend a hand, um, voice, as you surf. If you call upon Siri and ask the voice genie inside the iPad to open the Safari app, Siri obliges. If you mention a specific website to Siri — “ESPN.com,” say — Siri opens the site or at the very least your designated search engine (Google, Bing, or Yahoo!), as discussed later in this chapter. And that web page will open in a new tab, so you don’t lose whatever pages are already open.
When you tap certain letters, the iPad has three ways to determine websites to suggest:
- Bookmarks: The iPad suggests websites you’ve bookmarked from Safari or other browsers on your computer (and synchronized, as we describe in Chapter 3). More on bookmarks later in this chapter.
- History: The iPad suggests sites from the history list — those cyberdestinations where you recently hung your hat, including websites you’ve visited on your other Apple devices. Because history repeats itself, we also tackle that topic later in this chapter.
- Smart search field: When you type an address in the search field, you see icons for sites you frequent most often, and you can tap any of those icons to jump immediately to those sites.
You might as well open your first web page now — and it’s a full HTML page, to borrow from techie lingo:
-
Tap the Safari icon docked at the bottom of the Home screen.
If you haven’t moved the Safari icon, it’s a member of the Fantastic Five on the dock (along with Messages, Mail, Music, and Files). Chapter 1 introduces the Home screen.
- Tap the smart search field (refer to Figure 4-1).
- Begin typing the web address, or URL, on the virtual keyboard that slides up from the bottom of the screen.
- Do one of the following:
- To accept one of the bookmarked (or other) sites that show up in the list, merely tap the name. Safari automatically fills in the URL in the address field and takes you where you want to go.
-
Keep tapping the proper keyboard characters until you enter the complete web address for the site you have in mind, and then tap the Go key on the right side of the keyboard.
 You don’t need to type www at the beginning of a URL. So if you want to visit
 www.theonion.com, for example, typing theonion.com is sufficient to transport you to the humor site.
 Safari in iPadOS is a desktop browser first — even more so than it was when iPad ran Apple’s iOS. When you pull up a website on your iPad, it no longer defaults to the mobile version, because Apple takes steps behind the scenes to make sure your iPad is requesting the full desktop version of every website.
You can still pull up the mobile version of a website, though we can’t imagine why you’d want to. Simply tap the AA icon in the smart search field and tap Request Mobile Website in the pane that appears. This action affects only the current site.
Zoom, zoom, zoom
Zooming in can let you read and see what you want, without enlisting a magnifying glass. Better yet, it’s easy to zoom in, and we show you how.
Try these neat tricks for starters:
- Unpinch the page to zoom. Sliding your thumb and index finger together and then spreading them apart (or, as we like to say, unpinching) zooms in and out of a page. By way of example, check out Figure 4-3, which shows two views from Apple’s web page for the 2019 Mac Pro. In the first view, you see what the page looks like when you first open it. In the second view, we’ve zoomed in to get a closer look at the ventilation holes — and come on, we’re all thinking they look like aliens.
- Press down on a page and drag it in any direction, or flick through a page from top to bottom. You’re panning and scrolling, baby.
- Rotate the iPad to its side. This action reorients from portrait view to a widescreen landscape view. The keyboard is also wider, making it a little easier to enter a new URL. However, this little bit of rotation magic won’t happen if you set and enabled the screen orientation lock feature, which we describe in Chapter 1.
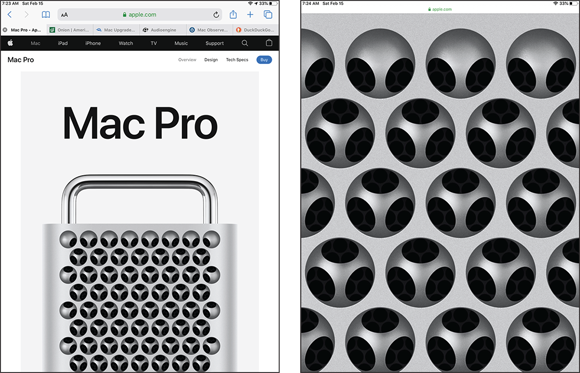
FIGURE 4-3: Unpinch to zoom in.
Reading clutter-free web pages with reader view
It’s all too easy to get distracted reading web pages, what with ads, videos, and other clutter surrounding the stuff you want to take in. Reader view can remove most of those distractions, but you need to activate it first.
When you first pull up a new web page that has reader view available, the URL bar briefly displays Reader View Available. To activate reader view, tap the AA icon, which appears to the left of the URL, as shown in Figure 4-4. If Show Reader View is blue in the pane that appears, tap it to switch to reader view. If Show Reader View appears dimmed, reader view is not available on this site.

FIGURE 4-4: Reducing clutter when reading.
Finding Your Way around Cyberspace
In this section, we discuss ways to navigate the Internet on your iPad by using links and tabs.
Looking at lovable links
Because Safari functions on the iPad in the same way browsers work on your Mac or PC, text links that transport you from one site to another typically are underlined, are shown in blue, red, or bold type, or appear as items in a list. Tap the link to go directly to the site or page.
Other types of links lead to different outcomes:
- Map address link: Tapping an address might launch the Maps app.
- Email address link: Tap an email address, and the iPad opens the Mail app (see Chapter 5) and populates the To field with that address. The virtual keyboard is also summoned so you can add other email addresses and compose a subject line and message. For this feature to work, your Mail app must be set up (see Chapter 5).
To see the URL for a link, press your finger on the link and hold it there until a preview of the linked web page pops up, along with a list of options (see Figure 4-5). You can use this method also to preview where a linked image will take you.

FIGURE 4-5: Tap and hold down on a link to see a preview and other options.
As for the link options shown in Figure 4-5, here’s what three of them do:
- Open in New Tab: Opens the link in a new tab.
- Copy: Copies the link’s URL to your iPad’s Clipboard so you can paste it elsewhere.
- Share: Tap to open the same sharing options presented when you tap the share icon.
Not every web link cooperates with the iPad because it doesn’t support some common web standards.
Tabbed browsing
When we surf the web on a Mac or PC, we rarely go to a single web page and call it a day. In fact, we often have multiple web pages open at the same time. Sometimes we choose to hop around the web without closing the pages we visit. Sometimes a link automatically opens a new page without closing the old one, whether we want it to or not.
Safari on the iPad, like the desktop version of Safari (and other browsers), lets you open multiple pages. After you have one page open, you have two ways to open additional web pages in Safari so they appear on the tab bar at the top of the screen (rather than replace the page you’re currently viewing):
- Tap the + icon near the top-right corner of the browser. A tab named Favorites appears, as shown in Figure 4-6. Now type a URL, tap a bookmark or an icon for a favorite or frequently visited site, or initiate a search, and the result will appear on this tab.
- Hold your finger on a link until a list of options appears (refer to Figure 4-5), and then tap Open in New Tab.

FIGURE 4-6: A new tab, ready to display any page you choose.
To switch tabs, just tap the tab you want to view. To close a tab, tap the gray x-in-a-circle that appears on the left edge of the active tab.
![]() You can manage tabs in one other way. Tap the view open tabs icon in the top-right corner of the browser (labeled in Figure 4-1 and shown in the margin) to summon thumbnail views of your open web pages, as shown in Figure 4-7. You can tap the X on any thumbnail to close it. From here you can also go into private browsing mode (discussed later in this chapter) or check out iCloud tabs, the topic we’re about to dive into.
You can manage tabs in one other way. Tap the view open tabs icon in the top-right corner of the browser (labeled in Figure 4-1 and shown in the margin) to summon thumbnail views of your open web pages, as shown in Figure 4-7. You can tap the X on any thumbnail to close it. From here you can also go into private browsing mode (discussed later in this chapter) or check out iCloud tabs, the topic we’re about to dive into.
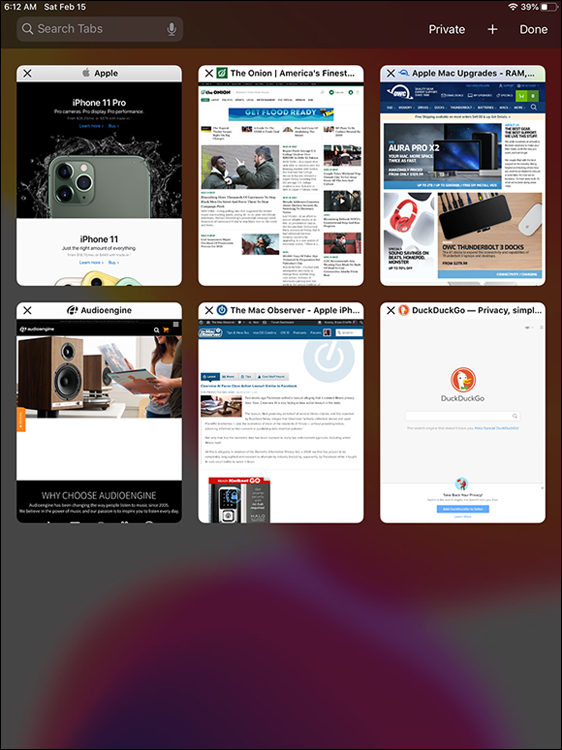
FIGURE 4-7: A thumbnail view of all your open tabs.
Surfing your iCloud tabs
![]() Although the iPad is your likely traveling companion just about everywhere you go, we know you also browse the web from your smartphone or personal computer. If that smartphone happens to be an iPhone and the computer is a Mac (or a Windows PC running Safari), you can take advantage of iCloud tabs, a feature that lets you resume reading web pages you started looking at on those other devices. Tap the view open tabs icon (shown in the margin) to bring up tab view.
Although the iPad is your likely traveling companion just about everywhere you go, we know you also browse the web from your smartphone or personal computer. If that smartphone happens to be an iPhone and the computer is a Mac (or a Windows PC running Safari), you can take advantage of iCloud tabs, a feature that lets you resume reading web pages you started looking at on those other devices. Tap the view open tabs icon (shown in the margin) to bring up tab view.
Doing the splits
When you rotate an iPad running iPadOS in landscape mode, you can display a split view in Safari, with two web pages each claiming half the screen. For instance, maybe you’re trying to decide between two cars or exploring different places to go on vacation.
In typical Apple fashion, you can arrive at this split view in more than one way:
- Drag a tab to the left or right edge of the screen and release.
- Tap and drag any link in a web page to the left or right edge of the screen and release.
To exit split view, drag the gray handle in the middle of your display to the left or right edge of the screen and release. If you drag to the right, the window on the left side takes over the entire screen. If you drag to the left, the window on the right side takes over your screen.
Revisiting Web Pages
Surfing the web would be a drag if you had to enter a URL every time you wanted to navigate from one page to another. To find those favorite websites in the future, the iPad provides bookmarks, web clips, reading lists, and history lists.
Book(mark) ’em, Danno
You already know how useful bookmarks are and how you can synchronize bookmarks from the browsers on your computer. It’s equally simple to bookmark a web page directly on the iPad. Follow these steps:
 Make sure the page you want to bookmark is open, and then tap the share icon (shown in the margin) at the top of the screen.
You have many options beyond bookmarking when you tap the share icon (refer to Figure 4-1, though not all the options are visible in the figure), as you discover later in this chapter.
-
Tap Add Bookmark.
A new Add Bookmark window opens with a default name for the bookmark, its web address, maybe a logo, and its folder location.
- Give the bookmark a name and folder location:
- Accept the default bookmark name and default bookmark folder: Tap Save.
- Change the default bookmark name: Tap the x-in-a-circle next to the name, enter the new title (using the virtual keyboard), and then tap Save.
- Change the location where the bookmark is saved: Tap the suggested Location field, which likely shows Favorites, tap the folder where you want the bookmark to be kept so that a check mark appears, and then tap Save.
To open a bookmarked page after you set it up, tap the bookmarks icon, which is to the left of the smart search field. (Refer to Figure 4-1.)
If you don’t see bookmarks right away after tapping the bookmarks icon, make sure the leftmost of the three tabs at the top of the bookmarks menu is highlighted. The other tabs are for the reading list and your history.
If the bookmark you have in mind is buried inside a folder, tap the folder name first and then tap the bookmark you want.
Altering bookmarks
If a bookmarked site is no longer meaningful, you can change it or get rid of it:
-
To remove a bookmark (or folder), tap the bookmarks icon and then tap Edit. Tap the red circle next to the bookmark you want to toss off the list, and then tap Delete.
To remove a single bookmark or folder, you can also swipe its name from right to left and then tap the red Delete button. - To change a bookmark name or location, tap Edit at the bottom-right corner of the Bookmarks window. Tap a given bookmark, and an Edit Bookmark window appears, with the name, URL, and location of the bookmark already filled in. Tap the fields you want to change. In the Name field, tap the gray x-in-a-circle and then use the keyboard to enter a new title. In the Location field, tap the location name and scroll up or down the list until you find a new home for your bookmark.
- To create a new folder for your bookmarks, tap Edit and then tap New Folder. Enter the name of the new folder, and choose where to put it.
- To move a bookmark up or down in a list, tap Edit and then drag the three bars to the right of the bookmark’s name to the bookmark's new resting place.
If you take advantage of iCloud, the web pages you’ve bookmarked on your Mac and on your other iOS devices will be available on the iPad, and vice versa.
Saving to your reading list
When you visit a web page you’d like to read, but just not now, the reading list feature is sure to come in handy, including when you’re offline. Here’s how it works:
- Saving a page for later: Tap the share icon and then tap Add to Reading List. Or, if you see a link to a page you’d like to read later, press on the link until a list of options appears (refer to Figure 4-5) and then tap Add to Reading List. The first time you add an article to your reading list, you may be asked if you would like to automatically save reading list articles for offline viewing. Tap Save Automatically or Don’t Save Automatically, as you want.
- Reading a page on your reading list: Tap the bookmarks icon and tap the page in the reading list, as shown in Figure 4-8.
- Keeping track of what you’ve read: Tap Show Unread to display only those items you haven’t read yet. Tap Show All to show all the items in the reading list.
- Removing items from the reading list: Swipe the item from right to left, and then tap its red Delete button. If you swipe a little farther to the left, you can tap Mark Read instead.

FIGURE 4-8: Tap a page in the reading list to read it.
Finally, don’t forget you can share your reading list (and bookmarks) among your computers and iDevices with iCloud, as described in Chapter 3.
Clipping a web page
You frequent lots of websites, some way more than others. For example, perhaps you consult the train schedule several times during the day. In their infinite wisdom, the folks at Apple let you bestow special privileges on frequently visited sites, not just by bookmarking pages but also by affording them unique Home screen icons. Creating one is dead simple. Follow these steps:
- Open the web page in question, and tap the share icon (shown in the margin).
-
Tap Add to Home Screen; you may have to scroll through the options to find it.
Apple creates an icon out of the area of the page that was displayed when you saved the clip, unless the page has its own custom icon.
- Type a new name for your web clip or leave the one Apple suggests.
-
Tap Add.
The icon appears on your Home screen.
As with any icon, you can remove a web clip by pressing and holding down on its icon until it starts to wiggle. Tap the X in the corner of the icon, and then tap Delete. You can also move the web clip to a more preferred location on one of your Home screens or on the dock.
Letting history repeat itself
Sometimes you want to revisit a site you failed to bookmark, but you can’t remember the darn destination or what led you there in the first place. Good thing you can study the history books.
Safari records the pages you visit and keeps the logs on hand for several days. Here’s how to access your history:
- Tap the bookmarks icon and then tap the history icon (clock) at the top of the pane that appears.
-
Tap the day you think you hung out at the site.
Sites are listed under such headings as This Morning, Thursday Evening, or Thursday Morning, or segregated by a specific date.
-
When you find the listing, tap it.
You’re about to make your triumphant return.
To clear your history so no one can trace your steps, tap Clear in the bottom-right corner of the history list. You can clear the last hour, clear only the day when you tapped Clear, clear today and yesterday, or clear all your history. Alternatively, starting on the Home screen, tap Settings ⇒ Safari ⇒ Clear History and Website Data. With both methods, per usual, you have a chance to back out without wiping the slate clean.
 When you clear your history from settings, your history, cookies, and browsing data will be removed from all the devices signed into iCloud. If that was not your intention, tap Cancel.
Saving web pictures
You can capture most pictures you come across on a website — but be mindful of any potential copyright violations, depending on what you plan to do with the images. To copy an image from a website, follow these steps:
-
Tap and hold down on the image.
A preview of the image you have selected appears, along with a pop-up menu offering the following options: Share, Add to Photos, and Copy.
-
Tap Add to Photos, as shown in Figure 4-9.
Saved images end up in your Photos, where they can be synced back to a computer.
Tap Copy instead, and you can paste the image into an email or as a link in a program such as Notes. Tap Share to display the regular Sharing pane.

FIGURE 4-9: Hold your finger against a picture in Safari to save it to the iPad.
Sharing Your Web Experiences
![]() When you find a great website you just must share, tap the share icon (shown in the margin) or tap Share after pressing down on a link, and you find these sharing options:
When you find a great website you just must share, tap the share icon (shown in the margin) or tap Share after pressing down on a link, and you find these sharing options:
-
 One Tap Suggestions: The top row in the iPadOS Sharing pane is one of the best new features in iPadOS. It contains people and places Siri thinks you're most likely to want to share with, such as nearby AirDrop devices, as described next, as well as a combination of your most-used and recent Messages contacts. Sharing with your closest friends and family is now even easier!
 - AirDrop: Share the page with other people who have compatible devices and AirDrop. You’ll need to turn on AirDrop in Control Center (swipe down from the top-right corner of the screen). Then choose whether to make your iPad discoverable to everyone or only people in your contacts.
- Messages: Send a link to the web page in a text or an iMessage.
- Mail: The Mail program opens, with a new message containing a link for the page and the name of the site or page in the Subject line.
- News: Using this option isn’t so much sharing as opening the web page you're viewing in Apple’s News app. Tap the News icon to go to the Apple News version of that article.
- Reminders: Add to a new reminder a link to the web page you're viewing so you don’t forget! If you tap Options, you can be reminded on a given day or location.
- Notes: Your iPad opens a pane that allows you to save the web page as an attachment in an existing or new note. Tap Save to finish the process and return to Safari.
- Books: Convert the web page you're viewing into a PDF that is then added to your Books library.
-
More: Display other recent apps — including social networking apps such as Twitter, Facebook, Tencent Weibo, and others.
Your list may not look exactly like the list we described, which was based on a clean iPad set up just for this book. If you've been using your iPad for a while, you’ll see your frequently used apps. - Copy: Copy the page in question.
- Add to Reading List: See the “Saving to your reading list” section for details.
- Add Bookmark: Bookmark a web page.
- Add to Favorites: When you tap the + button to add a new tab, you see a page of icons representing the web pages you visit most often. Tap Add to Favorites to add the web page you're viewing to this most-favored-nation-status grouping.
- Find on Page: Type a word you want to find. Matching words are highlighted; use the up and down arrows that appear to cycle through each mention. Tap Done when you're finished.
- Add to Home Screen: We discuss this feature in the “Clipping a web page” section.
- Print: Print to an AirPrint printer. You can choose the number of copies you want. Tap Print to complete the job.
- Markup: Convert the web page to a PDF you can then draw on! Use the brush palette that appears at the bottom of the screen to choose a color, a type of pen, and other markup controls. Tap Done to either save or delete the PDF.
Launching a Mobile Search Mission
Most of us spend a lot of time using search engines. And the ones we summon most often are Google, Yahoo!, and Microsoft’s Bing, at least in the United States. If you’re in China, chances are you search using Baidu. All these search options are available on the iPad, along with DuckDuckGo, a search engine that doesn’t track your web footsteps.
Apple combines the address bar and search fields into a single, convenient, unified strip called the smart search field, following the path taken on most popular web browsers for PCs and Macs. Although you can certainly use the virtual keyboard to type google.com, yahoo.com, bing.com, or other search engines into this field, Apple doesn’t require that tedious effort. Instead, just type your search query directly in the box.
To conduct a web search on the iPad, tap the smart search field. You immediately see icons for your favorite web destinations. But when you start typing in the smart search field, a Google (or other) search mission commences, with live guesses shown at the top.
You see other search suggestions as you start tapping additional letters. In Figure 4-10, for example, typing the letters ap yields such suggestions as Applebees, Apple Store, and Apple Watch. Tap any search result that looks promising, or tap Go on the keyboard to immediately land on the top hit. Or keep tapping out letters until you generate the search result you want.
You can also find a search word or phrase on the web page you have on-screen. If there's a match, you’ll see an On This Page entry at the bottom of the smart search results. If you tap that result, the smart search pane vanishes, and the Find on Page pane comes up from the bottom of your screen.
To switch the search field from the current search engine to another search engine on your iPad, check out the “Smart Safari Settings” section, later in this chapter.

FIGURE 4-10: Running a search on the iPad.
As mentioned earlier in this chapter, Siri can open Safari — all you have to do is ask. Of course, much of what Siri can do is web-centric. So now is as good a time as any to recommend Chapter 14, where you get an excellent sense of all Siri can do.
Through the search engine suggestions and Safari suggestions features, you can get potentially useful information even if you don’t explicitly search for it. If you search the name of a movie, for example, Safari will also provide showtimes at nearby theaters without being asked. If you’re not comfortable with this feature, you can turn it off in Settings.
Private Browsing
Don’t want to leave any tracks while you surf? Turn on private browsing for a “what happens in Safari stays in Safari” tool. Those truly bent on staying private will also want to tap Clear History, as we mention earlier in this chapter.
To go incognito, tap the view open tabs icon (labeled in Figure 4-1), and then tap the Private button at the upper-right corner of the screen. After private browsing is on, any traces of your visit to nonono.com (or wherever) are nowhere to be found. Your history is wiped clean, open tabs don’t appear in iCloud tabs, and your autofill information is not stored anywhere. To remind you that you’re browsing privately, the Safari interface takes on a darker shade.
To come out of hiding, tap the view open tabs icon again and then tap Private again to turn it off.
The history of pages you’ve visited can be useful and a huge timesaver, so don’t forget to disable this option when you’re finished.
Be mindful of your settings on other machines. If you run Safari on both an iPad and a Mac, but choose to go private only on Apple’s tablet, your Mac browsing history will still show up in your history list on the iPad. Safari browsers marked private on the iPad will still bring in sites from iPhones or Macs via iCloud. Mark things private across all devices to keep things really private.
Smart Safari Settings
Along with the riches galore found on the Internet are places in cyberspace where you’re hassled. You might want to take action to protect your privacy and maintain your security.
To get started, tap the Settings icon on the Home screen and then tap Safari.
The following settings enable you to tell your iPad what you want to be private and how you want to set your security options:
- Search Engine: Tap the search engine you desire — just as long as that search engine happens to be Google, Yahoo!, Bing, DuckDuckGo, or if you’ve enabled a Chinese keyboard, Baidu. Other settings found here let you determine whether the iPad can make search engine suggestions and Safari suggestions, features touched on earlier in this chapter.
- Quick Website Search: Determine whether or not to use website shortcuts when you’re searching within a website. For example, you can type wiki FDR to show Wikipedia entries for Franklin Roosevelt.
- Preload Top Hit: We talk about the smart search field throughout this chapter. Here you get to choose whether the iPad can preload the top hit in the background.
-
AutoFill: Safari can automatically fill out web forms by using your personal contact information, usernames, and passwords, or information from your other contacts. Tap AutoFill and then tap the on/off switch to enable or disable AutoFill.
- Tap Use Contact Info if you’re comfortable using the information found about your contacts.
- Tap My Info to select yourself in your contacts so that Safari knows which address, phone number, email address, and other information to use when it fills in a form.
- Tap Credit Cards to manage and enter the credit card numbers you’re comfortable sharing. Tap Saved Credit Cards to view the cards you’ve saved on your tablet or to add others.
Turning on AutoFill can compromise your security if someone gets hold of your iPad. It can also affect security across all your iCloud-enabled devices. - Frequently Visited Sites: This setting controls whether Safari in iPadOS displays your most frequently visited websites when you first open a new tab. Tap the toggle to disable it, changing it from green to white.
- Favorites: Apple lets you quickly access favorite bookmarks when you enter an address, search, or create a tab. Tap the category of sites for which you’d like to see icons (News, Business, Technology, whatever). A check mark appears next to your selection. Or leave the default category setting as Favorites.
- Show Favorites Bar: If you enable this option, you'll see Safari’s bookmarks bar between the smart search field and tab bar.
- Block Pop-Ups: Pop-ups are web pages that appear whether or not you want them to. Often, they’re annoying advertisements. But on some sites, you welcome the appearance of pop-ups, so remember to turn off blocking under such circumstances.
- Downloads: Tap through to decide where the files you download to your iPad will reside, in iCloud drive or directly on your iPad. If you choose the iCloud Drive option, the files will be available on all of your Apple devices signed into iCloud drive.
- Show Tab Bar: You can display open tab buttons in a bar near the top of the Safari display, another matter of personal preference.
- Show Icons in Tabs: Turn this feature on to have website icons displayed in each of your open tabs.
- Open New Tabs in Background: If you enable this setting, new tabs that you open in Safari will load even if you’re reading a different page in another tab.
- Close Tabs: Tap through to decide whether you want to close tabs manually — which we recommend — or have them closed automatically after one day, one week, or one month.
- Prevent Cross-Site Tracking: Apple is the tech leader in protecting your privacy, and no close second exists. The Prevent Cross-Site Tracking feature makes it difficult for Google, Facebook, and the myriad of advertising trackers on the Internet to track you as you go from site to site. This feature is enabled by default, and we recommend you keep it enabled.
-
Block All Cookies: Cookies are tiny bits of information a website places on the iPad when you visit so that the site recognizes you when you return. You need not assume the worst; most cookies are benign.
If this concept wigs you out, take action and block cookies from third parties and advertisers: Tap the Always Block option, and you will theoretically never again receive cookies on the iPad. Or choose to accept cookies only from the website you’re currently visiting or only from the websites you visit. You can also tap Always to accept cookies from all sites. Tap Safari to return to the main Safari Settings page.
If you set the iPad so that it doesn’t accept cookies, certain web pages won’t load properly, and other sites such as Amazon won’t recognize you or make any of your preferred settings or recommendations available. - Fraudulent Website Warning: Safari can warn you when you land on a site whose producers have sinister intentions. The protection is better than nothing, but don’t let down your guard because this feature isn’t foolproof. The setting is on by default.
- Check for Apple Pay: If you come to a website that accepts Apple Pay (Apple’s mobile payments service), the site can check whether you have Apple Pay enabled on your tablet. If you’re not comfortable with this idea, make sure this switch is off.
- Clear History and Website Data: You met this option earlier. Tap it to erase everything in Safari’s history, leaving nary a trace of the pages you’ve visited.
- Page Zoom: Apple offers several settings for controlling what happens on every website, starting with Page Zoom. Tap Page Zoom to change the default setting for every website. You have options ranging from 50% to 300%, which is useful if you find yourself constantly adjusting the zoom level for new web pages.
- Request Desktop Website: Earlier in this chapter, we talk about how Safari for iPadOS requests the desktop version of every website, rather than the mobile version. If you want to turn off this feature for some reason, tap Request Desktop Website and toggle the All Websites switch from green to white. Turning off this feature allows the server to decide whether you get the website's mobile version or desktop version.
- Reader: Tap the Reader category, and then tap the All Websites toggle to green if you want to view in reader mode every website you visit.
- Camera, Microphone, or Location: You set up all three features in the same way. Tap through Camera, Microphone, or Location to control how websites request access to these features on your iPad. By default, they’re all set to Ask, which means a website must ask for your permission before accessing one of these features.
- Automatically Save Offline: Tap the toggle for this setting to have your iPad automatically save to your iPad any web page you added to your reading list so you can read the page offline, without an Internet connection.
- Advanced: The Advanced category has several settings most iPad users will never need to worry about. But because we love you, dear reader, we’re going to explain just in case! Tap Advanced to access the following additional settings.
- Tap Website Date to view and manage the data cached by websites you've visited. They're listed in order by how much data they've saved, showing only the top ten by default. Tap Show All Sites to see the rest. If you tap and slide to the left on an individual website, you reveal a red Delete button. Tap Delete to remove that site’s data. Tap and slide back to the left to hide the Delete button after you're finished with the site. Tap the Remove All Website Data to remove all cached data from every site at once.
- Tap to toggle JavaScript on or off. Be careful when turning off JavaScript, however, because it adds advanced functionality to websites.
- Tap the Web Inspector toggle to enable the capability to inspect different elements of a website. This feature is typically used by developers and isn’t something the rest of us will ever need to think about. Similarly, the Remote Automation feature is a developer feature, and we do not recommend that you enable it.
- Tap the Experimental Features category to unveil a wealth of different things Apple is experimenting with in WebKit, the engine that powers Safari. We strongly recommend that you leave this entire section alone, unless you’re a developer who needs to access these features to develop a website.