
Chapter 10
Apply Here (to Find Out about iPad Apps)
IN THIS CHAPTER
![]() Getting a handle on apps
Getting a handle on apps
![]() Getting apps onto your iPad
Getting apps onto your iPad
![]() Deleting and reviewing apps
Deleting and reviewing apps
One of the best things about the iPad is that you can download and install apps created by third parties, which is to say not created by Apple (the first party) or you (the second party). At the time of this writing, our best guess is that there are more than 4 million apps available and over 200 billion apps downloaded to date. Some apps are free, and other apps cost money; some apps are useful, and other apps are lame; some apps are perfectly well behaved, and other apps quit unexpectedly (or worse). The point is that of the many apps out there, some are better than others.
In this chapter, we take a broad look at apps you can use with your iPad. You discover how to find and download apps on your iPad, and you find some basics for managing your apps. Don’t worry: We have plenty to say about specific third-party apps in Chapters 18 and 19.
Tapping the Magic of Apps
Apps enable you to use your iPad as a game console, a streaming Netflix player, a recipe finder, a sketchbook, and much, much more. You can run three categories of apps on your iPad:
- Apps made exclusively for the iPad: This is the rarest kind, so you find fewer of these than the other two types. These apps won’t run on an iPhone or iPod touch, so you can’t even install them on either device.
- Apps made to work properly on an iPad, iPhone, or iPod touch: These so-called universal apps can run on any of the three device types at native resolution.
-
Apps made for the iPhone and iPod touch: These apps run on your iPad but only at iPhone/iPod touch resolution rather than the full resolution of your iPad, as demonstrated in Figure 10-1.
 You can double the size of an iPhone/iPod touch app by tapping the little 2x button in the lower-right corner of the screen; to return it to its native size, tap the 1x button. Figure 10-1 shows you what an iPhone/iPod touch app looks like on an iPad screen.
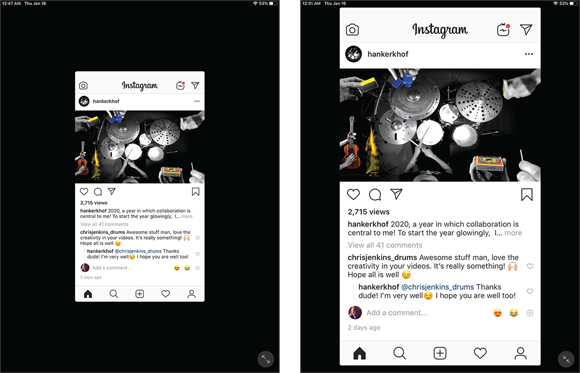
FIGURE 10-1: iPhone and iPod touch apps run at a smaller size (left), but can be increased to double size (right).
You can obtain and install apps for your iPad in two ways:
- The App Store app on your iPad
- Via automatic download
To switch on automatic downloads on the iPad, tap Settings ⇒ iTunes & App Store. Then tap the Automatic Downloads switch for Apps so that it turns green (on). After you do so, all apps you buy on other iPadOS and iOS devices will automagically appear on your iPad.
Consider also enabling automatic downloads for Music, Books, and Updates while you have the iTunes & App Store settings on your screen.
After you’ve obtained an app from the App Store, you can download it to up to ten iOS devices (as long as you log in with the same iCloud account or use Family Sharing).
But before you can use the App Store on your iPad, you first need an iTunes Store account.
 If you don’t have an iTunes Store account, you can’t download a single cool app — not even the free ones — for your iPad.
So, if you don’t have an iTunes Store account, might we suggest that you get one now? Just tap Settings ⇒ iTunes & App Store ⇒ Sign In ⇒ Create New Account and follow the on-screen instructions.
Finding Apps in the App Store
Finding apps with your iPad is easy. The only requirement is that you have an Internet connection of some sort — Wi-Fi or wireless data network — so that you can access the App Store and browse, search, download, and install apps.
Browsing the App Store
![]() To get started, tap the App Store icon (shown in the margin) on your iPad’s Home screen. After you launch the App Store, you see five icons at the bottom of the screen, representing five ways to interact with the store, as shown in Figure 10-2. The first three icons— Today, Games, and Apps— offer three ways to browse the virtual shelves of the App Store. (We get to the fourth and fifth icons, Arcade and Search, shortly.)
To get started, tap the App Store icon (shown in the margin) on your iPad’s Home screen. After you launch the App Store, you see five icons at the bottom of the screen, representing five ways to interact with the store, as shown in Figure 10-2. The first three icons— Today, Games, and Apps— offer three ways to browse the virtual shelves of the App Store. (We get to the fourth and fifth icons, Arcade and Search, shortly.)

FIGURE 10-2: The icons across the bottom represent different ways to browse the App Store.
The Today section, shown in Figure 10-2, highlights curated selections from the App Store, including Game of the Day and App of the Day, themed collections such as Top Games of the Week, and staff favorites (not shown in the figure).
The Games section lets you browse games in categories such as AR Games, New Games We Love, and Essential Game Picks, to name a few. Scroll down and you’ll find sections for Top Paid Games, Top Free Games, Top Game Categories, and more.
The Apps section is like déjà vu all over again if you’ve already visited the Games section. It also contains categories such as Great on iPad, Our Favorites, and Apple Pencil Starter Kit, as shown in Figure 10-3. Scroll down a little farther and you’ll find Top Paid Apps, Top Free Apps, Top App Categories, and more.

FIGURE 10-3: The Apps section displays apps organized by themes, such as New to iPad.
Most pages in the App Store display more apps than can fit on the screen at once. For example, the New to iPad section in Figure 10-3 contains more than the four apps you can see. A few tools help you navigate the Games, Apps, and other sections of the App Store:
- Swipe from right to left to see more apps in most categories.
- Swipe up the screen to scroll down and see additional categories.
- Tap the See All link at the top right of most sections to (what else?) see all the apps in that section on one screen at the same time.
Arcade
 Apple introduced Arcade, a subscription game service, with iPadOS. It’s the fourth icon at the bottom of the App Store. And it’s really cool — let us tell you why!
With Arcade, you get on-demand access to more than 100 games, with Apple adding more every week. These are high-quality, top-tier games. Even better, none of them have in-app purchases, which means you can play the entire game without having to spend a penny outside the Arcade subscription itself. You'll find racing games, fighting games, strategy games, simulations, puzzles, mysteries, and so much more. These games are original, with most produced exclusively for Arcade.
But here’s the best part. Arcade is just $4.99 per month, and that includes everything. To subscribe, tap the Try It Free button in the Arcade section to start a 30-day free trial. If you unsubscribe before the trial ends, you won’t be charged. Otherwise, you’ll begin paying $4.99 per month through your Apple ID. If you love playing great games, that price makes Arcade a no-brainer. Some of our favorites so far include Red Reign, Mini Motorways, and LEGO Brawls.
Searching for apps
Finally, the last option at the bottom of the screen is Search, the magnifying glass icon. If you know exactly what you’re looking for (or even approximately what you’re looking for), just tap Search to bring up the virtual keyboard, and then type a word or phrase. Then tap the Search key to initiate the search.
That’s all there is to it.
Updating apps
Every so often the developer of an iPad app releases an update, but for some reason Apple made it harder to see your updates in the App Store in iPadOS. The Arcade icon on the Home screen replaced the Updates icon, so now you need to tap your profile button in the upper-right corner of any of the five main sections of the App Store. An account sheet will appear with your Apple ID, tabs for seeing previously purchased apps, managing subscriptions, redeeming gift cards and gift card codes, sending gift cards by email, and adding funds to your Apple ID.
At the bottom of the screen are recent and pending updates, with app icons, the name of each app, and update notes for the newest update. If an update has already been applied by the App Store, you'll see an Open button, which allows you to launch the app. If the app is waiting to be updated, you'll see an Update button. Tap the Update button to update the app. When the update is complete, the button changes to an Open button.
If you try to update an app purchased from any iTunes Store account except your own, you’re prompted for that account’s ID and password. If you can’t provide them, you can’t download the update. This doesn’t apply, of course, if you’ve enabled Family Sharing (see Chapter 15).
One last tip: If you download an app and it doesn’t work properly, try deleting and redownloading it from the App Store. Doing so fixes the problem as often as not.
Finding details about an app
Now that you know how to browse and search for apps in the App Store, the following sections show you how to find out more about a particular app. After tapping an app icon as you browse the store or in a search result, your iPad displays a details screen like the one shown in Figure 10-4.

FIGURE 10-4: Kingdom Rush Vengeance is the newest version of a great tower defense franchise.
Note the blue More link in the Preview section in Figure 10-4; click More to see a longer description of the app.
Bear in mind that the app description on this screen was written by the app’s developer and may be biased. Never fear, gentle reader: In an upcoming section, we show you how to find app reviews written by people who have used the app (and, unfortunately, sometimes people who haven’t).
Understanding the age rating
The Kingdom Rush Vengeance app is rated for age 9+, as you can see to the far right of the 4.8 user rating (labeled in Figure 10-4). The rating means that the app may contain content that is unsuitable for children under 9. Other age ratings are 4+, 12+, and 17+, each designed to help parents manage what games and apps their kids are using.
Checking requirements and device support for the app
One more thing: Remember the three categories of apps we mention at the beginning of the chapter, in the “Tapping the Magic of Apps” section? Scroll down the page to the Information section (not shown in Figure 10-4), and you’ll find that this app Requires iOS 9.0 or later. Compatible with iPhone, iPad, and iPod touch.
Reading reviews
The Ratings & Reviews section of the details screen offers reviews written by users of this app. Each review includes a star rating, from zero to five. If an app is rated four stars or higher, you can safely assume that most users are happy with the app.
In Figure 10-4, you can see that this app has a rating of 4.8 stars based on 23K user ratings. That means it’s a great app. Finally, Tap See All to read more user reviews.
Don’t believe everything you read in reviews. In our experience, people find some amazingly bad reasons to give apps bad — and sometimes good — ratings. Take App Store ratings and reviews with a grain of salt, and learn how to look for the reviews that resonate with you. We also like to look for a preponderance of opinions to help weigh the ones to take seriously. Lastly, make sure the review you’re reading is for the current version — reviews of older versions may be inaccurate.
To read reviews from your iPad, tap the See All link in the Reviews section of an app’s details page.
Downloading an app
To download an app to your iPad from the App Store, follow these steps:
-
To start the download process, tap the blue price button (or the word Get or the download from iCloud icon) near the top of the app’s details screen.
For apps with a price, the price button will morph into a blue Buy button. You may be prompted to sign in to your iTunes account, or to use Touch ID or Face ID to authorize the purchase. In Figure 10-4, you see the installing icon instead of a price because Bryan got too excited when he saw this app and paid for it before taking a screenshot.
-
Tap the blue Buy button.
When the app is finished downloading and is installed on your iPad, the installing icon changes to an Open button.
-
Tap the Open button to launch the app.
 If you close the App Store before the app finishes installing, you see your new app’s icon on the Home screen. (Depending on how many apps you have installed on your iPad, you may need to swipe to another Home screen to find the new app.) The new app’s icon is slightly dimmed and has the word Loading below it, with a pie chart to indicate how much of the app remains to be downloaded (about one third, as shown in the margin).
 - If the app is rated 17+, click OK on the warning screen that appears after you type your password to confirm that you’re 17 or older before the app downloads.
The app is now on your iPad. If your iPad suddenly loses its memory (unlikely) or you delete the app from your iPad, you can download it again later from the App Store at no charge.
Working with Apps
Most of what you need to know about apps involves simply installing third-party apps on your iPad. However, you might find it helpful to know how to delete and review an app.
Deleting an app
Many of the preinstalled apps that came on your iPad — Photos, Camera, Contacts, Clock, Settings, and Messages, to name a few — can’t be removed. But you can delete other apps.
You can, however, hide some of Apple’s preinstalled apps by choosing Settings ⇒ Screen Time ⇒ Content & Privacy Restrictions ⇒ Allowed Apps. For any of the Apple apps listed, toggle the switch for the app you want to hide so that it goes from green to white.
Here’s how to delete an app on your iPad:
- Press and hold any app icon until all the icons begin to wiggle.
-
Tap the little x in the upper-left corner of the app you want to delete.
A dialog appears, informing you that deleting this app also deletes all its data, as shown in Figure 10-5.
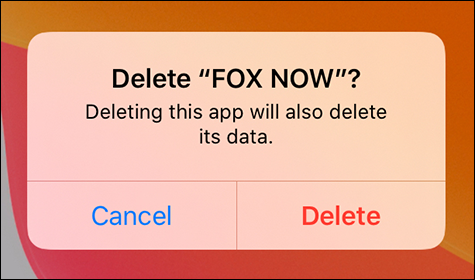
FIGURE 10-5: Tap an app’s little x and then tap Delete to remove the app from your iPad.
- Tap the Delete button.
- To stop the icons from wiggling, press the Home or sleep/wake button, or swipe up from the bottom of your screen.
You also make icons wiggle to move them around on the screen or move them from page to page. To rearrange wiggling icons, press and drag them one at a time. If you drag an icon to the left or right edge of the screen, it moves to the next or previous Home screen. You can also drag additional icons to the dock (where Safari, Mail, Photos, and Music live) to make them available on every Home screen.
Writing an app review
Sometimes you love or hate an app so much that you want to tell the world about it. In that case, you should write a review. You can do this directly from your iPad.
To write a review from your iPad, follow these steps:
 Tap the App Store icon to launch the App Store.
- Navigate to the details screen for the app.
-
Tap one to five of the stars at the top of the screen to rate the app.
You might have to type your iTunes Store password.
- In the Title field, type a title for your review, and in the Review field, type your review.
-
Tap the Send button in the upper-right corner of the screen.
Whichever way you submit your review, Apple reviews your submission. As long as the review doesn’t violate the (unpublished) rules of conduct for app reviews, it appears in a day or two in the App Store in the Reviews section for the particular app.
You can configure the behavior of many apps in the Settings app. Scroll all the way down the list of settings and you’ll find an alphabetical list of apps that have settings; tap an app in the list to see its settings.