
Chapter 7
Leaving Impressive Impressions: Shoes, Tires, and Tools
IN THIS CHAPTER
![]() Using shoeprints to identify the perpetrator
Using shoeprints to identify the perpetrator
![]() Identifying tire tracks as evidence
Identifying tire tracks as evidence
![]() Analyzing and using tool-mark evidence
Analyzing and using tool-mark evidence
![]() Recognizing fabric patterns
Recognizing fabric patterns
“Watch where you step” is good advice for a criminal. For a farmhand, too. Many suspects have been connected to crime scenes by the tracks of their shoes. Even though shoes are manufactured in vast numbers, and the same shoe brand and size may be worn by any number of people, your particular walking pattern still may give you away.
Tires and tools also leave impressions that usually are classified as class evidence (see Chapter 3), meaning that they can exclude certain types of shoes, tires, or tools but can’t absolutely identify a particular one. The tread pattern of a shoe or a tire may identify the size and the manufacturer of the product, and that information narrows the search for the perpetrator by focusing the investigation on sellers and buyers of the particular product.
Stepping Out: Shoeprints as Evidence
When the shoe fits, criminals often find themselves walking right off to prison. Shoeprints and impressions are useful to criminalists for many reasons. Not only can they suggest that a particular person was at the crime scene, they may also confirm or refute a suspect’s alibi. For example, a neighbor claims that when he walked next door to borrow a cup of sugar, he found the woman who lived there lying on the kitchen floor bludgeoned to death. He says that the door was unlocked, so he checked for the woman’s pulse, called 911, and waited for police to arrive. The neighbor says that he went nowhere else in the house. If police discover the neighbor’s shoeprint elsewhere in the home, say on the hardwood floor of the woman’s bedroom, near where her empty jewelry box is found, his story doesn’t ring true.
Prints also can indicate the points of entry and exit at a crime scene. Shoeprints in the soft soil of a flower garden beneath a pried-open window that match dirt and grime prints on the floor inside the home indicate the point of entry. Bloody prints leading through a rear door suggest an exit portal. Prints left on tile or wooden floors, stairs, countertops, windowsills, ladders, and even chair seats can reveal the perpetrator’s movements within the crime scene.
Following shoeprints through a crime scene helps investigators focus their search for evidence. When prints are found in several rooms of a house that has been burglarized, investigators concentrate their search in those areas. Following an exit trail can lead investigators to where the perpetrator tossed a weapon or articles of clothing, such as a mask or gloves. The best evidence tends to be left in the perpetrator’s wake.
A shoeprint also can link several crimes. Finding identical prints at several different crime scenes indicates that the same perpetrator may be involved in each crime. This linkage (see Chapter 3) often is crucial to solving the crimes. Each separate scene may provide evidence that when taken alone is of little help, but when combined with evidence from the other scenes may become significant.
 For example, suppose that investigators find a dark brown hair at one crime scene, blue carpet fibers from a Chevrolet at another, and, at a third crime scene, blood spatter patterns that suggest the killer was left-handed and approximately 6 feet tall. Viewed separately, each item of evidence tells investigators little about the crimes, but when the same shoeprints link the crimes and suggest that the same person committed all the crimes, a much clearer picture emerges. That picture is of a 6-foot-tall, left-handed male with dark brown hair who drives a Chevrolet with blue carpet. Although this profile still doesn’t provide conclusive identification, it nevertheless constructs a better description of the perpetrator.
Multiple shoeprints can indicate whether more than one person is involved and may even help determine exactly how many. When investigators find three distinct types of prints, they can state that at least three people are involved. More people may have participated but failed to leave behind any shoe impressions.
Characterizing and using shoeprints
Cinderella may have been the only belle at the ball wearing tiny glass slippers, but few suspects wear shoes that are so easily identifiable. Most shoes are mass-produced in a wide assortment of sizes and shapes for different genders and age groups, and that makes matching a suspect to a shoeprint quite a challenge, to say the least. Investigators start by identifying the size and manufacturer of a shoe before moving on to the characteristics that make the track unique. Individualization comes from the varying wear patterns, damage, or debris either lodged in the shoe tread or left behind by the perpetrator. Shoeprints are so important to crime fighters that the FBI works with shoe manufacturers to maintain a database of sole patterns.
Your shoes travel across a wide array of surfaces every day — hardwood, tile, carpet, soft soil, and rain-soaked or snow-covered sidewalks, for example. As you walk, the soles of your shoes are worn, nicked, and scuffed, and they pick up dirt, oil, grease, moisture, and debris. Much of this material then is tracked across other surfaces, leaving behind your distinctive shoeprints.
 The three basic kinds of shoeprints include the following:
- Patent: The term patent means visible. These prints are the result of tracking through a substance, such as dirt, paint, or blood, and leaving some of it behind as you walk.
- Plastic: Walking through mud, snow, or other soft, malleable substances leaves plastic, or three-dimensional tracks.
- Latent: Latent shoeprints are invisible to the naked eye and result when you transfer a thin layer of accumulated yet invisible oils and grime from the soles of your shoes to a hard surface, such as glass, pieces of paper, cardboard, or polished wooden, tile, or even concrete floors.
Matching sole to soul — so to speak
Shoeprint impressions often are considered class evidence because they identify only the manufacturer and size of the shoe, which narrows the search to a suspect list rather than identifying a specific suspect.
A few specific characteristics may, however, point to a particular person. Everyone wears out the soles of their shoes in a distinct manner, as shown in Figure 7-1. Some people walk more on the outsides of their feet, others favor the heel, and still others shuffle along on the balls of their feet. How your foot strikes the ground determines how the sole of your shoe will wear.
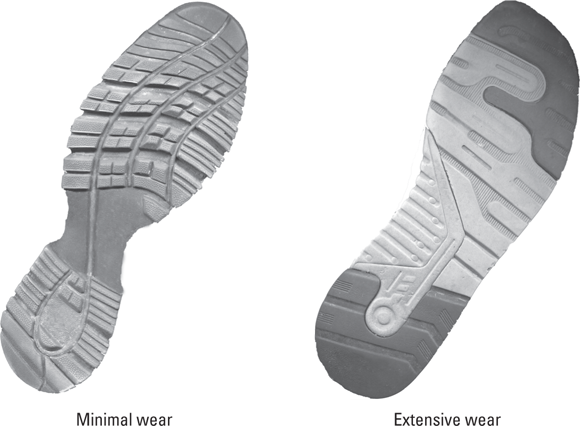
Illustration by Nan Owen
FIGURE 7-1: Investigators compare the wear patterns of shoeprints with suspect shoes.
Furthermore, from one day to the next, people routinely walk over the same kinds of surfaces during the normal course of their activities; however, the types of surfaces they walk on vary from person to person. As a result, the shoe sole–wear patterns of an office worker, who walks across carpets most of the day, will vary greatly from those of a construction worker who frequently stomps through gravel or across rough concrete.
Noticing wear patterns
Check out the bottoms of a pair of your old tread-soled shoes. The original tread pattern will be worn more in some areas than in others. Maybe it’s your heel or the outside area near the ball of your foot that wears down more severely than the rest of your shoe.
Now check out the soles of someone else’s shoes. Although comparing the same brand, style, and size of shoe offers a better example, you still can distinguish a wear pattern that is much different from yours.
Differences in tread wear patterns essentially mean that everyone leaves a unique shoeprint. And often the print made by one shoe can be matched to that shoe to the exclusion of any others. The wear pattern makes a shoeprint individual evidence (evidence that points to one suspect — see Chapter 3) and not just class specific. Such an individualized pattern may enable the criminalist to positively identify a suspect’s shoe as the exact same shoe that left the crime-scene impression.
Cuts, nicks, scratches, and gouges in the sole or a stone trapped in the tread also can make a particular shoeprint very distinctive. Whenever a print found at a crime scene reveals a size; style; worn, nicked, or gouged sole; and perhaps a small, imbedded rock pattern that exactly matches an impression of a suspect’s shoes, it strongly suggests that that shoe was the one that left the print.
Of course, after months have passed, the wear pattern may have changed, the gouge mark may have lost some of its characteristics, and the rock may have come loose. When those things happen, individualizing characteristics can be lost or altered to the point where a positive match can’t be made.
Figuring out gait patterns
Shoeprints also offer insight into the gait, walking style, length of stride, and stance of the person wearing the shoes. They can even tell investigators whether that person is pigeon-toed or slew-footed. Although generally unreliable as evidence, stride length and step width can help investigators estimate the shoe-wearer’s height or expose whether that person has a limp or walks with any other unusual characteristics. A tall, thin suspect is not likely to leave a widely spaced, short stride-length impression, for example.
Collecting shoe impressions
Protecting the crime scene means protecting all evidence, including shoeprints and impressions. Investigators must be mindful of where perpetrators have or even may have walked so they can avoid those areas of the crime scene until the prints can be recovered. Likewise, exclusionary shoeprints are obtained from all law enforcement personnel who visit the crime scene before prints are secured. Doing so prevents confusion later on when prints are examined back at the crime lab, because an examiner therefore can exclude prints belonging to investigators. To avoid such confusion, investigators should slip surgical booties over their shoes while they’re checking out the crime scene.
Patent prints often are simply photographed. Those left by tracked mud or blood typically are easily captured on film. Others, however, may need to be enhanced by using an angled or high-intensity light source to produce a clear-enough ridge pattern for a photograph. Regardless of how they’re lighted, photographs of prints must be taken head-on, at a 90-degree angle relative to the surface of the print, and centered in the camera’s viewing screen. Doing so lessens the amount of distortion in the image, which, in turn, means that more accurate comparisons can be made. Including a small ruler or other measuring device in pictures helps investigators more accurately determine the size of the print.
Looking for latent prints
Latent prints are not readily visible to the naked eye and tend to be deposited by shoes that are relatively clean. The soles of your shoes constantly pick up and deposit substances and debris, such as oils, dust, and fine particles of dirt. When your shoe comes into contact with a clean surface, it leaves a faint print. Even clean, dry shoes can leave prints on glass, floors, tables, countertops, or other surfaces that have been polished, waxed, or otherwise left with a faint film of grease or grime.
Searching for latent shoeprints is a task that is as meticulous as searching for latent fingerprints. Hard-surface flooring, sheets of paper, magazines, and larger pieces of broken glass make excellent surfaces for finding shoeprints. The areas near the victim and close to points of entry and exit are typically the most fruitful places to search for shoeprints.
Latent shoeprints are handled in a manner similar to latent fingerprints. They can often be dusted with fingerprint powder and either photographed or lifted with special adhesive tape. For latent dust or fine dirt prints, investigators may use an electrostatic lifting device, which creates an electrostatic charge that actually transfers the print to a lifting film specifically designed for this purpose. Latent shoeprints in blood often are exposed by using luminol (see Chapter 6).
Recording plastic prints
Plastic shoeprints are made in soft, malleable material such as mud or snow. These prints can be photographed, using an angled light source to bring out depth and detail. Impressions in snow and sand create special problems because they’re light in color, and this makes achieving any contrast in the photographic image more difficult. You can resolve this issue by lightly coating the shoe impression with a dark spray paint.
After the impression is photographed, a criminalist usually makes a three-dimensional casting of the print, which then can be used for making a better match between the impression and the suspect’s shoes. First, a metal or wooden frame is placed around the impression. Dental stone, a hard durable plaster, is then carefully poured into the shoe impression and allowed to set. Before the dental stone hardens completely, the initials of the person making the casting are scratched into its base so that later in court it can be identified easily and accurately.
When making a casting of a print in soft mud or sand, the weight of the plaster can deform or change the impression. Spraying the print with shellac or an acrylic lacquer before making the casting helps harden and support the impression to prevent any damage or distortion caused by the plaster.
Impressions left in snow create special problems because they’re easily deformed and, of course, snow melts. Dental stone is of little use for prints in the snow. However, all is not lost. Snowprint Wax, a product that works a lot like shellac and stabilizes snow impressions, can be applied before a casting is made.
A special form of three-dimensional shoe impression occurs when someone steps on a carpet, leaving behind faint indentions in the pile. The indention fades with time, but sometimes an angled light reveals these footprint indentations.
 Interference holography also may be used to reveal footprints in carpet. This technique uses a split laser beam to create a holographic image of the print that is then recorded on photographic film. Although interference holography doesn’t reveal great detail, it helps determine the size and overall structure of the shoe.
Making the match
After photographing, lifting, or making a casting of the crime-scene shoeprint, investigators compare it with a print obtained from a suspect’s shoe. The sole of the suspect’s shoe is coated with ink, and its pattern then is transferred to a sheet of paper or acetate. An investigator compares the prints, first by eyeballing them to determine whether the shoes have the same tread and general wear patterns, and then by using a magnifying glas — or sometimes even a low-power microscope — to look for small cuts and scars, which are key to matching any individual characteristics.
The expert examining the shoeprints determines whether the impressions match or don’t match, or whether the results are inconclusive, which means the examiner can’t say with certainty one way or the other.
Tracking Down Tires
 A hundred years ago, criminals didn’t stray too far, prowling only their local neighborhoods or towns on foot or horseback. They had fewer means of traveling far from home to commit their crimes. Think about it: How far can you walk or ride a horse in an hour or two? The advent of the automobile, however, dramatically changed the distances that criminals are able to roam. Cars make criminals extremely mobile and enable them to travel from city to city, state to state, and even country to country, committing crimes across more widespread areas.
Hot on the heels of the automobile came a new world of forensic investigation. Vehicles often leave behind or carry away trace evidence. Glass and paint from an automobile can be left at the scene of an accident or hit-and-run and can help investigators identify the manufacturer, model, color, and year of the vehicle and narrow their search for the owner. Careful processing of a car’s interior can reveal blood and many other types of trace evidence connected to a perpetrator or victim. And just like fingerprints and shoeprints, a vehicle’s tires can leave behind impressions that connect them with vehicles, crime scenes, and hopefully their owners and drivers.
Although automobile tires can’t leave impressions in firm asphalt or concrete, tracks nevertheless may be present. When a car rolls through mud, paint, or blood, these substances can be picked up by the tires and transferred to the pavement. Tires also pick up grease and grime from the roadway, and if they then pass over a piece of paper or a cardboard box along the roadside, a clear tire track may be left behind.
Many of these impressions, such as those made by tar or paint, are durable, whereas others made by fragile materials, such as mud or blood, will deteriorate over time. Impressions therefore should be photographed at the scene before the paper or cardboard is moved.
Latent (invisible) tire tracks can be left on concrete or paved roads. Likewise, tires can leave behind extender oils — substances tire manufacturers use to make their products more pliable — on the surface of the roadway.
The amount of extender oils present in a given tire varies from manufacturer to manufacturer and according to the age of the tire. Because they fluoresce under ultraviolet light, these oils can expose a tire tread pattern, which then can be photographed and compared with other tire tracks. However, because tar also fluoresces under ultraviolet lights, this technique is not useful where tar-covered roads are prevalent.
Tires leave plastic or three-dimensional tracks when they are driven across soft dirt roads, soft shoulders, mud, snow, and many off-road surfaces, including lawns or fields.
Analyzing tire-track evidence
Like shoeprints, tire tracks tend to be class evidence. Although the tread design may point to a particular manufacturer and tire size, it doesn’t usually indicate the exact tire that made the impression. Matching a tire impression from a crime scene to that of a known design stored in a database narrows the field of suspects by focusing the attention of investigators on vehicles with similar tires. Several databases of tread designs, including an extensive one maintained by the FBI, are available to aid in this process.
Determining the manufacturer
A good tire track or impression yields information about tire size, tread design, manufacturer, and even the turning radius of the vehicle on which it was mounted. Tracks may also reveal the relative positions of all four tires, which is particularly important when tires on a particular vehicle vary in design, manufacturer, and tread wear. This variation is not uncommon because tires frequently are replaced one or two at a time, and replacement tires often differ from the original-equipment tires.
Tires have several design features that help with classification and identification (see Figure 7-2):
- Texture: Tire tread is wrapped around a tire’s circumference in alternating ribs (high points or ridges) and grooves (depressions), which are crisscrossed at approximately 90-degree angles by transverse grooves (called slots). This cross-hatching effect breaks up the ribs into more-or-less square islands called lugs. On the contact surface of the lugs are small grooves called sipes. Though the exact pattern varies greatly, these basic features are fairly standard and appear on most tires.
- Wear bars: Bars of rubber called wear bars or wear indicators are placed in the grooves at scattered points around the tire. They rise above the floors of the grooves approximately 1/16 inch, which is much lower in height than the tread ribs and lugs. Their purpose is to show the degree of tread wear, and, when fully exposed, they indicate that the tire should be replaced. A tire has to be significantly worn before these bars can contribute to a two-dimensional impression. However, wear bars should be visible in the casting of a three-dimensional impression.
- Noise treatment: If you look carefully at a car tire, you can see that the tread design is not simply a monotonous repetition of ribs, lugs, and grooves. Minor variations exist in the sizes of each of these design elements. Typical lugs tend to be of three different sizes, but on better tires you may find as many as nine. The purpose of these variations in lug size is to improve traction and to reduce noise. At high speeds, tires tend to vibrate. Whenever the tread design is completely uniform, vibration increases because of the development of harmonic waves, which, in turn, create more tire noise. A slight variation in design pattern prevents the buildup of vibration and harmonic waves, and thus decreases tire noise.
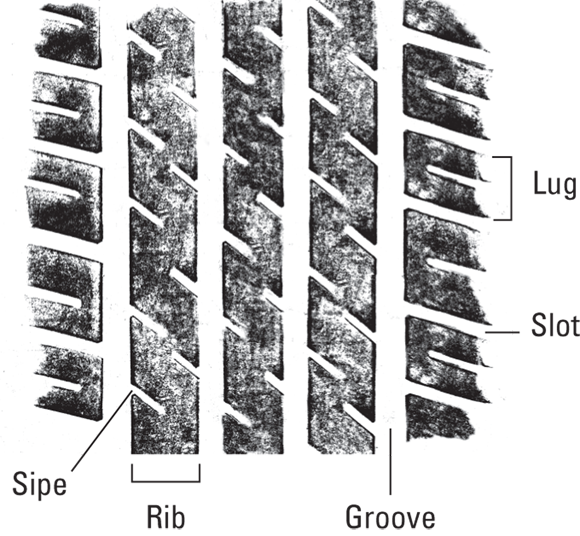
Illustration by Nan Owen
FIGURE 7-2: Investigators take a close look at these common features when trying to match tracks to the tires that made them.
Besides helping to determine the exact type and style of the tire, track evidence also can reveal other information about the car:
- Track width, or stance, can be measured from the center of one tire to the center of the tire opposite it.
- Wheelbase, or distance between the center of the front wheel hubs and the center of the rear wheel hubs, can be measured if the car was turning when it left the tracks.
- Turning radius, a measure of the tightest circle in which the vehicle can turn, also may be measurable if the tracks were left as the car turned.
These characteristics vary among vehicle models and can help narrow the field of search. For example, a Cadillac has a wider stance, longer wheelbase, and wider turning radius than a Volkswagen Beetle.
Matching track to car
Tires constantly are subjected to wear and road hazards, which produce defects that make the tire unique and distinguishable from others of the same model and size.
Wear patterns vary greatly from tire to tire and car to car. Tires usually aren’t perfectly aligned and balanced (and they’re not always inflated properly), so they wear more on one side than the other. In addition, the wear pattern may not be uniform around the entire circumference of the tire, which means that flat spots or islands of excess wear may develop. Similarly, cuts, tears, and gouges can occur, and accumulated debris, such as rocks, nails, and sharp glass, add a unique quality to the tread impression.
At times, impressions from two, three, or even all four tires are recovered from a crime scene. Collecting each of them and determining the respective locations of the tires on the vehicle that made them is important. A new car with new tires usually has the same brand of tires at all four positions, but older cars may have one or more replacement tires. The owner of a suspect vehicle with tires matching crime-scene impressions of a vehicle that has a different brand of tire at each position is in very hot water, indeed. If the wear and defect patterns on the tires also match up, he’s just about cooked.
Obtaining tire impressions
Drive your car over a firm surface or a material like cardboard, and you’ll leave a two-dimensional tire track. Careen across your neighbor’s lawn after a light rain, and you’ll likely create three-dimensional tracks. The same kind of tracks would show up in any malleable surface, such as mud or snow. Investigators have different techniques for handling these different types of tracks.
Two-dimensional
Investigators typically photograph two-dimensional impressions from a 90-degree angle, which is important for preventing any distortions. They also place a ruler near the track to capture the size of the tire and its tread patterns in the photograph.
Some two-dimensional tracks are latent, in which case investigators often use laser light and other alternative light sources to snap the tracks into view so they can be photographed.
Tread patterns from the tires of suspect vehicles are obtained by inking the tires and then rolling them down long pieces of white paper, which then are compared with tire impressions from the crime scene. Capturing the entire tread pattern is important because recording noise reduction patterns and patterns caused by defects are the keys to making a match. Obtaining only a foot or so of the pattern may exclude this critical information.
Three-dimensional
Investigators photograph three-dimensional impressions under an angled light source, which can add detail and depth to the photo. After taking the photos, they make a casting of the impression, using techniques similar to the ones used for plastic shoe impressions. Castings are better for comparisons than photographs because they show more detail, accurately reflect tread depth and design element contours, and expose any unevenness in wear pattern of the tire tracks. Photographs are less likely to reveal these types of details.
Castings can also be inked and used to make two-dimensional impressions on paper, which then can be matched against any other two-dimensional impressions found at the scene or against those obtained from a suspect vehicle.
Prying Clues from Tool Marks
Although they may look identical, two tools of the same kind made by the same manufacturer bear tiny variations that make them as unique and distinguishable as fingerprints. Even mass-produced products, cut from the same mold, have minor flaws that distinguish them from one another. And after they’ve been used, tools develop nicks, scrapes, striations, and other minor defects that further set them apart. These minor, even microscopic, defects are individual characteristics that may be recognized whenever the tools are put to use.
Characterizing and using tool marks
Marks that are found on and often transferred from tools are classified into the following three categories:
- Indentation marks occur when a tool is pressed into a soft material such as putty, caulking, or thick paint. A screwdriver tip wedged into a caulked window seal during a break-in may leave behind an indentation in the soft caulking or even the wood, vinyl, or metal parts of the window itself. Class characteristics, such as the width and depth of the tool, are often revealed by these impressions. For example, investigators may even be able to determine that a screwdriver of a particular size made the pry marks on the window. Matching the indentation marks with a particular screwdriver, however, is difficult, if not impossible.
- Sliding marks occur when a tool slides or scratches across a surface. Chisels, screwdrivers, and crowbars often produce sliding marks when wedged into a doorjamb or window seal. These tools can leave behind a pattern of lines or striations in wood, metal, paint, or other materials. These striations vary from tool to tool and often reveal manufacturing and use defects. These defects may be distinct enough to yield a conclusive match with a tool belonging to a suspect.
- Cutting marks are left by tools that slice through materials. Wire and bolt cutters often leave behind lines and striations along the cut edges of wires, bolts, and lock shackles. And because many of these cutting tools are ground or sharpened by hand, the resulting striation pattern may be unique to a particular tool. An examiner may therefore conclude that the tool in question produced the pattern. The best cut surfaces to use for comparison are soft metals, such as copper and lead, because they more readily retain the microscopic detail of the cut marks left by the tool’s blade.
The best places to look for prying tool marks at a crime scene are at points of entry into a building or any enclosure. Windows, doors, cabinets, and safes are common locations. Cutting marks typically are found on chains and lock hackles or hasps.
Capturing tool impressions
After carefully examining and photographing tool marks, investigators remove them (if they can) and take them to the lab for further analysis. A door, window, lock, or chain can be taken in its entirety to the lab. Investigators make castings of any indentation marks that cannot be moved. Several casting materials are available, but the most versatile appear to be rubberized or silicon-based materials such a Mikrosil, as these tend to retain minute details of the impression.
Under no circumstances whatsoever should the suspect tool be placed into contact with the impression. In other words, investigators can forget about making any effort to fit the suspect tool into the indented tool mark. Doing so can alter the impression or mark and thereby render it useless in court.
In the lab, a comparison microscope (see the nearby sidebar, “Using two, two, two microscopes in one”) enables an examiner to place two images side by side so that the finer details are more easily compared. Close examination of indentation, scrape, and cut marks from a crime scene reveals microscopic lines, grooves, and striations that can be matched by an examiner with a suspect tool. The examiner makes a cut using the suspect implement, preferably into a soft material that will retain the unique striations caused by defects in the working surfaces of the tool but won’t damage the tool. The cut surface from the crime scene then is compared under the comparison microscope with the cut surface produced in the lab, as shown in Figure 7-3.
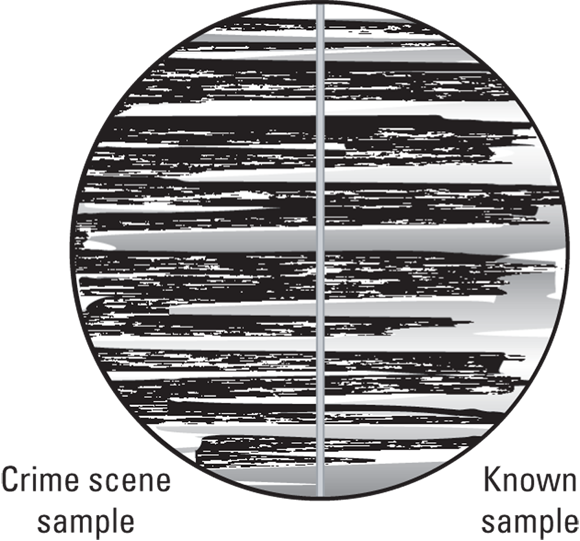
Illustration by Nan Owen
FIGURE 7-3: Tool-mark striations from a crime scene and suspect tool as seen through the comparison microscope.
Sometimes a comparison cut in soft lead isn’t adequate for making an accurate comparison. To re-create the crime scene cut as accurately as possible, the examiner must cut the same material in the same manner. For example, if a bolt cutter was used to cut a lock hackle and the lab has the cut lock and a suspect bolt cutter, the examiner can cut a similar lock hackle with the bolt cutter, trying to do so at the same angle and with the same pressure used by the perpetrator. The separate crime-scene and lab-produced cuts then are compared under the comparison microscope.
Bolt cutters and similar devices can cause special problems for crime labs because their cutting edges are bigger than the items they cut. For an accurate comparison to be made, the lab-produced cuts must be made by the same portion of the cutting blade that was used in the crime. The examiner can make several cuts using different areas of the tool’s working surface, but doing so is time consuming and may damage the blade, thus making further comparisons impossible.
Fortunately, chemical tests can reveal traces of the cut object or material on the cutting edge of the tool. For example, many locks have zinc coatings. Testing the blade for zinc may reveal exactly where on the blade the cut was made and enable the examiner to make a cut at the same spot, thus making a more accurate comparison. To avoid contamination of the cutting edge, such chemical testing should take place before any comparison cuts are made.
Investigators or lab technicians also may be asked to evaluate pressed imprints. Many illegal drug labs compress their products into tablets. Presses used for this purpose often leave behind distinguishing marks on the surfaces of the pills. Microscopic examination of the press and the suspect pills may lead to a match.
Finding Facts in Fabrics
Prints and impressions aren’t just for fingers, shoes, and tools. Fabrics, leathers, and other materials also can leave behind impressions, although these are not as commonly found and rarely are used as individual evidence.
The most common fabric impressions come from gloves. Just like your fingertips, gloves can pick up grease, dirt, and grime and then deposit either patent or latent prints on surfaces. Sometimes patterns left at a crime scene can be used for comparison with a suspect glove.
Leather gloves tend to crease, wrinkle, and crack with use. The pattern of these defects can make a unique print. Gloves made from cotton and other fabrics also can leave behind an imprint of their weave patterns, and any pulls, snags, tears, and other imperfections that show up in the print may make it possible for an investigator to make a conclusive match with a suspect glove.
Glove prints are handled in a manner similar to the way fingerprint evidence is gathered. Patent prints are photographed, and latent prints are dusted with fingerprint powder and then photographed and lifted. An electrostatic device (see the earlier section, “Looking for latent prints”) can be used to lift glove prints left in dust.
Other fabrics may also leave impressions. For example, when blood, oil, grease, or dirt get on clothing, they can be transferred by contact to a wall or other object. Fabric impressions from the clothing of hit-and-run victims have been found in the dirt and grease on car fenders.