CHAPTER 2
Personalizing Your iPhone
To make your iPhone work the way you prefer, you can configure its many settings. In this chapter, you learn how to control iCloud sync, notifications, audio preferences, screen brightness, and other key aspects of the iPhone’s behavior.
Choose Which iCloud Items to Sync
Choose Which Apps Can Give Notifications
Choose Sounds and Haptics Settings
Set Appearance, Brightness, and Wallpapers
Configure Night Shift and Display Zoom
Choose Privacy and Location Settings
Choose Locking and Control Center Settings
Set Up and Use Do Not Disturb Mode
Secure Your iPhone with Face ID and a Passcode
Configure Screen Time and Restrictions
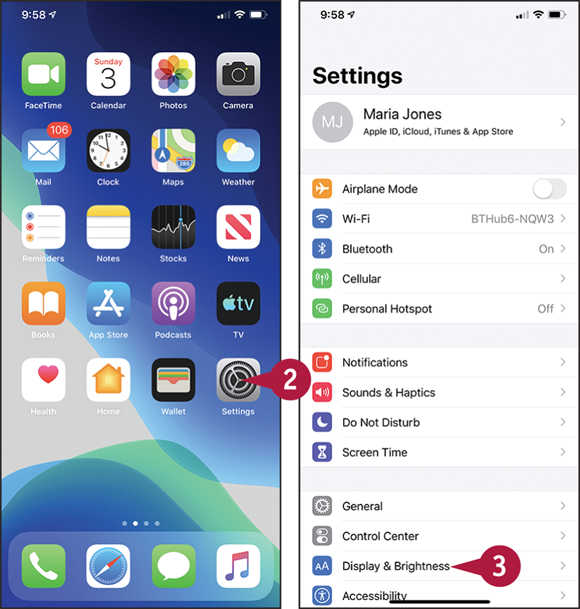
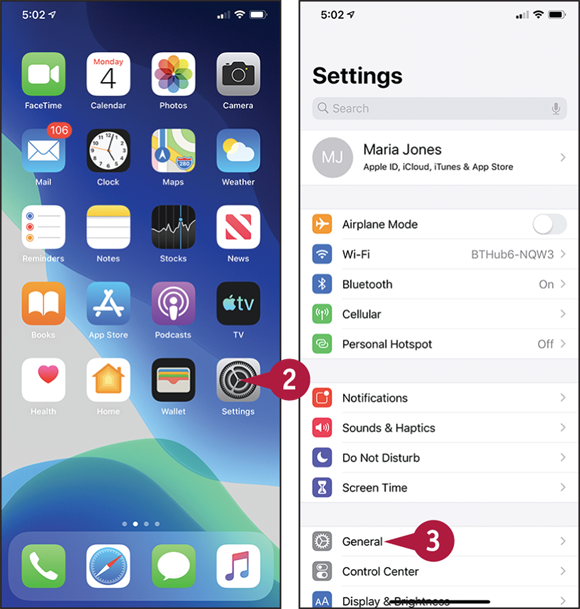
Find the Settings You Need
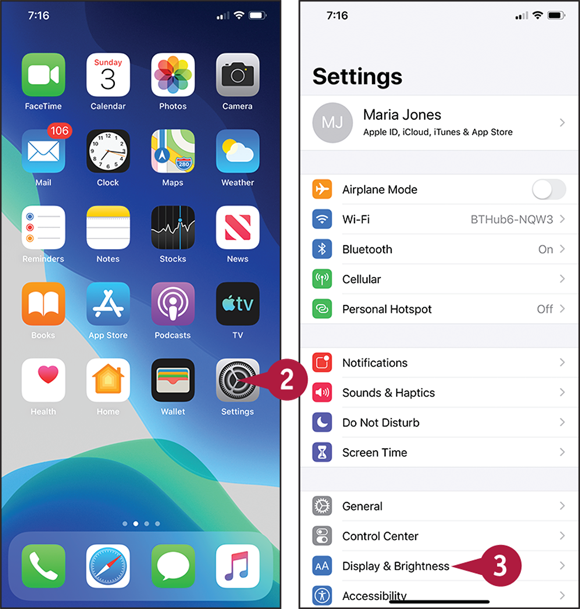
The iOS operating system includes many settings that enable you to configure your iPhone to work the way you prefer. The central place for manipulating settings is the Settings app, which contains settings for the iPhone’s system software, the apps the iPhone includes, and third-party apps you have added. To reach the settings, you first display the Settings screen and then the category of settings you want to configure.
Find the Settings You Need

Display the Settings Screen
![]() Swipe up from the bottom of the screen.
Swipe up from the bottom of the screen.
The Home screen appears.
![]() Tap Settings (
Tap Settings (![]() ).
).
The Settings screen appears.
![]() You can tap Search (
You can tap Search (![]() ) and type a setting name or keyword to locate the setting. You may need to drag down the screen to reveal the Search bar.
) and type a setting name or keyword to locate the setting. You may need to drag down the screen to reveal the Search bar.
![]() The Apple ID button, which shows your Apple ID name, gives access to settings for your Apple ID and your accounts for iCloud, iTunes, and the App Store.
The Apple ID button, which shows your Apple ID name, gives access to settings for your Apple ID and your accounts for iCloud, iTunes, and the App Store.
![]() The top section of the Settings screen contains settings you are likely to use frequently, such as Airplane Mode, Wi-Fi, and Bluetooth.
The top section of the Settings screen contains settings you are likely to use frequently, such as Airplane Mode, Wi-Fi, and Bluetooth.
![]() Tap and drag up to scroll down the screen.
Tap and drag up to scroll down the screen.
![]() This section contains settings for built-in apps and features developed by Apple.
This section contains settings for built-in apps and features developed by Apple.
![]() Tap and drag up to scroll farther down the screen. You can also swipe up to move more quickly.
Tap and drag up to scroll farther down the screen. You can also swipe up to move more quickly.
![]() This section contains settings for apps you install. These apps can be either from Apple or from third-party developers.
This section contains settings for apps you install. These apps can be either from Apple or from third-party developers.
Display a Settings Screen
![]() On the Settings screen, tap the button for the settings category you want to display. For example, tap Sounds & Haptics (
On the Settings screen, tap the button for the settings category you want to display. For example, tap Sounds & Haptics (![]() ) to display the Sounds and Haptics screen.
) to display the Sounds and Haptics screen.
![]() Tap Settings (
Tap Settings (![]() ) when you are ready to return to the Settings screen.
) when you are ready to return to the Settings screen.
Note: Tap at the very top of the screen — for example, tap the clock readout or the battery icon — to scroll quickly to the top of the screen. This shortcut action works in most iOS apps.
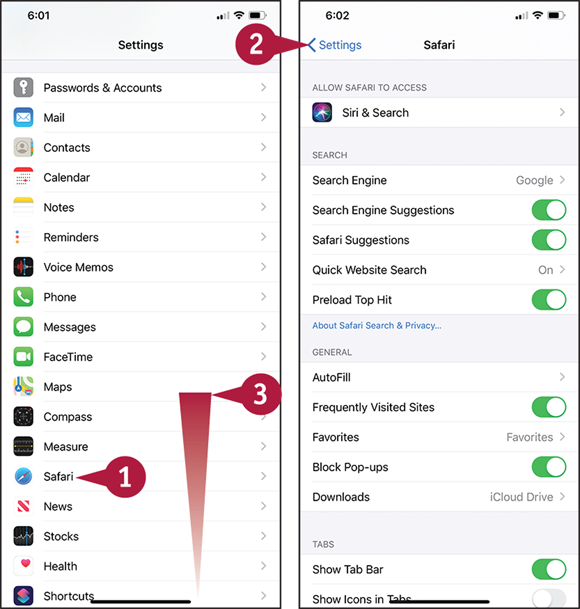
Display the Settings for an App
![]() On the Settings screen, tap the button for the app whose settings you want to display. For example, tap Safari (
On the Settings screen, tap the button for the app whose settings you want to display. For example, tap Safari (![]() ) to display the Safari settings.
) to display the Safari settings.
![]() Tap Settings (
Tap Settings (![]() ) when you are ready to return to the Settings screen.
) when you are ready to return to the Settings screen.
![]() Swipe up from the bottom of the screen.
Swipe up from the bottom of the screen.
The Home screen appears again.
Note: When you next open the Settings app, it displays the screen you were last using. For convenience, it is usually best to return to the main Settings screen when you finish choosing settings.
Choose Which iCloud Items to Sync
Apple’s iCloud service enables you to sync many types of data — such as your e-mail account details, your contacts, and your calendars and reminders — online so you can access them from any of your devices. You can also use the Find My iPhone feature to locate your iPhone when it goes missing. To use iCloud, you set your iPhone to use your Apple ID, and then choose which features to use.
Choose Which iCloud Items to Sync

![]() Swipe up from the bottom of the screen.
Swipe up from the bottom of the screen.
The Home screen appears.
![]() Tap Settings (
Tap Settings (![]() ).
).
The Settings screen appears.
![]() Tap the Apple ID button. This button shows the name you have set for your Apple ID.
Tap the Apple ID button. This button shows the name you have set for your Apple ID.
![]() Tap iCloud (
Tap iCloud (![]() ).
).
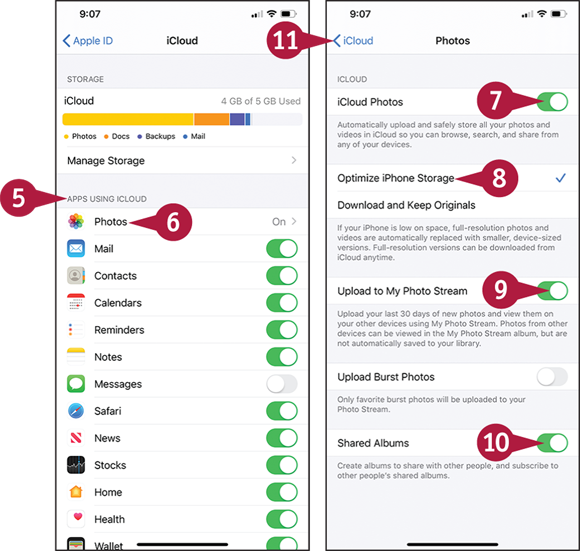
The iCloud screen appears.
![]() In the Apps Using iCloud section, set each app’s switch to On (
In the Apps Using iCloud section, set each app’s switch to On (![]() ) or Off (
) or Off (![]() ), as needed.
), as needed.
![]() Tap Photos (
Tap Photos (![]() ).
).
The Photos screen appears.
![]() Set the iCloud Photos switch to On (
Set the iCloud Photos switch to On (![]() ) to store all your photos in iCloud.
) to store all your photos in iCloud.
![]() Tap Optimize iPhone Storage to store lower-resolution versions of photos on your iPhone to save space. Tap Download and Keep Originals if you prefer to keep original, full-quality photos on your iPhone.
Tap Optimize iPhone Storage to store lower-resolution versions of photos on your iPhone to save space. Tap Download and Keep Originals if you prefer to keep original, full-quality photos on your iPhone.
![]() Set the Upload to My Photo Stream switch to On (
Set the Upload to My Photo Stream switch to On (![]() ) to upload photos to your photo stream.
) to upload photos to your photo stream.
![]() Set the Shared Albums switch to On (
Set the Shared Albums switch to On (![]() ) to use the Shared Albums feature.
) to use the Shared Albums feature.
![]() Tap iCloud (
Tap iCloud (![]() ).
).
The iCloud screen appears again.
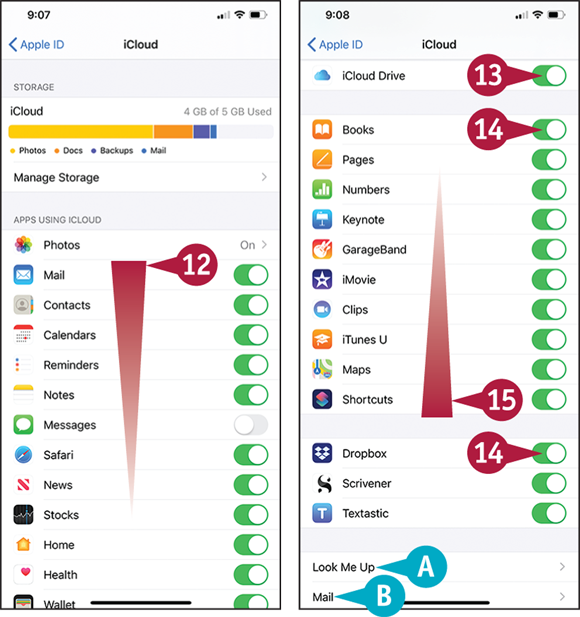
![]() Swipe up to scroll down to the lower part of the screen.
Swipe up to scroll down to the lower part of the screen.
![]() Set the iCloud Drive switch to On (
Set the iCloud Drive switch to On (![]() ) to enable iCloud Drive.
) to enable iCloud Drive.
![]() In the next two sections, set each app’s switch to On (
In the next two sections, set each app’s switch to On (![]() ) or Off (
) or Off (![]() ) to control whether the app can use iCloud.
) to control whether the app can use iCloud.
![]() You can tap Look Me Up to control which apps can look you up by your Apple ID.
You can tap Look Me Up to control which apps can look you up by your Apple ID.
![]() You can tap Mail to change your name in outgoing iCloud messages or choose advanced settings.
You can tap Mail to change your name in outgoing iCloud messages or choose advanced settings.
![]() Swipe down to scroll up until iCloud Drive appears at the bottom of the screen.
Swipe down to scroll up until iCloud Drive appears at the bottom of the screen.
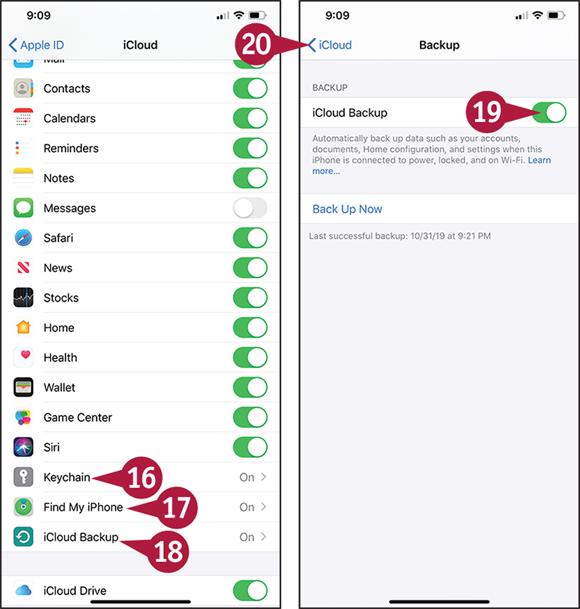
![]() Tap Keychain (
Tap Keychain (![]() ) to display the Keychain screen, set the iCloud Keychain switch to On (
) to display the Keychain screen, set the iCloud Keychain switch to On (![]() ), and then create a security code if prompted to do so.
), and then create a security code if prompted to do so.
![]() Tap Find My iPhone (
Tap Find My iPhone (![]() ) to display the Find My iPhone screen, set the Find My iPhone switch to On (
) to display the Find My iPhone screen, set the Find My iPhone switch to On (![]() ), and set the Send Last Location switch to On (
), and set the Send Last Location switch to On (![]() ) or Off (
) or Off (![]() ), as necessary.
), as necessary.
![]() Tap iCloud Backup (
Tap iCloud Backup (![]() ).
).
The Backup screen appears.
![]() Set the iCloud Backup switch to On (
Set the iCloud Backup switch to On (![]() ).
).
![]() Tap iCloud (
Tap iCloud (![]() ).
).
The iCloud screen appears again.
Choose Which Apps Can Give Notifications
Some iPhone apps can notify you of events that occur, such as messages arriving or updates becoming available. You can choose which notifications an app gives or prevent an app from giving notifications. You can also control notification previews and choose which notifications appear on the lock screen and in Notification Center.
iPhone apps use three types of notifications: badges on app icons, persistent banners, and temporary banners. See the tip for details.
Choose Which Apps Can Give Notifications
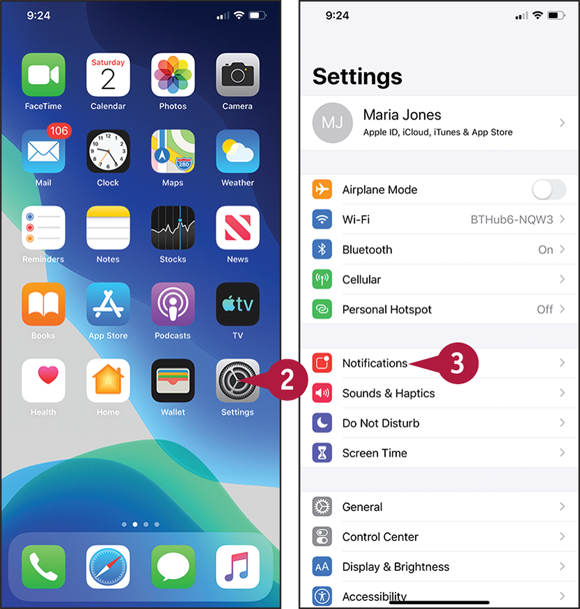
![]() Swipe up from the bottom of the screen.
Swipe up from the bottom of the screen.
The Home screen appears.
![]() Tap Settings (
Tap Settings (![]() ).
).
The Settings screen appears.
![]() Tap Notifications (
Tap Notifications (![]() ).
).
The Notifications screen appears.
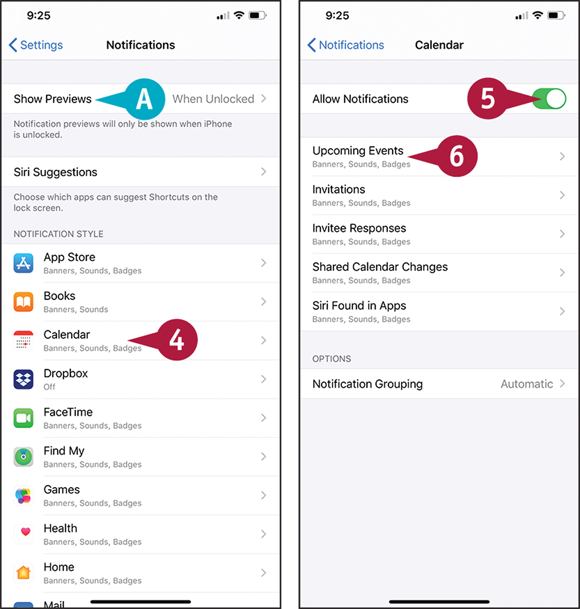
![]() To choose your default setting for notification previews, tap Show Previews, and then tap Always, When Unlocked, or Never, as needed.
To choose your default setting for notification previews, tap Show Previews, and then tap Always, When Unlocked, or Never, as needed.
![]() Tap the app for which you want to configure notifications. This example uses Calendar (
Tap the app for which you want to configure notifications. This example uses Calendar (![]() ).
).
The screen for configuring the app’s notifications appears.
![]() Set the Allow Notifications switch to On (
Set the Allow Notifications switch to On (![]() ) to enable notifications.
) to enable notifications.
Note: For some apps, all the options appear on the screen for configuring the app’s notifications.
![]() Tap the button for the notification type you want to configure. This example uses Upcoming Events.
Tap the button for the notification type you want to configure. This example uses Upcoming Events.
The screen for configuring that notification type appears, such as the Upcoming Events screen.
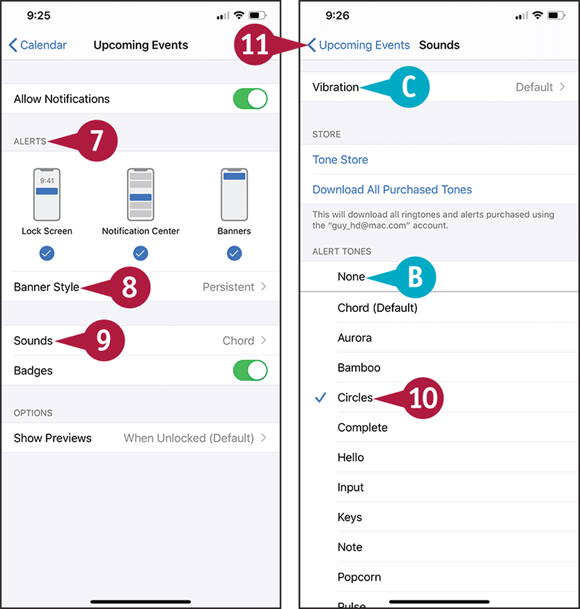
![]() In the Alerts section, tap Lock Screen, Notification Center, and Banners to control where alerts appear (
In the Alerts section, tap Lock Screen, Notification Center, and Banners to control where alerts appear (![]() ) or do not appear (
) or do not appear (![]() ).
).
![]() Tap Banner Style to display the Banner Style screen; tap Temporary or Persistent, as needed; and then tap Back (
Tap Banner Style to display the Banner Style screen; tap Temporary or Persistent, as needed; and then tap Back (![]() ).
).
![]() Tap Sounds.
Tap Sounds.
![]() Tap the sound you want to use.
Tap the sound you want to use.
![]() You can tap None for no sound.
You can tap None for no sound.
![]() You can tap Vibration and choose the vibration pattern for the notification type.
You can tap Vibration and choose the vibration pattern for the notification type.
![]() Tap the Back button (
Tap the Back button (![]() ), such as Upcoming Events (
), such as Upcoming Events (![]() ) in this example.
) in this example.
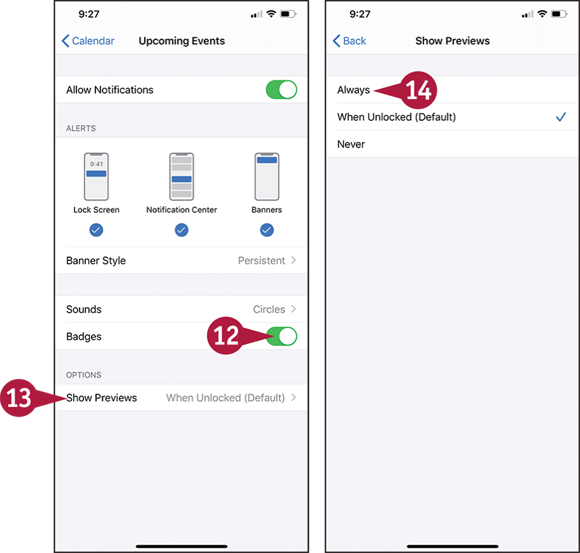
![]() Set the Badges switch to On (
Set the Badges switch to On (![]() ) to show badges.
) to show badges.
![]() To exempt this app from your default preview setting, tap Show Previews.
To exempt this app from your default preview setting, tap Show Previews.
The Show Previews screen appears.
![]() Tap Always, When Unlocked, or Never, as needed.
Tap Always, When Unlocked, or Never, as needed.
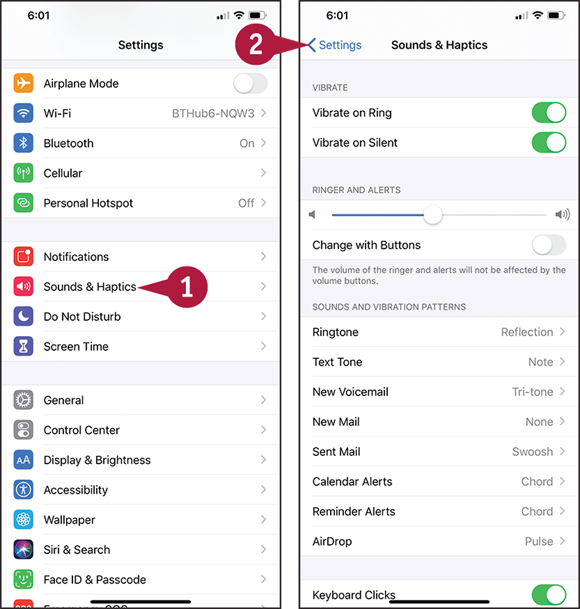
Choose Sounds and Haptics Settings
The Sounds & Haptics screen in Settings enables you to control what audio feedback and vibration feedback your iPhone gives you. You can have the iPhone always vibrate to signal incoming calls, or vibrate only when the ringer is silent. You can set the ringer and alerts volumes, choose your default ringtone and text tone, and choose which items can give you alerts. Your iPhone can play lock sounds to confirm you have locked or unlocked your iPhone. It can also play keyboard clicks to confirm each key press.
Choose Sounds and Haptics Settings

![]() Swipe up from the bottom of the screen.
Swipe up from the bottom of the screen.
The Home screen appears.
![]() Tap Settings (
Tap Settings (![]() ).
).
The Settings screen appears.
![]() Tap Sounds & Haptics (
Tap Sounds & Haptics (![]() ).
).

The Sounds & Haptics screen appears.
![]() Set the Vibrate on Ring switch to On (
Set the Vibrate on Ring switch to On (![]() ) or Off (
) or Off (![]() ), as needed.
), as needed.
![]() Set the Vibrate on Silent switch to On (
Set the Vibrate on Silent switch to On (![]() ) or Off (
) or Off (![]() ), as needed.
), as needed.
![]() Tap and drag the Ringer and Alerts slider to set the volume.
Tap and drag the Ringer and Alerts slider to set the volume.
![]() When the Change with Buttons switch is On (
When the Change with Buttons switch is On (![]() ), you can change the Ringer and Alerts volume by pressing the volume buttons on the side of the iPhone.
), you can change the Ringer and Alerts volume by pressing the volume buttons on the side of the iPhone.
![]() Tap Ringtone.
Tap Ringtone.
The Ringtone screen appears.
![]() Tap the ringtone you want to hear.
Tap the ringtone you want to hear.
![]() You can tap Tone Store to browse and buy ringtones.
You can tap Tone Store to browse and buy ringtones.
![]() Tap Vibration.
Tap Vibration.
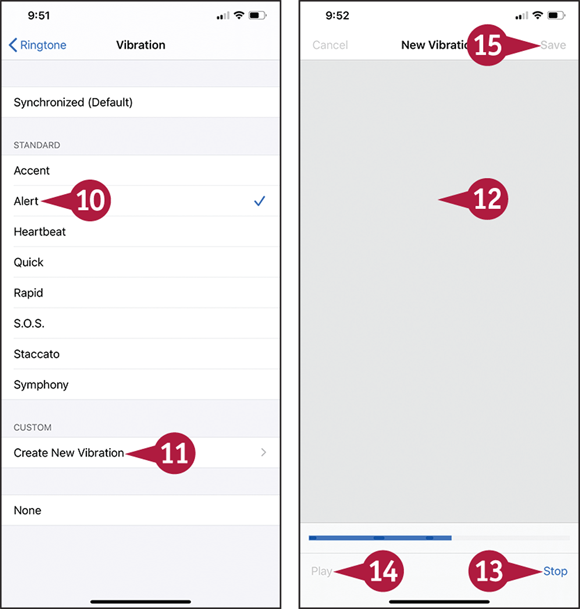
The Vibration screen appears.
![]() Tap the vibration pattern you want to feel.
Tap the vibration pattern you want to feel.
![]() If you prefer a custom vibration, tap Create New Vibration in the Custom area.
If you prefer a custom vibration, tap Create New Vibration in the Custom area.
The New Vibration screen appears.
![]() Tap a rhythm.
Tap a rhythm.
![]() Tap Stop.
Tap Stop.
![]() Tap Play to play back the vibration.
Tap Play to play back the vibration.
![]() Tap Save.
Tap Save.
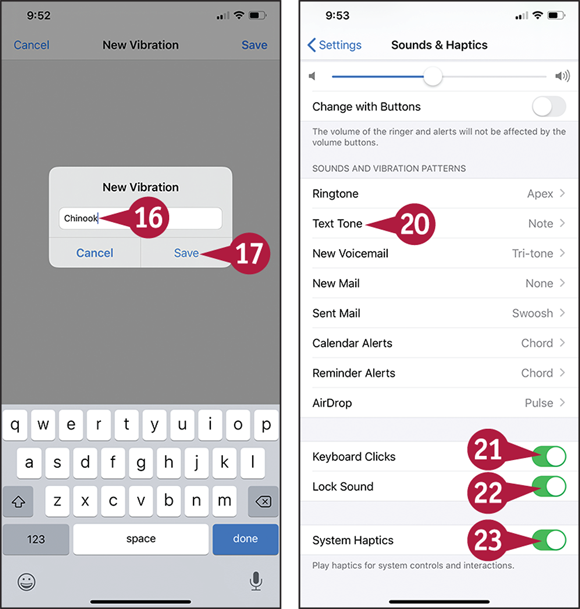
The New Vibration dialog opens.
![]() Type a name.
Type a name.
![]() Tap Save.
Tap Save.
The Vibration screen appears.
![]() Tap Ringtone (
Tap Ringtone (![]() ).
).
The Ringtone screen appears.
![]() Tap Sounds & Haptics (
Tap Sounds & Haptics (![]() ).
).
The Sounds & Haptics screen appears.
![]() Repeat steps 7 to 19 to set other tones, such as text tones.
Repeat steps 7 to 19 to set other tones, such as text tones.
![]() Set the Keyboard Clicks switch to On (
Set the Keyboard Clicks switch to On (![]() ) or Off (
) or Off (![]() ), as needed.
), as needed.
![]() Set the Lock Sound switch to On (
Set the Lock Sound switch to On (![]() ) or Off (
) or Off (![]() ), as needed.
), as needed.
![]() Set the System Haptics switch to On (
Set the System Haptics switch to On (![]() ) or Off (
) or Off (![]() ) to control whether your iPhone plays haptics for system controls and touches.
) to control whether your iPhone plays haptics for system controls and touches.
Set Appearance, Brightness, and Wallpapers
You can choose between a Light appearance and a Dark appearance for iOS, or you can set iOS to switch automatically between Light and Dark. You can adjust the screen’s brightness to improve visibility, and you can turn the True Tone feature on to make colors appear consistent.
To make the screen look good, you can choose which picture to use as the wallpaper that appears in the background. You can use either a static wallpaper or a dynamic, changing wallpaper. You can set different wallpaper for the lock screen and for the Home screen.
Set Appearance, Brightness, and Wallpapers
![]() Swipe up from the bottom of the screen to display the Home screen.
Swipe up from the bottom of the screen to display the Home screen.
![]() Tap Settings (
Tap Settings (![]() ) to display the Settings screen.
) to display the Settings screen.
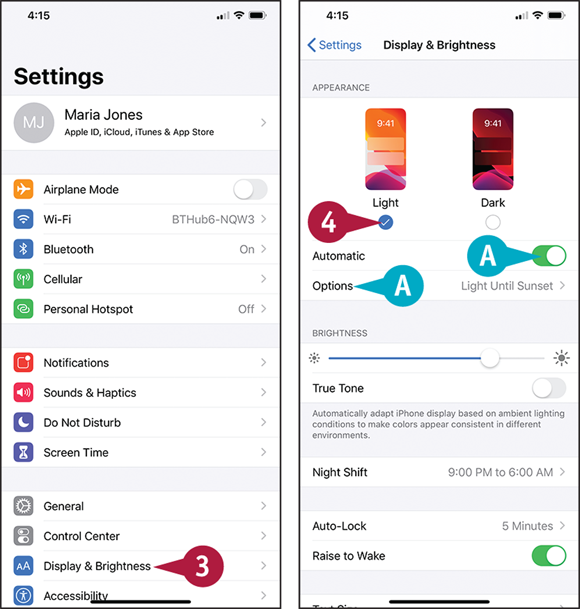
![]() Tap Display & Brightness (
Tap Display & Brightness (![]() ).
).
![]() In the Appearance area, select Light (
In the Appearance area, select Light (![]() ) or Dark (
) or Dark (![]() ), as appropriate.
), as appropriate.
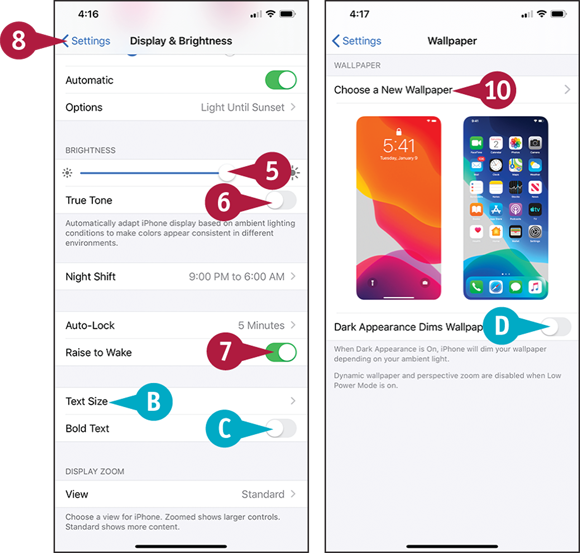
![]() If you want iOS to switch between Light and Dark for you, set the Automatic switch to On (
If you want iOS to switch between Light and Dark for you, set the Automatic switch to On (![]() ). Tap Options; tap Sunset to Sunrise, or tap Custom Schedule and set custom times; and then tap Back (
). Tap Options; tap Sunset to Sunrise, or tap Custom Schedule and set custom times; and then tap Back (![]() ).
).
![]() Drag the Brightness slider left or right to set brightness.
Drag the Brightness slider left or right to set brightness.
![]() Set the True Tone switch to On (
Set the True Tone switch to On (![]() ) if you want colors to appear consistent in different lighting conditions.
) if you want colors to appear consistent in different lighting conditions.
![]() Set the Raise to Wake switch to On (
Set the Raise to Wake switch to On (![]() ) to make the iPhone wake when you raise it.
) to make the iPhone wake when you raise it.
![]() You can tap Text Size to set your preferred text size.
You can tap Text Size to set your preferred text size.
![]() You can set the Bold Text switch to On (
You can set the Bold Text switch to On (![]() ) to make the system text bold.
) to make the system text bold.
![]() Tap Settings (
Tap Settings (![]() ).
).
The Settings screen appears again.
![]() Tap Wallpaper (
Tap Wallpaper (![]() ).
).
![]() You can set the Dark Appearance Dims Wallpaper switch to On (
You can set the Dark Appearance Dims Wallpaper switch to On (![]() ) to make the Dark appearance dim the wallpaper.
) to make the Dark appearance dim the wallpaper.
![]() Tap Choose a New Wallpaper.
Tap Choose a New Wallpaper.
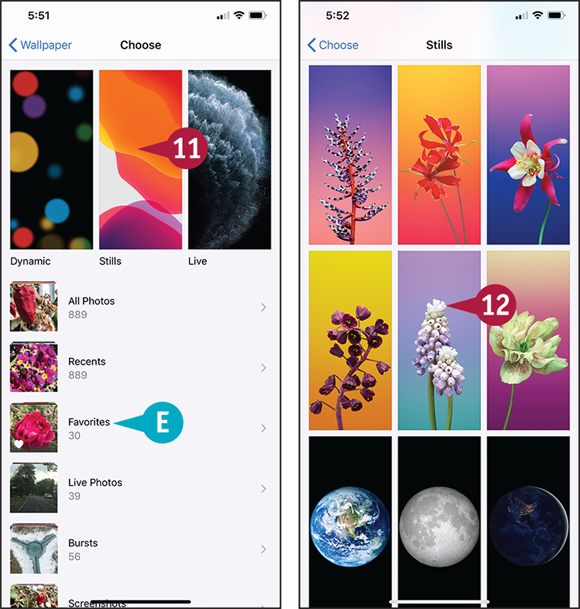
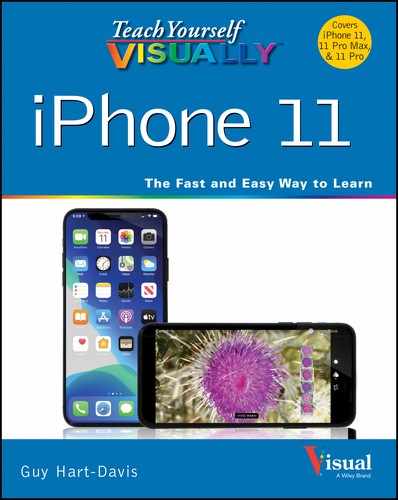
![]() Tap Dynamic, Stills, or Live in the Apple Wallpaper area. This example uses Stills.
Tap Dynamic, Stills, or Live in the Apple Wallpaper area. This example uses Stills.
![]() To choose a picture from a different picture category, tap that category.
To choose a picture from a different picture category, tap that category.
![]() Tap the wallpaper you want to use.
Tap the wallpaper you want to use.
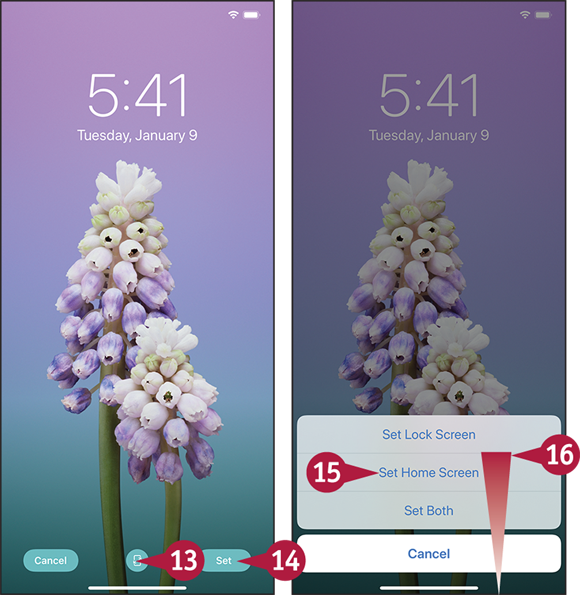
The Wallpaper Preview screen appears.
![]() Tap Perspective (
Tap Perspective (![]() or
or ![]() ) to toggle perspective on (
) to toggle perspective on (![]() ) or off (
) or off (![]() ). Perspective makes it appear that there is depth between the icons and the wallpaper.
). Perspective makes it appear that there is depth between the icons and the wallpaper.
![]() Tap Set.
Tap Set.
![]() Tap Set Lock Screen, Set Home Screen, or Set Both. Tap Cancel if you do not want to proceed.
Tap Set Lock Screen, Set Home Screen, or Set Both. Tap Cancel if you do not want to proceed.
![]() Swipe up from the bottom of the screen.
Swipe up from the bottom of the screen.
The Home screen appears.
If you changed the Home screen wallpaper, the new wallpaper appears.
Note: To see the lock screen wallpaper, press Side.
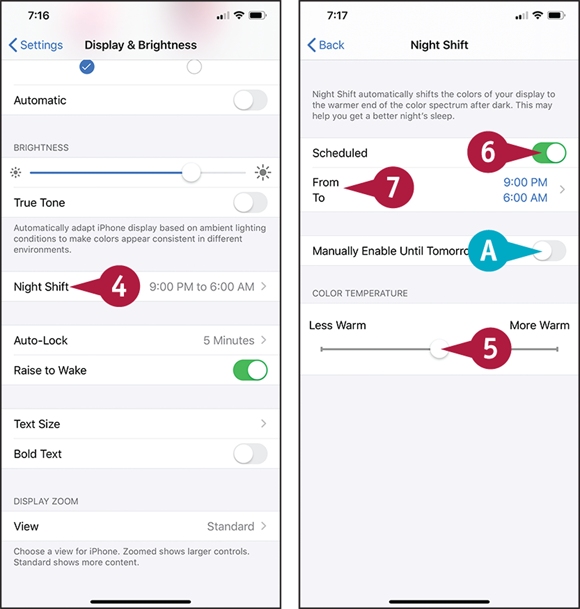
Configure Night Shift and Display Zoom
Blue light from the screens of devices can prevent or disrupt your body’s sleep, so the iPhone includes a feature called Night Shift that reduces blue light from the screen. You can configure Night Shift to run automatically each night, manually enable it until the next day, and adjust the color temperature to look more or less warm.
On large-screen iPhones, you can choose whether to zoom the display in to a larger size or to keep it at the standard size.
Configure Night Shift and Display Zoom
![]() Swipe up from the bottom of the screen.
Swipe up from the bottom of the screen.
The Home screen appears.
![]() Tap Settings (
Tap Settings (![]() ).
).
The Settings screen appears.
![]() Tap Display & Brightness (
Tap Display & Brightness (![]() ).
).
The Display & Brightness screen appears.
![]() Tap Night Shift.
Tap Night Shift.
The Night Shift screen appears.
![]() Drag the Color Temperature slider along the Less Warm–More Warm axis to set the color temperature you want for Night Shift.
Drag the Color Temperature slider along the Less Warm–More Warm axis to set the color temperature you want for Night Shift.
![]() You can set the Manually Enable Until Tomorrow switch to On (
You can set the Manually Enable Until Tomorrow switch to On (![]() ) to enable Night Shift immediately.
) to enable Night Shift immediately.
![]() Set the Scheduled switch to On (
Set the Scheduled switch to On (![]() ) to run Night Shift each night.
) to run Night Shift each night.
![]() Tap From, To.
Tap From, To.
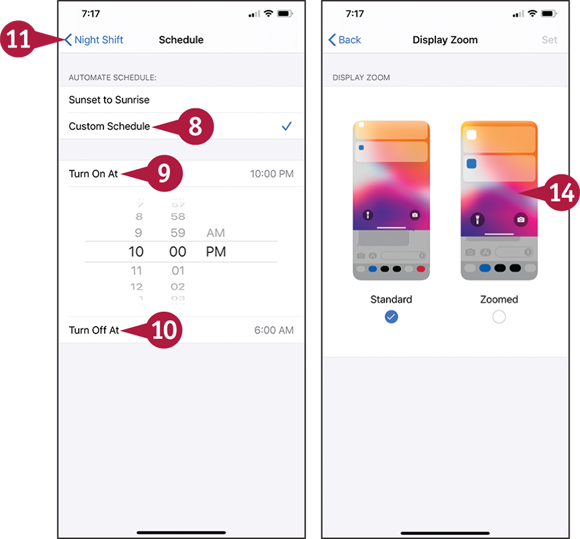
The Schedule screen appears.
![]() Tap Sunset to Sunrise if you want Night Shift to follow sunset and sunrise times for your location; go to step 11. Otherwise, tap Custom Schedule.
Tap Sunset to Sunrise if you want Night Shift to follow sunset and sunrise times for your location; go to step 11. Otherwise, tap Custom Schedule.
![]() Tap Turn On At and set the time.
Tap Turn On At and set the time.
![]() Tap Turn Off At and set the time.
Tap Turn Off At and set the time.
![]() Tap Night Shift (
Tap Night Shift (![]() ).
).
The Night Shift screen appears.
![]() Tap Display & Brightness (
Tap Display & Brightness (![]() ).
).
The Display & Brightness screen appears.
![]() Tap View in the Display Zoom area.
Tap View in the Display Zoom area.
The Display Zoom screen appears.
![]() Tap the unselected zoom type (
Tap the unselected zoom type (![]() changes to
changes to ![]() ).
).

The preview shows the zoom effect.
The preview cycles through several images to illustrate how the zoom types look.
![]() Tap Set.
Tap Set.
The Changing Display Zoom Will Restart iPhone dialog opens.
![]() Tap Use Zoomed or Use Standard, depending on which button appears.
Tap Use Zoomed or Use Standard, depending on which button appears.
Your iPhone restarts, but you do not need to unlock it again.
The display appears with the zoom effect you chose.
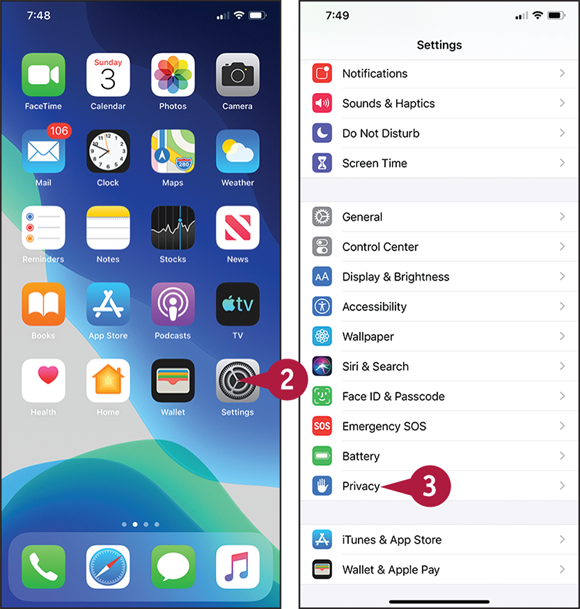
Choose Privacy and Location Settings
Your iPhone contains a huge amount of information about you, the people you communicate with, what you do, and where you go. To keep this information secure, you need to choose suitable privacy and location settings.
Privacy settings enable you to control which apps can access your contacts, calendars, reminders, and photos. You can also choose which apps can use your iPhone’s location services and which can track the iPhone’s location via the Global Positioning System, or GPS.
Choose Privacy and Location Settings
![]() Swipe up from the bottom of the screen.
Swipe up from the bottom of the screen.
The Home screen appears.
![]() Tap Settings (
Tap Settings (![]() ).
).
The Settings screen appears.
![]() Tap Privacy (
Tap Privacy (![]() ).
).
Note: To limit how ads can track your iPhone usage, tap Advertising at the bottom of the Privacy screen. On the Advertising screen, set the Limit Ad Tracking switch to On (![]() ). Tap Reset Advertising Identifier and then tap Reset Identifier in the confirmation dialog.
). Tap Reset Advertising Identifier and then tap Reset Identifier in the confirmation dialog.
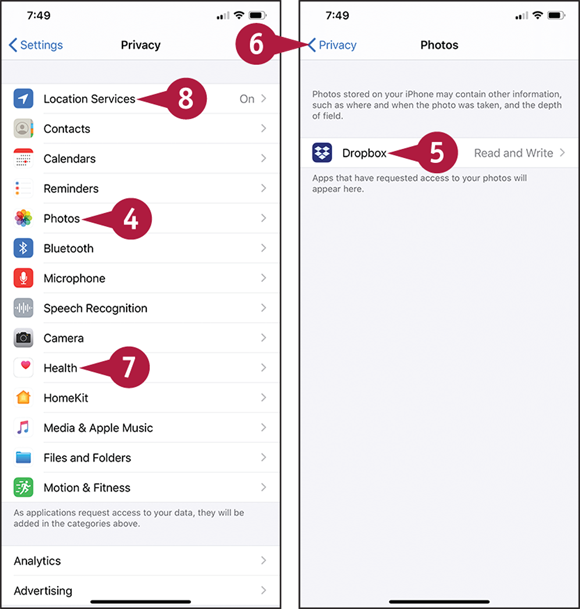
The Privacy screen appears.
![]() Tap the app or service you want to configure. This example uses Photos (
Tap the app or service you want to configure. This example uses Photos (![]() ).
).
The screen for the app or service appears.
![]() For each app, tap the switch to display the app’s screen, tap Never to prevent access or Read and Write to allow access, and then tap Back (
For each app, tap the switch to display the app’s screen, tap Never to prevent access or Read and Write to allow access, and then tap Back (![]() ).
).
![]() Tap Privacy (
Tap Privacy (![]() ).
).
The Privacy screen appears.
![]() Configure other apps and services as needed.
Configure other apps and services as needed.
![]() Tap Location Services (
Tap Location Services (![]() ).
).

The Location Services screen appears.
![]() If you need to turn location services off completely, set the Location Services switch to Off (
If you need to turn location services off completely, set the Location Services switch to Off (![]() ). Usually, you would leave it set to On (
). Usually, you would leave it set to On (![]() ).
).
![]() Tap the app or feature you want to configure.
Tap the app or feature you want to configure.
![]() In the Allow Location Access box, tap the appropriate button, such as While Using the App or Never.
In the Allow Location Access box, tap the appropriate button, such as While Using the App or Never.
Note: The buttons in the Allow Location Access box vary depending on the app or feature.
![]() Tap Back (
Tap Back (![]() ).
).
The Location Services screen appears again.
![]() Set location access for other apps and features.
Set location access for other apps and features.
![]() Tap System Services (
Tap System Services (![]() ).
).
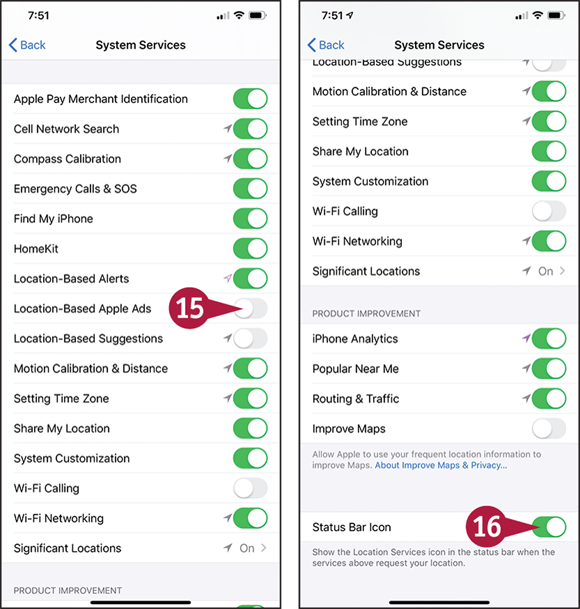
The System Services screen appears.
![]() Set the switch for each system service to On (
Set the switch for each system service to On (![]() ) or Off (
) or Off (![]() ), as needed. For example, set the Location-Based Apple Ads switch to Off (
), as needed. For example, set the Location-Based Apple Ads switch to Off (![]() ) to turn off ads based on your location.
) to turn off ads based on your location.
![]() Set the Status Bar Icon switch to On (
Set the Status Bar Icon switch to On (![]() ) to see the Location Services icon in the status bar when an app requests your location.
) to see the Location Services icon in the status bar when an app requests your location.
Configure and Use Search
Your iPhone can put a huge amount of data in the palm of your hand, and you may often need to search to find what you need.
To make your search results more accurate and helpful, you can configure the Search feature. You can turn off searching for items you do not want to see in your search results.
Configure and Use Search

Configure Search
![]() Swipe up from the bottom of the screen.
Swipe up from the bottom of the screen.
The Home screen appears.
![]() Tap Settings (
Tap Settings (![]() ).
).
The Settings screen appears.
![]() Tap Siri & Search (
Tap Siri & Search (![]() ).
).
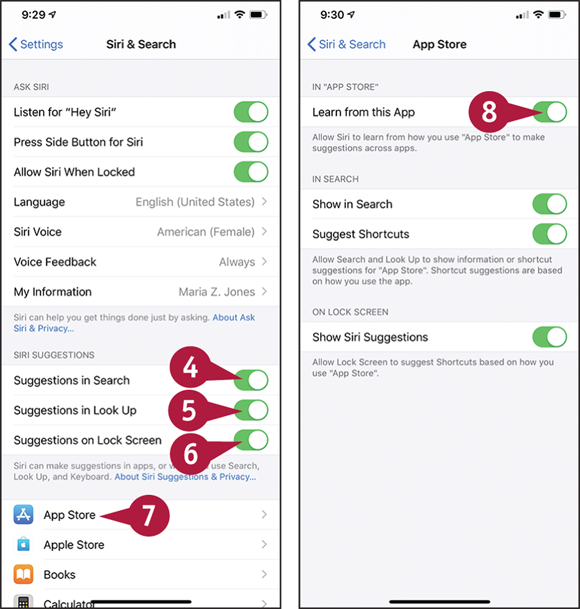
The Siri & Search screen appears.
![]() Set the Suggestions in Search switch to On (
Set the Suggestions in Search switch to On (![]() ) if you want to see Siri suggestions when you search.
) if you want to see Siri suggestions when you search.
![]() Set the Suggestions in Look Up switch to On (
Set the Suggestions in Look Up switch to On (![]() ) if you want to see Siri suggestions when you use Look Up.
) if you want to see Siri suggestions when you use Look Up.
![]() Set the Suggestions on Lock Screen switch to On (
Set the Suggestions on Lock Screen switch to On (![]() ) if you want to see Siri suggestions on the lock screen.
) if you want to see Siri suggestions on the lock screen.
![]() In the list of apps, tap the app you want to configure. This example uses App Store (
In the list of apps, tap the app you want to configure. This example uses App Store (![]() ).
).
The screen for that app appears.
![]() Set the Learn from this App switch to On (
Set the Learn from this App switch to On (![]() ) if you want Siri to learn from your use of this app.
) if you want Siri to learn from your use of this app.
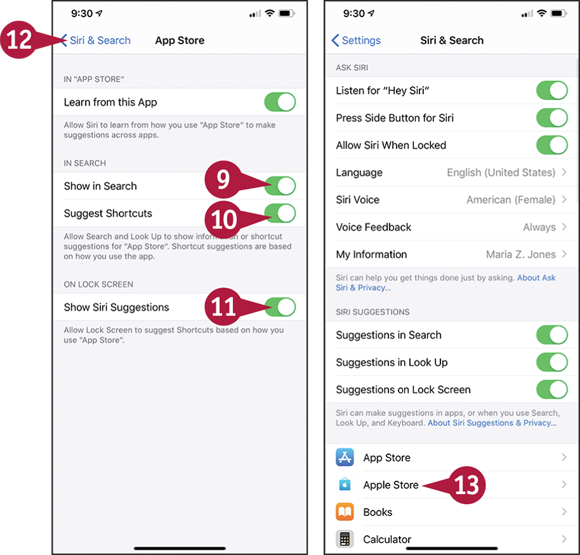
![]() Set the Show in Search switch to On (
Set the Show in Search switch to On (![]() ) if you want this app’s content to appear in searches.
) if you want this app’s content to appear in searches.
![]() Set the Suggest Shortcuts switch to On (
Set the Suggest Shortcuts switch to On (![]() ) if you want this app to appear in results for Search and Look Up.
) if you want this app to appear in results for Search and Look Up.
![]() Set the Show Siri Suggestions switch to On (
Set the Show Siri Suggestions switch to On (![]() ) if you want Siri suggestions to appear on the lock screen.
) if you want Siri suggestions to appear on the lock screen.
![]() Tap Siri & Search (
Tap Siri & Search (![]() ).
).
The Siri & Search screen appears again.
![]() Tap the next app you want to configure.
Tap the next app you want to configure.
Search for Items Using Search
![]() Swipe up from the bottom of the screen.
Swipe up from the bottom of the screen.
The Home screen appears.
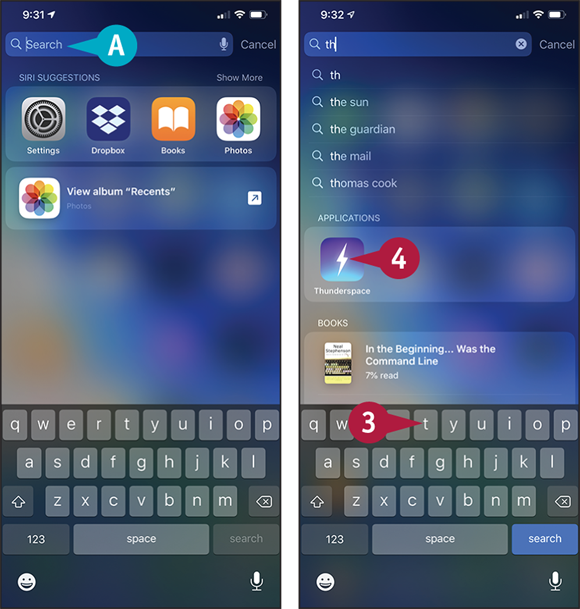
![]() Tap near the top of the screen and pull down.
Tap near the top of the screen and pull down.
![]() The Search panel appears, with the insertion point in it.
The Search panel appears, with the insertion point in it.
Note: You can also start a search by swiping right from the Home screen and then tapping the Search box at the top of the screen.
The keyboard appears.
![]() Type your search term.
Type your search term.
A list of results appears.
![]() Tap the result you want to view or open.
Tap the result you want to view or open.
Choose Locking and Control Center Settings
After a period of inactivity whose length you can configure, your iPhone automatically locks itself. It then turns off its screen and goes to sleep to save battery power. Setting your iPhone to lock itself quickly helps preserve battery power, but you may prefer to leave your iPhone on longer so that you can continue to work, and then lock your iPhone manually. You can also choose which controls to display in Control Center and the order in which they appear.
Choose Locking and Control Center Settings
![]() Swipe up from the bottom of the screen.
Swipe up from the bottom of the screen.
The Home screen appears.
![]() Tap Settings (
Tap Settings (![]() ).
).
The Settings screen appears.
![]() Tap Display & Brightness (
Tap Display & Brightness (![]() ).
).
Note: If your iPhone is managed by an administrator, you may not be able to set all the options explained here. For example, an administrator may prevent you from disabling automatic locking for security reasons.
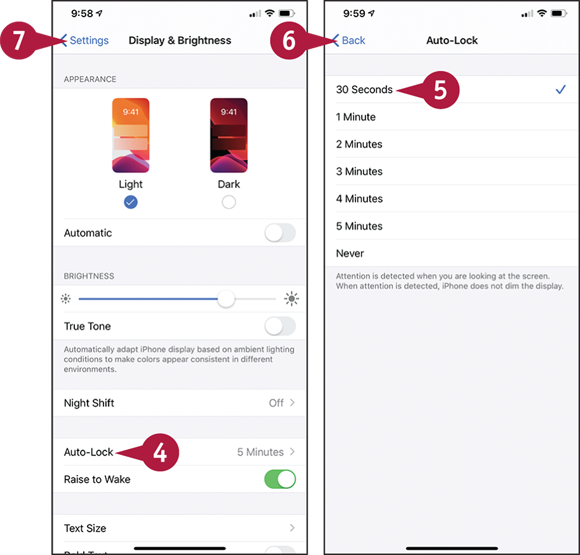
The Display & Brightness screen appears.
![]() Tap Auto-Lock.
Tap Auto-Lock.
The Auto-Lock screen appears.
![]() Tap the interval — for example, 30 Seconds.
Tap the interval — for example, 30 Seconds.
Note: Choose Never for Auto-Lock if you need to make sure your iPhone never goes to sleep. For example, if you are playing music with the lyrics displayed, turning off auto-locking may be helpful.
![]() Tap Back (
Tap Back (![]() ).
).
The Display & Brightness screen appears again.
![]() Tap Settings (
Tap Settings (![]() ).
).
The Settings screen appears again.
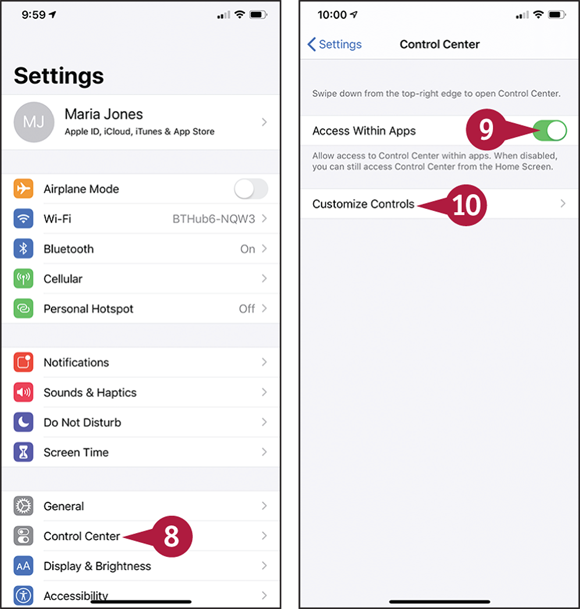
![]() Tap Control Center (
Tap Control Center (![]() ).
).
The Control Center screen appears.
![]() Set the Access Within Apps switch to On (
Set the Access Within Apps switch to On (![]() ) if you want to be able to access Control Center from apps rather than only from the Home screen.
) if you want to be able to access Control Center from apps rather than only from the Home screen.
![]() Tap Customize Controls.
Tap Customize Controls.

The Customize screen appears.
![]() The Include section shows the controls currently in Control Center that you can remove.
The Include section shows the controls currently in Control Center that you can remove.
![]() The More Controls section shows controls you can add.
The More Controls section shows controls you can add.
![]() To remove a control from Control Center, tap Remove (
To remove a control from Control Center, tap Remove (![]() ), and then tap the textual Remove button that appears.
), and then tap the textual Remove button that appears.
Note: You can also remove a control by dragging it from the Include list to the More Controls list.
![]() To add a control to Control Center, tap Add (
To add a control to Control Center, tap Add (![]() ).
).
![]() The control moves to the Include list.
The control moves to the Include list.
![]() To change the order of controls in Control Center, drag a control up or down by its handle (
To change the order of controls in Control Center, drag a control up or down by its handle (![]() ).
).
Set Up and Use Do Not Disturb Mode
When you do not want your iPhone to disturb you, turn on its Do Not Disturb Mode. You can configure Do Not Disturb Mode to turn on and off automatically at set times each day; you can also configure Do Not Disturb While Driving to run automatically. You can turn Do Not Disturb Mode on and off manually from Control Center.
You can allow particular groups of contacts to bypass Do Not Disturb Mode so they can contact you even when Do Not Disturb is on. You can also allow repeated calls to ring when Do Not Disturb is on.
Set Up and Use Do Not Disturb Mode
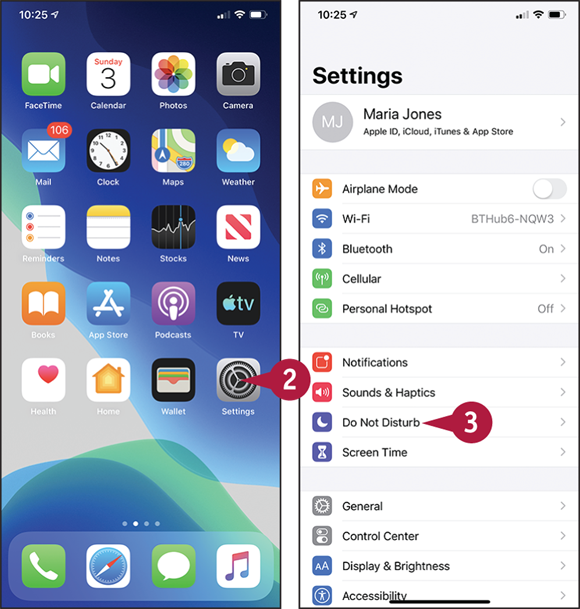
Configure Do Not Disturb Mode
![]() Swipe up from the bottom of the screen.
Swipe up from the bottom of the screen.
The Home screen appears.
![]() Tap Settings (
Tap Settings (![]() ).
).
The Settings screen appears.
![]() Tap Do Not Disturb (
Tap Do Not Disturb (![]() ).
).

![]() You can turn on Do Not Disturb manually by setting the Do Not Disturb switch to On (
You can turn on Do Not Disturb manually by setting the Do Not Disturb switch to On (![]() ).
).
Note: You can turn Do Not Disturb on and off more easily from Control Center. See the first tip in this section.
![]() Set the Dim Lock Screen switch to On (
Set the Dim Lock Screen switch to On (![]() ) if you want iOS to dim the lock screen and send notifications to Notification Center when Do Not Disturb is on.
) if you want iOS to dim the lock screen and send notifications to Notification Center when Do Not Disturb is on.
![]() Set the Scheduled switch to On (
Set the Scheduled switch to On (![]() ).
).
![]() Tap From, To.
Tap From, To.
![]() Tap From.
Tap From.
![]() Set the From time.
Set the From time.
![]() Tap To.
Tap To.
![]() Set the To time.
Set the To time.
![]() Tap Do Not Disturb (
Tap Do Not Disturb (![]() ).
).
The Do Not Disturb screen appears again.
![]() In the Silence section, tap Always or While iPhone is locked, as needed.
In the Silence section, tap Always or While iPhone is locked, as needed.
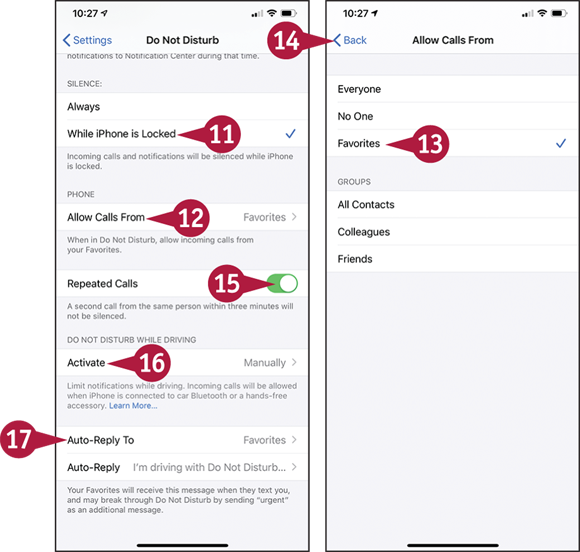
![]() Tap Allow Calls From.
Tap Allow Calls From.
![]() Tap the group you will allow to call you when Do Not Disturb is on.
Tap the group you will allow to call you when Do Not Disturb is on.
![]() Tap Do Not Disturb (
Tap Do Not Disturb (![]() ).
).
![]() Set the Repeated Calls switch to On (
Set the Repeated Calls switch to On (![]() ) or Off (
) or Off (![]() ), as needed.
), as needed.
![]() Tap Activate to display the Activate screen; choose settings for Do Not Disturb While Driving, such as Automatically or When Connected to Car Bluetooth; and then tap Do Not Disturb (
Tap Activate to display the Activate screen; choose settings for Do Not Disturb While Driving, such as Automatically or When Connected to Car Bluetooth; and then tap Do Not Disturb (![]() ).
).
![]() Choose Auto-Reply options for Do Not Disturb While Driving.
Choose Auto-Reply options for Do Not Disturb While Driving.
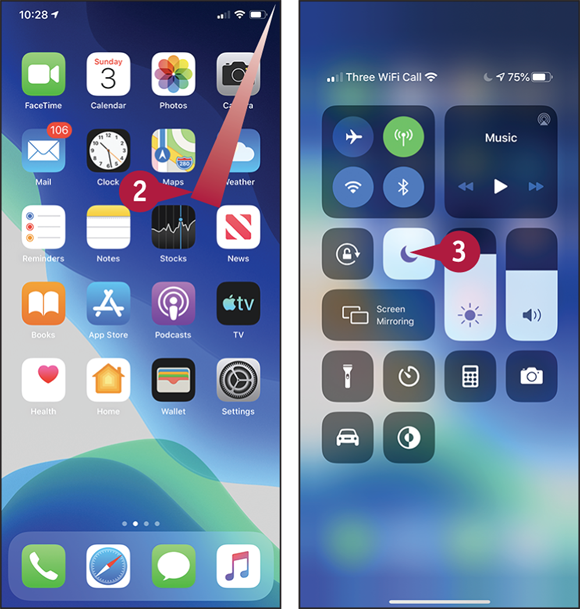
Turn Do Not Disturb Mode On or Off Manually
![]() Swipe up from the bottom of the screen.
Swipe up from the bottom of the screen.
The Home screen appears.
![]() Swipe down from the upper-right corner of the screen.
Swipe down from the upper-right corner of the screen.
Control Center opens.
![]() Tap Do Not Disturb to turn Do Not Disturb on (
Tap Do Not Disturb to turn Do Not Disturb on (![]() changes to
changes to ![]() ) or off (
) or off (![]() changes to
changes to ![]() ).
).
Customize Today View
Today View, which you display by swiping right on the first Home screen page, shows a list of widgets to provide you with quick information about the weather, the news, and your time commitments. You can configure Today View by removing widgets you do not need, adding widgets you find useful, and arranging the widgets into the order you find most helpful.
Customize Today View
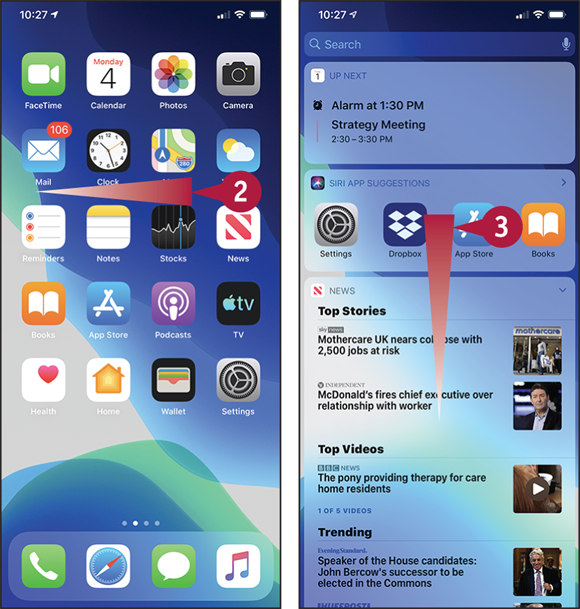
![]() Swipe up from the bottom of the screen.
Swipe up from the bottom of the screen.
The Home screen appears.
Note: If the first Home screen page does not appear at first, swipe up from the bottom of the screen again to display it.
![]() Swipe right.
Swipe right.
Today View appears.
![]() Swipe up to scroll down to the bottom of the screen.
Swipe up to scroll down to the bottom of the screen.
More items in Today View appear.
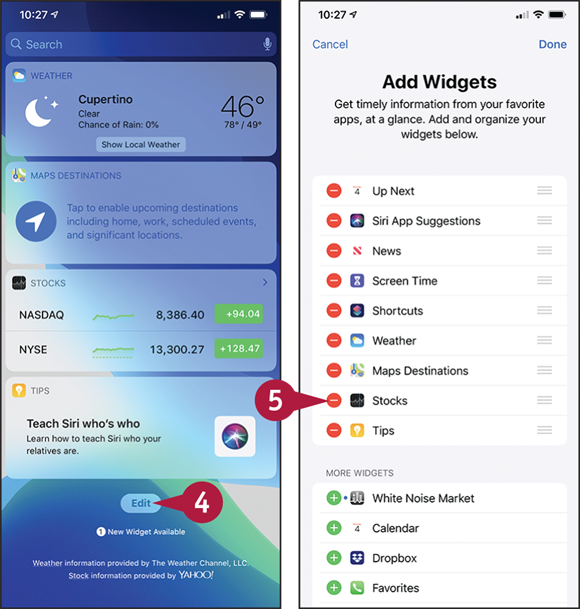
![]() Tap Edit.
Tap Edit.
The Add Widgets screen appears.
![]() Tap Remove (
Tap Remove (![]() ) to the left of a widget you want to remove.
) to the left of a widget you want to remove.

The textual Remove button appears.
![]() Tap Remove.
Tap Remove.
The widget disappears from the list.
![]() Swipe up.
Swipe up.
The More Widgets list appears.
![]() Tap Add (
Tap Add (![]() ) to the left of a widget you want to add to Today View.
) to the left of a widget you want to add to Today View.
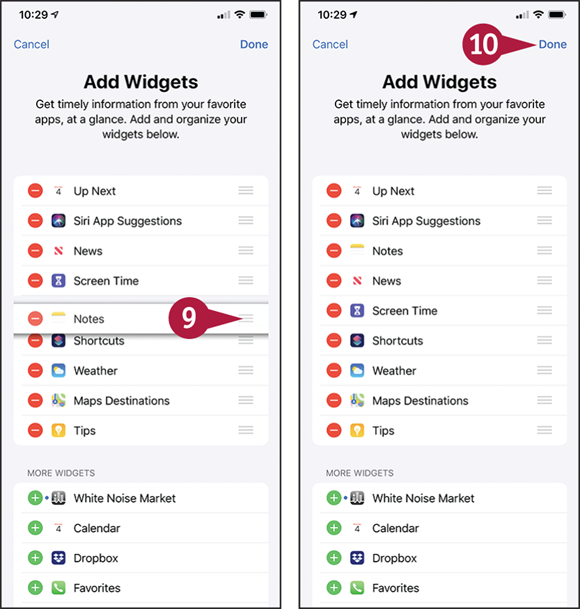
The widget appears in the upper list.
![]() Tap a widget’s handle (
Tap a widget’s handle (![]() ) and drag up or down to rearrange the widgets.
) and drag up or down to rearrange the widgets.
![]() Tap Done.
Tap Done.
Today View appears, showing the widgets in the order you specified.
Secure Your iPhone with Face ID and a Passcode
The primary method of unlocking your iPhone is Face ID, which uses depth cameras to scan your face in 3D and match it to stored data. During initial setup of your iPhone, iOS walks you through setting up Face ID, together with a passcode as a backup method of unlocking your iPhone for when Face ID does not work. After setup, you can configure Face ID, reset Face ID, or add an alternate appearance. For added security, you can set your iPhone to automatically erase its data after ten failed attempts to enter the passcode.
Secure Your iPhone with Face ID and a Passcode
![]() Swipe up from the bottom of the screen.
Swipe up from the bottom of the screen.
The Home screen appears.
![]() Tap Settings (
Tap Settings (![]() ).
).
The Settings screen appears.
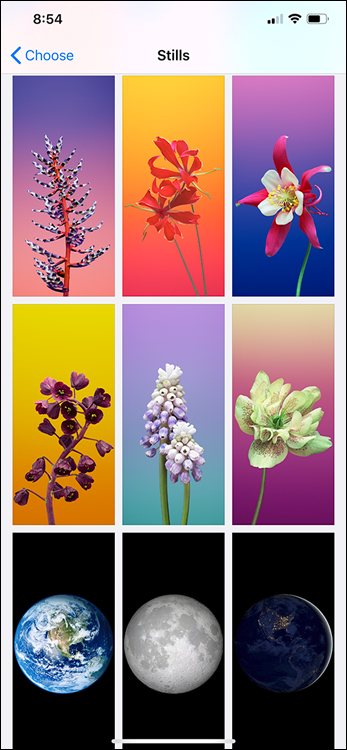
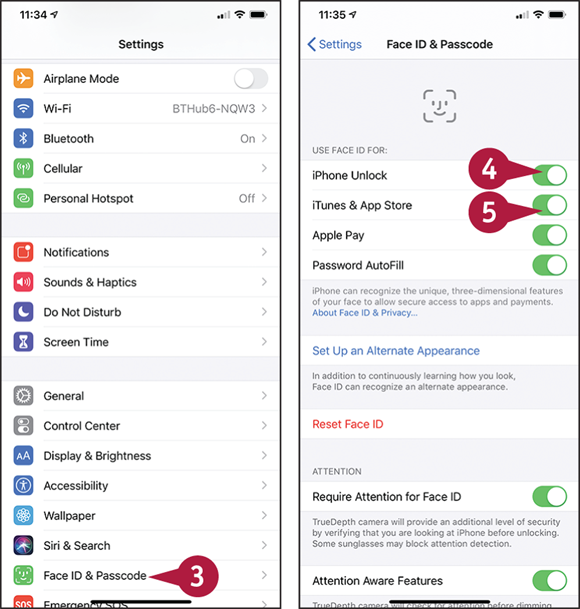
![]() Tap Face ID & Passcode (
Tap Face ID & Passcode (![]() ).
).
Note: If the Enter Passcode screen appears, type your passcode.
The Face ID & Passcode screen appears.
![]() Set the iPhone Unlock switch to On (
Set the iPhone Unlock switch to On (![]() ) to use Face ID to unlock your iPhone.
) to use Face ID to unlock your iPhone.
![]() Set the iTunes & App Store switch to On (
Set the iTunes & App Store switch to On (![]() ) to use Face ID to authorize purchases on the iTunes Store and the App Store.
) to use Face ID to authorize purchases on the iTunes Store and the App Store.
![]() Set the Apple Pay switch to On (
Set the Apple Pay switch to On (![]() ) to use Face ID to authorize payments via Apple Pay.
) to use Face ID to authorize payments via Apple Pay.
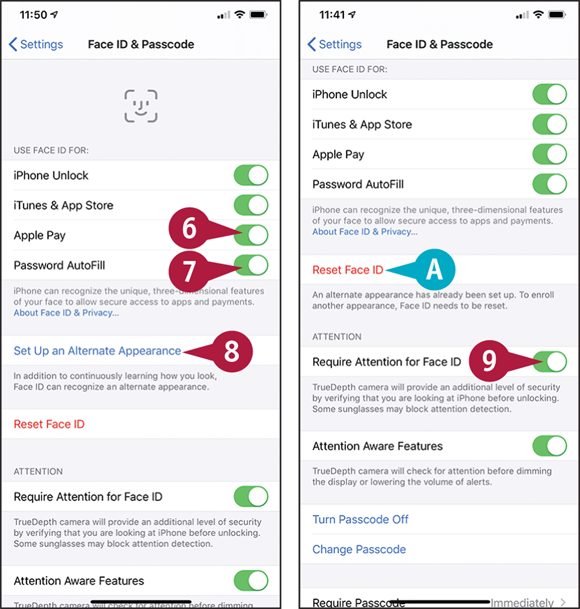
![]() Set the Password AutoFill switch to On (
Set the Password AutoFill switch to On (![]() ) to use Face ID to authorize filling in passwords automatically.
) to use Face ID to authorize filling in passwords automatically.
![]() If you want to add an alternate appearance, such as wearing glasses or makeup, tap Set Up an Alternative Appearance and follow the prompts.
If you want to add an alternate appearance, such as wearing glasses or makeup, tap Set Up an Alternative Appearance and follow the prompts.
![]() You can tap Reset Face ID if you want to redo Face ID, including any alternate appearance.
You can tap Reset Face ID if you want to redo Face ID, including any alternate appearance.
![]() Set the Require Attention for Face ID switch to On (
Set the Require Attention for Face ID switch to On (![]() ) for added security.
) for added security.
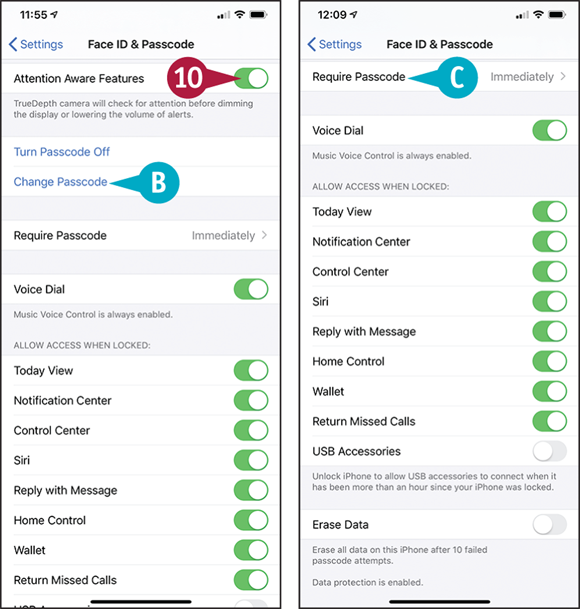
![]() Set the Attention Aware Features switch to On (
Set the Attention Aware Features switch to On (![]() ) to have Face ID detect whether you are using the phone before it dims the screen or turns down alerts.
) to have Face ID detect whether you are using the phone before it dims the screen or turns down alerts.
![]() To change the passcode type, you can tap Change Passcode, tap Passcode Options, and then tap Custom Alphanumeric Code, Custom Numeric Code, or 4-Digit Numeric Code.
To change the passcode type, you can tap Change Passcode, tap Passcode Options, and then tap Custom Alphanumeric Code, Custom Numeric Code, or 4-Digit Numeric Code.
![]() iOS normally requires a passcode immediately after locking it. If your iPhone is configured via management policy, you may be able to tap Require Passcode and implement a delay, such as 30 Seconds.
iOS normally requires a passcode immediately after locking it. If your iPhone is configured via management policy, you may be able to tap Require Passcode and implement a delay, such as 30 Seconds.
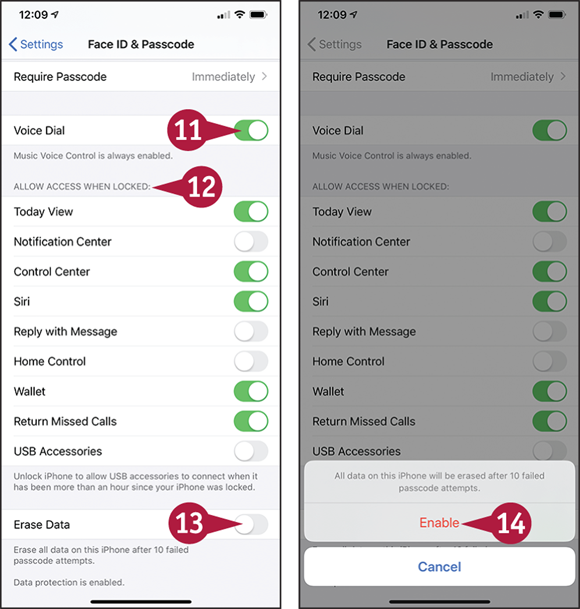
![]() Set the Voice Dial switch to On (
Set the Voice Dial switch to On (![]() ) or Off (
) or Off (![]() ), as needed.
), as needed.
![]() In the Allow Access When Locked area, set the switches to On (
In the Allow Access When Locked area, set the switches to On (![]() ) or Off (
) or Off (![]() ), as needed.
), as needed.
Note: Allowing access to Wallet when your iPhone is locked enables you to make payments and reach boarding passes and similar documents more quickly when you need them.
![]() If you want the iPhone to erase all its data after ten failed passcode attempts, set the Erase Data switch to On (
If you want the iPhone to erase all its data after ten failed passcode attempts, set the Erase Data switch to On (![]() ).
).
The iPhone displays a confirmation dialog.
![]() Tap Enable.
Tap Enable.
Configure Screen Time and Restrictions
Mobile phones can be not only extremely useful, but great productivity tools as well — yet they can also be addictive time-sinks promoting disengagement and isolation. iOS provides the Screen Time feature to enable you to track and manage the time spent using an iPhone, enforce downtime away from the screen, and set limits on apps, either on your own iPhone or an iPhone you manage. You can also enforce restrictions on content and privacy — for example, preventing the iPhone’s user from buying content in apps or watching adult-rated movies.
Access the Screen Time Features
To access the Screen Time features, first swipe up from the bottom of the screen to display the Home screen. Tap Settings (![]() ) to display the Settings screen, and then tap Screen Time (
) to display the Settings screen, and then tap Screen Time (![]() ) to display the Screen Time screen.
) to display the Screen Time screen.
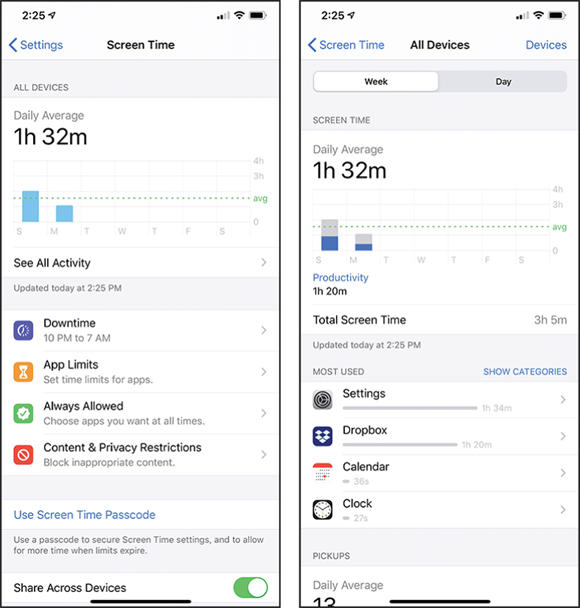
The All Devices histogram shows your daily average usage for this week. You can tap See All Activity to display the All Devices screen, which breaks down the usage details.
Set Downtime Hours
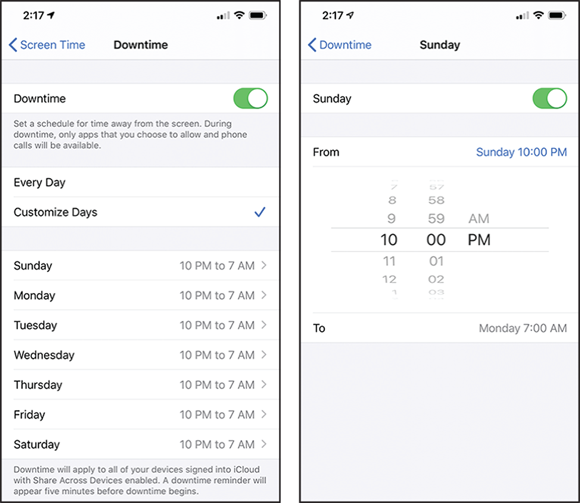
To enforce downtime on the iPhone and other iOS devices, tap Downtime (![]() ) on the Screen Time screen, and then work on the Downtime screen. Set the Downtime switch to On (
) on the Screen Time screen, and then work on the Downtime screen. Set the Downtime switch to On (![]() ) to enable the controls, then either tap Every Day to use the same hours each day or tap Customize Days and tap a day to customize its hours. On the screen for a day, such as the Sunday screen, you can disable downtime by setting the switch to Off (
) to enable the controls, then either tap Every Day to use the same hours each day or tap Customize Days and tap a day to customize its hours. On the screen for a day, such as the Sunday screen, you can disable downtime by setting the switch to Off (![]() ), or simply specify custom hours.
), or simply specify custom hours.
Set App Limits and Always Allowed
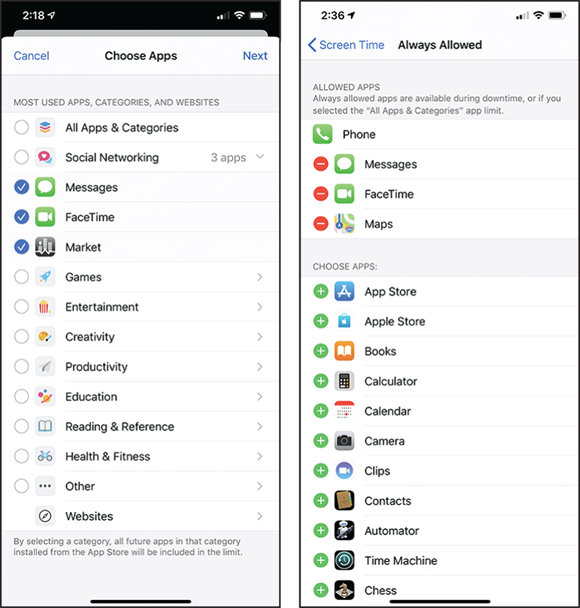
To set limits for app usage, tap App Limits (![]() ) on the Screen Time screen. On the App Limits screen, tap Add Limit to display the Choose Apps panel. Tap to select the app (
) on the Screen Time screen. On the App Limits screen, tap Add Limit to display the Choose Apps panel. Tap to select the app (![]() changes to
changes to ![]() ), tap Next, specify the time limit, and then tap Add.
), tap Next, specify the time limit, and then tap Add.
To allow anytime usage of some apps, tap Always Allowed (![]() ) on the Screen Time screen. On the Always Allowed screen, tap Add (
) on the Screen Time screen. On the Always Allowed screen, tap Add (![]() ) to move an app from the Choose Apps list to the Allowed Apps list, or tap Remove (
) to move an app from the Choose Apps list to the Allowed Apps list, or tap Remove (![]() ) to remove an app from the Allowed Apps list.
) to remove an app from the Allowed Apps list.
Set Content and Privacy Restrictions

To set limits on the content the user can access and the degree to which the user can expose personal information, tap Content & Privacy Restrictions (![]() ) on the Screen Time screen. On the Content & Privacy Restrictions screen, set the Content & Privacy Restrictions switch to On (
) on the Screen Time screen. On the Content & Privacy Restrictions screen, set the Content & Privacy Restrictions switch to On (![]() ) to enable the controls. You can then configure the settings. For example, tap Content Restrictions and then use the controls on the Content Restrictions screen to set restrictions on movies, TV shows, books, apps, and other items.
) to enable the controls. You can then configure the settings. For example, tap Content Restrictions and then use the controls on the Content Restrictions screen to set restrictions on movies, TV shows, books, apps, and other items.
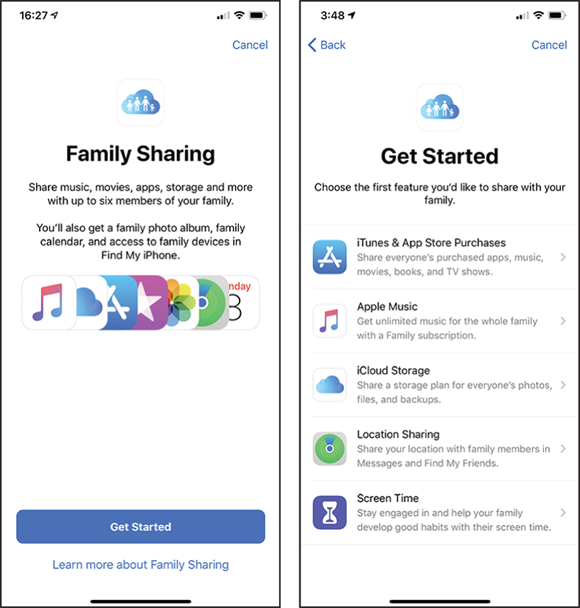
Set Up Family Sharing and Add Members
Apple’s Family Sharing feature enables you to share purchases from Apple’s online services with other family members. You can also share photos and calendars, and you can use the Find My iPhone feature to find your iOS devices and Macs when they go missing.
This section assumes that you are the Family organizer, the person who gets to set up Family Sharing; invite others to participate; and pay for the content they buy on the iTunes Store, the iBooks Store, and the App Store.
Access the Family Sharing Controls
To set up Family Sharing, swipe up from the bottom of the screen to display the Home screen, and then tap Settings (![]() ) to open the Settings app. Tap Apple ID — the button bearing your Apple ID name — at the top of the Settings screen to display the Apple ID screen, and then tap Set Up Family Sharing (
) to open the Settings app. Tap Apple ID — the button bearing your Apple ID name — at the top of the Settings screen to display the Apple ID screen, and then tap Set Up Family Sharing (![]() ) to display the Family Sharing screen.
) to display the Family Sharing screen.
Tap Get Started to display the Get Started screen, which shows a list of the features you can share via Family Sharing: iTunes & App Store Purchases, Apple Music, iCloud Storage, Location Sharing, and Screen Time.
Set Up Shared Features
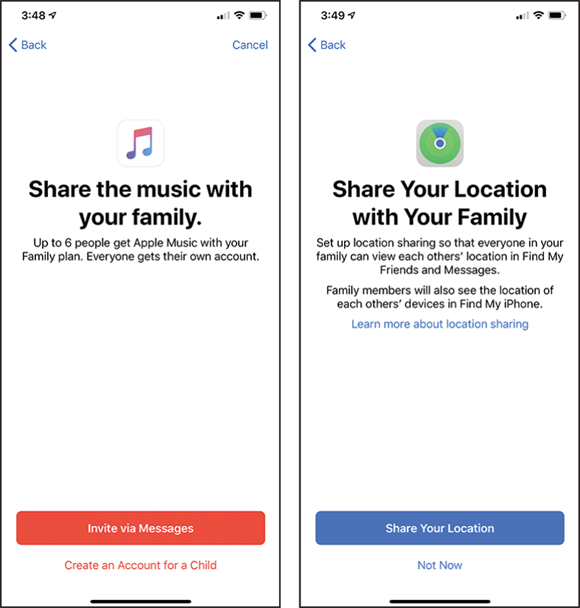
On the Get Started screen, tap the first feature you want to share with your family members, and then follow the prompts to set up the feature.
For example, if you want to share unlimited music with a Family subscription to the Apple Music service, tap Apple Music (![]() ) on the Get Started screen. The Share the Music with Your Family screen appears. Here, you can tap Invite via Messages to send a family member an invitation using the Messages app, or tap Create an Account for a Child to start the process of creating a child account.
) on the Get Started screen. The Share the Music with Your Family screen appears. Here, you can tap Invite via Messages to send a family member an invitation using the Messages app, or tap Create an Account for a Child to start the process of creating a child account.
Similarly, you can tap Location Sharing (![]() ) to display the Share Your Location with Your Family screen, and then tap Share Your Location to start the process of sharing your location information.
) to display the Share Your Location with Your Family screen, and then tap Share Your Location to start the process of sharing your location information.
Add a Family Member to Family Sharing
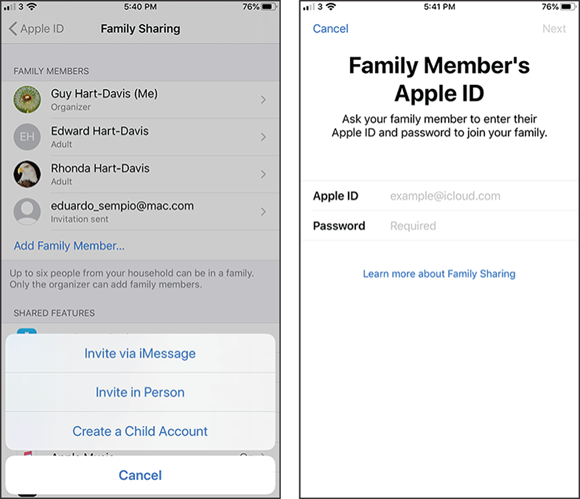
To add a family member, first display the Family Sharing screen in the Settings app. Swipe up from the bottom of the screen to display the Home screen. Tap Settings (![]() ), tap Apple ID — the button bearing your Apple ID name — and then tap Family Sharing (
), tap Apple ID — the button bearing your Apple ID name — and then tap Family Sharing (![]() ).
).
On the Family Sharing screen, tap Add Family Member. In the dialog that opens, tap Invite via iMessage, Invite in Person, or Create a Child Account, and then follow the prompts. For example, if you tap Invite in Person, the Family Member’s Apple ID screen appears, and you can hand your iPhone to the family member so he or she can fill in his or her Apple ID and password.
Accept an Invitation to Family Sharing
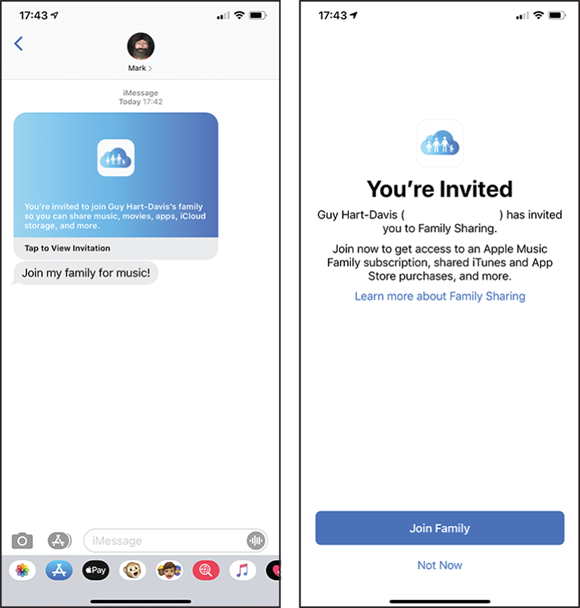
When someone sends you an invitation to Family Sharing, tap the invitation’s button in the message, and then tap Join Family on the You’re Invited screen that appears.
If you do not want to accept the invitation, tap Not Now instead.
Choose Date, Time, and International Settings
To keep yourself on time and your data accurate, you need to make sure the iPhone is using the correct date and time.
To make dates, times, and other data appear in the formats you prefer, you may need to change the iPhone’s International settings.
Choose Date, Time, and International Settings
Choose Date and Time Settings
![]() Swipe up from the bottom of the screen.
Swipe up from the bottom of the screen.
The Home screen appears.
![]() Tap Settings (
Tap Settings (![]() ).
).
The Settings screen appears.
![]() Tap General (
Tap General (![]() ).
).

The General screen appears.
![]() Tap Date & Time.
Tap Date & Time.
The Date & Time screen appears.
![]() Set the 24-Hour Time switch to On (
Set the 24-Hour Time switch to On (![]() ) if you want to use 24-hour times.
) if you want to use 24-hour times.
![]() To set the date and time manually, set the Set Automatically switch to Off (
To set the date and time manually, set the Set Automatically switch to Off (![]() ).
).
![]() Tap the bar that shows the current date and time.
Tap the bar that shows the current date and time.
Controls for setting the date and time appear.
![]() Use the controls to set the date and time.
Use the controls to set the date and time.
![]() Tap General (
Tap General (![]() ).
).
The General screen appears.
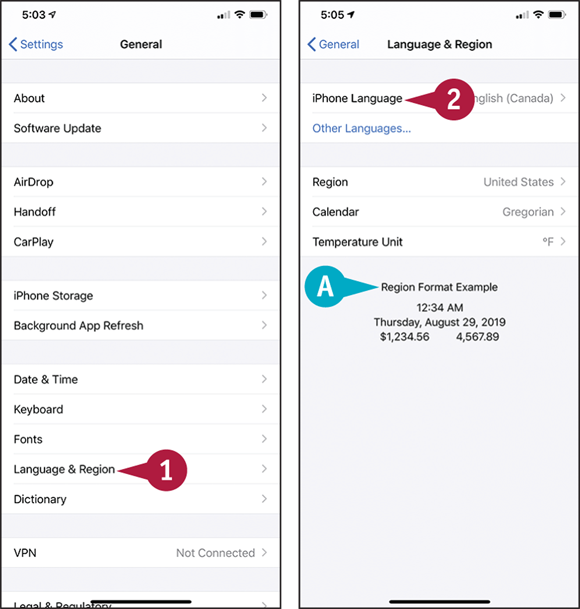
Choose International Settings
![]() From the General screen, tap Language & Region.
From the General screen, tap Language & Region.
The Language & Region screen appears.
![]() The Region Format Example area shows examples of the time, date, currency, and number formats for the current region.
The Region Format Example area shows examples of the time, date, currency, and number formats for the current region.
![]() Tap iPhone Language.
Tap iPhone Language.

The iPhone Language screen appears.
![]() Tap the language you want to use.
Tap the language you want to use.
A confirmation dialog opens.
![]() Tap Change To.
Tap Change To.
The Language & Region screen appears.
![]() Tap Region.
Tap Region.
The Select Region screen appears.
![]() Tap the region you want.
Tap the region you want.
A confirmation dialog opens.
![]() Tap Continue.
Tap Continue.
The Language & Region screen appears.