CHAPTER 9
Keeping Your Life Organized
Your iPhone includes many apps for staying organized, such as the Calendars app, the Reminders app, and the Wallet app. Other apps help you find your way, stay on time, and track stock prices, weather forecasts, and your own health.
Browse Existing Events in Your Calendars
Create New Events in Your Calendars
Work with Calendar Invitations
Track Your Commitments with Reminders
Keep Essential Documents at Hand with Wallet
Using Maps’ Favorites and Contacts
Using Stocks, Weather, and Clock
Manage Files with the Files App
Understanding Shortcuts and Automation
Browse Existing Events in Your Calendars
Your iPhone’s Calendar app gives you a great way of managing your schedule and making sure you never miss an appointment.
After setting up your calendars to sync using iCloud or other calendar services, you can take your calendars with you everywhere and consult them whenever you need to. You can view either all your calendars or only those you choose.
Browse Existing Events in Your Calendars
Browse Existing Events in Your Calendars
![]() Swipe up from the bottom of the screen.
Swipe up from the bottom of the screen.
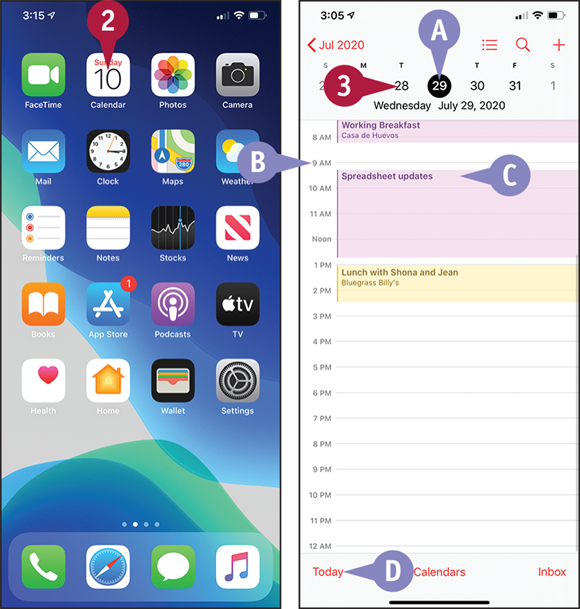
![]() Tap Calendar (
Tap Calendar (![]() ).
).
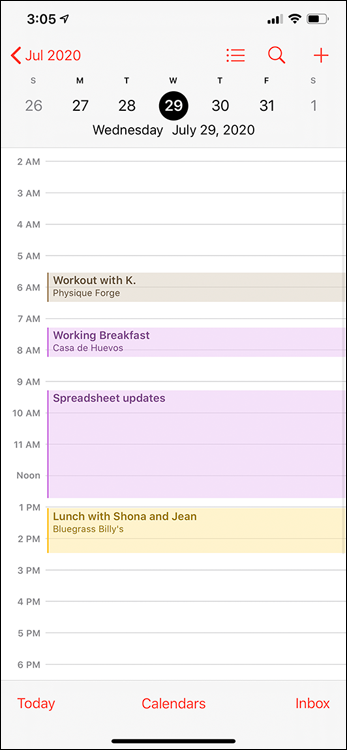
![]() In Light Mode, the black circle indicates the day shown; in Dark Mode, the circle is white. When the current date is selected, the circle is red.
In Light Mode, the black circle indicates the day shown; in Dark Mode, the circle is white. When the current date is selected, the circle is red.
![]() Your events appear on a scrollable timeline.
Your events appear on a scrollable timeline.
![]() An event’s background color indicates the calendar it belongs to.
An event’s background color indicates the calendar it belongs to.
![]() You can tap Today to display the current day.
You can tap Today to display the current day.
![]() Tap the day you want to see.
Tap the day you want to see.
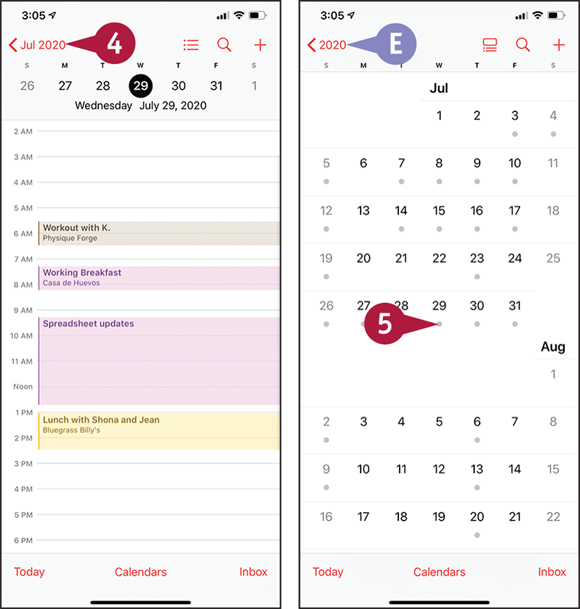
The events for the day appear.
![]() Tap the month.
Tap the month.
The calendar for the month appears.
![]() You can tap the year to display the calendar for the full year, in which you can navigate quickly to other months.
You can tap the year to display the calendar for the full year, in which you can navigate quickly to other months.
![]() Scroll up or down as needed, and then tap the date you want.
Scroll up or down as needed, and then tap the date you want.
The date’s appointments appear.
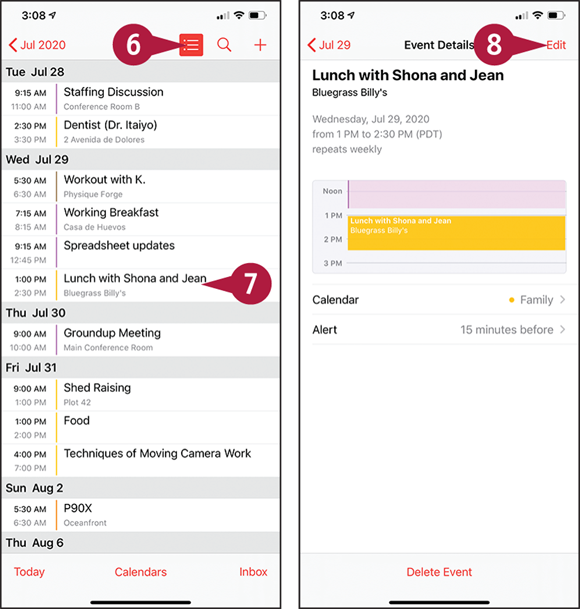
![]() Tap List (
Tap List (![]() changes to
changes to ![]() ).
).
The appointments appear as a list, enabling you to see more.
![]() Tap an event to see its details.
Tap an event to see its details.
The Event Details screen appears.
![]() To edit the event, tap Edit.
To edit the event, tap Edit.
The Edit screen appears, and you can make changes to the event. When you finish, tap Done.
Choose Which Calendars to Display
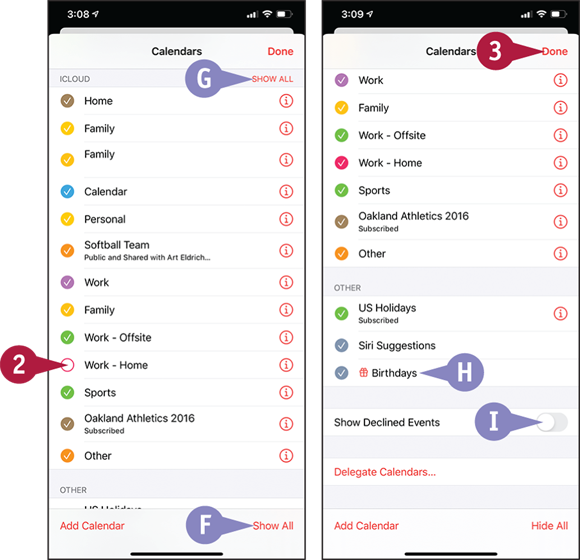
![]() Tap Calendars.
Tap Calendars.
![]() Tap to place or remove a check mark next to a calendar you want to display or hide.
Tap to place or remove a check mark next to a calendar you want to display or hide.
![]() Tap Show All to place a check mark next to each calendar for all accounts. Tap Hide All to remove all check marks.
Tap Show All to place a check mark next to each calendar for all accounts. Tap Hide All to remove all check marks.
![]() Similarly, tap Show All or Hide All for an account to display or hide the account’s calendars.
Similarly, tap Show All or Hide All for an account to display or hide the account’s calendars.
![]() The Birthdays calendar automatically displays birthdays of contacts whose contact data includes the birthday.
The Birthdays calendar automatically displays birthdays of contacts whose contact data includes the birthday.
![]() You can set the Show Declined Events switch to On (
You can set the Show Declined Events switch to On (![]() ) to include invitations you have declined.
) to include invitations you have declined.
![]() Tap Done.
Tap Done.
The calendars you chose appear.
Create New Events in Your Calendars
You can create calendar events on your computer, or online using a web interface such as that of iCloud, and then sync the events to your iPhone. But you can also create new events directly on your iPhone.
You can create either a straightforward, one-shot appointment or an appointment that repeats on a schedule. You can also choose the calendar in which to store the appointment.
Create New Events in Your Calendars
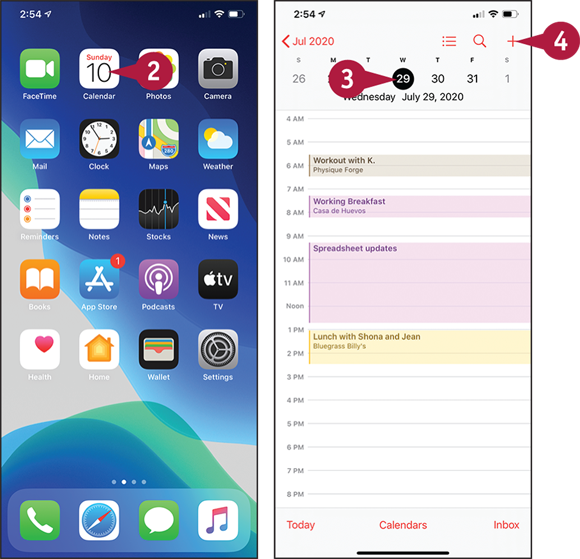
![]() Swipe up from the bottom of the screen to display the Home screen.
Swipe up from the bottom of the screen to display the Home screen.
![]() Tap Calendar (
Tap Calendar (![]() ) to display the Calendar screen.
) to display the Calendar screen.
![]() Tap the day on which you want to create the new event.
Tap the day on which you want to create the new event.
Note: From the Home screen, tap and hold Calendar (![]() ) to display the pop-up panel and then tap Add Event to start creating a new event. You will need to select the date.
) to display the pop-up panel and then tap Add Event to start creating a new event. You will need to select the date.
Note: You can also leave the current date selected, and then change the date when creating the event.
![]() Tap New (
Tap New (![]() ).
).
Note: If New (![]() ) is disabled, tap Settings (
) is disabled, tap Settings (![]() ) on the Home screen, tap Passwords & Accounts (
) on the Home screen, tap Passwords & Accounts (![]() ), tap the appropriate account, and verify that the Calendars switch is On (
), tap the appropriate account, and verify that the Calendars switch is On (![]() ).
).
The New Event screen appears.
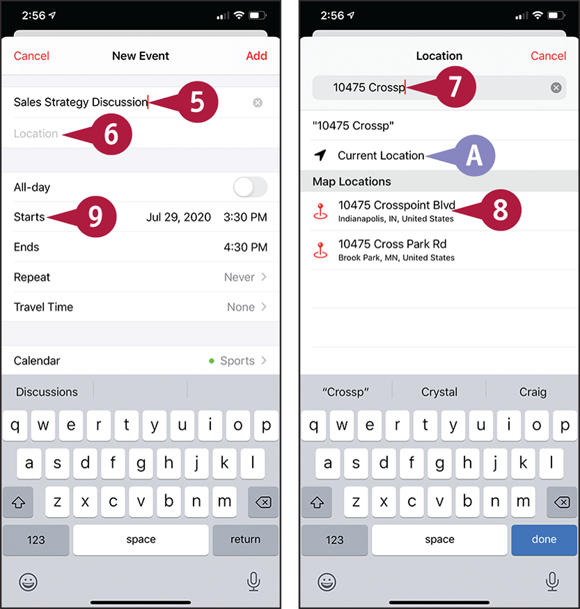
![]() Tap Title and type the title of the event.
Tap Title and type the title of the event.
![]() Tap Location.
Tap Location.
Note: If the Allow “Calendar” to Access Your Location While You Use the App? dialog opens when you tap Location, tap Allow to use locations.
The Location screen appears.
![]() You can tap Current Location to use the current location.
You can tap Current Location to use the current location.
![]() Start typing the location.
Start typing the location.
![]() Tap the appropriate match.
Tap the appropriate match.
![]() Tap Starts.
Tap Starts.
The time and date controls appear.
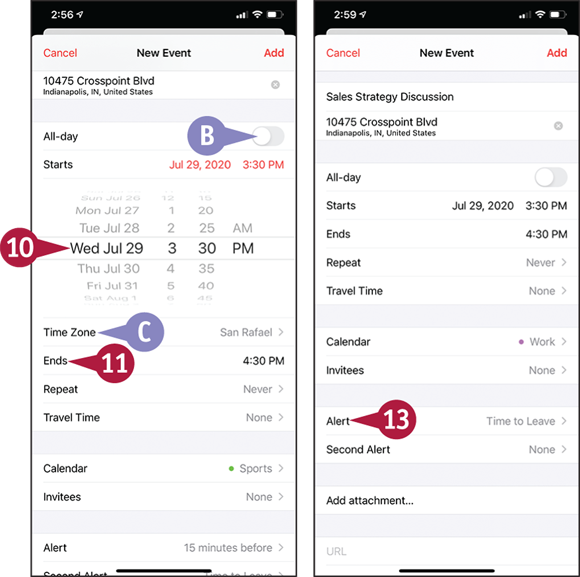
![]() Tap the date and time controls to set the start time.
Tap the date and time controls to set the start time.
![]() Tap Ends.
Tap Ends.
![]() Tap the date and time controls to set the end time.
Tap the date and time controls to set the end time.
![]() If this is an all-day appointment, set the All-day switch to On (
If this is an all-day appointment, set the All-day switch to On (![]() ).
).
![]() If you need to change the time zone, tap Time Zone, type the city name, and then tap the time zone.
If you need to change the time zone, tap Time Zone, type the city name, and then tap the time zone.
![]() Tap Alert.
Tap Alert.

The Alert screen appears.
![]() Tap Time to Leave if you want Calendar to calculate when you should leave, based on your location, the event’s location, and the traffic conditions. Otherwise, tap the timing for the alert, such as 30 minutes before.
Tap Time to Leave if you want Calendar to calculate when you should leave, based on your location, the event’s location, and the traffic conditions. Otherwise, tap the timing for the alert, such as 30 minutes before.
The New Event screen appears.
![]() Tap Calendar.
Tap Calendar.
The Calendar screen appears.
![]() Tap the calendar for the event.
Tap the calendar for the event.
The New Event screen appears again.
![]() Tap Add.
Tap Add.
The event appears on your calendar.
Work with Calendar Invitations
As well as events you create yourself, you may receive invitations to events that others create. When you receive an event invitation attached to an e-mail message, you can choose whether to accept the invitation or decline it. If you accept the invitation, you can add the event automatically to your calendar.
Work with Calendar Invitations
Respond to an Invitation from an Alert
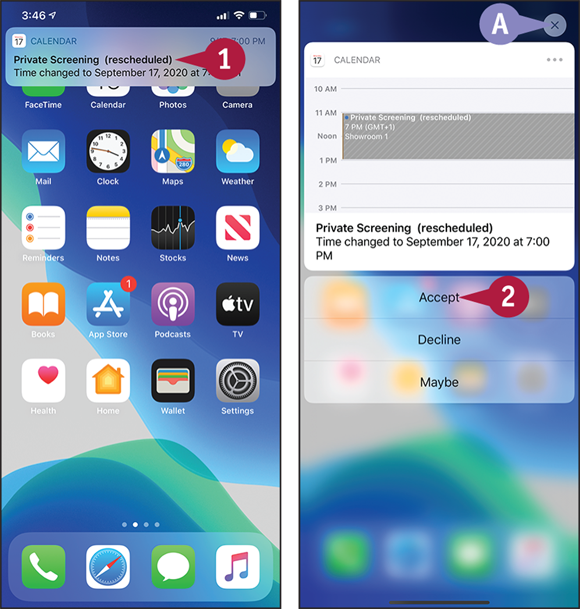
![]() When an invitation alert appears, tap and hold it.
When an invitation alert appears, tap and hold it.
The pop-up panel displays the event’s details, together with buttons for responding to the event.
![]() Tap Accept, Maybe, or Decline, as needed.
Tap Accept, Maybe, or Decline, as needed.
![]() You can tap Close (
You can tap Close (![]() ) to close the pop-up panel without tapping one of the response buttons.
) to close the pop-up panel without tapping one of the response buttons.
Respond to an Invitation from the Inbox Screen
![]() Swipe up from the bottom of the screen.
Swipe up from the bottom of the screen.
The Home screen appears.
![]() Tap Calendar (
Tap Calendar (![]() ).
).
The Calendar screen appears.
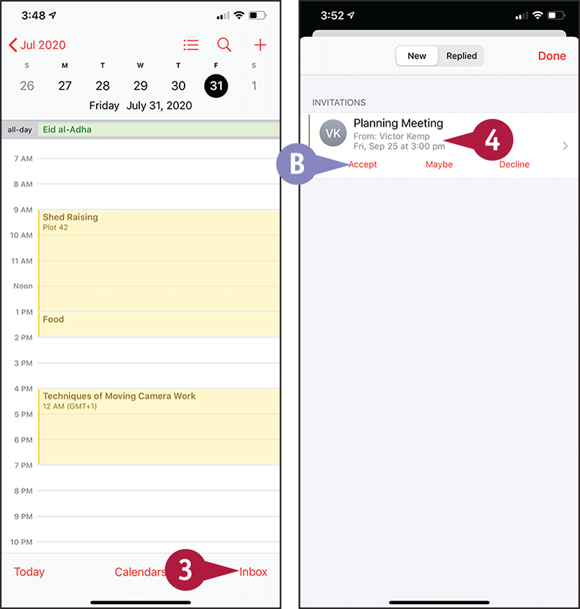
![]() Tap Inbox.
Tap Inbox.
The Inbox screen appears.
![]() You can tap Accept, Maybe, or Decline to deal with the invitation without viewing the details.
You can tap Accept, Maybe, or Decline to deal with the invitation without viewing the details.
![]() Tap the invitation whose details you want to see.
Tap the invitation whose details you want to see.
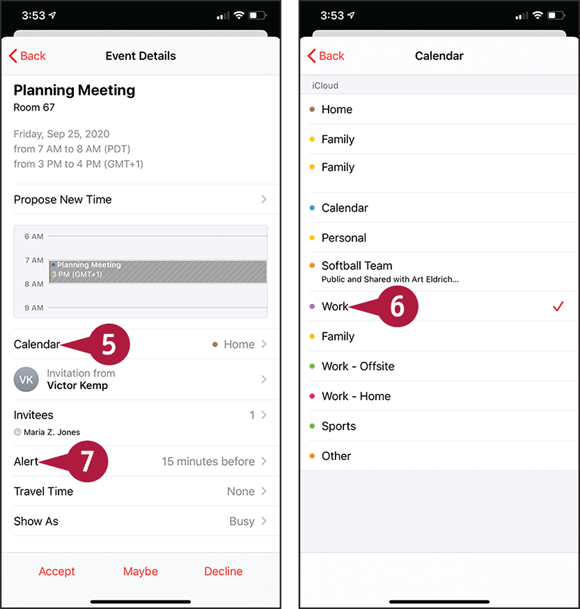
The Event Details screen appears.
![]() Tap Calendar if you decide to accept the invitation.
Tap Calendar if you decide to accept the invitation.
The Calendar screen appears.
![]() Tap the calendar to which you want to assign the event.
Tap the calendar to which you want to assign the event.
The Event Details screen appears again.
![]() Tap Alert.
Tap Alert.
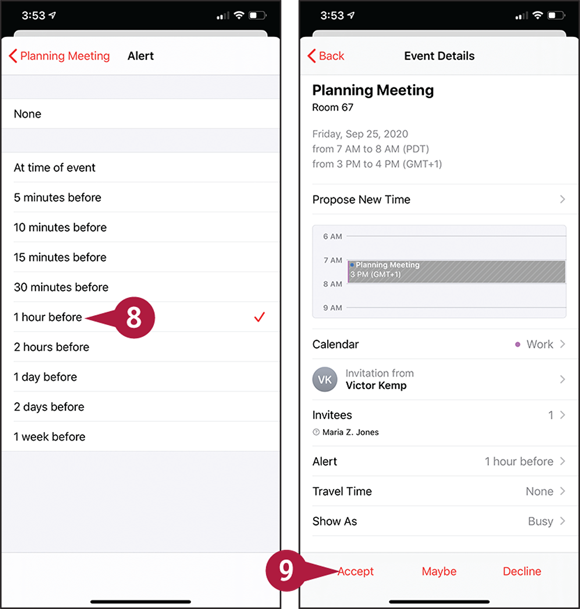
The Alert screen appears.
![]() Tap the button for the alert interval. For example, tap 1 hour before.
Tap the button for the alert interval. For example, tap 1 hour before.
The Event Details screen appears again.
Note: To control how the event’s time appears in your calendar, tap Show As, and then tap Busy or Free, as appropriate, on the Show As screen.
![]() Tap Accept.
Tap Accept.
Your calendar appears, showing the event you just accepted.
Track Your Commitments with Reminders
Your iPhone’s Reminders app gives you an easy way to note your commitments and keep track of them. The Reminders app comes with a built-in list called Reminders, but you can create as many other lists as you need, giving each a distinctive color.
You can create a reminder with no due time or location or tie a reminder to a due time, arriving at or leaving a location, or both. Your iPhone can remind you of time- or location-based commitments at the appropriate time or place.
Track Your Commitments with Reminders
Open the Reminders App and Create Your Reminder Lists
![]() Swipe up from the bottom of the screen.
Swipe up from the bottom of the screen.
The Home screen appears.
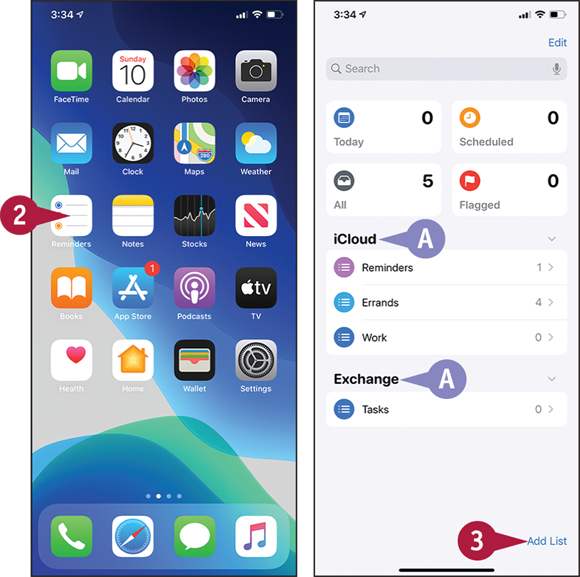
![]() Tap Reminders (
Tap Reminders (![]() ).
).
The Reminders app opens, displaying the Lists screen.
![]() If you have set up reminders or tasks on multiple accounts, such as iCloud and Exchange, a list appears for each account.
If you have set up reminders or tasks on multiple accounts, such as iCloud and Exchange, a list appears for each account.
![]() Tap Add List (
Tap Add List (![]() ).
).
The Choose Account dialog opens.
Note: If you have only one Reminders account, the Choose Account dialog does not appear.
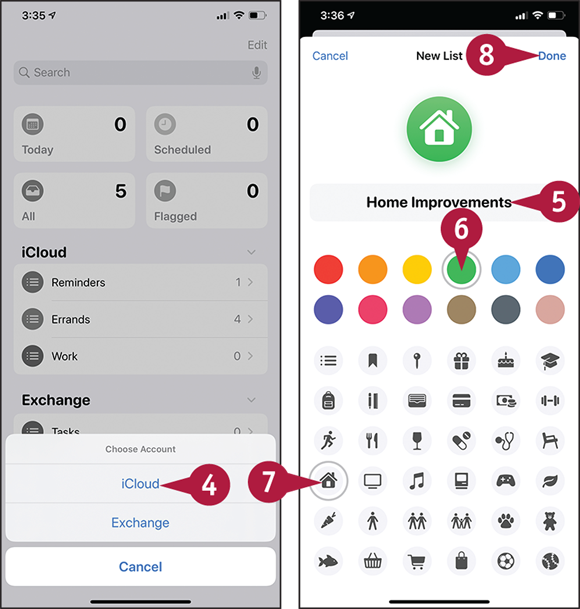
![]() Tap the account in which you want to store the list.
Tap the account in which you want to store the list.
The New List screen appears.
![]() Type the name for the list.
Type the name for the list.
![]() Tap the color to use for the list.
Tap the color to use for the list.
![]() Optionally, tap an icon for the list. If you do not choose an icon, the icon is a plain circle of the color you choose.
Optionally, tap an icon for the list. If you do not choose an icon, the icon is a plain circle of the color you choose.
![]() Tap Done.
Tap Done.
The list appears.
Create a New Reminder
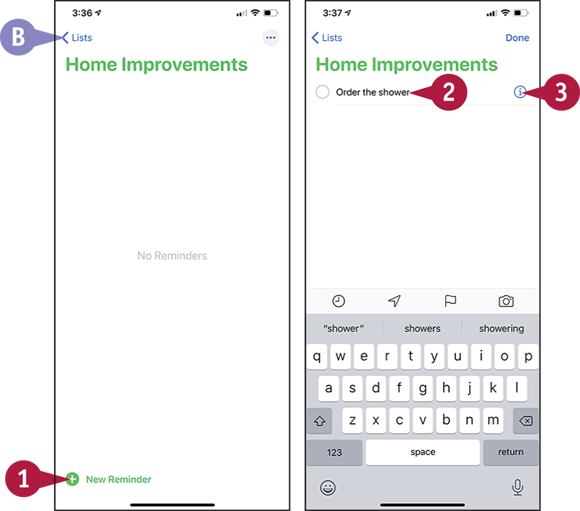
![]() To create a new reminder in this list, tap New Reminder (
To create a new reminder in this list, tap New Reminder (![]() ). This icon’s color matches the color you assigned to the list.
). This icon’s color matches the color you assigned to the list.
![]() You can tap Lists (
You can tap Lists (![]() ) to return to the Lists screen so you can switch to another list.
) to return to the Lists screen so you can switch to another list.
The keyboard appears.
![]() Type the text for the reminder.
Type the text for the reminder.
![]() Tap Information (
Tap Information (![]() ).
).
The Details screen appears.
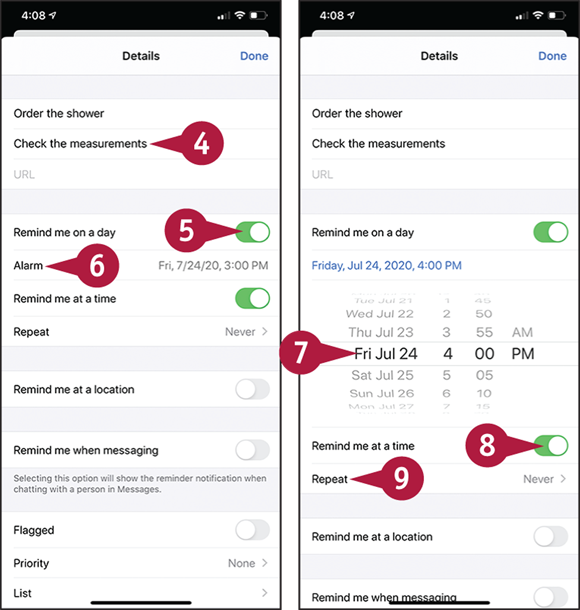
![]() Optionally, tap Notes and type any notes.
Optionally, tap Notes and type any notes.
![]() To create a time-based reminder, set the Remind me on a day switch to On (
To create a time-based reminder, set the Remind me on a day switch to On (![]() changes to
changes to ![]() ).
).
The Alarm button, the Remind Me at a Time switch, and the Repeat button appear.
![]() Tap Alarm.
Tap Alarm.
The date and time controls appear.
![]() Set the date and time for the reminder.
Set the date and time for the reminder.
![]() Set the Remind me at a time switch to On (
Set the Remind me at a time switch to On (![]() ) if you want to receive a reminder at the time you specified.
) if you want to receive a reminder at the time you specified.
![]() If you need to repeat the reminder, tap Repeat, choose the repeat interval on the Repeat screen, and then tap Details to return to the Details screen.
If you need to repeat the reminder, tap Repeat, choose the repeat interval on the Repeat screen, and then tap Details to return to the Details screen.
You can assign different priorities to your reminders to give yourself a quick visual reference of their urgency. You can also add notes to a reminder to keep relevant information at hand. When you have completed a reminder, you can mark it as completed. You can view your list of scheduled reminders for quick reference, and you can choose whether to include your completed reminders in the list. If you no longer need a reminder, you can delete it from the list.

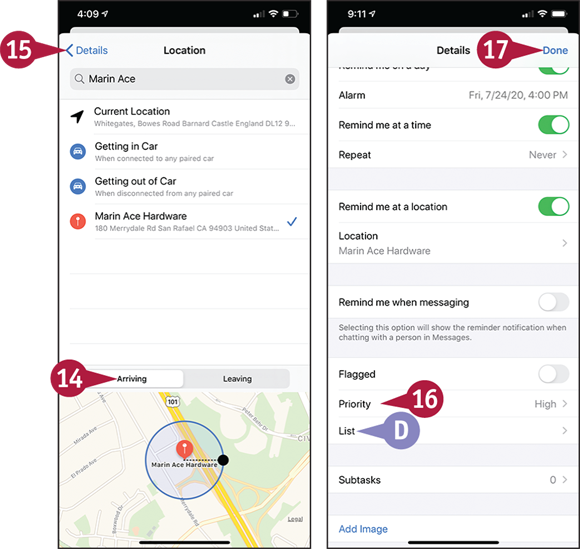
![]() To create a location-based reminder, set the Remind me at a location switch to On (
To create a location-based reminder, set the Remind me at a location switch to On (![]() ).
).
Note: If Reminders prompts you to allow it to use your current location, tap Allow.
![]() Tap Location.
Tap Location.
The Location screen appears.
![]() Start typing the location in the search box.
Start typing the location in the search box.
![]() You can tap Current Location to use your current location.
You can tap Current Location to use your current location.
![]() Tap the location in the list of results.
Tap the location in the list of results.
The Location screen displays a map of the location.
![]() Tap Arriving or Leaving, as needed.
Tap Arriving or Leaving, as needed.
![]() Tap Details (
Tap Details (![]() ).
).
The Details screen appears again.
![]() To assign a priority to the reminder, tap Priority, tap Low, Medium, High, or None; and then tap Details (
To assign a priority to the reminder, tap Priority, tap Low, Medium, High, or None; and then tap Details (![]() ).
).
![]() To assign the reminder to a different list than the current list, tap List. On the Change List screen, tap the list you want to use.
To assign the reminder to a different list than the current list, tap List. On the Change List screen, tap the list you want to use.
![]() Tap Done.
Tap Done.
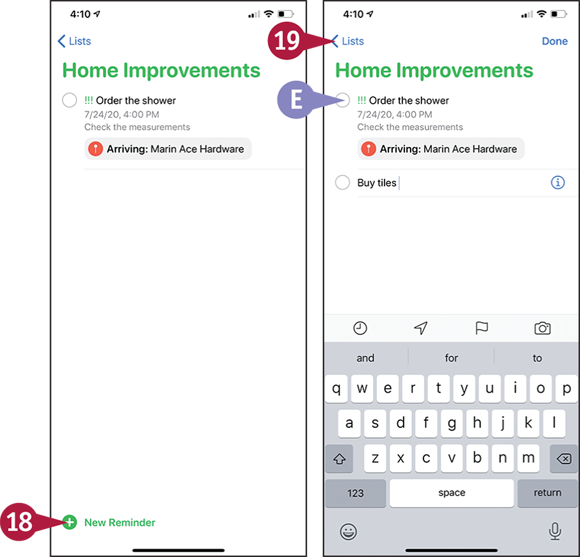
The new reminder appears on your list of reminders.
![]() Tap New Reminder (
Tap New Reminder (![]() ) to start creating a new reminder.
) to start creating a new reminder.
![]() When you finish a task, tap its button (
When you finish a task, tap its button (![]() changes to
changes to ![]() ) to mark the reminder as complete.
) to mark the reminder as complete.
Note: To delete a reminder, tap Edit on the screen that contains it. Tap Delete (![]() ) to the left of the reminder, and then tap Delete.
) to the left of the reminder, and then tap Delete.
![]() Tap Lists (
Tap Lists (![]() ) to switch to another reminder list.
) to switch to another reminder list.
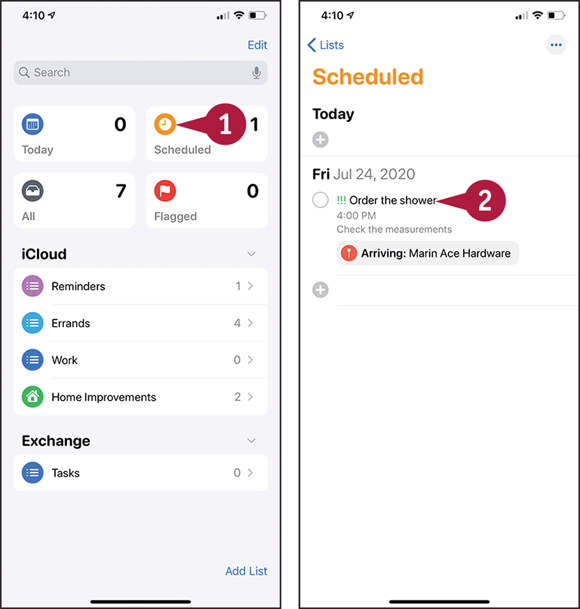
View a List of Your Scheduled Reminders
![]() Tap Scheduled (
Tap Scheduled (![]() ).
).
The Scheduled list appears.
![]() Tap the reminder you want to see.
Tap the reminder you want to see.
Note: If you have many lists of reminders, you can arrange the lists in groups. To create a group, tap Edit on the Reminders screen, then tap Add Group in the lower-left corner. On the New Group screen, type the name for the group, then tap Include. On the Include screen, tap Add (![]() ) for each list you want to add to the new group.
) for each list you want to add to the new group.
Keep Essential Documents at Hand with Wallet
Wallet is an app for storing payment cards and electronic versions of essential documents, such as insurance cards, airline boarding passes, movie tickets, and hotel reservations. As explained in Chapter 1, the iPhone’s setup routine walks you through adding a payment card for Apple Pay to Wallet; you can add other cards later, as needed.
You can add documents to Wallet from built-in apps such as Mail and Safari, as shown in this section, or by using custom apps for shopping, booking hotels, and booking flights.
Keep Essential Documents at Hand with Wallet
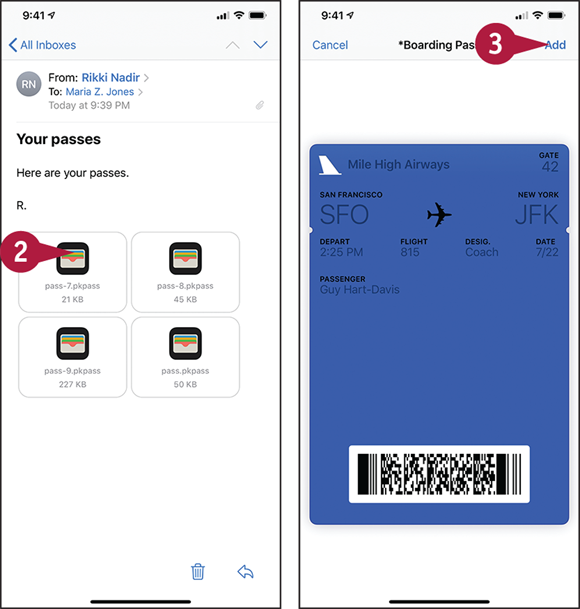
Add a Document to Wallet
![]() In Mail, tap the message with the document attached.
In Mail, tap the message with the document attached.
The message opens.
![]() Tap the document’s button.
Tap the document’s button.
The document appears.
![]() Tap Add.
Tap Add.
Mail adds the document to Wallet.
The message appears again.
Note: In Safari, open the web page containing the document, and then tap Add to add the document to Wallet.
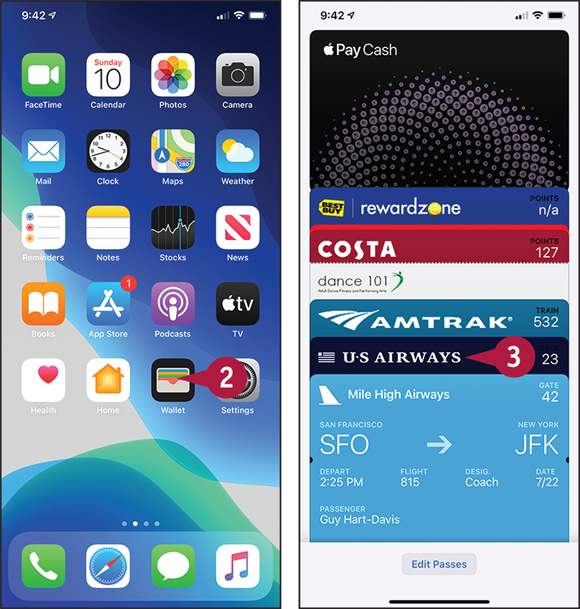
Open Wallet and Find the Documents You Need
![]() Swipe up from the bottom of the screen.
Swipe up from the bottom of the screen.
The Home screen appears.
![]() Tap Wallet (
Tap Wallet (![]() ).
).
The Wallet app opens.
The documents you have added appear.
Note: Until you add one or more documents to Wallet, the app displays an information screen highlighting its uses.
![]() Tap the document you want to view.
Tap the document you want to view.
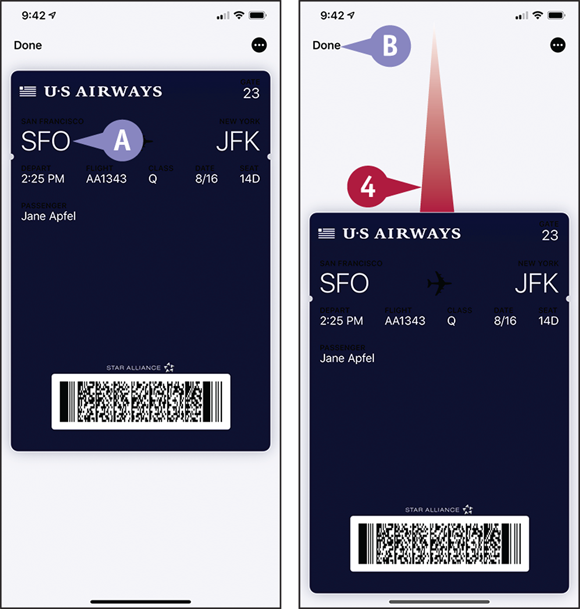
![]() The document appears above the other documents. You can then hold its barcode in front of a scanner to use the document.
The document appears above the other documents. You can then hold its barcode in front of a scanner to use the document.
![]() To see another document, tap the current top document and swipe down.
To see another document, tap the current top document and swipe down.
Wallet reshuffles the documents so you can see them all.
![]() You can also tap Done to return to the first Wallet screen, and then tap the document you want to view.
You can also tap Done to return to the first Wallet screen, and then tap the document you want to view.

Choose Settings for a Document or Delete It
![]() Tap Details (
Tap Details (![]() ).
).
The Details screen appears.
![]() Set the Automatic Updates switch to On (
Set the Automatic Updates switch to On (![]() ) if you want to receive updates to this document.
) if you want to receive updates to this document.
![]() Set the Allow Notifications switch to On (
Set the Allow Notifications switch to On (![]() ) if you want to allow the document to raise notifications.
) if you want to allow the document to raise notifications.
![]() Set the Suggest on Lock Screen switch to On (
Set the Suggest on Lock Screen switch to On (![]() ) if you want notifications about the document to appear on the lock screen.
) if you want notifications about the document to appear on the lock screen.
![]() If you have no further need for the document, tap Remove Pass to remove it.
If you have no further need for the document, tap Remove Pass to remove it.
![]() Tap Back (
Tap Back (![]() ).
).
![]() Tap Done.
Tap Done.
Find Your Location with Maps
Your iPhone’s Maps app can pinpoint your location by using the Global Positioning System, known as GPS, or via triangulation using wireless networks. You can view your location on a road map, display a satellite picture with or without place labels, or view transit information. You can easily switch among map types to find the most useful one. To help you get your bearings, the Tracking feature in the Maps app can show you which direction you are facing.
Find Your Location with Maps
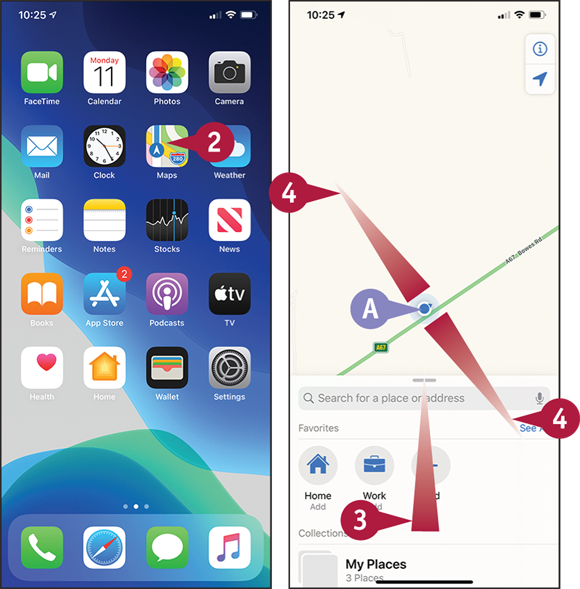
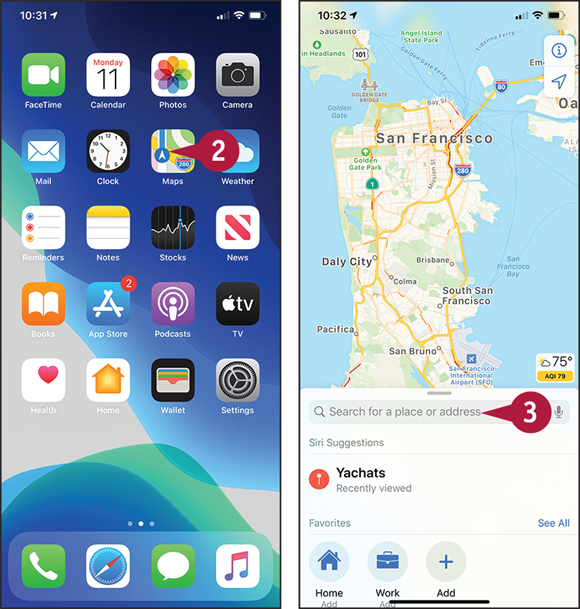
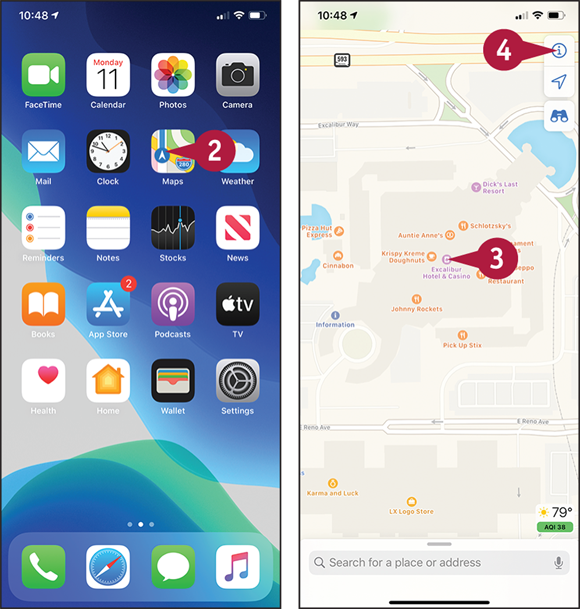
![]() Swipe up from the bottom of the screen.
Swipe up from the bottom of the screen.
The Home screen appears.
![]() Tap Maps (
Tap Maps (![]() ).
).
The Maps screen appears.
![]() A blue dot shows your current location. The expanding circle around the blue dot shows that Maps is determining your location.
A blue dot shows your current location. The expanding circle around the blue dot shows that Maps is determining your location.
Note: It may take a minute for Maps to work out your location accurately. While Maps determines the location, the blue dot moves, even though the iPhone remains stationary.
![]() Drag the gray handle down to collapse the Search pane.
Drag the gray handle down to collapse the Search pane.
![]() Place your thumb and finger apart on the screen and pinch inward.
Place your thumb and finger apart on the screen and pinch inward.
Note: To zoom in, place your thumb and finger on the screen and pinch apart.
The map zooms out, showing a larger area.
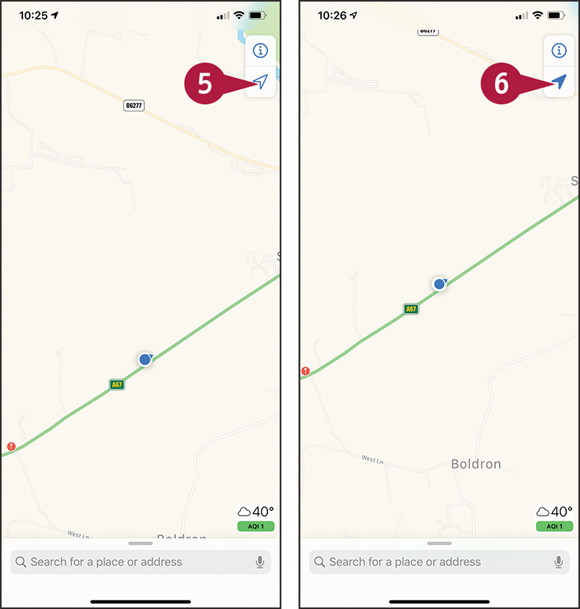
![]() Tap Location (
Tap Location (![]() changes to
changes to ![]() ), turning on the Location service.
), turning on the Location service.
![]() Tap Location (
Tap Location (![]() changes to
changes to ![]() ).
).
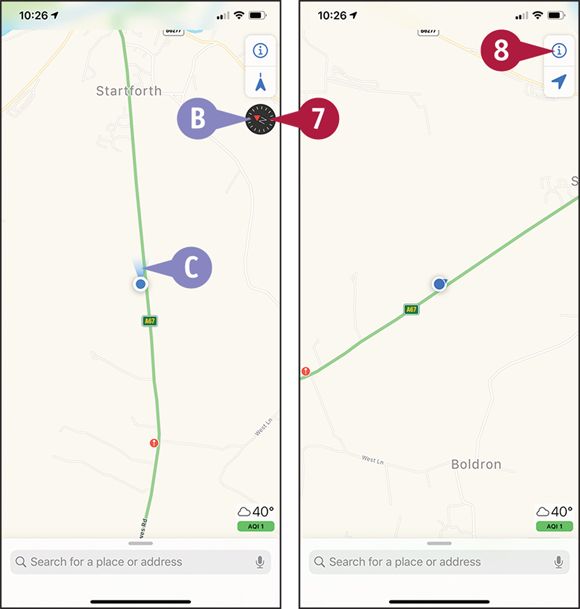
![]() The Compass icon appears (
The Compass icon appears (![]() ). The red arrow indicates north.
). The red arrow indicates north.
![]() The map turns to show the direction the iPhone is facing, so that you can orient yourself.
The map turns to show the direction the iPhone is facing, so that you can orient yourself.
![]() When you need to restore the map orientation, tap Compass (
When you need to restore the map orientation, tap Compass (![]() ).
).
The map turns so that north is upward.
The Compass icon disappears.
![]() Tap Information (
Tap Information (![]() ).
).
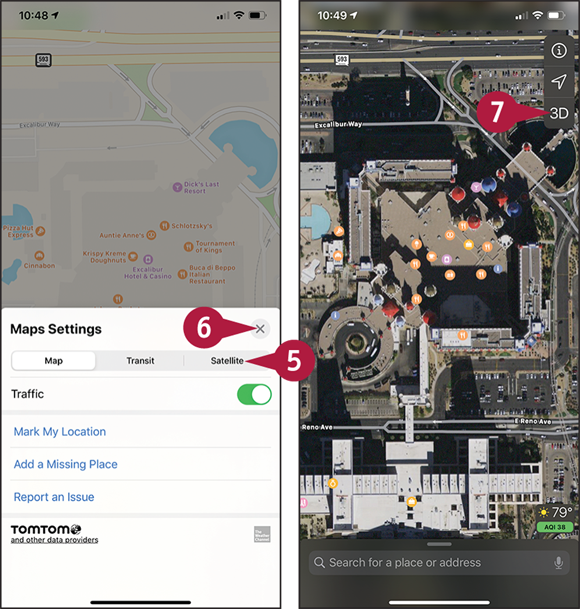
The Maps Settings dialog opens.
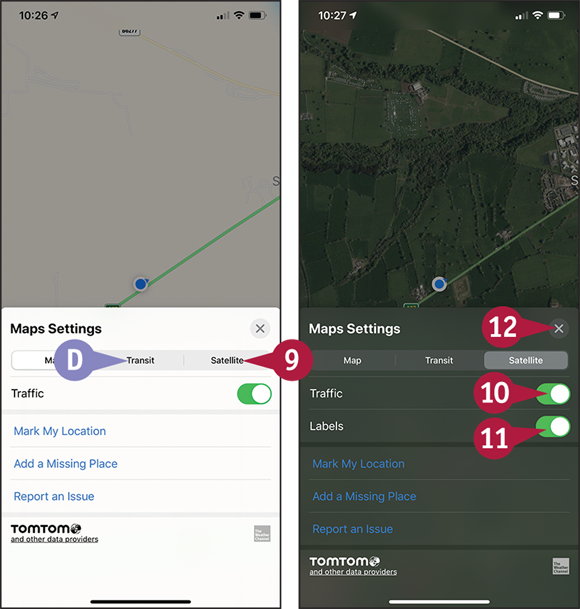
![]() You can tap Transit to display transit information for the area.
You can tap Transit to display transit information for the area.
![]() Tap Satellite.
Tap Satellite.
The satellite map appears, showing photos with street and place names overlaid on them.
![]() Set the Traffic switch to On (
Set the Traffic switch to On (![]() ) or Off (
) or Off (![]() ), as needed.
), as needed.
![]() Set the Labels switch to On (
Set the Labels switch to On (![]() ) to display labels.
) to display labels.
![]() Tap Close (
Tap Close (![]() ).
).
The Maps Settings dialog closes.
Note: The satellite photos may be several years old and no longer accurate.
Find Directions with Maps
Your iPhone’s Maps app can give you directions to where you want to go. Maps can also show you current traffic congestion in some locales to help you identify the most viable route for a journey.
Maps displays driving directions by default, but you can make it display public transit directions and walking directions.
Find Directions with Maps
![]() Swipe up from the bottom of the screen.
Swipe up from the bottom of the screen.
The Home screen appears.
![]() Tap Maps (
Tap Maps (![]() ).
).
The Maps screen appears.
![]() Tap Search for a place or address.
Tap Search for a place or address.
The Directions screen appears.
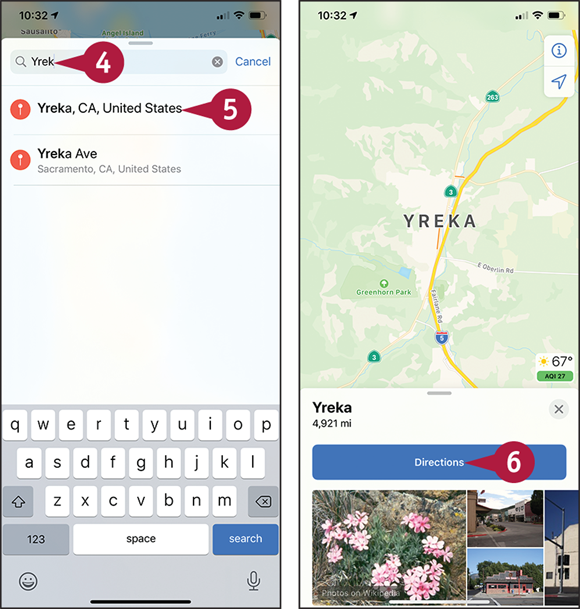
![]() Start typing your destination.
Start typing your destination.
A list of suggested matches appears.
![]() Tap the correct match.
Tap the correct match.
A map of the destination appears.
![]() Tap Directions.
Tap Directions.
Note: If you want the directions to start from your current location, leave My Location in the From field. Go to step 10.
![]() Tap My Location.
Tap My Location.
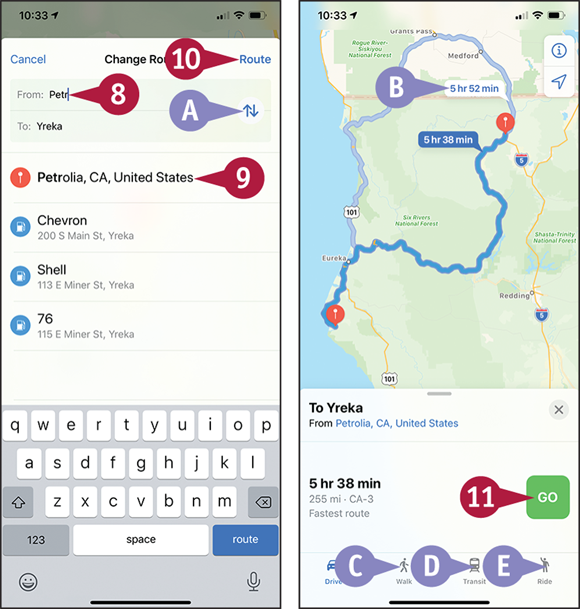
The Change Route dialog opens.
![]() Tap From and start typing the start location for the directions.
Tap From and start typing the start location for the directions.
![]() Tap the correct match.
Tap the correct match.
![]() You can tap Switch Places (
You can tap Switch Places (![]() ) to switch the start location and end location.
) to switch the start location and end location.
![]() Tap Route.
Tap Route.
A screen showing the driving directions appears.
![]() If multiple routes are available, tap a time button to view a different route. The time button changes to blue to indicate it is active.
If multiple routes are available, tap a time button to view a different route. The time button changes to blue to indicate it is active.
![]() You can tap Walk (
You can tap Walk (![]() ) to see walking directions.
) to see walking directions.
![]() You can tap Transit (
You can tap Transit (![]() ) to see transit directions.
) to see transit directions.
![]() You can tap Ride (
You can tap Ride (![]() ) to see ride-sharing apps that are available.
) to see ride-sharing apps that are available.
![]() Tap Go.
Tap Go.
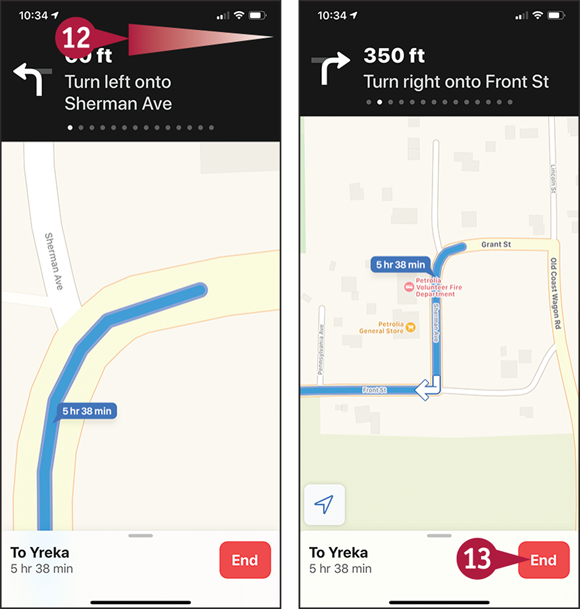
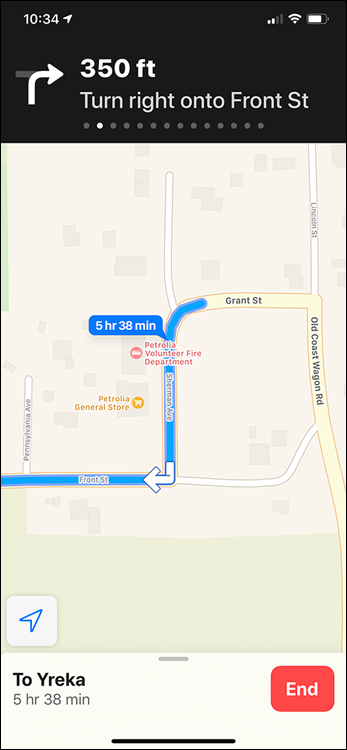
The first screen of directions appears.
![]() Swipe left to display the next direction.
Swipe left to display the next direction.
Note: When you start navigating the route, the directions change automatically to reflect your progress.
![]() To finish using the directions, tap End.
To finish using the directions, tap End.
The map appears again.
Explore with 3D Flyover
Maps is not only great for finding out where you are and for getting directions to places, but it can also show you 3D flyovers of the places on the map. Flyovers can be a useful way to explore a place virtually so that you can find your way around later in real life.
After switching on the 3D feature, you can zoom in and out, pan around, and move backward and forward.
Explore with 3D Flyover
![]() Swipe up from the bottom of the screen.
Swipe up from the bottom of the screen.
The Home screen appears.
![]() Tap Maps (
Tap Maps (![]() ).
).
The Maps screen appears.
![]() Display the area of interest in the middle of the screen. For example, tap and drag the map, or search for the location you want.
Display the area of interest in the middle of the screen. For example, tap and drag the map, or search for the location you want.
![]() Tap Information (
Tap Information (![]() ).
).
The Maps Settings dialog opens.
![]() Tap Satellite.
Tap Satellite.
The map switches to Satellite view.
![]() Tap Close (
Tap Close (![]() ).
).
The Maps Settings dialog closes.
![]() Tap 3D.
Tap 3D.
Note: You can also swipe up the screen with two fingers to switch to 3D view.
The map switches to 3D view.
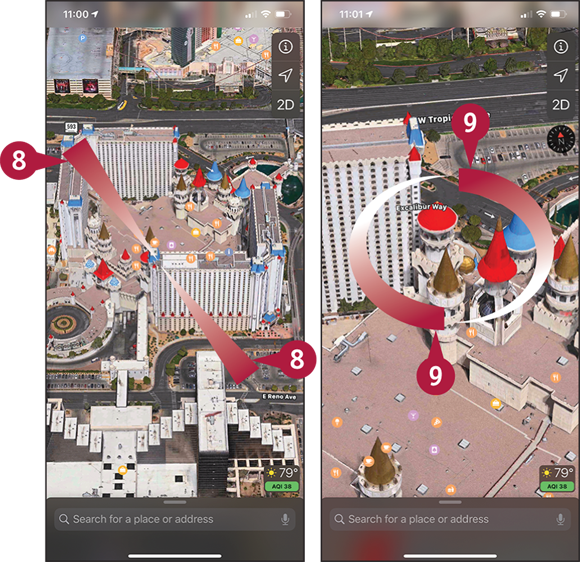
![]() Place your thumb and finger on the screen and pinch outward.
Place your thumb and finger on the screen and pinch outward.
The map zooms in.
Note: You can place your thumb and finger on the screen and pinch inward to zoom out.
Note: Tap and drag to scroll the map as needed.
![]() Place two fingers on the screen and twist clockwise or counterclockwise to rotate the view.
Place two fingers on the screen and twist clockwise or counterclockwise to rotate the view.
The rotated view appears.
![]() The Compass arrow (
The Compass arrow (![]() ) appears. You can tap it to restore the direction to north.
) appears. You can tap it to restore the direction to north.
Note: Pan and zoom as needed to explore the area.
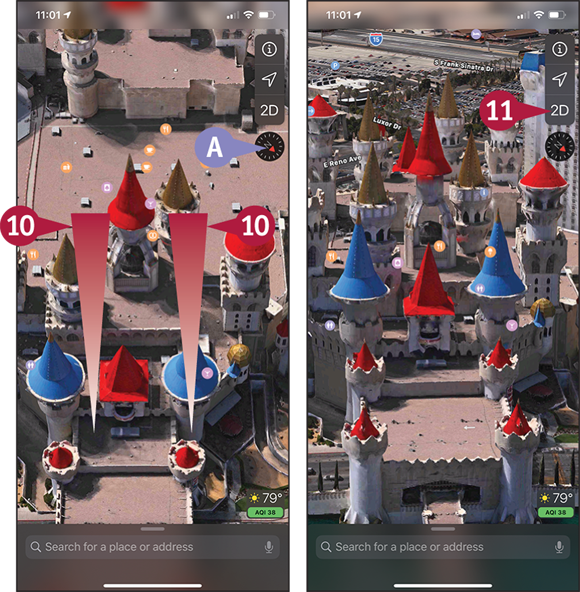
![]() Tap and drag up with two fingers.
Tap and drag up with two fingers.
The viewing angle becomes shallower.
![]() Tap 2D.
Tap 2D.
The two-dimensional map reappears.
Using Maps’ Favorites and Contacts
When you want to return to a location easily in the Maps app, you can create a favorite for the location.
Similarly, you can add a location to your contacts, so that you can access it either from the Contacts app or from the Maps app. You can either create a new contact or add the location to an existing contact. You can also return quickly to locations you have visited recently but for which you have not created a favorite or contact.
Using Maps’ Favorites and Contacts
Create a Favorite in Maps
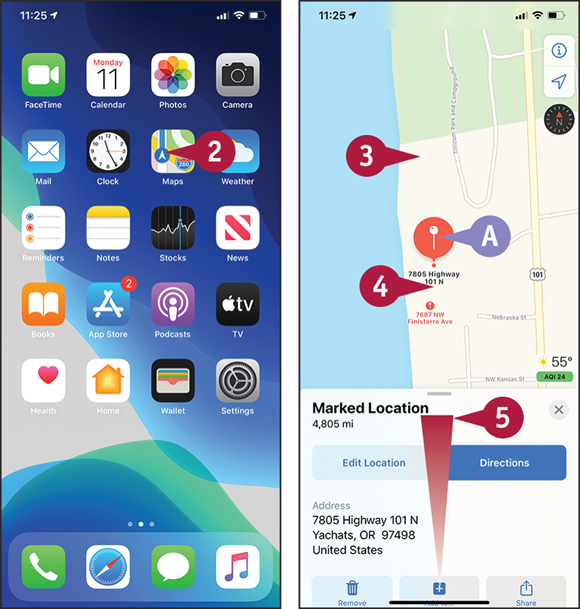
![]() Swipe up from the bottom of the screen.
Swipe up from the bottom of the screen.
The Home screen appears.
![]() Tap Maps (
Tap Maps (![]() ).
).
The Maps screen appears.
![]() Find the place for which you want to create a favorite. For example, tap and drag the map, or search for the location you want.
Find the place for which you want to create a favorite. For example, tap and drag the map, or search for the location you want.
![]() Tap and hold the place for which you want to create a favorite.
Tap and hold the place for which you want to create a favorite.
![]() The Maps app drops a pin on the place.
The Maps app drops a pin on the place.
The Marked Location panel opens.
![]() Swipe up.
Swipe up.
The Marked Location panel opens further.
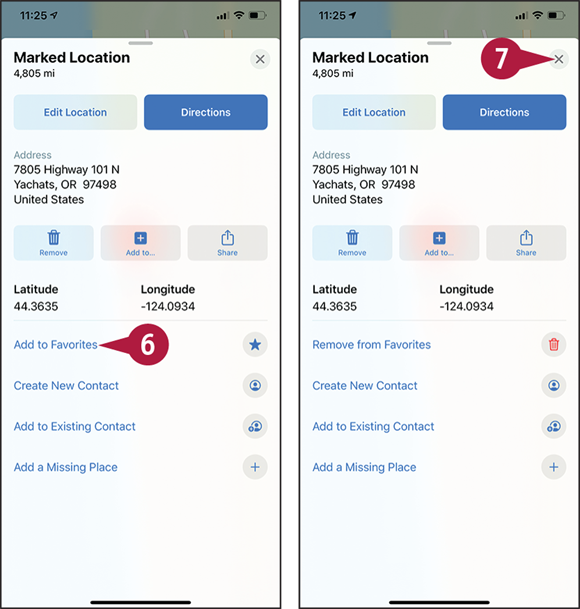
![]() Tap Add to Favorites (
Tap Add to Favorites (![]() ).
).
![]() Tap Close (
Tap Close (![]() ).
).
The panel closes.
Create a Contact in Maps
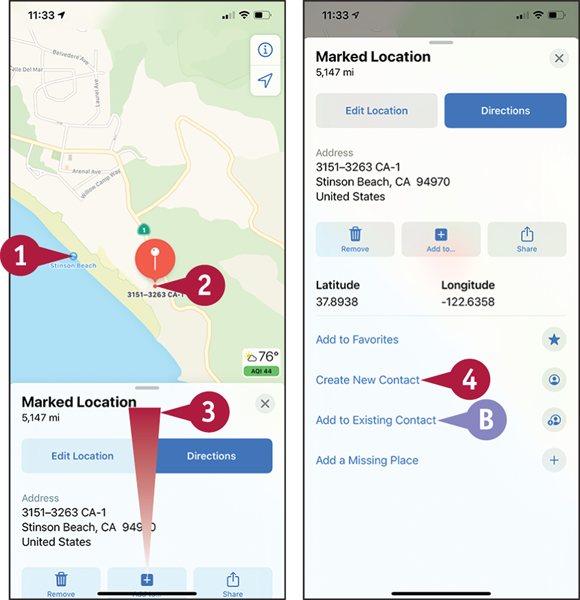
![]() Find the place for which you want to create a contact. For example, tap and drag the map, or search for the location you want.
Find the place for which you want to create a contact. For example, tap and drag the map, or search for the location you want.
![]() Tap and hold the appropriate place.
Tap and hold the appropriate place.
The Maps app drops a pin on the place.
The Marked Location panel opens.
![]() Swipe up.
Swipe up.
The Marked Location panel opens further.
![]() Tap Create New Contact (
Tap Create New Contact (![]() ).
).
![]() You can tap Add to Existing Contact (
You can tap Add to Existing Contact (![]() ) and then tap the contact to which you want to add the location instead.
) and then tap the contact to which you want to add the location instead.
The New Contact screen appears.
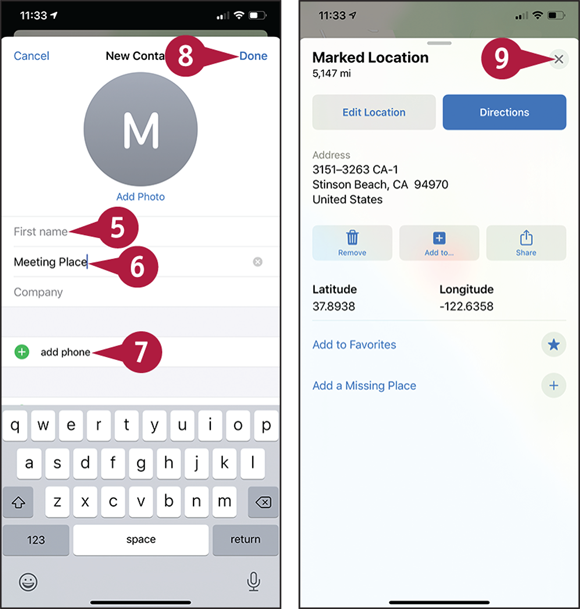
![]() Type the first name for the contact record, as needed.
Type the first name for the contact record, as needed.
![]() Type the last name for the contact record, as needed.
Type the last name for the contact record, as needed.
![]() Add any other information the contact record requires.
Add any other information the contact record requires.
![]() Tap Done.
Tap Done.
The Maps app creates the contact record for the location.
The Marked Location panel appears again.
![]() Tap Close (
Tap Close (![]() ).
).
The Marked Location panel closes.
Take Notes
Your iPhone is a great device for taking notes no matter where you happen to be. The Notes app enables you to create notes stored in an e-mail account — such as your iCloud account — or on your iPhone.
You can create straightforward notes in plain text for any account you add to Notes. For notes stored on Exchange, IMAP, or Google accounts, you can also add formatting. For notes stored in iCloud, you can add check boxes, photos, web links, and sketches.
Take Notes
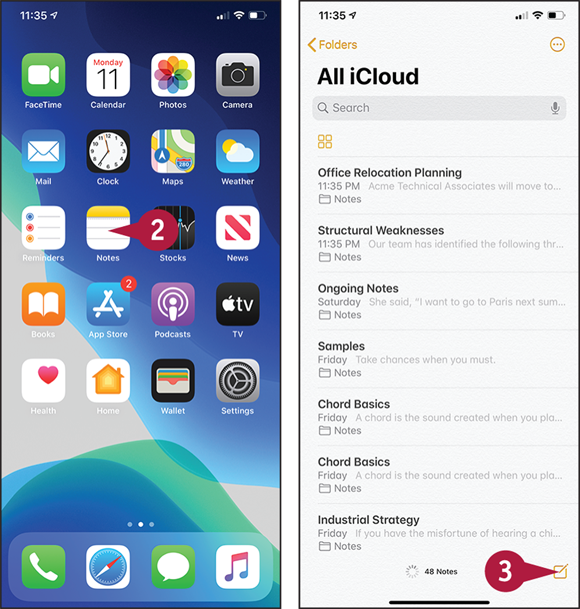
![]() Swipe up from the bottom of the screen.
Swipe up from the bottom of the screen.
The Home screen appears.
![]() Tap Notes (
Tap Notes (![]() ).
).
The Notes app opens.
Note: To change the account or folder in which you are working, tap Back (![]() ), and then tap the account or folder you want to use.
), and then tap the account or folder you want to use.
![]() Tap New (
Tap New (![]() ).
).
A new note opens.
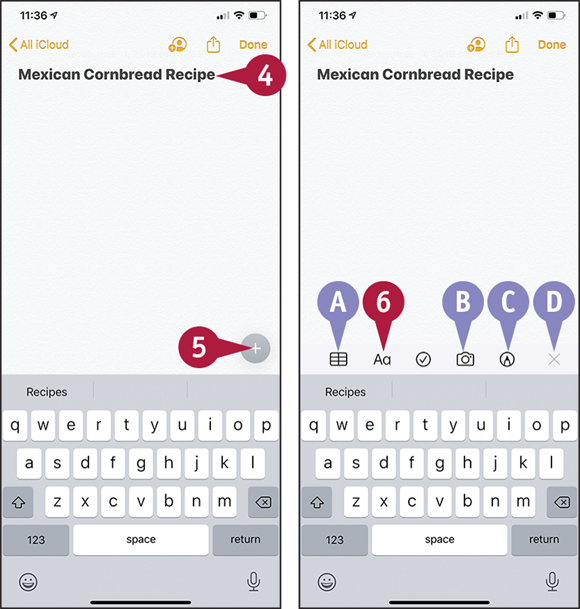
![]() Type the title or first paragraph of the note.
Type the title or first paragraph of the note.
![]() Tap More (
Tap More (![]() ).
).
The More bar appears.
![]() Tap Formatting (
Tap Formatting (![]() ).
).
![]() You can tap Table (
You can tap Table (![]() ) to add a table.
) to add a table.
![]() You can tap Add Photo (
You can tap Add Photo (![]() ) to add a new photo, an existing photo, or a scanned document to the note. This adds the photo or document as a separate item attached to the note.
) to add a new photo, an existing photo, or a scanned document to the note. This adds the photo or document as a separate item attached to the note.
![]() You can tap Sketch (
You can tap Sketch (![]() ) to draw a sketch in the note.
) to draw a sketch in the note.
![]() You can tap Close (
You can tap Close (![]() ) when you no longer need the More bar displayed.
) when you no longer need the More bar displayed.
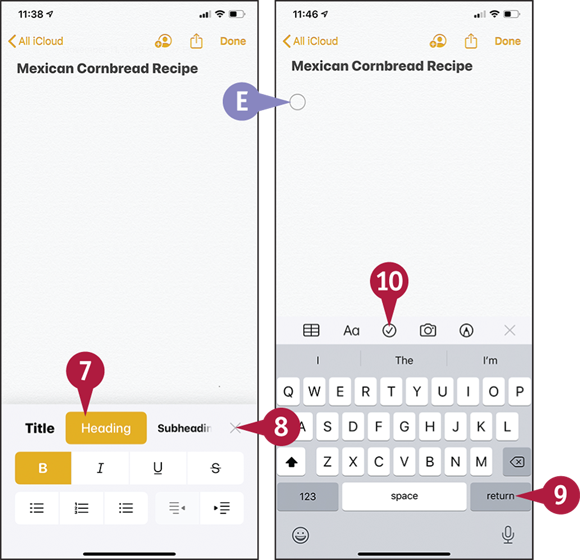
The Formatting pane appears.
![]() Tap the style you want to apply to the paragraph.
Tap the style you want to apply to the paragraph.
The paragraph takes on the style.
![]() Tap Close (
Tap Close (![]() ).
).
The Formatting pane closes.
![]() Tap return.
Tap return.
The insertion point moves to a new paragraph.
![]() Tap Check box (
Tap Check box (![]() ).
).
![]() The Notes app inserts a check box on the current line.
The Notes app inserts a check box on the current line.
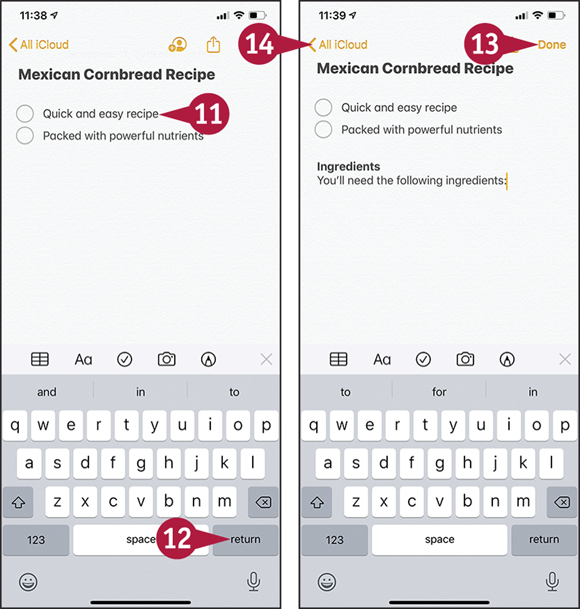
![]() Type the text to accompany the check box.
Type the text to accompany the check box.
![]() Tap return twice.
Tap return twice.
The Notes app creates a new paragraph and discontinues the check boxes.
![]() When you finish working on the note, tap Done.
When you finish working on the note, tap Done.
The Notes app hides the keyboard.
![]() Tap Back (
Tap Back (![]() ) one or more times. The name varies depending on the folder you are using.
) one or more times. The name varies depending on the folder you are using.
The Notes screen appears again, and you can work with other notes.
Using Stocks, Weather, and Clock
The iPhone includes several built-in apps that enable you to keep track of important information throughout the day. You can use the Stocks app to track stock prices so that you can take immediate action when it becomes necessary. You can use the Weather app to learn the current weather conditions and forecast for your current location and for as many cities as you need. And you can use the Clock app’s World Clock, Alarm, Bedtime, Stopwatch, and Timer features to track and measure time.
Using the Stocks App
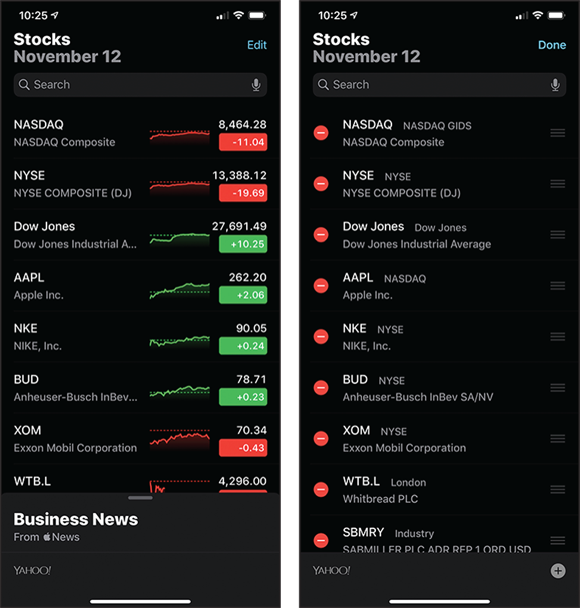
The Stocks app enables you to track a customized selection of stock prices.
Tap Stocks (![]() ) on the Home screen to launch the Stocks app. The Stocks screen appears, showing the default selection of stocks. At the bottom is a news section that you can expand by swiping up. To view more information on a stock, tap it.
) on the Home screen to launch the Stocks app. The Stocks screen appears, showing the default selection of stocks. At the bottom is a news section that you can expand by swiping up. To view more information on a stock, tap it.
To change the stocks displayed, tap Edit. On the Stocks configuration screen that appears, tap Add (![]() ) to display the Search screen. Type the name or stock symbol of the stock you want to add, tap the matching entry in the list to display the information panel, and then tap Add to Watchlist. You can tap stock handles (
) to display the Search screen. Type the name or stock symbol of the stock you want to add, tap the matching entry in the list to display the information panel, and then tap Add to Watchlist. You can tap stock handles (![]() ) and drag the stocks into your preferred order. Tap Done to return to the Stocks screen.
) and drag the stocks into your preferred order. Tap Done to return to the Stocks screen.
Using the Weather App
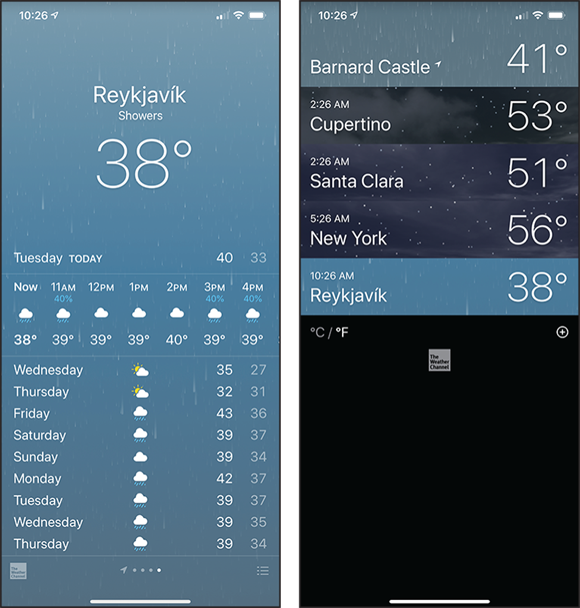
The Weather app lets you stay in touch with current weather conditions and forecasts for multiple locations.
Tap Weather (![]() ) on the Home screen to launch the Weather app. You can then swipe left or right at the top of the screen, or tap the dots at the bottom of the screen, to display the city you want to see. Swipe the timeline left to see later hours. Swipe up to display further details, such as sunrise and sunset times, humidity, and wind.
) on the Home screen to launch the Weather app. You can then swipe left or right at the top of the screen, or tap the dots at the bottom of the screen, to display the city you want to see. Swipe the timeline left to see later hours. Swipe up to display further details, such as sunrise and sunset times, humidity, and wind.
To customize the locations, tap Cities (![]() ). You can then tap Add (
). You can then tap Add (![]() ) to add a location, swipe a location left and tap Delete to delete it, or tap and hold and then drag to move a city up or down the list. When you finish customizing the list, tap the city whose weather you want to display.
) to add a location, swipe a location left and tap Delete to delete it, or tap and hold and then drag to move a city up or down the list. When you finish customizing the list, tap the city whose weather you want to display.
Using the Clock App
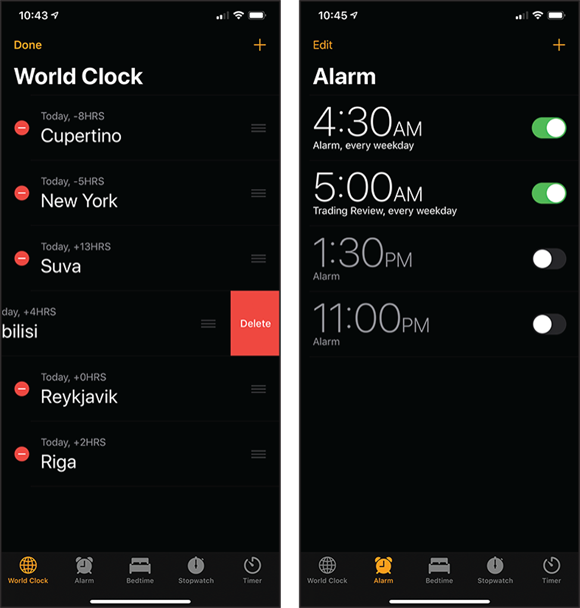
The Clock app, which you can launch by tapping Clock (![]() ) on the Home screen, has five main features: World Clock, Alarm, Bedtime, Stopwatch, and Timer. You tap the buttons at the bottom of the screen to select the feature you want to use.
) on the Home screen, has five main features: World Clock, Alarm, Bedtime, Stopwatch, and Timer. You tap the buttons at the bottom of the screen to select the feature you want to use.
The World Clock feature enables you to easily keep track of the time in different cities. From the list, you can remove a city by swiping its button left and then tapping Delete. To add cities, tap Add (![]() ) and select the city on the Choose a City screen. To change the order of the list, tap Edit and drag cities up or down by their handles (
) and select the city on the Choose a City screen. To change the order of the list, tap Edit and drag cities up or down by their handles (![]() ); tap Done when you finish.
); tap Done when you finish.
The Alarm feature lets you set as many alarms as you need, each with a different schedule and your choice of sound. Tap Add (![]() ) to display the Add Alarm screen, set the details for a new alarm, and then tap Save. On the Alarm screen, you can set each alarm’s switch to On (
) to display the Add Alarm screen, set the details for a new alarm, and then tap Save. On the Alarm screen, you can set each alarm’s switch to On (![]() ) or Off (
) or Off (![]() ), as needed.
), as needed.
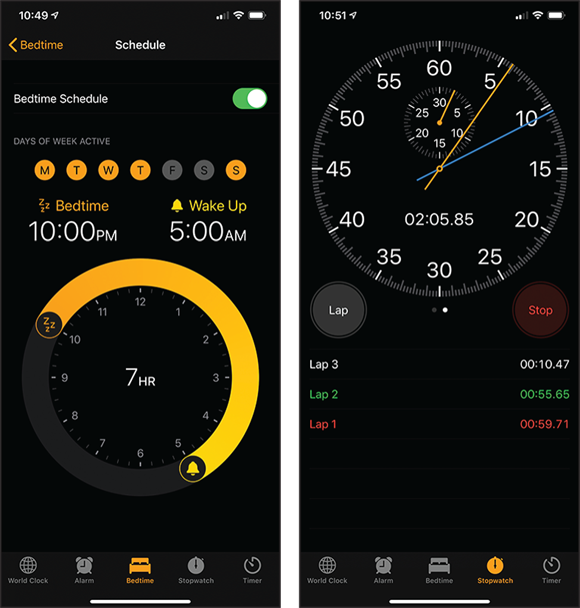
The Bedtime feature encourages you to follow consistent times for going to bed and waking. It also provides sleep analysis.
The Stopwatch feature allows you to time events to the hundredth of a second. You can switch between the analog-look stopwatch and the digital-look stopwatch by swiping left or right. Tap Start to start the stopwatch, tap Lap to mark a lap time, and tap Stop to stop the stopwatch.
The Timer feature enables you to count down a set amount of time and play a sound when the timer ends. You can also use the Timer to play music or other media for a set amount of time. To do this, tap When Timer Ends, tap Stop Playing on the When Timer Ends screen, and then tap Set.
Using the Health App
The Health app integrates with third-party hardware and software to enable you to keep tabs on many different aspects of your health, ranging from your weight and blood pressure to your nutrition, activity levels, and body mass index. Swipe up from the bottom of the screen to display the Home screen, and then tap Health (![]() ) to launch the Health app.
) to launch the Health app.
Navigate the Health App’s Screens

The Health app contains two main screens, the Summary screen and the Browse screen.
The Summary screen appears at first, showing the Favorites list, the Highlights list, the Get More from Health list, and the Apps list.
The Browse screen, which you can display by tapping Browse (![]() changes to
changes to ![]() ) at the bottom of the screen, contains the Health Categories list and the Health Records list.
) at the bottom of the screen, contains the Health Categories list and the Health Records list.
Set Up Your Health Profile and Medical ID
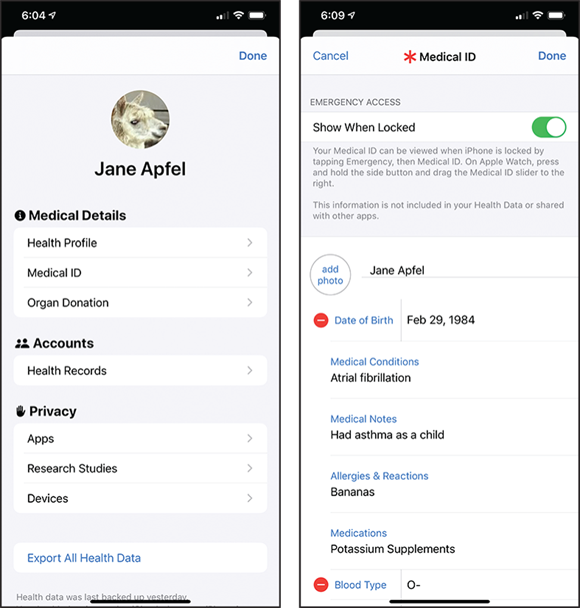
Tap Account (![]() or your chosen photo) to display the Account screen. Here you can enter your medical details; connect to a provider to see your health records; specify privacy settings for apps, research studies, and devices; and export all your health data to share with medical professionals.
or your chosen photo) to display the Account screen. Here you can enter your medical details; connect to a provider to see your health records; specify privacy settings for apps, research studies, and devices; and export all your health data to share with medical professionals.
Start by tapping Health Profile and entering basic details, such as your date of birth and blood type, on the Health Profile screen. Then tap Medical ID to display the Medical ID screen. Here, you can enter your medical conditions, medical notes, allergies and reactions, medications, and emergency contact information. At the top of the screen, set the Show When Locked switch to On (![]() ) if you want to allow your Medical ID to be viewed from the iPhone’s Power Off screen.
) if you want to allow your Medical ID to be viewed from the iPhone’s Power Off screen.
Set Up Your Favorites List
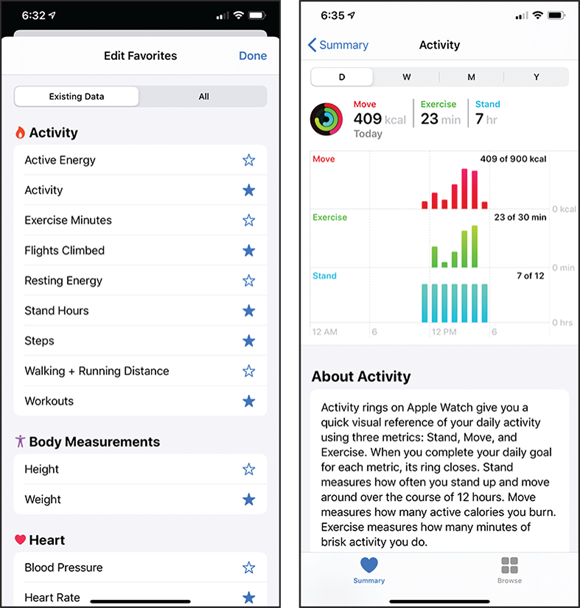
To put the items you will find most useful on your Favorites list, tap Edit to the right of Favorites. On the Edit Favorites screen, tap Existing Data to view the items that have data, or tap All to view all items. Tap Favorite (![]() changes to
changes to ![]() ) to add an item to the Favorites list. Tap Done when you finish.
) to add an item to the Favorites list. Tap Done when you finish.
From the Favorites screen, you can tap an item to view its current data. For example, tap Activity to display the Activity screen, where you can examine your data for the Move, Exercise, and Stand targets.
Add Data Points
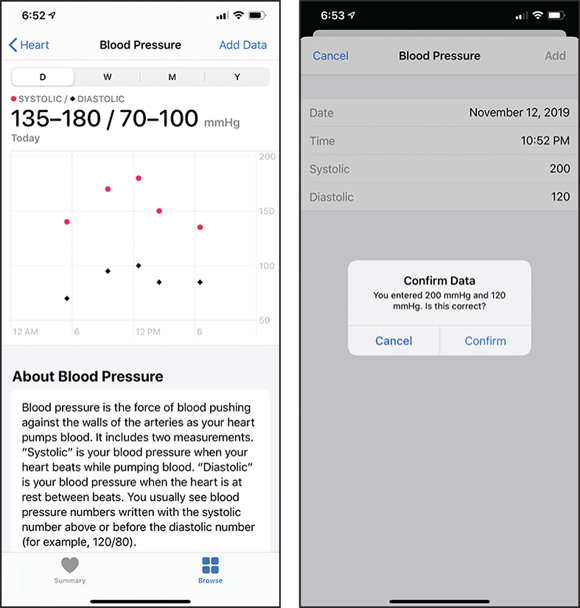
The Health app can automatically accept data points from sources you approve, but you can also add data points manually. For example, if you weigh yourself on a manual scale or have your blood pressure taken, you can add your latest readings to the Health app so that you can track your weight and blood pressure over time.
Tap the appropriate button — for example, tap Blood Pressure — on the Favorites screen to display the Blood Pressure screen. Tap Add Data to display the data-entry screen, such as the Blood Pressure screen shown here, input the data, and then tap Add. If the values are abnormal, the Confirm Data dialog opens to prompt you to confirm the values; tap Confirm if they are correct.
Manage Files with the Files App
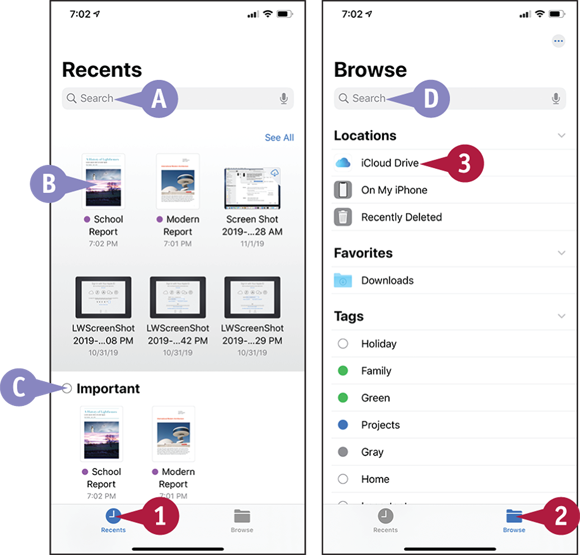
The Files app enables you to work with files stored on your iPhone; files stored on network servers, such as macOS Server; and files stored on online storage services, such as iCloud Drive. You can quickly locate files by using the Recents screen, by using the Browse screen, or by searching by keyword. You can also recover recently deleted files by using the Recently Deleted Location. You navigate the Files app using similar techniques to those for navigating file-opening and file-saving features within apps.
Manage Files with the Files App
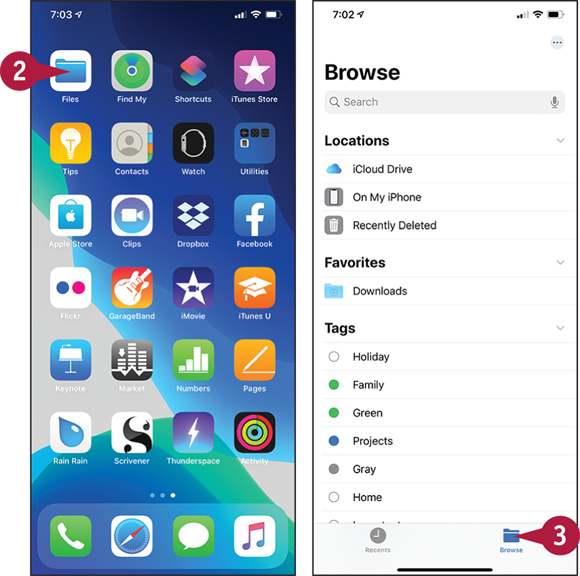
Open the Files App
![]() Swipe up from the bottom of the screen.
Swipe up from the bottom of the screen.
The Home screen appears.
![]() Tap Files (
Tap Files (![]() ).
).
The Files app opens.
![]() Tap Browse (
Tap Browse (![]() changes to
changes to ![]() ).
).
The Browse screen appears.
Note: The Recently Deleted location contains files that you have deleted recently, somewhat like the Trash on macOS or the Recycle Bin on Windows. To retrieve a deleted file, tap Recently Deleted, tap and hold the file, and then tap Recover on the command bar that appears.
Browse Files and Open Files
![]() Tap Recents (
Tap Recents (![]() changes to
changes to ![]() ).
).
The Recents screen appears.
![]() You can search your recent files by tapping Search (
You can search your recent files by tapping Search (![]() ) and then typing a search term.
) and then typing a search term.
![]() Some of your most recent files appear at the top.
Some of your most recent files appear at the top.
![]() Older files appear listed by their tags.
Older files appear listed by their tags.
![]() Tap Browse (
Tap Browse (![]() changes to
changes to ![]() ).
).
The Browse screen appears.
![]() You can search all your files by tapping Search (
You can search all your files by tapping Search (![]() ) and then typing a search term.
) and then typing a search term.
![]() Tap the location you want to browse. This example uses iCloud Drive.
Tap the location you want to browse. This example uses iCloud Drive.
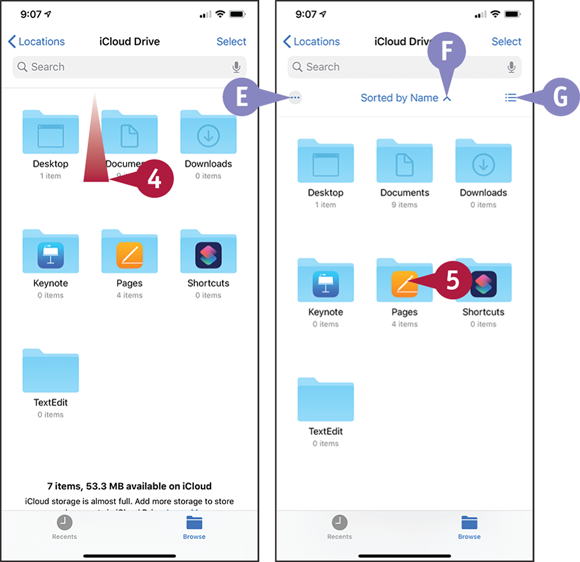
The screen for the location appears.
![]() Swipe down from below the Search box and divider bar.
Swipe down from below the Search box and divider bar.
Additional commands appear.
![]() You can tap More (
You can tap More (![]() ) to access more commands, including New Folder and Connect to Server.
) to access more commands, including New Folder and Connect to Server.
![]() You can change the sort order by tapping Sorted by and then tapping Name, Date, Size, Kind, or Tags in the Sort By dialog.
You can change the sort order by tapping Sorted by and then tapping Name, Date, Size, Kind, or Tags in the Sort By dialog.
![]() You can tap List (
You can tap List (![]() ) to display the files and folders as a list rather than as a grid.
) to display the files and folders as a list rather than as a grid.
![]() Tap the folder you want to open.
Tap the folder you want to open.
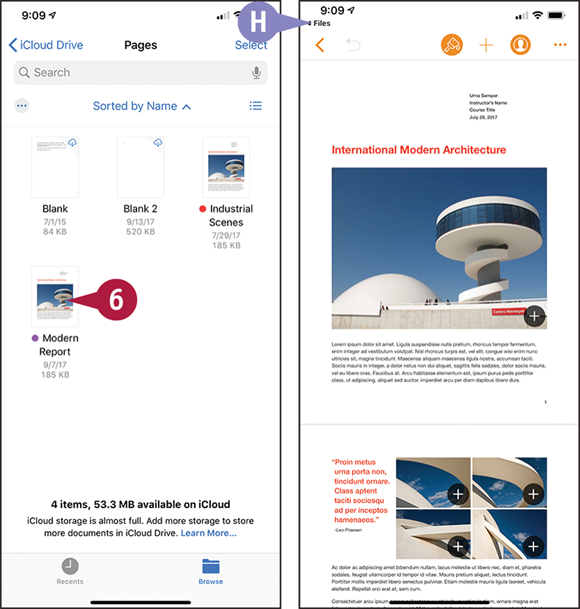
The folder opens.
![]() Tap the file you want to open.
Tap the file you want to open.
The file opens in the default app for the file type, assuming your iPhone has such an app.
The app appears, and you can work on the file.
Note: You can open only files for which your iPhone contains a suitable app. If there is no suitable app, Files displays the file for viewing if it has a suitable viewer, but you cannot change the file.
![]() You can tap Files (
You can tap Files (![]() ) to return to the Files app.
) to return to the Files app.
As well as opening a file, the Files app enables you to take other actions with a file, such as renaming it, copying it and pasting a copy, duplicating it in the same location, or moving it to another location.
The Files app also enables you to use tags to group and sort your files. The Files app comes with default tags with color names, such as Red and Orange, but you can customize the names and create new tags as needed.
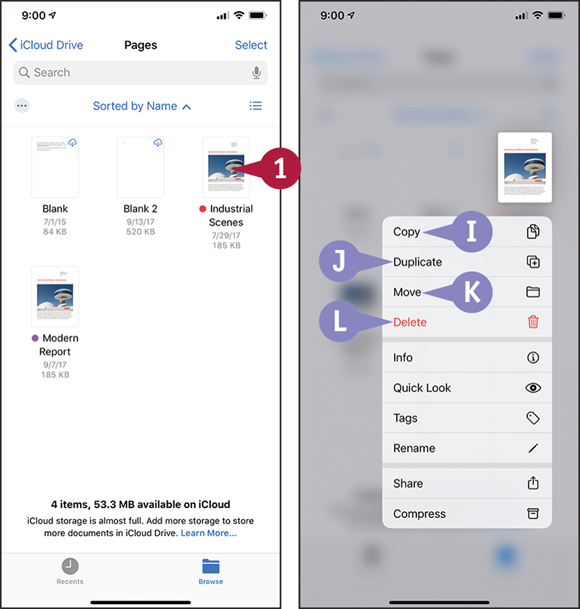
Take Other Actions with a File
![]() Tap and hold the file you want to affect.
Tap and hold the file you want to affect.
The pop-up menu opens.
![]() Tap Copy (
Tap Copy (![]() ) to copy the file. After copying the file, navigate to the location in which you want to paste the copy, tap and hold open space, and then tap Paste on the control bar.
) to copy the file. After copying the file, navigate to the location in which you want to paste the copy, tap and hold open space, and then tap Paste on the control bar.
![]() Tap Duplicate (
Tap Duplicate (![]() ) to create a duplicate file in the same folder.
) to create a duplicate file in the same folder.
![]() Tap Move (
Tap Move (![]() ) to display a screen for moving the file. Tap the location, and then tap Move.
) to display a screen for moving the file. Tap the location, and then tap Move.
![]() Tap Delete (
Tap Delete (![]() ) to delete the file.
) to delete the file.
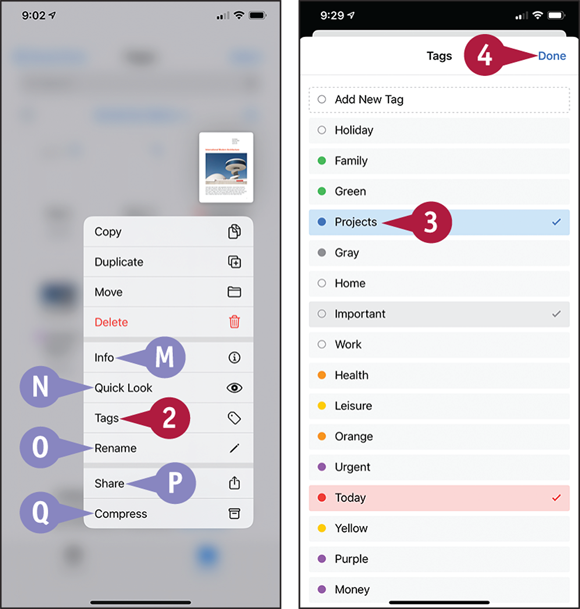
![]() Tap Info (
Tap Info (![]() ) to display information about the file.
) to display information about the file.
![]() Tap Quick Look (
Tap Quick Look (![]() ) to display a preview of the file.
) to display a preview of the file.
![]() Tap Rename (
Tap Rename (![]() ) to display the Rename Document screen. Type the new name, and then tap Done.
) to display the Rename Document screen. Type the new name, and then tap Done.
![]() Tap Share (
Tap Share (![]() ) to open the Share sheet for sharing the file.
) to open the Share sheet for sharing the file.
![]() Tap Compress (
Tap Compress (![]() ) to create a zip file containing the file.
) to create a zip file containing the file.
![]() Tap Tags (
Tap Tags (![]() ).
).
The Tags screen appears.
![]() Tap each tag you want to apply to the file. Also tap any applied tag that you want to remove.
Tap each tag you want to apply to the file. Also tap any applied tag that you want to remove.
![]() Tap Done.
Tap Done.
The Files app displays the folder from which you started.
Organize Your Locations and Tags
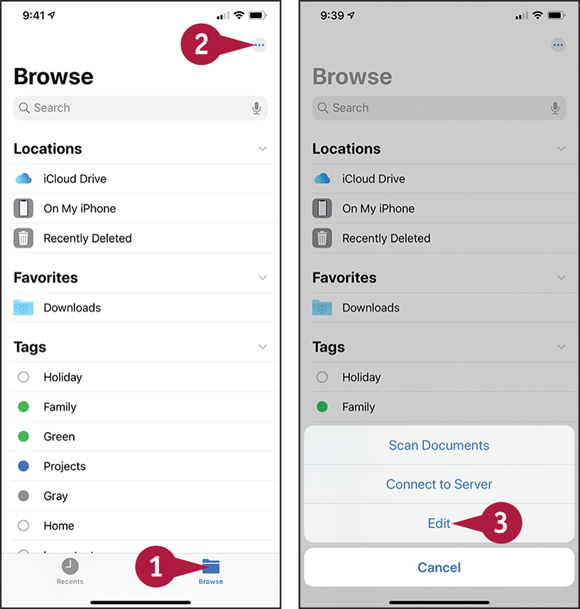
![]() Tap Browse (
Tap Browse (![]() changes to
changes to ![]() ).
).
The Browse screen appears.
![]() Tap More (
Tap More (![]() ).
).
The menu opens.
![]() Tap Edit.
Tap Edit.
The Browse screen switches to Edit Mode.
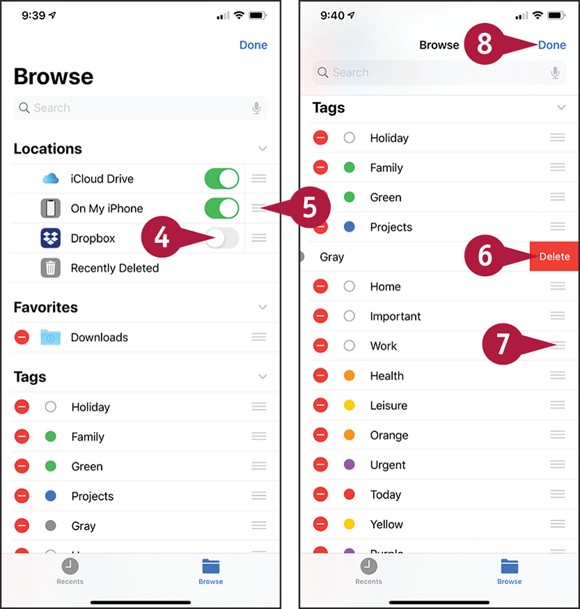
![]() In the Locations list, set a switch to Off (
In the Locations list, set a switch to Off (![]() changes to
changes to ![]() ) if you want to hide the location.
) if you want to hide the location.
Note: If you have configured a compatible app, but it has not appeared in the Locations list, set its switch here to On (![]() ) to enable it.
) to enable it.
![]() Tap a handle and drag a location up or down, as needed.
Tap a handle and drag a location up or down, as needed.
![]() In the Tags list, tap Delete (
In the Tags list, tap Delete (![]() ) and then tap Delete to delete a tag.
) and then tap Delete to delete a tag.
![]() To change the tag order, tap the handle (
To change the tag order, tap the handle (![]() ) and drag the tag up or down the list.
) and drag the tag up or down the list.
![]() When you finish editing the Browse screen, tap Done.
When you finish editing the Browse screen, tap Done.
The Browse screen switches off Edit Mode.
Understanding Shortcuts and Automation
Your iPhone includes the Shortcuts app, which gives you two ways of executing tasks quickly and effortlessly. The first way of executing tasks is using shortcuts, sequences of actions that run at the tap of a button. iOS comes with many prebuilt shortcuts, but you can also build your own custom shortcuts to take exactly the actions you want.
The second way of executing tasks is by using automations. Like a shortcut, an automation is a sequence of actions; the difference is that an automation runs automatically when an event occurs rather than when you tap a button.
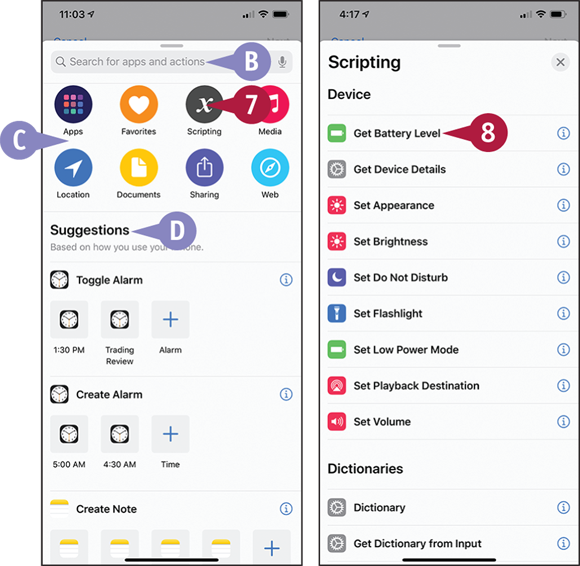
Open the Shortcuts App and Navigate the Interface
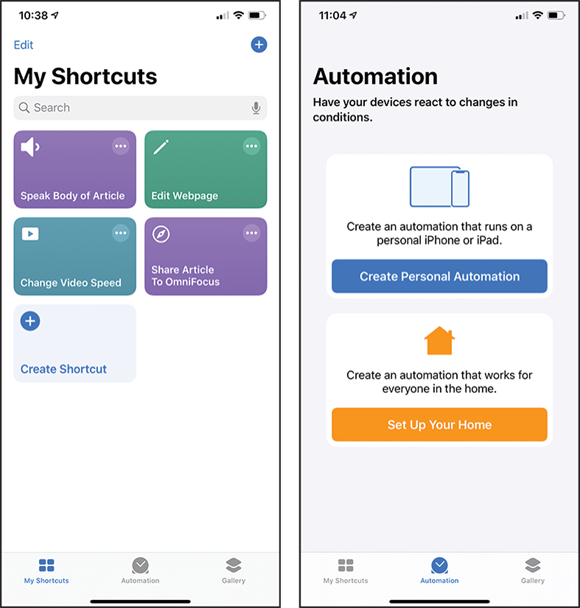
To get started with shortcuts, swipe up from the bottom of the screen to display the Home screen, and then tap Shortcuts (![]() ). The Shortcuts app opens, displaying the My Shortcuts screen. At first, this screen may contain only the Create Shortcut button, which you can tap to start creating a new shortcut. You can add other shortcuts to this screen as needed. When you want to run a shortcut, you tap its button on the My Shortcuts screen.
). The Shortcuts app opens, displaying the My Shortcuts screen. At first, this screen may contain only the Create Shortcut button, which you can tap to start creating a new shortcut. You can add other shortcuts to this screen as needed. When you want to run a shortcut, you tap its button on the My Shortcuts screen.
On the Automation screen, the Create Personal Automation feature lets you configure the Shortcuts app to automatically trigger sequences of software tasks when certain conditions are met. You can also create automated tasks to be performed with HomeKit-compatible devices using the Home app’s interface, again when certain conditions are met.
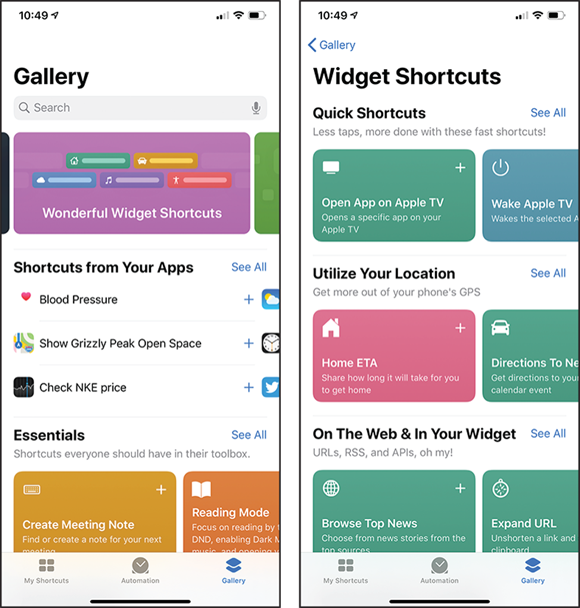
Explore Built-In Shortcuts in the Gallery
Before creating any shortcuts of your own, spend a few minutes exploring the prebuilt shortcuts. Tap Gallery (![]() changes to
changes to ![]() ) to display the Gallery screen.
) to display the Gallery screen.
At the top of this screen, you can search using keywords, or browse through highlighted collections.
In the Shortcuts from Your Apps section, you can tap any of the suggestions for custom shortcuts based on your recent iPhone usage. Below this are various categories of shortcuts. Scroll down to find a category of interest, and then scroll left to explore the shortcuts it contains; tap See All to display a screen showing the entire category.
Add Shortcuts to the My Shortcuts Screen
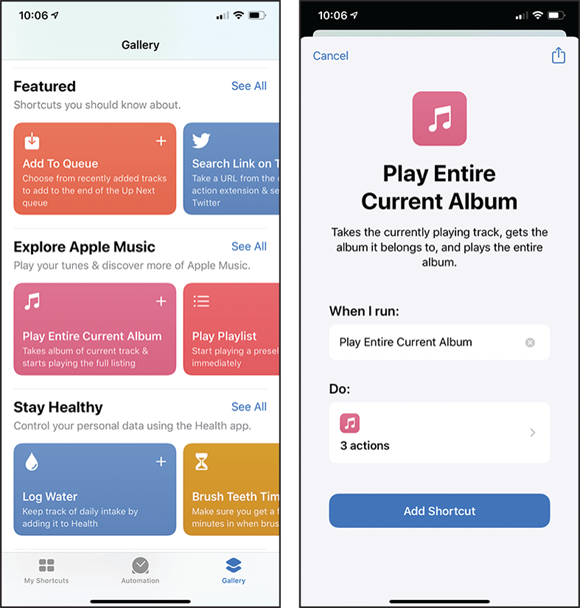
When you find a shortcut you want to use on the Gallery screen, add it to the My Shortcuts screen. Tap the shortcut on the Gallery to display the information screen for the shortcut. Here, you can edit the shortcut’s name in the When I Run text box as needed; for example, you might give the shortcut a snappier or more memorable name to help you identify it among many shortcuts. You can also tap the Do box to view the actions the shortcut will take. Then tap Add Shortcut to add the shortcut to the My Shortcuts screen.
From the Gallery screen, you can also add a shortcut to the My Shortcuts screen more quickly: Tap and hold the shortcut on the Gallery screen until the pop-up menu opens, and then tap Add Shortcut (![]() ).
).
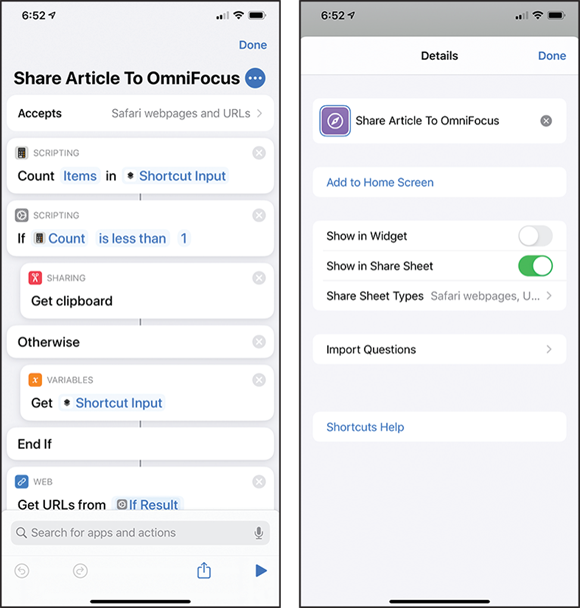
Configure or Modify a Shortcut
The Shortcuts app enables you to configure an existing shortcut or modify what it does. To start configuring or modifying a shortcut, tap My Shortcuts (![]() changes to
changes to ![]() ) to display the My Shortcuts screen. Then tap Details (
) to display the My Shortcuts screen. Then tap Details (![]() ) on the shortcut to open the shortcut in the shortcut editor.
) on the shortcut to open the shortcut in the shortcut editor.
You can then tap an item in an action to configure that item, or tap Remove (![]() ) to remove an action.
) to remove an action.
To configure the shortcut, tap Details (![]() ) and work on the Details screen. Here, you can choose settings for the shortcut. For example, set the Show in Widget switch to On (
) and work on the Details screen. Here, you can choose settings for the shortcut. For example, set the Show in Widget switch to On (![]() ) to add the shortcut to the widgets list. Tap Done when you finish configuring the shortcut, and then tap Done again to close the shortcut editor.
) to add the shortcut to the widgets list. Tap Done when you finish configuring the shortcut, and then tap Done again to close the shortcut editor.
Create a Custom Shortcut
The Shortcuts app enables you to create custom shortcuts that perform exactly the actions you want. You can browse an extensive selection of actions, arrange the actions you need into the right order, and customize what the actions do. You can then assign your new shortcut a name and a glyph — an icon — with a colored background.
As with prebuilt shortcuts, you can run your custom shortcuts either from the My Shortcuts screen in the Shortcuts app or directly from the iPhone’s Home screen.
Create a Custom Shortcut
![]() Swipe up from the bottom of the screen to display the Home screen.
Swipe up from the bottom of the screen to display the Home screen.
![]() Tap Shortcuts (
Tap Shortcuts (![]() ) to open the Shortcuts app.
) to open the Shortcuts app.
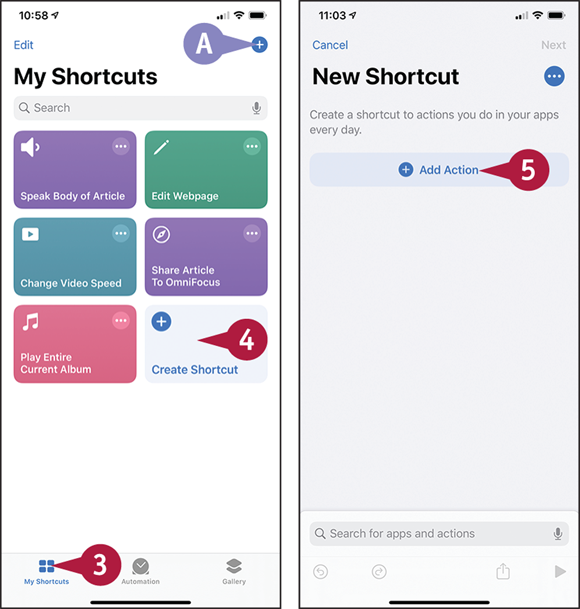
![]() If the My Shortcuts screen does not appear at first, tap My Shortcuts (
If the My Shortcuts screen does not appear at first, tap My Shortcuts (![]() changes to
changes to ![]() ) to display it.
) to display it.
![]() Tap Create Shortcut (
Tap Create Shortcut (![]() ).
).
Note: You may need to scroll down to locate the Create Shortcut button.
![]() You can also tap Create Shortcut (
You can also tap Create Shortcut (![]() ).
).
The shortcut editor screen appears, showing a new shortcut with the default name New Shortcut.
![]() Tap Add Action (
Tap Add Action (![]() ).
).
The Action panel opens.
![]() Locate the action you want to add to the shortcut.
Locate the action you want to add to the shortcut.
![]() You can tap Search and enter a keyword to search for.
You can tap Search and enter a keyword to search for.
![]() You can tap a category, such as Apps (
You can tap a category, such as Apps (![]() ) or Media (
) or Media (![]() ), to view actions in that category.
), to view actions in that category.
![]() You can browse the Suggestions list to find an action based on your iPhone usage.
You can browse the Suggestions list to find an action based on your iPhone usage.
![]() To follow this example, tap Scripting (
To follow this example, tap Scripting (![]() ).
).
The contents of the Scripting category appear.
![]() Tap the action you want to add.
Tap the action you want to add.
The shortcut editor screen appears, with the action added to the shortcut.
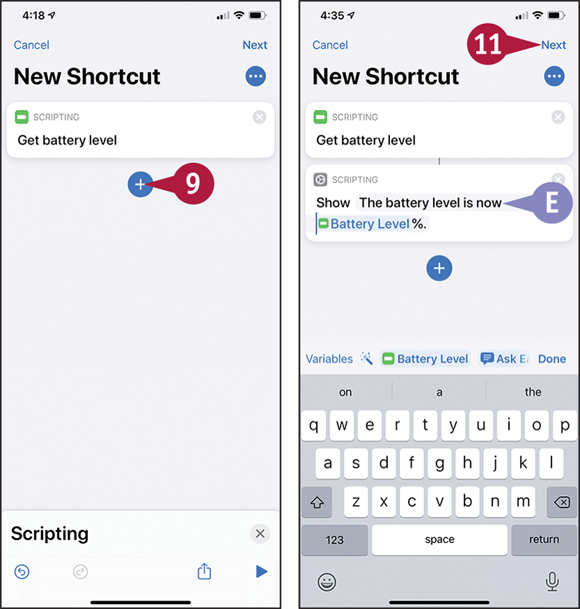
![]() Tap Add Action (
Tap Add Action (![]() ) and add other actions, as needed.
) and add other actions, as needed.
![]() If an action has configurable items, tap the item you want to configure, and then choose options for it.
If an action has configurable items, tap the item you want to configure, and then choose options for it.
![]() For example, for the Show Result action, you can enter text to accompany the result returned by the previous action, such as the Get Battery Level action in the example.
For example, for the Show Result action, you can enter text to accompany the result returned by the previous action, such as the Get Battery Level action in the example.
![]() Tap Next.
Tap Next.
The screen for naming the shortcut appears.
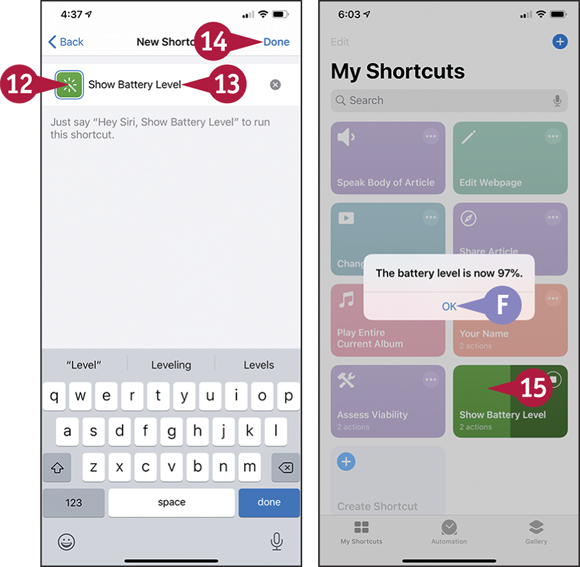
![]() Tap the default icon to display the icon screen, tap a color on the Color tab, tap Glyph and tap a glyph on the Glyph tab, and then tap Done.
Tap the default icon to display the icon screen, tap a color on the Color tab, tap Glyph and tap a glyph on the Glyph tab, and then tap Done.
![]() Tap Name and type the name for the shortcut.
Tap Name and type the name for the shortcut.
![]() Tap Done.
Tap Done.
The shortcut appears on the My Shortcuts screen.
![]() Tap the new shortcut.
Tap the new shortcut.
![]() The shortcut performs its actions — in this example, displaying a dialog that shows the battery level percentage.
The shortcut performs its actions — in this example, displaying a dialog that shows the battery level percentage.
Get Your Bearings with Compass
When you need to get your bearings, use the Compass app that comes installed on your iPhone. With Compass, you can establish your relationship to the points of the compass and learn your precise GPS location. You can also determine your elevation and measure an angle between two points.
The Compass app can show either True North or Magnetic North. To switch, tap Settings (![]() ) on the Home screen, tap Compass (
) on the Home screen, tap Compass (![]() ), and then set the Use True North switch to On (
), and then set the Use True North switch to On (![]() ) or Off (
) or Off (![]() ), as needed.
), as needed.
Get Your Bearings with Compass
Open Compass and Get Your Bearings
![]() Swipe up from the bottom of the screen to display the Home screen.
Swipe up from the bottom of the screen to display the Home screen.
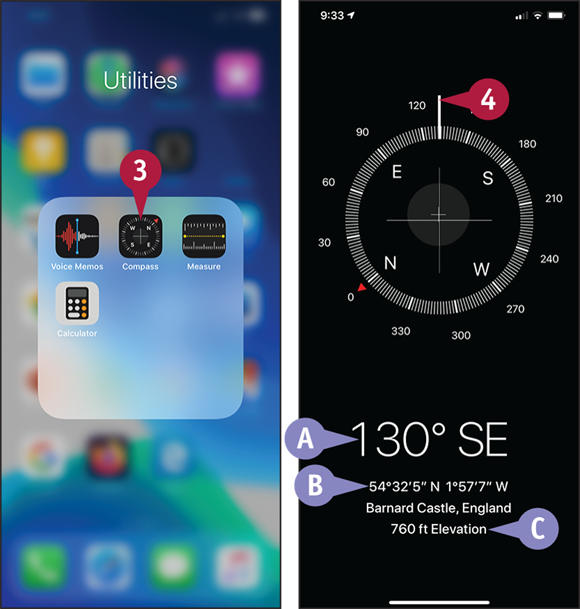
![]() Tap Utilities (
Tap Utilities (![]() ) to open the Utilities folder.
) to open the Utilities folder.
![]() Tap Compass (
Tap Compass (![]() ) to open the Compass app.
) to open the Compass app.
Note: If Compass displays a message prompting you to complete the circle to calibrate it, turn your iPhone this way and that until the circle is filled in. The compass then appears.
![]() Point your iPhone in the direction whose bearing you want to take.
Point your iPhone in the direction whose bearing you want to take.
![]() The readout shows the bearing.
The readout shows the bearing.
![]() You can tap the GPS location to switch to the Maps app and display the map for that location.
You can tap the GPS location to switch to the Maps app and display the map for that location.
![]() The readout shows the approximate elevation above sea level.
The readout shows the approximate elevation above sea level.
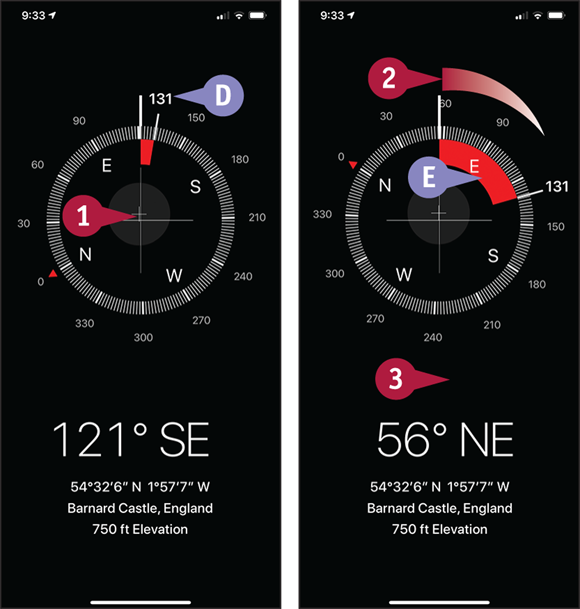
Measure an Angle
![]() On the Compass screen, tap anywhere on the compass to fix the current bearing.
On the Compass screen, tap anywhere on the compass to fix the current bearing.
![]() The bearing appears at the top of the compass.
The bearing appears at the top of the compass.
![]() Turn the iPhone toward the target point.
Turn the iPhone toward the target point.
![]() The red arc measures the difference between the two bearings.
The red arc measures the difference between the two bearings.
![]() Tap anywhere to release the compass.
Tap anywhere to release the compass.
Measure with the Measure App
The Measure app, which you can find in the Utilities folder, has two features. The Measure feature enables you to measure distances between points by using the iPhone’s rear camera. The Level feature enables you to measure the current slant of an object, which can help you to level it precisely.
Measure with the Measure App
Open the Measure App and Measure Distances
![]() Swipe up from the bottom of the screen to display the Home screen.
Swipe up from the bottom of the screen to display the Home screen.
![]() Tap Utilities (
Tap Utilities (![]() ) to open the Utilities folder.
) to open the Utilities folder.
![]() Tap Measure (
Tap Measure (![]() ) to open the Measure app.
) to open the Measure app.
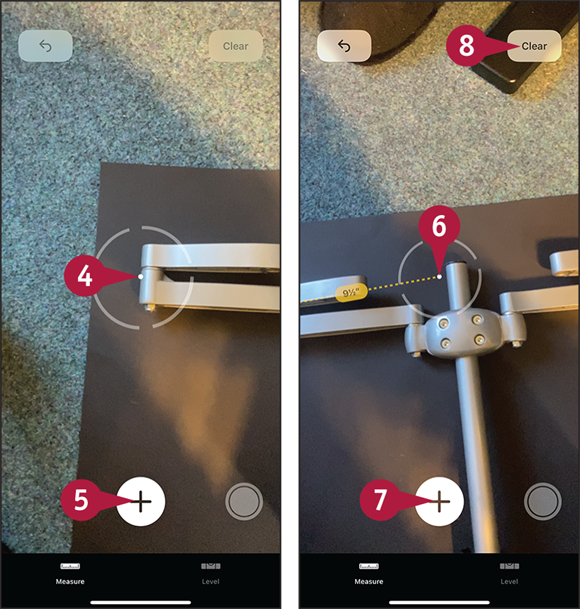
![]() Point the dot in the center circle at the point where you want to start measuring.
Point the dot in the center circle at the point where you want to start measuring.
![]() Tap Add (
Tap Add (![]() ).
).
The Measure app starts measuring.
![]() Move the dot to the end point for the measurement.
Move the dot to the end point for the measurement.
![]() Tap Add (
Tap Add (![]() ) to lock the measurement.
) to lock the measurement.
![]() To restart the measuring process, tap Clear.
To restart the measuring process, tap Clear.
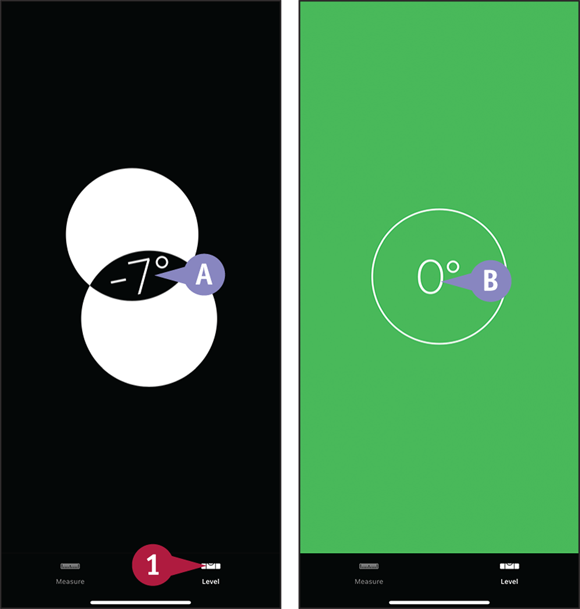
Using the Level Feature
![]() In the Measure app, tap Level (
In the Measure app, tap Level (![]() changes to
changes to ![]() ).
).
The Level screen appears.
![]() The figure shows the angle of the object or surface.
The figure shows the angle of the object or surface.
![]() Tilt your iPhone toward a level position to move the circles on top of each other.
Tilt your iPhone toward a level position to move the circles on top of each other.
Note: If the black-and-white color scheme is hard to see, tap anywhere on the screen to change the background color to red.
![]() When you align the circles, the screen goes green.
When you align the circles, the screen goes green.