
CHAPTER 3
Using Voice, Accessibility, and Continuity
Your iPhone includes the Siri personal assistant, helpful accessibility features, and integration with your Mac and Apple Watch via the Continuity feature.
Gather and Share Information with Siri
Configure Siri to Work Your Way
Set Up VoiceOver to Identify Items On-Screen
Configure Other Accessibility Features
Give Commands with Siri
Often, speaking is even easier than using your iPhone’s touch screen — especially when you are out and about or on the move. The powerful Siri feature enables you to take essential actions by using your voice to tell your iPhone what you want. Siri requires a fast Internet connection because the speech recognition runs on servers in Apple’s data center.
You can use Siri either with the iPhone’s built-in microphone or with the microphone on a headset. The built-in microphone works well in a quiet environment or if you hold your iPhone close to your face, but in noisy situations you will do better with a headset microphone.
Open Siri

You can open Siri from the Home screen or any app. Press and hold Side for several seconds. If you have connected a headset with a clicker button, you can also press and hold the headset clicker button for several seconds to invoke Siri. If you have chosen to allow Siri access when your iPhone is locked, you can also activate Siri while the lock screen is displayed.
The Siri screen appears. A tone indicates that Siri is ready to take your commands. If you enable the “Hey Siri” feature in the Settings app, you can also activate Siri by saying “Hey Siri.”
Send an E-Mail Message
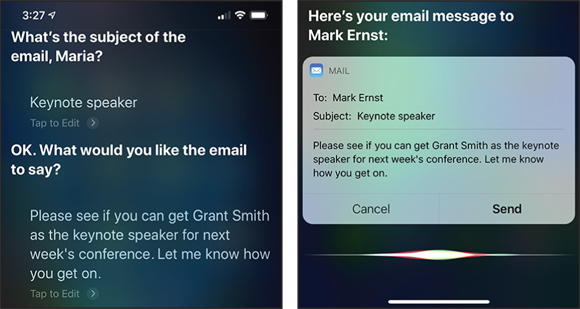
Say “E-mail” and the contact’s name, followed by the message. Siri creates an e-mail message to the contact and enters the text. Review the message, and then tap Send to send it.
If you prefer, you can start the message by saying “E-mail” and the contact’s name, and then pausing. Siri then prompts you for the subject and text of the message in turn.
Set an Alarm

Say “Set an alarm for 4:30 a.m.” and check the alarm that Siri displays.
You can turn the alarm off by tapping its switch (![]() changes to
changes to ![]() ).
).
You can ask a question such as “Which alarms do I have set?” to make Siri display a list of your alarms.
Set a Reminder for Yourself
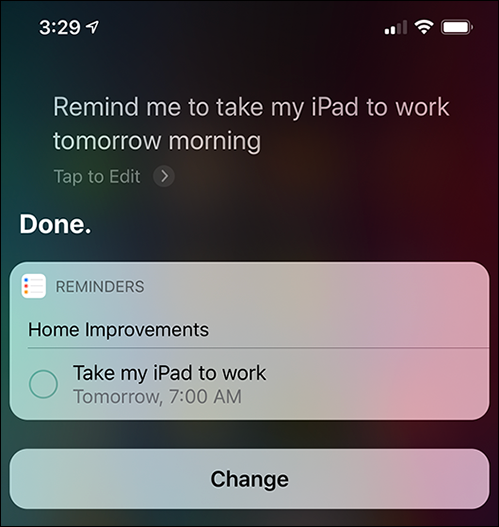
Say “Remind me” and the details of what you want Siri to remind you of. For example, say “Remind me to take my iPad to work tomorrow morning.” Siri listens to what you say and creates a reminder. Check what Siri has written. If the reminder is correct, simply leave it; if not, tap Change and edit it.
Send a Text Message

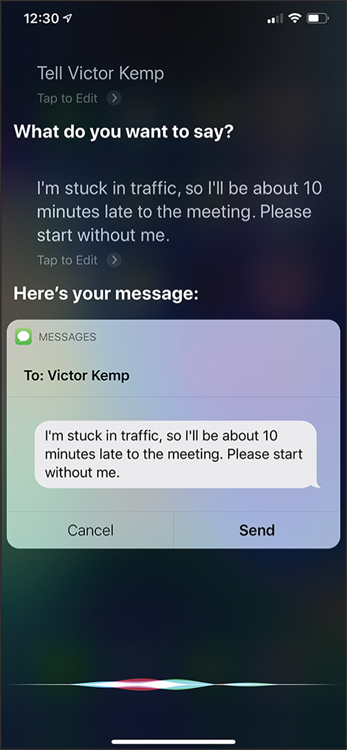
Say “Tell” and the contact’s name. When Siri responds, say the message you want to send. For example, say “Tell Victor Kemp” and then “I’m stuck in traffic, so I’ll be about 10 minutes late to the meeting. Please start without me.” Siri creates a text message to the contact, enters the text, and sends the message when you say “Send” or tap Send.
You can also say “Tell” and the contact’s name followed immediately by the message. For example, “Tell Bill Sykes the package will arrive at 10 a.m.”
Set Up a Meeting
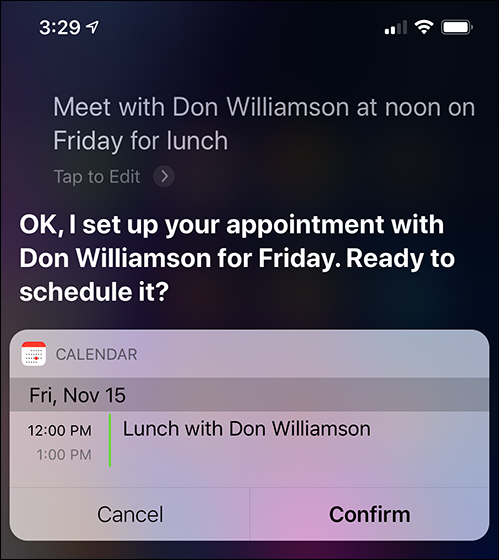
Say “Meet with” and the contact’s name, followed by brief details of the appointment. For example, say “Meet with Don Williamson at noon on Friday for lunch.” Siri listens and warns you of any scheduling conflict. Siri then sends a meeting invitation to the contact if it finds an e-mail address, and adds the meeting to your calendar after you tap Confirm or say “Confirm.”
Dictate Text Using Siri
One of Siri’s strongest features is the capability to transcribe your speech quickly and accurately into correctly spelled and punctuated text. Using your iPhone, you can dictate into any app that supports the keyboard, so you can dictate e-mail messages, notes, documents, and more. To dictate, simply tap the microphone icon (![]() ), speak after Siri beeps, and then tap Done or Keyboard (
), speak after Siri beeps, and then tap Done or Keyboard (![]() ).
).
To get the most out of dictation, it is helpful to know the standard terms for dictating punctuation, capitalization, symbols, layout, and formatting.
Insert Punctuation

To insert punctuation, use standard terms: “comma,” “period” (or “full stop”), “semicolon,” “colon,” “exclamation point” (or “exclamation mark”), “question mark,” “hyphen,” “dash” (for a short dash, –), or “em dash” (for a long dash, —). You can also say “asterisk” (*), “ampersand” (&), “open parenthesis” and “close parenthesis,” “open bracket” and “close bracket,” and “underscore” (_).
For example, say “Buy eggs comma bread comma and cheese semicolon and maybe some milk period nothing else exclamation point” to enter the text shown here.
Insert Standard Symbols
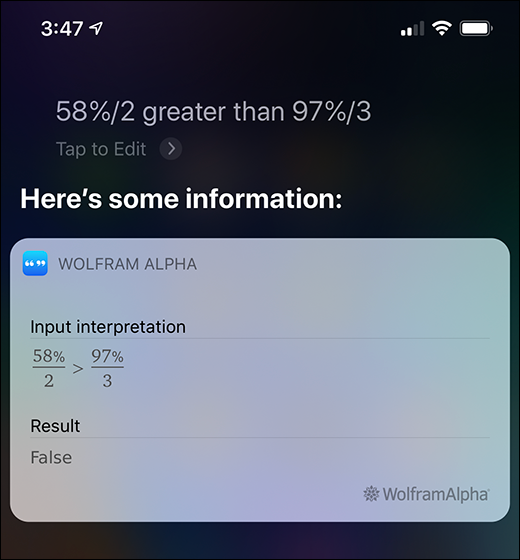
To insert symbols, use these terms: “at sign” (@), “percent” (%), “greater than” (>) and “less than” (<), “forward slash” (/) and “backslash” ( ), “registered sign” (®), and “copyright sign” (©).
For example, say “Fifty-eight percent forward slash two greater than ninety-seven percent forward slash three” to enter the computation shown here.
Insert Currency Symbols

To insert currency symbols, say the currency name and “sign.” For example, say “dollar sign” to insert $, “cent sign” to insert ¢, “euro sign” to insert €, “pound sterling sign” to insert £, and “yen sign” to insert ¥.
For example, say “Convert dollar sign two hundred to UK pounds sterling” to enter the calculation shown here.
Control Layout
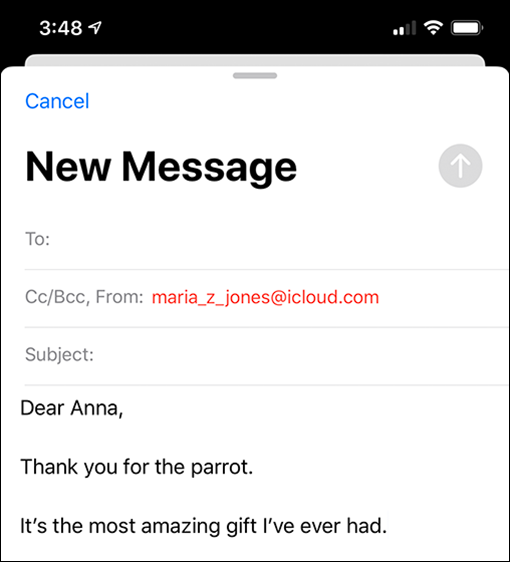
You can control text layout by creating new lines and new paragraphs as needed. A new paragraph enters two line breaks, creating a blank line between paragraphs. To create a new line, say “new line.” To create a new paragraph, say “new paragraph.”
For example, say “Dear Anna comma new paragraph thank you for the parrot period new paragraph it’s the most amazing gift I’ve ever had period” to enter the text shown here.
Control Capitalization

You can apply capitalization to the first letter of a word or to a whole word. You can also switch capitalization off temporarily to force lowercase:
Say “cap” to capitalize the first letter of the next word.
Say “caps on” to capitalize all the words until you say “caps off.”
Say “no caps” to prevent automatic capitalization of the next word — for example, “no caps Monday” produces “monday” instead of “Monday.”
Say “no caps on” to force lowercase of all words until you say “no caps off.”
For example, say “Give the cap head cap dining cap table a no caps french polish period” to enter the text shown here.
Insert Quotes and Emoticons

To insert double quotes, say “open quotes” and “close quotes.” To insert single quotes, say “open single quotes” and “close single quotes.” To enter standard emoticons, say “smiley face,” “frown face,” and “wink face.”
For example, say “she said comma open quotes I want to go to Paris next summer exclamation point close quotes” to enter the text shown here.
Gather and Share Information with Siri
You can use Siri to research a wide variety of information online — everything from sports and movies to restaurants worth visiting or worth avoiding. You can also use Siri to perform hands-free calculations. When you need to share information quickly and easily, you can turn to Siri. By giving the right commands, you can quickly change your Facebook status or post on your wall. Similarly, you can send tweets on your Twitter account.
Find Information About Sports
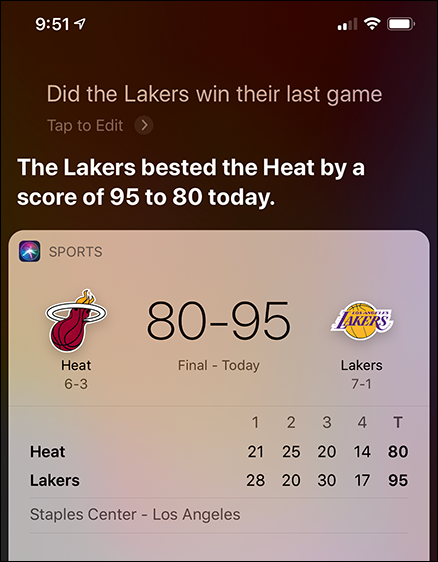
Launch Siri and ask a question about sports. For example:
“Siri, when’s the next White Sox game?”
“Did the Lakers win their last game?”
“When’s the end of the NBA season?”
“Can you show me the roster for the Maple Leafs?”
Find Information About Movies

Launch Siri and ask a question about movies. For example:
“Siri, where is the movie Terminator: Dark Fate playing in Indianapolis?”
“What’s the name of Morgan Freeman’s latest movie?”
“Who’s the star of Tigers Are Not Afraid?”
“Is Vita and Virginia any good?”
Find a Restaurant

Launch Siri, and then tell Siri what type of restaurant you want. For example:
“Where’s the best Mexican food in Palo Alto?”
“Where can I get sushi in Albuquerque?”
“Is there a brewpub in Minneapolis?”
“Is there any dim sum within 50 miles of here?”
Address a Query to the Wolfram Alpha Computational Knowledge Engine

Launch Siri, and then say “Wolfram” and your query. For example:
“Wolfram, minus 20 centigrade in Kelvin.”
“Wolfram, what is the cube of 27?”
“Wolfram, tangent of 60 degrees.”
“Wolfram, give me the chemical formula for hydrogen peroxide.”
Find Out What Music You Are Listening To

Launch Siri and ask a question such as “What song is this?” or “Do you know what this music is called?” Siri monitors the microphone’s input, consults the Shazam music-recognition service, and returns a result if there is a match.
Translate to Another Language
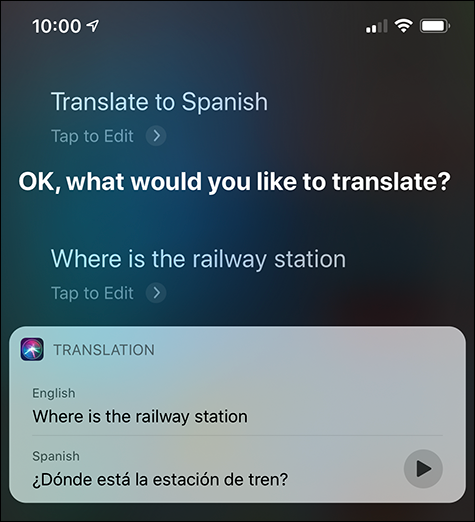
Launch Siri, and then say “Translate to” and the name of the language, such as “Translate to Spanish.” When Siri prompts you for the text, speak it. Siri announces the translated text and displays it on-screen, together with a Play button (![]() ) that you can tap to play the audio again.
) that you can tap to play the audio again.
Configure Siri to Work Your Way
To get the most out of Siri, spend a few minutes configuring Siri. You can set the language Siri uses and choose when Siri should give you voice feedback. You can also decide whether to use the Raise to Speak option, which activates Siri when you raise your iPhone to your face.
Most important, you can tell Siri which contact record contains your information, so that Siri knows your name, address, phone numbers, e-mail address, and other essential information.
Configure Siri to Work Your Way
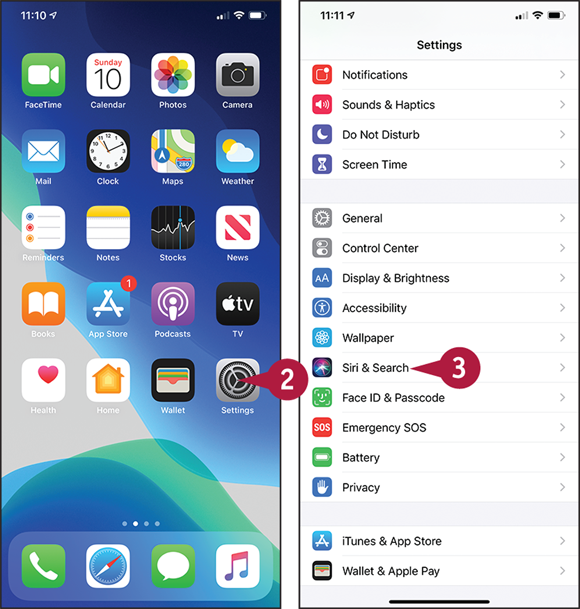
![]() Swipe up from the bottom of the screen.
Swipe up from the bottom of the screen.
The Home screen appears.
![]() Tap Settings (
Tap Settings (![]() ).
).
The Settings screen appears.
![]() Tap Siri & Search (
Tap Siri & Search (![]() ).
).
The Siri & Search screen appears.
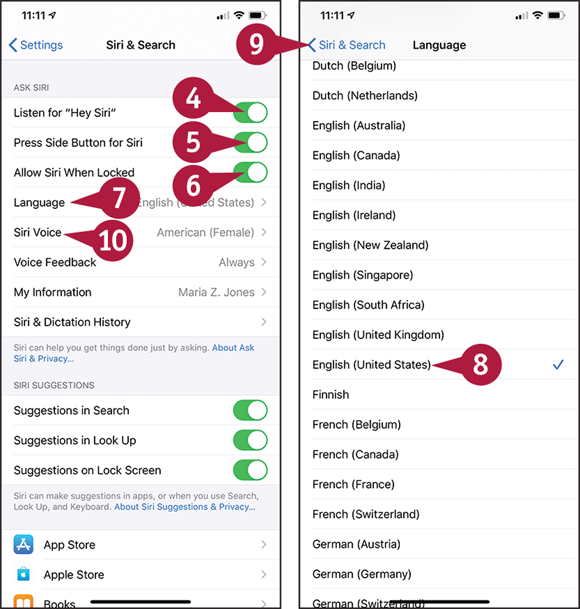
![]() Set the Listen for “Hey Siri” switch to On (
Set the Listen for “Hey Siri” switch to On (![]() ) if you want to be able to activate Siri by saying “Hey Siri!”
) if you want to be able to activate Siri by saying “Hey Siri!”
![]() Set the Press Side Button for Siri switch to On (
Set the Press Side Button for Siri switch to On (![]() ) if you want to be able to summon Siri by pressing and holding the Side button.
) if you want to be able to summon Siri by pressing and holding the Side button.
![]() Set the Allow Siri When Locked switch to On (
Set the Allow Siri When Locked switch to On (![]() ) if you want to use Siri from the lock screen.
) if you want to use Siri from the lock screen.
![]() Tap Language.
Tap Language.
The Language screen appears.
![]() Tap the language you want to use.
Tap the language you want to use.
![]() Tap Siri & Search (
Tap Siri & Search (![]() ).
).
The Siri & Search screen appears again.
![]() Tap Siri Voice.
Tap Siri Voice.
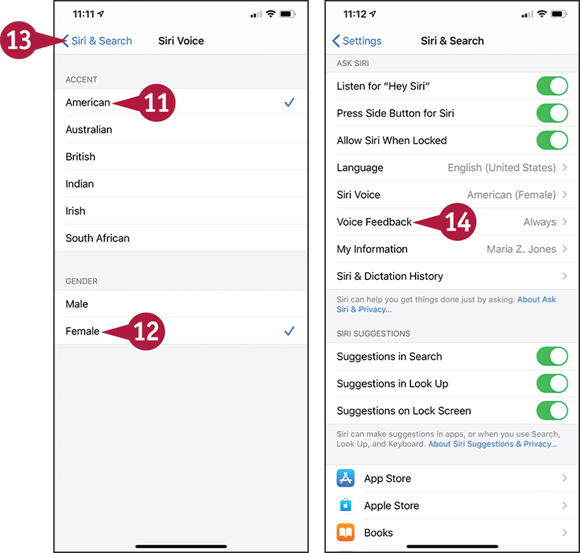
The Siri Voice screen appears.
![]() In the Accent box, tap the accent you want Siri to use. For example, for English (United States), you can tap American, Australian, or British.
In the Accent box, tap the accent you want Siri to use. For example, for English (United States), you can tap American, Australian, or British.
![]() In the Gender box, tap Male or Female, as needed.
In the Gender box, tap Male or Female, as needed.
![]() Tap Siri & Search (
Tap Siri & Search (![]() ).
).
The Siri & Search screen appears again.
![]() Tap Voice Feedback.
Tap Voice Feedback.
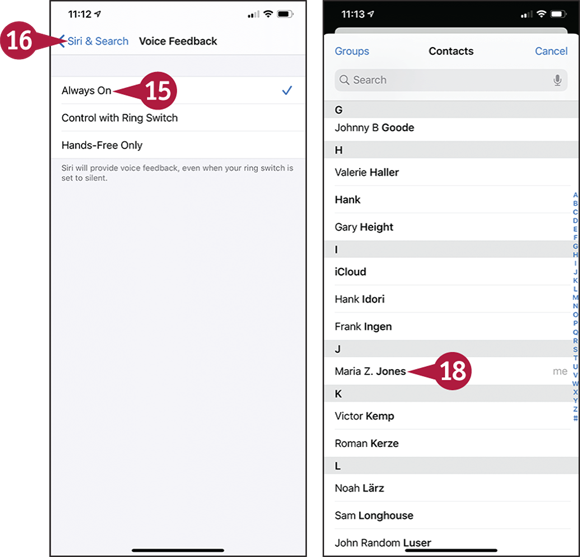
The Voice Feedback screen appears.
![]() Tap Always On, Control with Ring Switch, or Hands-Free Only, as needed.
Tap Always On, Control with Ring Switch, or Hands-Free Only, as needed.
![]() Tap Siri & Search (
Tap Siri & Search (![]() ).
).
The Siri & Search screen appears again.
![]() Tap My Info.
Tap My Info.
The Contacts screen appears, showing either the All Contacts list or the groups you have selected.
Note: If necessary, click Groups to display the Groups screen, select the groups you need, and then tap Done.
![]() Tap the contact record that contains your information.
Tap the contact record that contains your information.
Set Up VoiceOver to Identify Items On-Screen
If you have trouble identifying the iPhone’s controls on-screen, you can use the VoiceOver feature to read them to you. VoiceOver changes your iPhone’s standard finger gestures so that you tap to select the item whose name you want it to speak, double-tap to activate an item, and flick three fingers to scroll.
VoiceOver can make your iPhone easier to use. Your iPhone also includes other accessibility features, which you can learn about in the next section, “Configure Other Accessibility Features.”
Set Up VoiceOver to Identify Items On-Screen
![]() Swipe up from the bottom of the screen.
Swipe up from the bottom of the screen.
The Home screen appears.
![]() Tap Settings (
Tap Settings (![]() ).
).
The Settings screen appears.
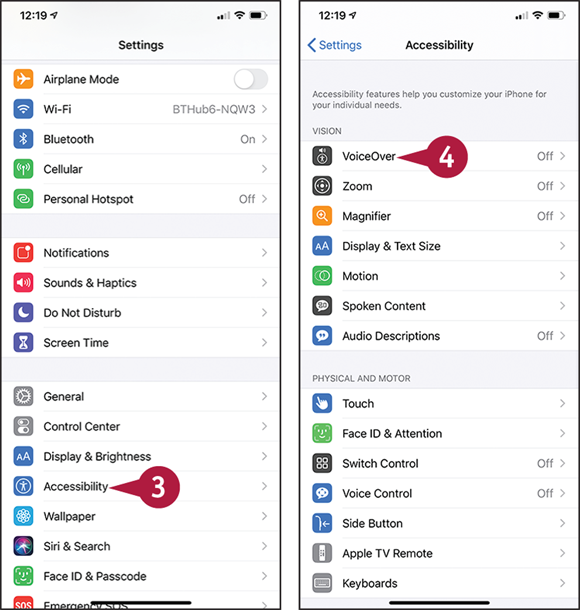
![]() Tap Accessibility.
Tap Accessibility.
The Accessibility screen appears.
![]() Tap VoiceOver.
Tap VoiceOver.
Note: You cannot use VoiceOver and Zoom at the same time. If Zoom is on when you try to switch VoiceOver on, your iPhone prompts you to choose which of the two to use.
The VoiceOver screen appears.
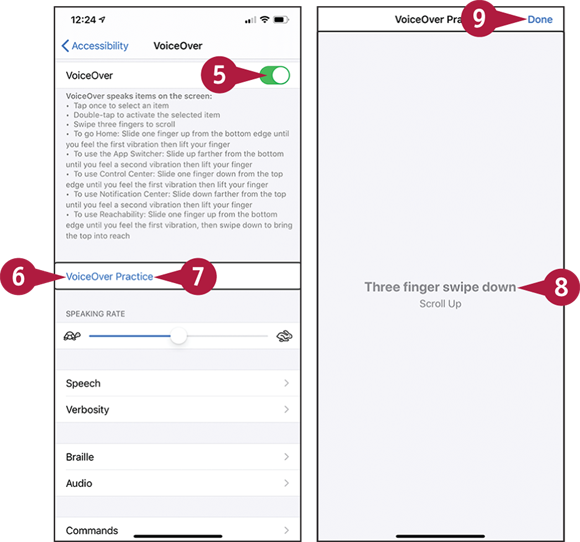
![]() Set the VoiceOver switch to On (
Set the VoiceOver switch to On (![]() changes to
changes to ![]() ).
).
![]() Tap VoiceOver Practice.
Tap VoiceOver Practice.
A selection border appears around the button, and VoiceOver speaks its name.
![]() Double-tap VoiceOver Practice.
Double-tap VoiceOver Practice.
The VoiceOver Practice screen appears.
![]() Practice tapping, double-tapping, triple-tapping, swiping, and flicking. VoiceOver identifies each gesture and displays an explanation.
Practice tapping, double-tapping, triple-tapping, swiping, and flicking. VoiceOver identifies each gesture and displays an explanation.
![]() Tap Done to select the button, and then double-tap Done.
Tap Done to select the button, and then double-tap Done.
The VoiceOver screen appears again.
![]() Swipe up with three fingers.
Swipe up with three fingers.
The screen scrolls down.
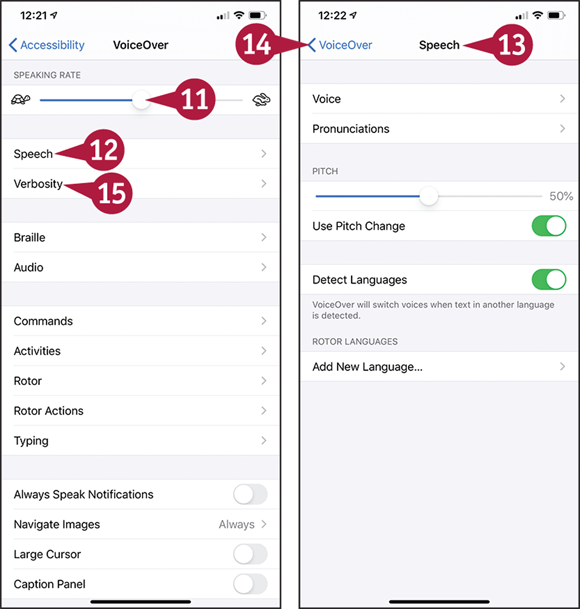
![]() Tap Speaking Rate to select it, and then swipe up or down to adjust the rate. Swiping up or down is the VoiceOver gesture for adjusting the slider.
Tap Speaking Rate to select it, and then swipe up or down to adjust the rate. Swiping up or down is the VoiceOver gesture for adjusting the slider.
![]() Tap Speech.
Tap Speech.
The Speech screen appears.
![]() Choose options for voice, pronunciations, pitch, and languages.
Choose options for voice, pronunciations, pitch, and languages.
![]() Tap VoiceOver (
Tap VoiceOver (![]() ).
).
The VoiceOver screen appears again.
![]() Tap Verbosity and choose which items to have VoiceOver announce.
Tap Verbosity and choose which items to have VoiceOver announce.
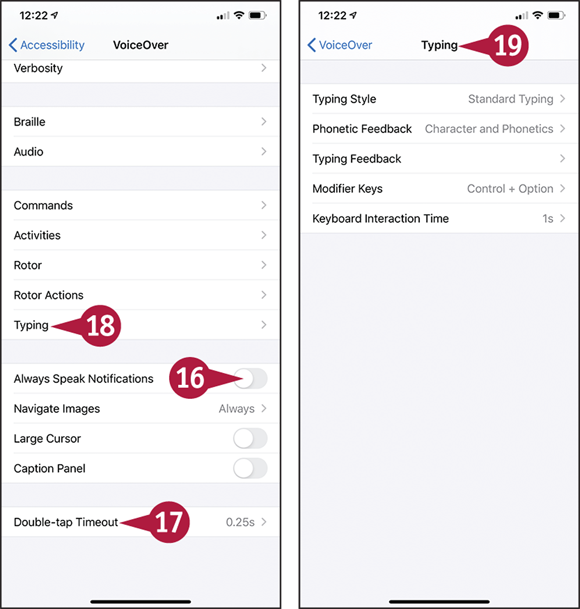
![]() Set the Always Speak Notifications switch to On (
Set the Always Speak Notifications switch to On (![]() ) or Off (
) or Off (![]() ), as needed.
), as needed.
![]() Tap Double-tap Timeout and set the timeout for double-tapping.
Tap Double-tap Timeout and set the timeout for double-tapping.
![]() Tap Typing.
Tap Typing.
The Typing screen appears.
![]() Choose typing options, as needed. For example, you can tap Typing Style and then tap Standard Typing, Touch Typing, or Direct Touch Typing. You can tap Typing Feedback and choose which feedback to receive for software keyboards and which to receive for hardware keyboards.
Choose typing options, as needed. For example, you can tap Typing Style and then tap Standard Typing, Touch Typing, or Direct Touch Typing. You can tap Typing Feedback and choose which feedback to receive for software keyboards and which to receive for hardware keyboards.
Configure Other Accessibility Features
To help you see the screen’s contents, you can turn on the zoom capability and then triple-tap the screen to zoom in and out quickly. You can also display the Zoom Controller for easy control of zoom, choose the zoom region, and set the maximum zoom level.
Apart from the accessibility features explained in this section, your iPhone supports physical accessibility features such as Switch Control and AssistiveTouch. Switch Control enables you to control your iPhone through a physical switch you connect to it. AssistiveTouch lets you use an adaptive accessory to touch the screen.
Configure Other Accessibility Features

Display the Accessibility Screen and Configure Zoom Settings
![]() Swipe up from the bottom of the screen to display the Home screen.
Swipe up from the bottom of the screen to display the Home screen.
![]() Tap Settings (
Tap Settings (![]() ) to display the Settings screen.
) to display the Settings screen.
![]() Tap Accessibility (
Tap Accessibility (![]() ) to display the Accessibility screen.
) to display the Accessibility screen.
![]() Tap Zoom (
Tap Zoom (![]() ) to display the Zoom screen.
) to display the Zoom screen.

![]() Set the Zoom switch to On (
Set the Zoom switch to On (![]() changes to
changes to ![]() ).
).
![]() The Zoom window appears if the Zoom Region is set to Window Zoom.
The Zoom window appears if the Zoom Region is set to Window Zoom.
![]() Set the Follow Focus switch to On (
Set the Follow Focus switch to On (![]() ) to make the zoomed area follow the focus on-screen.
) to make the zoomed area follow the focus on-screen.
![]() Set the Smart Typing switch to On (
Set the Smart Typing switch to On (![]() ) to make iOS switch to Window Zoom when a keyboard appears, so that text is zoomed but the keyboard is regular size.
) to make iOS switch to Window Zoom when a keyboard appears, so that text is zoomed but the keyboard is regular size.
![]() Tap Keyboard Shortcuts to display the Keyboard Shortcuts screen.
Tap Keyboard Shortcuts to display the Keyboard Shortcuts screen.
![]() Set the Keyboard Shortcuts switch to On (
Set the Keyboard Shortcuts switch to On (![]() ) to enable keyboard shortcuts.
) to enable keyboard shortcuts.
![]() Specify which keyboard shortcuts you want to use by setting each switch to On (
Specify which keyboard shortcuts you want to use by setting each switch to On (![]() ) or Off (
) or Off (![]() ).
).
![]() Tap Zoom (
Tap Zoom (![]() ) to display the Zoom screen again.
) to display the Zoom screen again.
![]() Tap Zoom Controller to display the Zoom Controller screen.
Tap Zoom Controller to display the Zoom Controller screen.

![]() Set the Show Controller switch to On (
Set the Show Controller switch to On (![]() ).
).
![]() The Zoom Controller (
The Zoom Controller (![]() ) appears.
) appears.
![]() In the Controller Actions list, tap each button and choose the command for each action, or choose None. For example, tap Single-Tap, tap Zoom In/Out, and then tap Zoom Controller (
In the Controller Actions list, tap each button and choose the command for each action, or choose None. For example, tap Single-Tap, tap Zoom In/Out, and then tap Zoom Controller (![]() ).
).
![]() Set the Adjust Zoom Level switch to On (
Set the Adjust Zoom Level switch to On (![]() ) if you want to adjust the zoom level by double-tapping the controller and sliding your finger.
) if you want to adjust the zoom level by double-tapping the controller and sliding your finger.
![]() You can adjust the controller’s color and its opacity when it is idle.
You can adjust the controller’s color and its opacity when it is idle.
![]() Tap Zoom (
Tap Zoom (![]() ) to display the Zoom screen again.
) to display the Zoom screen again.
![]() Tap Zoom Filter to display the Zoom Filter screen.
Tap Zoom Filter to display the Zoom Filter screen.
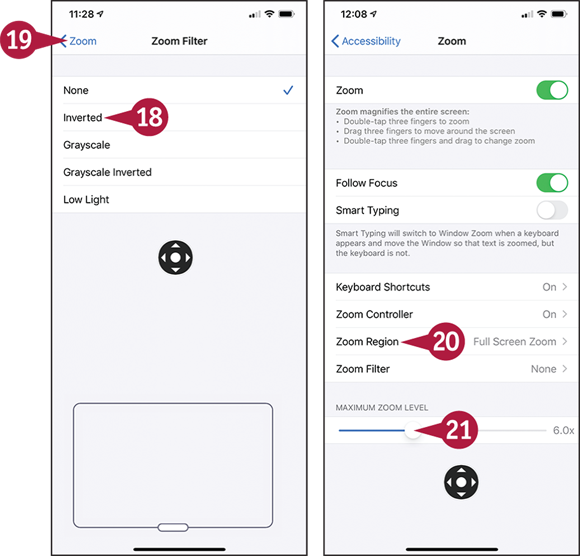
![]() Tap None, Inverted, Grayscale, Grayscale Inverted, or Low Light, as needed.
Tap None, Inverted, Grayscale, Grayscale Inverted, or Low Light, as needed.
![]() Tap Zoom (
Tap Zoom (![]() ) to return to the Zoom screen.
) to return to the Zoom screen.
![]() Tap Zoom Region to display the Zoom Region screen; tap Full Screen Zoom or Window Zoom, as needed; and then tap Zoom (
Tap Zoom Region to display the Zoom Region screen; tap Full Screen Zoom or Window Zoom, as needed; and then tap Zoom (![]() ).
).
![]() Drag the Maximum Zoom Level slider to set the maximum zoom level, such as 8×.
Drag the Maximum Zoom Level slider to set the maximum zoom level, such as 8×.
Your iPhone includes several display and text-size features to make the screen easier to view. These features include inverting the screen colors, reducing the white point to lessen the intensity of bright colors, and applying color filters for grayscale or for the protanopia, deuteranopia, or tritanopia color blindnesses.
You can also configure visual interface accessibility settings to make items easier to see. For example, you can set a larger text size, apply shading around text-only buttons, reduce the transparency of items, and darken colors.
Configure Display and Text Size
![]() On the Accessibility screen, tap Display & Text Size (
On the Accessibility screen, tap Display & Text Size (![]() ) to show the Display & Text Size screen.
) to show the Display & Text Size screen.
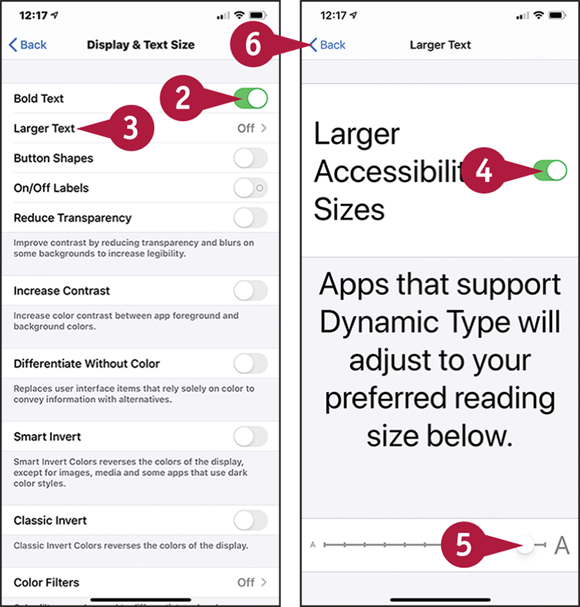
![]() Set the Bold Text switch to On (
Set the Bold Text switch to On (![]() ) if you want to make text bold.
) if you want to make text bold.
![]() Tap Larger Text to display the Larger Text screen.
Tap Larger Text to display the Larger Text screen.
![]() Set the Larger Accessibility Sizes switch to On (
Set the Larger Accessibility Sizes switch to On (![]() ).
).
![]() Drag the slider to set the text size.
Drag the slider to set the text size.
![]() Tap Back (
Tap Back (![]() ) to return to the Display & Text Size screen.
) to return to the Display & Text Size screen.
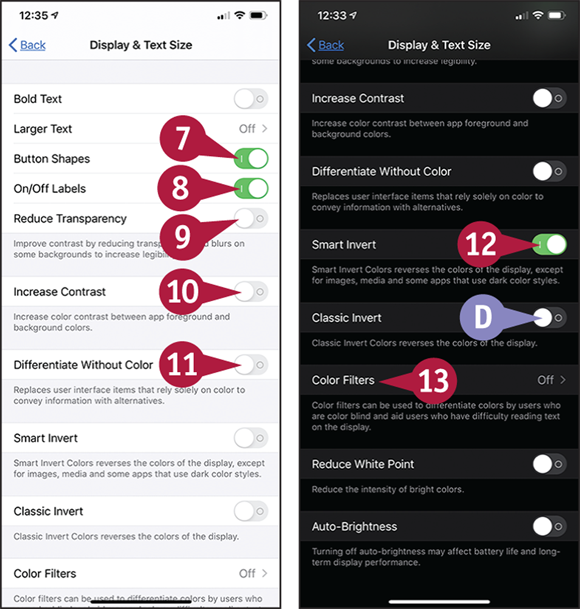
![]() Set the Button Shapes switch to On (
Set the Button Shapes switch to On (![]() ) if you want iOS to underline navigation buttons, such as the Back button at the top of the left screen.
) if you want iOS to underline navigation buttons, such as the Back button at the top of the left screen.
![]() Set the On/Off Labels switch to On (
Set the On/Off Labels switch to On (![]() ) if you want to display I and O labels on the switches.
) if you want to display I and O labels on the switches.
![]() Set the Reduce Transparency switch to On (
Set the Reduce Transparency switch to On (![]() ) or Off (
) or Off (![]() ), as needed.
), as needed.
![]() Set the Increase Contrast switch to On (
Set the Increase Contrast switch to On (![]() ) if you want to increase contrast.
) if you want to increase contrast.
![]() Set the Differentiate Without Color switch to On (
Set the Differentiate Without Color switch to On (![]() ) if you want visual differentiations to use other means than color.
) if you want visual differentiations to use other means than color.
![]() Set the Smart Invert switch to On (
Set the Smart Invert switch to On (![]() ) if you want to invert the colors except for images, media files, and dark-themed apps.
) if you want to invert the colors except for images, media files, and dark-themed apps.
Note: Enabling Invert Colors disables Night Shift.
![]() You can set the Classic Invert switch to On (
You can set the Classic Invert switch to On (![]() ) if you want to invert all the colors.
) if you want to invert all the colors.
![]() Tap Color Filters.
Tap Color Filters.
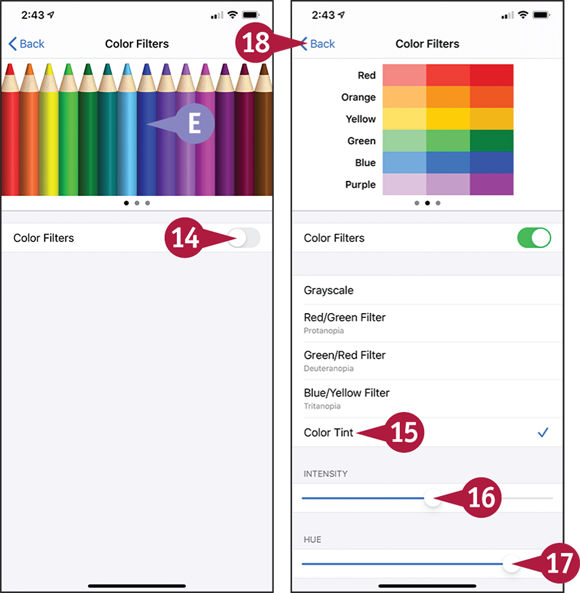
The Color Filters screen appears.
![]() The color chart displays colors using the filtering you apply. Swipe left for other charts.
The color chart displays colors using the filtering you apply. Swipe left for other charts.
![]() Set the Color Filters switch to On (
Set the Color Filters switch to On (![]() ).
).
The list of color filters appears.
![]() Tap the filter you want to apply: Grayscale, Red/Green Filter, Green/Red Filter, Blue/Yellow Filter, or Color Tint.
Tap the filter you want to apply: Grayscale, Red/Green Filter, Green/Red Filter, Blue/Yellow Filter, or Color Tint.
![]() If the Intensity slider appears, drag it to adjust the intensity.
If the Intensity slider appears, drag it to adjust the intensity.
![]() For Color Tint, drag the Hue slider to adjust the hue.
For Color Tint, drag the Hue slider to adjust the hue.
![]() Tap Back (
Tap Back (![]() ).
).

The Display & Text Size screen appears again.
![]() Set the Reduce White Point switch to On (
Set the Reduce White Point switch to On (![]() ) if you want to reduce the intensity of bright colors.
) if you want to reduce the intensity of bright colors.
![]() Drag the slider to adjust the white point.
Drag the slider to adjust the white point.
![]() Set the Auto-Brightness switch to On (
Set the Auto-Brightness switch to On (![]() ) if you want iOS to adjust the screen brightness to suit the lighting conditions the iPhone detects.
) if you want iOS to adjust the screen brightness to suit the lighting conditions the iPhone detects.
Note: Auto-Brightness can improve battery life by saving power. Auto-Brightness may be enabled by default.
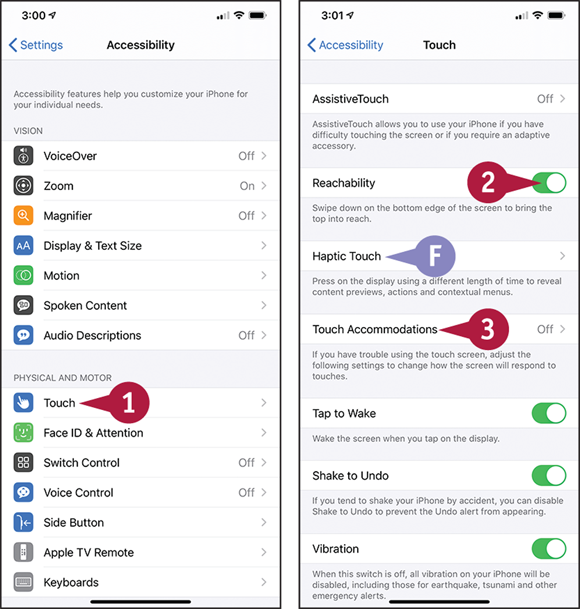
Your iPhone includes a suite of interaction features designed to make it easier for you to interact with the touch screen and other hardware components, such as the accelerometers that detect and analyze the device’s movements. Changes you can make include setting the tap-and-hold duration and the repeat interval, adjusting the pressure needed for 3D Touch, and configuring the double- and triple-click speed for the Side button. You can also choose your default audio device for call audio.
Configure Interaction Accessibility Features
![]() On the Accessibility screen, tap Touch (
On the Accessibility screen, tap Touch (![]() ) to display the Touch screen.
) to display the Touch screen.
![]() Set the Reachability switch to On (
Set the Reachability switch to On (![]() ) if you want to be able to bring the top of the screen down to about halfway by swiping down on the bottom edge of the screen.
) if you want to be able to bring the top of the screen down to about halfway by swiping down on the bottom edge of the screen.
![]() You can tap Haptic Touch and use the controls on the Haptic Touch screen to set the duration for haptic touch.
You can tap Haptic Touch and use the controls on the Haptic Touch screen to set the duration for haptic touch.
![]() Tap Touch Accommodations to display the Touch Accommodations screen.
Tap Touch Accommodations to display the Touch Accommodations screen.

![]() Set the Touch Accommodations switch to On (
Set the Touch Accommodations switch to On (![]() ) to enable touch accommodations.
) to enable touch accommodations.
Note: If the Important dialog opens, warning you that Touch Accommodations changes iPhone control gestures, tap OK.
![]() The zoom controller appears automatically when you enable touch accommodations.
The zoom controller appears automatically when you enable touch accommodations.
![]() Set the Hold Duration switch to On (
Set the Hold Duration switch to On (![]() ) if you need to adjust the hold duration.
) if you need to adjust the hold duration.
![]() Tap + or – to set the hold duration.
Tap + or – to set the hold duration.
![]() Tap Swipe Gestures to display the Swipe Gestures screen.
Tap Swipe Gestures to display the Swipe Gestures screen.
![]() Set the Swipe Gestures switch to On (
Set the Swipe Gestures switch to On (![]() ) to use swipe gestures without waiting for the hold duration.
) to use swipe gestures without waiting for the hold duration.
![]() Tap the required movement distance for a swipe gesture.
Tap the required movement distance for a swipe gesture.
![]() Tap Back (
Tap Back (![]() ) to return to the Touch Accommodations screen.
) to return to the Touch Accommodations screen.
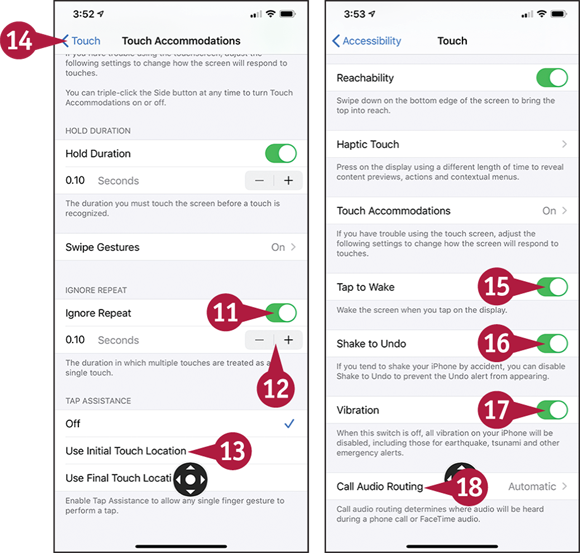
![]() Set the Ignore Repeat switch to On (
Set the Ignore Repeat switch to On (![]() ) if your iPhone detects false repeat touches.
) if your iPhone detects false repeat touches.
![]() Tap + or – to set the Ignore Repeat interval.
Tap + or – to set the Ignore Repeat interval.
![]() In the Tap Assistance box, tap Off, Use Initial Touch Location, or Use Final Touch Location, as needed, to specify how iOS should interpret touches that move across the screen.
In the Tap Assistance box, tap Off, Use Initial Touch Location, or Use Final Touch Location, as needed, to specify how iOS should interpret touches that move across the screen.
![]() Tap Touch (
Tap Touch (![]() ) to return to the Touch screen.
) to return to the Touch screen.
![]() Set the Tap to Wake switch to On (
Set the Tap to Wake switch to On (![]() ) if you want to wake your iPhone by tapping the screen.
) if you want to wake your iPhone by tapping the screen.
![]() Set the Shake to Undo switch to On (
Set the Shake to Undo switch to On (![]() ) if you want to shake the iPhone to undo the last action.
) if you want to shake the iPhone to undo the last action.
![]() Set the Vibration switch to Off (
Set the Vibration switch to Off (![]() ) if you want to disable all vibration.
) if you want to disable all vibration.
![]() Tap Call Audio Routing.
Tap Call Audio Routing.

The Call Audio Routing screen appears.
![]() Tap Automatic, Bluetooth Headset, or Speaker to specify the audio routing for phone calls and FaceTime audio.
Tap Automatic, Bluetooth Headset, or Speaker to specify the audio routing for phone calls and FaceTime audio.
![]() Tap Auto-Answer Calls.
Tap Auto-Answer Calls.
The Auto-Answer Calls screen appears.
![]() Set the Auto-Answer Calls switch to On (
Set the Auto-Answer Calls switch to On (![]() ) if you want the iPhone to answer calls automatically after a delay.
) if you want the iPhone to answer calls automatically after a delay.
![]() Tap + or – to set the delay before answering.
Tap + or – to set the delay before answering.
Using Your iPhone with Your Mac
If you have a Mac, you can enjoy the impressive integration that Apple has built into iOS and the Mac’s operating system, macOS. Apple calls this integration Continuity. Continuity involves several features, including Handoff, which enables you to pick up your work or play seamlessly on one device exactly where you have left it on another device. For example, you can start writing an e-mail message on your Mac and then complete it on your iPhone.
Understanding Which iPhone Models and Mac Models Can Use Continuity
To use Continuity, your iPhone must be running iOS 8 or a later version. Your Mac must be running Yosemite, El Capitan, Sierra, High Sierra, Mojave, Catalina, or a later version. Your Mac must have Bluetooth 4.0 hardware. In practice, this includes a Mac mini or MacBook Air from 2011 or later, a MacBook Pro or iMac from 2012 or later, a Mac Pro from 2013 or later, or a MacBook from 2015 or later.
Enable Handoff on Your iPhone

To enable your iPhone to communicate with your Mac, you need to enable the Handoff feature. Display the Home screen, tap Settings (![]() ) to open the Settings app, tap General (
) to open the Settings app, tap General (![]() ) to display the General screen, and then tap AirPlay & Handoff. On the AirPlay & Handoff screen, set the Handoff switch to On (
) to display the General screen, and then tap AirPlay & Handoff. On the AirPlay & Handoff screen, set the Handoff switch to On (![]() ).
).
Enable Handoff on Your Mac

You also need to enable Handoff on your Mac. To do so, click ![]() on the menu bar and then click System Preferences to open the System Preferences window. Click General to display the General pane. Click Allow Handoff between this Mac and your iCloud devices (
on the menu bar and then click System Preferences to open the System Preferences window. Click General to display the General pane. Click Allow Handoff between this Mac and your iCloud devices (![]() changes to
changes to ![]() ). You can then click System Preferences on the menu bar and click Quit System Preferences to quit System Preferences.
). You can then click System Preferences on the menu bar and click Quit System Preferences to quit System Preferences.
Make and Take Phone Calls on Your Mac
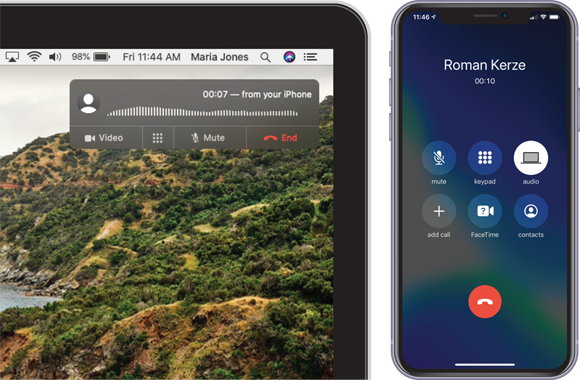
When you are using your Mac within Bluetooth range of your iPhone, Continuity enables you to make and take phone calls on your Mac instead of your iPhone. For example, when someone calls you on your iPhone, your Mac displays a call window automatically, and you can pick up the call on your Mac.
Send and Receive Text Messages from Your Mac
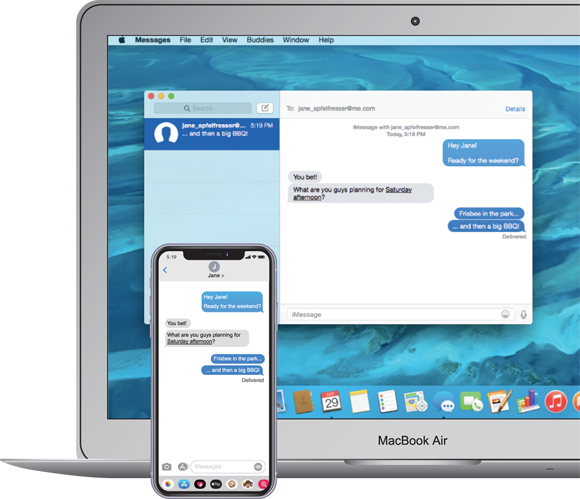
Your Mac can already send and receive messages via Apple’s iMessage service, but when your iPhone’s connection is available, your Mac can send and receive messages directly via Short Message Service (SMS) and Multimedia Messaging Service (MMS). This capability enables you to manage your messaging smoothly and tightly from your Mac.
Using Your iPhone with Your Apple Watch
Apple Watch puts timekeeping, notifications, and other essential information directly on your wrist. Apple Watch is an accessory for the iPhone — it requires an iPhone to set it up, to provide apps and data, and to give access to the cellular network and the Internet.
Apple Watch works with iPhone 5 and later models.
Pair Your Apple Watch with Your iPhone

You must pair Apple Watch with your iPhone before you can use the devices together. Press and hold the side button on Apple Watch until the Apple logo appears, and then wait while Apple Watch finishes starting up.
On your iPhone, display the Home screen, and then tap Watch (![]() ) to open the Watch app. Tap Start Pairing, and then follow the prompts to hold Apple Watch up to your iPhone’s rear camera so that the Watch app can recognize the pattern on the Apple Watch screen.
) to open the Watch app. Tap Start Pairing, and then follow the prompts to hold Apple Watch up to your iPhone’s rear camera so that the Watch app can recognize the pattern on the Apple Watch screen.
When the Your Apple Watch Is Paired screen appears, tap Set Up Apple Watch and complete the setup routine.
Configure Your Apple Watch Using Your iPhone

The Watch app on your iPhone enables you to configure your Apple Watch. On your iPhone, display the Home screen, tap Watch (![]() ) to open the Watch app, and then tap My Watch (
) to open the Watch app, and then tap My Watch (![]() ) to display the My Watch screen.
) to display the My Watch screen.
From here, you can choose a wide range of settings. For example, you can tap App Layout (![]() ) to configure the layout of the apps on your Apple Watch’s screen, or you can tap Notifications (
) to configure the layout of the apps on your Apple Watch’s screen, or you can tap Notifications (![]() ) to choose which notifications you receive on your Apple Watch.
) to choose which notifications you receive on your Apple Watch.
Install Apps on Your Apple Watch

The Watch app on your iPhone enables you to install apps on your Apple Watch — and remove them if necessary.
When you install an iPhone app that has a companion app for Apple Watch, the app’s name appears on the My Watch screen. Tap the app’s name to display the app’s screen. You can then set the Show App on Apple Watch switch to On (![]() changes to
changes to ![]() ) to install the app.
) to install the app.
Receive Notifications on Your Apple Watch
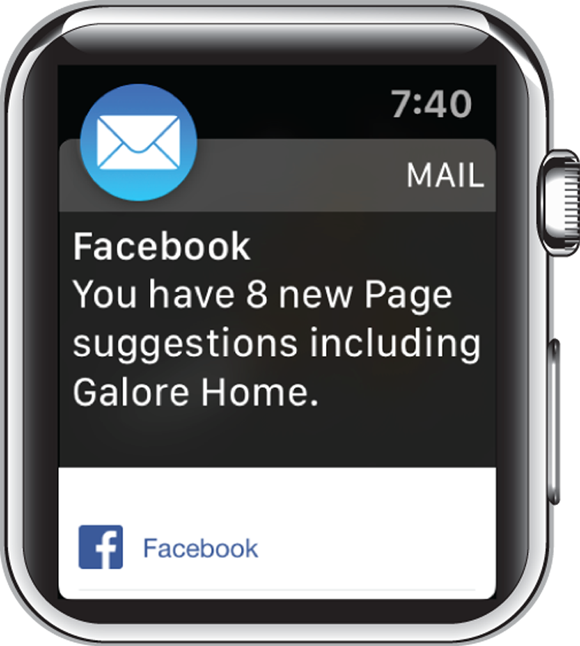
When you receive a notification from an app you have permitted to raise notifications, your Apple Watch displays an icon showing the app and other information, such as the sender of an e-mail message. You can tap the notification to view its details.
Receive Calls on Your Apple Watch
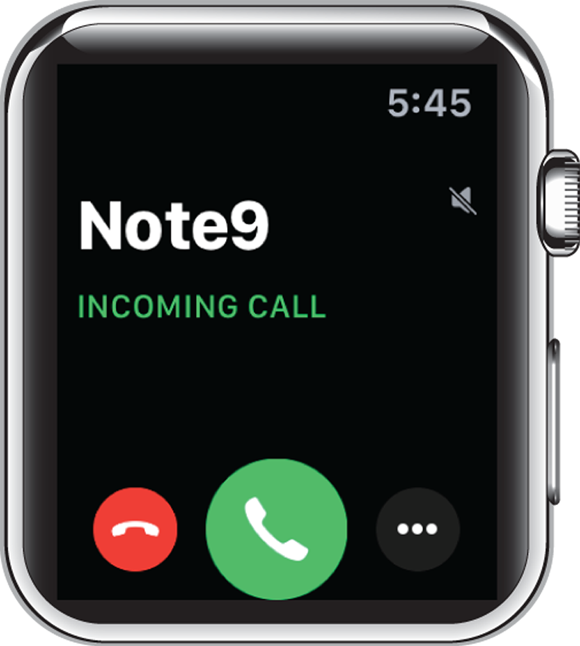
When you receive a phone call, it rings on both your Apple Watch and your iPhone. You can tap Accept (![]() ) to pick up the call on Apple Watch or tap Decline (
) to pick up the call on Apple Watch or tap Decline (![]() ) to decline the call, sending it to voicemail.
) to decline the call, sending it to voicemail.