CHAPTER 4
Setting Up Communications
In this chapter, you learn how to add your e-mail accounts to the Mail app and control how Mail displays your messages. This chapter also shows you how to control the way your iPhone displays your contacts; browse, search, create, and import contacts; choose options for your calendars; and set up Wallet and Apple Pay.
Control How Your E-Mail Appears
Organize Your E-Mail Messages by Threads
Set Your Default E-Mail Account
Control How Your Contacts Appear
Import Contacts from a SIM Card
Choose Default Alert Options for Calendar Events
Set Up Your Mail Accounts
Usually, you set up your iCloud account while going through the initial setup routine for your iPhone. You can set up other e-mail accounts as explained here.
To set up an e-mail account, you need to know the e-mail address and password, as well as the e-mail provider. You may also need to know the addresses of the mail servers the account uses. For Microsoft Exchange, including Office 365, you may need the domain name as well; see “Connect Your iPhone to Exchange Server” in Chapter 12.
Set Up Your Mail Accounts
![]() Swipe up from the bottom of the screen.
Swipe up from the bottom of the screen.
The Home screen appears.
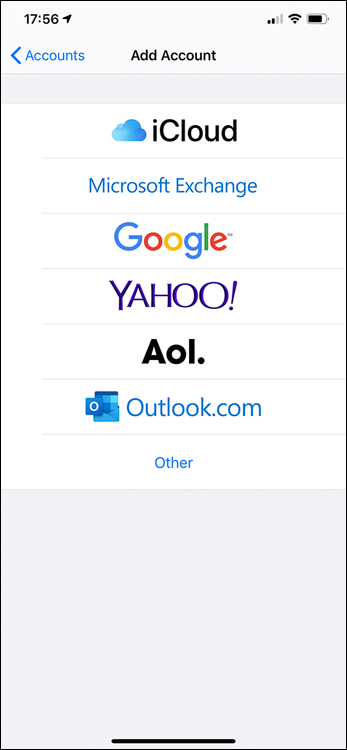
![]() Tap Settings (
Tap Settings (![]() ).
).
The Settings screen appears.
Note: If you have not yet set up an e-mail account on the iPhone, you can also open the Add Account screen by tapping Mail on the iPhone’s Home screen.
Note: If you primarily use Microsoft’s e-mail services, such as Outlook and Exchange, consider trying Microsoft’s Outlook mail app, which integrates tightly with these services but also works with other e-mail services.
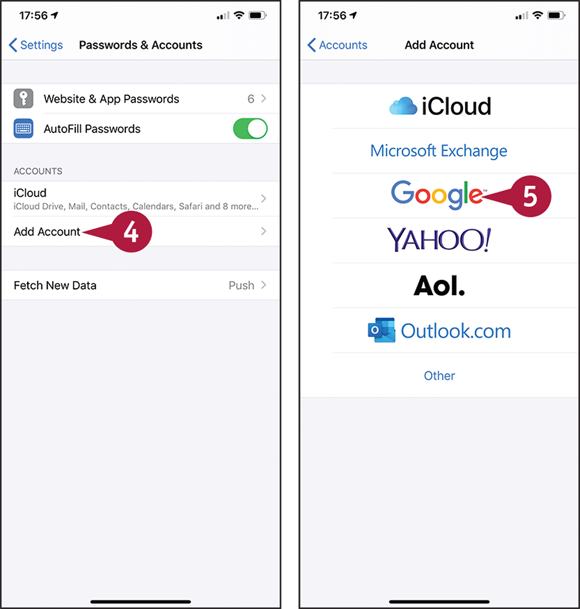
![]() Tap Passwords & Accounts (
Tap Passwords & Accounts (![]() ).
).
The Passwords & Accounts screen appears.
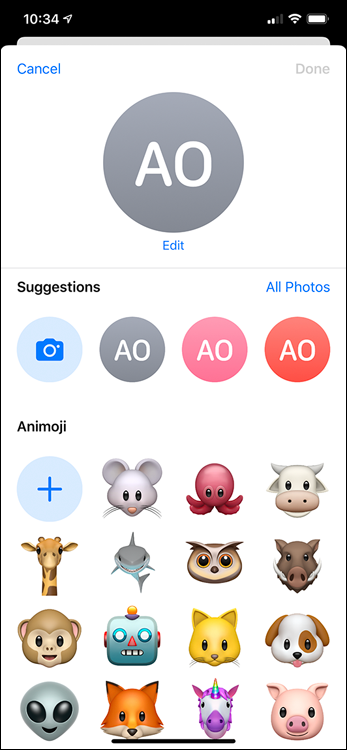
![]() Tap Add Account.
Tap Add Account.
The Add Account screen appears.
![]() Tap the kind of account you want to set up. For example, tap Google.
Tap the kind of account you want to set up. For example, tap Google.
Note: Some account types have fields other than those shown here. For example, some accounts include a field for entering your name the way you want it to appear on outgoing messages. Some include a field for changing the description displayed for the account.
The screen for setting up that type of account appears.
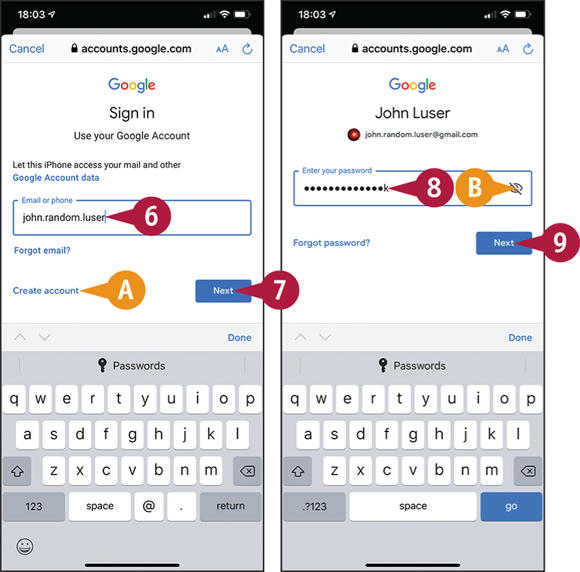
![]() You can tap Create account to create a new account.
You can tap Create account to create a new account.
![]() Tap Enter your email and type the e-mail address.
Tap Enter your email and type the e-mail address.
Note: For a Google address ending gmail.com, you need not type gmail.com.
![]() Tap Next.
Tap Next.
The Password screen appears.
![]() Type your password.
Type your password.
![]() You can tap Show (
You can tap Show (![]() ) to display the password you have typed.
) to display the password you have typed.
![]() Tap Next.
Tap Next.
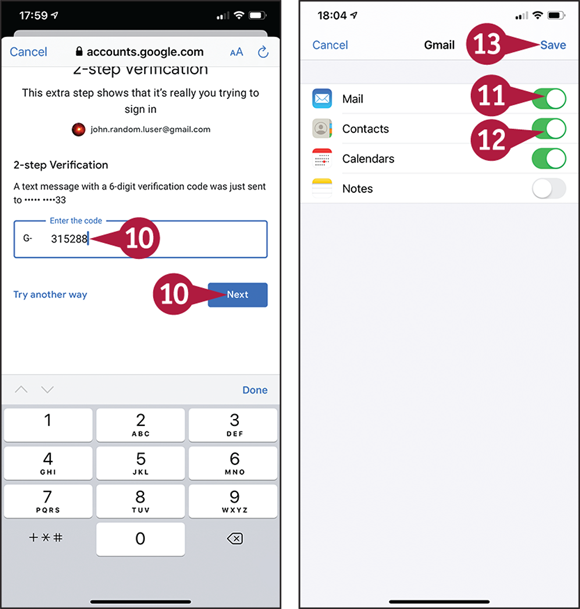
![]() If another security screen appears, such as the 2-Step Verification screen shown here, enter the required information and tap Next.
If another security screen appears, such as the 2-Step Verification screen shown here, enter the required information and tap Next.
The configuration screen for the account appears.
![]() Make sure the Mail switch is set to On (
Make sure the Mail switch is set to On (![]() ).
).
![]() Set the Contacts switch, Calendars switch, Notes switch, and any other switches to On (
Set the Contacts switch, Calendars switch, Notes switch, and any other switches to On (![]() ) or Off (
) or Off (![]() ), as needed.
), as needed.
![]() Tap Save.
Tap Save.
The account appears on the Passwords & Accounts screen.
Control How Your E-Mail Appears
In the Mail app, you can choose how many lines to include in message previews, decide whether to display the To and Cc label, and control whether Mail prompts you before deleting a message. You can change the minimum font size. You can also choose whether to load remote images in messages; whether to mark e-mail addresses outside a particular domain, such as that of your company or organization; and whether to increase the indentation on messages you reply to or forward.
Control How Your E-Mail Appears

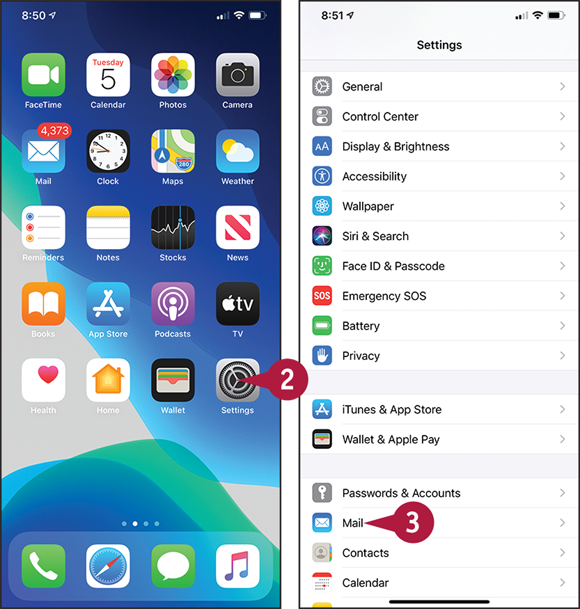
![]() Swipe up from the bottom of the screen.
Swipe up from the bottom of the screen.
The Home screen appears.
![]() Tap Settings (
Tap Settings (![]() ).
).
The Settings screen appears.
![]() Tap Mail (
Tap Mail (![]() ).
).
The Mail screen appears.
![]() Set the Cellular Data switch to On (
Set the Cellular Data switch to On (![]() ) if you want to allow Mail to transfer data across the cellular connection. This is good for synchronization but increases use of data and battery power.
) if you want to allow Mail to transfer data across the cellular connection. This is good for synchronization but increases use of data and battery power.
![]() Tap Preview.
Tap Preview.
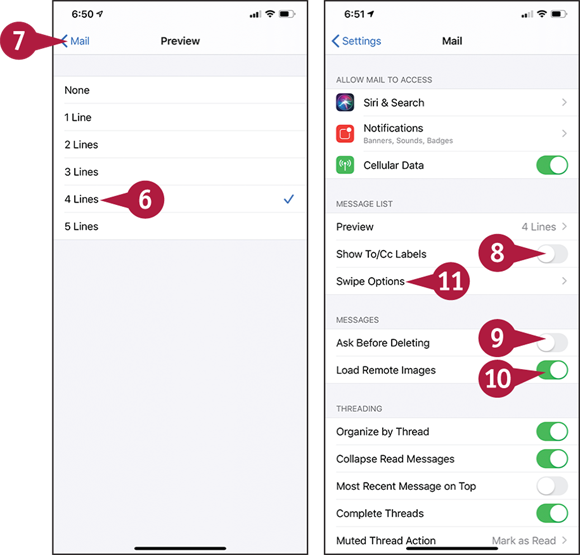
The Preview screen appears.
![]() Tap the number of preview lines you want.
Tap the number of preview lines you want.
![]() Tap Mail (
Tap Mail (![]() ).
).
The Mail screen appears again.
![]() Set the Show To/Cc Labels switch to On (
Set the Show To/Cc Labels switch to On (![]() ) or Off (
) or Off (![]() ), as needed.
), as needed.
![]() Set the Ask Before Deleting switch to On (
Set the Ask Before Deleting switch to On (![]() ) or Off (
) or Off (![]() ), as needed.
), as needed.
![]() Set the Load Remote Images switch to On (
Set the Load Remote Images switch to On (![]() ) or Off (
) or Off (![]() ), as needed.
), as needed.
![]() Tap Swipe Options.
Tap Swipe Options.
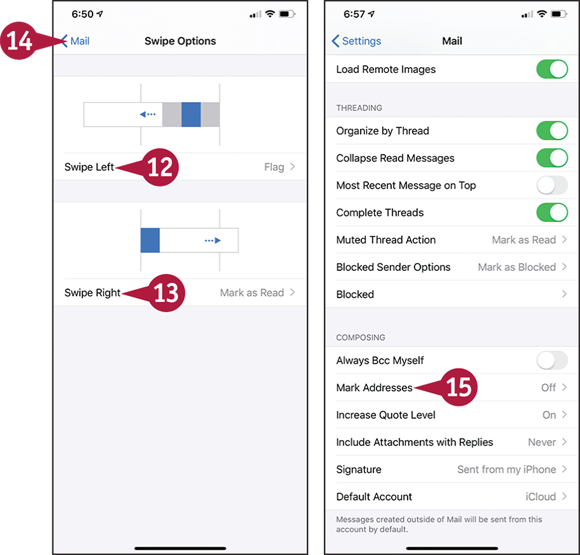
The Swipe Options screen appears.
![]() Tap Swipe Left; tap None, Mark as Read, Flag, or Move Message; and then tap Swipe Options (
Tap Swipe Left; tap None, Mark as Read, Flag, or Move Message; and then tap Swipe Options (![]() ).
).
![]() Tap Swipe Right; tap None, Mark as Read, Flag, Move Message, or Archive; and then tap Swipe Options (
Tap Swipe Right; tap None, Mark as Read, Flag, Move Message, or Archive; and then tap Swipe Options (![]() ).
).
![]() Tap Mail (
Tap Mail (![]() ).
).
The Mail screen appears again.
![]() Tap Mark Addresses.
Tap Mark Addresses.
The Mark Addresses screen appears.
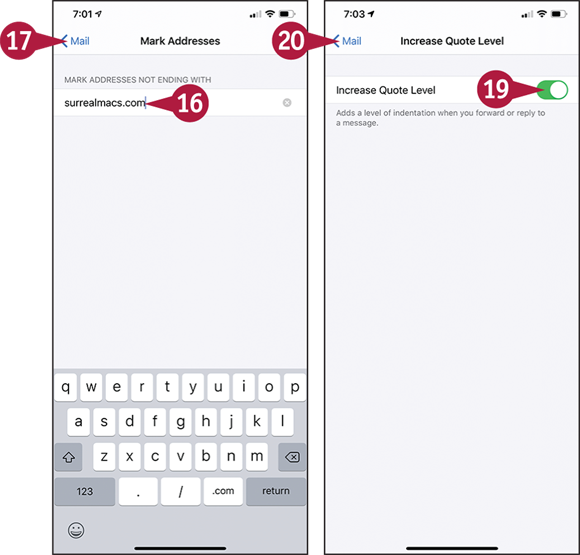
![]() In the Mark Addresses Not Ending With box, type the domain name of your company or organization, such as surrealmacs.com.
In the Mark Addresses Not Ending With box, type the domain name of your company or organization, such as surrealmacs.com.
![]() Tap Mail (
Tap Mail (![]() ).
).
The Mail screen appears again.
![]() Tap Increase Quote Level.
Tap Increase Quote Level.
The Increase Quote Level screen appears.
![]() Set the Increase Quote Level switch to On (
Set the Increase Quote Level switch to On (![]() ) or Off (
) or Off (![]() ), as needed.
), as needed.
![]() Tap Mail (
Tap Mail (![]() ).
).
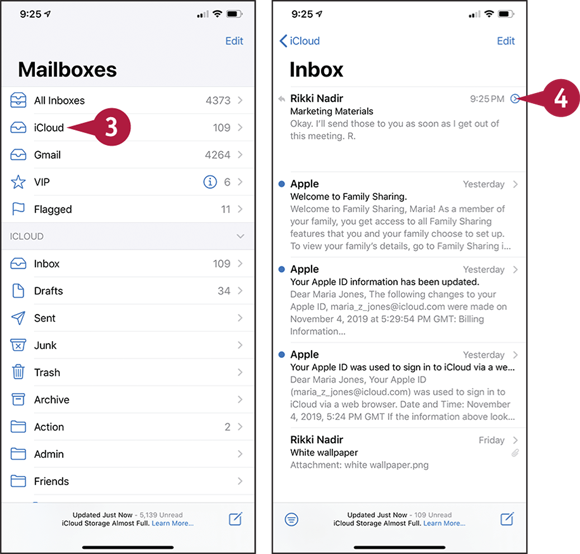
Organize Your E-Mail Messages by Threads
The Mail app gives you two ways to view e-mail messages. You can view the messages as a simple list, or you can view them with related messages organized into threads, which are sometimes called conversations.
Having Mail display your messages as threads can help you navigate your Inbox quickly and find related messages easily. You may find threading useful if you tend to have long e-mail conversations, because threading reduces the number of messages you see at once.
Organize Your E-Mail Messages by Threads
Set Mail to Organize Your Messages by Thread
![]() Swipe up from the bottom of the screen.
Swipe up from the bottom of the screen.
The Home screen appears.
![]() Tap Settings (
Tap Settings (![]() ).
).
The Settings screen appears.
![]() Tap Mail (
Tap Mail (![]() ).
).
The Mail screen appears.
![]() Set the Organize by Thread switch to On (
Set the Organize by Thread switch to On (![]() ).
).
![]() Set the Collapse Read Messages switch to On (
Set the Collapse Read Messages switch to On (![]() ) if you want Mail to save space by collapsing messages you have read.
) if you want Mail to save space by collapsing messages you have read.
![]() Set the Most Recent Message on Top switch to On (
Set the Most Recent Message on Top switch to On (![]() ) if you want the newest message in each thread to appear at the top of the screen. This option is often helpful for keeping up with your messages.
) if you want the newest message in each thread to appear at the top of the screen. This option is often helpful for keeping up with your messages.
![]() Set the Complete Threads switch to On (
Set the Complete Threads switch to On (![]() ) if you want each thread to show all its messages, even if you have moved some to other mailboxes. This option is usually helpful.
) if you want each thread to show all its messages, even if you have moved some to other mailboxes. This option is usually helpful.
![]() Tap Muted Thread Action to display the Muted Thread Action screen, and then tap Mark as Read or Archive or Delete to specify which action Mail should take when you mute a thread.
Tap Muted Thread Action to display the Muted Thread Action screen, and then tap Mark as Read or Archive or Delete to specify which action Mail should take when you mute a thread.
Read Messages Organized into Threads
![]() Swipe up from the bottom of the screen.
Swipe up from the bottom of the screen.
The Home screen appears.
![]() Tap Mail (
Tap Mail (![]() ).
).
The Mailboxes screen appears.
Note: If Mail displays the contents of a mailbox, tap Back (![]() ) to return to the Mailboxes screen.
) to return to the Mailboxes screen.
![]() Tap the mailbox you want to open.
Tap the mailbox you want to open.
The Inbox for the account appears.
The Expand Thread icon on the right, a chevron in a circle (![]() ), indicates a thread.
), indicates a thread.
![]() Tap Expand Thread (
Tap Expand Thread (![]() changes to
changes to ![]() ).
).
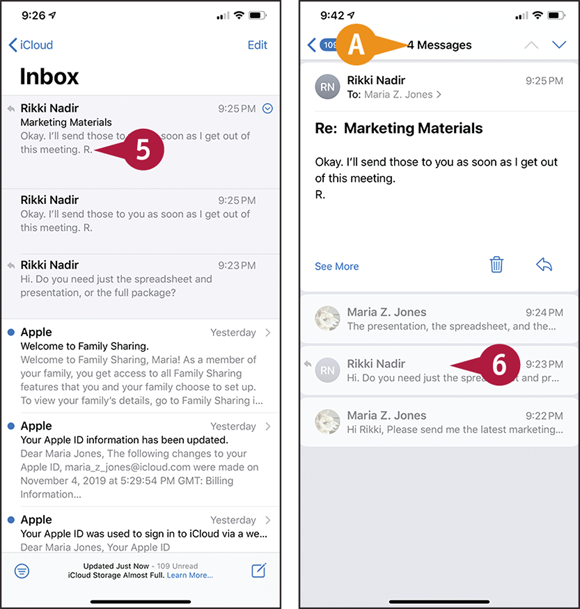
The thread expands, showing the messages it contains from other people.
You can get an overview of the thread’s contents.
![]() Tap the message you want to view.
Tap the message you want to view.
The thread opens.
![]() The bar at the top of the screen shows the number of messages in the thread.
The bar at the top of the screen shows the number of messages in the thread.
![]() Tap the message you want to display.
Tap the message you want to display.
Set Your Default E-Mail Account
If you set up two or more e-mail accounts on your iPhone, make sure that you set the right e-mail account to be the default account. The default account is the one from which the Mail app sends messages when you start creating a message from another app. For example, if you open the Photos app and choose to share a photo via Mail, Mail uses your default account.
You can quickly set your default e-mail account on the Mail screen in the Settings app.
Set Your Default E-Mail Account

![]() Swipe up from the bottom of the screen.
Swipe up from the bottom of the screen.
The Home screen appears.
![]() Tap Settings (
Tap Settings (![]() ).
).
The Settings screen appears.
![]() Tap Mail (
Tap Mail (![]() ).
).
The Mail screen appears.
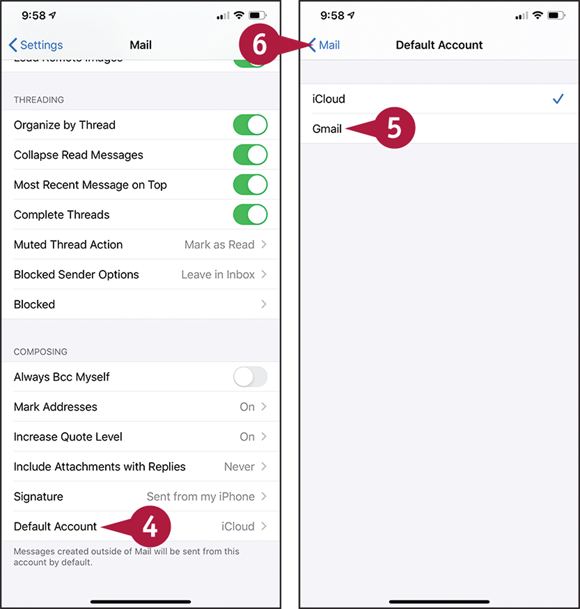
![]() In the Composing section, tap Default Account.
In the Composing section, tap Default Account.
The Default Account screen appears.
![]() Tap the account you want to make the default.
Tap the account you want to make the default.
![]() Tap Mail (
Tap Mail (![]() ).
).
Note: To change the e-mail account for a message you are sending, tap Cc/Bcc, From to expand the Cc, Bcc, and From fields. Next, tap From, and then tap the address on the list that appears at the bottom of the screen.
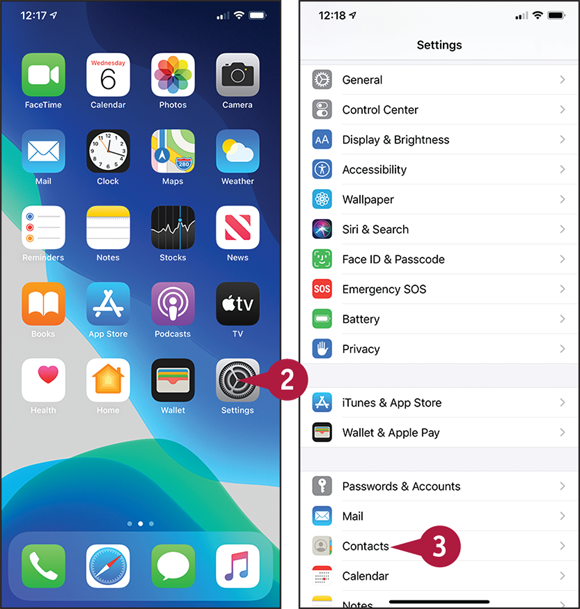
Control How Your Contacts Appear
To swiftly and easily find the contacts you need, you can make your iPhone sort and display the contacts in your preferred order. Your iPhone can sort contacts either by first name, putting Abby Brown before Bill Andrews, or by last name, putting Bill Andrews before Abby Brown. Your iPhone can display contacts either as first name followed by last name or as last name followed by first name. You can also specify how you want your iPhone to display short names for contacts.
Control How Your Contacts Appear

![]() Swipe up from the bottom of the screen.
Swipe up from the bottom of the screen.
The Home screen appears.
![]() Tap Settings (
Tap Settings (![]() ).
).
The Settings screen appears.
![]() Tap Contacts (
Tap Contacts (![]() ).
).
The Contacts screen appears.
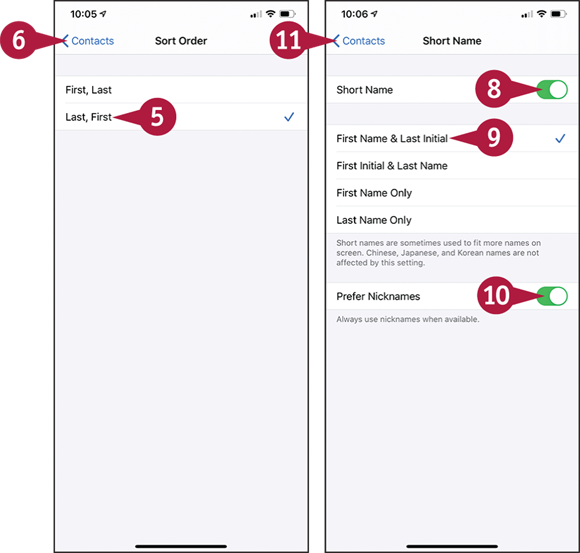
![]() In the Contacts section, tap Sort Order or Display Order, depending on which order you want to set. This example uses Sort Order.
In the Contacts section, tap Sort Order or Display Order, depending on which order you want to set. This example uses Sort Order.
The Sort Order screen or the Display Order screen appears.
![]() Tap First, Last or Last, First, as needed.
Tap First, Last or Last, First, as needed.
![]() Tap Contacts (
Tap Contacts (![]() ).
).
The Contacts screen appears again.
![]() Tap Short Name.
Tap Short Name.
The Short Name screen appears.
![]() Set the Short Name switch to On (
Set the Short Name switch to On (![]() ).
).
![]() Tap First Name & Last Initial, First Initial & Last Name, First Name Only, or Last Name Only to specify the format for short names.
Tap First Name & Last Initial, First Initial & Last Name, First Name Only, or Last Name Only to specify the format for short names.
![]() Set the Prefer Nicknames switch to On (
Set the Prefer Nicknames switch to On (![]() ) or Off (
) or Off (![]() ), as needed.
), as needed.
![]() Tap Contacts (
Tap Contacts (![]() ).
).
The Contacts screen appears again.
Browse or Search for Contacts
Your iPhone’s Contacts app enables you to store contact data that you sync from your computer or online accounts or that you enter directly on your iPhone. You can access the contacts either via the Contacts app itself or through the Contacts tab in the Phone app.
To locate a particular contact, you can browse through the list of contacts or through selected groups, such as your friends, or use the Search feature.
Browse or Search for Contacts
Browse Your Contacts
![]() Swipe up from the bottom of the screen.
Swipe up from the bottom of the screen.
The Home screen appears.
![]() Tap Contacts (
Tap Contacts (![]() ).
).
The Contacts screen appears, showing either all contacts or your currently selected groups.
Note: You can also access your contacts by displaying the Home screen, tapping Phone (![]() ), and then tapping Contacts (
), and then tapping Contacts (![]() changes to
changes to ![]() ).
).
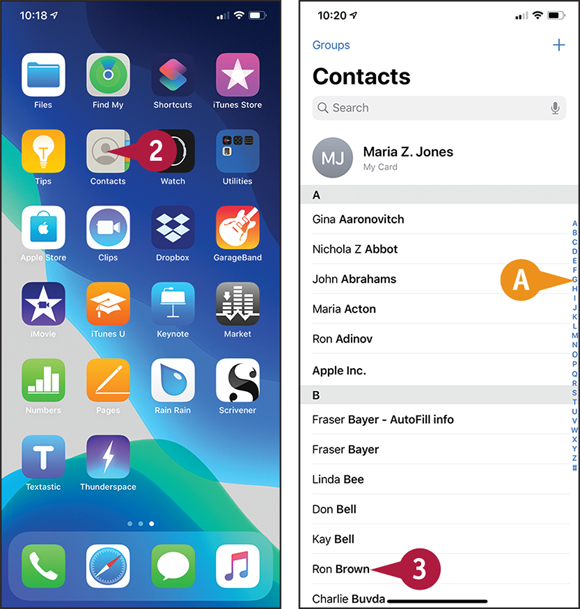
![]() To navigate the screen of contacts quickly, tap the letter on the right that you want to jump to. To navigate more slowly, scroll up or down.
To navigate the screen of contacts quickly, tap the letter on the right that you want to jump to. To navigate more slowly, scroll up or down.
![]() Tap the contact whose information you want to view.
Tap the contact whose information you want to view.

The contact’s screen appears.
Note: From the contact’s screen, you can quickly phone the contact by tapping the phone number you want to use.
![]() If necessary, tap and drag up to scroll down the screen to display more information.
If necessary, tap and drag up to scroll down the screen to display more information.
![]() You can tap Edit to open the contact record for editing.
You can tap Edit to open the contact record for editing.
![]() Tap Contacts (
Tap Contacts (![]() ) when you want to return to the Contacts screen.
) when you want to return to the Contacts screen.

Choose Which Groups of Contacts to Display
![]() From the Contacts screen, tap Groups.
From the Contacts screen, tap Groups.
The Groups screen appears.
![]() Tap Show All Contacts.
Tap Show All Contacts.
Contacts displays a check mark next to each group.
Note: When you tap Show All Contacts, the Hide All Contacts button appears in place of the Show All Contacts button. You can tap Hide All Contacts to remove all the check marks.
![]() Tap a group to apply a check mark to it or to remove the existing check mark.
Tap a group to apply a check mark to it or to remove the existing check mark.
![]() Tap Done.
Tap Done.
The Contacts screen appears, showing the contacts in the groups you selected.

Search for Contacts
![]() From the Contacts screen, tap Search (
From the Contacts screen, tap Search (![]() ).
).
The Search screen appears.
![]() Start typing the name you want to search for.
Start typing the name you want to search for.
![]() From the list of matches, tap the contact you want to view.
From the list of matches, tap the contact you want to view.
The contact’s information appears.
Create a New Contact
As well as syncing your existing contacts via cloud services such as iCloud or Yahoo!, you can create new contact records directly on your iPhone. For example, if you meet someone you want to remember, you can create a contact record for that person — and take a photo using the iPhone’s camera. You can then sync that contact record online, adding it to your other contacts.
Create a New Contact

![]() Swipe up from the bottom of the screen.
Swipe up from the bottom of the screen.
The Home screen appears.
![]() Tap Phone (
Tap Phone (![]() ).
).
The Phone app opens.
![]() Tap Contacts (
Tap Contacts (![]() changes to
changes to ![]() ).
).
The Contacts screen appears.
Note: You can also access the Contacts app by tapping Contacts (![]() ) on the Home screen.
) on the Home screen.
![]() Tap Add (
Tap Add (![]() ).
).
The New Contact screen appears.
![]() Tap First name and type the first name.
Tap First name and type the first name.
![]() Tap Last name and type the last name.
Tap Last name and type the last name.
![]() Fill in other information, such as a company or phone numbers.
Fill in other information, such as a company or phone numbers.
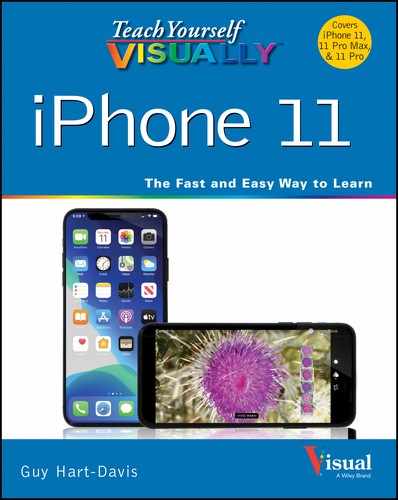
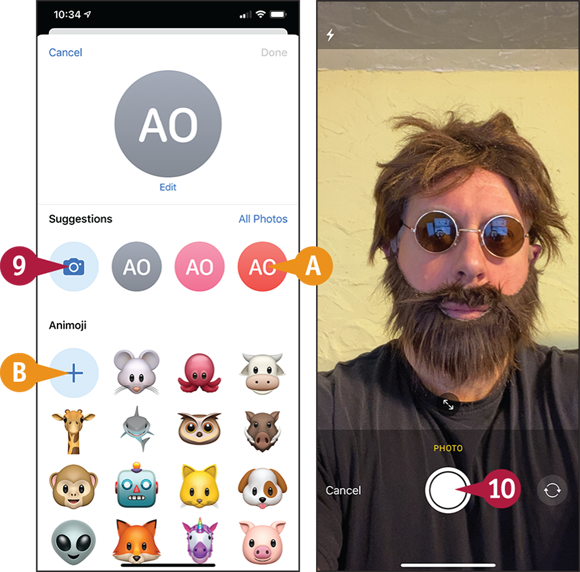
![]() Tap Add Photo.
Tap Add Photo.
The Add Photo screen appears.
![]() You can tap a suggested logo or photo to use instead of taking a photo.
You can tap a suggested logo or photo to use instead of taking a photo.
![]() You can tap a suggested animoji or tap New (
You can tap a suggested animoji or tap New (![]() ) to create a new animoji.
) to create a new animoji.
![]() Tap Take Photo (
Tap Take Photo (![]() ).
).
The Take Photo screen appears.
![]() Compose the photo, and then tap Take Photo (
Compose the photo, and then tap Take Photo (![]() ).
).
The Move and Scale screen appears.
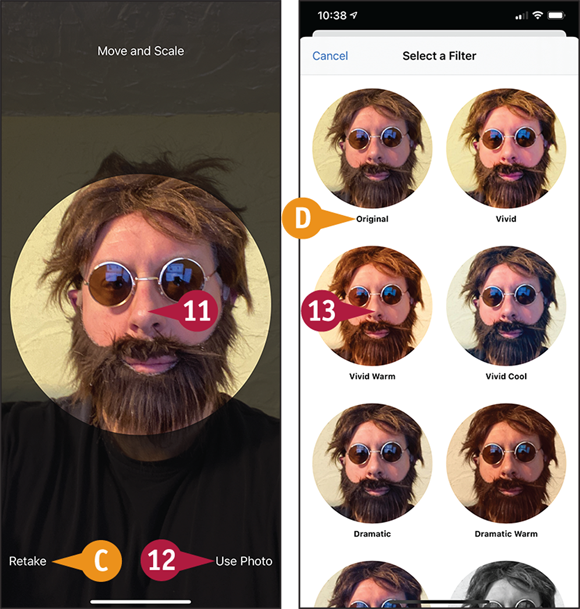
![]() Position the part of the photo you want to use in the middle.
Position the part of the photo you want to use in the middle.
Note: Pinch in with two fingers to zoom the photo out. Pinch out with two fingers to zoom the photo in.
![]() You can tap Retake to take another photo.
You can tap Retake to take another photo.
![]() Tap Use Photo.
Tap Use Photo.
The Select a Filter screen appears.
![]() Tap the filter you want to apply, such as Vivid Warm.
Tap the filter you want to apply, such as Vivid Warm.
![]() Tap Original to skip applying a filter.
Tap Original to skip applying a filter.
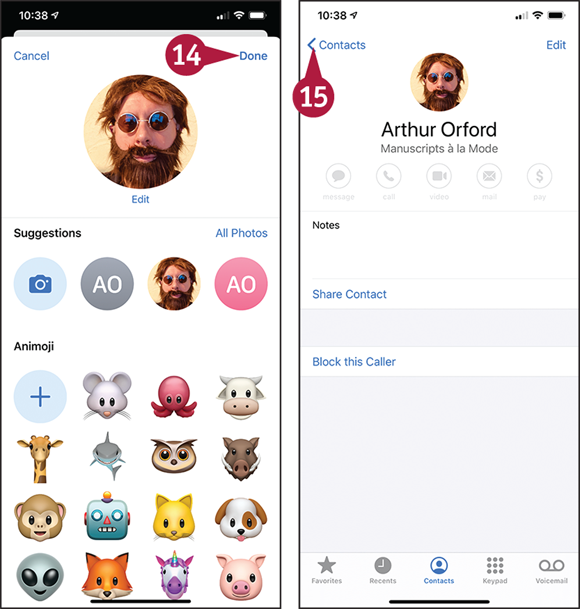
The photo appears in the contact record.
![]() Tap Done.
Tap Done.
The contact record closes.
![]() Tap Contacts.
Tap Contacts.
The Contacts screen appears again.
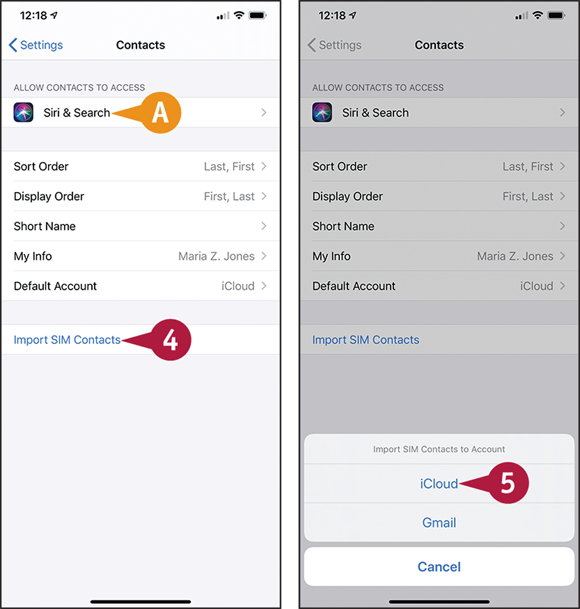
Import Contacts from a SIM Card
If you have stored contacts on a SIM card, you can import them into your iPhone. If the SIM card is a nano-SIM, the smallest common size, you can insert the SIM card in the iPhone temporarily and import the contacts. Alternatively, you can insert the iPhone’s SIM card in an unlocked cell phone, copy the contacts to the SIM card, and then put the SIM card back in the iPhone. This approach enables you to use a SIM adapter to make the iPhone’s nano-SIM fit in a micro-SIM or full-size SIM slot.
Import Contacts from a SIM Card
![]() Swipe up from the bottom of the screen.
Swipe up from the bottom of the screen.
The Home screen appears.
![]() Tap Settings (
Tap Settings (![]() ).
).
The Settings screen appears.
![]() Tap Contacts (
Tap Contacts (![]() ).
).
The Contacts screen appears.
![]() In the Contacts section, tap Import SIM Contacts.
In the Contacts section, tap Import SIM Contacts.
![]() If the Import SIM Contacts to Account dialog appears, tap the account in which you want to put the contacts.
If the Import SIM Contacts to Account dialog appears, tap the account in which you want to put the contacts.
Your iPhone imports the contacts from the SIM.
![]() If you want your iPhone to suggest creating contacts from names and data found in e-mail messages, incoming calls, or contact data, tap Siri & Search (
If you want your iPhone to suggest creating contacts from names and data found in e-mail messages, incoming calls, or contact data, tap Siri & Search (![]() ) to display the Siri & Search screen, and then set the Show Siri Suggestions for Contacts switch to On (
) to display the Siri & Search screen, and then set the Show Siri Suggestions for Contacts switch to On (![]() ).
).
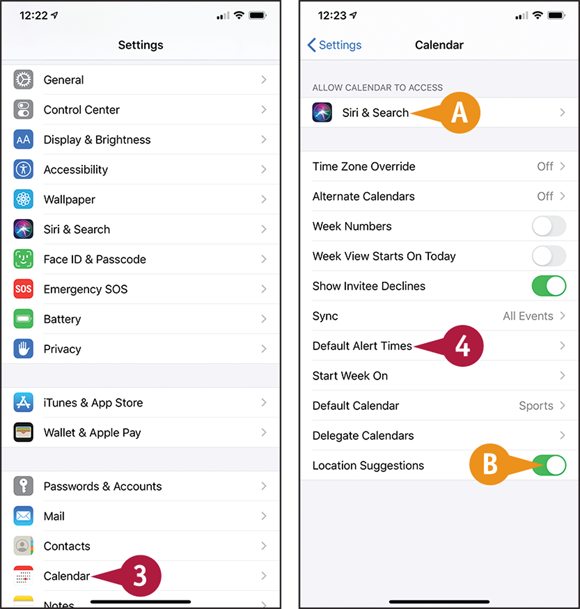
Choose Default Alert Options for Calendar Events
Your iPhone enables you to sync your calendars via iCloud and other online services. To help keep on schedule, you can set default alert times for calendar events. You can set a different alert time for each type of event — for example, 15 minutes’ notice for a regular event and a week’s notice for a birthday. You can also turn on the Time to Leave feature to make the Calendar app allow travel time based on your location and current traffic.
Choose Default Alert Options for Calendar Events
![]() Swipe up from the bottom of the screen to display the Home screen.
Swipe up from the bottom of the screen to display the Home screen.
![]() Tap Settings (
Tap Settings (![]() ) to display the Settings screen.
) to display the Settings screen.
![]() Tap Calendar (
Tap Calendar (![]() ) to display the Calendar screen.
) to display the Calendar screen.
![]() If you want your iPhone to suggest creating events from apparent event data found in apps such as Mail and Messages, tap Siri & Search (
If you want your iPhone to suggest creating events from apparent event data found in apps such as Mail and Messages, tap Siri & Search (![]() ) to display the Siri & Search screen, and then set the Show Siri Suggestions in App switch to On (
) to display the Siri & Search screen, and then set the Show Siri Suggestions in App switch to On (![]() ).
).
![]() Set the Location Suggestions switch to On (
Set the Location Suggestions switch to On (![]() ) if you want Calendar to suggest locations for events.
) if you want Calendar to suggest locations for events.
![]() Tap Default Alert Times.
Tap Default Alert Times.
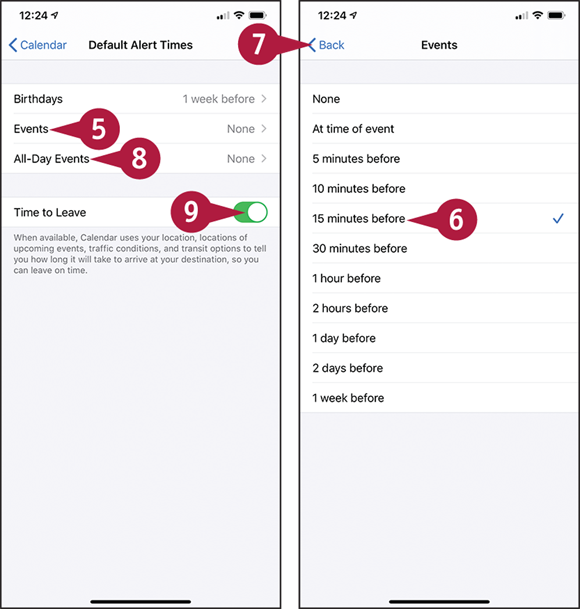
The Default Alert Times screen appears.
![]() Tap the event type for which you want to set the default alert time. For example, tap Events.
Tap the event type for which you want to set the default alert time. For example, tap Events.
The Events screen, Birthdays screen, or All-Day Events screen appears.
![]() Tap the amount of time for the alert.
Tap the amount of time for the alert.
![]() Tap Back (
Tap Back (![]() ).
).
The Default Alert Times screen appears again.
![]() Set default alert times for other event types by repeating steps 5 to 7.
Set default alert times for other event types by repeating steps 5 to 7.
![]() Set the Time to Leave switch to On (
Set the Time to Leave switch to On (![]() ) if you want Calendar to suggest leave times based on your location and current traffic information.
) if you want Calendar to suggest leave times based on your location and current traffic information.
Set Up and Use Wallet and Apple Pay
Your iPhone enables you to make payments using the Apple Pay system and the Wallet app on your iPhone. Apple Pay can be faster and more convenient than paying with cash. It can also be more secure than paying with a credit card or debit card.
Understanding Apple Pay and Wallet
Apple Pay is Apple’s electronic-payment and digital-wallet service. After setting up Apple Pay with one or more credit cards or debit cards, you can make payments using your iPhone either at contactless payment terminals or online. If you have an Apple Watch, you can use Apple Pay on that device as well. You can also set up the Apple Cash service and use it to make peer-to-peer payments via apps such as Messages.
Wallet is the app you use on your iPhone to manage Apple Pay and the digital documents you want to carry with you, such as airline tickets or store rewards cards.
Set Up Wallet
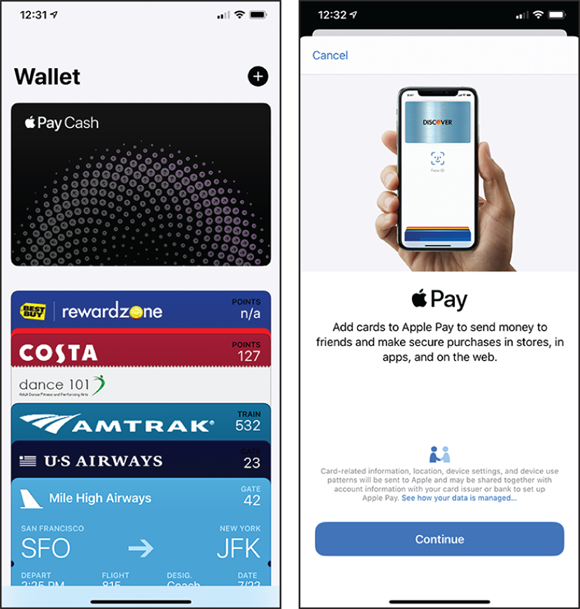
Swipe up from the bottom of the screen to display the Home screen, and then tap Wallet (![]() ) to open the Wallet app.
) to open the Wallet app.
If you have not yet set up a credit card or debit card, tap Add (![]() ) at the top of the Wallet screen. Follow the prompts to add a card to Wallet. You can add the card either by lining it up within an on-screen frame and using the camera to recognize it or by typing in the details manually; if the card is one you already use with Apple, you may need to provide only the CVV, the card verification code.
) at the top of the Wallet screen. Follow the prompts to add a card to Wallet. You can add the card either by lining it up within an on-screen frame and using the camera to recognize it or by typing in the details manually; if the card is one you already use with Apple, you may need to provide only the CVV, the card verification code.
Complete the card registration by selecting the correct billing address. For some cards, you may need to contact the card provider to confirm you are setting up Apple Pay.
After you add cards, they appear at the top of the Wallet screen.
Set Apple Pay to Use Face ID
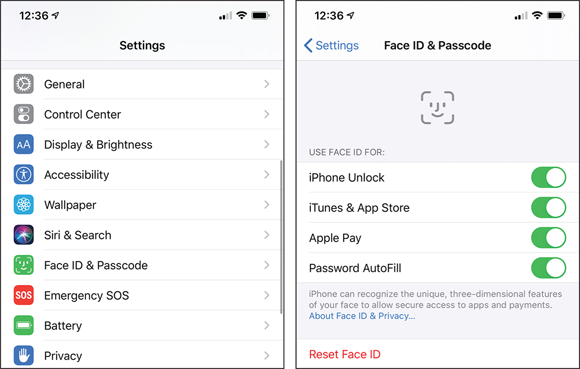
After setting up Apple Pay, you can set your iPhone to use Face ID instead of your Apple ID password for buying items. Face ID enables you to authenticate yourself and approve a purchase by looking at your iPhone. This is much more convenient than typing a password, especially when you are shopping in the physical world rather than online.
To set your iPhone to use Face ID for Apple Pay, swipe up from the bottom of the screen to display the Home screen, and then tap Settings (![]() ) to display the Settings screen. Tap Face ID & Passcode (
) to display the Settings screen. Tap Face ID & Passcode (![]() ), and then type your passcode when prompted, to display the Face ID & Passcode screen. Then go to the Use Face ID For section and set the Apple Pay switch to On (
), and then type your passcode when prompted, to display the Face ID & Passcode screen. Then go to the Use Face ID For section and set the Apple Pay switch to On (![]() ).
).
While in the Settings app, you may want to tap Wallet & Apple Pay (![]() ) to display the Wallet & Apple Pay screen. Here, you can set the Double-Click Side Button switch to On (
) to display the Wallet & Apple Pay screen. Here, you can set the Double-Click Side Button switch to On (![]() ) to give yourself instant access to your cards and passes.
) to give yourself instant access to your cards and passes.
Make a Payment with Apple Pay

Now that you have set up Apple Pay and configured your iPhone to use it, you can make payments by bringing your iPhone close to the contact area on a payment terminal.
When the Near Field Communication (NFC) chips on the two devices make contact, a tone sounds. Your iPhone then displays details of the transaction and prompts you to confirm it using Face ID.
Set Up and Use eSIMs
SIM is the acronym for Subscriber Identity Module, a container that holds unique information used to identify a phone to cellular providers and to specify what it is allowed to do through their networks. A SIM can be either physical — a SIM card — or virtual, an electronic SIM, or eSIM for short.
Your iPhone contains a slot for a single physical SIM card — specifically, a nano-SIM. But as well as this SIM card, or instead of it, you can use one or more eSIMs, which enables you to use different cellular plans on the same phone. Before using an eSIM, you must add it to your iPhone and configure it. Only one eSIM can be active at a time, but you can easily switch back and forth between eSIMs.
Determine Whether You Can Use eSIMs
First of all, determine whether you can use eSIMs with your iPhone.
If your iPhone is an unlocked model — one that is not bound to a particular carrier — you should be able to use eSIMs freely. But if your iPhone is locked to a carrier, you will only be able to use eSIMs from that carrier. If that carrier does not support eSIMs, you will not be able to use eSIMs with your iPhone.
The simplest way to find out whether your carrier supports eSIMs in your region is to check the Apple website. Alternatively, consult your carrier.
Get and Add an eSIM

Once you have determined that you can use eSIMs with your iPhone, evaluate your options for getting an eSIM.
If your iPhone is locked to a particular carrier, you must use that carrier’s method of adding an eSIM. But if your iPhone is unlocked, you may have multiple options for adding an eSIM. In this case, your next step is to identify the eSIM plan you want to buy. Go to Apple’s website and look at the list of carriers per region that support eSIM to determine your choice of carriers, and then explore the eSIM plans they offer.
After choosing your plan, you need to add it to your iPhone. You can add an eSIM to your iPhone in four different ways, depending on your carrier and how it handles eSIMs:
- If the carrier provides a card with a QR code, scan the QR code on the Add Cellular Plan screen. A Cellular Plan Detected notification appears. Tap the notification, tap Continue, and then tap Add Cellular Plan.
- If the carrier provides an app, tap App Store (
 ) on the Home screen. In the App Store app, search for the carrier’s app, and then download and install it. Tap the app’s icon on the Home screen, and then follow the prompts to buy a cellular plan.
 - If the carrier assigns cellular plans “over the air,” your iPhone will display a Carrier Cellular Plan Ready to Be Installed notification. Tap this notification to open the Settings app, and then tap Carrier Cellular Plan Ready to Be Installed. Tap Continue, and follow the prompts.
- If the carrier tells you to enter the eSIM details manually, tap Settings (
 ) on the Home screen, tap Cellular (
 ) on the Settings screen, and then tap Add Cellular Plan on the Cellular screen. Next, tap Enter Details Manually at the bottom of the Add Cellular Plan screen.
Configure an eSIM
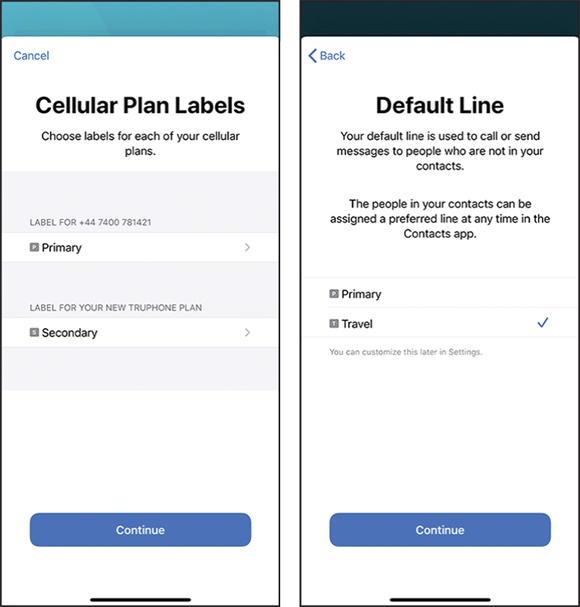
You configure an eSIM while installing it, but you can also change its configuration later. During the initial configuration of the eSIM, you decide which SIM — the eSIM you are adding or the physical SIM card — plays which roles in your iPhone. You can assign a descriptive label to each SIM to make them easy to identify.
For each contact, you can configure the Preferred Line setting between Last Used and the two SIMs, the SIM card and the active eSIM. This feature lets you continue using the number with which a contact is familiar, so that the contact can see who the call is coming from.
To control which number is used for calling or messaging anyone not in your contacts, you set the default line. You can subsequently change this by changing the Default Voice Line setting from the Cellular screen in the Settings app.
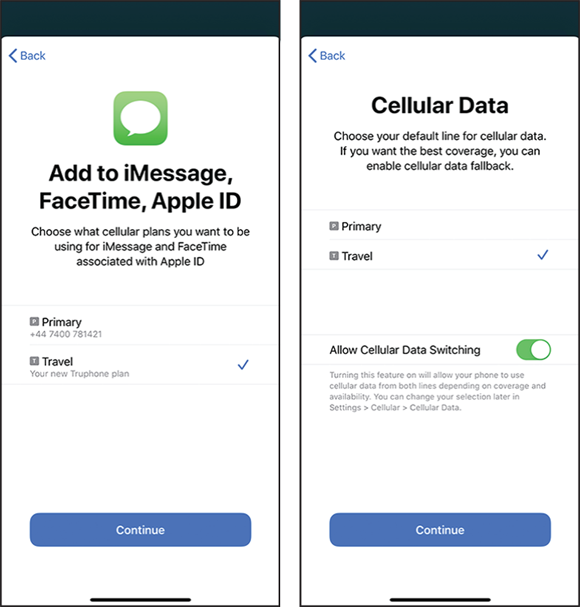
On the “Add to iMessage, FaceTime, Apple ID” screen, you can choose which SIMs you want to associate with your Apple ID. This lets you control the number on which people can contact you through Apple ID–connected services such as iMessage and FaceTime. You can change these settings later by tapping Settings (![]() ), tapping Messages (
), tapping Messages (![]() ), tapping Send & Receive, and then working on the iMessage screen.
), tapping Send & Receive, and then working on the iMessage screen.
On the Cellular Data screen, you can choose which SIM’s plan to use as the default for transferring data across the cellular network. You can also set the Allow Cellular Data Switching switch to On (![]() ) to enable the iPhone to fall back on the other SIM’s plan when the default SIM’s plan cannot maintain a data connection. Be aware that enabling cellular data switching may inadvertently exhaust the secondary plan’s allowance or run up charges.
) to enable the iPhone to fall back on the other SIM’s plan when the default SIM’s plan cannot maintain a data connection. Be aware that enabling cellular data switching may inadvertently exhaust the secondary plan’s allowance or run up charges.