
CHAPTER 6
Networking and Social Networking
You can control which cellular and wireless networks your iPhone uses and enjoy social networking wherever you go.
Monitor Your Cellular Network Usage
Control Cellular Data and Background Refresh
Connect Your iPhone to a Different Carrier
Connect Bluetooth Devices to Your iPhone
Share Internet Access via Personal Hotspot
Using Airplane Mode
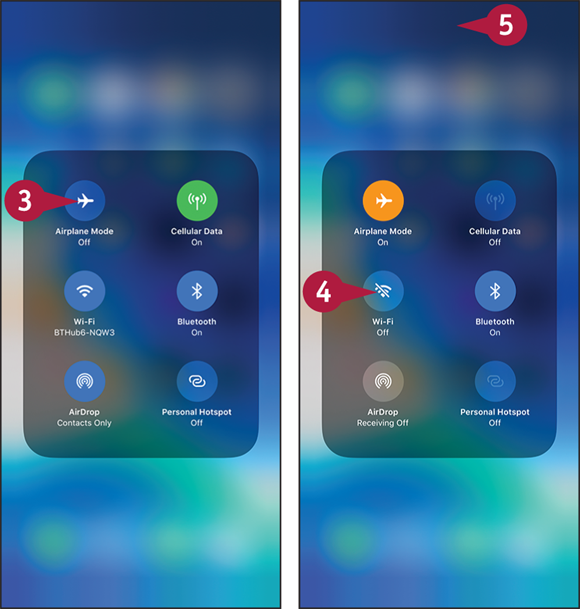
Normally, you will want to keep your iPhone connected to the cellular network so that you can make or receive phone calls and access the Internet. But when you do not need or may not use the cellular network, you can turn on the iPhone’s Airplane Mode feature to cut off all connections.
Turning on Airplane Mode turns off Wi-Fi as well, but you can turn Wi-Fi on and off separately when you need to.
Using Airplane Mode

![]() Swipe down from the upper-right corner of the screen to open Control Center.
Swipe down from the upper-right corner of the screen to open Control Center.
Note: You can open Control Center from within most apps. If an app blocks Control Center, first display the Home screen, and then open Control Center. If all apps block you opening Control Center, tap Settings (![]() ), tap Control Center (
), tap Control Center (![]() ), and then set the Access Within Apps switch to On (
), and then set the Access Within Apps switch to On (![]() ).
).
![]() You can tap Airplane Mode (
You can tap Airplane Mode (![]() changes to
changes to ![]() ) to turn Airplane Mode on quickly.
) to turn Airplane Mode on quickly.
![]() Tap and hold the upper-left box.
Tap and hold the upper-left box.
The pop-up panel opens.
![]() Tap Airplane Mode (
Tap Airplane Mode (![]() changes to
changes to ![]() ).
).
Your iPhone turns off all cellular and wireless connections.
![]() To turn on Wi-Fi, tap Wi-Fi (
To turn on Wi-Fi, tap Wi-Fi (![]() changes to
changes to ![]() ).
).
![]() Tap the screen above the pop-up panel.
Tap the screen above the pop-up panel.
The pop-up panel closes.
![]() Tap the screen at the top of Control Center.
Tap the screen at the top of Control Center.
Control Center closes.
Note: When your iPhone has a wireless network connection, it uses that connection instead of the cellular connection. This helps keep down your cellular network usage and often gives a faster connection.
Monitor Your Cellular Network Usage
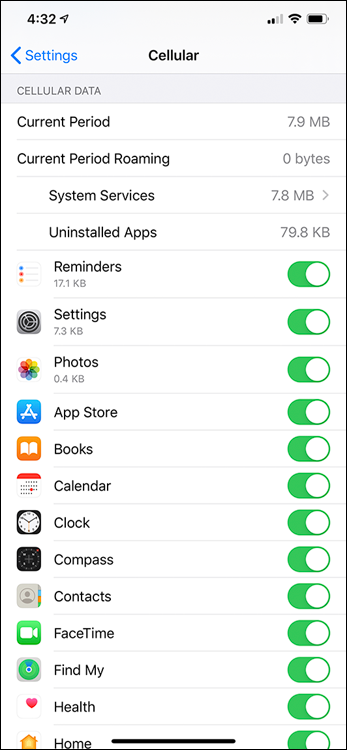
If you use your iPhone extensively, you may need to monitor your usage of the cellular network to avoid incurring extra charges beyond your data allowance. You can check your current data usage and roaming data usage in the Cellular Data Usage area of the Cellular screen in the Settings app. However, you should also see if your carrier provides an app for monitoring data usage, because such apps frequently offer extra features, such as warning you when your phone is using data quickly.
Monitor Your Cellular Network Usage
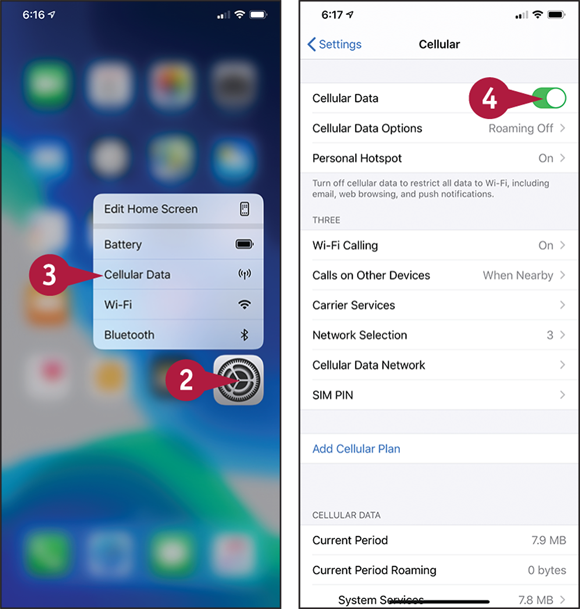
![]() Swipe up from the bottom of the screen to display the Home screen.
Swipe up from the bottom of the screen to display the Home screen.
![]() Tap and hold Settings (
Tap and hold Settings (![]() ) to open the pop-up panel.
) to open the pop-up panel.
The pop-up panel opens.
![]() Tap Cellular Data (
Tap Cellular Data (![]() ) to display the Cellular screen.
) to display the Cellular screen.
Note: You can also display the Cellular screen by displaying the Home screen, tapping Settings (![]() ), and then tapping Cellular (
), and then tapping Cellular (![]() ) on the Settings screen.
) on the Settings screen.
![]() Set the Cellular Data switch to On (
Set the Cellular Data switch to On (![]() ) to enable cellular data.
) to enable cellular data.
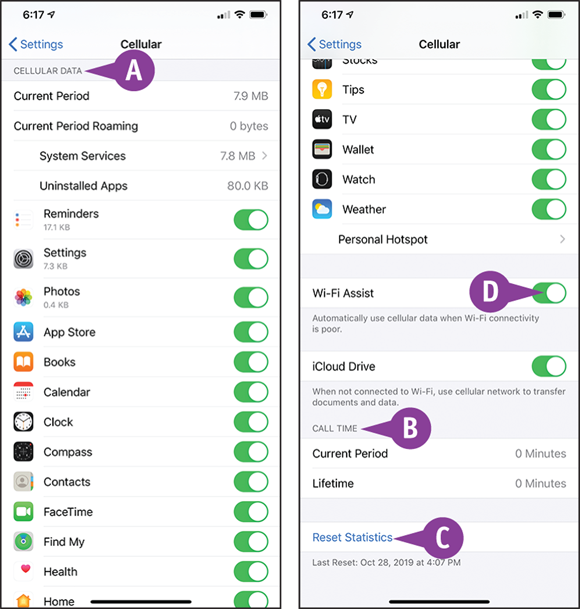
![]() The readouts in the Cellular Data Usage area show your cellular data usage since last resetting the statistics and how much roaming data you have used.
The readouts in the Cellular Data Usage area show your cellular data usage since last resetting the statistics and how much roaming data you have used.
![]() The readouts in the Call Time area show the amount of time you have spent making calls since last resetting the statistics and during your phone’s lifetime.
The readouts in the Call Time area show the amount of time you have spent making calls since last resetting the statistics and during your phone’s lifetime.
![]() You can reset your usage statistics by tapping Reset Statistics at the bottom of the Cellular screen.
You can reset your usage statistics by tapping Reset Statistics at the bottom of the Cellular screen.
![]() You can set the Wi-Fi Assist switch to On (
You can set the Wi-Fi Assist switch to On (![]() ) to make your iPhone automatically use cellular data when the phone’s Wi-Fi connection is poor. This switch may be set to On (
) to make your iPhone automatically use cellular data when the phone’s Wi-Fi connection is poor. This switch may be set to On (![]() ) by default. The readout shows the amount of cellular data used.
) by default. The readout shows the amount of cellular data used.
Control Cellular Data and Background Refresh
To control your iPhone’s use of cellular data, you can turn cellular data on and off, and you can specify which apps can use cellular data. You can determine which apps and services use the most data, and then turn off greedy apps.
You can also use the Background App Refresh feature to control which apps refresh their content via Wi-Fi or cellular connections when running in the background rather than the foreground.
Control Cellular Data and Background Refresh
![]() Swipe up from the bottom of the screen to display the Home screen.
Swipe up from the bottom of the screen to display the Home screen.
![]() Tap Settings (
Tap Settings (![]() ) to display the Cellular screen.
) to display the Cellular screen.
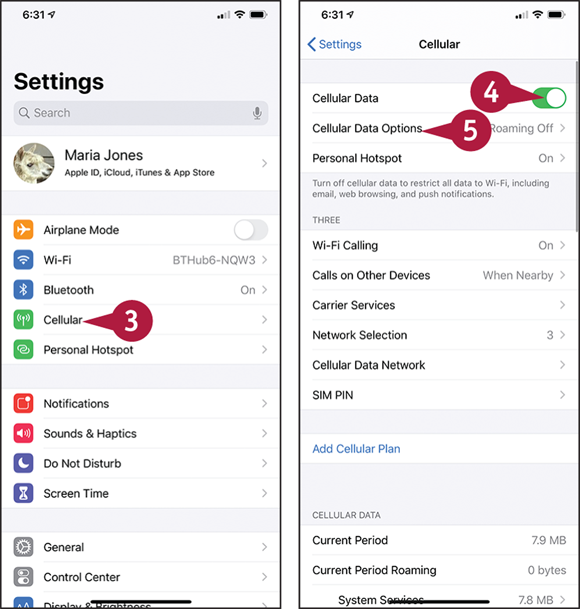
![]() Tap Cellular (
Tap Cellular (![]() ) to display the Cellular screen.
) to display the Cellular screen.
Note: Turning off cellular data does not affect cellular voice services: You can still make phone calls, and GPS tracking still works.
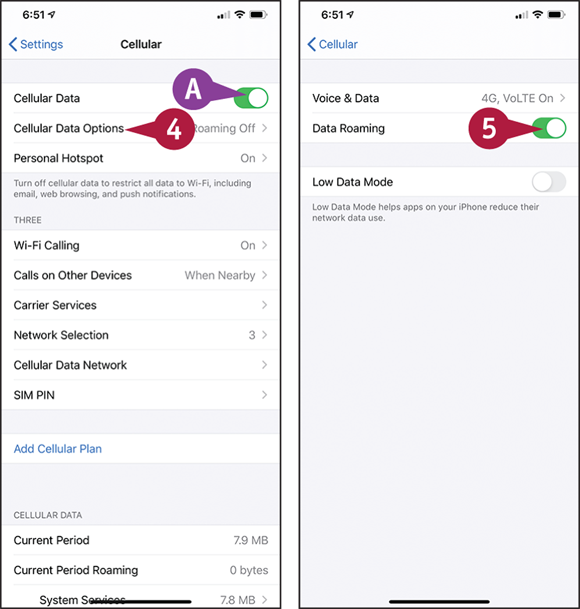
![]() If you need to turn cellular data off altogether, set the Cellular Data switch to Off (
If you need to turn cellular data off altogether, set the Cellular Data switch to Off (![]() changes to
changes to ![]() ).
).
![]() Tap Cellular Data Options.
Tap Cellular Data Options.

The Cellular Data Options screen appears.
![]() Tap Voice & Data to display the Voice & Data screen.
Tap Voice & Data to display the Voice & Data screen.
Note: The options on the Voice & Data screen vary depending on your carrier and region.
![]() Tap the button for the service or services you want to use. In the example, you might tap 4G, VoLTE On to enable 4G cellular with Voice over LTE.
Tap the button for the service or services you want to use. In the example, you might tap 4G, VoLTE On to enable 4G cellular with Voice over LTE.
![]() Tap Back (
Tap Back (![]() ).
).
The Cellular Data Options screen appears again.
![]() Tap Cellular (
Tap Cellular (![]() ).
).

The Cellular screen appears again.
![]() If cellular data is enabled, set each app’s switch to On (
If cellular data is enabled, set each app’s switch to On (![]() ) or Off (
) or Off (![]() ), as needed.
), as needed.
![]() To see which system services have been using cellular data, tap System Services.
To see which system services have been using cellular data, tap System Services.
The System Services screen appears.
![]() Browse the list to identify any services that hog cellular data.
Browse the list to identify any services that hog cellular data.
![]() Tap Cellular (
Tap Cellular (![]() ).
).
The Cellular screen appears.
![]() Tap Settings (
Tap Settings (![]() ).
).
The Settings screen appears.
![]() Tap General (
Tap General (![]() ).
).

The General screen appears.
![]() Tap Background App Refresh.
Tap Background App Refresh.
The Background App Refresh screen appears.
![]() Tap Background App Refresh; tap Off, Wi-Fi, or Wi-Fi & Cellular Data, as needed; and then tap Background App Refresh (
Tap Background App Refresh; tap Off, Wi-Fi, or Wi-Fi & Cellular Data, as needed; and then tap Background App Refresh (![]() ).
).
![]() Assuming you chose Wi-Fi or Wi-Fi and Cellular Data, set each individual app switch to On (
Assuming you chose Wi-Fi or Wi-Fi and Cellular Data, set each individual app switch to On (![]() ) or Off (
) or Off (![]() ), as needed.
), as needed.
![]() Tap General (
Tap General (![]() ).
).
The General screen appears.
![]() Tap Settings (
Tap Settings (![]() ).
).
The Settings screen appears.
Connect Your iPhone to a Different Carrier
Your iPhone’s SIM card makes it connect automatically to a particular carrier’s network, such as the AT&T network or the Verizon network. If your iPhone is not locked to a particular carrier’s network, you can connect the iPhone to a different carrier’s network when you go outside the area your carrier covers. For example, if you travel to the United Kingdom, you can connect your iPhone to carriers such as O2, Vodafone, Three, or EE. You may need to change the iPhone’s SIM card to connect to another network.
Connect Your iPhone to a Different Carrier

![]() Swipe up from the bottom of the screen.
Swipe up from the bottom of the screen.
The Home screen appears.
![]() Tap Settings (
Tap Settings (![]() ).
).
The Settings screen appears.
![]() Tap Cellular (
Tap Cellular (![]() ).
).
The Cellular screen appears.
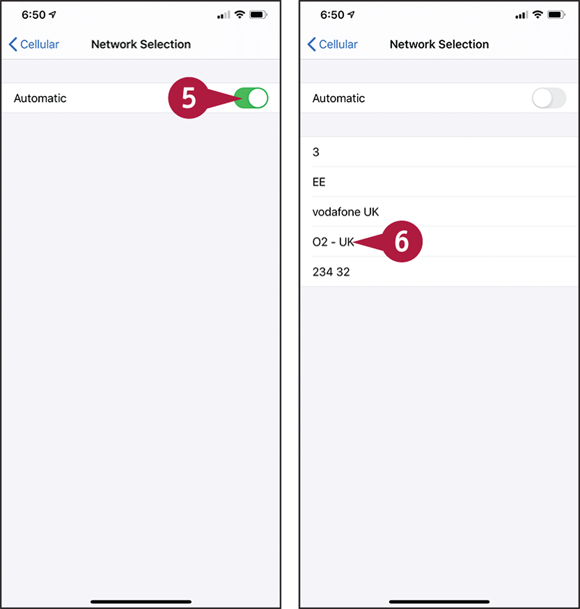
![]() Tap Network Selection.
Tap Network Selection.
Note: To connect to a different carrier’s network, you may need to set up an account with that carrier or pay extra charges to your standard carrier. You may also need to insert a different SIM card in your iPhone.
The Network Selection screen appears.
![]() Set the Automatic switch to Off (
Set the Automatic switch to Off (![]() changes to
changes to ![]() ).
).
The list of available carriers appears.
![]() Tap the carrier you want to use.
Tap the carrier you want to use.
Note: When you want to switch back to your regular carrier, set the Automatic switch on the Network Selection screen to On (![]() changes to
changes to ![]() ).
).
Turn Data Roaming On or Off
When you need to use your iPhone somewhere your carrier does not provide Internet service, you can turn on data roaming, which enables you to access the Internet using other carriers’ networks. Data roaming may incur extra charges, especially when you use it in another country, so keep data roaming turned off and turn it on only when you need it. Normally, you will want to use data roaming only when no wireless network connection is available.
Turn Data Roaming On or Off
![]() Swipe up from the bottom of the screen.
Swipe up from the bottom of the screen.
The Home screen appears.
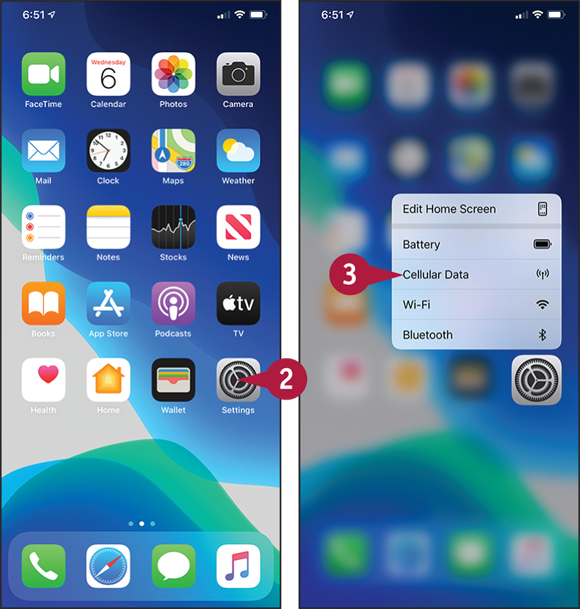
![]() Tap and hold Settings (
Tap and hold Settings (![]() ).
).
The pop-up panel opens.
![]() Tap Cellular Data (
Tap Cellular Data (![]() ).
).
The Cellular screen appears.
![]() You can also turn off cellular data altogether by setting the Cellular Data switch to Off (
You can also turn off cellular data altogether by setting the Cellular Data switch to Off (![]() ). Do this when you need to ensure that all apps use Wi-Fi rather than cellular connections.
). Do this when you need to ensure that all apps use Wi-Fi rather than cellular connections.
![]() Tap Cellular Data Options.
Tap Cellular Data Options.
The Cellular Data Options screen appears.
![]() Set the Data Roaming switch to On (
Set the Data Roaming switch to On (![]() changes to
changes to ![]() ).
).
Note: When you need to turn data roaming off again, set the Data Roaming switch on the Cellular Data Options screen to Off (![]() changes to
changes to ![]() ).
).
Connect Bluetooth Devices to Your iPhone
To extend your iPhone’s functionality, you can connect devices to it that communicate using the wireless Bluetooth technology.
For example, you can connect a Bluetooth headset and microphone so that you can listen to music and make and take phone calls. Or you can connect a Bluetooth keyboard so that you can quickly type e-mail messages, notes, or documents. You can also connect your iPhone to another phone, to a tablet, to many cars’ infotainment unit, or to a computer via Bluetooth.
Connect Bluetooth Devices to Your iPhone

Set Up a Bluetooth Device
![]() Swipe up from the bottom of the screen.
Swipe up from the bottom of the screen.
The Home screen appears.
![]() Tap and hold Settings (
Tap and hold Settings (![]() ).
).
The pop-up panel opens.
![]() Tap Bluetooth (
Tap Bluetooth (![]() ).
).
The Bluetooth screen appears.
![]() Set the Bluetooth switch to On (
Set the Bluetooth switch to On (![]() changes to
changes to ![]() ).
).
![]() Turn on the Bluetooth device and make it discoverable.
Turn on the Bluetooth device and make it discoverable.
Note: Read the Bluetooth device’s instructions to find out how to make the device discoverable via Bluetooth.
![]() Devices in the My Devices list are already paired with your iPhone. You can tap a device to connect it.
Devices in the My Devices list are already paired with your iPhone. You can tap a device to connect it.
![]() Tap the device’s button.
Tap the device’s button.
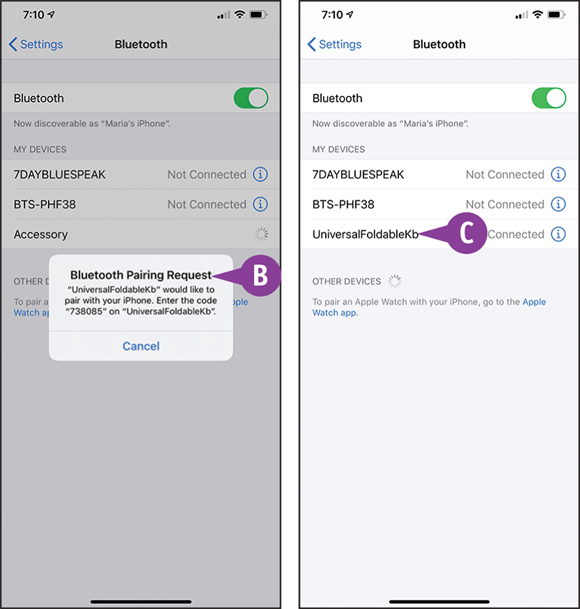
![]() For a device such as a keyboard or a computer, the Bluetooth Pairing Request dialog opens.
For a device such as a keyboard or a computer, the Bluetooth Pairing Request dialog opens.
![]() Type the pairing code on the device.
Type the pairing code on the device.
The iPhone pairs with the device and then connects to it.
![]() The My Devices list shows the device as Connected. You can start using the device.
The My Devices list shows the device as Connected. You can start using the device.
Choose the Device for Playing Audio or Taking a Call
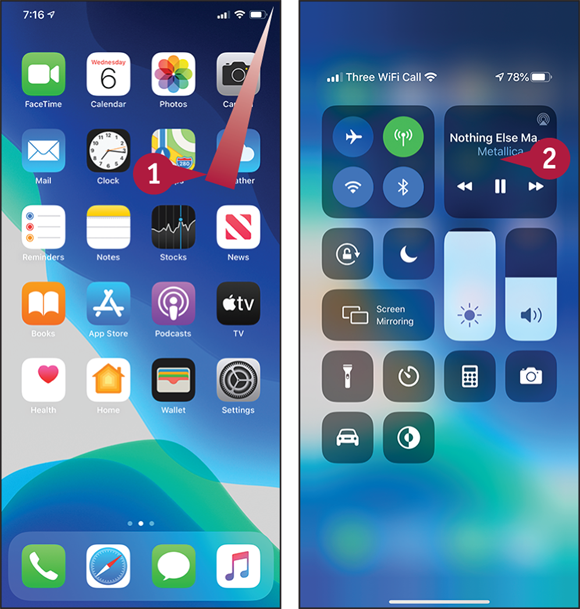
![]() Swipe down from the upper-right corner of the screen.
Swipe down from the upper-right corner of the screen.
Note: This example uses the Music app.
Control Center opens.
![]() Tap and hold the audio controls box.
Tap and hold the audio controls box.
The pop-up panel opens.
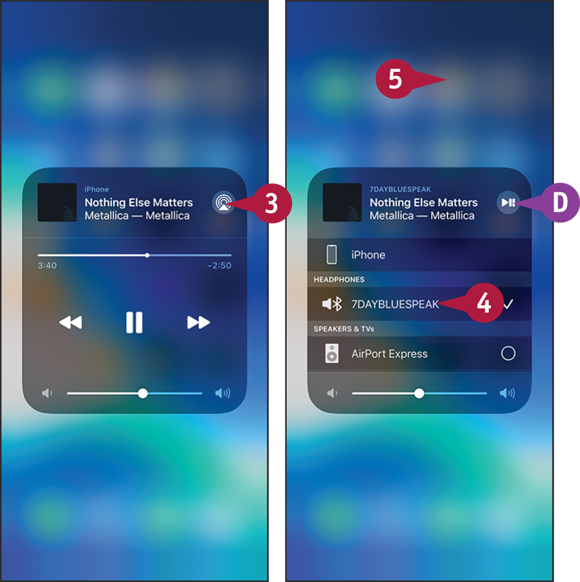
![]() Tap AirPlay (
Tap AirPlay (![]() ).
).
The list of devices appears.
![]() Tap the device you want to use.
Tap the device you want to use.
![]() You can tap Audio Controls (
You can tap Audio Controls (![]() ) to display the audio controls box again.
) to display the audio controls box again.
![]() Tap outside the pop-up panel.
Tap outside the pop-up panel.
The pop-up panel closes.
![]() Tap the screen at the top of Control Center.
Tap the screen at the top of Control Center.
Control Center closes.
Share Items via AirDrop
AirDrop enables you to share files quickly and easily with iOS devices and Macs near your iPhone. For example, you can use AirDrop to share a photo, a contact record, or an item from Wallet. You can use AirDrop in any app that displays a Share button (![]() ).
).
You can turn AirDrop on when you need it and off when you do not. When AirDrop is on, you can choose between accepting items only from your contacts or from everyone.
Share Items via AirDrop

Turn AirDrop On or Off
![]() Swipe down from the upper-right corner of the screen.
Swipe down from the upper-right corner of the screen.
Control Center opens.
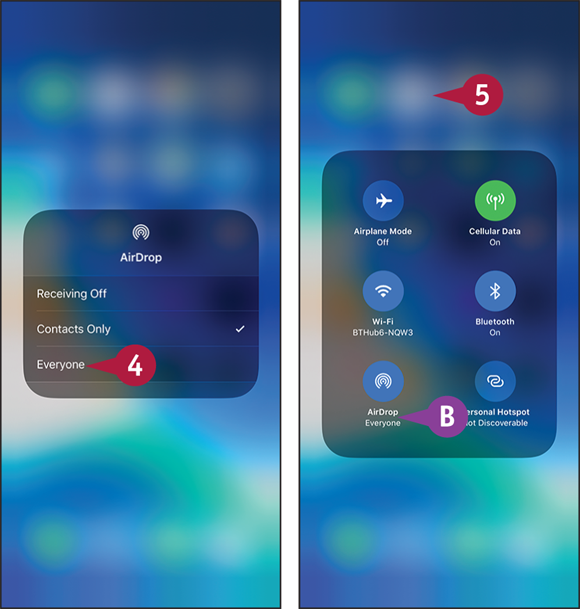
![]() Tap and hold the upper-left box.
Tap and hold the upper-left box.
The pop-up panel opens.
![]() The readout shows AirDrop’s status: AirDrop: Receiving Off; AirDrop: Contacts Only; or AirDrop: Everyone.
The readout shows AirDrop’s status: AirDrop: Receiving Off; AirDrop: Contacts Only; or AirDrop: Everyone.
![]() Tap AirDrop (
Tap AirDrop (![]() ).
).
Note: AirDrop uses Wi-Fi or Bluetooth to transfer files wirelessly without the devices having to be on the same wireless network.
The AirDrop panel opens.
![]() Tap Receiving Off, Contacts Only, or Everyone, as needed.
Tap Receiving Off, Contacts Only, or Everyone, as needed.
The AirDrop panel closes.
![]() The AirDrop readout shows the AirDrop setting you chose.
The AirDrop readout shows the AirDrop setting you chose.
![]() Tap the screen above the pop-up panel.
Tap the screen above the pop-up panel.
The pop-up panel closes.
![]() Tap the screen at the top of Control Center.
Tap the screen at the top of Control Center.
Control Center closes.

Share an Item via AirDrop
![]() Open the app that contains the item. For example, tap Photos (
Open the app that contains the item. For example, tap Photos (![]() ) on the Home screen.
) on the Home screen.
![]() Navigate to the item you want to share. For example, tap a photo to open it.
Navigate to the item you want to share. For example, tap a photo to open it.
![]() Tap Share (
Tap Share (![]() ).
).
The Share sheet appears.
![]() In some apps, you can select other items to share at the same time. For example, in Photos, you can select other photos.
In some apps, you can select other items to share at the same time. For example, in Photos, you can select other photos.
![]() In the AirDrop area, tap AirDrop (
In the AirDrop area, tap AirDrop (![]() ).
).
The AirDrop panel opens.
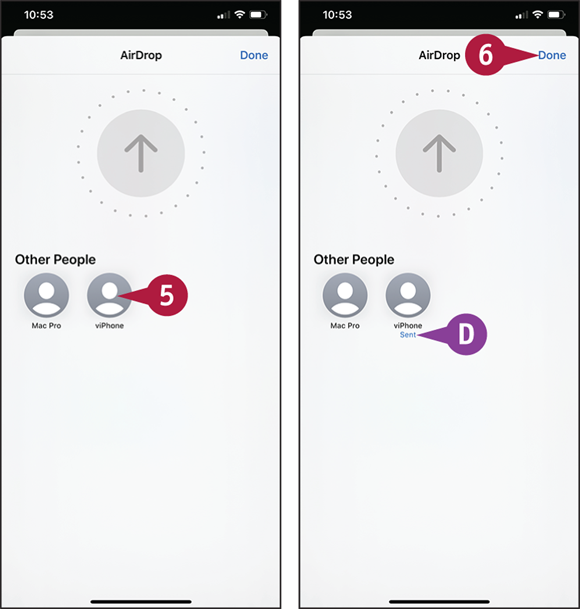
![]() Tap the icon for the device to which you want to send the item.
Tap the icon for the device to which you want to send the item.
AirDrop sends the item.
![]() The Sent readout appears below the icon for the device.
The Sent readout appears below the icon for the device.
![]() Tap Done. The app and the share sheet appear again.
Tap Done. The app and the share sheet appear again.
Share Internet Access via Personal Hotspot
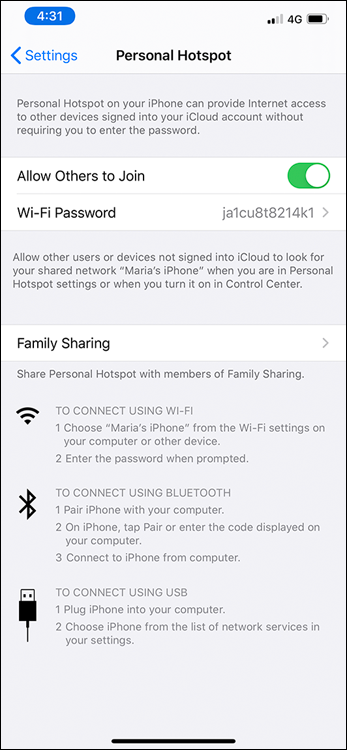
Your iPhone can not only access the Internet itself from anywhere it has a suitable connection to the cellular network, but it can also share that Internet access with your computer and other devices. This feature is called Personal Hotspot.
For you to use Personal Hotspot, your iPhone’s carrier must permit you to use it. Some carriers charge an extra fee per month on top of the standard data plan charge.
Share Internet Access via Personal Hotspot
Set Up Personal Hotspot
![]() Swipe up from the bottom of the screen.
Swipe up from the bottom of the screen.
The Home screen appears.
![]() Tap Settings (
Tap Settings (![]() ).
).
The Settings screen appears.
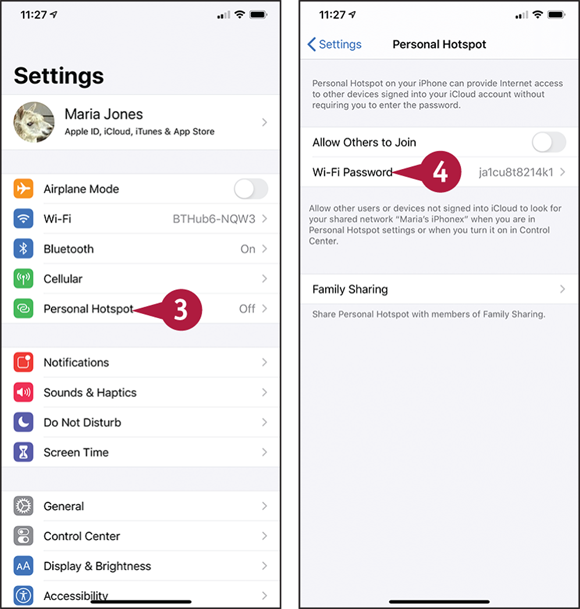
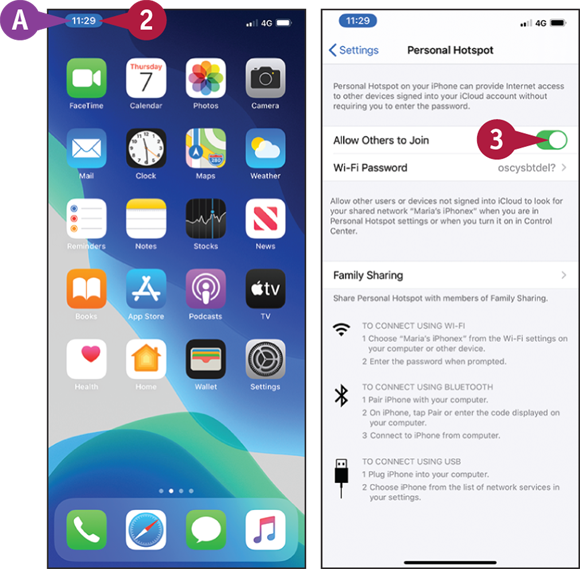
![]() Tap Personal Hotspot (
Tap Personal Hotspot (![]() ).
).
The Personal Hotspot screen appears.
![]() Tap Wi-Fi Password.
Tap Wi-Fi Password.
The Wi-Fi Password screen appears.
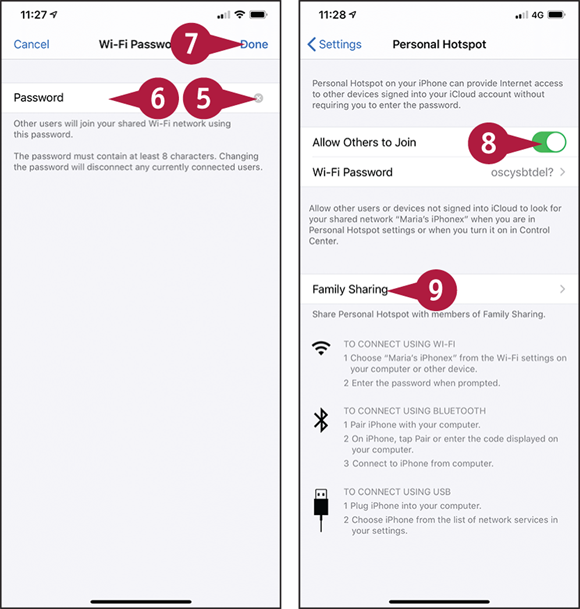
![]() Tap Delete (
Tap Delete (![]() ) to delete the default password.
) to delete the default password.
![]() Type the password you want to use.
Type the password you want to use.
![]() Tap Done.
Tap Done.
The Personal Hotspot screen appears again.
![]() Set the Allow Others to Join switch to On (
Set the Allow Others to Join switch to On (![]() ) if you want to allow people other than Family Sharing members to use the hotspot.
) if you want to allow people other than Family Sharing members to use the hotspot.
![]() Tap Family Sharing.
Tap Family Sharing.
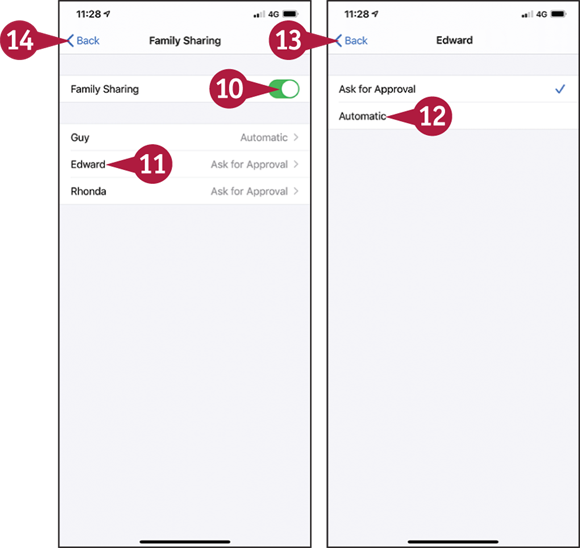
The Family Sharing screen appears.
![]() Set the Family Sharing switch to On (
Set the Family Sharing switch to On (![]() ) if you want to let Family Sharing members use the hotspot.
) if you want to let Family Sharing members use the hotspot.
![]() Tap the family member whose access you want to configure.
Tap the family member whose access you want to configure.
The screen for that family member appears.
![]() Tap Ask for Approval or Automatic, as appropriate.
Tap Ask for Approval or Automatic, as appropriate.
![]() Tap Back (
Tap Back (![]() ).
).
The Family Sharing screen appears again.
![]() Tap Back (
Tap Back (![]() ).
).
The Personal Hotspot screen appears again.
You can now connect your computer or other devices.
Stop Using Personal Hotspot
![]() Swipe up from the bottom of the screen.
Swipe up from the bottom of the screen.
The Home screen appears.
![]() The blue background for the clock readout indicates that Personal Hotspot is active and has one or more connections.
The blue background for the clock readout indicates that Personal Hotspot is active and has one or more connections.
![]() Tap the clock readout with the blue background.
Tap the clock readout with the blue background.
The Personal Hotspot screen appears.
![]() Set the Allow Others to Join switch to Off (
Set the Allow Others to Join switch to Off (![]() changes to
changes to ![]() ).
).
Connect to Wi-Fi Networks and Hotspots
To conserve your data allowance, use a Wi-Fi network instead of the cell phone network whenever you can. Your iPhone can connect to both private Wi-Fi networks and to public Wi-Fi hotspots. Use public Wi-Fi hotspots with caution, because they may not be secure.
The first time you connect to a Wi-Fi network, you must provide the network’s password. After that, the iPhone stores the password, so you can connect to the network without entering the password again.
Connect to Wi-Fi Networks and Hotspots
Connect to a Network Listed on the Wi-Fi Screen
![]() Swipe up from the bottom of the screen.
Swipe up from the bottom of the screen.
The Home screen appears.
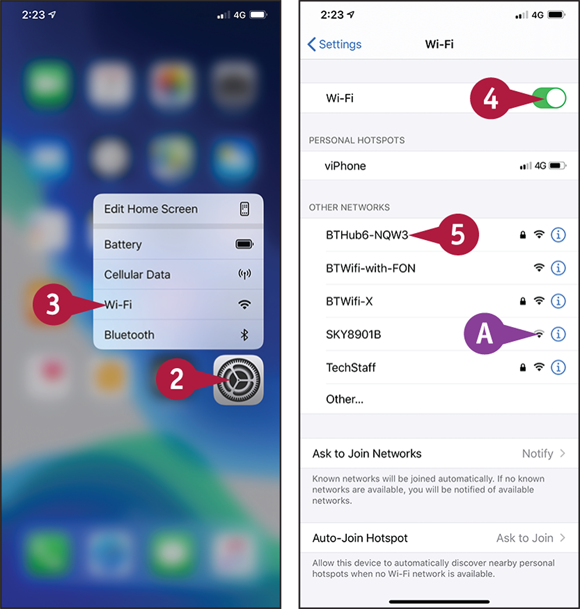
![]() Tap and hold Settings (
Tap and hold Settings (![]() ).
).
The pop-up panel opens.
![]() Tap Wi-Fi (
Tap Wi-Fi (![]() ).
).
The Wi-Fi screen appears.
![]() If Wi-Fi is off, set the Wi-Fi switch to On (
If Wi-Fi is off, set the Wi-Fi switch to On (![]() changes to
changes to ![]() ).
).
The list of networks appears.
![]() A lock icon (
A lock icon (![]() ) indicates the network has security such as a password.
) indicates the network has security such as a password.
![]() Tap the network you want to connect to.
Tap the network you want to connect to.
Note: If the network does not have a password, your iPhone connects to it without prompting you for a password.
Note: When connecting to a Wi-Fi hotspot, you may need to enter login information in Safari. In this case, Safari usually opens automatically and prompts you to log in.
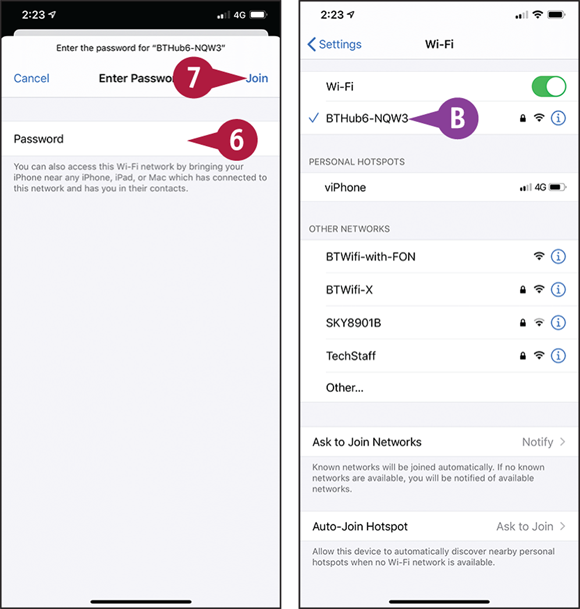
The Enter Password screen appears.
![]() Type the password.
Type the password.
![]() Tap Join.
Tap Join.
Your iPhone connects to the wireless network.
![]() The Wi-Fi screen appears again, showing a check mark (
The Wi-Fi screen appears again, showing a check mark (![]() ) next to the network the iPhone has connected to.
) next to the network the iPhone has connected to.

Connect to a Network Not Listed on the Wi-Fi Screen
![]() On the Wi-Fi screen, tap Other.
On the Wi-Fi screen, tap Other.
The Other Network screen appears.
![]() Type the network name.
Type the network name.
Note: If the network does not use security, tap Join.
![]() The Wi-Fi signal icons (
The Wi-Fi signal icons (![]() ) on the Wi-Fi screen and in the status bar show the strength of the Wi-Fi signals. The more bars that appear in black rather than gray, the stronger a signal is.
) on the Wi-Fi screen and in the status bar show the strength of the Wi-Fi signals. The more bars that appear in black rather than gray, the stronger a signal is.
![]() Tap Security.
Tap Security.

The Security screen appears.
![]() Tap the security type — for example, WPA2/WPA3.
Tap the security type — for example, WPA2/WPA3.
![]() Tap Other Network (
Tap Other Network (![]() ).
).
The Other Network screen appears.
![]() Type the password.
Type the password.
![]() Tap Join.
Tap Join.
Your iPhone joins the network.
Set Up and Enjoy Social Networking
Always in your pocket or purse if not in your hand, your iPhone is the perfect device for keeping in touch with family, friends, and acquaintances via social networking. You can install apps such as Facebook, Twitter, or WhatsApp; post updates or browse what others have posted; and share content easily from many apps, such as Photos.
To protect your account and data, it is a good idea to enable two-factor authentication for any social-networking app or other app that offers this security feature.
Install the Social Networking Apps You Need

To start with, install the social networking apps you want to use. Swipe up from the bottom of the screen to display the Home screen, and then tap App Store (![]() ) to launch the App Store app. To find a specific app, tap Search (
) to launch the App Store app. To find a specific app, tap Search (![]() changes to
changes to ![]() ), type the app’s name, and then tap the appropriate search result. On the screen showing the app, tap Get and follow the procedure for installing the app.
), type the app’s name, and then tap the appropriate search result. On the screen showing the app, tap Get and follow the procedure for installing the app.
Configure Settings for a Social Networking App
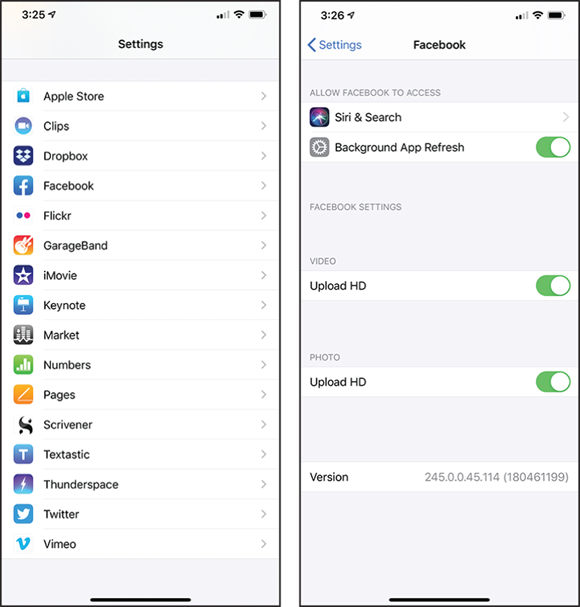
Many social networking apps have settings that you can configure in the Settings app. To do so, swipe up from the bottom of the screen to display the Home screen, tap Settings (![]() ), and then tap the app’s button — for example, tap Facebook (
), and then tap the app’s button — for example, tap Facebook (![]() ) to display the settings screen for the app. You can then configure the controls. Many apps have standard settings such as the Siri & Search screen, the Notifications screen, and the Background App Refresh switch. Some have other settings, such as the Upload HD switches in the Facebook app, which controls whether the app uploads high-definition videos and photos.
) to display the settings screen for the app. You can then configure the controls. Many apps have standard settings such as the Siri & Search screen, the Notifications screen, and the Background App Refresh switch. Some have other settings, such as the Upload HD switches in the Facebook app, which controls whether the app uploads high-definition videos and photos.
Some apps also have settings that you can configure within the app itself. For example, in Facebook, tap Menu (![]() ) to open the menu, and then tap Settings & Privacy (
) to open the menu, and then tap Settings & Privacy (![]() ).
).
Launch and Sign In to a Social Networking App

When you are ready to start using a social networking app, launch it by tapping its icon on the Home screen. For example, tap Twitter (![]() ). Follow the prompts to sign in or log in. For example, in Twitter, enter your username or Twitter handle, enter your password, and then tap Log in.
). Follow the prompts to sign in or log in. For example, in Twitter, enter your username or Twitter handle, enter your password, and then tap Log in.
The app then opens, and you can start using it as normal. For example, in Twitter, tap Tweet (![]() ) to start writing a new tweet.
) to start writing a new tweet.
Share Content with a Social Networking App
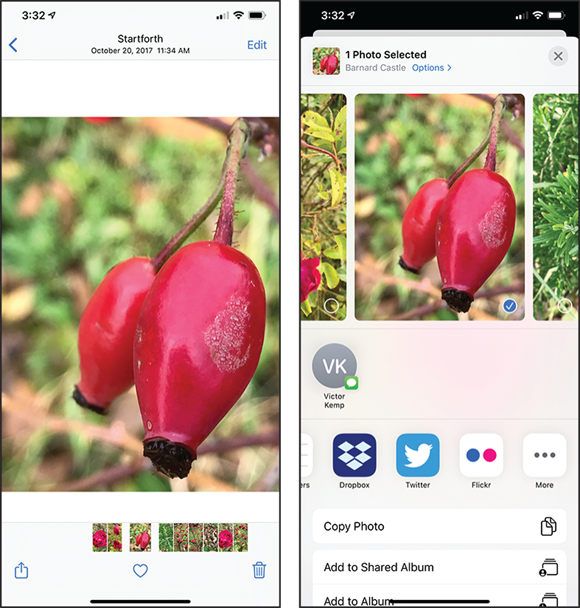
You can easily share content from other apps with your social networking apps. To do so, first open the appropriate app and select the item you want to share. For example, tap Photos (![]() ) and select a photo to share. Next, tap Share (
) and select a photo to share. Next, tap Share (![]() ) to open the Share sheet, tap the social networking app on the Activities bar, and then follow the prompts to post the photo.
) to open the Share sheet, tap the social networking app on the Activities bar, and then follow the prompts to post the photo.
If the app does not appear on the Activities bar, tap More (![]() ) at the right end of the Activities bar to display the Apps screen. Tap Edit, set the app’s switch to On (
) at the right end of the Activities bar to display the Apps screen. Tap Edit, set the app’s switch to On (![]() ) in the Suggestions list, and optionally drag the app by its handle (
) in the Suggestions list, and optionally drag the app by its handle (![]() ) to the Favorites list. Then tap Done.
) to the Favorites list. Then tap Done.