Chapter 15
A Laptop at Play
IN THIS CHAPTER
![]() Exploring media programs and apps
Exploring media programs and apps
![]() Adding music from a CD
Adding music from a CD
![]() Grabbing pictures from a cell phone
Grabbing pictures from a cell phone
![]() Using the laptop’s camera
Using the laptop’s camera
![]() Sharing media by using OneDrive
Sharing media by using OneDrive
![]() Accessing a network media player
Accessing a network media player
![]() Making a phone call
Making a phone call
![]() Reading an eBook
Reading an eBook
Forget about work. Your laptop is capable of intruding upon the leisure time domain of mobile devices, such as phones and tablets. These activities include listening to music, watching videos, and taking photos. The modern laptop (specifically, the tablet PC) is more than capable of handling these tasks — and of doing those business things.
The Laptop Media Player
To enjoy the pictures, music, and video on your laptop, you run a specific program or app. The traditional program is Windows Media Player, which still works great in Windows 10. For a more app-y experience, you can employ one of the newer apps, which may work better if your laptop is a tablet PC.
Exploring Windows Media Player
Media management programs are no longer the rage. Specific applications for certain types of media, such as music-playing and video-watching, are now more common. Still, the legacy Windows Media Player program handles many tasks in a single location.
To start Windows Media Player, follow these steps in Windows 10:
Click the Start button.
Up pops the Start button menu.
- Type windows media player or as many letters as necessary to see the Windows Media Player item appear atop the search list.
Press the Enter key to start the Windows Media Player program.
Windows Media Player appears on the screen, although if it’s the first time the program is run, you must do some configuration. Choose the recommended settings.
Figure 15-1 shows the Windows Media Player window. Media categories are shown on the left side of the screen, content in the middle, and special options on the right.
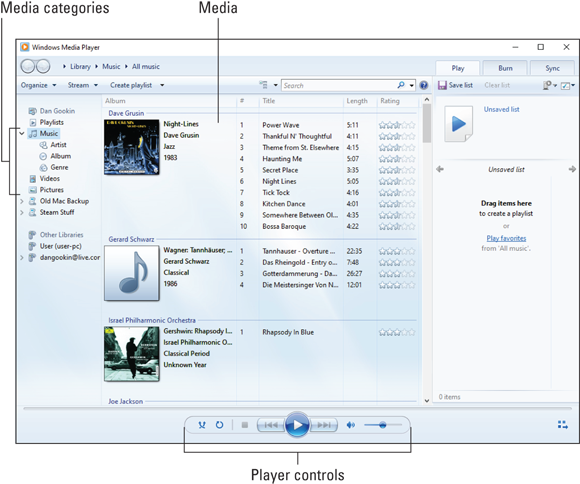
FIGURE 15-1: Windows Media Player.
 Fret not when you find no media in the Windows Media Player window. You can easily add media as described in the later section “Expand the Laptop’s Media Universe.”
- If you’re an Android user, you can connect with your online media by using the laptop’s web browser and visiting Google Play on the Internet.
- iOS users can install the iTunes program for Windows, where you can access your iTunes library.
Running the Photos app
The Photos app has only one, obvious job: Display and manage photos found not only on your laptop but from online sources as well, such as Microsoft’s OneDrive. The Photos app main screen is shown in Figure 15-2.
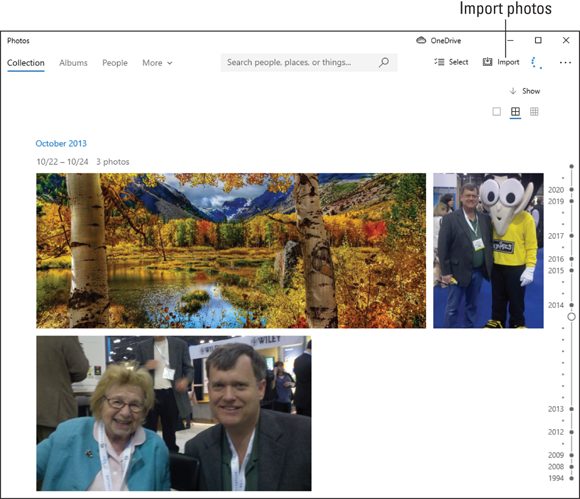
FIGURE 15-2: The Photos app.
To start the Photos app, choose it from the Start button menu. You can press the Windows key on the keyboard to pop up the menu and then type photos to start the program.
Click or tap an image to examine it, as shown in Figure 15-3. Icons appearing atop the window let you manage or manipulate the image, as illustrated in the figure.
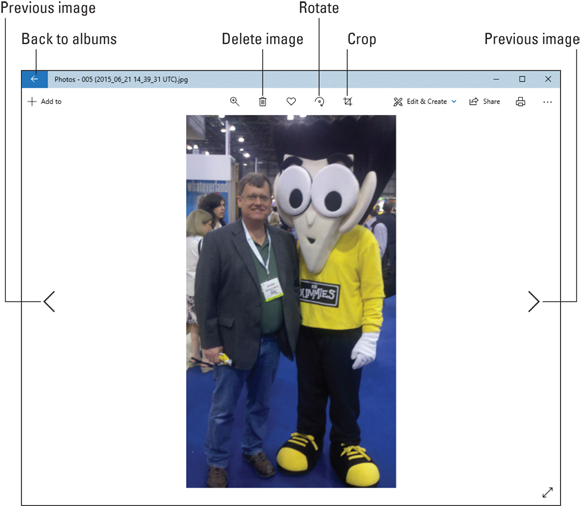
FIGURE 15-3: Viewing an image in the Photos app.
Click the Back icon to return to the Photo app’s Album view (refer to Figure 15-3).
Using the Groove Music app
Windows 10 doesn’t appear to have a native music-playing app. The only thing that comes close is Groove Music, which not only lets you buy and stream music online but also recognizes any music already stored on the laptop.
Figure 15-4 shows the Groove Music app’s main screen. To listen to music, choose an album and then click the Play button that appears at the bottom of the app’s window.
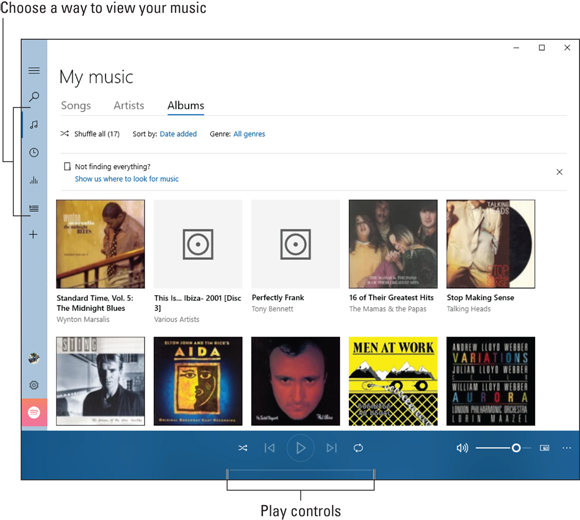
FIGURE 15-4: The Groove Music app.
Expand the Laptop’s Media Universe
Unless you have a really good memory, or you hang out only with musicians and artists all the time, it’s important to pack your laptop with plenty of exciting media. The goal is to get that media — music, pictures, and video — into your laptop. You have two options:
- If you have physical media, such as music on a CD, you can rip the music into the laptop. This media must be ripped, scanned, or otherwise sourced from the physical realm into the laptop’s digital realm.
- You can obtain digital media, either free or paid, from an online source. For example, the Microsoft Store features an Entertainment category from which you can retrieve movies or music or other media. If you lack an app to access the media, the store offers this software as well.
Ripping music from a CD
You can use Windows Media Player to copy music from your CD collection to your laptop. The process is called ripping, which seems violent and illegal, so it’s probably a music industry term. With one of your treasured music CDs in hand, follow these steps to magically copy its contents from eternal plastic to sacred digital:
Insert the music CD into the laptop’s optical drive.
If your laptop lacks an optical drive, connect an external optical drive.
Ignore any AutoPlay notification.
You could tap the notification to choose the Play Audio CD option to immediately listen to the CD. Don’t.
Open Windows Media Player.
Directions are found in the earlier section “Exploring Windows Media Player.”
Choose the CD from the left side of the window.
The CD’s content — the music — appears in the center of the window.
Select which songs you want to rip.
All songs are selected, as shown in Figure 15-5. If you want only a few, remove the check marks by the songs you don’t want to copy.
Click the Rip CD button.
The music is copied from the optical disc to the laptop’s storage. While it’s copying, the Rip CD button changes to the Stop Rip button. A progress bar appears by each track as it’s copied.
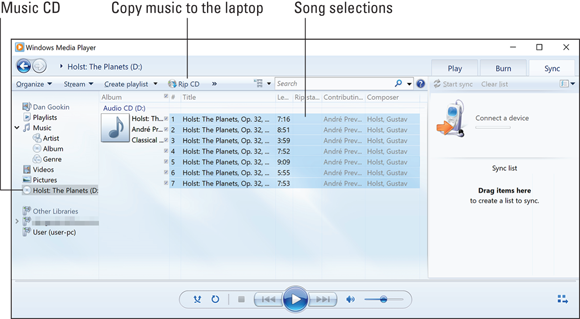
FIGURE 15-5: Copying music from a CD.
When the ripping is done, the songs appear in the Windows Media Player music library. Choose the Music category from the left side of the window to look for the album and locate its tunes.
- To continue ripping your old CD collection, eject the disc and replace it with another one. Repeat the steps in this section to rip more music.
- If you want to share the music with other devices, copy it to cloud storage. See the later section “Copying media to your OneDrive.”
- Any music you copy to your laptop is also available in the Groove Music app.
Uploading pictures and videos from a phone or camera
The best way to obtain a ton of pictures and videos is to connect a digital camera to your laptop and synchronize the images. To properly connect the device to your laptop, follow these steps:
- Ensure that the phone or tablet is turned on and unlocked.
Connect the phone, tablet, or digital camera to the laptop.
Attach one end of a USB cable to the laptop and the other to the device.
- Ensure that the device is turned on and unlocked.
Ignore the notification.
The notification generally doesn’t help in Windows 10, at least not when you desire to import pictures and videos.
After the connection is made, you can use either the Photos app or the Windows Media Player program to import images. Using the Photos app is quicker, but the Windows Media Player program offers more options.
To import images when using the Photos app, follow these steps:
Click the Import Photos button.
Refer to Figure 15-2 for the button’s location.
Choose From a USB Device.
Your phone, tablet, or camera is effectively a USB storage device, like a thumb drive.
Continue to follow the onscreen directions to import photos and videos.
A notification appears when the process is complete.
For more discrete control over which images are imported, and potentially a higher degree of success, use the Windows Media Player program instead of the Photos app. Follow these steps:
Choose the device’s Pictures category from the left side of the window.
Look for your phone, tablet, or camera listed on the left side of the window, as illustrated in Figure 15-6. Expand this item to view the Pictures category, as illustrated in the figure.
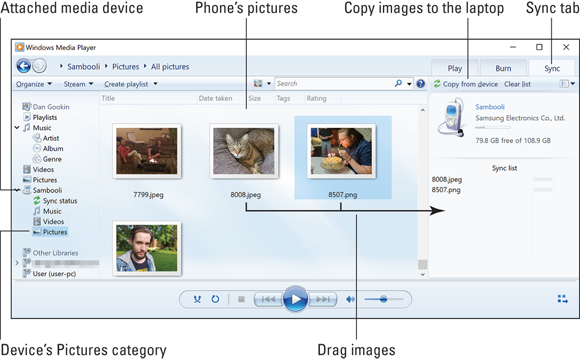
FIGURE 15-6: Copying images from a smartphone to a laptop.
- Click the Sync tab.
Select the images you want to copy from the center of the window.
Refer to Figure 15-6 for the specific location.
- Drag the images you want to copy from the middle of the window to the Sync tab.
Click the Copy from Device button.
The images are copied from the other gizmo into your laptop.
The copied images are found in your laptop’s main storage. Look in your User Profile folder, in the Pictures folder. Images are organized into subfolders given the month and year in which the images were taken.
- You can use the same process in the Windows Media Player program (the second set of steps) to copy over music and videos on a phone or tablet. Choose the proper category from Step 1 and then repeat the rest of the steps.
- Once you’re done copying media from the device, disconnect it: Unplug the USB cable.
- If you want to share the music with other devices, copy it to cloud storage. See the later section “Copying media to your OneDrive.”
Taking a picture
A common feature on today’s laptops is the webcam, usually found squat above the screen. Tablet PCs might also feature a rear or main camera. Obviously, one solid way to get a photo into your laptop is to use this camera.
Follow these steps to use your laptop’s webcam to snap a photo:
Open the Camera app.
The app is found on the Start menu: Type camera and choose the Camera App item.
- Frame the picture.
- Tap the Shutter icon to record the image for posterity.
To record video, tap the Video icon. The app’s window changes, replacing the Shutter icon with the Video Camera icon. Tap that Video Camera icon to begin recording. Tap the icon again to stop recording.
Figure 15-7 illustrates the Camera app’s interface. Use the onscreen controls to snap an image or record a video. You can also make some photographic adjustments, though these are limited by your laptop’s camera capabilities.
For example, to switch between front and rear cameras, tap the Switch Front/Rear Camera icon, as illustrated in Figure 15-7. If your laptop has only a front camera, this button doesn’t appear.
- Pictures you snap and videos you record are saved in the PicturesCamera Roll folder found in the User Profile area on the laptop’s storage.
- Both the Photos app and Windows Media Player can be used to examine photos.
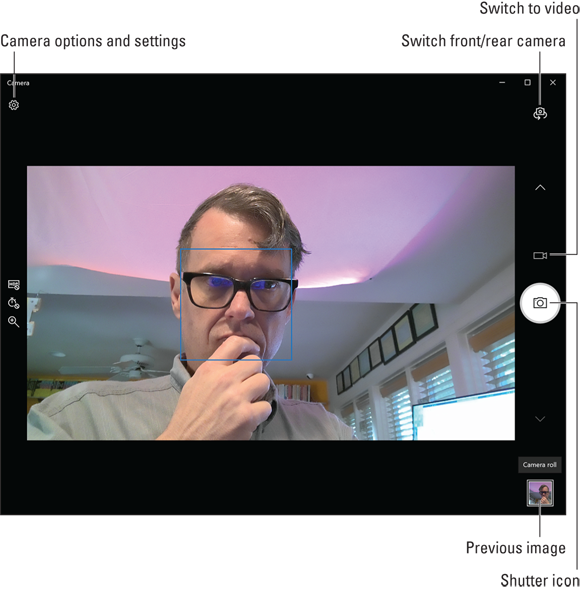
FIGURE 15-7: The Camera app.
Media Sharing
Your laptop isn’t the only device on which you store media. You most likely have a phone or tablet. You probably also use online storage for some of your media. Happiness occurs when all those devices can peacefully coexist and share their media in a pleasant and convenient manner.
Copying media to your OneDrive
Your Windows 10 computer works automatically with Microsoft’s OneDrive cloud storage. Any files or media you copy to the OneDrive area on your laptop’s storage are immediately shared with other devices you own that can access the storage — including any device connected to the Internet.
To make media from your laptop available to another OneDrive gizmo, copy that media to your OneDrive folder. Suppose that you have an album of music on your laptop and you want to share that music with other devices. Follow these steps:
Open a File Explorer window.
Press the Win+E keyboard shortcut.
From the left side of the window, choose your User Profile folder.
The folder is given the name of your account on the laptop. See Chapter 8 for more information on the User Profile folder.
- Double-click to open the Music folder.
- Right-click the folder representing the music album you want to share from your laptop.
Choose Cut.
You’re moving this folder to the Music folder on OneDrive.
- Choose OneDrive from the left side of the window.
- Open the Music folder on OneDrive.
Click the Home tab and choose the Paste command.
The folder is moved to OneDrive cloud storage and synchronized with all other OneDrive devices.
Changing the album’s location doesn’t affect how it plays in either the Groove Music app or Windows Media Player program. The media is still available; only its storage location has changed.
These steps can be repeated for any media stored on your laptop. You can move photos from the Pictures folder in your User Profile area to the Pictures folder on OneDrive. Ditto for video. Just change the proper location in this section’s set of steps.
See Chapter 18 for more information on OneDrive and cloud storage.
Adding media from your OneDrive
Though you have music, photos, and videos stored on your OneDrive cloud storage, that media may not show up in Windows Media Player. To ensure that it does, you must add the OneDrive storage location to those places where the program looks to find media. Follow these steps while using the Windows Media Player program:
Choose Organize ⇒ Manage Libraries ⇒ Music.
The Music Library Locations dialog box appears. It lists the folders where Windows Media Player looks to find music or other audio files. The standard folder is the Music folder in your User Profile folder.
If you see your OneDriveMusic folder in the list, you’re good to go. Otherwise, continue with Step 2.
Click the Add button.
The Include Folder in Music dialog box appears, which works like the standard Open dialog box.
- Choose OneDrive from the list of locations on the left side of the dialog box.
- On the right side of the dialog box, choose the Music folder on your OneDrive storage.
Click the Include Folder button.
The OneDrive folder appears in the Music Library Locations window.
You can add other folders — say, from Dropbox or Google Drive — by repeating Steps 2 through 4.
Click the OK button.
Instantly, the online media is synchronized with Windows Media Player, and your online music populates the screen.
Repeat these steps for the Videos and Pictures items.
Choose Videos in Steps 1 through 6 as well as Pictures to coordinate those items from your OneDrive cloud storage.
Music stored on OneDrive is automatically synchronized to the Groove Music app. The same holds true for pictures when using the Photos app.
Connecting to a network media player
The joy of sharing music, pictures, and videos is that it can work both ways. Your laptop can access other PCs on the network to view any media available for sharing. To do so, open Windows Media Player and choose a network media server from the list shown on the left side of the screen.
In Figure 15-8, two PCs are available for sharing media: User-PC and Tony. In the figure, Tony has been selected and its media appears categorized, just like media stored on your laptop. The Music category is chosen, and music from that PC appears in the center of the window.
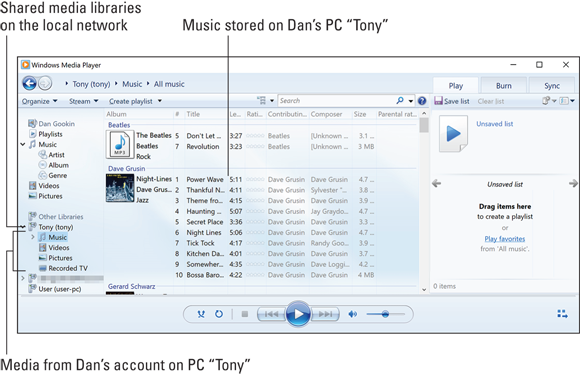
FIGURE 15-8: Accessing media on another network PC.
Playing music or viewing photos or videos on the other computer works the same as accessing your laptop’s media: Choose a song to play, view a picture, or watch a video.
- You don’t need to disconnect from the network PC’s media server. Just close the Windows Media Player window.
- To share your laptop’s media with other computers and gizmos on the network, refer to the next section.
Sharing your laptop’s media
Media sharing, or streaming, is normally disabled for Windows 10 laptops. To activate the feature and make your laptop’s music, pictures, and video available to other computers on a private network, follow these steps:
Pop up the Start menu.
Press the Windows key on the keyboard.
- Type media streaming options, or enough of this text until you see the item Media Streaming Options Control Panel.
Click the Turn On Media Streaming button.
A list of network devices capable of accessing your laptop appears. On my screen, I see computers on the network as well as my Internet-ready HDTV and the Xbox One. You can remove items from this list by removing their check marks.
Click OK.
Your laptop’s media is now shared.
Pictures, videos, and music on your laptop are accessed by other network PCs, similar to the process outlined in the preceding section. Your Internet-ready TV and Xbox One use other techniques to access the media.
Laptop Phone Calls
If you recall laptop history (found in Chapter 1), you know that one pillar of laptop technology is communications. That means not only computer communications, networking, and modem use but also people communications. Yes, it's possible to use your laptop as a phone.
The go-to app on your Windows 10 laptop for chatting it up is Skype. You can connect with other Skype users to text-chat, voice-chat, and video-chat. If you already have a Skype account — great! Otherwise, you can use your Microsoft account to sign in.
To start Skype, choose it from the Start menu. It’s appears in the list of apps, or you can type skype to quickly find it in the list. If you don’t see the Skype app, look for the Get Skype app, which installs Skype.
After the Skype app starts, sign in or create an account.
You can use Skype to voice- or video-chat with other Skype users. To call a real phone with Skype, you need Skype credit, which is where you add money to your account. Only a small amount is necessary, because the calls are cheap, even for international calling. Use the dialpad to type the number and connect.
When you’re done using Skype, you can set it aside or sign out.
To set Skype aside, close the app window. Skype stays active and catches incoming chats or video call requests. Click the App button on the taskbar to reactivate Skype, or choose the notification for an incoming message.
To sign out of Skype, click the Skype menu item and choose Sign Out. You hear the “Skype deflating” sound, and then the sign-in screen appears. You’re officially signed out of Skype and can close the app window.
- Click the Add Skype Credit link to add more credit to your account.
- If you don’t want to spend the money for Skype Credit, ensure that your pals have Skype on their computers, phones, or tablets. Then you can chat it up for free as long as an Internet connection is available.
 Though you can use inflight Wi-Fi to access the Internet, most airlines forbid you to use Skype while aloft.
- When someone receives a Skype call on their phone, they see an unusual or unknown phone number appear on the caller ID. Therefore, I recommend first sending your friend an email so your Skype call isn’t wantonly dismissed.
- Get a good headset if you plan to use Skype for video chat or phone calls. Yes, the program works work with the laptop’s built-in microphone, but a headset is so much better. Plus, a headset doesn’t annoy everyone else in the room.
eBooks on Your Laptop
Another fun thing you can do on your laptop is read an eBook. I guess you’re familiar with the whole reading thing. eBooks work similarly to real books, with the exceptions that the book appears electronically on your laptop screen and the publisher really screws the author on the royalty percentage.
eBook reading apps can be obtained from the Microsoft Store. Open the Store app and browse for eBook readers. Many of them are free, such as Amazon’s Kindle app.
- My advice is to obtain the eBook reader app for whatever electronic book library you already use. For example, if you have an Amazon account and have ordered eBooks there, get the Kindle app. Sign in to that app and behold your entire Amazon eBook library. Ditto for the Nook app.
- If you use Google Play Books, you can access your eBook library by visiting the Play Books website:
play.google.com/books.  Download or synchronize your eBook library with your laptop before you leave on a trip. That way, you can read on the airplane without having to pay for the inflight Wi-Fi.