Chapter 12
Expanding Your Laptop's Universe
IN THIS CHAPTER
![]() Connecting a USB device
Connecting a USB device
![]() Expanding the USB universe
Expanding the USB universe
![]() Using Bluetooth
Using Bluetooth
![]() Adding an extra keyboard or mouse
Adding an extra keyboard or mouse
![]() Connecting an external monitor
Connecting an external monitor
![]() Using the laptop with the lid closed
Using the laptop with the lid closed
When your laptop’s contents don’t meet up with your portable computing desires, you move into the forbidden territory of adding the dreadful peripheral. It’s not that peripherals are bad. No, the problem with peripherals and various items clinging to a laptop is that such a configuration flies in the face of being “lite” and mobile. Still, an entire universe of external goodies is available to your laptop, like an electronic cafeteria of digital delights. If you can find room in your laptop bag, go for it!
USB Expansion Options
Similar to a desktop computer, the primary way you expand your laptop’s universe is by adding USB peripherals. Whether your laptop has a single USB port or is festooned with USB ports like craters on the moon, your laptop’s options for expansion are nearly limitless.
Understanding the USB thing
Three pieces comprise the USB system:
- The USB port
- The USB cable
- The USB peripheral
Your laptop has one or more USB ports on its sides or rear. They may look like rectangular holes to you, perfect for inserting a Sucrets, but they’re USB ports. The newer USB C standard features an oval end, which connects in any orientation. Many laptops feature the USB C port in addition to the traditional, rectangular ports.
The ports are color-coded based on the USB standard they support as well as on other features offered. These colors are listed in Table 12-1. They are found inside the USB port opening. For optimum peripheral efficiency, match the color of the cable with the color on the port.
TABLE 12-1 USB Color Codes
Color |
Meaning |
|---|---|
White |
The port supports only the original USB 1.0 standard. |
Black |
The port supports the original USB 1.0 and USB 2.0 standards. |
Blue |
The port supports USB standard 3.0 and all previous standards. |
Red |
This USB 3.0 port also supplies power to charge a device. This port charges the device whether the laptop is turned off or not, though the laptop must be connected to power. |
Yellow |
This one is the same as a red USB port. |
The USB cable, like most cables in our space-time continuum, has two ends. The end that plugs into your laptop is the A end, which matches the USB port. The other end sports different sizes, such as the B end, shown in Figure 12-1, and also the mini-USB and micro-USB connectors used to attach various devices.
The cable features different ends so that you can’t plug a USB cable in backward, upside down, or sideways.
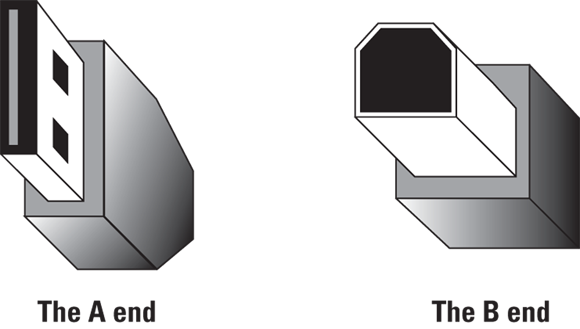
FIGURE 12-1: The A and B ends of a USB cable.
Finally, at the far end of the USB cable, lies the USB device itself. It can be any USB peripheral, including the entire pantheon of peripherals available to a desktop PC.
 The beauty of USB is that you can connect or disconnect peripherals without having to turn the laptop off or on or having to complete a complex setup or configuration. This is the number one reason why USB is so popular and why you use it to expand upon your laptop’s hardware abilities.
- A port is a “hole” in the computer’s case into which you plug something. The port is also the “smarts” that make useful whichever device you connect to the laptop.
- Not every USB device comes with its own USB cable. For example, USB printers are notorious for not including USB cables in the box. You must buy a separate USB cable.
- USB cables come in a variety of lengths, but they can be no longer than about 16 feet. And who needs to use a laptop with a USB gizmo sitting 16 feet away?
- The USB cable isn’t always necessary. Many USB devices are plugged directly into a USB port, such as a thumb drive or wireless adapter.
 Please don’t stick a Sucrets lozenge into a USB port.
- USB stands for Universal Serial Bus. The key word is Universal, like the movie studio, but in this case it means that the USB standard supports a vast array of gizmos.
 All USB devices, even the cables and the spot where the USB port lives on your laptop, sport the USB symbol, shown in the margin.
Attaching and removing a USB gizmo
A USB device is a snap to connect — literally. You don’t need to turn off your laptop, run a special program, or incant a spell in Latin. Just plug in the USB gadget and you're ready to go. The USB device adds its features to your laptop.
When you’re done with the USB device, unplug it. The only time this operation isn’t so easy is when detaching storage devices where your laptop is actively using the storage. See Chapter 9 for details on removing USB storage.
- Many USB devices generate a notification after they’re connected. The notification explains that software drivers are being installed, which allow Windows to access the device and, hopefully, make it useful.
- Storage devices generate an AutoPlay notification. See Chapter 9 for information.
- If the USB device has its own power switch, you must switch the thing on before the computer recognizes the peripheral.
- Some wireless USB gizmos still require a USB connection. You plug a teensy USB transceiver into the laptop, which allows communications to a mouse or another wireless peripheral.
- It’s okay to leave those tiny USB transceivers plugged into your laptop at all times. The only drawback is that they occupy a USB port, which is often a precious commodity on a laptop.
- Be sure to read the manual that comes with the USB peripheral to determine whether you need to install special software before plugging in the device or turning it on.
 The ability to plug and unplug USB devices without having to turn the computer off or on is known as hot swapping. It sounds risqué, but it's not.
Dealing with USB-powered devices
Quite a few USB doohickeys draw the electricity they need from the laptop's USB port. These USB-powered peripherals include external hard drives, cooling pads, and USB lamps.
The good news is that you don't need an extra cable, power supply, wall socket, or battery for a USB-powered device. The bad news is that these gizmos suck up the laptop's precious power juice. Generally speaking, when I’m using my laptop with a USB-powered device, the laptop is plugged into AC power.
- Though you’re free to use a USB-powered device when your laptop is running from battery power, keep a close eye on that battery meter. See Chapter 10 for tips.
- Many USB-powered devices demand that they be connected directly to the laptop or to a powered USB hub. The device won’t function when connected to a nonpowered USB hub. See the next section for information on powered USB hubs.
- Windows automatically enables USB power reduction when battery life becomes critical. This reduction means that any USB-powered peripherals are shut off when the battery gets low. Though this feature can be disabled, I don’t recommend doing so.
Using a USB hub
Expandability is one key to the USB port's popularity. It may not seem practical, but your laptop can have as many as 127 USB devices attached to it at any given time. Yes, all at once. Imagine dragging that chain of goodies through airport security! You’d win a medal. Or be detained.
A USB hub is nothing more than a USB device with more USB ports on it. You plug the hub into your laptop's USB port. Then you can plug additional USB devices into the hub, depending upon how many ports it has.
- If you get a USB hub for your laptop, look for a smaller, more portable, laptop-size model. It’s quaint — and more portable than the desktop, or full-size, USB hub.
- Two types of hubs are available: powered and unpowered. The powered hub must have its own power source. (It must be plugged into the wall.) Powered hubs are necessary in order to supply more power to certain USB devices.
- Some devices cannot be run from hubs, such as high-speed hard drives. In this case, the peripheral must be connected directly into the laptop’s USB port. Don't fret: A warning message appears and instructs you when such a thing happens.
 Keep your eye out for pass-through USB devices. For example, a USB keyboard may sport more USB ports on its sides, so you can plug the USB device into your laptop and then plug more USB devices into the first device. This way, you don't run out of USB ports.
- Every USB port on your laptop is considered part of the root port. The 127-device limitation is per root port, so if your laptop has two USB root ports, it can access as many as 254 USB devices. Golly.
Perusing potential USB goodies
I just checked with Google, the official source of all human knowledge, and it reports that over 14 gazillion different USB devices are available to attach to your laptop. Rather than list them all, I decided to present the most common and useful USB laptop peripherals in Table 12-2.
TABLE 12-2 Typical, Plain, Boring Uses for the USB Port
Device |
Typical Boring Use |
|---|---|
Phone, tablet, digital camera |
Grab photos from the device’s memory card and store them on your laptop. You can also do this directly, by removing the mobile device’s digital storage media, which is covered in Chapter 9. |
External storage |
Use external hard drives, optical drives, thumb drives, and media card readers for storage. See Chapter 9 for more information on external storage. |
Headphones |
Though your laptop most likely has its own headphone jack, USB headphones are far more sophisticated (though wireless headphones are the bomb). |
Network adapter |
Add wired networking to your laptop, but also Bluetooth, as covered later in this chapter. |
Printer |
Print stuff on paper. See Chapter 11 for printer fun. |
Legacy adapter |
Connect legacy (antique) dialup modem, serial, parallel, joystick, or other devices to your laptop. Employ this adapter to continue to use antique computer hardware with your laptop. |
Numeric keypad |
Quickly enter values without having to toggle the main keyboard between numeric and alpha modes. |
Scanner |
Do your document scanning in a portable manner, especially if you’re a lawyer. |
Little light |
Imagine! Plug it in, and it’s powered by the USB port. Furthermore, imagine it with a stiff-yet-twistable neck so that you can see the keyboard when you use your laptop in the dark. |
Game controller |
Control your little man, pilot your spaceship, or wield that sword of truth. |
Laptop cooler |
Set your laptop on it, which acts like a fancy pad. It contains a tiny, quiet fan that helps keep your laptop cool, and it runs from the power supplied by the USB port. |
Security device |
Use the USB port to power an alarm on a cable lock, or plug in to the USB port and unlock (or unscramble) the laptop's data. |
The Bluetooth Thing
Bluetooth refers to a wireless standard for connecting computer peripherals, as well as other, noncomputer devices. As long as your laptop is equipped with a Bluetooth radio, you can use various Bluetooth devices and gizmos with your laptop, including printers, keyboards, speakers, and automobiles.
- The advantage of Bluetooth is that it lets you connect wirelessly to a variety of peripherals without having to use a separate wireless adapter for each peripheral.
- Bluetooth began its existence as a wireless replacement for the old serial (RS-232) interface, popular with computers in the 1980s and 1990s.
Checking for Bluetooth
Before you can get all excited about using Bluetooth, you need to ensure that your laptop has a wireless Bluetooth radio. Not every laptop does. You have two ways to check for this feature.
![]() The first way is to look for the Bluetooth logo (shown in the margin) on your laptop. Bluetooth gizmos feature this logo, though your laptop may not.
The first way is to look for the Bluetooth logo (shown in the margin) on your laptop. Bluetooth gizmos feature this logo, though your laptop may not.
The second way is to use Windows. Follow these steps:
Open the Settings app.
Press the Win+I keyboard shortcut.
- Choose Devices.
- On the left side of the window, ensure that Bluetooth & Other Devices is chosen.
The right side of the window indicates whether Bluetooth is on and lists any paired Bluetooth peripherals, as shown in Figure 12-2.
As long as you see something similar to what’s shown in Figure 12-2, your laptop features a Bluetooth radio and it can connect with Bluetooth peripherals.
- If your laptop lacks a Bluetooth radio, you can easily add one: The teensy Bluetooth radio dongle easily plugs into a USB port. As a bonus, USB Bluetooth dongles are relatively inexpensive. They also install all their own software, so you don’t have to set up anything.
- When Bluetooth is available and configured, a Bluetooth notification appears on the taskbar, in the notification area (on the right). If it’s not readily visible, click the up-pointing chevron to see it. Click the Bluetooth notification to access commands on a pop-up menu.
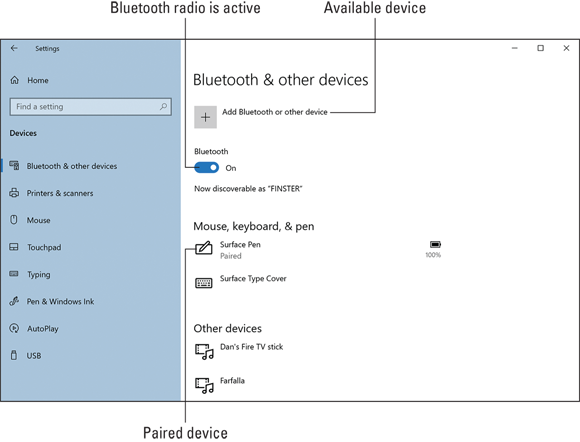
FIGURE 12-2: Bluetooth options.
Pairing with a Bluetooth gizmo
Thanks to its wireless nature, connecting your laptop with a Bluetooth peripheral involves a specific dance with a willing partner. The dance is called pairing, and it works like this:
Turn on the Bluetooth peripheral and ensure that it’s discoverable.
The Bluetooth device must broadcast its availability. For some devices, you turn it on. Other devices sport a Bluetooth button. When the Bluetooth peripheral is available, a lamp on the device blinks.
On your laptop, display the Bluetooth window in the Settings app.
Press Win+I to bring up the Settings app. Choose Devices. Choose Bluetooth & Other Devices from the left side of the screen. Refer to Figure 12-2.
- Ensure that the Bluetooth radio is active; set the toggle to the On position.
- Tap the button Add Bluetooth or Other Device.
Choose Bluetooth from the Add a Device List.
The laptop actively scans for available Bluetooth peripherals, listing them in the window.
Choose the desired Bluetooth device from the list.
Additional action may be required. For example, a Bluetooth keyboard requires you to type a PIN and press the Enter key on the peripheral.
Tap the Done button.
The device is paired and ready to use. It appears in the list of devices in the Settings app.
The good news is that after pairing is complete, the peripheral and your laptop remain connected. To stop using the device, turn it off. When you turn it on again, it’s instantly available.
- Bluetooth devices are discoverable for only a brief length of time; usually, two minutes. If you fail to pair during this period, you must make the device discoverable again.
- If you don’t plan to use the Bluetooth peripheral again, unpair it: Select the device in the Manage Bluetooth Devices window (refer to Figure 12-2). Click the Remove Device button. Click the Yes button to confirm.
- Unpairing is required only when you no longer want to use the Bluetooth peripheral with your laptop. Bluetooth is a monogamous standard; devices are paired for life, until they’re unpaired. No attorneys need be involved.
The Laptop Becomes a Desktop
If you plan to park your laptop in one place most or all of the time, you probably want to upgrade its teensy portable features with more-robust desktop counterparts. Specifically, I refer to the keyboard, monitor, and mouse. Any of these desktop-size items can be added to, and used with, a laptop. You can even take them with you, but don’t expect your laptop bag to fit beneath the seat in front of you on an airplane.
Using a full-size keyboard and mouse
If you miss the full size and action of a real PC keyboard, get one! Ditto for a full-size computer mouse: Plug the keyboard into your laptop’s USB port. Ditto for the mouse. You can start using the keyboard or mouse the second it's plugged in.
When you're done using the keyboard or mouse, unplug it. Once again, the laptop can roam free and untethered.
- Often, adding an external keyboard doesn’t disable the laptop's keyboard. Likewise, adding an external mouse might not disable the laptop’s touch pad. You can use both! But you're probably not crazy enough to do that.
- If all you're yearning for is to have a separate numeric keypad, consider getting only this peripheral. USB numeric keypads are available anywhere fine USB numeric keypads are sold.
Adding a monitor
Your laptop is readily able to handle two monitors: the laptop's own screen and an external monitor; almost all modern laptops feature an external monitor connector or port. The reason is so that you can use the external monitor or projector for making presentations. Even if you’re not making a presentation, you can use the monitor connector to add a larger or second monitor to your laptop computer system.
To add the external monitor, locate the monitor connector on your laptop’s edge. Plug in the monitor. (An adapter may be required.) Turn on the monitor.
After a successful connection, you may be prompted on how to use the second monitor, or the second monitor may duplicate the laptop’s screen. Options for how to use the external monitor are summoned by pressing the Win+P keyboard shortcut and illustrated in Figure 12-3. Here are their descriptions:
- PC Screen Only: Use only the laptop’s display; ignore the external monitor.
- Duplicate: In this mode, the laptop uses both displays at the same time, showing the same image on each. This option is chosen automatically when you attach an external monitor (or projector) to your laptop. It’s ideal for running a slide show presentation.
- Extend: This mode uses the second monitor to expand desktop real estate, combining both monitors into a single, larger desktop area.
- Second Screen Only: Use only the external monitor; the laptop’s screen is disabled (until the external monitor is disconnected).

FIGURE 12-3: The second display projection panel.
Further adjustment of the second monitor can be made in the Settings app: Right-click the desktop and choose Display Settings to get there quick. Use the icons presented to adjust each monitor’s resolution, orientation, and position relative to each other.
If your laptop seems to lack an external monitor port, such as mini-DP connector, use the USB C connector instead. This connector can be fitted with an adapter, which translates the versatile USB signal for use with a DisplayPort or HDMI cable. These adapters are inexpensive and a must-have item for any road warrior’s laptop bag.
Running the laptop with its lid closed
When you plan to keep your laptop in one spot and you’ve attached an external keyboard, mouse, and monitor, you can get away with closing the laptop’s lid and using only the full-size desktop computer input devices. I’ve set up my laptop that way on many occasions, especially when it’s been in only one spot for a long time.
To ensure that the laptop doesn’t sleep or hibernate when you close the lid, you must configure the system so that the laptop does nothing when the lid is closed. Follow these steps:
Tap the Windows key.
Up pops the Start menu.
Type the text change what closing the list does, or enough so that you see a matching item in the search results.
The Control Panel opens, displaying options for the power button and lid. These options are arranged in a grid: rows for the power button and lid and columns for On Battery and Plugged In.
From the Plugged In column, When I Close the Lid row, tap the menu button and choose Do Nothing.
You’re directing the laptop to do nothing (don’t shut down, sleep, or hibernate) when the laptop is plugged into a power source and you close the lid. This is the option you want.
I do not recommend that you choose this same option from the On Battery column. Ensure that the laptop either hibernates, sleeps, or shuts down when you close the lid on battery power.- Click the Save Changes button.
- Close the System Settings window.
Of course, you may have to open the laptop to turn it on, but after it’s on, you can close the lid and use the keyboard, monitor, and mouse just like you do on a desktop computer.