
Chapter 19
Internet Safety
IN THIS CHAPTER
![]() Locating security features
Locating security features
![]() Updating Windows
Updating Windows
![]() Protecting your laptop from malware
Protecting your laptop from malware
![]() Using Windows Firewall
Using Windows Firewall
![]() Avoiding virus risks
Avoiding virus risks
![]() Browsing the web privately
Browsing the web privately
![]() Disabling location settings
Disabling location settings
![]() Reviewing privacy options
Reviewing privacy options
They say that the Internet was designed to withstand a nuclear attack. Yet computer scientists apparently never anticipated antisocial teenage programmers who crave negative attention. If you are to participate in the goodness the Internet offers, you must defend your laptop from imminent peril.
Security Central
Without security, using your laptop on the Internet is like smearing your body with honey and walking through the bear cage at the zoo. Sure, you could get lucky, but why take the risk?
To help you thwart the bad guys, Windows offers a host of security tools. Fortunately, these tools aren’t all stored in one location, which I suppose would make sense. Then again, often the Windows operating system isn’t about making sense.
- A key part of laptop security is a healthy backup regimen. See Chapter 20.
- Though my bear cage example may be humorous, it’s actually quite true. People on the Internet do figuratively smear themselves with honey and walk into a bear cage. Oftentimes, it’s their own silly or misadvised decisions that lead to trouble on the Internet. See the nearby sidebar, “The social engineering threat.”
Viewing the Action Center
The first location for checking security issues is the Action Center. To view the Action Center in Windows 10, press the Win+A keyboard shortcut to swipe in from the far right edge of the screen.
The Action Center lists items requiring attention, such as updating software or checking the status of a failed backup. At the bottom of the Action Center lie the Quick Settings buttons, which provide shortcuts to common Windows features. Figure 19-1 illustrates the Action Center, though no important messages appear.
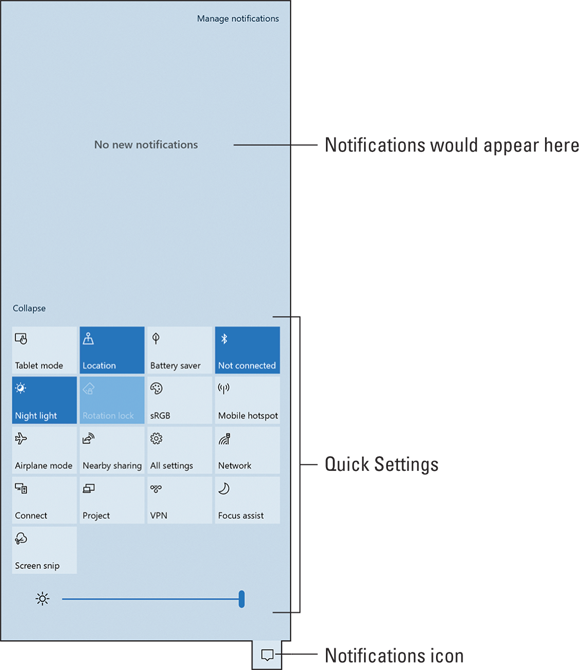
FIGURE 19-1: The Action Center.
Checking the Windows Security Center
A recent update to Windows 10 moved all security related features to a single location. (Well, almost all the features.) This location is called the Windows Security Center, shown in Figure 19-2.
![]() To access the security center, locate the Windows Security notification icon on the taskbar, as shown in the margin. Click this icon to display the Windows Security Center window. If the notification icon is hidden, click the chevron to the right of the notification area on the taskbar.
To access the security center, locate the Windows Security notification icon on the taskbar, as shown in the margin. Click this icon to display the Windows Security Center window. If the notification icon is hidden, click the chevron to the right of the notification area on the taskbar.
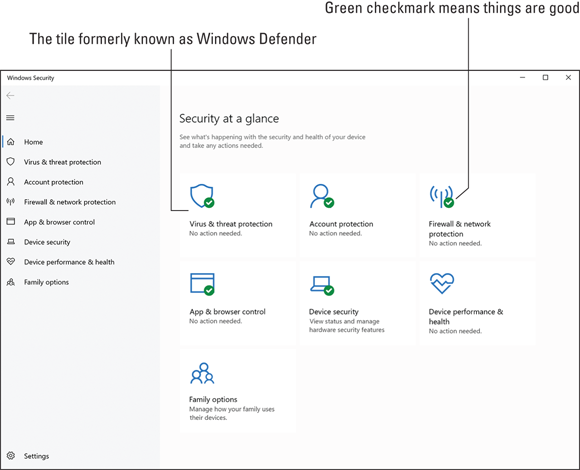
FIGURE 19-2: The Windows Security Center.
The Windows Security notification icon as well as the items in the Windows Security window feature tiny green check marks when no security issues are present. Otherwise, you see a yellow warning flag on the notification icon as well as on a specific tile in the Windows Security Center window. This yellow flag is your clue that an item needs attention: Click the flagged tile to receive more information and directions on what to do next.
- Not every warning in the Windows Security Center window is serious. For example, the App & Browser Control item offers issues specific to the Microsoft Edge browser. If you don’t use this browser, the issue is of no concern.
- The other location where you can find security related features is the Settings app, covered elsewhere in this chapter.
 The old Windows Defender (antimalware) app is now part of the Windows Security Center, shown as the Virus & Threat Protection tile. In older versions of Windows, Windows Defender was a separate program.
Keep Windows Up-to-Date
One key to your laptop’s software security is to ensure that you always have the most current version of Windows. This goal means installing the various updates and patches released by Microsoft to ensure that your laptop’s operating system has all the latest security information and can meet any known, current, or looming threats.
Checking the update status
In Windows 10, updates are applied automatically. You can delay a pending update to a more convenient time, though I recommend that you install it after you’re alerted — as long as you’re not about to board a plane or go somewhere remote. The goal is to install the update when you have both time and an Internet connection.
To check for a pending update, follow these steps:
- Press the Win+I keyboard shortcut to summon the Settings app.
Choose Update & Security.
Windows Update should be chosen on the left side of the Settings app window. If not, tap that item.
On the right side of the screen, click the Check for Updates button.
You are alerted to any pending updates that haven’t already been queued for the day.
If updates are waiting, click the Install button to download and configure them. When critical updates are done installing, you see a Restart button. Click it to complete the process, which takes only a few minutes.
- Some critical updates are installed automatically, even to the point of restarting the laptop for you. You see this type of automatic restart occur only if you leave your laptop on all the time. Otherwise, all restarts are prompted.
- You can avoid clicking the Restart button — for a brief time. Eventually, Windows installs the update itself, usually automatically when you restart or shut down the laptop.
Postponing an update
Updates are important, so install them as they appear. Microsoft is understanding, however, especially for a laptop that may need to avoid an update while you’re in an area with spotty Internet access or busy working or traveling and you don’t want to wait for an update.
To postpone an update, visit the Windows Update screen in the Settings app; refer to Steps 1 and 2 in the preceding section. Choose the item titled Pause Updates for 7 Days. Upon success, you see an urgent-looking Resume button appear, which you click to resume the normal update schedule.
The Malware Scourge
Worry not your weary head over the prospect of nasty programs descending from the Internet and infecting your laptop. That’s because Windows comes with an antivirus utility as part of the Windows Security Center. It protects against malware and spyware. It should be active and ready to work on your laptop.
- The Windows antimalware program is commonly known as Windows Defender. This is its original name, though now it’s officially called Virus & Threat Protection.
- Rather than worry, be cautious. Computer security mustn’t be taken lightly, even when using an antimalware program.
- If Internet security is really, really important to you, you can obtain third-party antivirus programs, such as the popular PC security suites from Norton and McAfee. These can be used in addition to the protection offered from Windows.
 Some legitimate antivirus programs are available for free on the Internet. And quite a few illegitimate antivirus programs lurk out there as well, some of which are actual viruses themselves. Therefore, I advise that you either pay for the third-party antivirus software or obtain it from a reputable source.
Doing a virus scan
Windows constantly checks memory and files for signs of malware and other nasty items. You need not do a thing — unless the laptop has been turned off a while and an automatic virus scan hasn’t been performed. If so, obey these steps:
Pop up the Start menu.
Press the Windows key on the keyboard.
- Type Windows Security to see a list of matching search results.
- From the list of matching items, choose the Windows Security Center app.
Click the Virus & Threat Protection tile.
You see the Virus & Threat Protection screen, illustrated in Figure 19-3.
Click the Quick Scan button.
Windows performs a quick scan of memory and files to ensure that no infections lurk undetected.
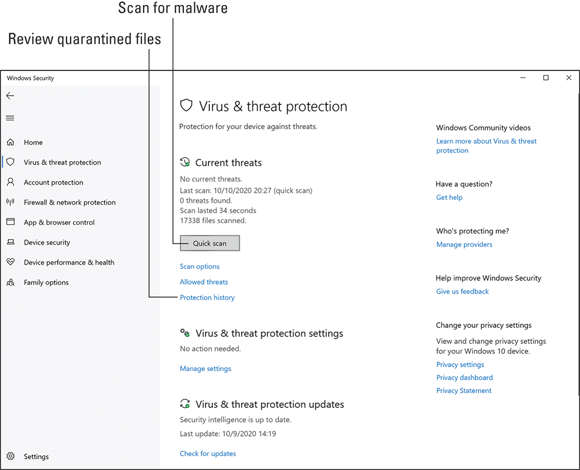
FIGURE 19-3: Windows Security Center antivirus.
If a suspicious file is located, it’s placed into quarantine. See the later section “Dealing with a quarantined file” for what to do next.
Most other items on the Virus & Threat Protection screen are configured automatically. You can review them at your leisure to understand and appreciate the protection Windows offers. These items include Ransomware Protection, which helps guard against malware that locks your computer with a payment required to unlock it.
 The malware most likely infected your system due to social engineering. See the sidebar “The social engineering threat,” earlier in this chapter.
- If you remain suspect about an infection yet the virus scan comes up empty, try running the scan again in Safe mode. See Chapter 21 for information about Safe mode.
Dealing with a quarantined file
When Windows antivirus protection locates a suspect file, it places it into quarantine. This placement doesn’t delete the file, but it does prevent the malware from doing its nasty deed. It also allows you to rescue falsely accused files from imminent peril.
To review quarantined files, follow these steps:
View the Virus & Threat Protection screen.
Refer to Steps 1 through 4 in the preceding section.
- Click the Protection History link.
- Ensure that Quarantined Items is selected.
Click the View Details button.
You see a list of any suspect files.
It’s okay to keep the files in the list; they do no further harm.
To rescue an incorrectly identified file, click to select it from the list and then click the Restore button. Please be extra certain that the file isn’t infected! Do an Internet search on the filename to see what others have discovered. (That’s how I once rescued a wrongly accused file.)
To remove actual infected files, select them in the list and then click the Remove All or Remove button. The infected files are obliterated and shall never harm your laptop.
Behind the Firewall
In the real world, a firewall is a specially constructed part of a building designed to impede the progress of a blazing inferno. The firewall acts as protection for whatever lies on the other side.
On your laptop, a firewall keeps nasty things on the Internet from either coming into or escaping out of your laptop. The firewall monitors the Internet’s virtual doors, or ports. Each port is an individual Internet connection, and at any time your laptop may have dozens of ports in use or available.
When a network program knocks on a port’s door, the firewall perks up and confirms that the program has permission to enter or leave. If not, a prompt appears, and you can decide for yourself whether to let the program in or out.
- The official name of the Windows Firewall utility is Windows Defender Firewall.
- Without a firewall in place, your computer is wide open to attack from any number of nasties on the Internet.
- The best firewall is a hardware firewall. Most network gateways (routers) come with this feature installed and are more than capable of defending your Internet connection, as well as all computers on the local network, from incoming attacks.
- A firewall cannot protect your computer from a virus. It may prevent the virus from replicating itself on other computers, but it doesn’t stop the virus from coming in. You should use both antivirus software and a firewall.
Finding the firewall
The Windows Firewall is configured to be on and working all the time. To view the status of the Windows Firewall, obey these steps:
Open the Windows Security Center app.
Click the Start button on the taskbar and type Windows Security. Choose the Windows Security app item from the search results.
- Choose Firewall & Network Protection.
The Windows Firewall window is rather plain. As long as each item shown in the window is On or active and no warnings appear, you’re good; Windows Firewall protection is active.
If any options on the Firewall & Network Protection screen are disabled, enable them: Choose the option and set the master control gizmo to the On position.
- The key to setting the level of protection offered by Windows Firewall is to properly configure the network to public or private. That configuration takes place when you first connect to the network, which is covered in Chapter 16.
- For a private network, the firewall is at its lowest setting. On public networks, the firewall is on full-bore.
Dealing with a firewall warning
Windows Firewall lets you know when suspicious Internet access takes place. Because Windows Firewall is paranoid, it flags a warning for Internet activity, both suspicious and suspect.
When Windows Firewall freaks out, a pop-up message appears, similar to the one shown in Figure 19-4. The message alerts you that either a program is attempting to access your computer from the Internet or a program on your computer is trying to access the Internet.
When the warning appears, read it. The name of the program is listed. In Figure 19-4, the Red Dead Redemption 2 game is attempting to connect with the Internet. In this instance, I started the program myself, and it does request Internet access. Therefore, the warning is expected: Click the Allow Access button when you recognize why a program has triggered the firewall warning. Otherwise, click the Cancel button. You’re safe.
- Take the firewall warning seriously! It’s not a panic situation, because nothing bad has happened. Yet! Still, don’t let yourself develop the habit of automatically clicking the Allow Access button.
- It may seem like you see a lot of firewall warnings, especially for a new computer or new network configuration. This bombardment of warnings passes as you choose which programs to allow or deny. After you train Windows Firewall awhile, the firewall alerts appear less frequently.
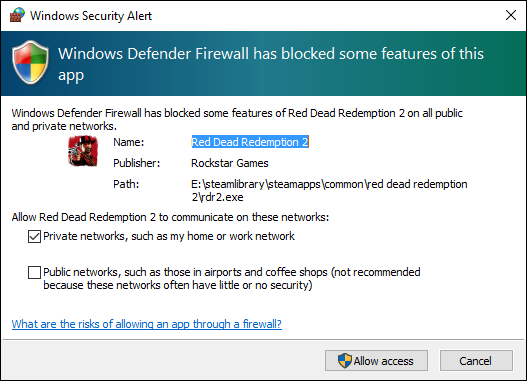
FIGURE 19-4: Is it okay for this program to access the Internet?
Safe and Private Browsing
Most web browsers feature tools that are useful for surfing the web without your having to worry whether anyone is snooping on you or trying to pull a fast one. These tools include private or incognito browsing, scanning for phony websites, and other tricks.
Browsing in secret
You can’t avoid it. No matter where you go on the Internet, your web browsing history is being tracked. The web page ads record which ads you click. Online shopping sites remember which products you look at. Information from social networking sites targets advertising based on your age, sex, and likes, and even your friends’ likes.
This type of snooping is nothing new. It’s just a more sophisticated way to gather consumer information than has been previously available. You can avoid being tracked by using a private browsing window.
- In the Windows 10 Edge browser, the feature is called Browsing InPrivate. To open a new InPrivate window, press Ctrl+Shift+N.
- If you use the Chrome web browser, open a new Incognito window by pressing Ctrl+Shift+N.
- Other web browsers feature similar, private windows. My guess is that Ctrl+Shift+N also brings up a secret browsing window in these programs as well.
The new, private browser window offers instructions on how it works. You browse in the window just as you would in a nonprivate window, though no cookies are tracked, cookies aren’t remembered, forms aren’t automatically filled in, and your website journeys aren’t recorded in the browser history.
The good news is that none of your actions in the private window is tracked — supposedly. You can browse without a record being made of where you went or what you did. Even so, some websites and advertising links monitor your laptop’s IP address, which is another way to track your activity.
End your private browsing session by closing the private window.
Purging your web browsing history
The web browser dutifully keeps track of every web page you’ve visited. The information is stored as your web browsing history. You can use the history to revisit web pages, create bookmarks, or see what your lying, cheating partner has been doing recently.
When you forget to use a private browsing window, you can review and purge the web page history. If you’re using Windows 10 and the Edge web browser, follow these steps:
Press the keyboard shortcut Ctrl+Shift+Del, where Del is the Delete key on the laptop’s keyboard.
The Clear Browsing Data panel appears. It’s chock-full of items that are recorded as you visit websites.
Ensure that the Browsing History item is selected.
It’s the only option you should zap; choose other items in the window at your own peril.
Click the Clear Now button.
History is gone and doomed to be repeated!
In the Chrome web browser, follow these steps to purge historical information:
Click the address box and type chrome://history.
Do not type a period after the word history.
- Press Enter to view the Chrome History screen.
- Click the check box by those web page items you want to purge.
Click the Delete button.
They’re gone.
To prevent the web browser from tracking your web page visits, you can use a private browsing window. See the preceding section.
Location Information
One feature popular in cell phones and tablets is the GPS radio. The radio uses global positioning system (GPS) satellites to discover its current location on Planet Earth. Laptops lack GPS radios (though this feature may arrive soon), but its absence doesn’t stop Windows from offering location services, similar to a mobile device.
Even though Windows recognizes that your laptop lacks a GPS radio, it can still guess your location and share that information with a variety of apps, place it on a photo, or share it with the Internet. If, like many mobile device users, you consider this type of sharing a security risk, I recommend that you disable Windows 10 location features. Follow these steps:
- Press Win+I to summon the Settings app.
- Choose Privacy.
- Choose Location from the left side of the window.
Click the Change button.
A teensy pop-up window appears with a single toggle switch.
- Set the master control to the Off position.
- Click outside the teensy pop-up window to dismiss it.
If you’d rather not disable all location information, you can select which apps or programs have access. At the bottom of the Location screen you find a list of apps that have requested to access the laptop’s location information. Set the master control by each app, on or off, to enable or disable the app from accessing location information.
General Security Settings
The Privacy screen in the Settings app is festooned with settings that affect you, what you do on your laptop, and how that information is shared with other entities. For example, did you know that Microsoft tracks what you do, type, or even say to your laptop and makes that information available to advertisers?
Yeah, that sucks.
I recommend shutting off many of the preset privacy options in the Settings app. Open the Settings app and choose Privacy. Peruse the following items as listed on the left side of the window:
General: Disable every item: advertising, websites, app launchers and so on. Many security experts have termed the features displayed on the General screen as spyware, pure and simple. Microsoft has no business knowing what you do on your laptop.
Location: See the preceding section.
Camera: Leave the master toggle on, but peruse the list of individual apps that desire camera access. Turn off an app if you don’t recognize why it would use the laptop’s camera. For example, Skype obviously uses the camera, so leave this app on. When in doubt, disable an app’s access to the camera.
Microphone: Follow the same rules on this screen as for the Camera screen. If an app such as Skype needs to use the laptop’s microphone, set its toggle to Yes. Otherwise, set the toggle to No.
Speech: If you don’t use Cortana, disable speech recognition. Even if you use Cortana, consider disabling this feature, which implies that the laptop’s microphone is always on and listening to — and recording — what you say.
Activity History: No one needs to know what you do with your laptop. Disable this feature: Uncheck all the boxes.
Other items on the Settings app’s Privacy screen also deal with items you may consider, well, private. My observation is that giving apps access to some information, such as contacts or calendar appointments, is okay. But if you find such information-sharing to be insecure, disable the item.