
Chapter 2
Exploring Your iPad
IN THIS CHAPTER
![]() See what’s needed to use your iPad
See what’s needed to use your iPad
![]() Turn on your iPad and use the multitouch screen
Turn on your iPad and use the multitouch screen
![]() Display and use the keyboard
Display and use the keyboard
![]() Switch between apps and adjust views
Switch between apps and adjust views
![]() Identify yourself to your iPad
Identify yourself to your iPad
![]() Discover the Control Center
Discover the Control Center
![]() Get to know the apps that are already installed
Get to know the apps that are already installed
Good news! Getting anything done on the iPad is simple when you know the ropes. In fact, using your fingers to do things is a very intuitive way to communicate with your computing device, which is just what the iPad is.
In this chapter, you turn on your iPad and then take your first look at the Home screen. You also practice using the onscreen keyboard, see how to interact with the touchscreen in various ways, learn how to use Touch ID or Face ID, get pointers on working with cameras, get an overview of built-in applications (more commonly referred to as apps), and more.
See What You Need to Use the iPad
You need to be able, at a minimum, to connect to the Internet to take advantage of most iPad features, which you can do using a Wi-Fi network (a network that you set up in your own home or access in a public place such as a library) or a cellular data connection from your cellular provider (if your iPad model supports cellular data).
You may want to have a computer so that you can connect your iPad to it to download photos, videos, music, or applications and transfer them to or from your iPad through a process called syncing (see Chapter 3 for more about syncing). An Apple service called iCloud syncs content from all your Apple iOS devices (such as the iPad or iPhone), so anything you buy on your iPhone that can be run on an iPad, for example, will automatically be pushed to your iPad. In addition, you can sync without connecting a cable to a computer using a wireless Wi-Fi connection to your computer.
Your iPad will probably arrive registered and activated, or if you buy it in a store, the person helping you can handle that procedure.
Turn On Your iPad for the First Time
When you’re ready to get going with your new toy, be sure you’re within range of a Wi-Fi network that you can connect with, and then hold the iPad with one hand on either side, oriented like a pad of paper. Plug the charging cable that came with your device (which kind depends on the iPad model you have) into your iPad and plug the other end into a USB port on your computer or into the charging block that came with your iPad, just in case you lose your battery charge during the setup process.
Now follow these steps to set up and register your iPad:
- Press and hold the Sleep/Wake button or Top button (depending on your iPad model) on the top of your iPad until the Apple logo appears. In another moment, a screen appears with a cheery Hello on it.
- Follow the series of prompts to make choices about your language and location, using iCloud (Apple’s online sharing service), and so on.
- After you deal with all the setup screens, a Welcome to iPad screen appears; tap Get Started to display the Home screen.
 If you set up iCloud during or after registering (see Chapter 3), updates to your operating system will be downloaded to your iPad without plugging it into a computer. Apple refers to this feature as PC Free, simply meaning that your device has been liberated from having to use a physical connection to a computer to get upgrades.
You can choose to have personal items transferred to your iPad from your computer when you sync the two devices using iTunes or Finder (depending on your computer’s operating system), including music, videos, downloaded apps, audiobooks, e-books, podcasts, and browser bookmarks. Contacts and Calendars are downloaded via iCloud, or (if you’re moving to iPad from an Android phone) you can download an app from the Google Play Store called Move to iOS (developed by Apple) to copy your current Android settings to your iPad. (See this support article from Apple for more info: https://support.apple.com/en-us/HT201196.) You can also transfer to your computer any content you download directly to your iPad by using iTunes, the App Store, or non-Apple stores.
Meet the Multitouch Screen
The iPad has more than one Home screen. By default, the first Home screen contains preinstalled apps, and the second contains a few more preinstalled apps. After those initial screens are fully populated with app icons, other screens are created to contain any further apps you download or sync to your iPad.
When the initial iPad Home screen appears (see Figure 2-1), you see a pretty background and two sets of icons.
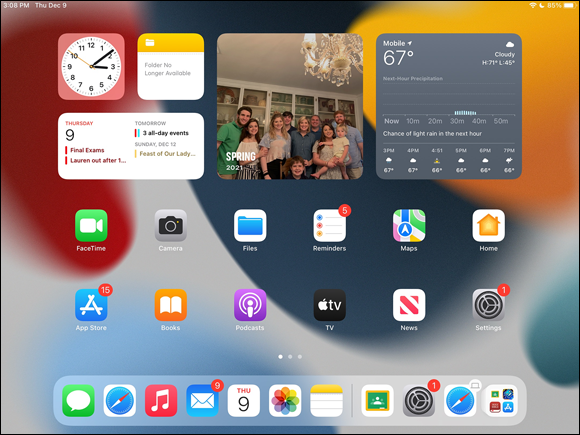
One set of icons appears in the Dock, along the bottom of the screen. The Dock contains the Messages, Safari, Music, Mail, Calendar, Photos, and Notes app icons by default, though you can swap out one app for another. The Dock appears on every Home screen and can even be accessed from within apps. You can add new apps to your iPad to populate additional Home screens, too.
Other icons appear above the Dock and are closer to the top of the screen. Some of these icons are for widgets, which are snippets of information from apps and other sources; see the section “Wonderful Widgets,” later in this chapter. Other icons above the Dock are for apps. I cover all these icons in the “Take Inventory of Preinstalled Apps” task, later in this chapter. Different icons appear in this area on each Home screen. You can also nest apps in folders, which gives you the possibility of storing almost limitless apps on your iPad. You are, in fact, limited — but only by your iPad’s memory.
Treat the iPad screen carefully. It’s made of glass and will break if an unreasonable amount of force is applied, or if it’s dropped, or if the kids in your life throw it against the wall (yes, that’s actually happened in our house).
The iPad uses touchscreen technology: When you swipe your finger across the screen or tap it, you’re providing input to the device just as you do to a computer using a mouse or keyboard. You hear more about the touchscreen in the next task, but for now, go ahead and play with it for a few minutes — really, you can’t hurt anything. Use the pads of your fingertips (not your fingernails) and try these tasks:
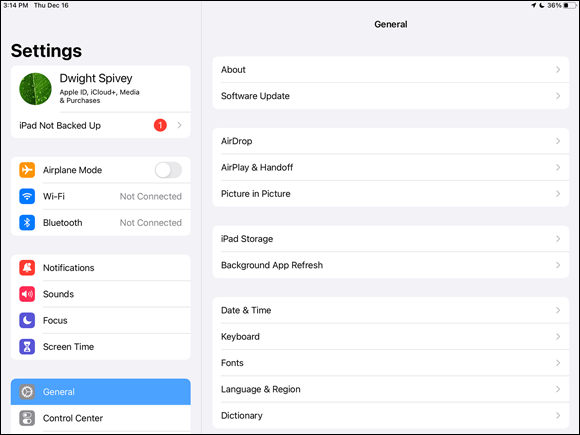
Tap the Settings icon. The various settings (which you read more about throughout this book) appear, as shown in Figure 2-2.
To return to the Home screen, press the Home button (if your iPad has one), or swipe up from the very bottom of the screen (if your iPad does not have a Home button).Swipe a finger from right to left on the Home screen. This action moves you to the next Home screen.
The little white dots at the bottom of the screen, above the Dock icons, indicate which Home screen is displayed.To experience the screen rotation feature, hold the iPad firmly while turning it sideways. The screen flips to the landscape (horizontal) orientation, if the app you’re in supports it.
To flip the screen back to portrait (vertical) orientation, just turn the device so that it’s oriented like a pad of paper again. (Some apps force iPad to stay in one orientation or the other.)
- Drag your finger down from the very top edge of the screen to reveal items such as notifications, reminders, and calendar entries. Drag up from the very bottom edge of the Home screen to hide these items.
- Drag your finger down from the top-right corner of the screen to display Control Center (containing commonly used controls and tools and discussed later in this chapter). Swipe up from the bottom of the screen to hide Control Center.
You can customize the Home screen by changing its wallpaper (background picture) and brightness. You can read about making these changes in Chapter 4.
Although the iPad’s screen has been treated to repel oils, you’re about to deposit a ton of fingerprints on your iPad — one downside of a touchscreen device. A soft cloth, like the one you might use to clean your eyeglasses, is usually all you need to clean things up, though. Having said that, third-party cleaners and screen protectors are available should you opt to use them; just be sure they’re compatible with your particular iPad model, because materials used in each model may vary.
Say Hello to Tap and Swipe
You can use several methods for getting around and getting things done with your iPad using its multitouch screen, including
- Tap once. To open an app, choose a field (such as a search box), choose an item in a list, use an arrow to move back or forward one screen, or follow an online link, simply tap the item once with your finger.
- Tap twice. Use this method to enlarge or reduce the display of a web page (see Chapter 9 for more about using the Safari web browser) or to zoom in or out in the Maps app.
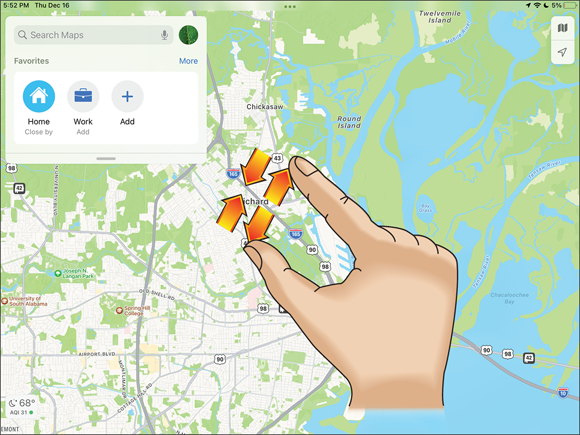
Pinch. As an alternative to the tap-twice method, you can pinch your fingers together or move them apart on the screen (see Figure 2-3) when you’re looking at photos, maps, web pages, or email messages to quickly reduce or enlarge them, respectively. This method allows you to grow or contract the image on the screen to a variety of sizes rather than a fixed size, as with the double-tap method.
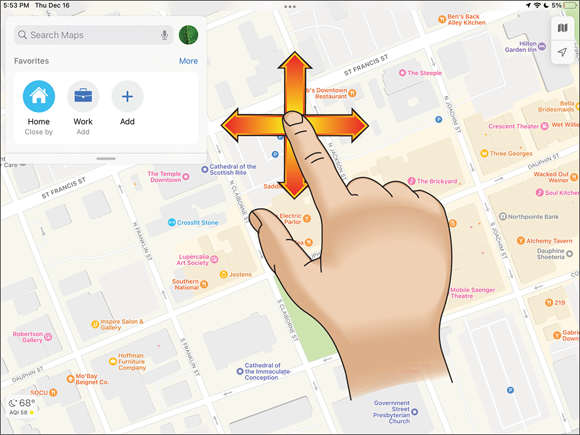
You can use the three-finger tap to zoom your screen to be even larger or use multitasking gestures to swipe with four or five fingers. This method is handy if you have vision challenges. Go to Chapter 4 to discover how to turn on this feature using Accessibility settings.- Drag to scroll (known as swiping). When you touch your finger to the screen and drag to the right or left, the screen moves (see Figure 2-4). Swiping to the left on the Home screen, for example, moves you to the next Home screen. Swiping down while reading an online newspaper moves you down the page; swiping up moves you back up the page.
- Flick. To scroll more quickly on a page, quickly flick your finger on the screen in the direction you want to move.
- Tap the status bar. To move quickly to the top of a list, web page, or email message, tap the status bar at the top of the iPad screen. (For some sites, you have to tap the status bar twice to get this to work.)
- Press and hold. If you’re using Notes or Mail or any other application that lets you select text, or if you’re on a web page, pressing and holding text selects a word and displays editing tools that you can use to select, cut, or copy and paste the text. You can also press and hold icons on the Home screen to view a list of options you can use with it.
When you rock your iPad backward or forward, the background moves as well (a feature called parallax). You can disable this feature if it makes you nauseous. From the Home screen, tap Settings ⇒ Accessibility ⇒ Motion and then tap and turn on the Reduce Motion setting by tapping the toggle switch (it turns green when the option is enabled).
You can try these methods now:
- Tap the Safari button in the Dock at the bottom of any iPad Home screen to display the web browser.
- Tap a link to move to another page.
- Double-tap the page to enlarge it; then pinch your fingers together on the screen to reduce its size.
- Drag one finger up and down the page to scroll.
- Flick your finger quickly up or down on the page to scroll more quickly.
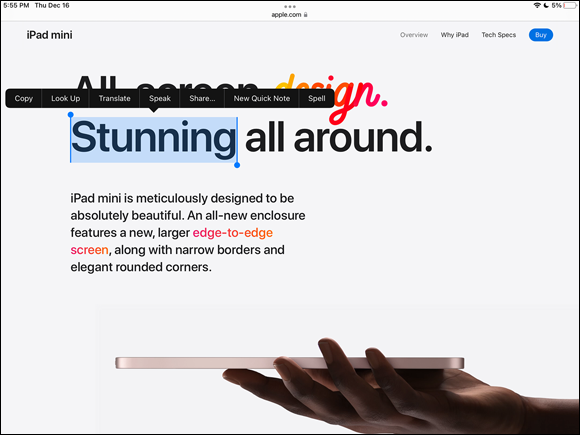
Press and hold your finger on a word that isn’t a link (links take you to another location on the web).
The word is selected, and the tools shown in Figure 2-5 are displayed. (You can use these tools to either get a definition of a word or copy it.)
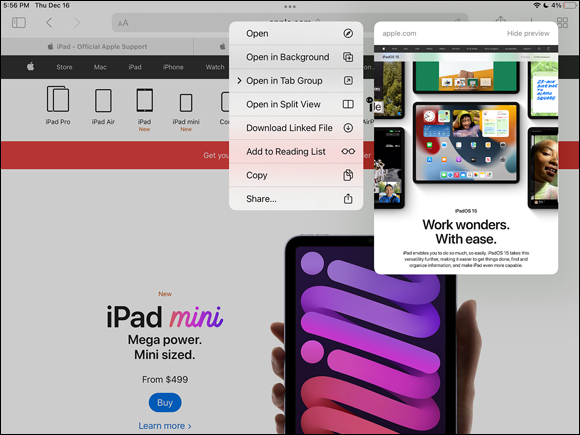
Press and hold your finger on a link or an image.
A menu appears (shown in Figure 2-6) with commands that you select to open the link or picture, open it in a new tab or window, open it in a new tab group, download a linked file, add it to your Reading List, copy it, or share it. If you press and hold an unlinked image, the menu also offers the Add to Photos command.
Tap outside the menu to close it without making a selection.
- Position your fingers slightly apart on the screen, and then pinch your fingers together to reduce the page; with your fingers already pinched together on the screen, move them apart to enlarge the page.
- Press the Home button or swipe up from the bottom of the screen (depending on your iPad model) to go back to the Home screen.
Introducing App Library
App Library is an organizational tool that houses every app on your iPad and organizes them automatically, according to categories (defined by Apple). This tool allows you to hide apps from your Home screens, reducing the number of them that you have to scroll through to find an app. You can even hide entire Home screens, too! And if you want to display the apps or Home screens again, it’s simple to do so. Follow these steps to get around in App Library:
Swipe from right to left on any Home screen and continue to swipe until the App Library screen appears.
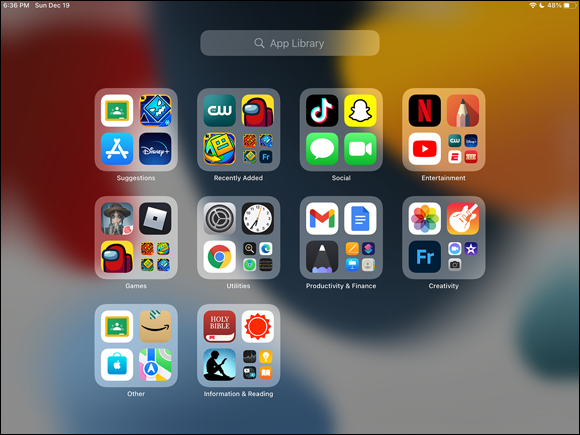
App Library (shown in Figure 2-7) always resides on the screen immediately following the last Home screen.
App Library organizes apps according to categories, such as Suggestions, Recently Added, Social, Utilities, and Information & Reading. Note that each category displays three larger app icons and four smaller app icons, with the exception of Suggestions, which displays four larger icons.
- Tap one of the large apps to open it. When finished, press the Home button or swipe up from the bottom of the screen to exit the app and return to the App Library screen.
- Tap one of the smaller apps to expand the category, and then tap the app you want to open. Tap near the top or bottom of the screen when viewing an expanded category to return to the App Library’s main screen.
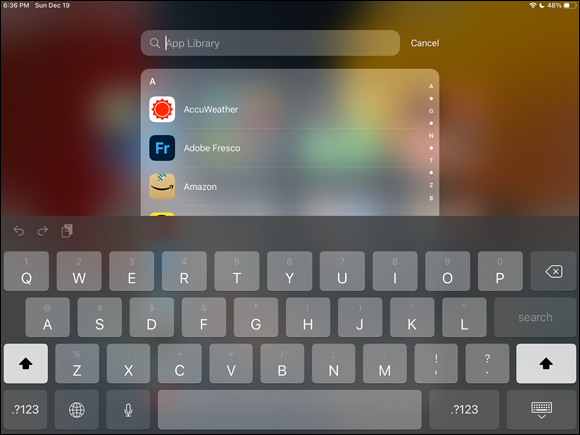
- Tap the search field at the top of App Library to see all apps listed alphabetically, as shown in Figure 2-8. To find a specific app, type its name using the keyboard.
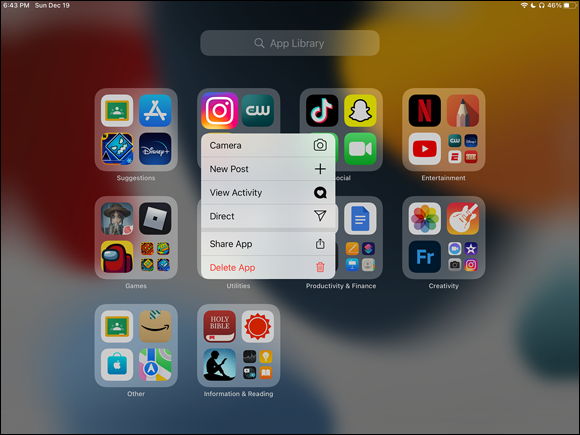
To perform a quick action on an app icon in App Library, press and hold an app icon to open the quick actions menu, the contents of which will vary depending on which options the app offers.
For example, Figure 2-9 shows the Instagram quick actions menu, which offers some options that aren’t available in the Camera app’s quick actions menu.
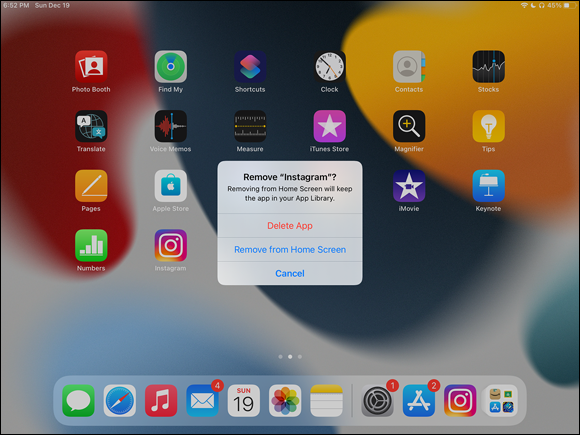
- To remove an app from your Home screen (leaving it in App Library) or delete it from your iPad, press and hold an app’s icon on the Home screen until the quick actions menu appears. Tap Remove App and then tap one of the selections shown in Figure 2-10. Tap Delete App to delete the app from your iPad altogether, or tap Remove from Home Screen to remove the app from the Home screen but retain it in App Library.
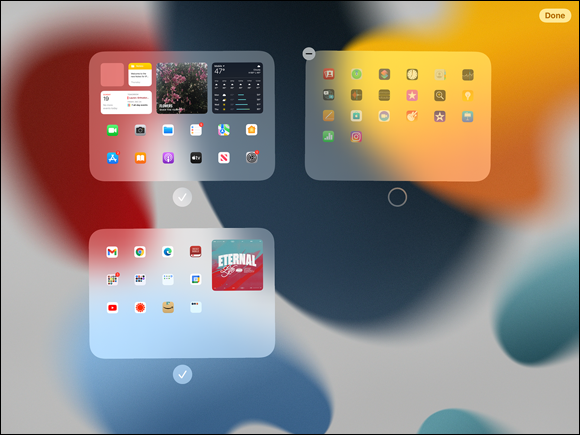
To hide an entire Home screen, press and hold any area on a Home screen until all the icons begin to jiggle. Tap one of the small white dots just above the Dock to view thumbnails of each of your Home screens, as shown in Figure 2-11. Tap the circle below a Home screen to hide or display it. (A visible Home screen displays a check mark in the circle.) Tap Done when you’re finished.
The Home screen remains in App Library, and you can display it again later.
The Dock
The Dock at the bottom of your iPad’s screen houses apps you use most often. You can remove or add apps from it simply by dragging and dropping their icons in or out of the Dock. You can also reorder icons within the Dock using the same drag-and-drop method. To drag and drop, press and hold an app icon until it pulsates (essentially tagging it to your finger) and then drag to a new location and drop it by removing your finger from the screen.
The Dock is divided between left and right sides by a thin gray line. The icons on the right side of the Dock are for those you use often but don’t keep in the Dock at all times. This makes it easier to access these apps while you’re using them more heavily. You can enable or disable this behavior by going to Settings ⇒ Home Screen & Dock and toggling the Show Suggested and Recent Apps in Dock switch to On (green) or Off.
Display and Use the Onscreen Keyboard
The built-in iPad keyboard appears whenever you’re in a text-entry location, such as a search field or a text message. Follow these steps to display and use the keyboard:
- Tap the Notes icon on the Home screen to open the Notes app.
- Open a note to work in:
- Tap the New Note icon in the top-right to create a new note.
- If you’ve already created some notes, tap one to display the page and then tap anywhere on the note.
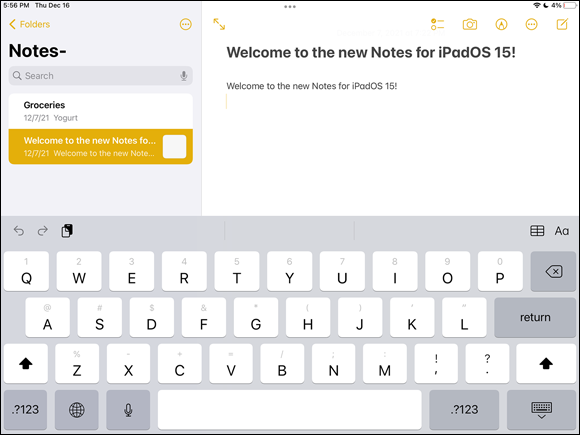
- Type a few words using the keyboard, as shown in Figure 2-12.
To make the keyboard display as wide as possible, rotate your iPad to landscape (horizontal) orientation. (If you’ve locked the screen orientation in Control Center, you have to unlock the screen to do this; just swipe down from the right corner of the screen to open Control Center, and then tap the Lock icon)
QuickType provides suggestions above the keyboard as you type. You can turn this feature off or on by pressing and holding either the Emoji (the smiley face) or International icon (looks like a globe) on the keyboard to display a menu. Tap Keyboard Settings and toggle the Predictive switch to turn the feature to Off or On (green). To quickly return to Notes from Keyboard Settings, tap the word Notes in the upper left of your screen.
Keyboard shortcuts
After you open the keyboard, you’re ready to use it for editing text. You'll find a number of shortcuts for editing text:
If you make a mistake while using the keyboard — and you will, especially when you first use it — tap the Delete key (it’s near the p key, with the little x on it) to delete text to the left of the insertion point.
To type a period and space together at the same time, just double-tap the spacebar.- To create a new paragraph, tap the Return key (just like the keyboard on a Mac, or the Enter key on a PC’s keyboard).
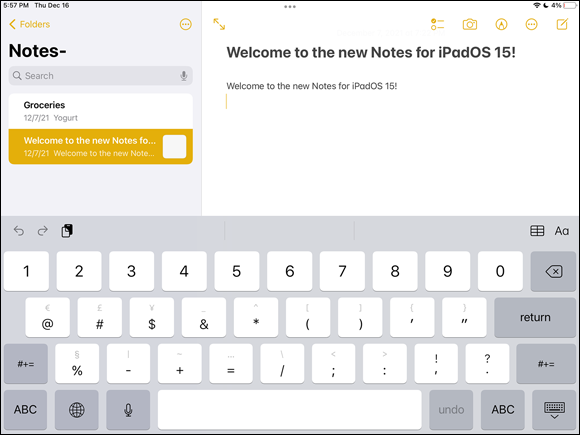
To type numbers and symbols, tap the number key (labeled .?123) on the left side of the spacebar (refer to Figure 2-12). The characters on the keyboard change (see Figure 2-13).
If you type a number and then tap the spacebar, the keyboard returns to the letter keyboard automatically. To return to the letter keyboard at any time, simply tap the key labeled ABC on the left side of the spacebar.
You can easily access an alternative character on a key by tapping and dragging down on the key. For example, if you need an exclamation mark (!), simply tap and drag the comma (,) key downward, and an exclamation mark will be inserted (because it’s the alternate character on the comma key).- Use the Shift key (it’s a wide, upward-facing arrow in the lower-left corner of the keyboard) to type capital letters:
- Tapping the Shift key once causes only the next letter you type to be capitalized.
- Double-tap (rapidly tap twice) the Shift key to turn on the Caps Lock feature so that all letters you type are capitalized until you turn off the feature.
Tap the Shift key once to turn off Caps Lock.
You can control whether Caps Lock is enabled by opening the Settings app, tapping General and then Keyboard, and toggling the switch called Enable Caps Lock.
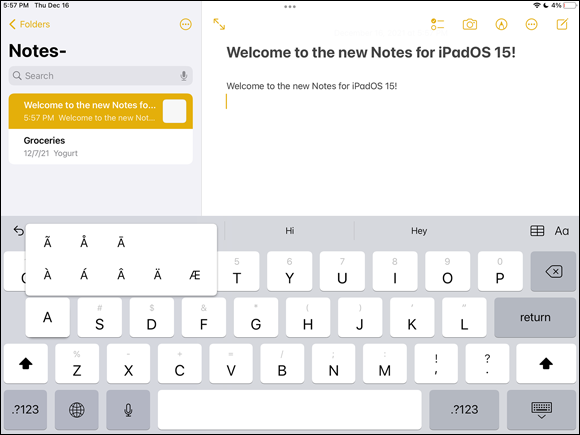
To type a variation on a symbol or letter (for example, to see alternative presentations for the letter A when you press the A key on the keyboard), hold down the key; a set of alternative letters/symbols appears (see Figure 2-14).
This trick works with only certain letters and symbols.Tap the smiley-faced Emoji button to display the Emoji keyboard containing symbols that you can insert, including numerical, symbol, and arrow keys, as well as a row of symbol sets along the bottom of the screen.
Tapping one of these displays a portfolio of icons from smiley faces and hearts to pumpkins, cats, and more. Tap the ABC button to close the Emoji keyboard and return to the letter keyboard.
A small globe symbol appears instead of the Emoji button on the keyboard if you’ve enabled multilanguage functionality in the iPad Settings app.- Press the Home button or swipe up from the bottom of the screen (iPad Pro models only) to return to the Home screen.
You can buy a Smart Keyboard Folio to go with iPad Pro models, or a Smart Keyboard for iPad Air and iPad. This physical keyboard from Apple attaches to your iPad and allows both power and data exchange. The connection for your keyboard is magnetic, so it’s a snap to put it and the iPad together.
QuickPath
QuickPath allows you to quickly zip your finger from key to key to quickly spell words without ever lifting your finger from the screen. For example, spell the word path by touching p on the keyboard and then quickly moving to a and then t and then h. Ta-da! You’ve spelled path without leaving the screen.
Use the Small Keyboard
The small keyboard feature allows you to shrink the keyboard to make more of the rest of the screen visible and to assist with one-handed typing. Open an application such as Notes in which you can use the onscreen keyboard and then follow these steps:
- Tap an entry field or page to display the onscreen keyboard.
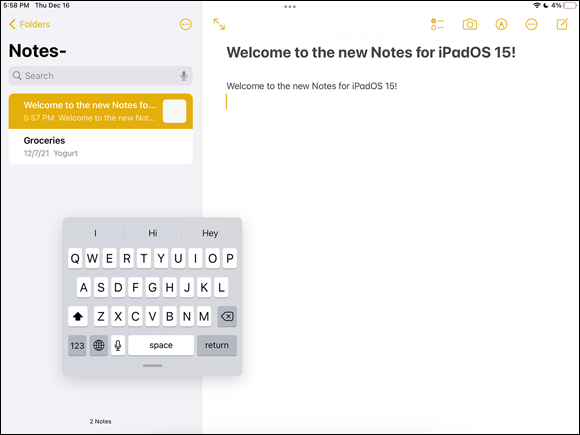
- Spread two fingers apart, place them on the keyboard, and then quickly pinch your fingers together on the keyboard to shrink it, as shown in Figure 2-15. (This feature can be finicky, so you may have to try it a few times.)
- Now hold the iPad with a hand on either side and practice using your thumbs to enter text. You may also move the small keyboard around the screen by tapping and dragging the dark-gray handle at the bottom of the keyboard (under the spacebar).
- To restore the original keyboard, pinch two fingers together, place them on the keyboard, and then quickly spread them apart.
Be sure to double-check that you didn’t inadvertently type unnecessary characters in your text when pinching.
Flick to Search
The Search feature in iPadOS helps you find suggestions from the web, Music, iTunes, and the App Store as well as suggestions for nearby locations and more. Here's how to use Search:
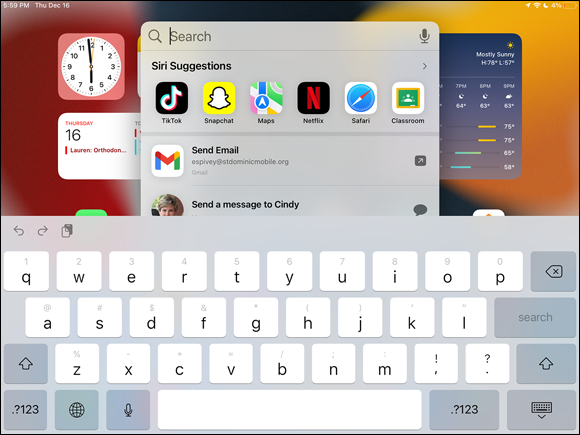
- Swipe down on any area of any Home screen (except the far edges) to reveal the Search feature (see Figure 2-16).
Begin entering a search term.
In the example in Figure 2-17, after I typed the word coffee, the Search feature displayed maps and other search results. As you continue to type a search term or phrase, the results narrow to match it.
- Scroll down to view more results.
- Tap an item in the search results to open it in its appropriate app or player.

Easily Switch Between Apps
iPadOS 15 lets you easily switch from one app to another without closing the first one and returning to the Home screen. With iPadOS 15, you accomplish this task by previewing all open apps and jumping from one to another; you quit an app by simply swiping upward (apps you’ve opened remain open in the background unless you quit them this way). To find out the ropes of basic app switching, follow these steps:
- Open the App Switcher by doing one of the following, depending on your iPad model:
- Press the Home button twice.
- Swipe up from the bottom edge of any screen with one finger, pause in the middle of the screen, and then lift your finger.
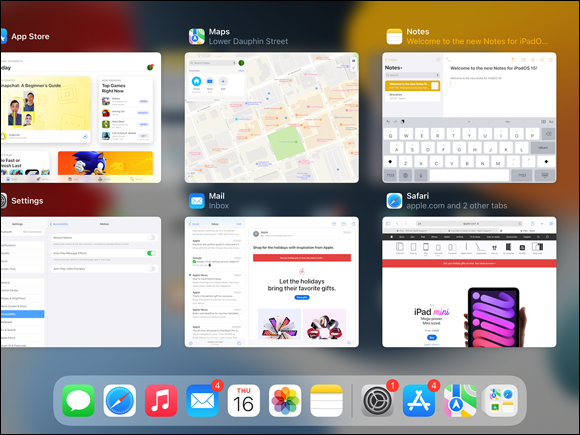
- The App Switcher appears (see Figure 2-18).
- To locate another app that you want to switch to, flick to scroll to the left or right.
- Tap an app to open it.
Press the Home button once or swipe up from the bottom of the screen (depending on your iPad model) to return to the app that you were working in.
Use Slide Over and Split View
iPadOS 15 allows you to be more productive than ever before with your iPad with features like Slide Over and Split View.
Slide Over lets you view one app in a floating panel, while viewing and working with other apps behind it. Split View allows two apps to share the screen between them, splitting the screen so that one app is on the left and the other is on the right. You can even adjust the amount of space each app is allocated by dragging a divider between them.
Starting with Slide Over
To use the Slide Over feature, follow these steps:
- From within an app you’re already using, swipe up from the bottom edge of the screen to open the Dock.
- Touch the icon of the app you want in the Dock to slide over the app you’re already working in, hold it for a brief moment, and then drag it above the Dock.
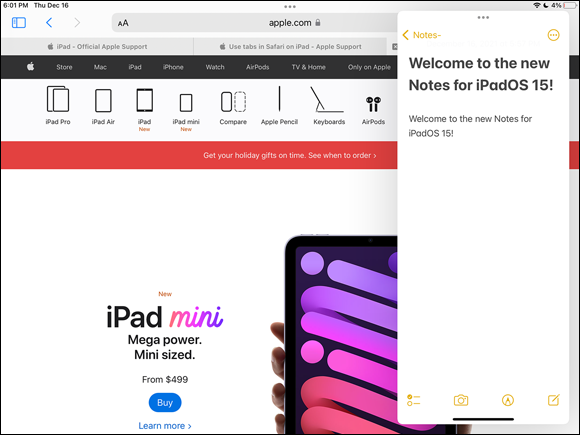
- The second app will open “floating” above the first app; it’s now in Slide Over mode, as illustrated with Notes and Safari in Figure 2-19.
- Simply tap the Home button or swipe up from the bottom of the screen (depending on your iPad model) to close Slide Over. You can also tap and hold the top of the floating app and then slide it off the screen to the right or left.
Moving to Split View
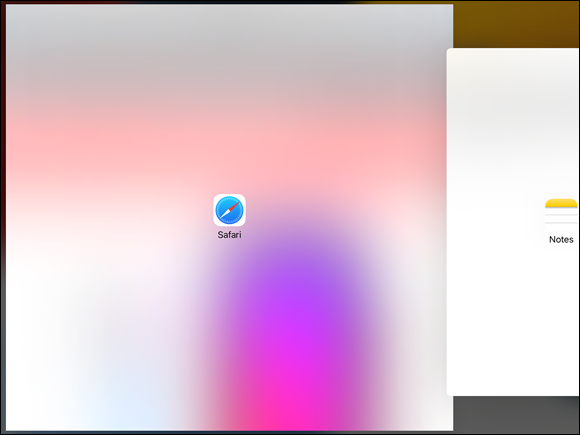
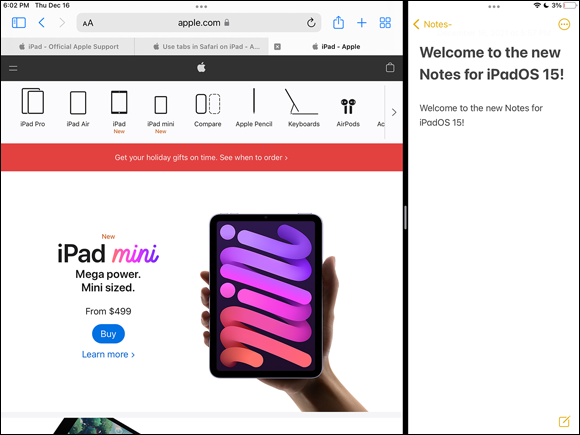
If you want to use both apps at the same time, you can move on to Split View. With Slide Over open, tap and drag the small gray dots at the top of the floating window toward the edge of the screen to open Split View, as shown in Figure 2-20. Simply tap the Home button or swipe up on one of the apps to exit Split View.
You can also move between Slide Over, Split View, and even Full Screen, by tapping the three gray dots at the top of a window and then tapping the icon for one of the aforementioned options.
While you’re in Split View, you can drag the heavy black divider (see Figure 2-21) left or right to change the sizes of the panes, or you can have equal space for both apps. Both apps are fully functional, although in some special cases, the app may not show certain noncritical elements to adjust to the narrower width of the split view when compared to the full screen.
You can drag and drop items between apps in Slide Over and Split View. For example, with Photos and Notes open, drag and drop a picture from Photos into a note in the Notes window. Another example might be dragging a link from a text document into the Safari web browser to open it.
Examine the iPad Cameras
iPads have front- and back-facing cameras. You can use the cameras to take still photos (covered in more detail in Chapter 14) or shoot videos (covered in Chapter 15).
For now, take a quick look at your camera by tapping the Camera app icon on the Home screen. You can use the controls on the screen to take pictures and video, switch between front and rear cameras, turn the flash on and off, and so much more. See Chapters 14 and 15 for more detail about using the iPad cameras.
Discover Control Center
Control Center is a one-stop screen for common features and settings, such as connecting to a network, increasing screen brightness or volume, and more. Here's how to use it:
- To display Control Center, swipe down from the upper-right corner of the screen. The Control Center screen appears to the right.
- In Control Center (highlighted in Figure 2-22), tap a button or press and drag a slider to access or adjust a setting.
- After you make a change, tap anywhere on the screen outside of Control Center to exit it.
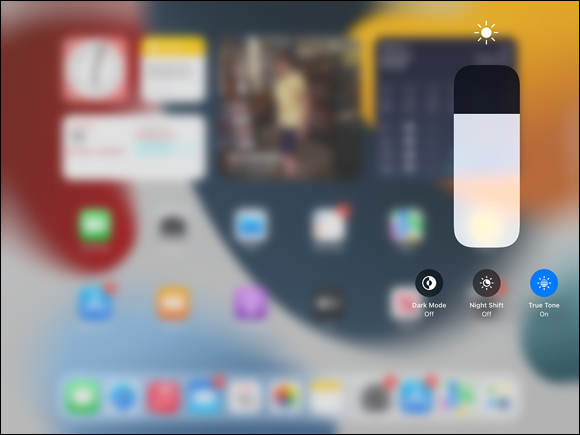
Some options in Control Center are hidden from initial view but may be accessed by tapping and holding a button in Control Center. For example, press and hold on the Brightness slider to reveal the True Tone, Dark Mode, and Night Shift buttons (as shown in Figure 2-23).
Try pressing and holding other buttons in Control Center to see what other options are waiting for you to discover. If you press and hold an item and its icon just bounces, no further options are available for the item.

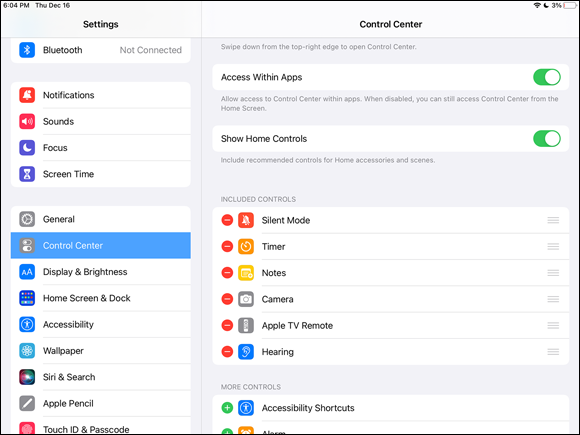
iPadOS 15 allows you to customize Control Center (a feature I love):
- Tap Settings.
- Tap Control Center and take a gander at the items in the Included Controls and More Controls sections (see Figure 2-24).
- Remove items from Control Center by tapping the minus sign (–) to the left, and then tap the Remove button that appears to the right.
- To add an item to Control Center, tap the plus sign (+) to the left. You’ll see the item in Control Center the next time you visit it. Don’t forget to press and hold an item to reveal any extras the item may afford.
Understand Touch ID
Certain iPad models sport a feature called Touch ID, which allows you to unlock your iPad by touching the Home button or Top button (depending on the model). The button contains a sophisticated fingerprint sensor. Because your fingerprint is unique, this feature is one of the most foolproof ways to protect your data.
If you’re going to use Touch ID (it’s optional), you must educate the iPad about your fingerprint on your finger of choice by tapping Settings ⇒ Touch ID & Passcode, entering your passcode, and choosing what to use Touch ID for — for example, unlocking the iPad, using Apple Pay (Apple’s electronic wallet service), or making purchases from the App Store and the iTunes Store. You can change these preferences anytime you like.
Then, if you did not set up a fingerprint previously or you want to add another one, tap Add a Fingerprint from inside Touch ID & Passcode. Follow the instructions and press your finger lightly on the Home button several times to allow Touch ID to sense and record your fingerprint. (You will be guided through this process and told when to touch and when to lift your finger.) With the iPad Unlock option turned on, press the power button to go to the lock screen and touch the Home button or Top button. The iPad unlocks. If you chose the option for using Touch ID with Apple Pay or for purchasing an item in the Apple stores, you simply touch your finger to the Home button or Top button rather than enter your Apple ID and password to complete a purchase.
Take a Look at Face ID
Many iPad models use a different — and very cool — method of authenticating a user: Face ID. Face ID uses your iPad’s built-in cameras and scanners to scan your face and save a profile of it. It then remembers the information and compares it to whoever is facing the iPad. If the face doesn’t match the profile, the person can’t access the iPad (unless they know and use your passcode, which you have to set up to use Face ID). Face ID is so advanced that it can even work in total darkness.
To set up Face ID:
- Go to Settings and tap Face ID & Passcode.
- Tap Set Up Face ID.
- Hold the iPad in front of your face (in portrait mode, not landscape).
- Tap the Get Started button and then follow the prompts to slowly move your head in a complete circle. If you have difficulty moving your head, tap the Accessibility Options button at the bottom of the screen and follow the prompts from there.
- Tap Continue and follow the prompts to perform the circle step again.
- Tap Done when finished.
The next time you want to use your iPad, simply hold it up in front of you, swipe up from the bottom of the screen when the lock icon unlocks, and you’ll jump right into the Home screen or whatever app you were last using.
For more information on using Face ID and its capabilities, visit https://support.apple.com/en-us/HT208109.
Lock Screen Rotation
Sometimes you don’t want your screen orientation to flip when you move your iPad around. Use these steps to lock the iPad into portrait orientation (narrow and tall, not low and wide):
- Swipe down from the upper-right corner of any screen to open Control Center.
- Tap the Lock Screen button. (It’s the button that looks like a padlock with an arrow encircling it.)
- Tap anywhere on the screen outside Control Center to exit it.
Perform the steps again to unlock the screen, if desired.
Explore the Status Bar
Across the top of the iPad screen is the status bar. Tiny icons in this area can provide useful information, such as the time, battery level, and wireless-connection status. Table 2-1 lists some of the most common items you find on the status bar.
TABLE 2-1 Common Status Bar Icons
Icon | Name | What It Indicates |
|---|---|---|
| Wi-Fi | You’re connected to a Wi-Fi network. |
| Activity | A task is in progress — a web page is loading, for example. |
| Time | You guessed it: You see the time. |
| Screen Rotation Lock | The screen is locked in portrait orientation and doesn’t rotate when you turn the iPad. |
| Do Not Disturb | Your iPad’s communications are disabled during scheduled times. |
| Battery Life | This shows the charge percentage remaining in the battery. The indicator changes to a lightning bolt when the battery is charging. |
If you have GPS, cellular (if your iPad supports it), Bluetooth service, or a connection to a virtual private network (VPN), a corresponding symbol appears on the status bar whenever a feature is active. (If you don’t already know what a virtual private network is, there’s no need to worry about it.)
Wonderful Widgets
Widgets are snippets of information, such as the weather and calendar appointments, that are provided at a glance so that you don’t have to open individual apps. You can add widgets to any Home screen.
To add a widget:
- Press and hold down on any Home screen until all the icons are jiggling.
- Tap the plus sign (+) in the upper-left corner of the screen.
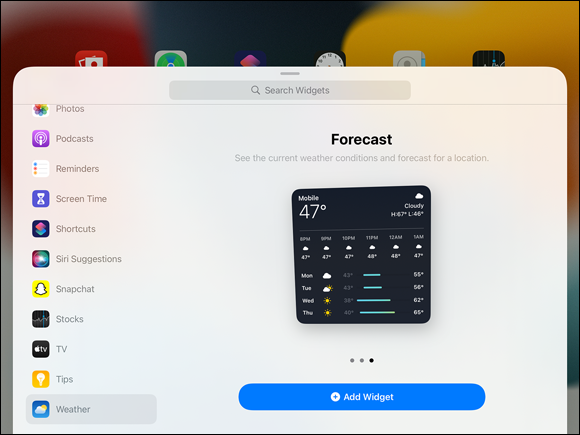
- When the list of widgets opens, scroll through and tap the widget you want to add, or use the Search Widgets field at the top to find a specific widget.
- If the widget has several styles (as indicated by dots at the bottom of the screen), like Forecast in Figure 2-25, swipe right or left to see those styles. Then tap to select one.
Tap the blue Add Widget button.
You can move your widget to another location by dragging it, or remove it and start over by tapping the minus sign (–) button in the upper-left corner of the widget.
- When you’re finished, tap Done in the upper right.
Take Inventory of Preinstalled Apps
The iPad comes with certain functionality and applications — or apps, for short — built in. When you look at the Home screen, you see icons for each app. This task gives you an overview of what each app does. (You can find out more about every one of them as you read different chapters in this book.)
By default, the following icons appear in the Dock at the bottom of every Home screen (refer to Figure 2-1), from left to right:
- Messages: If you love to instant message, the Messages app comes to the rescue. You can engage in live text- and image-based conversations with others on their phones or other devices that use email. You can also send video or audio messages.
- Safari: You use the Safari web browser to navigate on the Internet, create and save bookmarks of favorite sites, and add web clips to your Home screen so that you can quickly visit favorite sites from there. You may have used this web browser (or others, such as Google Chrome) on your desktop computer.
- Music: Music is the name of your media player. Although its main function is to play music, you can use it to play other audio files, like audiobooks, as well.
- Mail: Use this application to access email accounts that you have set up. You can use tools to move among a few preset mail folders, read and reply to email, and download attached photos to your iPad. Read more about email accounts in Chapter 10.
- Calendar: Use this handy onscreen daybook to set up appointments and send alerts to remind you about them.
- Photos: Organize pictures in folders, send photos in email, use a photo as your iPad wallpaper, and assign pictures to contacts. You can also run slide shows of your photos, open albums, pinch or unpinch to shrink or expand photos, and scroll photos with a simple swipe.
- Notes: Enter text, format text, or cut and paste text and objects (such as images) from a website into this simple notepad app.
Apps with icons above the Dock on the Home screen include the following:
- FaceTime: Engage in phone calls using video of the sender and receiver.
- Camera: The Camera app is Control Center for the still and video cameras built into the iPad.
- Files: This app allows you to browse files that you’ve stored not only on your iPad but also on other services, such as iCloud Drive, Google Drive, Dropbox, and the like.
- Clock: Display clocks from around the world, set alarms, and use timer and stopwatch features.
- Maps: View classic maps or aerial views of addresses and get directions from one place to another whether traveling by car, foot, or public transportation. You can even get your directions read aloud by a spoken narration feature.
- TV: This media player is similar to Music but specializes in playing videos, and it offers a few features specific to this type of media, such as chapter breakdowns and information about a movie’s plot and cast.
- Contacts: In this address-book feature, you can enter contact information (including photos, if you like, from your Photos or Cameras app) and share contact information by email. You can also use the search feature to find your contacts easily.
- Reminders: This useful app centralizes all your calendar entries, creates alerts to keep you on schedule, and allows you to create to-do lists.
- News: News is a customizable aggregator for stories from your favorite news sources.
- iTunes Store: Tapping this icon takes you to the iTunes store, where you can shop ’til you drop (or until your iPad battery runs out of juice) for music, movies, TV shows, and audiobooks and then download them directly to your iPad. (See Chapter 11 for more about how the iTunes Store works.)
- App Store: Buy and download apps that do everything from enabling you to play games to building business presentations. Many of these apps and games are free!
- Books: The Books app (formerly known as iBooks) is bundled with the iPad out of the box. Because the iPad has been touted as being a good small screen e-reader — a device that enables you to read books on an electronic device, similar to the Amazon Kindle Fire HD — you should definitely check this one out. (To work with the Books e-reader application itself, go to Chapter 12.)
- Home: Control most (if not all) of your home automation devices in one convenient app.
- Photo Booth: Enjoy snapping fun pictures of yourself and others with this app that adds a little flare to the standard Camera app.
- Stocks: Keep track of the stock market, including stocks that you personally follow, in real time.
- Translate: The Translate app translates text or voice between supported languages.
- Voice Memos: Record your thoughts and save or share them.
- Measure: Use your iPad to measure distances using its built-in camera.
- Magnifier: Zoom in on anything to get a better look.
- Podcasts: Use this app to find and listen to recorded informational programs.
- Find My: The Find My app combines the Find iPhone and Find Friends apps to help you locate Apple devices that you own (see Chapter 19 for more info) and track down friends who also own an Apple device.
- Shortcuts: This app helps you string together multiple iPad actions into single commands that you can run either manually or by using Siri.
- Settings: Settings is the central location on the iPad where you can specify settings for various functions and do administrative tasks, such as set up email accounts or create a password.
Lock iPad, Turn It Off, or Unlock It
Sleep is a state in which the screen goes black, though you can quickly wake up the iPad. You can also turn off the power to give your new toy a rest.
Here are the procedures you use to put the iPad to sleep or turn it off:
Sleep: Press the Sleep/Wake or Top button (depending on your iPad model), and the iPad goes to sleep. The screen goes black and is locked.
The iPad automatically enters Sleep mode after a brief period of inactivity. You can change the time interval at which it sleeps by adjusting the Auto-Lock feature in Settings ⇒ Display & Brightness.- Power Off: From any app or Home screen, press and hold the Sleep/Wake or Top button until the Slide to Power Off bar appears at the top of the screen, and then swipe the bar. You’ve just turned off your iPad.
- Force Off: For models with a Home button, if the iPad becomes unresponsive, hold the Sleep/Wake or Top button and Home button simultaneously until the iPad shuts itself off. For iPad models without a Home button, press and release the Volume Up button, press and release the Volume Down button, and then press and hold the Top button to achieve the same result. Let go of all buttons, regardless of model, when the Apple logo appears on the screen.
To wake the iPad up from Sleep mode, simply press the Home button once or tap the screen (iPad models without a Home button).
If you have the Passcode feature enabled, you need to enter your passcode before proceeding to unlock your screen after pressing the Home button. However, if you have Touch ID enabled, you need to press the Home button only once and rest your finger on it for it to scan your fingerprints; the iPad will automatically unlock. If you have Face ID, your iPad will scan your face and unlock when you swipe up from the bottom of the screen.
Want a way to shut down your iPad without having to press buttons? Go to Settings ⇒ General and scroll all the way to the bottom of the screen. Tap the Shut Down button, slide the Power Off slider, and your iPad will turn off.