
Chapter 4
Working with Active Directory
IN THIS CHAPTER
![]() Learning Active Directory basics
Learning Active Directory basics
![]() Configuring Active Directory objects in Windows Server 2022
Configuring Active Directory objects in Windows Server 2022
Most system administrators have worked with or will at some point in their careers work with Active Directory. Most become familiar with Active Directory Users and Computers, because they use it in their daily work. But that’s such a small part of what Active Directory contains.
In this chapter, I fill you in on what Active Directory is, what it does, and what the different components in Active Directory are.
Active Directory 101
Active Directory is a directory service. It’s used to store user accounts, computer accounts, group policies, and all kinds of records.
An Active Directory forest is the top level in the hierarchy. Each forest serves as a security boundary and is created by default with a root domain. Other domains can be created within the forest, though they must share the same namespace as the forest (this namespace matches the underlying DNS zones). For instance, if your forest’s namespace is sometestorg.com, the domains in that forest can be things like hr.sometestorg.com or accounting.sometestorg.com.
Domains are the next tier down from forests in the Active Directory hierarchy. Active Directory domains are a collection of objects that share the same database in Active Directory. Those objects are things like users, groups, workstations, and servers.
Within domains, organizational units (OUs) are used to organize systems or users that have something in common. This helps if you want to apply a Group Policy only to accounting users, because you can put them in their own OU and then link the Group Policy Object to that OU. Common criteria for organizing systems and users are things like their geographic location, their building, or their department.
Users in Active Directory are assigned to security groups to gain access to resources. The security groups are given permissions to the resources, and when the user is added to the security group, they're able to access any of the resources granted to her by the security group. In Active Directory, security groups come in three types, referred to as scopes:
- Universal: A universal security group is able to grant permissions for any domain in the same forest, or for other forests where there is a trust in place (trusts are discussed later in this chapter).
- Global: A global security group is able to grant permissions to resources for any domain in the forest, or for domains and forests when there is a trust in place.
- Domain local: A domain local security group is able to grant permissions for resources as long as they’re in the same domain.
Configuring Objects in Active Directory
Active Directory has a few different components. Each component serves a different purpose, but all the components support Active Directory in some way. I know plenty of system administrators who have only ever worked in Active Directory Users and Computers. They’ve never had a reason or the inclination to explore the other areas. But that’s not going to be you! In this section, you explore the different components of Active Directory and what each of them controls.
Using Active Directory Domains and Trusts
Small organizations often may have only one domain, but larger organizations will end up with multiple domains. To simplify administration and the user experience, you can set up trusts between domains so that an authenticated user in one domain can access resources in another domain without having to authenticate with a separate set of credentials. There are a few terms you should know before we discuss the type of trusts:
- Transitive trust: A transitive trust can take advantage of trust relationships formed by other domains. For instance, say Domain 1 trusts Domain 2, and Domain 2 trusts Domain 3; if the trust is set as a transitive trust, Domain 1 will also trust Domain 3.
- Nontransitive trust: A nontransitive trust means that trust relationships made with other domains do not automatically apply to all other domains. For example, Domain 1 trusts Domain 2, and Domain 2 trusts Domain 3; however, Domain 1 does not trust Domain 3 because it does not have a direct trust relationship.
- One-way trust: A one-way trust establishes trust in one direction only. Set this way, Domain 1 trusts Domain 2, but Domain 2 does not trust Domain 1.
- Two-way trust: A two-way trust is a bidirectional trust relationship. If Domain 1 trusts Domain 2, then Domain 2 also trusts Domain 1.
Identifying types of trusts
You’ll work with four types of trusts in Windows Server 2022. Each has its pros and cons and different use cases:
- Shortcut trust: Shortcut trusts are used on Windows Server domains that reside in the same forest, where there is a need to optimize the authentication process. This may happen when a user on Domain A frequently needs to authenticate to Domain B. They’re transitive and they can be created as one-way or two-way trusts.
- Realm trust: A realm trust allows you to create a trust between a Windows Server domain and a non-Windows (think Linux, Unix, or MacOS Server) Kerberos realm. Realm trusts have a lot of flexibility; they can be transitive or nontransitive and created as one-way or two-way trusts.
- External trust: External trusts connect a Windows Server domain in one forest to another Windows Server domain in a different forest. External trusts are nontransitive and can be established as one-way or two-way trusts.
- Forest trust: Forest trusts create a trust relationship between two Windows Server forests. They’re transitive and can be established as one-way or two-way trusts.
Creating a domain trust
Creating a domain trust is pretty simple. Let’s look at a use case and build it out.
Let’s say you have your domain in its own forest, and you want to connect to another Windows domain in another forest. You know that you need to set up an external trust, given the types of trusts you can create. Here are the steps to set that up:
- From Server Manager, choose Tools⇒ Active Directory Domains and Trusts.
- Right-click your domain name and select Properties.
- Click the Trusts tab, and then click the New Trust button.
- On the Welcome to the New Trust Wizard screen, click Next.
On the Trust Name screen, type the name of the domain you want to establish the trust relationship with.
In my case, it’s
someotherorg.com, see Figure 4-1.- Click Next.
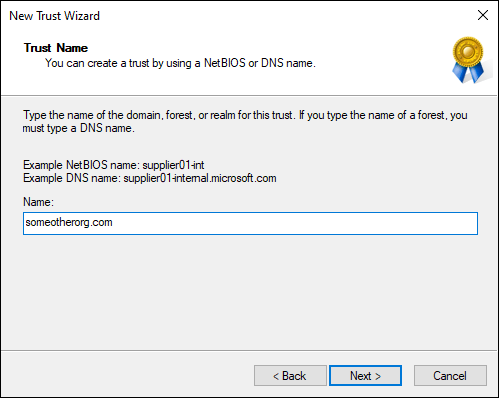
FIGURE 4-1: Setting the trust name for the new trust.
- On the Trust Type screen, assuming that you’re creating a trust between the root domains of each forest, select External Trust (as shown in Figure 4-2), and click Next.
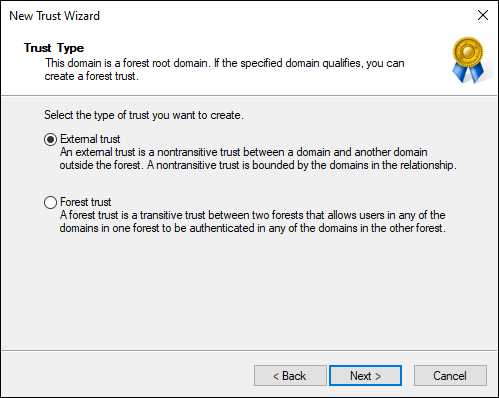
FIGURE 4-2: Setting the type of trust.
- On the Direction of Trust screen, you can set whether you want the trust to be two-way or one-way; in this case, select Two-Way (shown in Figure 4-3), and click Next.
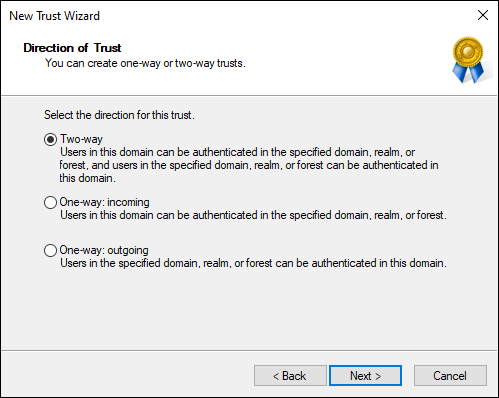
FIGURE 4-3: Setting the direction of the trust.
- On the Sides of Trust screen, you need to set whether you’re setting the trust on your domain or on both domains; for this example, select Both This Domain and the Specified Domain (as shown in Figure 4-4).

FIGURE 4-4: Setting where you want to set the trust at.
Click Next.
 You may be wondering why you would need to specify your local domain or both domains after you said you wanted to create a two-way trust. If you have the credentials for both domains (via universal or domain local security groups), then you can choose to create the trust in both. Say you recently acquired a business partner but you don’t know the credentials for a domain admin or enterprise admin account. You’d have to choose This Domain Only, and then one of their admins would need to repeat the process on their side to establish a two-way trust.
- On the next screen, enter the username and password of a domain administrator or enterprise administrator account, and click Next.
- On the Outgoing Trust Authentication-Local Domain screen, choose Domain-Wide Authentication, and click Next.
- On the Outgoing Trust Authentication-Specified Domain screen, choose Domain-Wide Authentication, and click Next.
- On the Trust Selections Complete screen, click Next.
- On the Trust Creation Complete screen, click Next.
- On the Confirm Outgoing Trust screen, select Yes, confirm the outgoing trust, and click Next.
On the Confirm Incoming Trust screen, click Yes, confirm the incoming trust, and click Next.
If all goes well, you see the Completing the New Trust Wizard screen, shown in Figure 4-5.
- Click Finish.
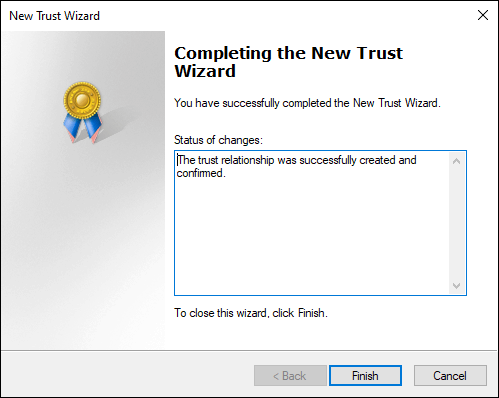
FIGURE 4-5: The successful completion of the New Trust Wizard.
Using Active Directory Sites and Services
Active Directory Sites and Services is very useful when you need to identify separate sites inside your Active Directory domain. This is typically done when a domain is used across multiple physical geographically separate locations.
Understanding what an Active Directory site is
A site in Active Directory is a representation of a physical site. Each site gets associated with an Active Directory domain. Although domains can contain many sites, a site can’t be joined to more than one domain.
Sites are useful with geographically distant locations as they can tell clients that are connecting which domain controller is the closest. This minimizes the amount of traffic that needs to flow over the network and can also improve performance since Active Directory replication is able to occur with the closest domain controller.
Creating a site
Now that you know what a site is, you probably want to create your own. Here’s how to create a site in Active Directory Sites and Services:
- With Server Manager open, choose Tools⇒ Active Directory Sites and Services.
- Right-click Sites and choose New Site.
Fill in the name of the site and select a site link object.
In this case, choose the default, as shown in Figure 4-6.
- Click OK.
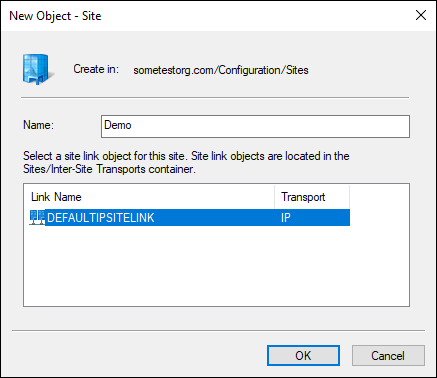
FIGURE 4-6: Creating a site in Active Directory.
Of course, a site is not useful without a subnet assigned to it, so let’s do that next:
- Right-click Subnets and choose New Subnet.
Enter the prefix for the site.
For my example, I’ve entered 192.168.178.0/24.
Select the site you just created (in my case, Demo).
Your screen should look similar to Figure 4-7 at this point.
- Click OK.
That’s all there is to it. You’ve created your first site in Active Directory!
Using Active Directory Users and Computers
Active Directory Users and Computers is the component of Active Directory that most people are familiar with. With Active Directory Users and Computers, you can manage the users, groups, and other objects that reside inside the Active Directory database. User accounts created in Active Directory Users and Computers are referred to as domain users. By having a domain account, users can log in to multiple resources with the same account. This is in stark contrast to local accounts, where the user would need a separate account on every system and/or application. In this section, I show you a couple of the most common use cases.
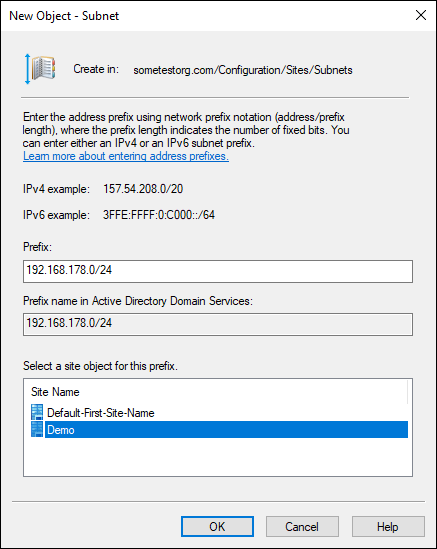
FIGURE 4-7: Configuring a subnet for the new Active Directory site.
Creating users
Creating users is arguably the most common task a system administrator will do in relation to Active Directory. Thankfully, Microsoft has made the process pretty painless:
- From Server Manager, choose Tools⇒ Active Directory Users and Computers.
Right-click the OU or container that you want to create the user account in.
For this example, I use the default Users container.
- Select New and then User.
- Fill in the First Name and Last Name (Full Name will automatically populate with what you use), and select a logon name (in my case, ksmith, as shown in Figure 4-8).
- Click Next.
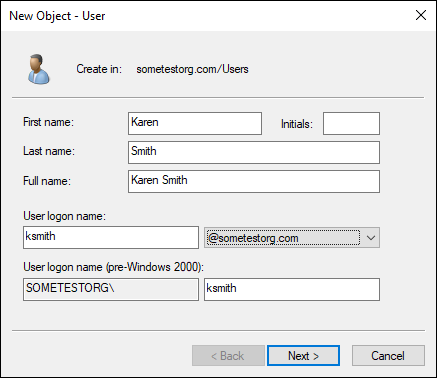
FIGURE 4-8: Creating a new user from within Active Directory Users & Groups.
- Type a password for the user and then type it again in the Confirm Password field.
- In most cases, you’ll select User Must Change Password at Next Logon.
- Click Next.
- On the confirmation screen, click Finish.
Now if you look in the Users container, you see your new user account. You can reset the password on the account by right-clicking the user’s name and choosing Reset Password. You can disable the account by right-clicking the user’s name and choosing Disable Account. Finally, you can configure the more advanced options for the user account by right-clicking the user’s name and choosing Properties. This gives you a multitude of selections, like setting organizational information, setting group memberships, and other pertinent information (see Figure 4-9).
Creating groups
Having a domain user account is great because it gives your users the ability to log in to multiple systems or applications with the same account. Giving each user account direct access to resources quickly becomes a nightmare, however, because it’s very difficult to keep up. When a user leaves, for example, you have to remove them from every location they had access to. If you use a domain group instead, you can still ensure they get the access they need, but when they leave the organization, you can simply remove them from the group and disable their account.
- From Server Manager, choose Tools⇒ Active Directory Users and Computers.
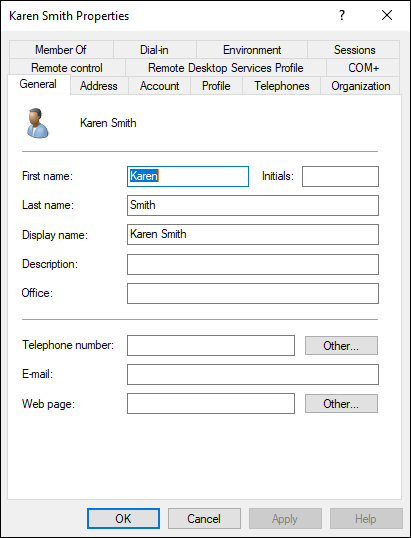
FIGURE 4-9: The Properties screen for the user account gives you more options to configure.
Right-click the OU or container that you want to create the user account in.
For this example, I’ll use the default Users container.
- Select New and then Group.
Fill in the Group Name field.
I simply entered New Group.
Choose the Group Scope.
Your options are as follows:
- Domain local: Groups that are only visible within their own domain.
- Global: Visible forest-wide but can only contain accounts and groups from the same domain.
- Universal: Visible forest-wide and can contain accounts and groups from across the forest.
For this example, I chose Domain Local.
Choose the Group Type.
Your options are as follows:
- Security: Used to manage user or computer access to resources on the network.
- Distribution: Used for email lists; can’t be used to assign permissions to objects.
In this case, I chose Security, shown in Figure 4-10.
- Click OK.
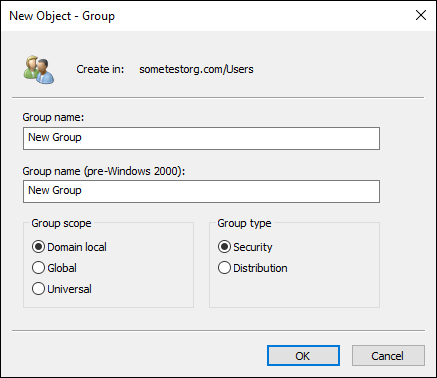
FIGURE 4-10: Creating a new group in Active Directory Users & Groups.
Groups don’t really do much without users, so let’s assign the new user account you created to the new group that you just created:
- Double-click your new group.
- Click the Members tab.
Click Add, and type the name of the user and click OK.
In my case, this is Karen Smith.
- Click OK to close the dialog box.
Using Active Directory Administrative Center
Active Directory Administrative Center is your central management point for Active Directory configuration tasks. You can run queries and build users and groups; you can also change functional levels and other settings. In the following sections, I walk you through a few of these settings.
Enabling Active Directory Recycle Bin
Before the Active Directory Recycle Bin was introduced, there was no nice way to restore a user or a group after it was deleted. You could do a restore from a backup of Active Directory (no small feat), or you could re-create the object you deleted. Restoring Active Directory entailed stopping AD DS, restoring from a system state backup that was taken before the object was deleted, marking the objects as authoritative with the ntdsutil.exe utility, and then restarting AD DS.
ntdsutil.exe is a command line tool that allows you to work with Active Directory at a database level.
Microsoft realized that this was a pain point for Active Directory administrators everywhere, so it introduced the Active Directory Recycle Bin. But it isn’t enabled by default, so you must plan ahead and enable it. After it’s enabled, you can restore deleted items to Active Directory with no downtime. Deleted items aren’t kept forever; by default, they’re retained for 180 days. A system administrator can adjust this value if desired.
To enable Active Directory Recycle Bin, follow these steps:
- From Server Manager, choose Tools⇒ Active Directory Administrative Center.
- Select your domain from the left menu.
Click Enable Recycle Bin from the menu on the right, as shown in Figure 4-11.
You see a dialog box warning you that Recycle Bin can’t be disabled after it’s enabled.
Click OK.
You see a dialog box telling you to refresh Active Directory Administrative Center.
- Click OK.
Click the circle with the two arrows inside of it at the top of the screen to refresh.
Enable Recycle Bin is now grayed out.
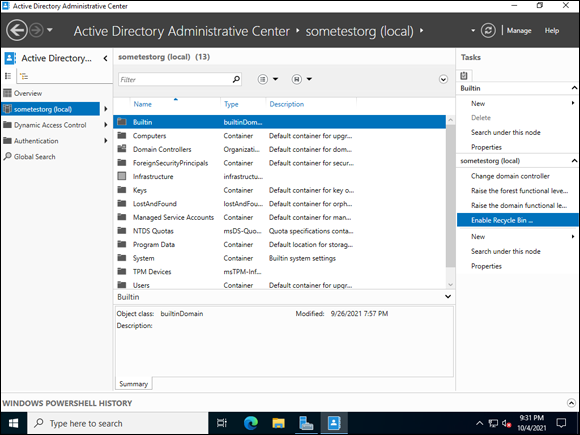
FIGURE 4-11: Enable the Active Directory Recycle Bin through the Active Directory Administrative Center.
Managing users and groups
Managing users and groups within Active Directory Administrative Center is not difficult. Most of the options become available when you select your domain name after you’ve opened Active Directory Administrative Center. For instance, if you right-click the Users container, you have the option to select New, and then User or Group. If you select User, you find that the user creation screen has a lot more options to work with. Figure 4-12 shows an example of user creation in Active Directory Administrative Center.
Being able to customize all these settings when creating a user is really nice. In the past, when using Active Directory Administrative Center, for example, you had to create the user. When the user was created, you could go into the User Properties screen and make the changes to the organizational tabs. Active Directory Administrative Center’s user creation utility lets you make all these settings all at once.
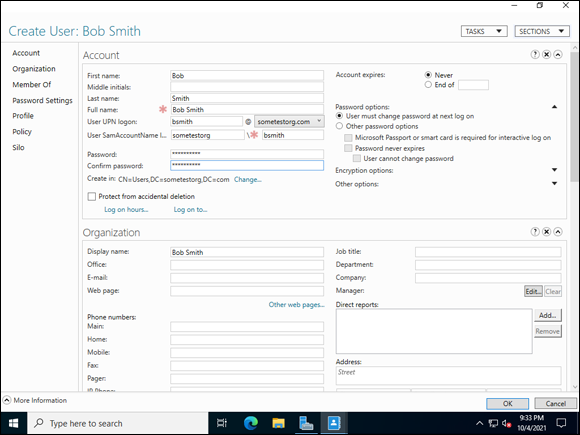
FIGURE 4-12: Creating a user in Active Directory Administrative Center gives you more options in the beginning.