
Chapter 3
Configuring the Registry
IN THIS CHAPTER
![]() Starting the Registry Editor in Windows Server 2022
Starting the Registry Editor in Windows Server 2022
![]() Importing and exporting Registry elements
Importing and exporting Registry elements
![]() Finding the Registry elements you’re looking for
Finding the Registry elements you’re looking for
![]() Understanding the different Registry data types you can use
Understanding the different Registry data types you can use
![]() Understanding the hives and what they do
Understanding the hives and what they do
![]() Connecting to network registries to configure remote systems
Connecting to network registries to configure remote systems
![]() Setting Registry security to prevent tampering
Setting Registry security to prevent tampering
There aren’t many things that will scare a system administrator, but messing with the Registry is definitely up there. The Registry in a Windows system is like the skeleton of the operating system. Control Panel items are just graphical front ends to the values that exist in the Registry. Every single thing that is installed or has ever been plugged into your system is recorded in your Registry. It’s not surprising then, that it can be a very intimidating prospect changing this thing that is so central to the operating system and how it functions. You delete or change the wrong key, and all of a sudden, your system is no longer functional.
In this chapter, I explain what the Registry is, what it’s made up of, how to safely configure it, and how to recover it if something goes terribly wrong.
Starting Registry Editor
There are several different ways to start the Registry Editor. If you’re in Server Manager, you can simply choose Tools ⇒ Registry Editor. If you aren’t in Server Manager, you can right-click the Start menu, choose Windows PowerShell, and then type regedit.exe. You need to have administrative privileges to run Registry Editor. Assuming you have the necessary privileges, using either option will open the Registry Editor, shown in Figure 3-1.
When you open the Registry for the first time, all the hives will be collapsed. If you have been in the Registry on the system before, it will typically open to where you were last.
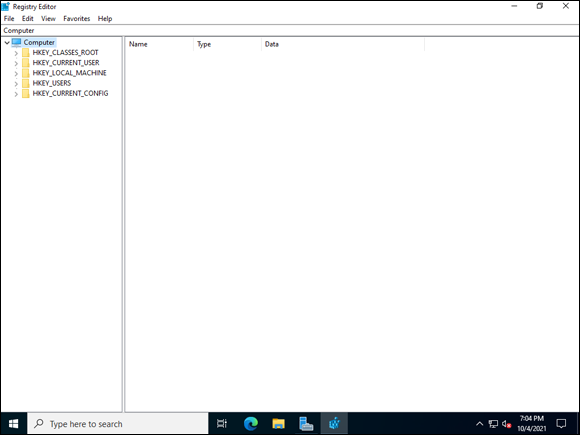
FIGURE 3-1: The Registry Editor allows you to work with the hives and keys in the Registry.
Importing and Exporting Registry Elements
Importing and exporting Registry elements gives you the ability to back up and restore your Registry. The process itself is very simple and really hasn’t changed much over the years. This same process will work on older systems, as well as on Windows Server 2022.
Exporting Registry elements
Whenever you’re planning on making a change to the Registry, it’s always a good idea to get a backup of your settings. This gives you a way to restore your Registry should something go horribly wrong. One of the simplest ways to back up the Registry is to export it to a .reg file. The .reg is used to identify Registry files.
Here’s how to create a backup of the Registry:
- From Server Manager, choose Tools ⇒ Registry Editor.
- Select the element that you want to export.
- With the individual element selected, choose File ⇒ Export.
- Select a save location for the
.regfile. - Click Save.
Note that you can export individual keys as well. You don't have to export the whole hive.
Importing Registry elements
Having a backup is great, being able to restore it is even better. To restore your Registry, you need the exported .reg file and access to the Registry Editor. There are a couple reasons why you may choose to import a .reg file:
- You may have made changes to the Registry that have caused the system to become unstable, so you need to restore from the exported
.regfile you made before you started your work. - You may have made customizations to the Registry on one of your servers and you want to more easily apply the same configurations to another server. You can do this quickly by importing the
.regfile from the configured server into the one that you want to configure.
 If a Registry change has made it to where your system is unable to boot and you can't get to the Registry Editor, your best bet is to restore from your most recent system backup.
Here’s how to restore the Registry from your backup file:
- From Server Manager, choose Tools ⇒ Registry Editor.
- Choose File ⇒ Import.
- Navigate to the location where your
.regbackup file is stored. Select the
.regfile and click Open.A progress bar pops up showing you the progress of the restore.
- Click OK when the restore is complete.
Finding Registry Elements
At some point in your career, you'll be charged with making an update to the Registry that will require you to find a specific key within a hive. This can be like finding the proverbial needle in a haystack given the levels of recursion in the hive in addition to the sheer content. Thankfully, the Registry has a search tool that can make finding what you’re looking for much easier.
Say, for example, I needed to find the SCHANNEL key because I needed to edit some of the encryption protocols my server supports, but I just can’t remember where SCHANNEL is. Here’s how the search tool can help me find my key:
- From Server Manager, choose Tools ⇒ Registry Editor.
- In Registry Editor, choose Edit ⇒ Find (or just press Ctrl+F).
- Type in your search term in the Find What box, and select what types of elements you want to look for, as shown in Figure 3-2.
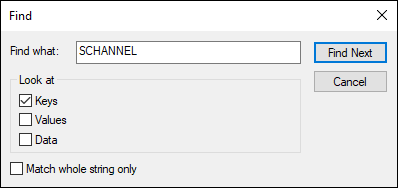
FIGURE 3-2: Searching the Registry for a specific key.
- Click Find Next.
- If the first result isn’t what you were looking for, choose Edit ⇒ Find Next, or you can simply press F3 until you find the result you want.
Understanding Registry Data Types
There is quite a bit of new terminology when it comes to the Registry that you may not be used to. Hives, for instance, are the highest level in the hierarchy in the Registry and are discussed in the next section.
Within each hive are keys, which look like folders in the Registry and are used for organizational purposes. Keys can have multiple levels of keys nested inside of them. Each hive and each key can contain data housed an some kind of data type. It’s important that you understand each data type, and what the data type might be used for. A DWORD and a QWORD may sound very similar, for instance, but in general they aren’t interchangeable.
Here are the different data types you’ll come across in the Registry and what each data type is used for:
- String Value (REG_SZ): Contains fixed-length text strings and is the second most common data type used in the Windows Registry.
- Multi-String Value (REG_MULTI_SZ): Made up of multiple text strings separated by commas or spaces.
- Expandable String Value (REG_EXPAND_SZ): Used to store variables that the operating system and/or applications need to be able to resolve. These may include variables like
\%username%and are similar to what you would use if you were scripting with environmental variables. - Binary Data (REG_BINARY): Used to store binary data in either decimal or hexadecimal format. This type is most often used in relation to hardware components and information.
- 32-Bit Number (REG_DWORD): Represents 32-bit numbers. DWORDs are one of the most common data types used in the Registry.
64-bit Number (REG_QWORD): Represents 64-bit numbers.
A common misconception is that 32-bit programs will write to DWORDs and 64-bit applications will write to QWORDs. That is not the case. If a 64-bit application is writing a value to the Registry that is 32 bits long, it will be stored as a DWORD.
Figure 3-3 gives you an idea of what the data stored in each of these data types might look like. These are just examples, but it should give you a general idea of what to look for.
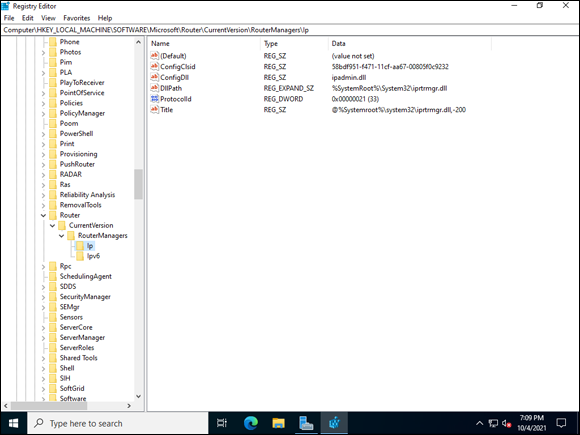
FIGURE 3-3: Data types in the Registry with sample values.
Understanding the Hives
In the context of the Windows Registry, a hive is a logical grouping of all the keys, subkeys, and values in the Registry. They’re grouped by like settings. For instance, HKEY_USERS has settings that affect all users, while HKEY_CURRENT_USER has settings that affect only the currently logged-in user. These local groupings also contain support files, which I call out in each Registry hive section.
HKEY_CLASSES_ROOT
HKEY_CLASSES_ROOT is commonly abbreviated to HKCR. It’s the area in the Registry that keeps track of which file types are associated with which programs, as shown in Figure 3-4. It also holds configuration data for Visual Basic programs and COM objects.
Data in HKEY_CLASSES_ROOT comes from two different sources:
HKEY_LOCAL_MACHINESOFTWAREClassesHKEY_CURRENT_USERSOFTWAREClasses
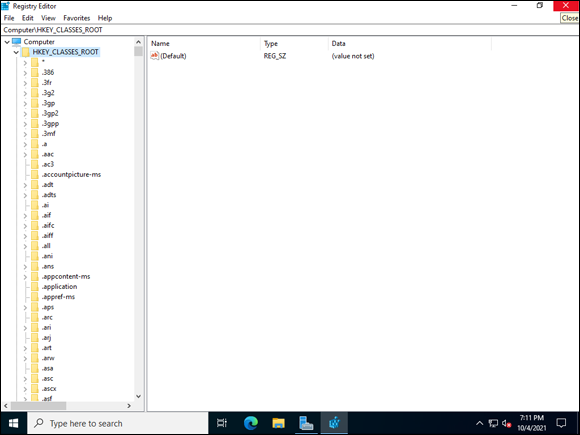
FIGURE 3-4: HKCR keeps tracks of associations between file types and programs.
If there is a subkey created in either location, it also gets created in HKCR automatically.
HKEY_CURRENT_USER
HKEY_CURRENT_USER is often shortened to HKCU. This area of the Registry changes depending on who the actual logged-in user is. Every time a user logs in, this is re-created based on the information stored in the user's ntuser.dat file. If the user has never logged in before, then this is created from the default user ntuser.dat file. which is stored at C:UsersDefaultNtuser.dat. You can see the HKCU in Figure 3-5.
If you ever want to look at the default user, you’ll need to enable hidden items in your view. Simply navigate to C:Users, click the View tab, and then select the Hidden Items check box. Then you’ll see the Default profile.
Note: HKCU does not actually store data. It contains a pointer to the user’s actual data, which is housed under HKEY_USERS. Each user is assigned a security identifier (SID), and each user has a key with his SID where his data is stored in HKEY_USERS. If you want to change a user’s settings, you can, in fact, change it in HKCU or HKEY_USERS because they’re essentially the same space.
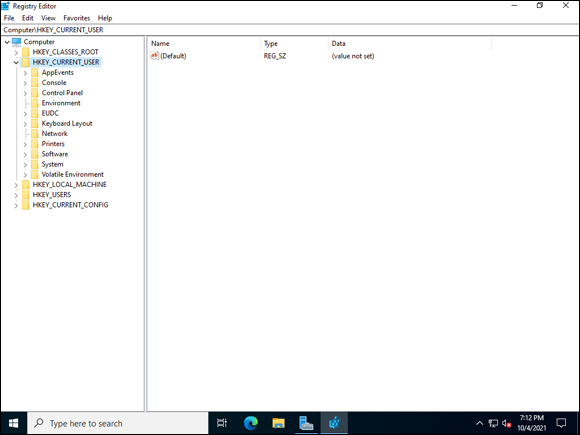
FIGURE 3-5: HKCU contains pointers to the currently logged on user's settings.
HKEY_LOCAL_MACHINE
HKEY_LOCAL_MACHINE is commonly abbreviated to HKLM. It’s a treasure trove of information on the system, including information on hardware, operating system, security, drivers, and startup parameters. Here’s more information on HKLM:
- Hardware: Stores information about hardware that the system has detected.
- SAM: SAM stands for Security Accounts Manager. Stores user and group information. Don’t ever edit this key directly. If you do, you may block users from being able to log on. If you need to change information in this key, use Active Directory.
- Security: Contains security information that is needed by the system and by the network. Don’t ever edit this key directly. Stick with Group Policy, Local Security Policy, and Active Directory instead.
- Software: The Software subkey stores subkeys for each software program you install, sorted by vendor. It also contains program variables that may be needed to launch or work with the application. These settings are ones that apply to all the users of the system.
- System: The System key stores subkeys related to control sets. This includes the current control set and the control sets that have been used at some point in time. If you look at the CurrentControlSet subkey, you can see which control set is actually active at any given point in time. If the entry in the Current value is 1, then ControlSet001 is the active control set.
HKEY_USERS
You’ll commonly see HKEY_USERS shortened to just HKU. It contains user-specific settings for each user that has logged on to the system. Each user is represented by his SID, which is unique to each user. In Figure 3-6, you can see a picture of several SIDs. The SID for the default user is just .DEFAULT, while the others have numerical representation.

FIGURE 3-6: SIDs for each account on the system are stored in HKU.
The short SIDs you see in the picture are built-in system accounts:
- S-1-5-18: Local System
- S-1-5-19: NT Authority–Local Service
- S-1-5-20: NT Authority–Network Service
Longer SIDs will belong to the accounts of users who have logged into the system. A longer SID with a 500 at the end of it is the administrator account.
HKEY_CURRENT_CONFIG
HKEY_CURRENT_CONFIG is usually written as HKCC. It’s similar to HKEY_CURRENT_USER in that it doesn’t actually store data; it stores pointers to the data. HKCC has the configuration data pulled from the current hardware profile. The pointer it actually stores points to HKLMSYSTEMCurrentControlSetHardware ProfilesCurrent.
Loading and Unloading Hives
There may come a time when you want to compare the settings of a user or a machine. The ability to load a hive gives you the ability to do exactly that.
You can only use the Load Hive and Unload Hive commands when you have HKEY_LOCAL_MACHINE or HKEY_USERS selected. With any of the other hives selected, the options will be grayed out.
Let's load a hive and see how this works. To give you some background, I’ve logged in with the administrator account. I’m going to launch Registry Editor and then compare the settings of this account to the John Smith account I created earlier. If you want to create an account to follow along but you’re not sure how to create it, check out Book 3, Chapter 4.
 To see the
 ntuser.dat file, you need to have Hidden Items turned on. The simplest way to do that is to open File Explorer, click the View tab, and select the Hidden Items check box.
- From Server Manager, choose Tools ⇒ Registry Editor.
- Select HKEY_USERS, and then choose File ⇒ Load Hive.
Navigate to the
ntuser.datfile you want to compare to.In my case, the path is
C:Usersjsmith tuser.dat.Select
NTUSER.DATand click Open.You’re prompted to name the key. This key will be created under HKEY_USERS so you can compare the settings you’re interested in.
- Name it JSMITH, and then click OK.
You can see in Figure 3-7 that the newly loaded key is present. From here you can expand it and compare its settings to the other user keys.
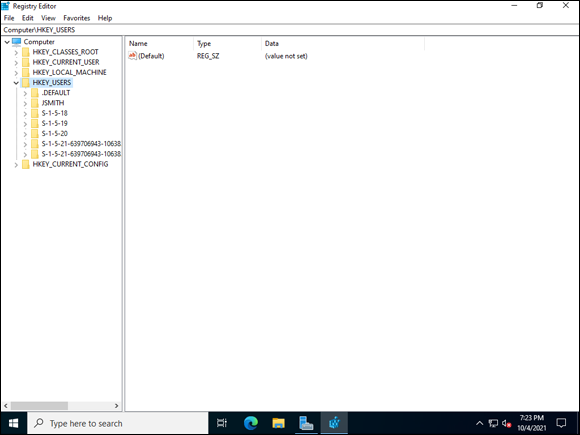
FIGURE 3-7: Loading a hive allows you to compare settings including user settings.
To unload the hive when you’re done, follow these steps:
- Select the key that you want to remove.
- Choose File ⇒ Unload Hive.
- In the Confirm Unload Hive dialog box, click Yes.
It’s that simple. The key is removed, and you’re back to your regular old Registry again.
Connecting to Network Registries
Sometimes you may need to check a setting really quickly or make a small edit to a Registry, but you don’t want to log on to that system just to make the change. You can connect to a Remote Registry over the network quite easily. In order for this to work, the remote system has to have remote administration enabled/allowed in the firewall, and the Remote Registry service needs to be running on both the source and destination systems.
Follow these steps:
- From Server Manager, choose Tools ⇒ Registry Editor.
- Choose File ⇒ Connect Network Registry.
Enter the system’s name that you want to connect to.
In my case, this will be SERVER2022-SVR2.
- Click OK.
The Registry that you wanted to connect to will appear in the list by name. Note that you can only work with HKEY_LOCAL_MACHINE and HKEY_USERS, and those are the only options presented to you. You can see this in Figure 3-8.
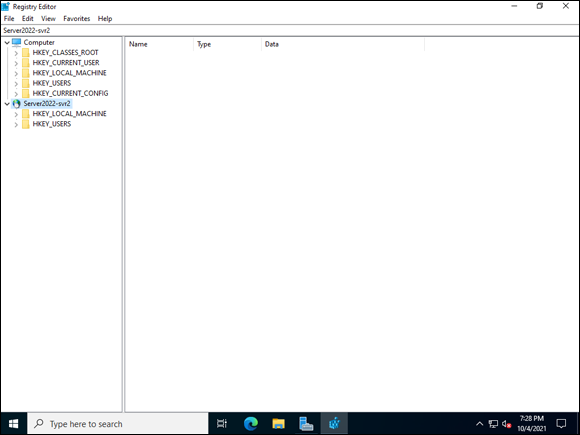
FIGURE 3-8: Remote Registry is useful for comparing or making quick changes to remote systems.
Setting Registry Security
Given that the Windows Registry is at the center of everything that happens in the Windows operating system, it makes sense that you would want to limit access to it and secure it properly.
Setting permissions in the Windows Registry
You can set permissions on the hives and individual keys in the Windows Registry. All you need to do is right-click the hive or key you want to secure and choose Permissions. This brings up a dialog box that most people are familiar with where you can add or remove users and groups and set the desired level of permissions. If you click the Advanced button, you can set much more granular permissions, just as you can in a file system. The Advanced Security Settings dialog box is shown in Figure 3-9.
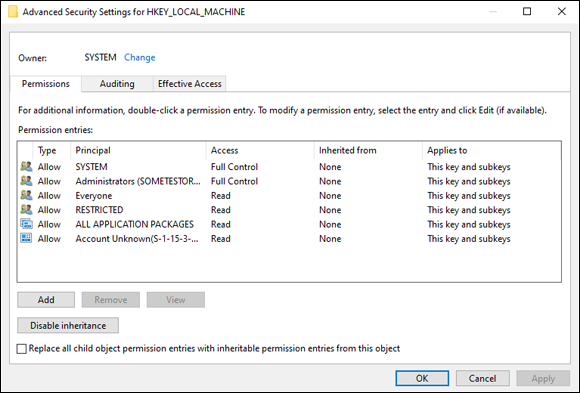
FIGURE 3-9: Setting permissions on the Windows Registry is very similar to setting permissions on file servers.
Disabling Remote Registry access
If you don’t need the ability to edit the Registry remotely, the simplest thing to do is disable the Remote Registry service. If this service is not running, then people can’t access the Registry remotely; they’ll need to log in. Follow these steps to disable Remote Registry access:
- From Server Manager, choose Tools ⇒ Services.
- Scroll down to the Remote Registry service and double-click it to open the Properties dialog box.
- Change Startup Type to Disabled, as shown in Figure 3-10.
- Click OK.
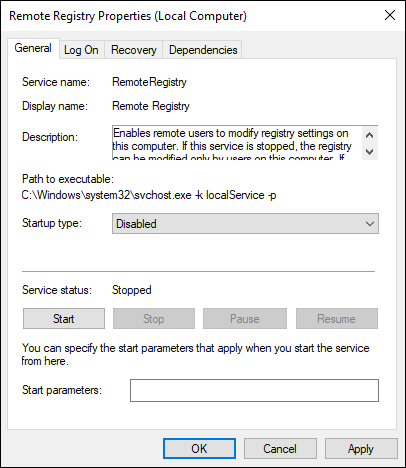
FIGURE 3-10: Disabling the Remote Registry service ensures that nobody can connect remotely to the Registry.
Securing remote administration
You can set which IP ranges or individual IP addresses are allowed to connect remotely to the system with Group Policy. You can push this setting out through Group Policy Objects (GPOs). Follow these steps:
- From Server Manager, click Group Policy Management.
- Expand Group Policy Objects.
- Select the GPO you want to edit, right-click it, and choose Edit.
- Navigate through Computer Configuration, Policies, Administrative Templates, Network, Network Connections, Windows Defender Firewall, and Domain Profile.
- Double-click Windows Defender Firewall: Allow Inbound Remote Administration Exception.
Choose Enabled and then add the address or subnet you want to allow remote connections from into the text box underneath Allow Unsolicited Incoming Messages from These IP Addresses (see Figure 3-11).
You can put an asterisk (*) there, but this allows connections from anywhere and is not a good practice.
- Click OK.
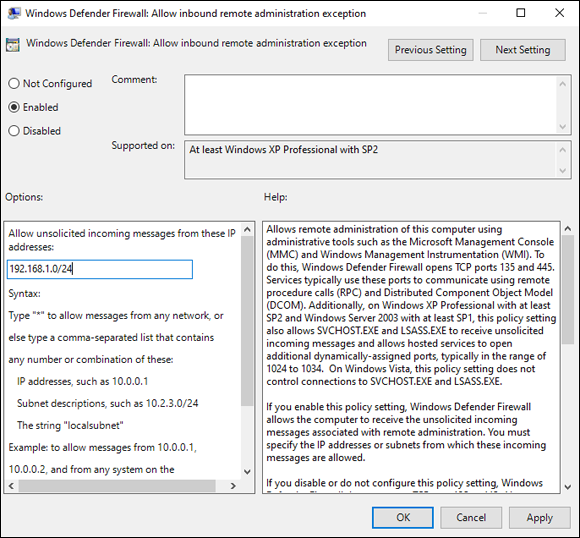
FIGURE 3-11: Restricting remote administration to specific subnets is a great layer of additional security.