
Chapter 4
Creating Your Own Scripts and Advanced Functions
IN THIS CHAPTER
![]() Understanding and Creating PowerShell scripts
Understanding and Creating PowerShell scripts
![]() Setting an execution policy for your PowerShell script
Setting an execution policy for your PowerShell script
![]() Signing a PowerShell script with a Code Signing Certificate
Signing a PowerShell script with a Code Signing Certificate
![]() Creating a PowerShell advanced function with VS Code
Creating a PowerShell advanced function with VS Code
Tons of scripts are already purpose made and ready for download, but nothing is quite as satisfying as writing your own scripts and cmdlets. That feeling of accomplishment really can’t be beat when the script you’ve been working on is put to use.
With Infrastructure as Code (IaC) gaining in popularity, being able to write custom scripts helps to make you a more marketable employee, not just from a system administration standpoint, but also from a DevOps standpoint. IaC allows you to script the deployment of a server so that you can respond to the need to scale much more quickly than if you had to manually build a server.
In this chapter, I show you how to create your own custom components of PowerShell. You discover how to create new shell extensions and your own PowerShell scripts, and you find out about creating your own cmdlets.
Creating a PowerShell Script
You’ve got this monotonous task you have to do every single day. This task regularly take you an hour to complete. You want to reclaim your hour. What do you do? You build a PowerShell script, of course!
PowerShell is probably one of my favorite scripting languages. The main reason is that when you have a grasp of the syntax and how to look up the properties of various cmdlets, you’re really only limited by your imagination.
Before I move on to working with scripts and functions, let’s get a few definitions out of the way:
- Script: A script is a series of commands that are run in order, dependent on whether you have conditional operations occurring within your script. Scripts often contain cmdlets, loops, and other elements that, when run together, accomplish some task. Scripts are the easiest method to automate repetitive work.
- Advanced function: An advanced function allows you to create and do the same things you can do with cmdlets, but without having to learn .NET Framework languages like C#, and without having to compile your code. You do have to follow the naming rules for PowerShell commands when creating a function — it should consist of the same verb/noun syntax as the usual PowerShell cmdlets.
Creating a simple script
When creating your first script, start with a small goal in mind and then build on it from there. If you try to do something really large and detailed, you may run into issues and get frustrated. Look at examples on the Internet to see how others have solved for the same issues, and experiment.
PowerShell scripts are always saved with a filetype of PS1. This tells your system that the file is a PowerShell script file and will suggest PowerShell or your favorite text editor to edit it or will open PowerShell to execute it.
If you ever find yourself in need of samples or you want to download pieces of code so that you’re crafting code from scratch, I highly recommend PowerShell Gallery (www.powershellgallery.com). It’s maintained by Microsoft and has modules, scripts, and even some examples of PowerShell DSC, which I talk about in Chapter 5 of this minibook. Figure 4-1 shows you the PowerShell Gallery homepage. At the time of this writing, you can see that there are 4,260 unique scripts and modules available from PowerShell Gallery. What I really like is that you can see how many downloads of each resource have been made, and any questions or comments that have been made to the authors of the scripts or modules.
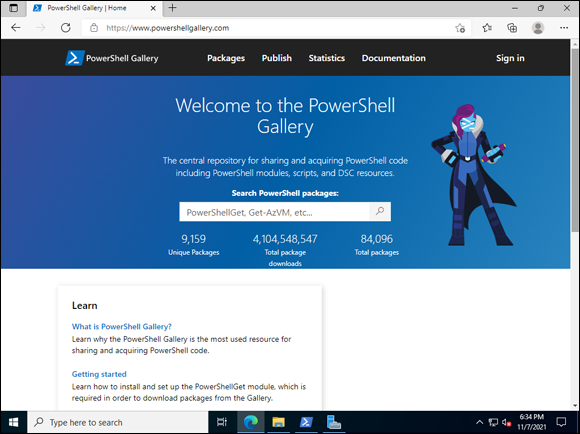
FIGURE 4-1: PowerShell Gallery is an excellent resource to download or see examples of various scripts or modules.
Before I get into an example of a script, I want to add that you should always use comments when you’re writing a script. You can denote a comment in PowerShell by starting the line with a hash (#). Everything after the hash on that line is ignored and is treated like a comment. Comments are useful for you because they can form an outline of what you’re trying to accomplish. They can serve as documentation for you later and can assist your co-workers in either using the script or helping you write it.
In Chapter 3 of this minibook, I show you an example of how to create a new user in Active Directory using PowerShell instead of using the graphical Active Directory Users and Computers. The real power of that little bit of code becomes apparent when it’s put into a script that can take a CSV file (from HR perhaps) and import it into PowerShell, and then have PowerShell loop through each row and create each user.
In the following sections, I step through this script step by step. Then I show you the whole thing all together. Never fear! The script is on the GitHub repo created for this book, and you can download it from there, rather than having to retype it. The GitHub repository created for this book is located at https://github.com/sara-perrott/Server2022PowerShell.
Creating the CSV file
The CSV file is the most important piece of this whole exercise because it provides the input to the script. The column names are assigned in the first part of the script to variables so that they can be called when you get to the loop that processes each row in the CSV. Figure 4-2 shows you a sample of what the CSV should look like. After the CSV is complete, you can move on to the script.

FIGURE 4-2: Using CSV files to import data sets for scripts is a simple way to deal with multiple inputs.
 As a working security professional, I have to point out that storing passwords in plaintext CSV files is not a good thing to do. I suggest setting complex temporary passwords and destroying the CSV when it’s complete. You can, of course, send the credentials to the supervisor of the new employee by whatever means is approved in your organization before destroying it. Don’t leave spreadsheets hanging around with passwords in them, though. They’re a treasure trove for hackers.
Creating the script
This script imports users from the CSV file you created earlier and creates an Active Directory account for each of them.
Assuming you aren’t working on a domain controller, you need to import the Active Directory module so that you can work with the AD cmdlets. This process used to be manual, but now it’s automatically imported when it’s needed. Assuming that you have Remote Server Administration Tools (RSAT) installed, the module for Active Directory will load when you use a cmdlet that requires it.
The following line of PowerShell will import the CSV file when run and will store the contents in the $ImportADUsers variable.
$ImportADUsers = Import-Csv C:PSTempUserImport.csv
The next line starts a foreach loop. This loop will go row by row through the CSV file. Each row is stored in the $User variable. Each of the column names is called by the $User.columnname section, and the value is stored in each of the variables that matches the same name. (Take note of the curly brace in between the foreach and the variable block.)
foreach ($User in $ImportADUsers)
{
   $FName = $User.FName
   $LName = $User.LName
                           $Username = $User.username
   $Email = $User.Email
   $Phone = $User.Phone
                                   $Dept = $User.Dept
                           $Password = $User.password
                                 $Title = $User.Title
   $OU = $User.OU
Next you want to check if the username you're creating already exists in Active Directory. The simplest way to accomplish this is with an If…Else statement. So, here’s the If portion, which checks if the user account already exists, and if it does, prints the error to the screen:
if (Get-ADUser -Filter {SamAccountName -eq $Username})
{
Write-Warning "This user account already exists in Active Directory: $Username"}
Then you use the Else part to say that if the account was not already found let's create it. So the New-ADUser cmdlet is called with the various parameters that were captured in the CSV file.
else
   {
   New-ADUser `
            -SamAccountName $Username `
            -UserPrincipalName "[email protected]" `
            -Name "$FName $LName" `
            -GivenName $FName `
            -Surname $LName `
            -Enabled $True `
            -DisplayName "$LName, $FName" `
            -Path $OU `
            -OfficePhone $Phone `
            -EmailAddress $Email `
            -Title $Title `
            -Department $Dept `
            -AccountPassword (convertto-securestring $Password -AsPlainText -Force) -ChangePasswordAtLogon $True
}
Those are the separate pieces, so let’s see the script in its entirety. Note: I’ve removed the comments from the example to make the print version more readable. The version on GitHub has all of the comments:
Import-Module ActiveDirectory
$ImportADUsers = Import-Csv C:PSTempUserImport.csv
foreach ($User in $ImportADUsers)
{
 $FName = $User.FName
 $LName = $User.LName
 $Username = $User.username
 $Email = $User.Email
 $Phone = $User.Phone
 $Dept = $User.Dept
 $Password = $User.password
 $Title = $User.Title
 $OU = $User.OU
   if (Get-ADUser -Filter {SamAccountName -eq $Username})
   {
   Write-Warning "This user account already exists in Active Directory: $Username"
   }
   else
   {
   New-ADUser `
            -SamAccountName $Username `
            -UserPrincipalName "[email protected]" `
            -Name "$FName $LName" `
            -GivenName $FName `
            -Surname $LName `
            -Enabled $True `
            -DisplayName "$LName, $FName" `
            -Path $OU `
            -OfficePhone $Phone `
            -EmailAddress $Email `
            -Title $Title `
            -Department $Dept `
            -AccountPassword (convertto-securestring $Password -AsPlainText -Force) -ChangePasswordAtLogon $True
   }
}
Running the script
The first time you run the script, I highly recommend that you run it within Visual Studio Code. Visual Studio Code is helpful in troubleshooting issues with scripts because you can do debugging and execute one line of code at a time. Plus, it highlights issues for you, which can make them easier to find. The usual culprits are those darn braces on the loops.
To open and run in PowerShell ISE, follow these steps:
- Click Start, scroll down to Visual Studio Code, expand the folder and click Visual Studio Code.
- Choose File ⇒ Open File.
- Navigate to your script.
- Select the script and click Open.
- To run the script, choose Terminal ⇒ Run Active File.
When you’re sure that your script is working, there are two methods to run it:
- Right-click the script and select Run with PowerShell. I don’t like this method because the PowerShell window pops up but closes right away when you’re done, so you can’t see if it encountered any errors.
- Open a PowerShell window and run it by specifying the directory (Example 1) or running it from the same directory (Example 2):
- Example 1:
C:PSTempUserImport.ps1 - Example 2:
.UserImport.ps1
- Example 1:
Defining a Script Policy
Defining a script execution policy allows you to define what kind of scripts are allowed to run within your network. You can set the execution policy through Group Policy organization wide, or through the following PowerShell cmdlet. The execution policy is set to Restricted by default.
Set-ExecutionPolicy -ExecutionPolicy <policy>
Here are the policy types that can be used to set execution policy:
- Restricted: Prevents PowerShell scripts from running and will not load configuration files.
- AllSigned: For a script to run, it must be signed by a trusted certificate.
- RemoteSigned: Requires that any script that is downloaded from the Internet be signed by a trusted certificate. Scripts created locally do not have to be signed to run.
- Unrestricted: Allows you to run all scripts. You're prompted for permission before a script is run.
- Bypass: Similar to Unrestricted, but it doesn’t prompt for permission to run.
- Undefined: Removes whatever execution policy is currently set, unless that execution policy is being set through Group Policy.
Signing a PowerShell Script
Depending on how your execution policy is set, you may be able to run scripts that you’ve created without any issue. If you’re in a more secure environment, however, you may need to sign your script so that it will be trusted and allowed to run.
Check out Chapter 1 of this minibook for more on code signing. There, I walk you through the steps of requesting a code signing certificate and signing a PowerShell script.
Creating a PowerShell Advanced Function
For most system administrators, the idea of making your own tools in PowerShell can be a little intimidating. With PowerShell advanced functions, you can use much of what you’ve learned about PowerShell to create your own tool set that you can run just like you run PowerShell cmdlets. The biggest difference is that PowerShell cmdlets are written in .NET Framework languages like C#, and you must compile them to use them. Advanced functions are written using the PowerShell scripting language.
There are a few components that go into creating a PowerShell advanced function. I’ll cover these components first, before I dig into creating your first advanced function.
[CmdletBinding()]: This is what changes a function into an advanced function. It not only allows the function to operate like a cmdlet, but also allows you to use cmdlet features.param: This area is used to set the parameters that you want your advanced function to use.
You can see how these components are laid out in Figure 4-3.
![Snapshot of the basic anatomy of an advanced function includes [CmdletBinding()], which allows the function to behave like a cmdlet and use cmdlet features.](https://imgdetail.ebookreading.net/2023/10/9781119867821/9781119867821__9781119867821__files__images__9781119867821-fg060403.png)
FIGURE 4-3: The basic anatomy of an advanced function includes [CmdletBinding()], which allows the function to behave like a cmdlet and use cmdlet features.
Playing with parameters
Advanced functions give you a lot of granularity when it comes to working with parameters that you just don't have with basic functions. These are placed in the parameter block where you define the parameters for your function. Here are a few of my favorites:
- Mandatory parameters: When you specify a parameter as mandatory, the function will not be able to run if that parameter is not provided. In the following example, I’ve set the parameter to be mandatory, and I’ve indicated that the value for the parameter will come from the pipeline.
[Parameter(Mandatory,ValueFromPipeline)] - Parameter validation: Parameter validation is very useful when you want to ensure that a parameter matches some form of expected input. This is done by typing ValidateSet, and then by specifying the strings you expect to see. If the parameter string does not match, then the function will not be able to run. See the following example:
[ValidateSet('String1','String2')]
Creating the advanced function
Now that you know the basic building blocks of advanced functions, I’ll create an example of an advanced function. This advanced function will retrieve information about a system. I’ll start with the individual components of the function, and then I’ll show you the whole thing after it’s done. The function is also available for download from this book’s GitHub repository at https://github.com/sara-perrott/Server2022PowerShell.
First, to tell PowerShell that you want to create a function, you need to start the text in the file with function, followed by what you want to name your function. This absolutely has to follow the PowerShell syntax of verb–noun. Next up, you add [CmdletBinding()], which tells PowerShell that this is an advanced function and should be treated similarly to a cmdlet. In the Param block, you define any parameters you want to use. In this case, you're defining one parameter, which is a variable named computername.
function Get-ReconData
{
    [CmdletBinding()]
   Param (
       [string[]] $computername
)
Next, I’ll add some text in a BEGIN block. I like to use this to see which system it's on currently. You probably won’t want to do this in production, especially if you have multiple systems that you’re running this function against. But it’s great for troubleshooting issues in your script.
   BEGIN {
      Write-Output "Gathering reconnaissance on $computername"
   }
Next up is where the magic happens. The PROCESS block is where I’m telling the function what I want it to do. In this example, I’m telling it to run the code block for every object that is passed to it through the $computername variable. Each object is assigned to the $computer variable.
Now you can make use of Windows Management Instrumentation (WMI) classes to get the information that you want. In this case, I'm using two WMI classes to query for the data that I want. I’m using the Win32_OperatingSystem class and the Win32_ComputerSystem class. You can see a listing of the properties that you can work with on the Microsoft documentation pages. Win32_OperatingSystem can be found at https://docs.microsoft.com/en-us/windows/desktop/cimwin32prov/win32-operatingsystem and Win32_ComputerSystem can be found at https://docs.microsoft.com/en-us/windows/desktop/cimwin32prov/win32-computersystem.
To tell PowerShell that I want to use the two WMI classes, I use the PowerShell cmdlet Get-WmiObject to assign the desired WMI class to a variable. I then chose a few of the properties that I felt were most useful for gathering some information about the system. I created names for them, and then mapped the name to the WMI variable I created earlier and the property that I'm interested in. Finally, I’m telling it to write the output of the function to the screen. In a production environment, if you were running this against multiple systems, you could export the data to a file.
   PROCESS {
      foreach ($computer in $computername) {
      $os = Get-WmiObject -class Win32_OperatingSystem -computerName $computer
      $comp = Get-WmiObject -class Win32_ComputerSystem -computerName $computer
      $prop = @{'ComputerName'=$computer;
                 'OSVersion'=$os.version;
                 'SPVersion'=$os.servicepackmajorversion;
                 'FreeMem'=$os.FreePhysicalMemory;
                 'OSType'=$os.OSType;
                 'Domain'=$comp.domain;
                 'Status'=$comp.Status}
      $sysinfo = New-Object -TypeName PSObject -Property $prop
      Write-Output $sysinfo}
   }
The last block is simply the End{} block. In this case, you don’t need it to run anything after the function has ran, so it’s left blank.
Here is the final function in all its glory!
function Get-ReconData
{
    [CmdletBinding()]
   Param (
       [string[]] $computername
   )
   BEGIN {
      Write-Output "Gathering reconnaissance on $computername"
   }
   PROCESS {
           foreach ($computer in $computername) {
           $os = Get-WmiObject -class Win32_OperatingSystem -computerName $computer
           $comp = Get-WmiObject -class Win32_ComputerSystem -computerName $computer
           $prop = @{'ComputerName'=$computer;
                   'OSVersion'=$os.version;
                   'SPVersion'=$os.servicepackmajorversion;
                   'FreeMem'=$os.FreePhysicalMemory;
                   'OSType'=$os.OSType;
                   'Domain'=$comp.domain;
                   'Status'=$comp.Status}
           $sysinfo = New-Object -TypeName PSObject -Property $prop
                   Write-Output $sysinfo}
   }
   END {}
}
Save your function as a .ps1 file just as you would a normal PowerShell script. Now let’s try it and see what it looks like when it is run.
Using the advanced function
You can run functions from your code editor of choice or from PowerShell. They’re all a little different as to how you should execute the code. In this section, I cover running the advanced function in VS Code, which you’ll most likely do while testing, and running it in PowerShell, which is the more realistic production method.
Running an advanced function in VS Code
Now that you’ve written the advanced function, you want to try it out and see if it works. I’ll use VS Code to test it. This is very common when wanting to validate that your function is working properly. I’ll use the names and parameters from my previous example.
- Click the Start menu and scroll down to the Visual Studio Code folder.
- Expand the folder and click Visual Studio Code to launch it.
- Choose File ⇒ Open File.
- Navigate to where your script is stored, select the file, and click Open.
In the Terminal, navigate to where you save your function.
In my case this is my PSTemp directory, so I typed cd C:PSTemp.
Type a period, followed by a space, and then .Get-ReconData.ps1.
This tells it that you want to run the script from the current directory. It should look like this: . .Get-ReconData.ps1.
- Type Get-ReconData -computername <computername>.
The output you receive will contain all the information you asked the function to retrieve. In this case, server2022-svr3 is a Windows Server 2022 virtual machine, but you can see that I’m still able to get valuable information, shown in Figure 4-4.
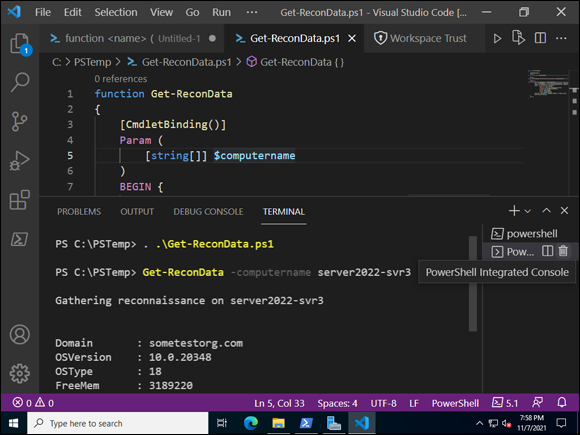
FIGURE 4-4: Testing your function is important to do, and it’s simple from within VS Code.
Running an advanced function in PowerShell
In a production environment, it’s far more likely that you’ll choose to run the advanced function from PowerShell rather than a code editor. Here’s how to do this:
- Right-click the Start menu and choose Windows PowerShell (Admin).
Navigate to the location where your function is saved.
In my case, it’s in my PSTemp folder, so I typed cd C:PSTemp to get to it.
Type a period, followed by a space, and then .Get-ReconData.ps1.
This tells it that you want to run the script from the current directory. It should look like this: . .Get-ReconData.ps1
- Type Get-ReconData -computername <computername>.
After the function has run, the information you requested is output to the screen, as shown in Figure 4-5.

FIGURE 4-5: You can run your advanced function in your PowerShell console.
And that’s all there is to it. If you’ve followed along you just created your first advanced function. From here, the sky’s the limit. If you aren’t sure what information you want to pull, I highly recommend that you check out the links for the various WMI classes. There is a wealth of information that you can pull.