Chapter 8
Digging into Software Applications in Windows 365
IN THIS CHAPTER
![]() Finding software applications that are already installed in your cloud PC
Finding software applications that are already installed in your cloud PC
![]() Exploring the free and paid software options in the Microsoft Store
Exploring the free and paid software options in the Microsoft Store
![]() Learning how to install and uninstall programs in your cloud PC
Learning how to install and uninstall programs in your cloud PC
![]() Seeing how security is important when installing software
Seeing how security is important when installing software
Your Windows 365 cloud PC can run any of the software you would normally run on a physical computer. A lot of software comes with your cloud PC by default. You might find some of this software useful and you might enjoy exploring it. On the other hand, some of this software you might want to uninstall right away. A computer is only as useful as its software applications, and your cloud PC is no different.
In this chapter, you look at using your cloud PC to run software. You learn about the software that is already installed by default on your cloud PC. Next, you learn how to install new software both from the Microsoft Store and from other sources. You learn about the importance of security and about installing only legitimate software. Finally, you learn how to uninstall software that you don’t want or need on your cloud PC.
Discovering Programs Already Installed on Your Cloud PC
Your Windows 365 cloud PC comes pre-installed with many software applications that Microsoft thinks you might find useful. Of course, among these are the familiar Office applications and collaboration applications such as Teams. In addition, you will also find many other familiar apps: apps for multimedia, such as Media Player and Photos; apps for generating content, such as Voice Recorder, Snipping Tool, and Video Editor; and apps for most basic computing tasks, such as Alarms & Clock, Calculator, and Notepad. There is even an app for checking the weather, aptly named Weather, and an app for checking the news, called Microsoft News. Covering every app on your Windows 365 cloud PC would require a book unto itself, so in this chapter we cover only a few of the most popular types of apps.
 The apps installed on your cloud PC can vary depending on whether your organization uses a Business plan or an Enterprise plan. Some applications, such as Office, depend on other subscriptions, like the Microsoft 365 subscription your organization uses. In addition, for large organizations, your IT team may have already pre-installed software you will use in your job duties. For example, if your organization uses an Enterprise Resource Planning (ERP) system, then that software may already be installed for you and ready to go when you log in for the first time.
You can find all the apps on your cloud PC by clicking on the Start button and then clicking the All Apps button in the upper-right part of the menu, as shown in Figure 8-1. All your apps are listed in alphabetical order, as shown in Figure 8-2. You can drag the slider on the right of the menu to scroll down the list of apps. Alternatively, you can type in the search box to filter down the list of apps based on an app’s name. When you find an app, you open it by clicking it in the list.
Finding our dear friends, the Office apps
We absolutely love Microsoft Office and have used it seemingly forever. Office 365 began the transition of moving the familiar Office apps such as Word, Excel, and PowerPoint (and many others) into a cloud-based world. We were happy to see our favorite apps were included as part of the future of Windows and pre-installed in Windows 365. We already pay for these apps through our Microsoft 365 subscription, so we were excited to see that we could continue using them when we logged into our cloud PC for the first time. We cover finding and opening the Office apps in Chapter 8 and go into more detail in Chapter 10.
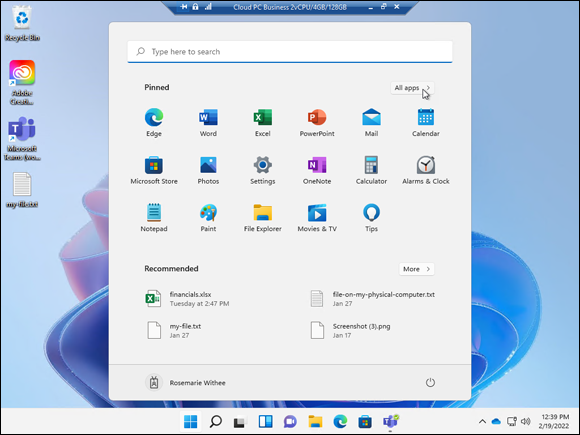
FIGURE 8-1: Finding the All Apps option on the Start menu.
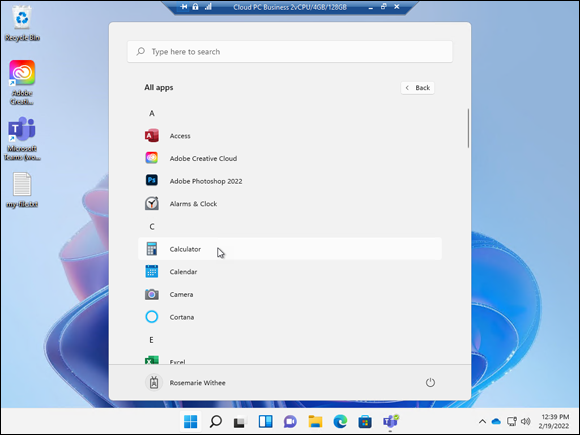
FIGURE 8-2: Viewing the list of apps installed on your cloud PC.
Using Media Player to view videos
Video is everywhere these days because almost all of us are carrying around a video-recording device in the form of our smartphones. Also, when working on our computer we often take video recordings to capture and convey information. For example, we might take a video capture of a bug we found in a software application so we can show it to the development team. In addition, web-based video (think security cameras) is more prevalent now than ever. The good news is that an app called Media Player is pre-installed on your cloud PC, and you can use it to watch videos and listen to audio.
If you use a screen-capture program on your cloud PC, then any video you record is already available on your cloud PC. If you use a physical device, such as your smartphone or a security camera, then you’ll need to get the video file onto your cloud PC. You can do this in multiple ways. We cover getting files from your physical computer to your cloud PC in Chapter 8. If your organization uses Teams or SharePoint, then your files are likely already available on your cloud PC as soon as you log in.
We have heard rumors for years that Microsoft might remove Windows Media Player from Windows. Those rumors have never come true. Instead, Microsoft added a brand new player called Media Player. When you search for Media Player, you will see in the results both the older Windows Media Player and the new Media Player. We suspect Microsoft added the new Media Player because many organizations still use video files distributed locally, or via a web URL, instead of using cloud-based services such as YouTube and Vimeo.
A common task in any organization is taking training in the form of videos. Although many videos can be streamed on a website, others can be found in the form of local files or web URLs. You can use Media Player to watch these videos and listen to audio files.
To open Media Player and watch a video, follow these steps:
-
Make sure you are logged into your cloud PC and then click the Start button.
The Start menu appears.
-
Click the All Apps button in the top-right corner of the Start menu.
A list of all the apps installed on your cloud PC appears (refer back to Figure 8-1 and Figure 8-2).
-
Scroll down the list of apps until you see Media Player and then click it.
The Media Player app opens, as shown in Figure 8-3.
-
Click the drop-down arrow on the right side of the orange Open Files button shown in Figure 8-3.
You can open a file, a folder, or even a URL to load videos. When you open more than one video file, you queue up the files in a playlist. You can then watch the videos in the playlist.
If you can’t find the video file you are looking for, it might be on your physical device (such as your phone or tablet). You can move the video file to your cloud PC. We cover how to do that in Chapter 8. - Click the Play button to begin watching the video.
Your cloud PC uses the speakers attached to your physical computer. We cover working with physical peripherals, like speakers, in Chapter 6.
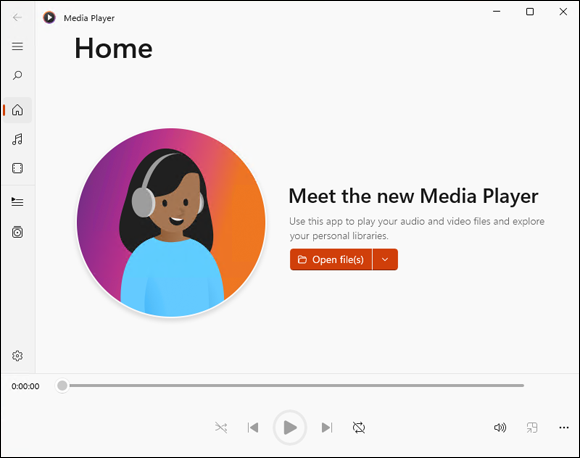
FIGURE 8-3: Opening the Media Player app in Windows 365.
You can also listen to radio stations over the Internet using Media Player. The key is that they must broadcast in a format that Media Player understands. This is a nice concept; however, we find we mostly use Spotify or Pandora these days.
Content-generation apps
Creating new content for others to consume is fun and a great way to boost your career. Some of the most popular apps used to create content are part of Office. However, there are other apps you can use, too. Your Windows 365 cloud PC ships with apps pre-installed that you can use to capture voice recordings, screenshots, and videos.
The Voice Recorder app is installed by default. We cover earlier in this chapter how to find and open apps. When you open the Voice Recorder app for the first time, it asks whether it can use your microphone. This seems like a straightforward request, and it brings us back to thinking about the ways our cloud PC and whatever physical device we happen to be using interact with each other. The microphone you use to record your voice on your cloud PC is located on your physical device. Microsoft does a good job with Windows 365 of making this complicated arrangement invisible. When you open the Voice Recorder app, or any app that requires a component of your physical computer, you are benefiting from a complicated feat of engineering. You are using the Internet to connect your physical device with a computer running in some other location. Such an arrangement is incredibly complex under the covers. However, Microsoft has developed Windows 365 to be as seamless as possible so you shouldn’t experience any friction.
The Voice Recorder app is extremely simple. Click one button and you begin recording from your microphone. All your recordings appear along the left side of the app; just select them and then select the Play button to listen to them. The Voice Recorder app is shown in Figure 8-4.
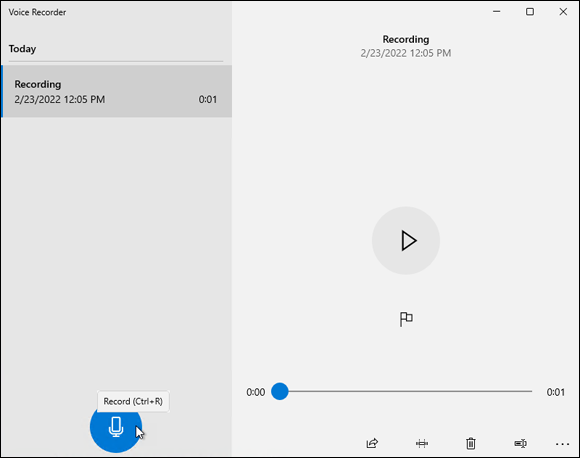
FIGURE 8-4: The Voice Recorder app on a Windows 365 cloud PC.
A picture, they say, is worth a thousand words. We couldn’t agree more! To convey meaning about something we are working on, we often take a screenshot.
A screenshot is a picture you take of your screen at a specific point in time. You can capture your entire screen or just parts of your screen.
Your cloud PC comes pre-installed with a screenshot-taking app called Snipping Tool. The Snipping Tool app is what we have used to take all the images you see in this book. Open the Snipping Tool app and then click the New button to begin the capture process. By default, the app captures the entire screen of your cloud PC in what is known as Full-Screen mode. After you take a capture, you can edit the image using basic features built into the app. When you are satisfied, save the image to your cloud PC. Figure 8-5 shows a screen capture of our cloud PC screen.
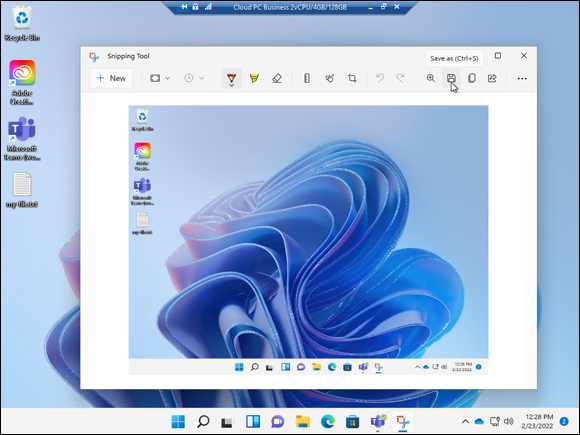
FIGURE 8-5: Using the Snipping Tool app to capture an image of the cloud PC screen.
A shortcut to taking a screenshot with the Snipping Tool app is to press and hold both the Windows and Shift keys on your keyboard and then press the S key. When you do so, the Snipping Tool app automatically opens in capture mode, and you can use your mouse to click and hold and draw a rectangle of the area of your screen you want to capture.
If a picture represents a thousand words, then a video represents more words than we can count. Professional video-editing software is numerous, but it can be expensive. A basic video-creation-and-editing app, called Video Editor, comes already installed with your cloud PC. The app provides basic functionality that lets you create videos by adding sound and combining video clips. The app provides basic functionality, and we have found it useful for the videos we create.
Oldie but goodie apps
Some of the apps installed on your cloud PC have been around for ages and are still some of our favorites. The Notepad app, for example, is a very simple, bare-bones text editor. We use it all the time to take quick notes and when we just want to type text from our keyboard and capture it in a digital format.
You can copy text from a web browser or document-processing app and paste it into the Notepad app to remove any formatting. What you are left with is simple text in Notepad, just the text content, which you can then copy and paste into any other app.
In addition to Notepad, another favorite app is the Calculator. The Calculator app provides basic functionality, and we find ourselves using it constantly for basic calculations.
Some of the other apps you might find useful include Alarms & Clock, Weather, and Microsoft News. The names of these apps do a good job of describing what they do. We find ourselves using them because they are always available on our cloud PC and easy to use.
The Clock app includes a Focus Sessions feature, which is good for time management systems such as Pomodoro.
Other websites and apps might be more useful for specific tasks, yet we find ourselves coming back to the pre-installed apps regularly for basic tasks.
Getting Comfortable with Apps on Your Physical Computer versus Your Cloud Computer
Your cloud PC is a separate computer that lives in the cloud. This is a concept that can take some time to adjust to. It is separate from any of your physical devices. There are applications that are installed, and that you use, on your physical device, and there are applications that are installed, and that you work with, on your cloud PC. Figure 8-6 illustrates the point.

FIGURE 8-6: Apps installed on your physical computer are separate from apps installed on your cloud PC.
 It is important to remember that your cloud PC is separate from any of your physical devices. The software running on your physical device is completely separate from the software running on your cloud PC.
The separation of software between your cloud PC and physical device is straightforward when your physical device is running MacOS or when it is a phone or a tablet. However, it is easy to get confused when both your physical device and cloud PC are running the Windows operating system, especially when you have the same software installed in both locations. We have caught ourselves opening apps such as Notepad on our physical computer when we meant to be working on our cloud PC. This is one of the reasons we decided to change the look and feel of our cloud PC compared to our physical computers. We cover how to do this in Chapter 5.
After some adjustment, however, the difference becomes intuitive. We now use many different physical devices as a gateway into our cloud PC. We use our cloud PC as our primary work environment and don’t worry about backing up our physical devices anymore. If one of our physical devices crashes and burns, we just grab another one, or a new one, and continue working on our cloud PC right where we left off. It can take some time to get comfortable with this new way of working, but when you do having your work environment always available and separate from the physical world is a great feeling.
Be sure you are aware of the location where the software you open is running. It is easy to open a software application on your physical device when you meant to open it on your cloud PC.
Finding and Installing Software on Your Cloud PC
The Microsoft Store is a centralized place where you can find and install apps. Microsoft makes both free and paid apps available in the store. The benefit of installing applications from the store (as opposed to somewhere else) is that Microsoft puts all the store’s apps through its vetting process, which ensures the store’s apps are legitimate and free of malware. With that said, you can, of course, still install software you buy and download from other locations.
Think of the Microsoft Store as being similar to app stores on other devices. For example, Apple has the App Store and Google has the Play Store.
Installing apps from the store
The Microsoft Store is available on your Windows 365 cloud PC by default. To find applications, simply open the store and browse for apps that you want to install.
The Microsoft Store offers more than just software apps. You can also browse for games, movies, and TV shows.
There are many web browsers to choose from. Microsoft Edge, for example, is already installed on your cloud PC. We like to have options, however; another web browser we like is Firefox by Mozilla. Firefox is a free app and is available in the Microsoft Store.
To install the Firefox web browser from the Microsoft Store, follow these steps:
-
Make sure you are logged into your cloud PC and then click the Start button.
The Start menu appears.
-
Click the All Apps button in the top-right corner of the Start menu.
A list of all the apps installed on your cloud PC appears (refer to Figure 8-2). Alternatively, you can type the word store in the search box and then jump to step 3 below to open the Microsoft Store app.
-
Scroll down the list of apps until you see Microsoft Store, and then click it.
The Microsoft Store app opens, as shown in Figure 8-7.
-
In the search field at the top of the store, type firefox and press Enter.
The Firefox app is displayed, as shown in Figure 8-8.
- Click the blue Get button to download and install the app.
The button you clicked provides status updates as the app is downloaded and installed. When it is done, the blue button will change to say Open. Click the same button again to open Firefox.
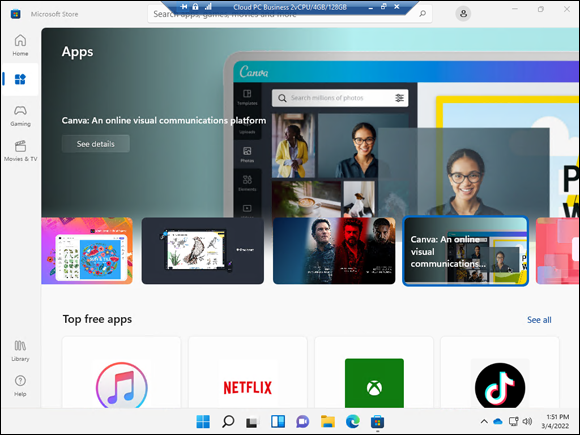
FIGURE 8-7: The Microsoft Store app on your cloud PC.
Another app that we use regularly is called Adobe Creative Cloud. Adobe Creative Cloud requires a paid subscription and includes a number of Adobe apps such as Acrobat, Photoshop, Illustrator, and InDesign. Rosemarie is an avid photographer and uses these apps on a regular basis.
The Microsoft Store includes apps you can install and use for free and apps that you must pay for. For example, the Firefox web browser is free, whereas the Adobe Creative Cloud is subscription-based software you must purchase. Be sure to check the subscription requirements for any app you want to try. Many apps offer a free trial. Some apps charge a one-time purchase fee and others charge a monthly or yearly subscription.
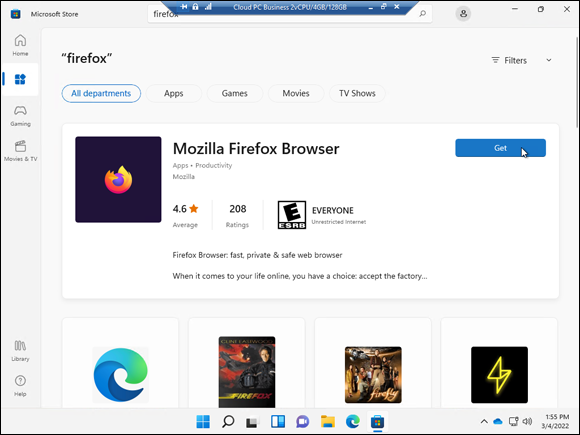
FIGURE 8-8: The Firefox app in the Microsoft Store.
Installing Apps from Other Sources
If you use an iPhone, then you are aware that you can only install software from the Apple App Store. Microsoft has the Microsoft Store, but it’s not so restrictive: You can also install software on your cloud PC directly from the Internet. This can be a risky proposition, however, and we recommend taking every precaution should you decide to install software you download.
The Microsoft Store is a great way to install software that you know is trusted and free of malware.
One of our favorite screen-capture programs is called Snagit, made by a company called TechSmith. When we want to install this software, we must make sure we are buying it and downloading it from the company that makes it. In other words, we need to use our web browser and go to the website, https://www.techsmith.com. If you happened to do this from an untrusted Internet connection, such as a coffee shop Wi-Fi, then you should take extra precautions as well. You should make sure the certificate for the website shows the verified name of the company — otherwise, a bad actor could be displaying a fake site to you in the hopes you will enter your personal and payment information. To check the certificate for the site, look to the left of the website’s URL in your web browser. In Google Chrome and Microsoft Edge, you will see a padlock icon. Click on the padlock icon to view the details of the certificate, as shown in Figure 8-9. When you verify that the site is legitimate and has a valid certificate, you can then interact with the site to purchase, download, and install software.
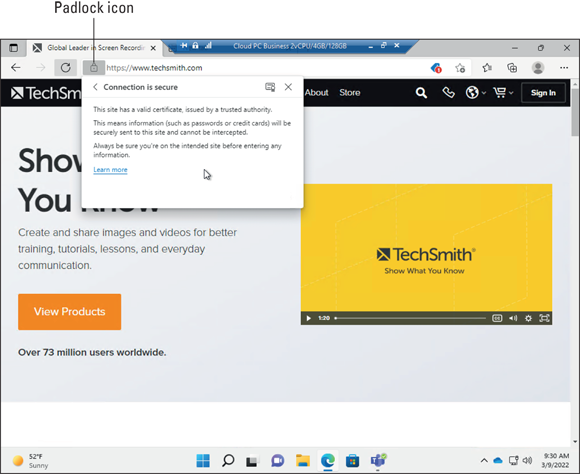
FIGURE 8-9: Viewing the certificate for a website to validate it is legitimate.
When viewing a website in a browser, you should check to make sure the site has a verified certificate. For most web browsers a padlock icon will appear to the right of the website. If you don’t see a padlock on a website, then the website has not been verified and you should not trust it.
One of the most important steps in installing software you have downloaded is verifying the publisher of the software. When you install software, a warning pops up asking you to confirm you want to install the software. You should confirm that the software is a verified publisher before installing. If you see a message that the publisher is “Unknown Publisher” then consider it a red flag and avoid installing the software. Only in rare cases does a software company fail to go through the process of obtaining a software signing certificate and still wants people to install their software so we recommend putting your radar on high alert before installing any software that has not been signed with a certificate. Figure 8-10 shows the trusted publisher information when we installed Snagit.
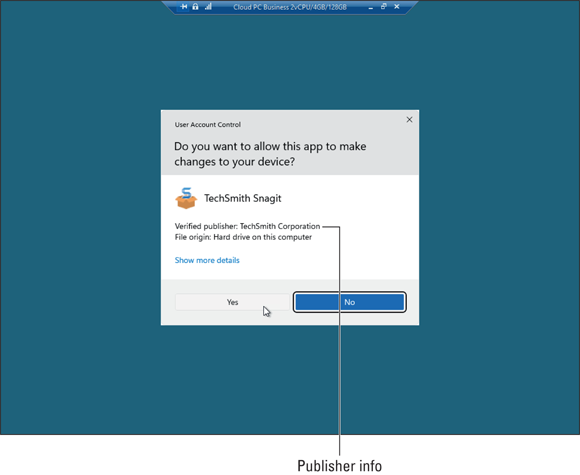
FIGURE 8-10: The trusted publisher notification when installing software.
 Only install software that has been signed and that shows up as a verified publisher. If you see a message that the publisher is “Unknown Publisher,” be sure to dig in deep to understand why the software company is not going through the process to sign their software as trusted software.
Cleaning Up and Uninstalling Apps
Everyone has a different level of comfort when it comes to the number of apps installed on their computer. Some people prefer to install and uninstall apps that they use frequently, and others prefer to keep all the apps they might ever want to use installed at all times. We lean towards limiting the number of apps installed to those that you use because it lowers the attack surface for any hackers.
Uninstalling software that you don’t use is important in maintaining security. We cover security further in Chapter 13.
To view the apps installed on your cloud PC and uninstall the ones you don’t need, follow these steps:
-
Make sure you are logged into your cloud PC and then click the Start button.
The Start menu appears.
-
In the search box type add or remove programs and then click the app, as shown in Figure 8-11.
The Apps & Features settings page appears with a list of apps found on your computer.
-
Scroll down and find the app you want to uninstall, click the vertical ellipsis to the right of the app, and choose Uninstall, as shown in Figure 8-12.
A warning is displayed for you to confirm that you want to uninstall the app and all its associated data.
If you are using Windows for your physical computer, then it is easy to get confused and uninstall apps from your physical computer instead of your cloud PC. Make sure you are working in your cloud PC if that is where you want to uninstall an app. We found ourselves thinking we were in our cloud PC when we were really on our physical computer many times before we came up with a strategy and habit to avoid the confusion. We changed the look and feel of our cloud PC and physical computer, so we always have a visual clue as to where we are working. We cover this in more detail in Chapter 5. -
Select Uninstall to confirm you want to remove the app and all its associated data.
The app is uninstalled and removed from the list.
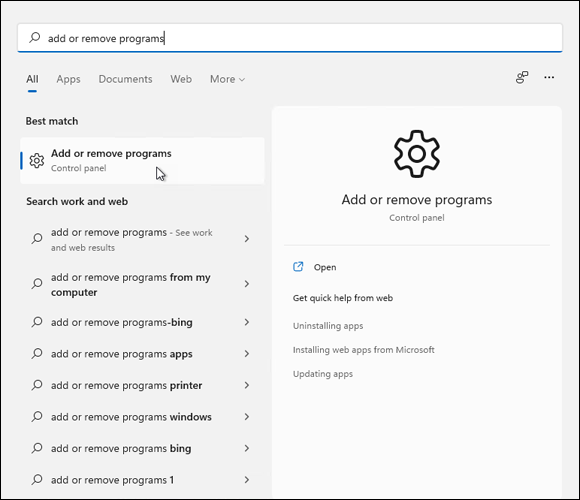
FIGURE 8-11: Opening Add or Remove Programs from the Start menu.
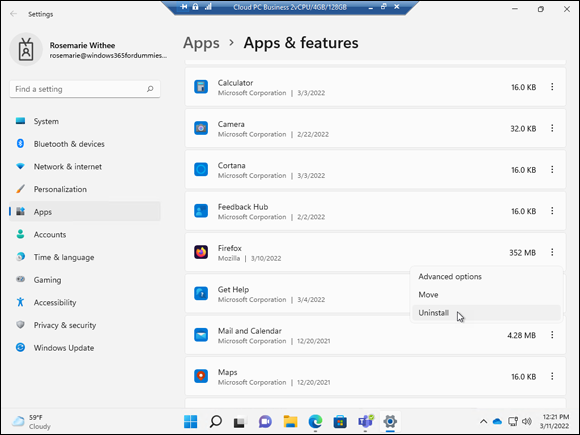
FIGURE 8-12: Uninstalling an app from the Apps & Features settings page of your cloud PC.