Chapter 10
Using Microsoft Teams to Stay Connected
IN THIS CHAPTER
![]() Gaining a general understanding of Teams
Gaining a general understanding of Teams
![]() Getting familiar with basic Teams terminology
Getting familiar with basic Teams terminology
![]() Learning how chats, channels, and teams work
Learning how chats, channels, and teams work
![]() Digging into tabs and files
Digging into tabs and files
First, Office went to the cloud with the introduction of Office 365. Then the Office suite of apps grew with the addition of SharePoint, Teams, OneDrive, and so on. Windows 365 completes the seamless cloud experience. As previously mentioned, you need to have a Microsoft 365 account in order to use Windows 365. The good news is that Microsoft Teams is already preinstalled with your cloud PC so you don’t have to take the extra steps of installing it.
We admit that when we first heard about Microsoft Teams, we were not very impressed. The market was already filled with chat programs. Microsoft even purchased the most popular one, Skype! So why did Microsoft decide to create redundant software? Well, that was years ago. Since then, our opinion has undergone a radical transformation. Now we understand the vision Microsoft had for Teams, we have seen what it has become, and we know why it has surpassed SharePoint as the fastest-growing product in Microsoft’s history.
In this chapter, you see what makes Teams so special. First, you take a quick spin around the Teams interface and learn some of the basic Teams terminology. Then, you get up and running with the Teams app in a quick tutorial. After that, you find out how to sign up and sign in. Let’s get Team-ing!
Wrapping Your Head around Microsoft Teams
Microsoft Teams is a relative newcomer to the world of business communication software. It was first announced in 2017, and when we first heard about it, we weren’t sure what to make of it. We had been using Skype to chat with friends and family for years, and we had used Lync (later rebranded Skype for Business) for business communications. Since its announcement, Teams has been integrated with just about every product Microsoft offers and has swallowed all the features that used to make Skype for Business so great. You can make phone calls, chat, conduct meetings, share your screen, and have video calls, to name just a few of the features Teams offers.
Microsoft Teams as a communications platform, replacing Skype for Business, is nice, but that is not what has made it the fastest-growing product in Microsoft history. What makes Teams so special is that Microsoft has invested heavily to make it the face and entry point to almost all other Office services. This means you can use Teams to not only collaborate in real time to chat but also work with others using the Office apps such as Word and without having to leave Teams. For example, we are writing this book using Microsoft Word, but we are doing so from within the Teams app, as shown in Figure 10-1. We really like having one main app that acts as a hub and think you will, too.
In addition to integrating with Microsoft Office, Teams also integrates with many third-party applications. The app section, as shown in Figure 10-2, includes Microsoft apps and also many others.
To be fair, the big competitor to Teams called Slack (https://slack.com), is also racing to integrate other software and be the primary business tool you use for communications and productivity. Slack had a head start — hitting the market in 2013 — and became incredibly popular very quickly. However, Microsoft had a big advantage in that so many people already used Office products, so when Microsoft integrated Office with Teams, it was an easy move for users to start using Teams. In fact, in 2020 it was announced that Teams now has more active users than Slack. That is a big milestone!
Don’t get us wrong; We still use Slack in Rosemarie’s consulting business, because some of her clients only use Slack and don’t use Teams. In fact, we use other apps, too, such as Google Workspace (https://workspace.google.com) and Zoom (https://zoom.us). Zoom has become extremely popular for video-calling especially for groups. However, Zoom is focused on video-calling and lacks the integrated capabilities needed to do effective remote work and collaboration.
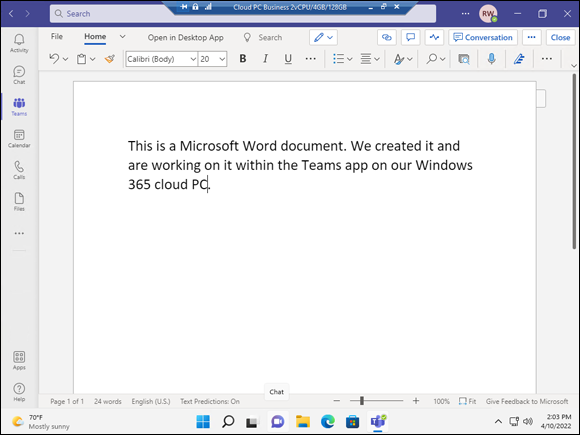
FIGURE 10-1: Using Microsoft Word from within Teams.
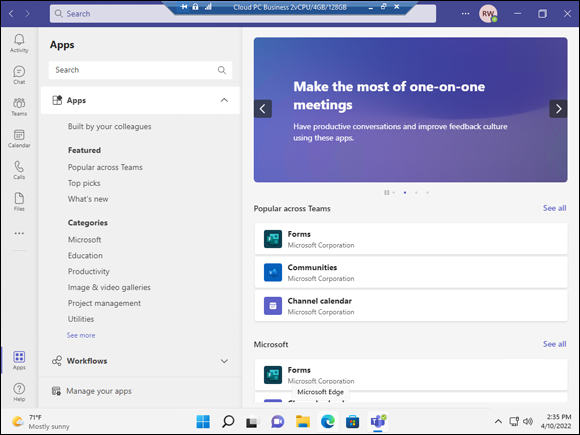
FIGURE 10-2: Some of the apps that integrate with Teams.
It is this software diversity resulting from Rosemarie’s consulting that gives us confidence to contrast and compare these tools.
Microsoft Teams is becoming the one app to rule them all in the Microsoft world. It has become the entry point for Office applications as well as other non-Microsoft software. This is the reason it has grown so quickly. If you are using Microsoft 365 apps on your cloud PC, you may find yourself using the integrated apps (some of which are covered in Chapter 11) through Teams instead of trying to remember how to use them independently.
Getting Familiar with Teams Terminology
Just like every other software program out there, Microsoft Teams has its own specific terminology. And even though the list of terms is short, keeping the Teams terminology straight can be a challenge. For example, you will likely one day find yourself inviting one of your teammates to your Teams team. Or asking which Teams team your coworker is talking about. After you get used to it, however, the terminology will seem normal.
To get a jump on the terms, here are some quick definitions:
- Teams: Use the term Teams (uppercase) to refer to the product itself.
- Team: A team (lowercase) is a group of users. You can specify settings for teams and have multiple teams within Microsoft Teams. For example, you might want to create a team for accounting, a team for legal, and another team for external contacts.
- Channel: A channel is a group chat within a team. A team can have multiple group chats with the idea being that you can create a chat for different topics.
- Thread: A thread is a specific topic of discussion within a channel. For example, one person might start a new thread in the channel and then others can reply to that thread. You can have multiple threads going in a channel at the same time.
- External/guest user: An external or guest user is a user who is not part of your organization. For example, you might be a consultant and need to communicate with the company’s accountant. You can invite that person as a guest user to your team.
These are the basic terms to get you started. When you get familiar with the relationship between Teams, a team, a channel, and a thread, you have all the knowledge you need to dive in further and get productive.
Getting Started with the Teams App
Now that you have an idea of what makes Microsoft Teams a useful tool for online collaboration and communication, it’s time to dive in and take a look at the app for yourself. It is already installed by default on your cloud PC.
Taking a Quick Spin around Teams
If you have been following along in this chapter, you may notice that Teams running on your cloud PC (refer to Figure 10-2) looks a lot like Teams running from within your web browser (see Figure 10-3). Microsoft did this on purpose. The design thinking is best practice, and we were glad to see Microsoft adopt it. This way, if you usually use Teams on your cloud PC and find yourself logging in to Teams using a web browser on your computer at home, you don’t have to worry about learning a different interface. Of course, you could always just log into your cloud PC directly, too, and find the same Teams app you are used to using. Microsoft gives you options, though, by also offering Teams in any browser on any device.
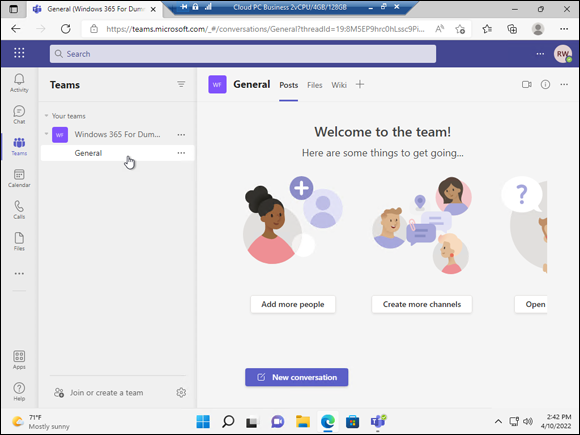
FIGURE 10-3: Microsoft Teams running in a web browser.
Primary navigation appears on the left side of the screen and includes the following icons: Activity, Chat, Teams, Calendar, Calls, and Files, as shown in Figure 10-3. At the bottom of the screen on the left, you will find links to Apps (refer to Figure 10-2) and Help. Clicking one of these main options opens that associated screen in the main part of the app.
Activity
If you click the Activity icon in the navigation pane, you will see your feed. You can also see your activity by clicking the feed heading and selecting My Activity, as shown in Figure 10-4. In the Activity feed, you find notifications about things going on around Teams that you might find interesting. For example, if there is an unread message in a channel or if someone sends you a chat message, it will appear in your Activity feed. Think of it as your one-stop-shop for everything that has happened in Teams since you were last there.
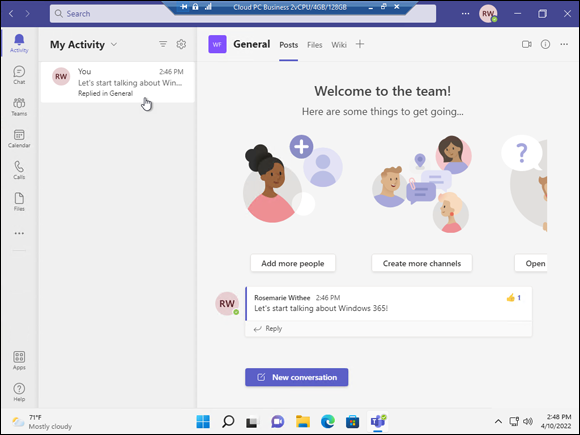
FIGURE 10-4: The Activity feed in Microsoft Teams.
Teams can get very noisy very quickly. Just a handful of people chatting and carrying on is enough to tempt you to ignore it entirely. Using the Activity feed, however, you can tune in to only the things that are important to you.
Chat
The Chat area is where you find all of your personal and group chats. There is a subtle difference between conversations in chats and conversations in channels. We like to think of chats as ad-hoc messages to one other person or a few other people. Chats come and go and are spontaneous, whereas a channel is a dedicated area that persists and where people can communicate about a particular topic. You will find channels within Teams as described in the next section.
 You can have one-on-one chats with another person or group conversations with several people at the same time in the Chat area.
Teams
The navigational area where we seem to spend all our time, and likely you will too, is the Teams area. Yes, the product is called Teams and the navigation component is also called Teams (see the left side of Figure 10-5). And within the Teams navigation component you have individual teams called a team. Confused yet? We don’t blame you! But don’t worry; it will become clear shortly.
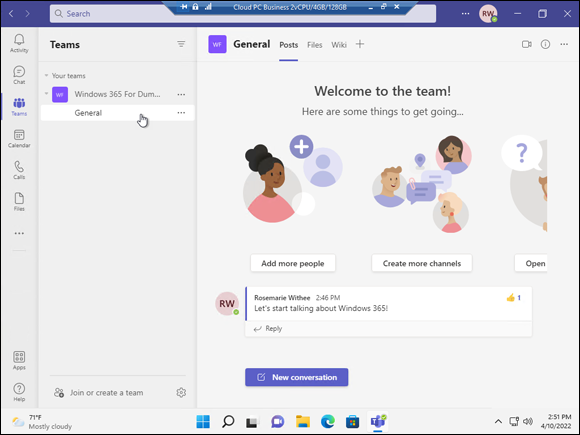
FIGURE 10-5: The Teams area of Microsoft Teams.
Clicking the Teams icon in the left navigation pane opens all the teams you are a member of. In Figure 10-5, you can see that we are only a member of one team: Windows 365 For Dummies. This is the team we created when we first set up Teams. Within the Windows 365 For Dummies team is a channel called General, which is the default channel created automatically when a new Team is created. If we click the General channel, we can see all of the chats going on in the channel. Right now, it is empty because Rosemarie is the only person in the team and in the channel.
Calendar
The Calendar area is focused on your calendar of events and meetings, as shown in Figure 10-6. If you have ever scheduled a meeting in Microsoft Outlook, then you will be familiar with working with your calendar in Teams. The calendar area is where you can have real-time meetings.
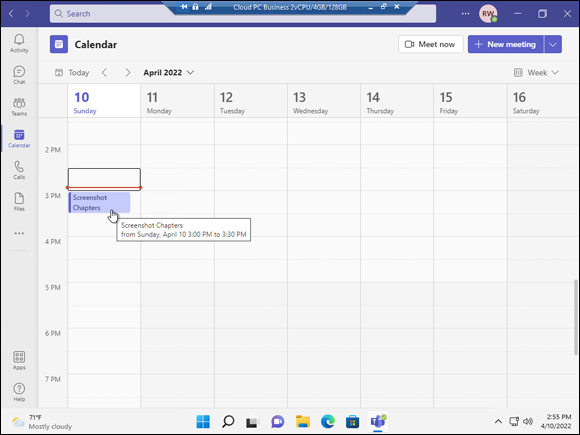
FIGURE 10-6: The Calendar area of Teams.
Calls
The Calls area is where you can make and receive phone calls, as shown in Figure 10-7. If you have ever used Skype, then this area will feel familiar to you.
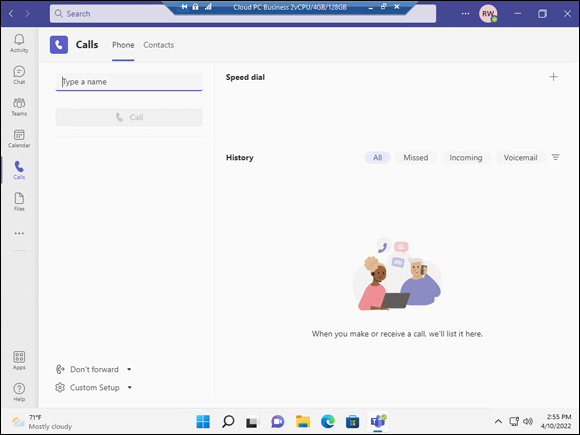
FIGURE 10-7: The Calls area of Teams.
Files
The Files area is where you can save and share digital files, as shown in Figure 10-8. If you have ever used SharePoint or OneDrive, then you will be happy to learn that you are already ahead of the game. Teams uses SharePoint and OneDrive behind the scenes of Teams, and at any point you can jump out of Teams and open the same files in the SharePoint or OneDrive applications.
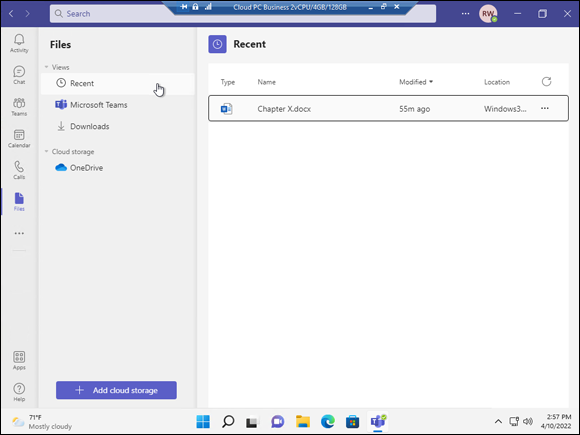
FIGURE 10-8: The Files area of Teams.
Instant Messaging in Teams
Before we started using Teams to chat, Rosemarie’s team had been using a different chat application for which we paid a monthly fee. However, we also had an Office 365 subscription (which included Teams). Teams was still brand new back then, but we realized we could stop paying for the other chat program and use Teams instead. It already came with Office 365, and unless it was terrible, it would work just fine for sending instant communications.
Our story happened a few years ago when Teams had just been released. However, based on our work with many clients, their stories (and perhaps your story) are very similar to us. Teams might have already been included with your organization’s Microsoft 365 subscription, even though you hadn’t used it before. You might need to use Teams now because the coronavirus pandemic in 2020 forced everyone in your office to start working from home, and you need a way to communicate virtually with your coworkers. Regardless of how you start using Teams, you will likely spend your initial interactions sending messages to other people on your team.
Instant messages in Teams happen in channels. A channel is a place where people can type messages, add files, and share links. We like to think of a channel like a virtual water cooler. You go there to communicate with colleagues, learn and share gossip, and generally stay in touch with your social circle.
A channel lives inside of a team, and a team can contain multiple channels. You can name a channel anything you want. We recommend using a name that describes the purpose of the channel. For example, you could name your channels channel01, channel02, channel03, and so on, but these titles aren’t descriptive. Are you creating a channel that people in your team will use to discuss carpooling to and from work? Name the channel Carpooling. Or do you want to create a channel for accounting and another for human resources? Name them Accounting and Human Resources, respectively. Or perhaps a group of people want to discuss the new policy of allowing pets in the office. Create a channel called Pets. You get the point.
A channel can contain multiple conversations happening at the same time. To try to make these conversations easier to follow, Teams groups them together in what are known as threads. A thread is simply a topic of conversation. When someone types a brand-new message, it appears in the channel, and any replies to that original message are placed underneath. If someone else types a different message for a different topic, it will become its own thread and any responses to that message will be grouped under the original message.
In Figure 10-9, you can see that we are creating a brand-new topic of conversation in the General channel. If we want to reply to the existing topic, we click the Reply link at the bottom of the thread. If we want to start another new topic, we click the New Conversation button at the bottom of the message window to open the text box to begin a new conversation.
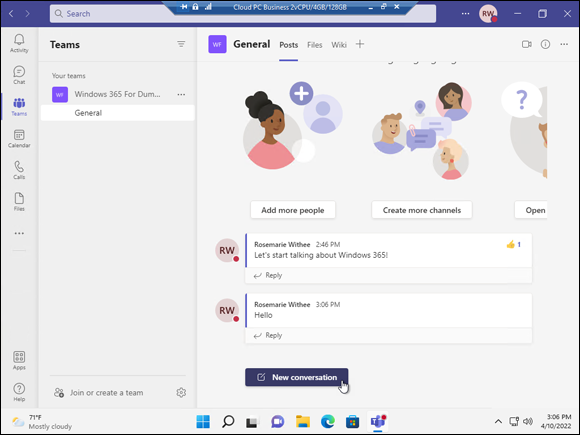
FIGURE 10-9: A new topic in the General channel.
Sending Messages in Channels
Whenever you create a new team, a channel is created for that team automatically. Called General, this channel is perfectly acceptable to use to start chatting with others on the team.
To send a message in the General channel, follow these steps:
-
Select the Teams icon in the left navigation pane to view all your teams.
Under each team, you will see a list of channels that are available to you. If this is a new team, you will only see the General channel until more channels are created.
In addition to the channels available to you, there may be other, private channels in the team that you don’t have access to. There could also be channels that are public but that you have not joined. The list of channels you see under a team might not be inclusive of every channel that team contains. You will see channels that you have either joined or that the channel administrator has joined you to on your behalf. -
Select the General channel, as shown in Figure 10-9.
When you click a channel, it opens in the main part of the screen.
- Click the New Conversation button that appears at the bottom of the screen.
-
Type a message in the text box that appears and click the Send icon, which looks like a paper airplane (or press the Enter key).
Your message appears in the General channel screen.
Congratulations! You are sending messages!
Notice above your message that Microsoft Teams is giving you some hints about adding more people, creating more channels, and opening the Frequently Asked Questions (FAQ). These buttons that appear in new channels are shortcuts for you. You can achieve these same tasks without using these shortcuts.
Creating a New Channel
As you use Teams more, you will want to create chat channels for other topics so that everything does not happen in one “general” channel. For example, you might want to create a channel for your team to discuss finances, another for carpooling, and another for team morale events. Team conversations can be organized in endless ways. The only thing that matters is what works for your team.
To create a new channel in your team, follow these steps:
- Select the Teams icon in the left navigation pane to view all your teams.
-
Click the ellipsis to the right of the team to which you wish to add a channel.
The More Options drop-down menu appears.
-
Choose Add Channel, as shown in Figure 10-10.
 If this option isn’t shown in the drop-down menu, you don’t have permission to create a new channel. If you are a guest to a team, your ability to create teams and channels can be limited.
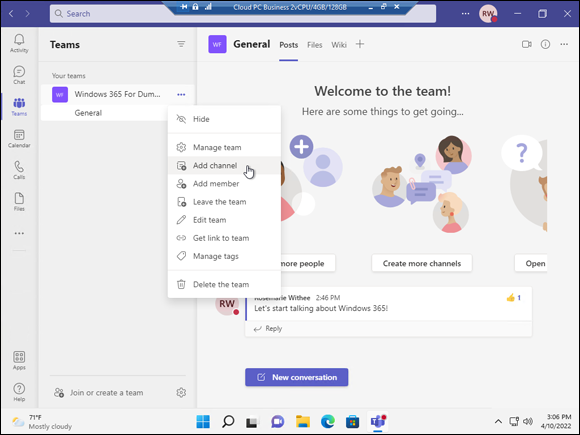
FIGURE 10-10: Choosing Add Channel from the settings menu for a team.
-
Enter a name and description for the channel in the dialog box that appears and then click Add, as shown in Figure 10-11.
The new channel appears under the team.
When you create a new channel, you can set a few options. First, you can set the privacy settings as shown in Figure 10-11. The options are standard and private. A standard channel is accessible to everyone on the team by default. A private channel is only accessible to a specific group of people. When you select Private, you then have the option on the next screen to add members to the channel. You can always add additional people to a private channel at any point in the future.
Second, you can also select the box to have this channel automatically show up for every person in the team. If you don’t select this box, the channel will show up as hidden, and people will need to click a button to see it in the list of channels in the team.
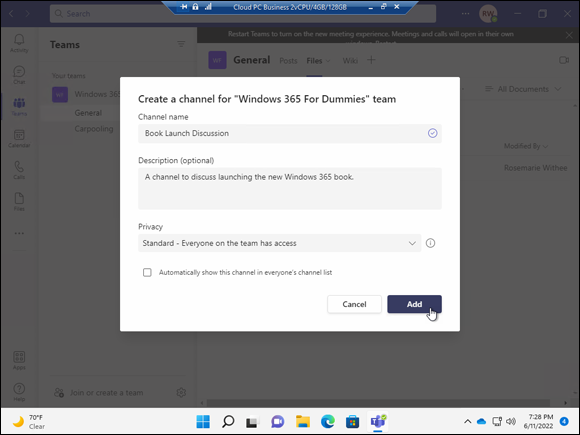
FIGURE 10-11: Filling in the dialog box to create a new channel.
 A channel is part of a team. A team can contain multiple channels, and each channel can contain its own threads of conversation. You can create chat channels for any topic you want. We see teams have a lot of success breaking out work-related channels from non-work-related channels, such as morale events in one channel and budget discussions in a different channel.
Some things to keep in mind with channels are:
- Each team can have a maximum of 200 standard channels.
- Each team can have a maximum of 30 private channels with a maximum of 250 members each.
- You can search using keywords in standard or private channels.
- Guest users cannot create private channels.
Configuring a Channel
You can configure many different settings for a channel via the More Options drop-down menu. You access these additional options by clicking the ellipsis next to the channel name you wish to manage. Figure 10-12 shows the More Options drop-down menu that appears next to the new channel we created in the previous section. The options that appear for a channel you add include the following:
- Channel Notifications: You can configure the notifications you receive for this channel. This is important as your organization’s use of Teams increases. Teams can quickly become noisy with everyone chatting about all manner of topics. You can use this setting to turn down the noise for channels that are less important to you and turn up the volume for topics you need to pay close attention to.
- Pin: Select this option to keep a channel at the top of your list of channels. You can pin multiple channels and arrange them in any order you want. Teams hides the Pinned area until you pin a channel. You can rearrange your pinned channels by dragging them up and down. And you can remove a pinned channel by choosing More Options and then selecting Unpin.
- Hide: Select this option to hide the channel from the list of channels you have in the team. You can always unhide the channel at any time. You will see a little message that lets you know how many channels you have hidden, and you can click it to see those hidden channels.
- Manage Channel: This option allows owners of the channel to manage the permissions for the channel, as shown in Figure 10-13. You can allow others to moderate the channel and control who can post new messages to the channel. See “Adding Moderators” later in this chapter for more on adding moderation to a channel.
- Get Email Address: A cool feature we use all the time is the ability to send an email message directly to a channel. You can configure the channel so that if you send an email, the message appears in the channel. (We frequently send a copy of our email messages to our channels!) Figure 10-14 shows the email address for the private channel we created. Whenever we send an email message to this address, it appears in the channel.
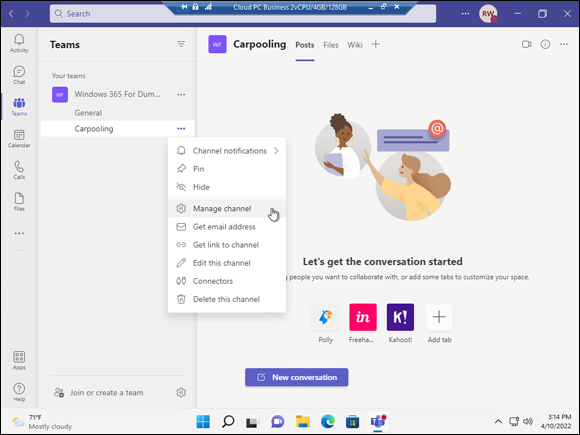
FIGURE 10-12: The More Options menu for a team’s channel.
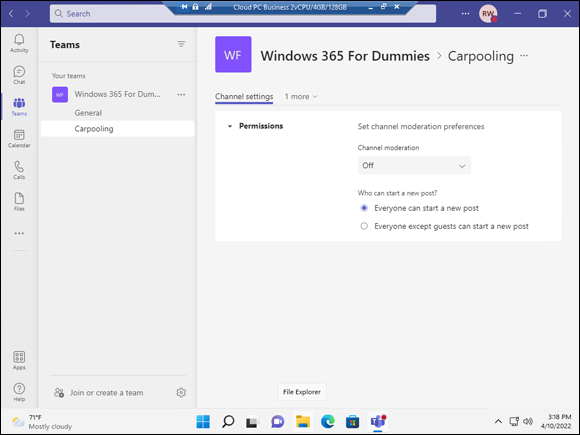
FIGURE 10-13: Managing the moderators and permissions for a channel.

FIGURE 10-14: Obtaining the dedicated email address to send email directly to the channel.
- Get Link to Channel: You can quickly get overwhelmed with the number of teams and channels in your organization. When you want to tell people about a channel, you can send them a direct link to the channel. You can get the link by using this option.
- Edit This Channel: When you first created the channel, you set the title and description. You can change those settings with this option.
- Connectors: Connectors are add-on apps. Think of them as custom extensions to Teams that you can add to a channel in order to connect with other software services. They allow you to connect other apps to your channel. There are many types of connectors, as shown in Figure 10-15. For example, you can connect your channel to GitHub or Zendesk or seemingly any other app on the Internet.
- Delete This Channel: When you are ready to remove a channel, you can choose this option to delete it.
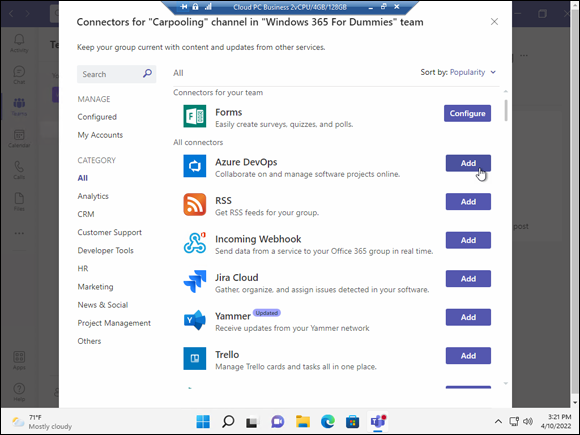
FIGURE 10-15: Viewing some of the connectors that are available for a channel.
Note which ellipsis you click to open the More Options drop-down menu. Figure 10-10 illustrates opening the menu for a team, whereas Figure 10-12 illustrates opening the menu for a channel. Channels appear underneath the team name, but it is easy to select the wrong ellipsis because they appear very close to each other.
Adding Moderators
One way to keep the team channel organized is to assign moderators. Moderators may only be assigned by team owners. With moderation, only an assigned moderator is able to start new posts and decide whether or not members are able to reply to posts. Using moderation allows you to leverage subject matter experts for a channel and ensure that their voices are heard. Think of a moderator as an air traffic controller. They can help things keep moving and avoid collisions.
The General channel and private channels do not have moderators by default. To turn on moderation for a standard channel, follow these steps:
- Click the ellipsis next to the channel name to which you want to add a moderator and choose Manage Channel.
- On the Channel Settings tab, open the Channel Moderation drop-down menu and select On, as shown in Figure 10-16.
- Click the Manage button to select who can be a moderator and then select which options require moderation.
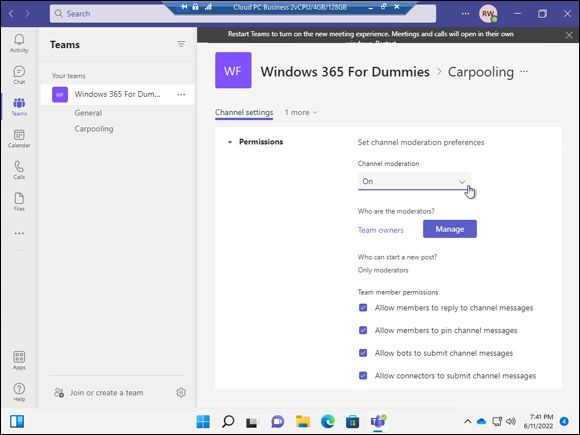
FIGURE 10-16: Turning on moderation for a channel.
You can allow or disallow members to reply in the channel and bots or connectors to submit messages.
Your changes are saved as you make them so there is no need to click a Save button.
A team moderator can do the following:
- Start new posts: Note that only moderators can start new posts when moderation is turned on.
- Add and remove team members as moderators to a channel: Moderators, however, cannot remove a team owner as a moderator.
- Control whether team members can post replies to existing channel messages: The moderator can also control whether bots and connectors can make changes as well.
Moving from a Channel to a Chat
The various ways you can communicate within Teams can quickly become confusing. As a quick recap, a team is a group of people, and a channel is an ongoing conversation within the team. You can be in multiple teams and each team can have multiple channels.
The nice thing about this system of communication is that it has structure. You can always select a team from the left navigation pane and see the channels in that team. However, you might also need to just chat with someone or with groups of people, and you don’t want to go through the process of setting up a new team or channel. Teams has you covered with a concept called chat. You find the Chat icon in the left navigation pane just above the Teams icon.
Starting a Private Chat
You can start a private chat by selecting the New Chat icon, located to the right of the Filter icon at the top of the chat list. The New Chat icon looks like a piece of paper with a pencil on it (see Figure 10-17). When you select the icon, a new chat appears in the main pane of the Teams workspace. Type in the name of the person you want to send a chat message to in the To: field, and then click that person’s name to add that person to the chat. After you have added the person to the chat, you can send a message just like you do in a channel. You type your message in the text box at the bottom of the chat area and press the Enter key on your keyboard or select the Send icon, which looks like a paper airplane.
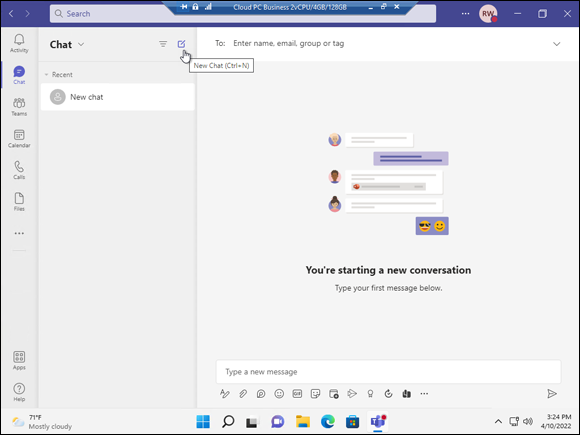
FIGURE 10-17: Starting a new chat in Teams.
Adding Multiple People to a Chat
The previous section covers how to start a new chat. You can chat with multiple people by adding them in the To: line when you start the chat. However, you may find that you want to add more people to an existing chat.
To add more people to a chat that has already started, select the Add People icon that appears in the top-right corner of the chat window. Then, type in the names of the people you want to add in the Add dialog box. If you are chatting with only one person and you add another person, a new chat will appear with the three people in the chat. If you already have three people in a chat and you add a fourth person (or more), you will be presented with the option of including the chat history for the new people you are adding.
 If you are chatting with one person, you cannot add another person to the same chat and share the history of the personal chat with the new third party. The feature of adding people and keeping the history of the chat only appears when there are at least three people already in the chat. Microsoft has said that this is done for privacy reasons and the expectation that if there is a one-on-one chat happening, Teams should not allow one person to share that confidential chat with other people.
Giving a Chat a Title
By default, a chat is listed in your chat list with the names of the people in the chat. Often a chat will take on a life of its own as more and more people are added, and the chat becomes the central point of communication for a topic. When this happens, we find it helpful to give the chat a title so that when we are looking through our list of chats, we can quickly remember the topic of that chat.
To add a title to a chat, click the pencil icon at the top of the chat and type in a name.
Pinning a Chat to the Top of the List
In addition to giving a title to a chat, you can also pin a chat so that it always appears at the top of the list. By default, chats are listed in order with the most recently used chat at the top. We like to pin a chat to the top of the list so that we can quickly get to that chat even if it has been a few days since anyone has added a message to it.
To pin a chat, select the ellipsis next to the chat in the left navigation pane and choose Pin from the More Options drop-down menu.
Sending More Than Text When Chatting
Entering text into a channel or chat is the most common way of sending your message to others on the team. However, you can send more than just text. You can send emojis, GIFs, stickers, and even attach files. These options appear at the bottom of the text box where you type in your message.
Adding a File
You add a file to the chat message. For example, you might be working on an Excel spreadsheet and you want to include it in the chat. You can add the file to your chat message using the paperclip icon. You can choose a recent file you have been working on, browse the files already uploaded to Teams, choose a file from OneDrive, or upload a file from your local computer.
When you attach a file to a channel, the file appears in the Files tab at the top of the channel. The Files tab is a SharePoint site behind the scenes. You can spot the Files tab at the top of Figure 10-9 in between the Posts tab and the Wiki tab.