Chapter 11
Managing Content with SharePoint and OneDrive
IN THIS CHAPTER
![]() Getting Familiar with SharePoint in your cloud PC
Getting Familiar with SharePoint in your cloud PC
![]() Understanding SharePoint sites
Understanding SharePoint sites
![]() Adding content to SharePoint
Adding content to SharePoint
![]() Using OneDrive
Using OneDrive
SharePoint and OneDrive go hand-in-hand and have been a part of the Microsoft suite of content management products for a long time. You get SharePoint when you sign up for a Microsoft 365 subscription. OneDrive is a file management system that you use to sync your files between SharePoint and your cloud PC.
In this chapter, you first learn how to create a new SharePoint site. You learn how Teams acts as a front end to work with SharePoint and how SharePoint is behind the scenes of many aspects of Teams. Next you learn how to work with SharePoint directly. You learn how to create a new SharePoint site, get documents into your SharePoint site, share documents, and sync content with OneDrive. Finally, we walk through some guidance and strategies for storing documents in SharePoint.
Finding SharePoint in Microsoft 365
In Chapter 2 we walked through signing up for Microsoft 365 and Windows 365. When you sign up for Microsoft 365, you can choose a subscription option that includes SharePoint. After you have signed up for Microsoft 365, you can access your SharePoint site.
To access the SharePoint site in Microsoft 365, you must first sign into Microsoft 365 and then choose SharePoint from the available apps. Here’s how:
-
Open your web browser (on your cloud PC or physical computer, any browser will do for SharePoint but we recommend using your cloud PC so you maintain your sign in) and navigate to
www.office.com.If you have signed in before, your dashboard will load. If you have not yet signed in, you will need to sign in.
-
Click the waffle icon in the top-left corner of the screen and then click SharePoint, as shown in Figure 11-1.
The Frequent Sites page appears, which lists your frequently visited SharePoint sites. If you have already visited some sites, then they will show up here and you can open them. If this is a new subscription, then you can create a site.
 You can also click SharePoint from the left side of the main dashboard to access the Frequent Sites page. However, if you are in another app, such as Outlook, you can always get to SharePoint using the waffle icon in the top-left corner. Also be aware that Microsoft tends to change things fairly frequently so your screen might look slightly different.
To create a new SharePoint site, follow the same procedure above to access SharePoint. Here are the steps to do it:
- On the main SharePoint Frequent Sites page, click the Create Site button, as shown in Figure 11-2.
- When you create a new SharePoint site, you can choose between a team site and a communications site. These are what are known as site templates. A site template creates a site based on specific scenarios.
- Click the Team Site option, as shown in Figure 11-3.
- Provide a name for the site and then click Next.
-
Add other members to the site if you want and then click Finish.
The site is created and loads in your browser as shown in Figure 11-4. Congratulations! You just created your first SharePoint site.

FIGURE 11-1: Selecting SharePoint from the main office.com landing page.
The team site template for SharePoint is completely different than Microsoft Teams. This can be confusing because in Microsoft Teams you can create a new team. And when you create a new team in Microsoft Teams, a SharePoint site is created for you on the back end. It would make sense if the site that Teams creates is the same as the site you are creating now based on the Team template. Unfortunately, however, this is not the case: The two sites are different. Keep in mind that the team site template is different from a site created from a team in Teams. Makes complete sense, right? The way we remember it is that the team site template in SharePoint was introduced long before Microsoft Teams was even a product. Microsoft Teams came along and took over the name, but the team site template still persists.
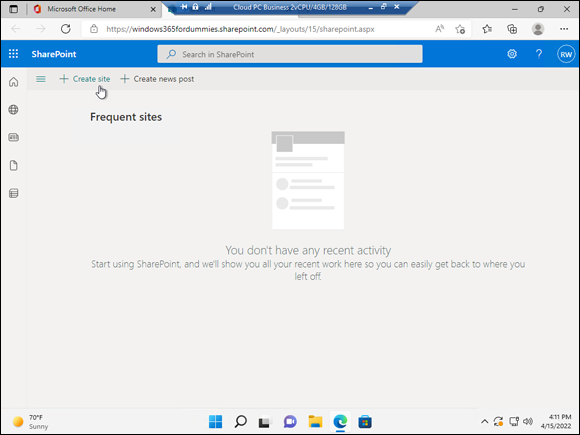
FIGURE 11-2: Creating a new SharePoint site.
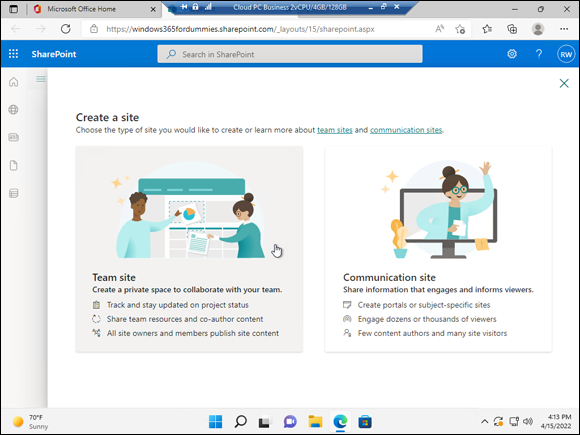
FIGURE 11-3: Choosing a template when creating a SharePoint site.
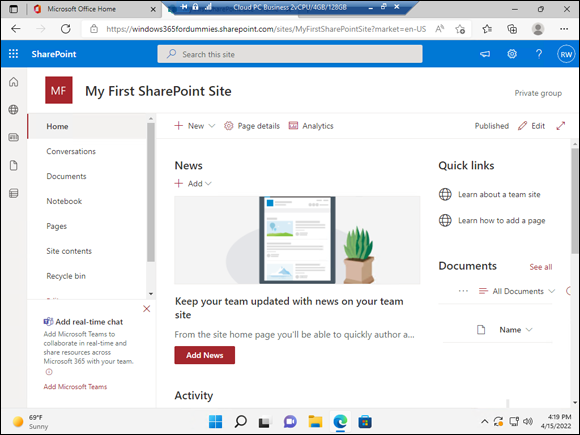
FIGURE 11-4: A brand new SharePoint site based on the team site template.
Exploring Your SharePoint Team Site
Although you can choose from many different site templates when you create a SharePoint site, the most popular is the team site template, as it contains a number of useful features for teams to share content and apps and collaborate on projects.
When you first open your newly created team site, you can do a number of things right out of the gate. From the left-side navigation menu, you can partake in Conversations (which is an integration with Outlook), you can store your digital documents in the prebuilt Document Library app (Documents), you can open OneNote to keep shared notes (Notebook), and you can create new web pages (Pages).
The default page that appears when you first open your team site is the Home page, which is also always accessible by selecting Home from the navigation menu. The team site home page has lots of useful functionality. It includes sections for news, quick links, activity, documents, and site comments. You can also customize the home page sections to fit your own needs.
Finding your way around
All SharePoint team sites have the same features. If you're using a new team site, your site should be similar to the one shown earlier in Figure 11-4. If you are using a default communication site, you will see a site using that template designed for communications. If your site has been customized, it may look slightly different. Never fear: All the same features are there. You may just have to hunt a little bit to find them.
Almost every SharePoint site contains the following major sections:
- Header: The header spans the entire top of the page. The header in a SharePoint page acts much like the menu in a traditional Windows application, such as Microsoft Word. SharePoint even features the ribbon in the page header, similar to the way the ribbon appears in the top of many Office applications. The header changes depending on what you are doing in SharePoint. If you refer back to Figure 11-4, a New button appears, allowing you to create new content as well as page details and analytic information. If you are working in a document library, then the header will have items related to that area of SharePoint.
- Left navigation pane: The navigation pane provides quick access to the site’s document libraries, lists, and discussion boards. You can even add links to content you create, such as documents and web pages. The navigation is fully customizable, and you can add any links you want. You can even add links to websites outside of SharePoint, such as a link to your partner website or any other favorite website.
- Page content: The content displays in the body of the page. Microsoft has done a nice job of providing a good default page for the team site. You can add your own pages and also customize the default page.
Generally speaking, the header and left navigation pane stay fairly consistent, whereas the body of the page changes to display the content of the web page. This is very similar to how most websites work. However, some sites have different layouts. For example, the Communication site includes navigation across the top and then large tiles and sections that are geared toward distributing information to an organization.
Microsoft has spent a lot of money on usability research to determine how best to lay out the pages in SharePoint. We highly encourage you to use the layouts provided by Microsoft instead of creating your own custom layouts. We have seen more than one site turn into a never-ending journey of changes and edits that end up causing confusion for people that land on the site.
Uploading documents
On a default team site (see Figure 11-4), the section in the lower-right part of the page is called Documents. This seemingly innocuous little section is actually an example of SharePoint at its finest.
A link to the Documents section also appears in the navigation menu. This is a common theme in SharePoint. There are seemingly endless ways to do any one task in SharePoint, which can make for some interesting breakroom chatter. One person might insist on how to do something in SharePoint whereas another person might insist on a different way. In SharePoint both ways can be correct!
In a nutshell, Documents is a digital repository to store your files. Adding a new file, such as a Microsoft Word document, to Documents is as simple as clicking the ellipsis link in the Documents header and then clicking New, as shown in Figure 11-5. If your screen is wide enough, you might not see the ellipsis and will see the New button directly on the Ribbon. After a document is located in SharePoint, you have all the content management functionality right at your fingertips, such as check-in/check-out, versioning, security, and workflow.
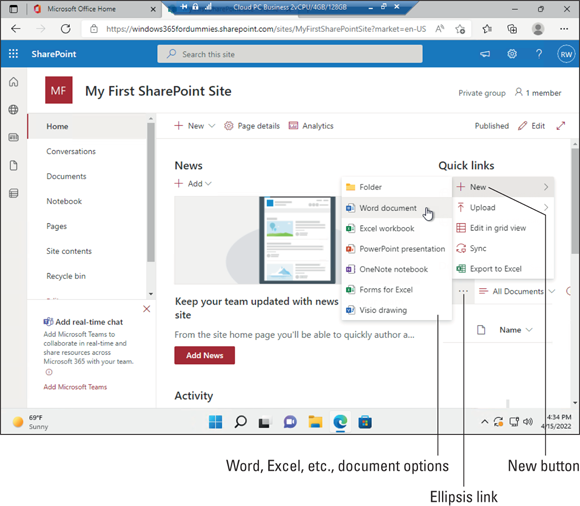
FIGURE 11-5: Adding a new document to a SharePoint team site.
Sharing your team site
A site without any users is a bit pointless. You can share your SharePoint team site in a number of different ways. The easiest way to share is to invite users to the site. When you share a site, the people you are sharing with receive an email with all the information they need to access the site.
To share your SharePoint site using your web browser, follow these steps:
- Open your web browser and navigate to the SharePoint team site you want to share.
-
Click the gear icon in the upper-right corner and select Site Permissions.
The Permissions pane opens.
-
Click the Add Members button and choose either to add members to the group of users who can access the site or to share the site only.
In this example, we chose to share the site only, as shown in Figure 11-6.
If you choose to add members to the group, you will be presented with a list of users who are already part of your Microsoft 365 subscription. If you are following along with the book, you will only see a single user (unless you have added more along the way). -
Enter the email address of the person with whom you want to share the site.
 If the person is outside of your organization, a message that alerts you to that fact appears. This notice is important, as you want to be careful not to share information outside of your organization if it shouldn’t be shared. If you are an administrator, you can turn off the ability to share with people outside of the organization completely.
 - Type a message to the person with whom you are sharing the site, confirm that the check box for Send Email is selected, and then click Add (see Figure 11-7).
In SharePoint, Microsoft lets you choose between using an older user interface experience or a newer user interface experience. The older user interface is called the classic experience. If you are using the classic SharePoint experience, your interface will be different than we describe here. For example, in the past, a Share button would be displayed at the top of a site. However, there could be a number of reasons why you may not see this button. We have seen where it doesn’t appear in the Chrome browser but appears in others. We outlined the procedure to share a site via the Permissions window because this method works regardless of whether you see a Share button at the top of your screen.
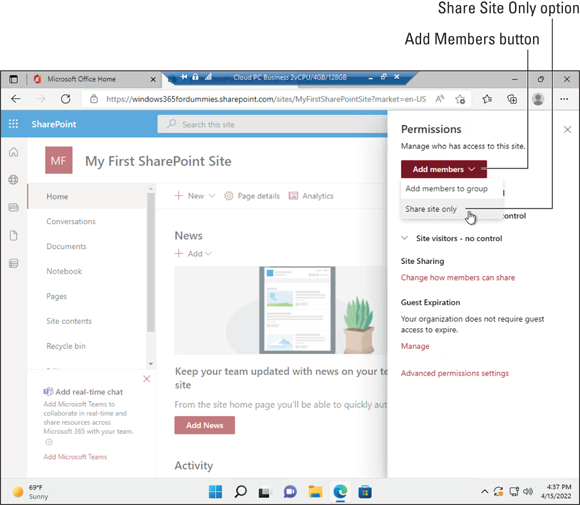
FIGURE 11-6: Inviting people to a SharePoint site.
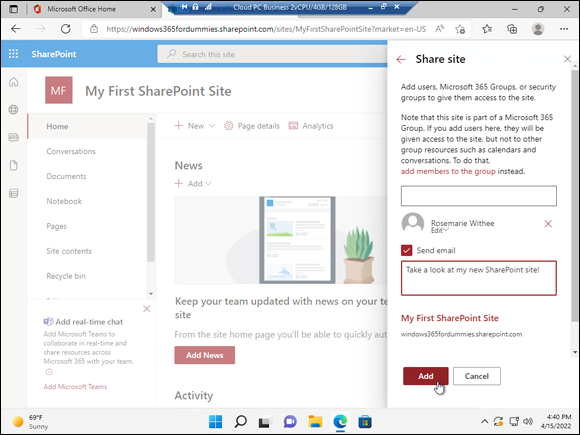
FIGURE 11-7: Sharing a SharePoint site by sending an email.
 If you don’t have permission to share access to the site, you won’t see the Site Permissions link when you click the gear icon — SharePoint automatically removes it. In general with SharePoint, if you read about something and it doesn’t match what you see on your site, it is probably due to one of two issues: First, you might not have the right permissions for that particular feature; or second, the feature might not be activated or configured for your site. For example, if email is not configured for your SharePoint instance, you won’t see the Share button.
Requesting a SharePoint Site
If you aren’t a site administrator, you won’t have permissions to create a new SharePoint site. In this case, you need to request one. Most organizations have a process for requesting a team site. For example, you might send an email request to the SharePoint administrator or fill out a form.
Getting Your Documents into SharePoint
There are many ways to upload your documents into SharePoint. You can upload them one at a time, or add a whole bunch in one swoop. You can even upload template files so that you can use them to create new documents within SharePoint based on the template. SharePoint doesn’t care whether you are uploading from within your cloud PC or from a physical computer.
Uploading files has become quite easy and intuitive with modern web technologies. If you are using your web browser, you can drag and drop them right into the web browser window. If you are using Microsoft Office, you can save them right into SharePoint without even leaving your Office application.
We cover getting files onto your cloud PC using File Explorer in Chapter 8. Another approach could be to upload your files from your physical computer using your web browser and SharePoint. In SharePoint, you can access your files from your cloud PC.
Uploading a single document
When you have a single document to upload into SharePoint, you can do so easily through a web browser. The easiest way is to simply drag the file onto the SharePoint app and drop it, as shown in Figure 11-8. Dragging and dropping the file into the web browser uploads it automatically to the SharePoint library. In this example we are adding a file from our cloud PC onto our SharePoint site. We could just as easily open SharePoint on our physical computer and drag a file into SharePoint that way, too.
You can also upload documents from directly within the SharePoint Mobile App. We have found this to be useful when we need to upload a document from another file-sharing service such as Dropbox into SharePoint so that we can work on it.
To upload a file using the SharePoint Mobile App, you first need to navigate to the site you want to store the document. On the team site, there is a web part that shows this on the main page. A web part is a special container in SharePoint that contains functionality. Scroll down the page to see the Documents section and then tap the small ellipsis that shows up next to the name of that location. (The Document Library called Documents, in this case.)
Uploading multiple documents
There may be times when you have multiple documents to upload. You can drag and drop multiple documents into SharePoint in the same way you do a single document. To select multiple documents, click the first document then, hold down the Ctrl key as you click additional documents to select as many as you want.
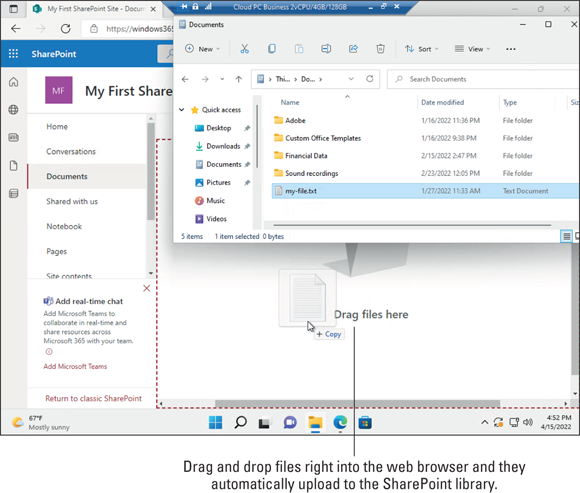
FIGURE 11-8: Dragging and dropping a document into SharePoint.
If you want to upload an entire folder of documents, choose the Folder option from the Upload tab and simply select the folder you wish to upload. All the files in that folder are uploaded to SharePoint. This makes it pretty nice when you want to get your content into SharePoint quickly.
Uploading multiple documents saves you time getting the documents into your app, but you still need to go into the properties for each document and set the properties for that particular document. Unfortunately, you can’t batch-upload properties. To learn about how to update properties for documents you upload, see the coverage of the Edit in Grid View option in the next section. Another option: If you have a developer on hand and need to work with documents in batches, then you can ask the developer to work with the SharePoint Application Programming Interface (API) and create a script to make the changes through code.
Your SharePoint administrator can block the upload of certain file types, such as executable (.exe) files. The reason is to prevent a malicious person from uploading a virus to SharePoint, because any user who clicked the virus file would run the virus. If you try to upload a blocked file type, you see a message letting you know that the administrator has blocked the file from uploading.
Sharing Your Documents
You’re probably familiar with network file shares: the file systems that enable people to upload files to a shared network drive so that other people can access and use them. File shares, when they were invented, revolutionized the ability of organizations to keep files in relatively secure locations and manage who had access. But SharePoint has done the file-sharing process one (okay, a whole bunch) better.
SharePoint apps based on libraries let you store and share files securely, and they also add features that help you manage things such as document workflow (the processes that let people edit, comment on, and approve documents) and version histories (what happened to a file, and who did what). And although file shares give you one path through folders to your document, SharePoint Library apps give you other paths to expose content. You can access documents directly through the browser, you can display them in Web Parts, and you can sort and filter them by their metadata and content types. And with Library apps, you can expose files by their title, not just their filename.
To share your document with others, they must know where to find the document. One way to do so is to send them the web address of the SharePoint site. You can also send them a link directly to the document itself.
To obtain the URL to a document in SharePoint, follow these steps:
-
Click the ellipsis next to the document to view the pop-up menu.
The document options are displayed.
-
Click the Share option and provide the person’s email address or name. You can also copy the URL link to the document on this dialog, too.
Alternatively, click the Copy Link option to copy a direct link to the document into your clipboard. You can then paste it into an email or chat so the person receives it. As long as your team members have network access and permissions to the document, they can click the link and open the file.
Recovering Deleted Documents
It is often said that SharePoint delivers on the promise of making people more productive through software. Although that’s not always true, one feature of SharePoint that truly delivers is the Recycle Bin. When you delete a document from an app, it isn’t gone forever. Nope. The document just moves to a holding place in your site — the Recycle Bin.
Go ahead and try it. Go to an app and delete a document. You can use the ellipsis menu to access the Delete command. You can also select the document and then use the Delete button in the ribbon. Either way, you’re prompted to confirm the deletion, and then your document appears in the Recycle Bin.
The Recycle Bin works for items in lists as well. A list is like a document library but instead of adding documents to it you add new items. For example, you might create a list of lunch spots nearby and then add new places you and your coworkers find to the list. When you delete a list item it appears in the Recycle Bin and you can restore it if needed.
Follow these steps to restore a document from the Recycle Bin to its original location:
-
Go to the Recycle Bin by clicking the Settings gear icon and choosing Site Contents.
The Site Contents page is displayed.
-
Click the Recycle Bin button in the upper-right corner to display the Recycle Bin.
This process works for any SharePoint template. If you are using the team site and following along with this chapter, then you can also just click the Recycle Bin in the left navigation. - Select the deleted document and then click the Restore link, as shown in Figure 11-9.
You can click the Delete link in the Recycle Bin to remove the file from your Recycle Bin. Doing so, however, doesn’t permanently delete the file. Instead, the file is moved to another Recycle Bin that can be accessed by the site collection administrator.
If you are a site collection administrator, you will see a link at the bottom of the Recycle Bin called Second-Stage Recycle Bin. If you click that, you will see the Recycle Bin for all the SharePoint sites in the collection. This is a feature of SharePoint that gives additional power to site collection administrators. So if a regular user accidentally deletes something and then goes into the Recycle Bin and accidentally deletes it from the Recycle Bin, a site collection administrator can still get the content back.
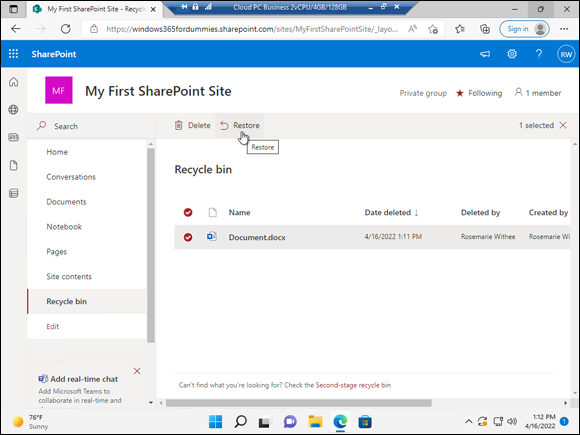
FIGURE 11-9: Restoring a document from the Recycle Bin.
Files remain in the Second-Stage Recycle Bin for a period of 30 days or until they’re deleted by the administrator, whichever comes first. When removed from the Recycle Bin, the fate of your documents depends on your company’s business continuity management plan. That’s a fancy way to say, how does your IT team back up data? SharePoint stores your documents in databases. An administrator can connect to a backed-up copy of the database and select individual documents to restore.
Uploading Documents into a Folder
You can use folders within your SharePoint apps as a means to organize your documents. We show you how to create a folder and upload files into it, but we urge you to first read the sidebar, “Why folders in SharePoint are evil.”
Saving Stuff with OneDrive
Your personal storage location, known as OneDrive, is designed as a place to store, organize, and share your documents, such as a carpool list you’re working on or a potluck spreadsheet. You might also be working on business documents that don’t really fit into any specific app in SharePoint. Your OneDrive is the catch-all place you can store it.
Think of your OneDrive as your personal Documents folder on your computer. The difference is that the personal Documents folder on your computer is only on that single computer. If you’re using a different computer, you can’t access those documents. In addition, if your computer crashes and you have not backed up your Documents folder, then those files are lost. OneDrive is designed to be a secure and safe place to store all your documents. What if your device crashes or is stolen? With your documents stored in OneDrive, you just sign in again from a different device and continue working on your documents.
Your OneDrive files are only secure and backed up if your IT team sets up the infrastructure that way. If you’re using SharePoint Online, then you can be assured that Microsoft is doing this for you. If your local IT team is running SharePoint for you, then check with them to make sure they back up and secure your OneDrive documents. This is because SharePoint Online is hosted and run by Microsoft, whereas SharePoint On-Premises is hosted and run by your internal IT team.
Your OneDrive is designed to live in the cloud and to be accessible by any device you happen to be working on. For example, if you start a document at work and then have to stop working on it when you leave to pick up your kids, you can sign in and continue working on the document when you get home. And if you later have to take your mother-in-law to the doctor, and you take your tablet with you, you can sign in from your tablet while you’re waiting in the doctor’s office. Finally, if you drop off your mother-in-law and make a quick stop at the grocery store, and you get an email on your smartphone asking about a detail in the document you have been working on, you can connect to your OneDrive on your smartphone and view the document so you can respond to the inquiry. Being this connected isn’t always the best way to spend your off-time, but OneDrive enables you to decide when and where you want to work. The idea behind OneDrive is that when you need your documents, you can access them as long as you can connect to the Internet.
OneDrive has been a source of confusion in the past because there was a separate OneDrive for business and a OneDrive for personal use. Microsoft has been making changes to try to reduce this confusion. Now, when you sign up for a Microsoft 365 subscription, you can choose either a home- based subscription or a business- based subscription. And OneDrive is included with all of the available subscriptions available. There is even a free Microsoft 365 subscription called Basic, which includes 5GB of OneDrive storage. The OneDrive discussed in this chapter is called OneDrive for Business, and it is designed for organizations and is part of SharePoint. A consumer version of OneDrive is also available at https://onedrive.live.com, but it is not part of SharePoint. It is a completely separate offering designed for general consumers, not organizations and business. When using the consumer version, your files are stored in the cloud on Microsoft servers. The consumer version of OneDrive is similar to other cloud storage services such as Dropbox and Google Drive.
Creating or Uploading Documents in Your OneDrive
When you first land on your OneDrive page, you are presented with a notice letting you know some tips about OneDrive such as accessing recent documents. OneDrive for Business is a place to store, sync, and share your documents. You can add documents to OneDrive by following these steps:
- Navigate to your OneDrive page by clicking the waffle icon in the top-left corner of your screen and choosing OneDrive from the menu (refer to Figure 11-1).
-
Click the New link at the top of the page and select the type of document you want to create, as shown in Figure 11-10.
- The blank document opens, ready for you to add content.
- On the other hand, if you want to upload an existing document, click the Upload button instead of the New button and then choose Files or Folder (Step 2), browse to the document you want to add to OneDrive, and click OK to add the file.
You can choose to overwrite the document if a document with the same name already exists. If versioning is turned on, a new version of the document will be created and the existing document will become the previous version. If versioning is turned off, then overwriting will result in the loss of the existing document with the same name.
The OneDrive site contains a number of ways to sort your document. You can sort the documents by things like the type, name, modified date, modified by user, and file size. You can also choose to do the sort in ascending or descending order. In addition, you can view the documents as a list, a compact list, or as tiles. You can find these options in the top-right corner of the screen. You can see all the documents you have recently worked on and all of the documents that are shared with you. You access these views by clicking the links in the left navigation pane (refer to Figure 11-10).
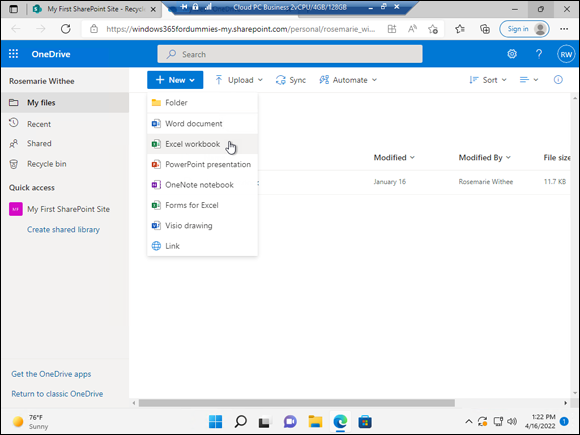
FIGURE 11-10: Creating a new document in OneDrive.
This chapter provides a brief overview of SharePoint and OneDrive. These topics have a lot of depth and require a book unto themselves, and we have written just such a book. If you want to go deeper in this area, then check out SharePoint For Dummies (Wiley) in which we go through all aspects of SharePoint in detail.
Discovering How SharePoint and Teams Work Together
Chapter 10 covered Microsoft Teams. Whenever you create a new team in Microsoft Teams you are also creating a new SharePoint site. When you select a team and then click the Files tab or Wiki tab at the top of the team you are viewing the contents of the back-end SharePoint site. Teams essentially becomes the front-end interface for using SharePoint. Teams even provides a menu item to open a document directly in the back-end SharePoint site.
To open a document in the SharePoint site, select the ellipsis next to the document and then select Open in SharePoint, as shown in Figure 11-11. The action opens your web browser and loads the SharePoint site that acts as the content storage mechanism for the Teams team.
Notice that the SharePoint site looks nearly identical to the site you created earlier in the chapter. That is the good news: When you get up to speed on SharePoint, you are already up to speed on the back-end content management system of Teams — because it is SharePoint!
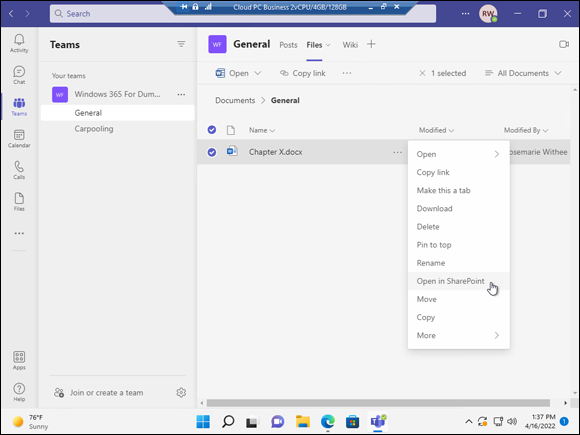
FIGURE 11-11: Opening a document in the back-end SharePoint site from Teams.