
Performance Techniques
There’s a famous moment in the musical A Chorus Line when the director of the show calls out to one of the dancers, “Don’t pop the head, Cassie!” He’s trying to tone down the star quality of one of the women auditioning for his show. He wants her to blend in with the chorus, not stand out from the crowd.
Some people just stand out. They’re not meant to blend in. However, whether you’re a natural showstopper, or your presentation skills need a little polish, there are things you can do that will make the most of what you’ve got and wow the crowd. That’s what this chapter is about: embracing extra techniques that enhance your presentation skills so you can look and feel like a superstar when you’re presenting.
Make It All About You
While your content and your superobjective are all about your audience, your performance techniques are all about you. You’re the main event! Your job as the presenter is to make it as easy as possible for your audience to hear you, see you, and understand what you’re saying.
A surefire way to get your audience to focus on you is to only give them the option to look at one thing—you. That means when you’re presenting, and you truly want to connect with your audience, it’s best to turn off your visuals.

If you’re going to black out your screen, you want to inform your audience that you’re going to do so. You can simply say, “I like to use the blackout key a lot during my presentations. It looks like this.” Then, show them the function in action. This will help you avoid audience confusion. You’ll bypass any thoughts that your technology has misfired and let them know any disappearing visuals are intentional.
“Blasphemy!” you may say. How can you possibly survive without something on the screen behind you? You can. In fact, you’ll raise the level of direct connection with your audience when you stop asking them to split their focus by looking at you and your screen. You can accomplish this by using the blackout function that can be found in many different programs. If you’re using a remote to control your visuals, you may even have an individual blackout key available to you. Shutting your visuals off momentarily works in a large room, a small room, or even in a one-on-one conversation. Remember, the goal is to have the audience look at and listen to you, the presenter. It’s easier for them to know which of those two things you’d like them to do when you get rid of other visual distractions.
Control Your Visuals
Of course, there are lots of times when you need your visuals to be visible. When you need to share your stage with visuals of any kind, remember: it’s your stage and your show. Visuals are there to enhance your performance and make it easy for your audience to understand your message. They shouldn’t dominate the presentation. When you want your audience to pay attention to a piece of data, a software function, a video, or other visual, a bit of performance technique can help you effectively share the stage with your supporting technology.
If you want people to look at something on a screen that is behind or to the side of you, start by giving them a specific instruction. Tell them where their eyes should go, and then give the audience time for their eyes to go there. Take a step to the right or left to open yourself up to the screen. This helps your audience continue to see your face while clearing the screen behind you.
Allow the audience a moment to see and comprehend the information you’re sharing with them before you continue to speak.

It’s not enough to say, “Look at the screen.” Try something like this:
“I want to review this quarter’s numbers. Please take a look at the upper-left side of the screen.”
Then pause, and give your audience a chance to do so.
Look Where You Want the Audience to Look
A lot of time is spent in the theater getting the audience to look at exactly the right place at the right time, to catch the piece of action the director wants them to. The director may accomplish this through a variety of technical means (spotlights, etc.). But perhaps the strongest directional option available on stage is the focus of the other actors. The audience looks where the actors look, so a director will ensure that all of the actors are looking in the same place for certain important moments.
Your own gaze is just as powerful a tool in your presentation. To get your audience to look where you want them to look, you, the presenter, need to look there yourself. Want the audience to focus on your screen? Turn (momentarily) and look at it yourself. Want them to focus on a flipchart or small item in your hand? Same thing. Always use your visual focus to guide that of the audience. (We’ll cover this technique in Chapter 10.)

One thing that has tempted many presenters is the siren song of their own visuals. Whether as a nervous reaction, or an act of subconscious admiration, lots of speakers find themselves sucked in to staring at, and speaking almost exclusively to, their screens or other visuals.
When you turn and look at your visuals in an effort to guide audience focus, be sure to return to facing front before you begin speaking again. It might feel good to just keep staring at that screen and pretend your audience isn’t there. But you’ll never connect with your listeners if you spend an entire hour speaking to everything but your audience.
Get Away from the Furniture
If there’s one thing I can’t stand as an audience member, it’s the old standby lectern. Why do I loathe a lectern? Because it’s an invitation for speakers to hide a majority of their visual communication from the audience. As good as it may feel to rest your elbows on a lectern, if you choose to stand behind one, you merely become a talking head.

Podium A platform or stage that you step on.
Lectern A structure that you can stand behind and use for your notes.
There’s a difference between a podium and a lectern—and an easy way to remember it. The word podium comes from the Latin root ped, or pod in Greek. Both ped and pod reference the foot. (Think podiatrist—the foot doctor.) So, a podium is something you put your feet on.
Lectern comes from the same Latin root as the word lecture. And from where are many lectures delivered? That’s right, a lectern. This is because, often, lecturers want a place to rest their notes. To recap: lectern, where speakers stand and rest their notes during a “lecture.” Podium, where speakers stand and rest their “pods”—errrr, feet—for a presentation.
Regardless of your height, lecterns can hide a large portion of your body from your audience. Since we know that your physicality is a huge part of the overall communication of your message, taking that much of your body out of commission is a detriment to you. The best thing you can do? Step away from the lectern. Let your audience see your entire body. Use strong gestures and stage movement to your advantage. Even if you need to stand next to the lectern in order to stay “in your light,” it’s still better for your audience than standing behind it. (We’ll talk about “finding your light” in Chapter 9.)
You may find yourself in a situation where your microphone is attached to the lectern. If that happens, see if you can point the microphone toward one side of the lectern or the other so that you’re still able to stand next to it rather than behind it (Figure 8-1). Most lecterns have moveable microphones.
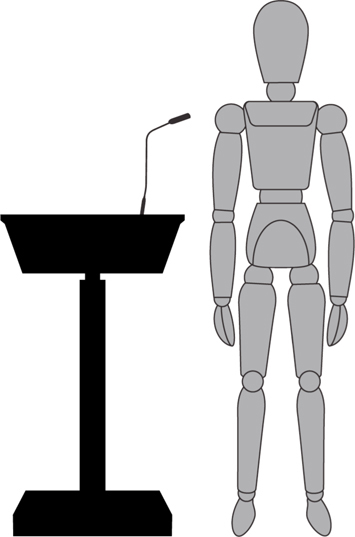
Figure 8-1. Try this setup to get out from behind the lectern
Remember, it’s your stage. Should you arrive for a presentation and a lectern is present, be brave and see if you can have it removed. Your audience will thank you. If you can’t have it taken away, you’re now armed with solutions to avoid the fate of a talking head.
What about when you need to use the furniture on stage? The same still holds true: avoid standing behind it as much as possible. Here’s a way to make your presentation space more presenter (and audience) friendly. Take a look at the stage layout in Figure 8-2.
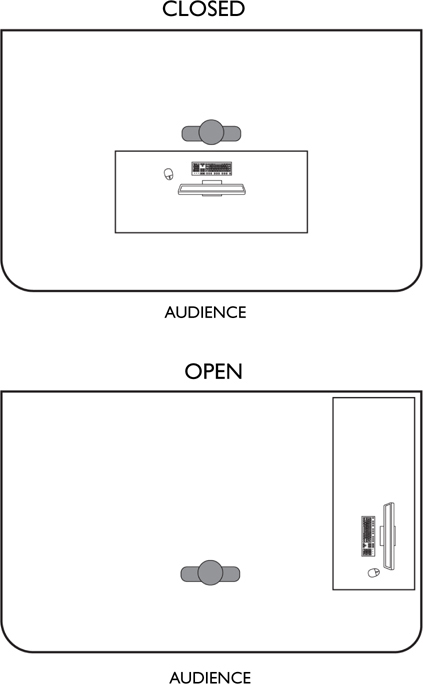
Figure 8-2. Bird’s-eye view of an adjusted stage layout
You’ll notice that the demo table, computer and all, has been positioned in such a way that you can run your demo while facing your audience and still have an open space in which to present—eureka! Any time you don’t have to use your computer, you can step away from the table entirely, take center stage, and use strong movement to really connect with your listeners. No hiding behind tables for you!
If you’re in a situation where you can’t move your table, you should still embrace the idea of stepping out from behind it and getting closer to the audience whenever you can. Want a double dose of power? Present what you need to from your computer, then black out your screen and cross in front of your table, closer to your audience. You’ll have complete command of your presentation space.
Don’t Match the Backdrop
If you’re unfamiliar with the location of your speaking engagement, ask the meeting planner, or anybody else who may know, what color the backdrop will be when you are speaking.
BackdropThe hanging behind you when you’re on stage. It’s often used to cover lighting instruments, or stage infrastructure, or simply to give presenters (and actors) a clean “set” to stand in front of. Backdrops are often made of stage curtain material; however, they may also be a screen or a tarp-like material branded with the logos of various sponsors or products.
The goal of this entire chapter is to make you stand out and not blend in. Despite all of your best efforts, if you visually fade away into the background, you’ll fall short of your goal!
The key to standing out from your backdrop is in war-drobe color selection. You want to choose a color that contrasts with your backdrop to avoid “floating-head syndrome.” This will also help your audience see you if the lighting is dim. If you can’t get this information ahead of time, bring a few different top options to your speaking engagement, and try to find out your backdrop color ASAP.

Stage actors spend a lot of time performing in front of large, black curtains, or in small stage spaces called “black boxes.” In a black box, everything in the space is black—walls, floor, ceiling, everything. In most cases, a costume designer gets to worry about this problem. However, occasionally, the actors may be dressing themselves. Many actors choose to wear jewel tones on stage for just this reason: emerald greens, ruby reds, subtle golds, and deep purples can keep them from visually fading away. Wearing a suit? Navy with a white shirt and a bold tie can do the trick as well.
Reading Your Audience
Reading your audience can be difficult. If you’re on a big stage, it’s hard to see the looks on people’s faces or what their body language is saying. Remember, Audience Analysis always helps. (If you haven’t already, go back and review Chapter 4.)
If you’re close enough to actually see your audience, like in a small conference room, look for positive verbal and nonverbal cues to see if they’re with you. Head nods and smiles are obviously a good sign, as is more looking up at you than down at devices. (Bear in mind that this isn’t a hard-and-fast rule. Personally, I’ve been very engaged in certain presentations but chosen to take notes on a device. I try to remember this when I have audience members buried in their devices.)
An obvious, but often overlooked, technique is the audience check-in. To easily see if they’re engaged, simply ask them! Be sure to wait for an actual response—whether a head nod, raised hand, or verbal answer—from your audience before moving on.
Meeting and Greeting
If you have the opportunity, take a few minutes prior to your presentation to meet and greet your audience. You’ll get a good feel for what’s going on with them if you simply talk to them.

As a manager, it’s important to know that your team is with you. You’re going to need them to take action on your information at some point—otherwise, why give a presentation at all? A simple audience check-in is effective regardless of whether you’re presenting to your team, your entire organization, or people you’ve never met at a conference. Want to make sure that your audience is with you? Try these:
“Any questions up to this point?”
“Are you with me?”
“Does this make sense so far?”
“Sound good?”
When I don’t know my audience, I work hard to introduce myself to as many people as possible beforehand, regardless of the size of the crowd. I ask, “What are you hoping to get out of today’s session?” This informal poll doesn’t alter my content—that’s already set and well rehearsed—but it allows me to hone in on points that may be hot topics for the audience. Also, the more people I meet, the more names and personal references I can use during my presentation.
Meeting and greeting your audience arms you with more information, while helping you build a rapport with them. This simple action shows that you care about your listeners and their needs and concerns. They’ll be more inclined to listen to you because you’ve shown interest in them before you’ve even begun your presentation.
When you make the effort to meet and greet your audience, you can add personalized statements like this to your presentation:
“I was speaking to Marvin from accounting prior to this presentation, and he’s really interested in top tips for presentation nerves. Anyone else looking for similar advice?”
Here are some other meet-and-greet questions you can ask your audience as they arrive:
“What brings you here today?”
“What’s the most important thing that I could cover in today’s session?”
“Anything you’re looking forward to hearing from me today?”
Ordinary presenters blend in. They might huddle away from their audience as they enter the room, or hide behind their lectern for the duration, or stare at their screen for an hour. You don’t want to blend in, you want to stand out from the crowd and really impact your audience. Go ahead, Cassie—pop the head! These performance techniques can help take your presentations from ordinary to extraordinary.
Manager’s Checklist for Chapter 8
![]() Prepare to work with your visuals, not for them.
Prepare to work with your visuals, not for them.
![]() Know where you will use the blackout function, and be ready to inform your audience.
Know where you will use the blackout function, and be ready to inform your audience.
![]() Use directional language to tell your audience exactly where to look.
Use directional language to tell your audience exactly where to look.
![]() Look where you want your audience to look.
Look where you want your audience to look.
![]() Make the most of your stage!
Make the most of your stage!
![]() Get away from the furniture. If possible, have any lecterns, tables, etc., that you won’t need removed.
Get away from the furniture. If possible, have any lecterns, tables, etc., that you won’t need removed.
![]() Dress to avoid blending into the backdrop.
Dress to avoid blending into the backdrop.
![]() Read and check in with your audience.
Read and check in with your audience.
![]() Look for verbal and nonverbal cues to ensure your audience is with you.
Look for verbal and nonverbal cues to ensure your audience is with you.