
The Blueprint for Every Presentation
We’ve identified our objectives and tactics and done our Audience Analysis. Armed with all of our prework, it’s time, with the help of this chapter, to put our content together via the Blueprint. Then, we’ll translate it into presentation notes that work for you.
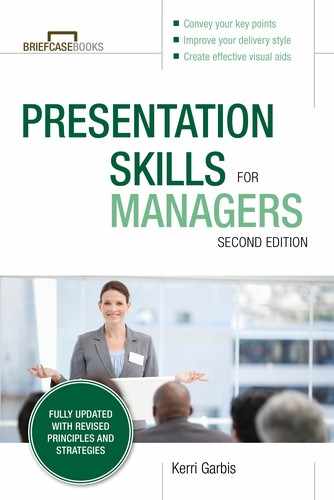
The Blueprint is a simple way to put your content together and organize all of your prework (Figures 6-1 through 6-3).
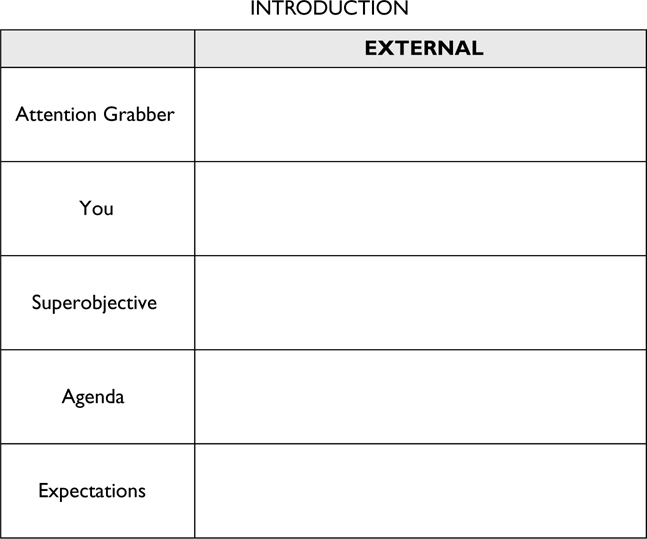
Figure 6-1. Presentation Blueprint: Introduction
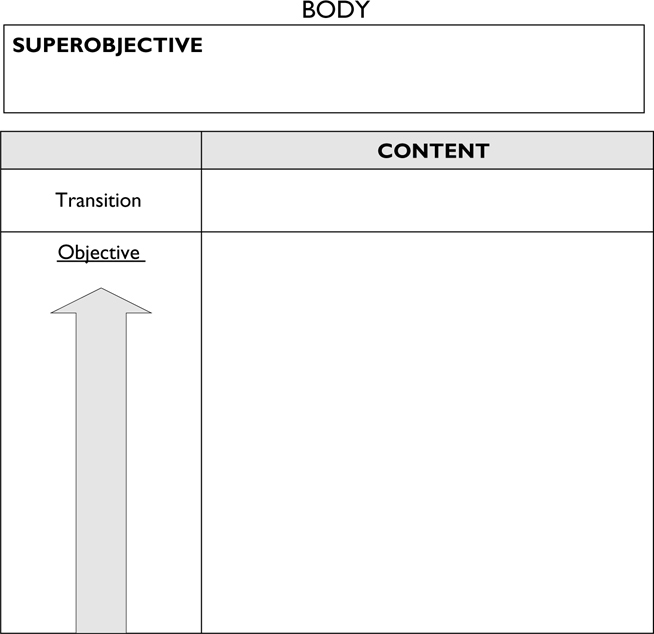
Figure 6-2. Presentation Blueprint: Body
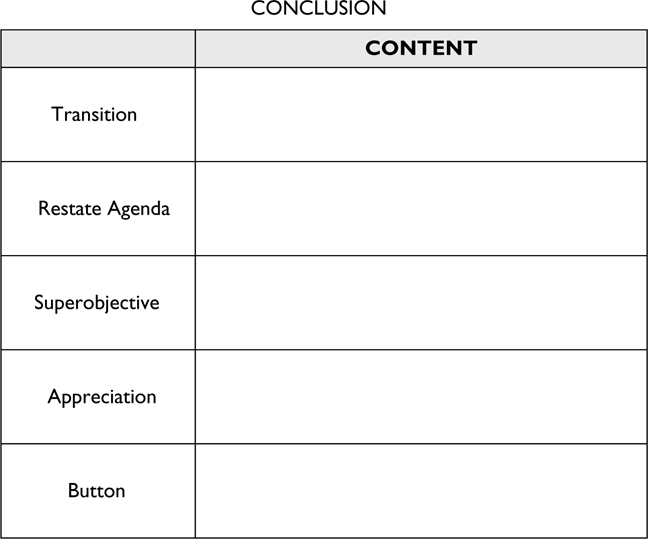
Figure 6-3. Presentation Blueprint: Conclusion
These three pages are the basis of the Blueprint. You can find a full version of the Blueprint in the Appendix.
Introduction
Let’s first examine the the introduction to your presentation.
Finding the Perfect Attention Grabber
When I was in college, along with getting my BFA in musical theater, I minored in music education. In one of my education classes, we had to teach a basic musical concept. I was assigned the sixteenth note: what it is and what it does. This mock lesson was intended for elementary school kids, but we were going to deliver it to our college peers. I wanted to teach the most engaging lesson that I possibly could.
I worked out my lesson plan, but I needed to figure out how to put it in the world of my audience—in this case, the college student. So, I based my entire lesson around pizza. I began by asking the class, “Who likes pizza?” After receiving a resounding “Me!” from most of the audience, I presented one very large, whole cheese pizza from my favorite pizza place near campus.

It’s difficult enough when you have your own presentations to plan and deliver. But what if you also need to oversee presentations given by your team for a conference or major event? The Blueprint is an extremely useful tool to implement teamwide. Not only will it help your team develop their presentations (just as it will for you!), but it will help everyone identify problems and make improvements with ease through uniformity of structure. It’s far simpler to work on a large project like a major presentation when everyone is speaking the same language conceptually.
I said, “This pizza is a whole note. If you cut it in half,” which I proceeded to do, “you get two half-notes. Cut them in half, you have quarter notes. One more cut, and you have eighth notes.” My final cut produced what represented sixteenth notes, and everyone got a small slice of pizza.
I remember glancing at my professor in the back of the room during my lesson. He was furiously taking notes and looking slightly confused. When I got my grade, I was stunned by the first comment the professor wrote: “What the heck are you doing?” (This isn’t what he actually wrote but a very cleaned-up version.) The comment that followed was, “Oh, I get it.”
He eventually got on board with my lesson plan, but what had inspired his initial response was my attention grabber. Like any good speaker, I wanted my opening statement to say or do something to grab my audience’s attention, so I began by asking, “Who likes pizza?”
Pizza has nothing to do with music, and asking about it was unexpected. I had fully grabbed the class’s attention. (I also received an A on the assignment with this final comment: “You’d make a great teacher!”)

Attention Grabber One of the most important parts of your presentation. It will make or break the impression the audience has of you. It’s the very first thing you say or do at the beginning of your presentation. It lets your audience know your “show” has started.
Bear in mind, your attention grabber doesn’t have to be cheesy (no pizza pun intended) or awkward, but it should be engaging and perhaps even fun for your audience. Most of all, it should signal that your presentation is about to begin and that you’re now in charge of the room.
Where can you begin? Attention grabbers come from a wide variety of sources. They can be simple or elaborate. They can be funny or not. They can be verbal or physical. The possibilities are endless! But whatever you choose, make sure to commit to it fully.

Dedicate time to creating your attention grabber. I recommend mapping out your content first and then returning to the top to solidify your attention grabber. If you’re comfortable with thinking on your feet, you can wait until just before your presentation and pull something from your presentation environment. However, if you choose to try an on-the-spot attention grabber, be prepared with a backup in case nothing occurs to you.
When exploring your attention grabber, try different options. See what feels best to you in your Rehearsal Process. Ask for feedback from peers.

![]() Ask a question of your audience. Make sure you leave time for hands to be raised or an audible response.
Ask a question of your audience. Make sure you leave time for hands to be raised or an audible response.
![]() Tell a story (see Chapter 7).
Tell a story (see Chapter 7).
![]() Display a visual: picture or video.
Display a visual: picture or video.
![]() Play an audible: music, song, or sound cue.
Play an audible: music, song, or sound cue.
![]() Share a quote: lyrics, passage from literature, inspiring words.
Share a quote: lyrics, passage from literature, inspiring words.
![]() A combination of any or all of the above.
A combination of any or all of the above.
For instance, you might show a picture of someone and ask, “Does anyone know who this is?” This is a unique way to get your audience to look away from their handheld devices and get ready for your presentation!
What if your attention grabber fails? (It happens to all of us: I thought it would be a great idea to make a joke about a member of the New England Patriots to a Boston-based audience. No one laughed.) If it tanks, don’t stress. You’ve got a lot of time to recover during your presentation. This is why we’ve also got to have a strong, rehearsed conclusion.

I was speaking at an off-site conference and was invited to have lunch with my audience just before I was speaking. One of the women sitting at my table was telling me how much she was enjoying the event. In the most charming singsong voice she said, “This is the best conference everrrrr!”
When I began my presentation I started by saying, “You all have big shoes to fill. Bridget over here just told me that ‘This is the best conference everrrr!’”
You
It’s time to introduce yourself. The most important thing to do is let the audience know who you are and why they should listen to you speak. While you don’t need to recite your entire resume or educational history, you should present the audience with the top reasons why you’re standing in front of them (Figure 6-4).

Figure 6-4. An example of a three-point “you” introduction
However you choose to introduce yourself, keep it positive. Your introduction sets the tone for the rest of your presentation.
In need of a formula for your personal introduction? Share three facts about yourself. Why three?
The Three Stooges. The Three Bears. Three Little Maids from School. We inherently love groupings of three. But it’s not just because we’ve heard or seen them since story time in nursery school. Three items are the least number of things you need to make a pattern, and patterns are satisfying to your audience. You’ll help them remember who you are long after your presentation is done.
Superobjective
Your next step is to articulate your superobjective to your audience. It’s a good thing you already know what that is!
Articulating your super-objective for the audience lets them know what they’re in for and what the end goal is. There’s absolutely no ambiguity. You’ll have a higher likelihood of achieving your goal if you’re able to articulate it at the beginning (Figure 6-5).

Figure 6-5. A concisely communicated super-objective
Agenda
A terrific way to pique the interest of your audience is to let them know what you’ll be covering in your presentation. Mind you, you don’t need to issue a spoiler alert—there’s no need to give away every single topic you’re going to address. You may want to keep some elements of your presentation a surprise! But when you give your audience a look at what’s coming up, you’ll get them on the hook with information they (hopefully!) can’t wait to know. Outline your agenda, and you’ll help maintain their attention throughout the presentation (Figure 6-6).

Figure 6-6. A brief highlight of an agenda
Expectations
This final part of the introduction is your chance to set the rules for your presentation. This is the time to let your audience know if you want to take questions during the presentation or at the end during a Q&A portion. (We’ll address the different ways of handling Q&A later.) Audience expectations might also include breaks you’ll take during your session, logistics you want to announce (like the location of beverages or restrooms), or physical activity involved in the session (perhaps for interactive exercises). Remember, this is your show, and this is your time to set the rules (Figure 6-7).

Figure 6-7. An outline of some expectations
Organizing Your Presentation Body
The body pages are the place to organize all of your content outside of the introduction and conclusion. You can use as many of these pages as needed (See the Blueprint in the Appendix.)
At the top of each page, you’ll notate your superobjective. That doesn’t change. We leave it there as a constant reminder, to keep it top-of-mind. All of your content always works toward your superobjective.
You want to dedicate one page to each individual objective. Remember, these are different than your superobjective, and usually align nicely with your key points.
Transition
There’s a line on the body page for a transition. As with our attention grabber, they can be as simple or elaborate as you’d like, as long as they signal to the audience that you’re moving on to another major thought. You’re helping the audience follow you from one section to another, or from one thought to the next (Figure 6-8).

Figure 6-8. An example of a good transition
Objectives and Tactics
The left column is used to list each of your individual objectives and the tactics you will use to achieve each goal. On the right side you can list some thoughts, or perhaps even the actual words, that you may want to use during your presentation. Don’t forget, one body page=one objective. However, you’ll likely have multiple tactics per objective (Figure 6-9).
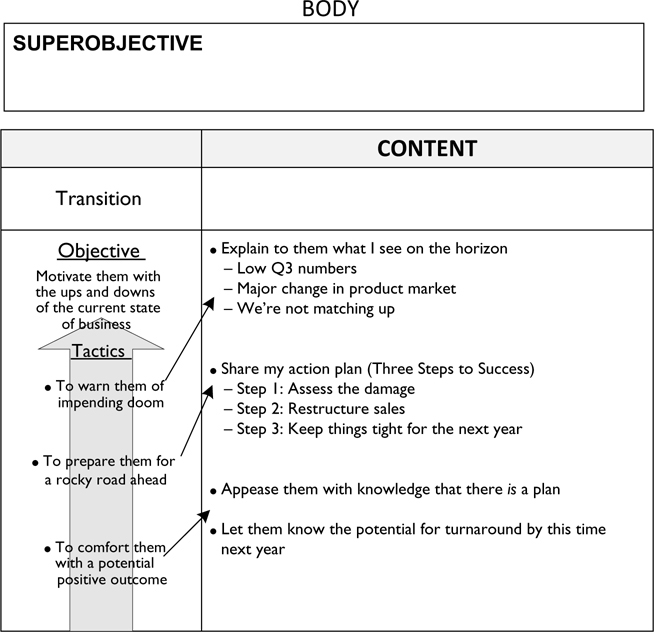
Figure 6-9. Sample body page with objectives and tactics
Say you’ve chosen three tactics for a particular objective. They are to warn your audience of impending doom, to prepare them for a rocky road, and to comfort them with a potential positive outcome. When you’re developing your content, you can link up those tactics with your notes, as in Figure 6-9.
Conclusion
Finally we come to the end of the presentation. Here’s how to do this effectively.
Restate Your Agenda
Now, we simply need to remind the audience of what they’ve heard and give one last push toward your superobjective. With one last transition, you’ll move to restating your agenda (Figure 6-10).

Figure 6-10. Restate your agenda
Superobjective
Don’t forget, your superobjective is the whole reason you’re there! This is your final opportunity to articulate this powerful call to action. Remind them what it’s all about.
Appreciation
It’s time to say all of the “thank yous” that you need to (Figure 6-11). Thank any meeting planners, VIPs, or players within the organization that you want to acknowledge. Most important, thank your audience. They’ve been with you every step of the way, and without them, there’d be no presentation!

Figure 6-11. Thank those you need to in the appreciation section
Button
In musical terms, the button of a song is the very last moment of music at the end that lets the audience know it’s time to applaud. It might be a loud chord, or a drum roll, or a cymbal crash. Whatever it is, it inspires the audience to respond, hopefully with rousing cheers!
In terms of a business presentation, the button is your opportunity, as the presenter, to do the same. The button is the flip side of your attention grabber: you use the attenion grabber to let the audience know it’s time to begin, and the button to let the audience know it’s time to end. Give your button as much care as you did your attention grabber! It might be a story, a quote, or even a reiteraion of your superobjective. Remember, the button is the very last thing your audience will hear, so be sure to make it memorable.
Working with Your Performance Notes
Your content is now all mapped. Prior to beginning your Rehearsal Process, you need to put together your presentation notes. What your notes look like is completely up to you; there are many different options and styles. Try a few of them during your Rehearsal Process to see which makes the most sense for you.
Try some of these:
![]() A song quote that relates to your point: “As the great Rolling Stones once said, ‘You can’t always get what you want.’ But clearly right now, we’re getting what we need.”
A song quote that relates to your point: “As the great Rolling Stones once said, ‘You can’t always get what you want.’ But clearly right now, we’re getting what we need.”
![]() A story about your presentation experience, with a restatement of your superobjective: “On the way here this morning, I was thrilled about sharing these findings with you. I hope you are as pleased as I am and inspired to go out and tell your patients the good news.”
A story about your presentation experience, with a restatement of your superobjective: “On the way here this morning, I was thrilled about sharing these findings with you. I hope you are as pleased as I am and inspired to go out and tell your patients the good news.”
![]() Echo your attention grabber: “I’ve enjoyed my time here today; it certainly is ‘The best conference everrrrrr.’”
Echo your attention grabber: “I’ve enjoyed my time here today; it certainly is ‘The best conference everrrrrr.’”
When writing out your notes, work toward short bullets or an outline of ideas. You’ll be well rehearsed for the actual presentation, so your notes are just a few words to prompt you in the right direction. Some speakers will highlight a few of the most important words of their presentation in their bulleted notes.

Once your Blueprint is completed, it is now the ideal time to create your visuals. Let them be informed by your Blueprint, superobjective, objectives, and tactics. Bear in mind, if your visuals are already created, you still need to do this prework. Visuals aren’t a substitute for the Blueprint.
Types of Presentation Notes
As mentioned, there are lots of different ways to take and use your presentation notes. It’s all about what works for you. Here are a few ideas to get you started:
Whether your notes are a hard copy, digital, or viewable on a confidence monitor along with your visuals, make sure the font size works for you. It’s very frustrating as an audience member to watch a speaker struggle with reading glasses or excessive squinting when referring to his or her notes. Also, make sure that if you’re working from paper, your pages are numbered sequentially. If possible, staple them together.
Use the Blueprint
The Blueprint as a whole allows you to keep track of where you are in your presentation and helps you keep an eye on your objectives and tactics. A simplified option is to use only the content side of the Blueprint (the right side of the individual body pages) as your performance notes (see Figure 6-9).
Notes-to-Visuals
To ensure your content is matching up with your visuals, print out a small version of each slide or visual with your corresponding notes.
Visuals Only
If you don’t want to hold paper or a device, opt for entering your performance notes into the visual program itself. This can be especially helpful when speaking in large conference rooms or theaters. Often, there will be a monitor placed in front of you, out of sight of the audience. With a quick glance, you can stay on track and on point.
Writing out your script can be a very helpful technique. However, you shouldn’t memorize an entire script for your presentation. You can memorize elements of your presentation (the introduction and conclusion are good options), but it can be detrimental to your delivery to rely on memory for your entire presentation. What happens if you forget your next line?
Without professional training, a recited script can sound just like that—a recited script. The goal here is to get your audience to change their perspective and take action. To do that well, you need to create an emotional connection with your listeners. If the audience thinks you’re reading, even if it’s just reading a script from your brain, the authentic connection is difficult to achieve. Just say no to script memorization.
Following is a sample of my notes from an actual presentation (Figure 6-12). I like simple phrases. I use an asterisk to identify where my visuals change and a B where I black out the screen completely. (We’ll address this in Chapter 8.) I always have the superobjective on top as a constant reminder of my overall goal.
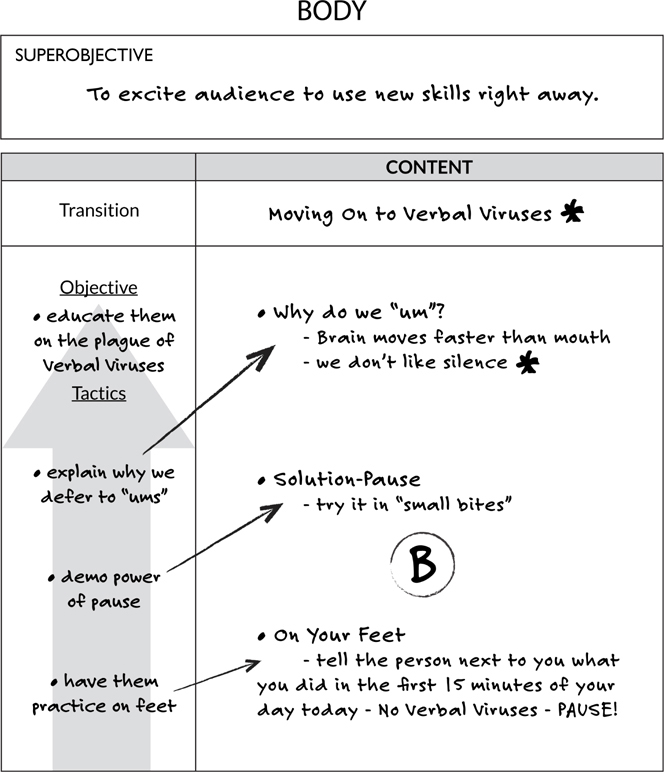
Figure 6-12. Sample of marked performance notes
The Blueprint takes the guesswork out of presentation prep. Just as a builder wouldn’t dream of starting a new house without a plan, you shouldn’t think about giving a presentation without one!
Manager’s Checklist for Chapter 6
![]() Craft your introduction. Don’t forget to include:
Craft your introduction. Don’t forget to include:
![]() An attention grabber to take hold of your listeners.
An attention grabber to take hold of your listeners.
![]() A section all about you.
A section all about you.
![]() A brief outline of your agenda.
A brief outline of your agenda.
![]() Expectations for your audience.
Expectations for your audience.
![]() Make sure your superobjectives and tactics take a front seat!
Make sure your superobjectives and tactics take a front seat!
![]() Use transitions to keep your audience on track.
Use transitions to keep your audience on track.
![]() Fill out as many sheets as there are objectives in your presentation.
Fill out as many sheets as there are objectives in your presentation.
![]() Create your conclusion.
Create your conclusion.
![]() Restate your agenda.
Restate your agenda.
![]() Remind your audience of your superobjective.
Remind your audience of your superobjective.
![]() Thank all the necessary parties.
Thank all the necessary parties.
![]() Put a button on it.
Put a button on it.
![]() Decide what format you will use for your presentation notes.
Decide what format you will use for your presentation notes.