Chapter 7
Public Key Infrastructure
Lab Exercises
7.01 DNSSEC for Security
7.02 DNSSEC for Exploiting
7.03 TLS in Action
Lab Analysis
Key Term Quiz
A public key infrastructure (PKI) manages public key encryption through software, hardware, policies, procedures, and more. In this chapter, we’ll take a look at a PKI used by DNSSEC (DNS Security Extensions) and another one used by TLS (Transport Layer Security).
![]() 45 MINUTES
45 MINUTES
Lab Exercise 7.01: DNSSEC for Security
A common attack on DNS (Domain Name System) today involves DNS cache poisoning and DNS spoofing.
Consider the fully qualified domain name (FQDN) www.flcc.edu, for the Finger Lakes Community College (FLCC) web server. In this example, the FQDN consists of the hostname of the machine, www (a common hostname for machines that run web servers); followed by the second-level domain (SLD) of flcc; and, finally, the top-level domain (TLD) of .edu. Most websites are set up in DNS in a way that if www is left off the URL (uniform resource locator, web site address), the web server’s IP address will be given by default. A URL starts with a transfer protocol, including HTTP (Hypertext Transfer Protocol), HTTPS (Hypertext Transfer Protocol Secure, which refers to TLS, Transport Layer Security), and FTP (File Transfer Protocol). After the transfer protocol in a URL comes the FQDN. The FQDN in the URL may be followed by a specific path including a folder or folders and sometimes even a filename.
See if you can identify all of the parts of this URL from the description above: www.flcc.edu/pdf/catalog/2020-2021-FLCC-Catalog.pdf
If I’m at Rochester Institute of Technology (RIT), connected to an RIT network, and I type www.flcc.edu into my browser’s URL bar, my DNS client service will check my machine’s DNS resolver cache (also referred to simply as DNS cache), which is stored in RAM, to see if it has an IP address that corresponds with www.flcc.edu.
If the entry for www.flcc.edu exists in the DNS resolver cache, my machine’s DNS client service will not query a DNS server at all and will immediately start a TCP three-way handshake with the machine running the web server service. If there is no such entry in the DNS resolver cache, my DNS client service will generate a DNS query for an RIT DNS server (step 1 of Figure 7-1). Usually, there will be two local DNS servers for fault tolerance and load balancing, to get DNS information for the internal DNS clients. Each domain should also have two other DNS servers that are authoritative for the zone (two, again for fault tolerance and load balancing) for external queries from other domains. That function, in this story, will be served by the authoritative DNS server for the flcc.edu domain.

FIGURE 7-1 The DNS Hierarchy
If the RIT DNS server has the answer in its DNS resolver cache (from a previous query it issued on behalf of another client), it will return the answer to the DNS client. If the RIT DNS server does not have the answer in its DNS resolver cache, it begins some heavy lifting, by first asking the same query to one of the thirteen root servers, also known as root name servers, that reside in the root zone (step 2 of Figure 7-1).
In reality, there are hundreds of servers around the world using 1 of 13 IP addresses assigned to the root servers, which are preprogrammed into a company’s internal DNS servers that do the querying and caching for their clients. Using anycast addressing (multiple nodes sharing the same public IP address), DNS queries can be routed to the nearest root server using that IP address by BGP (Border Gateway Protocol), the routing protocol used by the infrastructure of the Internet between autonomous systems. It’s like finding the nearest gas station, the nearest bank, the nearest Dunkin’, the nearest Starbucks, and so on from where you are currently located.
There are only 13 IP addresses for root servers because when DNS was designed (with only IPv4 32-bit addresses in existence, pre-IPv6), it was determined that up to 512 bytes of DNS information should be placed in a UDP (User Datagram Protocol) datagram. An Internet standard (RFC 791) requires each host to accept packets of 576 bytes or less (in whole or in fragments). The IPv4 header can range from 20 to 60 bytes, although the options that raised the size of the IPv4 header beyond the minimum of 20 bytes are no longer used today. UDP headers are 8 bytes long. When you start with 576 bytes that a host must accept, then subtract 8 (for the UDP header), and then subtract 60 (for the largest possible size of an IP header), you get 508. The nearest binary value is 512. When you put 13 domain names, 13 IPv4 addresses, and information about those resource records (such as TTL and type) in the payload of a single UDP datagram, they fit quite well within that 512-byte limitation (although the math does allow for a 14th as well).
A root server will give the RIT DNS server a referral to an authoritative DNS server for the .edu TLD (step 3 of Figure 7-1), and the RIT DNS will issue the same query to this server (step 4 of Figure 7-1) as well. The response will be a referral to an authoritative DNS server for flcc.edu (step 5 of Figure 7-1), and the RIT DNS server will once again issue the same query to this server (step 6 of Figure 7-1).
Without root servers, whenever a new TLD is created, every systems administrator on the planet would need to add information about that new TLD on their local DNS servers. With root servers, the local DNS servers just need information about these 13 logical IP addresses that, in turn, will have the responsibility of knowing about new TLDs.
If I’m at home, and I type www.flcc.edu into my browser’s URL bar, that will cause my ISP’s DNS server to go down the chain and get the answer for me.
If I’m using a public DNS server, such as Google’s 8.8.8.8 or 8.8.4.4, Cloudflare’s 1.1.1.1 or 1.0.0.1, or IBM’s (and others’) 9.9.9.9, again, those servers would do the heavy lifting.
Once the answer comes either to the RIT DNS server, to my ISP’s DNS server, or to one of the public DNS servers (step 7 of Figure 7-1), those servers cache the answers, so they don’t have to do the heavy lifting for subsequent queries; they then return the answer to the DNS client (step 8 of Figure 7-1). This answer is also cached on the client machine, so the DNS client doesn’t need to query a DNS server for this address in the near future.
The TTL (Time To Live) field, in the DNS message, encapsulated in a UDP datagram, specifies how long resource records should be cached. This is not to be confused with the TTL field in the IP header, which isn’t even a measurement of time, but is rather a hop count. The DNS TTL is set by the systems administrator of the second-level domain (like flcc.edu) being queried.
In DNS cache poisoning, also known as DNS spoofing, an attacker sends unsolicited DNS answers to caching DNS servers. For example, if the cache on the RIT DNS server were changed to associate www.flcc.edu with an IP address different from the legitimate one (a malicious website, for example), any downstream RIT client would be given that incorrect IP address upon request, and would be led to a site under control of an attacker.
This site could be a phishing site or could contain a drive-by-download exploit kit. If that happened to an ISP’s DNS server cache, all ISP customers would be affected. If that happened to a root server, or an authoritative TLD DNS server, oh my! All ISPs and customers downstream would be affected.
The false DNS resource records will even make their way to DNS caches on user machines. Furthermore, cybercriminals could change the TTLs to really high values to keep those false entries in cache for a long time.
Learning Objectives
In this lab exercise, we’re going to use the dig DNS tool to simulate how DNSSEC works and to see how DNSSEC is driven by PKI. At the end of this lab exercise, you’ll be able to
• Use the dig DNS tool
• Understand how DNSSEC works
• Understand how DNSSEC uses PKI
Lab Materials and Setup
The materials you need for this lab are
• The Principles of Computer Security: CompTIA Security+ and Beyond textbook
• The Kali Linux VM you installed in Chapter 1
Let’s Do This!
China’s great firewall blocks at the DNS level. For example, a website blocked in China, such as www.twitter.com, will have an incorrect IP address associated with it on the Chinese DNS servers. It’s an intentional, self-inflicted DNS cache poisoning attack.
In 2010, a non-Chinese ISP configured its DNS servers incorrectly to fetch information from DNS servers in China and cached them locally. Other ISPs got their DNS information from that ISP and used it on their DNS servers. The poisoned DNS entries spread quickly, and people in the United States were blocked from accessing sites including Twitter, Facebook, and YouTube.
The best way to mitigate this type of attack is to make sure that the DNS responses are actually coming from the authoritative DNS servers. This is done through DNSSEC, a protocol designed to secure DNS from DNS cache poisoning attacks.
In this lab exercise, you will open up a terminal in Kali Linux and type in commands. Be sure to press ENTER after each command. In all dig commands, be sure to add a dot (.) at the end of the FQDN. The dot represents the root zone, the highest level of the DNS hierarchy. Ending an FQDN with a dot makes sure nothing will be appended after it, which would cause the FQDN to be invalid in certain cases. Also, the order in which the various parts of the commands are entered doesn’t matter in most cases.
Open up a terminal in Kali Linux. Type in each command, and press ENTER after each command.
![]() 1–8
1–8
Step 1 First, we’ll use the DNS dig tool to look up the address of the arin.net web server. Open up a terminal in Kali Linux and type in the following command:
dig a www.arin.net.
See Figure 7-2.

FIGURE 7-2 The A resource record for the arin.net web server
The dig tool is looking for the A resource record for the web server named www, in the arin second-level domain, in the .net TLD.
The address returned is 199.43.0.47. By the time you’re doing this step, there could be a different IP address or multiple addresses returned. If so, adjust accordingly.
![]() Note
Note
ARIN (American Registry of Internet Numbers) is one of the five regional Internet registries (RIRs) and the organization responsible for IP addresses in North America. You can read an article I wrote for ARIN in 2016 at https://teamarin.net/author/jweissman/.
How do you know it’s the legitimate IP address of ARIN’s web server and not some malware-laced site? The rest of the steps of this lab exercise will take you to that level of confidence.
Step 2 Next let’s query with the +dnssec switch. The response includes the A resource record as before, but now there is a resource record signature (RRSIG) resource record as well. The RRSIG resource record is a hash of all the A resource records of www.arin.net that are returned, encrypted with the private key of arin.net. In this case, there is only one A resource record, but if there were more, they all would be hashed together.
dig +dnssec a www.arin.net.
See Figure 7-3.
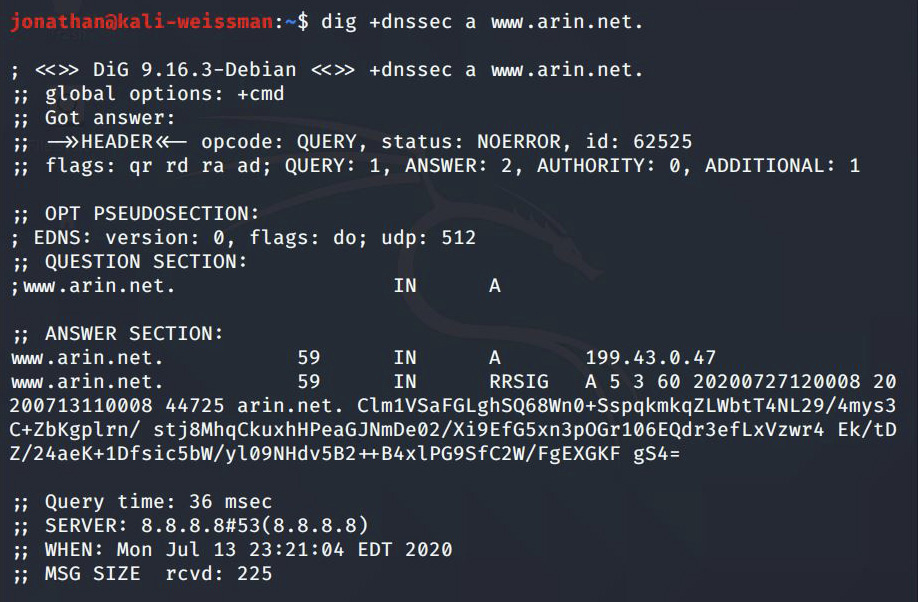
FIGURE 7-3 The RRSIG resource record that validates the A resource record
Step 3 To decrypt this encrypted hash, the RIT DNS server would request the public key of arin.net at this point, on behalf of a DNS client. To do that manually, enter the following command:
dig +dnssec dnskey arin.net.
See Figure 7-4.

FIGURE 7-4 arin.net’s DNSKEY resource records that validate the RRSIG resource record
Each zone has two key pairs: a zone signing key (ZSK) and a key signing key (KSK). The ZSK signs every resource record in a zone (creating RRSIG resource records for each group), with the exception of the DNSKEY resource records, which are signed by the KSK (creating an RRSIG resource record for the DNSKEY group). The keys that sign are private keys. The DNSKEY resource records contain the corresponding public keys.
ZSKs and KSKs are really public/private key pairs. The private key of the ZSK pair signs all non-DNSKEY resource records of the zone. That ZSK private key’s corresponding public key is stored in a DNSKEY resource record. The private key of the KSK pair signs DNSKEY resource records. That KSK private key’s corresponding public key is stored in a different DNSKEY resource record.
It’s difficult to swap out an old or compromised KSK. Changing the ZSK is a lot easier. A smaller ZSK can be used, without compromising the security of the server, minimizing the amount of data that the server has to send with each response. A larger KSK can be used and kept separately, so the parent zones don’t have to frequently update the DS resource records (discussed shortly). Furthermore, the DNSKEY resource record set and corresponding RRSIG resource records can be cached for future use.
DNSKEY resource records that have the value 256 contain ZSKs (public keys), while DNSKEY resource records that have the value 257 contain KSKs (public keys as well). In Figure 7-4, you can see that arin.net sends two of each type of key.
RFCs and experts recommend replacing KSKs over a period of years and replacing ZSKs over a period of months. During this short rollover period, both the new and old keys should be in the zone (and do “double signing”), as this enables old keys to time out and be removed from caches.
In other cases, the zone could be prepublishing for rollover, future keys (one future ZSK and one future KSK) that are not yet used for signing.
In the current story, if the decrypted hash matches the computed hash by the RIT DNS server, the DNSKEY resource record validates the RRSIG resource record, and the RRSIG resource record validates the A resource record. All is good.
Step 4 Wait a minute! What if someone broke into the arin.net DNS server and generated their own public/private key pair? Even though it would be hard to find a zone that doesn’t use a ZSK pair and a KSK pair, the DNSSEC RFCs do not require two key pairs, and it is possible to use one key pair to sign all zone data.
Now the attacker can modify the DNS resource records, point to incorrect IP addresses, and sign the resource records with an attacker key.
To make sure this doesn’t happen, arin.net’s KSK public key is certified by a higher authority. arin.net had previously sent its KSK public key to the .net zone administrators, and after arin.net was validated, the .net zone agreed to vouch for arin.net, by taking arin.net’s KSK public key and hashing it. This is in the form of another new DNS resource record—the delegation signer (DS) resource record. arin.net’s DS resource record is stored on the .net DNS servers.
The DS resource records authenticate the KSKs of the child zones and have nothing to do with the ZSKs of the child zones. In Figure 7-5 you’ll notice that there are 2 DS resource records returned, one each for the ZSKs returned in Figure 7-4.

FIGURE 7-5 The DS resource records that validate the DNSKEY resource records of arin.net
In our example, the .net zone, when giving the RIT DNS server a referral to the authoritative DNS servers for arin.net (step 5 of Figure 7-1), also sent a DS resource record, which contains the hash of arin.net’s KSK public key.
The RIT DNS server then hashes arin.net’s KSK public key and compares the results to the DS resource record sent from the .net zone. If the hashes match, we know that arin.net’s public key is really arin.net’s public key and that the resource records sent are legitimate.
How do we trust the DS resource record itself? The DS resource record is in turn hashed and encrypted with .net’s ZSK private key and presented in the form of an RRSIG resource record.
If a DNS client’s DNS server (the RIT DNS server, in this case) supports DNSSEC, it sets the DO (DNSSEC OK) flag in its DNS queries to a root server (step 2 of Figure 7-1), an authoritative TLD DNS server (step 4 of Figure 7-1), and the authoritative DNS server of the second-level domain in question (step 6 of Figure 7-1). In turn, the root server and the authoritative TLD DNS server will return extra DNS resource records (steps 3 and 5 of Figure 7-1), which tell the DNS client’s DNS server that the child zones are DNSSEC-enabled in the form of the DS resource records and the RRSIG resource records for the DS resource records, mentioned earlier. The second-level domain’s authoritative DNS server doesn’t have DS resource records to send, but in addition to the regular DNS response, it will also return RRSIG resource records for each resource record group (step 7 of Figure 7-1).
To manually query for the DS record of arin.net, enter the following command:
dig +dnssec ds arin.net.
Refer to Figure 7-5.
Step 5 Now the RIT DNS server would request that the .net zone send its DNSKEY resource records. To do that manually, enter the following command:
dig +dnssec dnskey net.
You’ll notice that .net sends two ZSKs (identified by 256) and one KSK (identified by 257), in Figure 7-6, Also, notice that there is one RRSIG for all three DNSKEY resource records.

FIGURE 7-6 .net’s DNSKEY resource records that validate the RRSIG resource records
.net’s ZSK public key in a DNSKEY resource record decrypts the RRSIG to validate the DS resource records.
.net’s KSK public key in a KSK DNSKEY resource record decrypts the RRSIG of the ZSK DNSKEY resource record group.
The RIT DNS server takes the .net KSK public key, decrypts the RRSIG encrypted hash, and computes its own hash. If the two match, the .net zone has proven it is really the .net zone.
Step 6 But wait another minute now! What if someone broke into the .net zone and used a different public/private key pair as described? Just like arin.net’s KSK is certified by its higher level parent, .net, the .net zone’s KSK is certified by its higher level parent the root zone, simply represented by a dot.
A hash of the .net KSK public key was sent in a DS resource record from the root zone earlier to the RIT DNS server (step 3 of Figure 7-1). To do that manually, execute the following command:
dig +dnssec ds net.
Then, the RIT DNS server hashes .net’s KSK public key and compares the results to the DS resource record sent by the root zone.
If the hashes match, we know that .net’s public key is really .net’s public key and that the resource records sent are legitimate.
How do we trust the DS resource record itself? The DS resource record is in turn hashed and encrypted with the root zone’s ZSK private key and presented in the form of an RRSIG resource record, as shown along with the DS records in Figure 7-7.

FIGURE 7-7 The DS resource record that validates the DNSKEY resource record of .net
Step 7 Now, the RIT DNS server would request that the root zone send its DNSKEY resource records. To do that manually, enter
dig +dnssec dnskey .
In Figure 7-8, you’ll notice that the root zone sends one ZSK (identified by 256) and one KSK (identified by 257). Also notice that there is one RRSIG for both DNSKEY resource records.

FIGURE 7-8 The root zone’s DNSKEY resource records that validate the RRSIG resource record
The root zone’s ZSK public key, in a DNSKEY resource record, decrypts the RRSIG to validate the DS resource records.
The root zone’s KSK public key, in a DNSKEY resource record, decrypts the RRSIG of the DNSKEY resource record group.
The RIT DNS server takes the root zone’s KSK public key, decrypts the RRSIG encrypted hash, and computes its own hash. If the two match, the root zone has proven it is really the root zone. This also means .net has proven it is .net, arin.net has proven that it is arin.net, and the A resource record contains the legitimate IP address of the arin.net web server.
Now I know what you’re thinking. What if someone broke into the root zone and switched the keys there? Right? Well, the root zone’s key is vetted by a thorough security procedure. This includes a root-signing ceremony that alternates between the two secure facilities that safeguard the root zone’s KSK located in El Segundo, California, and Culpeper, Virginia. A detailed description of the ceremony, as well as a video of an actual ceremony, can be found at www.stackscale.com/blog/root-dnssec-ksk-ceremony/. Official resources from all ceremonies can be found at www.iana.org/dnssec/ceremonies. On October 11, 2018, for the very first time in history, the root zone’s KSK pair was changed. Read about it here: www.icann.org/resources/pages/ksk-rollover.
Step 8 There is a way to do all of the previous steps at once (minus the requests for the DNSKEY resource records). The +trace option automatically turns on the dnssec option and goes through all DNS queries and responses from Kali Linux, simulating what a DNS server would do. You’ll notice in Figures 7-9 and 7-10 that all of the NS resource records (individually for the root zone, the .net zone, and arin.net) are displayed together.

FIGURE 7-9 The root servers and the .net authoritative TLD DNS servers

FIGURE 7-10 arin.net’s authoritative DNS servers and the A resource record of www.arin.net
dig +trace www.arin.net.
See Figures 7-9 and 7-10.
![]() 45 MINUTES
45 MINUTES
Lab Exercise 7.02: DNSSEC for Exploiting
An internal DNS zone transfer occurs when a secondary (also known as slave) DNS server requests either a full zone (authoritative transfer, AXFR) or partial zone (incremental transfer, IXFR) update from a primary (also known as master) DNS server. Both primary and secondary DNS servers are authoritative, which means they don’t use a DNS cache, but rather zone files, to respond to queries. The difference between primary and secondary DNS servers is that changes to the zone files can be made only on a primary DNS server. Zone transfers, which use TCP at Layer 4 of the OSI (Open System Interconnection) Model, unlike regular-sized DNS queries and responses, which use UDP (any response greater than 512 bytes would be sent in a TCP segment, not a UDP datagram), enable secondary DNS servers to synchronize with their primaries, so the secondary DNS servers can respond to DNS queries in the same authoritative fashion as primary DNS servers.
If cybercriminals were able to perform an external zone transfer, they could get a lot of great information on your infrastructure, including hostnames and IP addresses. Other information that could result from this unauthorized external transfer includes information on hidden functionalities of servers—for instance, which ones are used to authenticate to the domain. Looking at the hostnames, attackers can make guesses as to the functionality of those machines as well—for example, at a college, machines named admissions, bursar, registrar, captive-portal, facilities, ftp (File Transfer Protocol), gradprograms, intranet, library, ras (remote access server), vpn (virtual private network), and more could offer great intel for reconnaissance. Subdomains can even hide certain items, such as corporate login pages. A systems administrator may not want you to know about hiddenbackdoorintothedomain.example.com. None of this information will show up through a Google search.
One such occurrence of an external zone transfer happened in June 2017 when the registrar in charge of Russian TLDs accidentally let external zone transfers through and, as a result, 5.6 million resource records were exposed. You can read more about it at https://securitytrails.com/blog/russian-tlds.
Whether you’re using a Windows DNS server, a Berkeley Internet Name Domain (BIND) DNS server for Linux, or something else, it makes all the sense in the world to allow just authorized secondary DNS servers (and not a single external system) to request zone information from primary DNS servers.
The more information unauthorized adversaries have about your domain, the easier it will be for them to penetrate your infrastructure. For added security, you can use digital signatures to authenticate the zone transfers using Transaction SIGnature (TSIG).
Learning Objectives
In this lab exercise, you’ll once again use the dig tool, but this time with a different purpose. At the end of this lab exercise, you’ll be able to
• Get the same information from an external zone transfer using DNSSEC
• Understand the pros and cons of enabling DNSSEC
Lab Materials and Setup
The materials you need for this lab are
• The Principles of Computer Security: CompTIA Security+ and Beyond textbook
• The Kali Linux VM you installed in Chapter 1
Let’s Do This!
What you’re about to do in this lab exercise is hard to believe. You’ll use DNSSEC to do something that can seem to weaken security. DNSSEC protects well against DNS cache poisoning attacks, as you saw in the previous lab exercise. However, using it in an unintended way can expose a zone and get any information an unauthorized zone transfer would have returned. Does this mean DNSSEC should be avoided? No. Technically, DNS resource records aren’t meant to be kept secret like passwords, and a list of names and IP addresses by itself doesn’t expose any private information from a domain.
![]() 1–9
1–9
Step 1 Take a look at the authoritative DNS servers for the arin.net domain by entering the following command:
dig ns arin.net.
You’ll notice there are four of them, named ns2.arin.net., ns1.arin.net., u.arin.net., and ns3.arin.net., as shown in Figure 7-11.

FIGURE 7-11 arin.net’s authoritative DNS servers
Step 2 Let’s try an external zone transfer. The @ symbol means we’re going to ask the server following the symbol the query. In this case, we’re going to ask one of the authoritative DNS servers for the arin.net zone for an AXFR of the entire zone. Enter the following command:
dig axfr @ns1.arin.net arin.net.
Of course, arin.net has allowed only authorized internal zone transfers from its DNS servers, so you’ll see the message “Transfer failed,” as shown in Figure 7-12.

FIGURE 7-12 A failed zone transfer
Step 3 Let’s try dig with a hostname that doesn’t exist. Enter the following command:
dig rit.arin.net.
Without the DNSSEC option, there is a nonexistent domain (NXDOMAIN) status in the response. When a resource record isn’t specified, dig defaults to the A resource record type, as shown in Figure 7-13.

FIGURE 7-13 There is no rit.arin.net.
Step 4 Now, with the DNSSEC option back, let’s try a resource record that doesn’t exist. Enter the following command:
dig +dnssec rit.arin.net.
Again, there is an NXDOMAIN status, but now you’ll notice a Next SECure (NSEC) resource record that has ripe.arin.net. on the left and rpki.arin.net. on the right. The string rit actually falls right in the middle, alphabetically, between ripe and rpki, as shown in Figure 7-14.
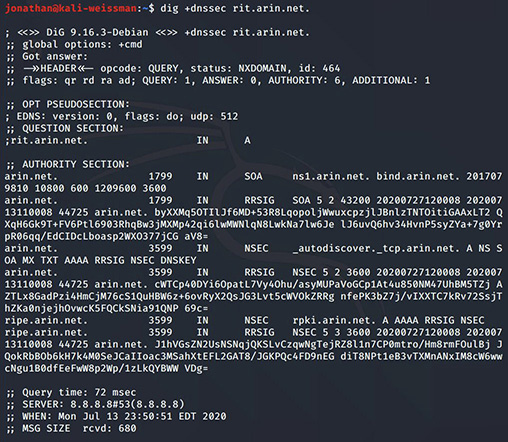
FIGURE 7-14 There is no rit.arin.net (with proof).
Step 5 When we try another name, we again get confirmation that the resource record doesn’t exist, and again we are also told what legitimate resource records it falls between. Enter the following command:
dig +dnssec jonathan.arin.net.
We are told that jonathan.arin.net. doesn’t exist and that it falls between jamf.arin.net. and kim-can.arin.net. (as shown in Figure 7-15).

FIGURE 7-15 There is no jonathan.arin.net (with proof).
If NXDOMAIN responses weren’t authenticated and signed with DNSSEC, this would be an easy attack for cybercriminals to carry out. For each query to a domain that supports DNSSEC, an NXDOMAIN response can be sent back before the actual answer from the legitimate DNS server, making domains simply disappear from the view of certain clients.
If NXDOMAIN responses were signed… well, how exactly would a response code be signed in the first place? The signed part of DNS never includes the header, anyway. Signing the whole message would make it hard to cache. Furthermore, if an attacker issues a query to a certain domain that is certain to return an NXDOMAIN, and it is signed, the attacker can save that response and send it out for legitimate queries before the actual answer from the legitimate DNS server, just like the unsigned NXDOMAIN example. In that case, the attacker doesn’t need the private key of the domain. The private key will be used to sign all NXDOMAIN messages to produce the same signature, regardless of the name that doesn’t exist. Signing a universal answer like that doesn’t prove anything.
Therefore, the solution decided upon was to introduce a new DNS resource record, NSEC, which will make each response unique by responding to a query for a name that doesn’t exist with the resource record that alphabetically comes before it and the resource record that comes alphabetically after it. We’ve seen that in this step and in the previous step.
What can we do with that, now?
Step 6 Let’s take the resource record that comes alphabetically after jonathan.arin.net. and add a character (which could actually be any character). Since jonathan.arin.net. falls between jamf.arin.net. and kim-can.arin.net. alphabetically, enter the following command:
dig +dnssec kim-can1.arin.net.
See Figure 7-16.

FIGURE 7-16 Zone walking
The new output shows kim-can.arin.net. on the left, and lacnic.arin.net. on the right. We are now zone walking! By forcing the previous answer on the right to the left, we can continue this process and walk through all of the resource records of the zone, as if we successfully performed an external zone transfer as seen in Step 2!
Step 7 Now, let’s add a character to lacnic to force it on the left and see what the next resource record is. Enter the following command:
dig +dnssec lacnic1.arin.net.
The new output shows lacnic.arin.net. is on the left and lightning.arin.net. is on the right, as shown in Figure 7-17.

FIGURE 7-17 More zone walking
What would be the next resource record after lightning.arin.net.?
Step 8 To combat this zone walking ability, the NSEC3 resource record was introduced. Some domains are set up to return NSEC3 resource records instead of NSEC records. The Internet Corporation for Assigned Names and Numbers (ICANN), the organization at the top of the hierarchy of Internet names and numbers, is one such example.
Enter the following command:
dig +dnssec rit.icann.org.
NSEC3 doesn’t replace NSEC—in fact, both are used today. When NSEC3 is used, the incorrect name is hashed and compared to the hashes of the names in the zone. As shown in Figure 7-18, NSEC3 doesn’t return the actual names that come before and after, but instead, what hash comes before the hash of the name that doesn’t exist and what hash comes after the hash of the name that doesn’t exist.

FIGURE 7-18 Hashing the before and after resource records
All the attacker needs to do now, to get the actual names, is an offline dictionary attack or brute force attack (both of which you’ll perform in Chapter 11). Subdomains/hostnames are not that long. If an attacker precomputes a wordlist for all subdomains/hostnames of length 10 and below, a corresponding hash for each name will be stored. Now the attacker simply compares the two hashes in the NSEC3 resource record with the stored hashes to find out what the subdomain/hostname is for each. Interestingly enough, three NSEC3 resource records will actually be returned, for reasons explained in sections 5.5 and 5.6 of RFC 7129 (https://tools.ietf.org/html/rfc7129).
Of note for NSEC3 is that there is one salt (also coming up in Chapter 11) per zone and many hash iterations.
An enhancement, NSEC3 White Lies, can help, but it require signatures to be computed in real time, unlike the RRSIGs we’ve seen so far, which are precomputed. The NSEC3 resource record would take the hash of a nonexistent name, compute its hash, and respond that there are no resource records between the hash -1 and the hash +1. If the hash is c32d2, hash -1 is c32d1 and hash +1 is c32d3. Now no actual names, hashed or plaintext, are ever revealed. The only value between hash -1 and hash +1 is the hash of the nonexistent name.
Having on-demand signing requires private keys to be stored on a zone’s authoritative servers. It also makes authoritative servers vulnerable to a denial of service (DoS) attack, since generating signatures is computationally intensive. Furthermore, on-demand signing could enable a chosen-plaintext attack to succeed.
Development on an NSEC5 resource record, using a keyed hash, didn’t go far.
Step 9 Let’s take a look at another NSEC3 resource record, with different hashes. Enter the following command:
dig +dnssec jonathan.icann.org.
See Figure 7-19.
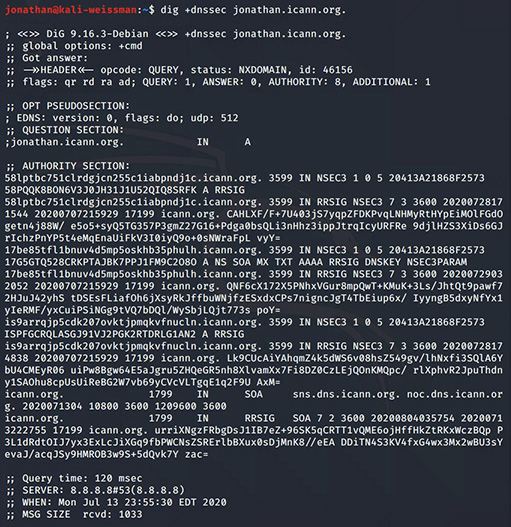
FIGURE 7-19 Another hashing of the before and after resource records
![]() 60 MINUTES
60 MINUTES
Lab Exercise 7.03: TLS in Action
TLS (Transport Layer Security) is a fascinating protocol, not just because it secures communications between web browsers and web servers, but because it has all parts of cryptography built in. Confidentiality, integrity, availability (indirectly), nonrepudiation, authentication, encryption, hashing, and more will be seen in this lab exercise!
Learning Objectives
In this lab exercise, you’re going to tie together a lot of cryptography concepts. At the end of this lab exercise, you’ll be able to
• Understand how TLS works
• Understand why TLS is so important to securing information traveling between web browsers and web servers
Lab Materials and Setup
The materials you need for this lab are
• The Principles of Computer Security: CompTIA Security+ and Beyond textbook
• A web browser with an Internet connection running Google Chrome and Mozilla Firefox
Let’s Do This!
There are so many misconceptions and misunderstandings about TLS and how it works. In fact, many people still say SSL (Secure Sockets Layer) when they actually mean TLS, which replaced SSL. SSL 2.0 was deprecated in 2011, and SSL 3.0 was deprecated in 2015, yet you’ll see a great number of SSL references all over the place and hear people say it on a daily basis. The most current version of TLS is TLS 1.3, but the most current deployed version (as of this writing) of TLS is TLS 1.2. Let’s take a deep dive into TLS.
![]() 1a–1r
1a–1r
Step 1 TLS can be implemented in two ways, with two variations each. Head over to Cloudflare’s TLS page at www.cloudflare.com/learning/ssl/keyless-ssl/.
Read the “What is keyless SSL?,” “How does keyless SSL work?,” “What is a session key?” and “What are the steps for generating session keys?” sections. Although SSL (Secure Sockets Layer), a deprecated protocol, is all over the page (as mentioned earlier, this is the case in many places), the website admits that the term is used incorrectly in the second paragraph with the phrase “SSL, more accurately known as TLS.”
Now take a look at how TLS can be implemented: the two ways with two variations each. Read the section “The RSA Key Exchange,” and examine the “SSL Handshake (RSA) Without Keyless SSL” diagram. Answer the following questions:
a. What encrypted item does the client send to the server?
b. What does the client encrypt the item with?
c. What does the server decrypt this encrypted item with?
d. What does each side independently do next?
e. When is the only time a private key is used?
Read the next paragraph about keyless SSL and examine the “Cloudflare Keyless SSL (RSA)” diagram. Answer the following questions:
f. How does this version differ from the “SSL Handshake (RSA) Without Keyless SSL” version?
g. Which companies might be interested in using the “Without Keyless” version and which companies might be interested in using the “Keyless” version?
Read the “The Ephemeral Diffie-Hellman Key Exchange” section and analyze the “SSL Handshake (Diffie-Hellman) Without Keyless SSL” diagram. Answer the following questions:
h. What encrypted items does the server send to the client?
i. What does the server encrypt these items with?
j. What does the client decrypt these encrypted items with?
k. What does each side independently do next?
l. When is the only time a private key is used?
Read the next paragraph about keyless SSL and examine the “Cloudflare Keyless SSL (Diffie-Hellman)” diagram. Answer the following questions:
m. How does this version differ from the “SSL Handshake (Diffie-Hellman) Without Keyless SSL” version?
n. Which companies might be interested in using the “Without Keyless” version and which companies might be interested in using the “Keyless” version?
Read the paragraph and section, “What is forward secrecy? What is perfect forward secrecy?” that follows. Answer the following questions:
o. Which implementation, RSA handshakes or Diffie-Hellman handshakes, do you think are far more common today?
p. Why do you think this is the case?
To gain a better understanding about the multiple session keys, go to this website: www.cloudflare.com/learning/ssl/what-is-a-session-key/.
q. Answer this question: What are the four session keys and why are all four needed?
r. Check out some of the other great links on the page, including these:
https://www.cloudflare.com/learning/performance/why-site-speed-matters/
https://blog.cloudflare.com/keyless-ssl-the-nitty-gritty-technical-details/
https://www.cloudflare.com/learning/ssl/what-is-ssl/
https://www.cloudflare.com/learning/ssl/transport-layer-security-tls/
https://www.cloudflare.com/learning/ssl/what-is-https/
https://www.cloudflare.com/learning/ssl/why-use-https/
Type out a quick summary, in your own words, of what you learned at each link.
Step 2 When a browser gets a digital certificate from a server, how does the browser know that the key on the certificate is that server’s actual public key? Use Figure 7-20 as you read through the following explanation.
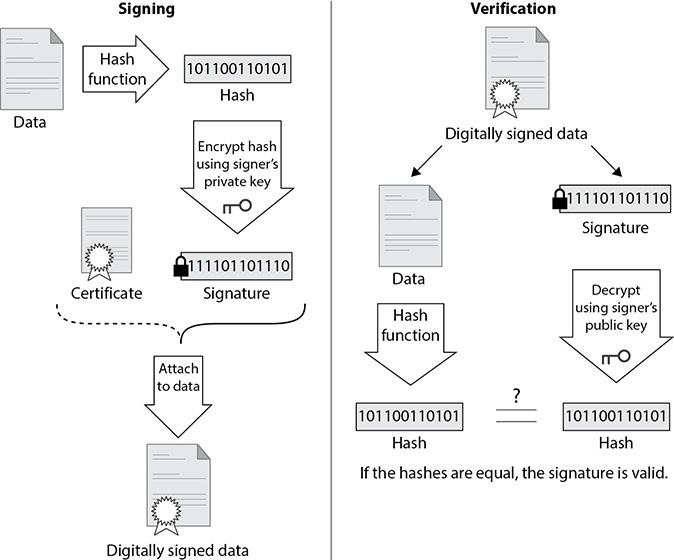
FIGURE 7-20 Signing and verifying a digital certificate (Source: “File:Digital Signature diagram.svg,” https://commons.wikimedia.org/w/index.php?title=File:Digital_Signature_diagram.svg&oldid=514368002, under CC BY-SA 3.0)
The certificate authority (CA) hashed all of the fields on the certificate except the hash algorithm and signature and encrypted the hash with the CA’s private key. That’s a field on the digital certificate known as the digital signature.
The browser retrieves the CA’s digital certificate from a trusted root certificate store, stored locally on the machine, and decrypts the encrypted hash (the digital signature) with the CA’s public key, found on the CA’s digital certificate.
The browser also hashes the same fields that the CA hashed and compares the computed hash with the decrypted hash. If the two hashes match, the fields of the certificate that were hashed (most importantly, the public key of the server) could only have been hashed and encrypted by the CA.
If the hash decrypts with the CA’s public key, it could have only been encrypted with the CA’s private key. This proves that the CA is really the CA, the server’s public key is really the server’s public key, and the website is legit and secure.
![]() 3a–3h
3a–3h
Step 3 Seeing is believing. Let’s look at how these actual digital certificates and the trusted root certificate store look through the eyes of Google Chrome.
a. In Google Chrome, go to www.citibank.com.
b. Click the lock at the far left of the URL bar.
c. Click Certificate (Valid).
A window, with tabs, will open up. In the General tab, notice the certificate information. In the Details tab, notice all of the fields and values for the digital certificate. In the Certification Path tab, notice the hierarchy of CAs.
The certificate the website gives the browser is known as a leaf certificate, because it’s at the end of the hierarchy, and it is signed by an intermediate CA’s certificate. The intermediate CA’s certificate is signed by a root certificate. The root certificate is self-signed and is trusted by browsers.
Using this hierarchy, browsers don’t have to manage large amount of root certificates. It enables the root CA to delegate signing to intermediate CAs without sharing the root master signing private key. It also enables the root CA to revoke an intermediate CA’s certificate in the event of a mistake or malicious action, instead of revoking the root CA’s certificate, which would cause immediate problems in browsers worldwide.
d. Click OK to close the certificate window.
e. At the upper-right corner of the browser window, click the Customize And Control Google Chrome Button (three vertical dots).
f. Click Settings.
g. In the Privacy And Security section, click Security, and scroll down to the Advanced section.
h. Click Manage Certificates, and then click each tab in the dialog. You’re now looking through Chrome’s trusted root certificate store, which since Chrome debuted in 2009, always used the root store of the system it was on. On Windows systems, Chrome used the Microsoft Trusted Root Program. On macOS systems, Chrome used the Apple Root Certificate program. It was announced at the end of October 2020 that Chrome has plans in the works to create and use its own dedicated certificate root store.
Read this for further details:
www.zdnet.com/article/chrome-will-soon-have-its-own-dedicated-certificate-root-store/
![]() 4a–4k
4a–4k
Step 4 Now let’s look at how digital certificates and the trusted root certificate store look through the eyes of Mozilla Firefox.
a. In Mozilla Firefox, go to www.citibank.com.
b. Click the lock at the far left of the URL bar.
c. Click the arrow near Connection Secure.
d. Click More Information.
e. Click the View Certificate button.
f. Go through the information in all three tabs, which includes information about the certificate, the CA, and that CA’s root.
g. On the upper-right corner of the browser window, click the Open menu button (three horizontal lines).
h. Click Options.
i. In the pane at the left, click Privacy & Security.
j. Scroll all the way down, and in the Certificates section, click the View Certificates… button.
k. Click each tab at the top. You’re now looking through Firefox’s trusted root certificate store.
![]() 5
5
Step 5 In the past, different types of digital certificates were issued, but as the following two articles explain, extended validation certificates are a thing of the past. Read these articles and type a paragraph with your thoughts about what you read:
• www.troyhunt.com/extended-validation-certificates-are-dead/
• www.troyhunt.com/extended-validation-certificates-are-really-really-dead/
Lab Analysis
1. Why do you think DNS DS resource records are never stored in the zone that they are referring to?
![]()
2. Which matters more to you, DNSSEC protecting against a DNS cache poisoning attack or privacy of your zone file? Explain in detail.
![]()
3. How does the client know the Diffie-Hellman parameters coming from the server are really the server’s and not a man-in-the-middle’s parameters?
![]()
Key Term Quiz
Use the terms from this list to complete the sentences that follow.
digital signature
trace
zone transfer
1. The Linux ____________ utility automates a series of queries and responses that illustrate how DNSSEC uses PKI.
2. Using DNSSEC, you can achieve the same results as an external ____________.
3. A ____________ is an encrypted hash.