APPENDIX B
OFFLINE SCRATCH DEVELOPMENT
If you only have occasional access to the Internet or your Internet access is extremely slow (aka 56k dial-up access), you are going to have a difficult time trying to work with Scratch 2.0 online. But don’t fret; offline versions of Scratch are available that allow you to run Scratch as a desktop program development environment. Your first option is to download the Scratch 2.0 Offline Editor, which was just released in beta version while this book was being written. Your second option is to download Scratch 1.4. This Appendix provides instruction on how to install and work with both of these Scratch editors.
An overview of the major topics covered in this appendix includes
![]() How to download and install the Scratch 1.4 and Scratch 2.0 Beta Offline Editors
How to download and install the Scratch 1.4 and Scratch 2.0 Beta Offline Editors
![]() A review of the differences between the Scratch 2.0 Online and Offline Editors
A review of the differences between the Scratch 2.0 Online and Offline Editors
![]() An explanation of how to upload and share Scratch projects created using the Scratch 1.4 and Scratch 2.0 Beta Offline Editors
An explanation of how to upload and share Scratch projects created using the Scratch 1.4 and Scratch 2.0 Beta Offline Editors
SCRATCH 1.4
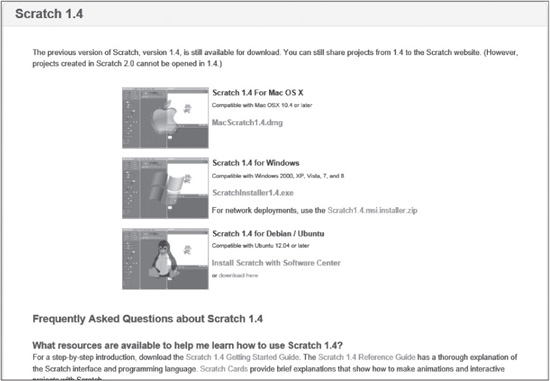
Scratch 1.4 is the latest version of Scratch prior to Scratch 2.0. As of the writing of the second edition of this book, Scratch 1.4 remained available for use by Scratchers. If you have an older computer and find the performance of Scratch 2.0 to be sluggish, you may discover that Scratch 1.4 provides you with a better experience. Scratch 1.4 is available for download at http://scratch.mit.edu/scratch_1.4/, as shown in Figure B.1.
Figure B.1
The Scratch 1.4 download page provides access to a few versions of Scratch 1.4 supporting its execution on different operating systems.
© 2014 Lifelong Kindergarten Group
As will be discussed in Appendix C, “Interacting with the Real World,” several companies provide external hardware that is compatible with Scratch, allowing Scratch to be used as the programming language that controls and interacts with these environments. As of the writing of the second edition of this book, Scratch 2.0 did not support any of these technologies, although plans were in the works to provide Scratch 2.0 with this compatibility. This means that to work with any of the technologies outlined in Appendix C, you need to use Scratch 1.4. However, it may be the case that some if not all of those technologies will be supported by Scratch 2.0 by the time you purchase this book.
Note
For additional instruction on how to work with Scratch 1.4, you can download the Scratch 1.4 Getting Started Guide (http://download.scratch.mit.edu/ScratchGettingStartedv14.pdf) and the Scratch Reference Guide (http://download.scratch.mit.edu/ScratchReferenceGuide14.pdf).
Supported Operating System Platforms
The Scratch 1.4 Offline Editor supports cross-platform project development. You can use Scratch 1.4 on any of the following operation systems:
![]() Windows. Windows 2000, Windows XP, Windows Vista, Windows 7, and Windows 8.
Windows. Windows 2000, Windows XP, Windows Vista, Windows 7, and Windows 8.
![]() MAC OS X. Mac OS X 10.4 or later version.
MAC OS X. Mac OS X 10.4 or later version.
![]() Linux. Ubuntu 12.04 or later.
Linux. Ubuntu 12.04 or later.
Note
Although Scratch 1.4 is advertised to work on Linux, the official installation packages only reference Ubuntu. However, you may be able to install Scratch on other versions of Linux using the Linux Installer.
Scratch 1.4 Hardware Requirements
Scratch 1.4 has the following hardware requirements:
![]() Support for 800×480 or larger screen display with 16-bit or better color support
Support for 800×480 or larger screen display with 16-bit or better color support
![]() 120MB or more free disk space
120MB or more free disk space
![]() Optional: Speakers or headphones to support audio playback
Optional: Speakers or headphones to support audio playback
![]() Optional: A microphone if you need to record new sounds
Optional: A microphone if you need to record new sounds
The Scratch 2.0 website states that, in regards to CPU and memory, most modern computers have sufficient memory to support Scratch 1.4. However, older computers may run Scratch slowly.
Of course, Scratch’s minimum hardware requirements are just that: minimum requirements. If your computer’s memory and processor exceed the minimum requirements of the operating system, things will run a lot faster and you will be a lot happier. In addition, you will need extra hard drive space beyond the 120MB minimum required to install Scratch 1.4 to have a place to store your creations.
Downloading and Installing Scratch 1.4
You can find download packages for Scratch 1.4 at http://scratch.mit.edu/scratch_1.4/. The following installers are available, one for MAC OS X, Windows, and Linux:
![]() Mac OS X.
Mac OS X. MacScratch1.4.dmg
![]() Windows.
Windows. ScratchInstaller1.4.exe
![]() Linux. Install Scratch with Software Center
Linux. Install Scratch with Software Center
Before you can use Scratch, you need to install it on your computer. The installation process varies, depending on your operating system. The following sections provide detailed instruction for installing Scratch 1.4 on Windows, Mac OS X, or Linux.
Downloading and Installing Scratch 1.4 on Windows
The Windows download file is provided as a 33MB self-extracting executable file. To install Scratch 1.4 on a computer running one of the supported versions of Microsoft Windows, click on the ScratchInstaller1.4.exe link. When prompted, you can either click on Run to initiate the installation process or click on Save to download and save the installation file on your computer.
A prerequisite for installing Scratch 1.4 on Microsoft Windows is the installation of Java. While Mac OS X comes with Java already installed, Windows does not. Fortunately, installing Java on Microsoft Windows is both free and easy. To do so, go to http://java.com/en/download and click on the Free Java Download button.
Once the online installation process begins, complete the following steps to finish installing Java:
1. After clicking on the Free Java Download button, you may be prompted by a Windows security window for permission to allow the installation process to continue. If so, click on the Continue button.
2. Next, a window appears requesting permission to begin the installation process. Click on the Install button to continue.
3. Finally, a Java Setup wizard appears, requiring that you accept the Java License Agreement. Click on the Accept button, and then follow the rest of the wizard’s instructions to complete the installation process.
Scratch installs on Microsoft Windows like any other Windows application. The following procedure outlines the steps involved in completing Scratch 1.4’s install process:
1. If you elected to download the ScratchInstaller1.4.exe installation file, double-click on the file to run it. Otherwise, if you elected to run the installation process from the Scratch website, continue to the next step.
2. If prompted for confirmation, click on Run to allow the installation process to begin.
3. If a security message is displayed, click on Allow to give permission for the installation process to continue.
4. The Scratch Setup wizard then appears, as demonstrated in Figure B.2. Click on Next and follow the instructions provided by the wizard to complete the installation process.
Figure B.2
Installing Scratch 1.4 on Microsoft Windows.

© 2014 Lifelong Kindergarten Group
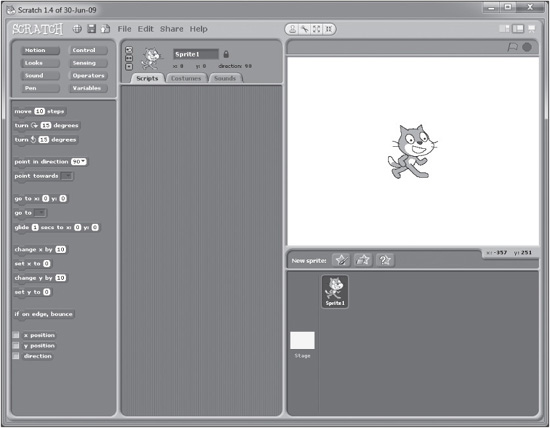
5. Once the Scratch Setup wizard has completed the installation process, you need to click on the Finish button to close the wizard. Scratch then automatically starts, as demonstrated in Figure B.3. In addition, a shortcut for Scratch is added to the Windows desktop.
In addition to being able to start Scratch by clicking on its desktop shortcut icon, you can click on Start, All Programs, Scratch 1.4, Scratch.
Figure B.3
Running Scratch 1.4 on Microsoft Windows 7.
© 2014 Lifelong Kindergarten Group
Downloading and Installing Scratch 1.4 on Mac OS X
The Mac OS X installation file is provided as a Mac OS X disk image file named MacScratch1.4.dmg. To install Scratch on Mac OS X, double-click on the MacScratch1.4 .dmg archive file to download it. Once it’s downloaded, as shown in Figure B.4, double-click on it to initiate the installation process.
Figure B.4
Downloading Scratch 1.4 on Mac OS X.
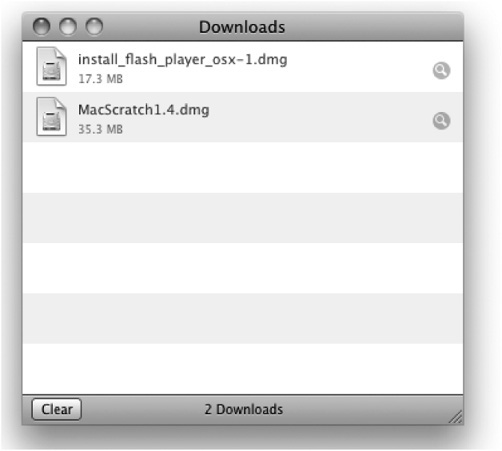
© 2014 Lifelong Kindergarten Group
The Scratch 1.4 window appears. All you have to do to finish the installation is drag and drop the Scratch 1.4 folder onto the Applications folder (or to any other location that you want), as shown in Figure B.5, to install it.
Figure B.5
Adding Scratch 1.4 to the Mac OS X Applications folder.
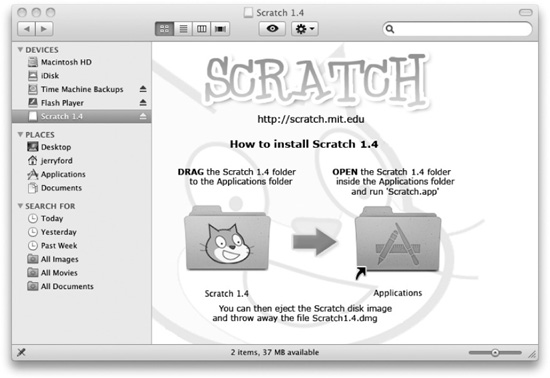
© 2014 Lifelong Kindergarten Group
To start Scratch 1.4, open the Applications folder, locate and open the Scratch 1.4 folder, and then double-click on the Scratch icon, which is represented as a cartoon image of a cat. Within a few moments, the Scratch IDE should appear, as shown in Figure B.6.
Figure B.6
Running Scratch on Mac OS X.
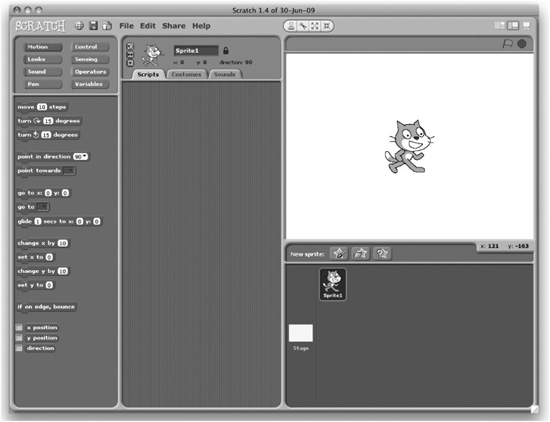
© 2014 Lifelong Kindergarten Group
Downloading and Installing Scratch 1.4 on Linux
The following procedure explains how to download and install Scratch 1.4 on a computer running either Debian or Ubuntu. You can install Scratch using the operations system’s Software Center, or you can click on the Download Here link to download and save the installation file in your home directory. For this procedure, a later install is assumed.
Once Scratch 1.4 is downloaded to your computer, start up a new terminal and change to the directory where the installation file was saved, as shown next (substituting your Linux account name for username):
#>cd ~/<username>/Downloads
Next, enter the following command:
#>sudo dpkg -i scratch_1.4.0.6~dfsg1-2~ubuntu12.04.1_all.deb
Finally, enter the following command:
#>sudo apt-get install -f
Scratch 1.4 is now installed. Figure B.7 shows how Scratch 1.4 looks once it’s started. As you can see, it appears very much like Scratch 1.4 does on Microsoft Windows and Mac OS X.
Figure B.7
Running Scratch 1.4 on Ubuntu Linux.

© 2014 Lifelong Kindergarten Group
Sharing Your Scratch 1.4 Projects
You can still share projects made with Scratch 1.4 on the Scratch 2.0 website by clicking on the Share menu and then on the Share This Project Online option. This displays the Upload to Scratch Server dialog window shown in Figure B.8.
Figure B.8
Sharing a Scratch 1.4 project on the Scratch 2.0 website.
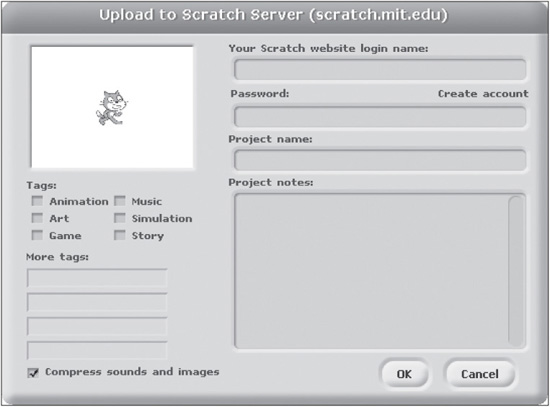
© 2014 Lifelong Kindergarten Group
Type your Scratch login name and password in the required fields, and then provide a name for the project in the Project Name field. Optionally, add project notes for the project, explaining its purpose and operation. You can also select or add custom tags to assist other Scratches in locating your project. When you’re ready, click on OK to upload and share your project. The Scratch 1.4 Offline Editor now uploads your project to the Scratch website. When complete, the pop-up dialog shown in Figure B.9 is displayed.
Figure B.9
The project has been uploaded to the Scratch 2.0 website.
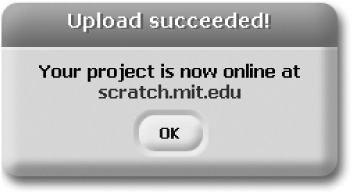
© 2014 Lifelong Kindergarten Group
The next time you access your My Stuff page on the Scratch 2.0 website, Scratch 1.4 will be displayed in your list of projects.
Caution
The only limitation imposed by the Scratch 1.4 Offline Editor is that you cannot upload a project that is larger than 50MB.
SCRATCH 2.0
As of the writing of the second edition of this book, a Beta version of the Scratch 2.0 Off-line Editor has been made available to the public. By the time you purchase this book, the official release of the Scratch 2.0 Offline Editor may have been made available. Nevertheless, the information provided in this appendix on how to install and work with the Scratch 2.0 Offline Editor should be relevant, although perhaps with a few minor changes.
Differences in the Scratch 2.0 Online and Offline Program Editors
The Scratch 2.0 Offline Editor and Online Editor look and feel very much the same. Both allow you to develop and execute Scratch projects, but there are a few differences. For starters, to work with the Scratch 2.0 Online Editor, your computer must have Adobe Flash Player installed. To install the Scratch 2.0 Offline Editor, you need to ensure that Adobe AIR is installed.
When you work with the Scratch 2.0 Online Editor, you have access to tons of online content, including every shared script on the Scratch 2.0 website. However, when working with the Scratch 2.0 Offline Editor, you have no such access. To compensate, you can download the Starter Projects Zip file located at http://scratch.mit.edu/scratchr2/static/__1378848502__/sa/Scratch2StarterProjects.zip. This zip file contains dozens of Scratch 2.0 projects that you can load and review and borrow ideas from. However, copying resources from these projects into your own project is more difficult. This is because the Scratch 2.0 Offline Editor does not have the backpack feature. Instead, you have to right-click on any sprite, costume, or sound that you want to copy from one of these projects to your computer and then upload that resource into your project. To copy a sprite, costume, or sound, right-click on its thumbnail, click on Save to Local File, and then specify the name and location where it should be saved. Next, use the Scratch 2.0 Offline Editor to open your project, and then upload the sprite, costume, or sound into it using the Upload Sprite/Costume/Sound from File option.
Another feature lacking in the Scratch 2.0 Offline Editor is access to the cloud, preventing you from being able to incorporate the use of cloud data in your projects. Also, as of the publishing of the second edition of this book, the Scratch 2.0 Offline Editor does not provide access to Sensor Board blocks and LEGO WeDo blocks, which means you need to use the Scratch 1.4 Offline Editor to work with these technologies.
In the Scratch 2.0 Online Editor, you see the login link and your username displayed in the upper-right corner of the browser window. In the Scratch 2.0 Offline Editor, you simply see the text “Offline Editor” displayed. Therefore, you have no access to your Profile, My Stuff, and Account settings links.
Other differences between the Scratch 2.0 Offline Editor and the Scratch 2.0 Online Editor are in the two editors’ menus. The Scratch 2.0 Offline Editor’s File menu has the following new menu options:
![]() Open. To open a Scratch 2.0 project stored locally on your computer
Open. To open a Scratch 2.0 project stored locally on your computer
![]() Share to Website. To upload and share your Scratch 2.0 project on the Scratch 2.0 website
Share to Website. To upload and share your Scratch 2.0 project on the Scratch 2.0 website
![]() Check for Updated. To check to see if there are any updates to the Scratch 2.0 Offline Editor
Check for Updated. To check to see if there are any updates to the Scratch 2.0 Offline Editor
On the surface, the Edit menu on both editors appears identical. However, if you Shift-click the Edit menu on the Scratch 2.0 Offline Editor, you won’t find any of the advanced options available in the Scratch 2.0 Online Editor.
In the Scratch 2.0 Online Editor, projects are identified by typing their name in the text field just above the stage. When working with the Scratch 2.0 Offline Editor, you assign names to your projects when you click on File, Save As and type a name into the File Name field. The next time you open the project, its name is displayed just above the stage.
Note
The Scratch 2.0 Offline Editor saves projects with an .sb2 file extension.
Downloading and Installing Scratch 2.0
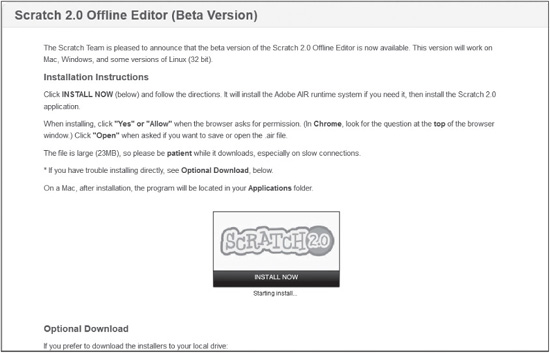
Like the Scratch 1.4 Offline Editor, the Scratch 2.0 Offline Editor runs on Windows, Mac OS X, and different versions of Linux. Unlike Scratch 1.4, the Scratch 2.0 Offline Editor installation process has been standardized across these operating systems, such that you can install it by following the same set of installation instructions. As of the writing of this book, the Scratch 2.0 Offline Editor was available for download at http://scratch.mit.edu/scratch2download/, as shown in Figure B.10.
Figure B.10
The Scratch 2.0 download page provides a standardized process for installing the Scratch 2.0 Offline Editor on different operating systems.
© 2014 Lifelong Kindergarten Group
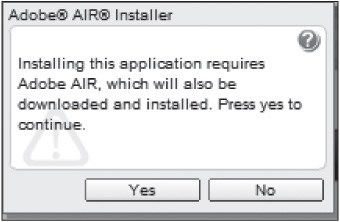
To initiate the download, click on the Scratch 2.0 Install Now graphic that is displayed on the web page. In response, the message shown in Figure B.11 is displayed, informing you that the installation requires Adobe AIR, which will be downloaded and installed as part of the Scratch 2.0 Offline Editor installation process. You are prompted to click on Yes to continue.
Figure B.11
The Scratch 2.0 Offline Editor requires that Adobe AIR be installed as part of the install process.
© 2014 Lifelong Kindergarten Group
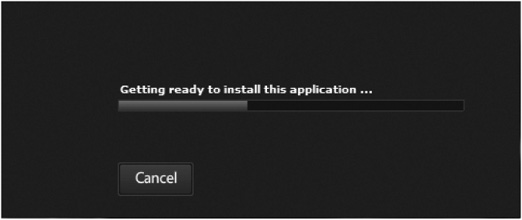
A dialog like the one shown in Figure B.12 is displayed announcing that the installation process is about to begin.
Figure B.12
The Application Install process begins.
© 2014 Lifelong Kindergarten Group
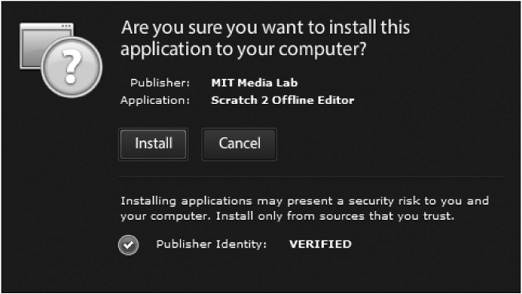
Next, as shown in Figure B.13, you are prompted for permission to install the Scratch 2.0 Offline Editor by clicking on the Install button.
Figure B.13
Click on Install to confirm that you want to continue with the install process.
© 2014 Lifelong Kindergarten Group
A dialog window similar to that shown in Figure B.14 is then displayed, allowing you to modify the editor’s installation options. Click on the Continue button.
Figure B.14
Verify and set your installation preferences and click on Continue.
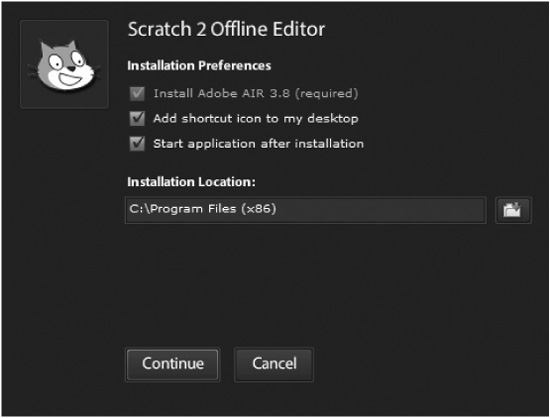
© 2014 Lifelong Kindergarten Group
If Adobe AIR is not already installed on your computer, the dialog window shown in Figure B.15 is displayed, prompting you to click on the I Agree button to install it.
Figure B.15
You must agree to the Adobe software license agreement.
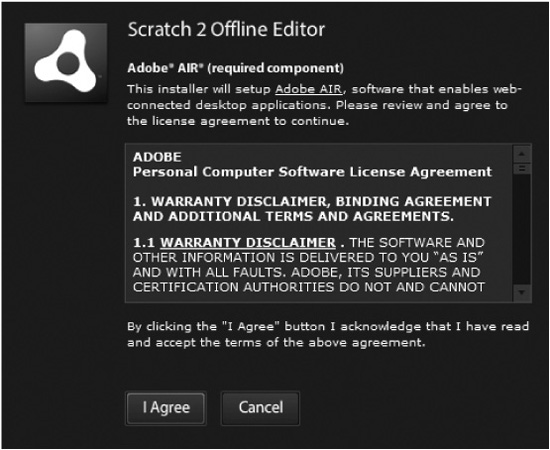
© 2014 Lifelong Kindergarten Group
Depending on your operating system, you may be prompted to supply a password to allow the installation process to complete. Once complete, Scratch 2.0 Offline Editor is ready for use. On Windows, there’s a shortcut on your desktop and on the Start menu, and on Mac OS X, the shortcut is in the Applications menu.
Sharing Your Scratch 2.0 Projects
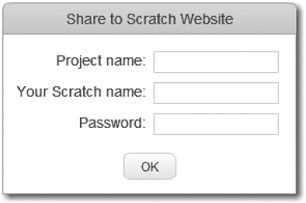
Just like the Scratch 1.4 Online Editor, you can share projects developed using the Scratch 2.0 Offline Editor. Scratch 2.0’s sharing process is similar to that of Scratch 1.4. Like Scratch 1.4, project uploads are limited to a maximum file size of 50MB. To upload a project, click on the File menu and select the Share to Website option. This displays the Share to Scratch Website dialog shown in Figure B.16.
Figure B.16
Sharing a Scratch 2.0 project on the Scratch 2.0 website.
© 2014 Lifelong Kindergarten Group
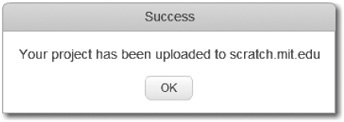
Type a name for your project in the Project Name field. Then type your Scratch login name and password in the required fields. When you’re ready, click on OK to upload and share your project. The Scratch 2.0 Offline Editor now uploads your project to the Scratch website. When it’s complete, the pop-up dialog shown in Figure B.17 is displayed.
Figure B.17
The project has been uploaded to the Scratch website.
© 2014 Lifelong Kindergarten Group
The next time you access your My Stuff page on the Scratch 2.0 website, you see your uploaded Scratch 2.0 project displayed in your list of projects.
Note
Project notes, instructions, and tags cannot be shared and are not uploaded to the Scratch 2.0 website when you share your projects.