
Once you have acquired the equipment for large-format photography, you will want to keep all of the pieces in good working order. Well-made cameras, lenses, and accessories have a long working life, but careless operation and the lack of routine maintenance can degrade the quality of your work and shorten the useful life of your expensive equipment. Occasional but regular attention should be sufficient, but the cardinal rule is this: keep it clean. Dust and dirt will paralyze shutters and focusing gears, create annoying marks on film, and impair the sharpness of a lens. A few simple precautions will protect your investment in equipment and ensure quality in your results.
The front and rear surfaces of your lens are exposed and fragile. Keep them covered with lens caps whenever the lens is not in use and dust the lens only when necessary. Try a gentle blast from a compressed gas sprayer or an air syringe to remove loose dust. Be very careful with any sprayers that might contain a propellant. If you don’t hold the can vertically, the gas can come out as a very cold liquid, leaving a permanent frost mark on your lens. Never blow on a lens. Your breath is never free of tiny bits of saliva that will leave spots on your lens.
If compressed air doesn’t remove the dust, you can use a brush on your lens. Use only a very clean, very soft camel’s hair brush and brush gently. To avoid transferring oil to the lens, don’t touch the bristles with your fingers. Never use a cloth or tissue to remove dust. Dust particles trapped under a cloth create a fine sandpaper which will abrade the lens’ delicate surface. Modern lenses have a fragile antireflection coating that can be damaged more easily than the glass itself.
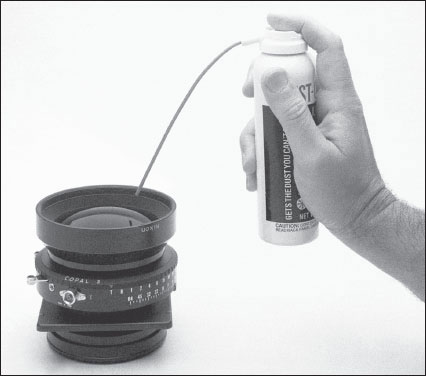
When using compressed gas spray dusters to clean your camera equipment, be very careful to hold the can vertically to avoid spraying the propellant in liquid form. ■
Never use silicone-treated eyeglass or record cleaning cloths on your photographic lenses. They will smear and degrade the coating. If a fingerprint or greasy smear appears on your lens, clean it with an untreated lint-free tissue (such as Tiffen lens-cleaning tissue) and a few drops of a good lens cleaning liquid (also Tiffen) or pharmaceutical methyl alcohol. Since liquids dripped on the lens can seep past the edge seal into the lens barrel, apply the liquid to the tissue, not directly onto the lens. Dust your lens with compressed air before attempting to remove a fingerprint and don’t allow any fingerprints to remain on the lens for long. The natural acidity of your skin trapped in a greasy print will etch the lens coating, making the mark permanent.
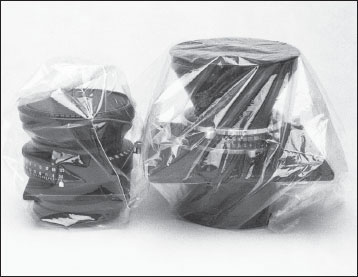
Store your lenses in plastic bags when not in use. ■
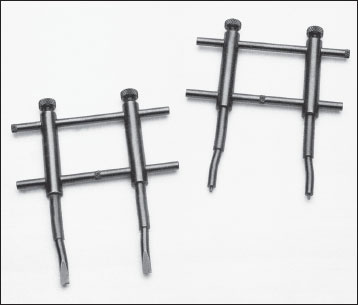
Use a spanner wrench to remove and replace the retaining ring that holds a lens to its board. ■
Handle your lenses carefully to avoid dropping them. When installing a lens, make sure the lens-board is properly seated and clipped into place. Vibration or jarring can loosen lens elements in the barrel or separate cemented groups. If an element moves slightly out of its correct position, the lens has decentered and its optical performance will suffer. A professional repair service can test a lens for proper centering. Whenever your lenses are not in use they should be stored in a plastic bag to keep out dust. For further protection, wrap the plastic bag containing the lens with soft cloth, leather, foam, or bubble-wrap.
If you wish to mount or remove a lens from its board, use a spanner wrench. This wrench is a special tool used to remove the retaining ring that holds the shutter or barrel to the lensboard. Its two blades fit into opposing slots on the perimeter of the retaining ring, allowing you to unscrew the ring without unnecessary hazard to the lens. It is easy to damage an expensive lens trying to remove a retaining ring with an improper tool. The spanner wrench can be adjusted to fit retaining rings on any common lens. Along with the spanner in your studio toolbox should be a set of small jeweler’s screwdrivers. These are handy to keep all the tiny screws on your shutter-mounted lenses properly tightened.
The back of the lensboard and lens, the side facing the film, should be nonreflective. The original black surface will eventually wear or chip, leading to image flare. Keep a small bottle of flat black paint on hand for touch-ups. Sherwin-Williams Opex dead flat black lacquer, M60 B 16, is recommended for this application.
Dust is your shutter’s worst enemy. Always store all your shutter-mounted lenses in plastic bags. Disuse can cause your shutter to slow and stick, but a few cycles of winding and releasing can sometimes remedy these problems. Never store your shutters in the wound position. The tension on the spring will eventually cause it to stretch and slow the speeds.
Some shutters, notably early Compurs, use an extra spring to provide sufficient tension for their highest speed. Your shutter has this extra spring if the highest speed setting on the dial is spaced farther apart from the others and if turning the dial to this setting requires more force to set the additional spring. These shutters can be severely damaged by changing the speed setting when the shutter is tensioned. To avoid damage with this shutter, always release it before changing speeds.
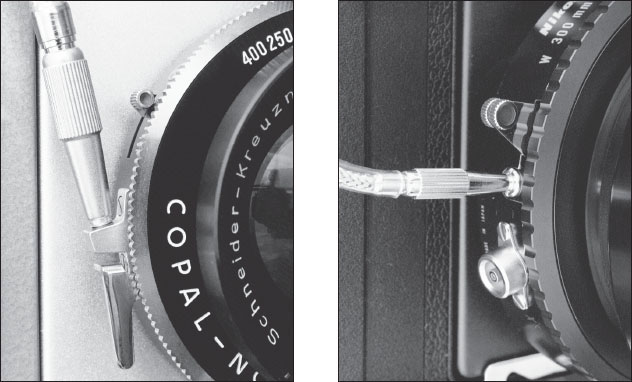
Never pull on an attached cable release. The attachment point is the most vulnerable part of a shutter. ■
Shutters have two particularly vulnerable points. The cable-release attachment point is easy to damage on most shutters, particularly by pulling on the cable release. Either remove the cable release or make sure there is no pressure on the attachment point when wrapping the lens for storage. A shutter’s other weak spot is the threaded lens mount. Pushing on or jarring a lens, particularly a wasp-waisted wide-field, can bend or twist the mount and leave the lens out of alignment. Always handle your lenses gently and store them carefully.
Never attempt to repair, dismantle, or lubricate a shutter yourself. Always take it to a trained professional in a repair shop. It is embarrassing to bring in a bag containing most of the shutter’s parts after you have removed the faceplate and watched the springs fly across the room. A professional repair shop will usually test the shutter speeds for accuracy for a nominal fee. A shutter’s inaccuracies are usually consistent and, if you know those for your shutter, you can compensate for them in exposure.
Light can leak into holders from worn felt light traps and cracked darkslides. If you suspect that one of your holders leaks, or if you buy used holders, test them before you entrust them with an important exposure. To test a film holder for leaks, cut a sheet of black-and-white printing paper to size, insert it in the holder, and leave the closed holder in a brightly lit place for an hour or two, turning the holder occasionally to expose all sides to light. Unless you test only one side of one holder at a time, mark the back of the sheet with a permanent marker or cut a corner to identify the holder and side. You can use film for your testing, but paper is less expensive and can be handled in safelight. Any holders to be used with infrared film should be tested for leaks with that film before using; infrared radiation can penetrate some darkslides that are opaque to the visible spectrum.
After developing the test paper or film, inspect it for dark areas that indicate unwanted exposure. The presence of streaks or fog indicates light leaks and their position will reveal the location of a crack, chip, or pinhole. If you find that a holder leaks light, repair or discard it. Black photo tape can be used to patch the bottom flap and new darkslides are available from the manufacturers of film holders. Replacement darkslides in uncommon sizes, such as those for banquet cameras, can be fabricated from sheets of black phenolic plastic available from a commercial plastic supplier.
Dust in the holders can settle on the film during exposure and produce tiny pinholes or clear specks on negatives and black marks on prints and transparencies. Store and transport your film holders in plastic bags and dust each holder before loading. For thorough cleaning, buy a new brush attachment for your vacuum cleaner and use it only on camera equipment.
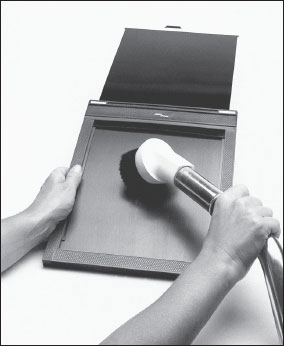
Keep a spare brush attachment for your vacuum cleaner for cleaning only your photography gear. ■
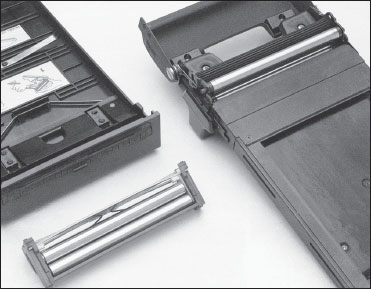
The roller assemblies in Polaroid and Fuji instant-film holders need frequent cleaning. Fortunately, they are easily accessible. ■
Instant-film holders need to be maintained regularly as well. Dust or vacuum them as you would any other holder. Before each use, inspect the rollers for bits of developing reagent that occasionally leak out of the film packs. Open the holder and clean the rollers with a damp lintless cloth, paper towel, or tissue. Try removing the roller assembly for cleaning, or for Polaroid #545 holders, release a pair of clips to disengage them from each other for access. Always store a Polaroid holder with its processing lever in the L position (that is, with its rollers disengaged).
Dust from the inside of your bellows can settle on film during exposure. Stretch out the bellows periodically and vacuum the inside. Leather bellows should be treated on their outer surface with a leather preservative to prevent cracking. Light leaks in a bellows can be difficult to diagnose, producing degrading flare in some photographs but not in others. To check the bellows, set up your camera in a darkroom and extend the bellows. Remove the back and hold a flashlight inside the bellows, covering your arm and the back with a darkcloth. Pinhole leaks will be visible as you move the flashlight. You can patch them with a dab of black silicone caulk or a small piece of black electrical tape.
For tripods, too, dust is the enemy. If possible, remove dust from the leg segments of your tripod each time you put it away. After a year or two of use, the tripod head may not move as smoothly as it should. Using simple tools, you can dismantle the head, clean it, lubricate its sliding parts with a little auto grease, and reassemble it. The leg section clamps are usually designed to operate without additional lubricant, but you can rejuvenate them occasionally with a thorough cleaning. Naphtha or small amounts of a nonabrasive household cleanser will remove grease and oil. To avoid corrosion, never wash your tripod or immerse it in water.

While working on a book of Chicago alleys, Bob Thall made this photograph in a parking structure using a 90mm lens on an old 4×5 Linhof Technika camera. Although not made in an alley, he liked the image so much that he included it anyway. ■