
If you are familiar with roll film, view camera film and its development will at first seem a little awkward. This feeling will quickly subside as you begin to notice the advantages.
One of the major virtues of the view camera is its unique film system. Large-format cameras use film in flat sheets with dimensions that correspond to the nominal size of the camera. For example, 4-inch by 5-inch sheets are used in a 4×5 camera. Each sheet is loaded, exposed, and processed individually so you will have more steps to follow than with roll film, but you will find that the advantages more than make up for this minor inconvenience.
THE ADVANTAGES OF THE FILM SYSTEM
Film in Sheets
The single-sheet film system used for view cameras gives you more freedom than any other system to shift from one kind of film to another. Once set up, many commercial shots are photographed first on instant film, then successively on black-and-white, color negative, and color reversal film. Each use for the photograph can then be satisfied with no sacrifice in quality: color transparency to the printer for a brochure, black-and-white prints from a negative for a press release, and color prints from a negative for the office walls.
A Variety of Film
Many different emulsions are available in sheet-film sizes—at least as many as are available in rolls—including special-purpose films for scientific, graphic arts, and aerial photography. Many of the available films are not only useful to their intended fields but also provide raw material for the experiments of inventive artists.
Large Film
Another advantage of large-format film, obvious to anyone who has ever seen a print made from a large negative, is the sheer visual quality that results from the great expanse of film. Sharpness, resolution, and graininess, common indicators of image quality in a photograph, are all related to the degree of enlargement from negative to print. A 35mm negative has less than 9 cm2 of image area and a 6×6cm negative from 120 film has 36 cm2. A 4×5 negative (10 by 12 cm), however, yields 120 cm2 of image. These figures mean that, all other things being equal, a print having the same fineness of detail can be made more than thirteen times larger from a 4×5 negative than a 35mm negative. Or, if the same size print is made from both, the resolution, sharpness, and granularity will be many times better from the larger negative. Larger film sizes, such as 8×10, are most often printed by contact for the highest possible image quality. Many artists have elected to work solely with 8×10 for this reason alone. For the advertising photographer, sheet film is often desirable for a client who wishes to see an original at the full size of its use. In the past, larger film was easier to retouch directly; commercial retouching is now done electronically.
Separate Development
The Zone System, an advanced technique for black-and-white photography, uses controlled exposure and development as a way of adjusting the contrast of a negative and can be used effectively only if development can be varied from one negative to the next. Once you are comfortable with the camera and can begin to explore its expressive uses, study the Zone System to introduce complete tonal control to your black-and-white picture-making. Several good texts are available on the subject.

These outlines are the actual sizes of frames of 35mm, 120, 4×5, 5×7, and 8×10 film. The potential technical quality of a photograph increases with the size of the film. ■
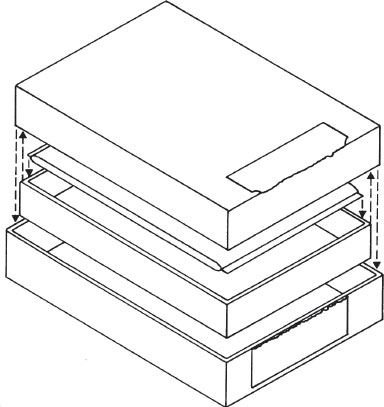
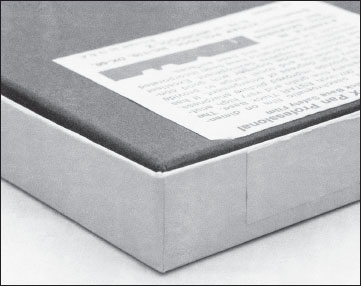
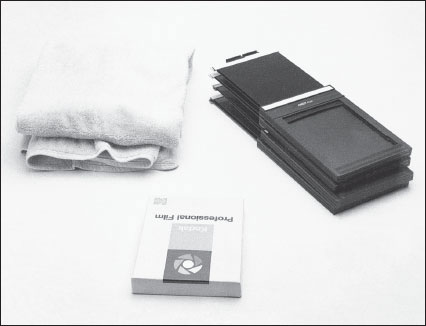
Sheet film is sold in three-part boxes, nested to assure lightproof storage. ■
When the bottom of a film box shows only one rim, the third part of the box is nested inside. Do not open it in the light. ■

If you store empty film boxes nested this way, the dust will be kept out and you can tell them apart from the boxes containing film. ■
Sheet film, sometimes called cut film, may be purchased in boxes that ordinarily contain either 25 or 100 sheets (for black-and-white; color film comes in 10- or 50-sheet boxes). Start with a small box: you will find the box itself useful to store and transport small quantities of film after you have exposed all the film in it. The film is contained in a sealed foil or plastic package of 25 sheets; 100-sheet boxes contain four packs. Unless you expect to use all the film soon after you purchase it, keep large boxes refrigerated or frozen to preserve the film and transfer one pack at a time to a smaller box as you need it. To avoid condensation on the film’s surface, allow the cold film to reach room temperature before opening the packet. Give refrigerated film at least 1 hour, and frozen film 4 hours, to reach room temperature. Sealed foil packs are airtight. If you wish to refrigerate an opened pack, reseal the box in a plastic bag first, preferably on a dry day.
The film is packed inside a box made of three nested lids to prevent light leaks. Store your empty boxes (only your empty boxes) with the outer two lids nested in the same direction (see illustration below). This keeps out dust, and a glance at the bottom of the box will allow you to tell by the visible edges of the center lid around the bottom of the inner lid that the box is empty.
The Film Holder
Sheet film is sold as raw stock. Before you can expose the film in your camera, you must load it into a reusable lighttight film holder, which is inserted for the exposure into the camera’s spring back. To develop the exposed film, you must remove it from the holder. Since the film you are most likely to use is either color or panchromatic black-and-white, you will be loading and unloading film holders in complete darkness.
The standard film holder for sheet film is a double sheet-film holder. This holder provides space for two sheets of film and has two identical faces each with a shallow compartment to hold the film. Each face has a hinged flap at the bottom to facilitate film insertion and has its own separate darkslide, a flat, opaque plastic sheet that slides through a felt-lined slot at the top of the holder and down in tracks along the sides of the film compartment to seat into the flap and cover the film. When the shallow film compartment is covered by the darkslide, the film inside is protected from the light.
After the film holder has been inserted properly into the camera’s spring back, the darkslide must be withdrawn before the exposure is made. The black felt in the slot acts as a light trap to block light from fogging the film when the darkslide is withdrawn. Other styles of film holders that may better suit your purposes are described on p. 144, along with more detail on this standard holder.
The Darkslide
When you are photographing you will want to have several holders with you, since each holds only enough film for two exposures. The film holders are all identical and each has two identical faces, so you will need a foolproof system to avoid exposing the same sheet of film twice. In most film-holding systems for large-format cameras there is a darkslide to prevent unwanted exposure when the holder is out of the camera. For standard double sheet-film holders, the darkslide performs an additional task—it gives you a way to tell whether the sheet of film it covers has been exposed.
The top rim (or handle) of the darkslide is black on one side and white (or polished metal) on the other. Run your finger along the white side and feel the short row of bumps or holes. The black side is smooth. These distinctions of color and texture allow you to indicate to yourself whether the film inside the holder has been exposed. White side out indicates unexposed film; black means exposed film or an empty holder. Before you insert a film holder for exposure, make sure the darkslide has its white rim out. When you replace the darkslide into the holder after exposing the film, leave the black side out. When loading or unloading holders, use the bumps on the white side for fingertip identification in the dark.
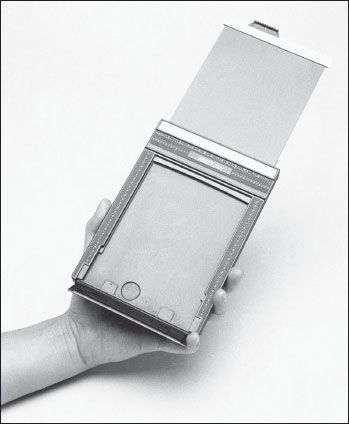
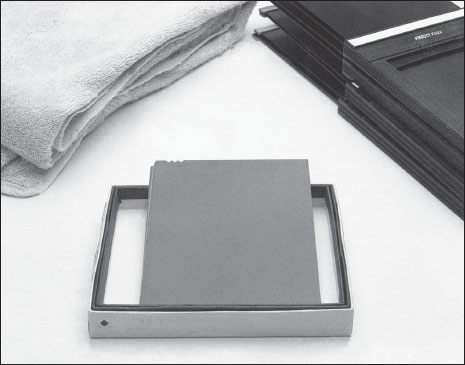
This is a standard double sheet-film holder for 4×5 film. One of its two supplied darkslides is withdrawn, revealing the compartment for one sheet of film. ■

The white edge of the darkslide, signifying unexposed film, has bumps for identification in the dark. The black side is smooth. On each side of the holder’s top there is a small wire clip to prevent inadvertent removal of the darkslide. ■

Each sheet of film has code notches in one corner that indicate the type of emulsion and the side on which it is coated. ■
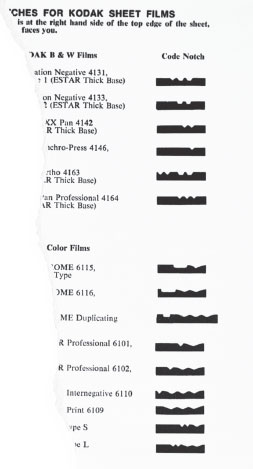
The code notches are your clue to which emulsion is on the film as well as which side of the sheet it is on. Each film manufacturer publishes a list of code notches for identification. ■
Film Code Notches
Since only one side of the film is coated with a lightsensitive emulsion to receive an exposure, you must load the film holder so that the emulsion side of each sheet will face the lens when inserted into the camera’s spring back. Because you will be loading holders in the dark, some nonvisual means of identifying the emulsion side is necessary.
Film manufacturers cut code notches into the corner of each sheet for identification in the dark. To locate the emulsion side, hold the film sheet by its edges in a vertical position, like a page to be read. Feel the perimeter of the film for the pattern of cut notches. When the notches are in the upper right or lower left corner of a sheet held vertically, the emulsion side of the film is facing you. Slide the film into the holder with that side facing out, to be covered by the darkslide.
The notches also identify the type of film. Each different sheet-film emulsion for use in a camera bears a different pattern of notches. Graphic arts sheet films and others that can be handled in safelight are not notched. Film manufacturers publish diagrams of the code notch patterns for all their films along with other film data in pamphlets or books; the notch code for the film in a box is also usually depicted on the film box label or in the instructions packed with it. If you need to identify the type of a sheet of film, for example, if you have gotten two unmarked holders mixed up, use a pencil to trace the outline of the notches onto paper while in the dark. After you put the film away, you can match the code to the manufacturer’s diagram. Once you learn a film’s notch code, your fingertips will be able to identify the film immediately. Because of the way the notches are cut into a stack of film during manufacture, they may not always be the same depth, but the shape and spacing will be the same.
How to Load Film
In your darkroom, prepare a very clean work surface free of clutter. To be comfortable you will need at least a meter’s width of counter with nothing nearby to knock over. Wash your hands thoroughly with soap and water and dry them completely. Any fingerprints you get on the film during loading will appear as permanent marks during development. Have only the box of unexposed film and the empty holders in front of you. If your darkroom is warm, keep a clean towel nearby to wipe perspiration from your hands. Withdraw the darkslides almost all the way and leave the white side facing out. Dust the holders using a vacuum cleaner, compressed air, or a clean camel’s hair brush and stack them to one side.
Before attempting to load any film you expect to use for a photograph, practice loading your film holder in the light with a piece of scrap film. You may wish to begin with a small box of Ilford Ortho Copy Plus, a black-and-white sheet film you can load and develop under a 1A (dark red) safelight. This practice will make your transition to working with sheet film more gentle.
Turn off the light and, if working in an unfamiliar darkroom, wait a few minutes to allow your pupils to dilate so you can make sure there is no light leaking into the room. Phosphorescent clock and timer dials, or even the afterglow of some fluorescent lights, can fog film if they are near enough.
Open the film box and nest the three sections in an open position. Remove the foil pack containing the film, tear it open, and remove the film in a stack, holding it only by its edges. Set aside any paper cover sheets and lay the pack of film sideways across the open box, emulsion side down. This way the film will be easy to find and dust won’t settle on the emulsion side of the film while you work.
Handling it by the edges, remove one sheet of film from the top of the stack. Do not touch the emulsion side and touch the back of the film only if necessary. Flip the sheet so that the code notches are in the upper right-hand corner; the emulsion side will be facing you. Pull down the bottom flap on the holder to reveal the tracks or channel for the film. With 4×5 film, you can hold the film holder in one hand and the film in the other. Larger sizes will probably require you to leave the holder on the counter and hold the film with both hands. Slide the film in and up to the top of the holder. Run a fingernail lightly along the track above the film on each side to make sure you haven’t gotten it in the track for the darkslide instead. Remember that the code notches must be in the upper right or lower left corner of the holder so that the emulsion side will face the lens during exposure. With the film in its proper position at the very top of the holder, the flap will close easily. Dust the emulsion surface of the film with a camel’s hair brush or compressed air. Slide the darkslide into its closed position; if it seems difficult to close, you may have the film in the wrong track.
Make sure your counter is clean and uncluttered before you try to loadfilm there in the dark. Have your film and holders ready and keep a towel nearby to clean and dry your hands. ■
Lay the stack of film across the box it came in with the emulsion side down so it will be easy to find in the dark and stay dust-free. ■
Load a sheet of film in the other side of the holder in the same way, load the rest of your stack of holders, and enclose the remaining film in its box before turning on the lights. Although there is probably no advantage to first returning the film to its foil pack, many photographers do. Store and transport the film holders in plastic bags to keep out dust.
If you do not have access to a darkroom, you can load and unload your holders in a changing bag made from an opaque cloth. These bags are available from most camera stores, but they are constricting and uncomfortable and will probably create severe dust problems.
Sheet film is no different from roll film during exposure. Your method of determining the correct exposure will be the same. You will probably use a light meter (p. 140). Make sure you have read and understood the section on exposure compensations (p. 54). The film holder fits into the spring back to form a lighttight seal with the camera body, and you need to withdraw the darkslide (p. 61) for the exposure and return it (black side out) before removing the holder from the back.
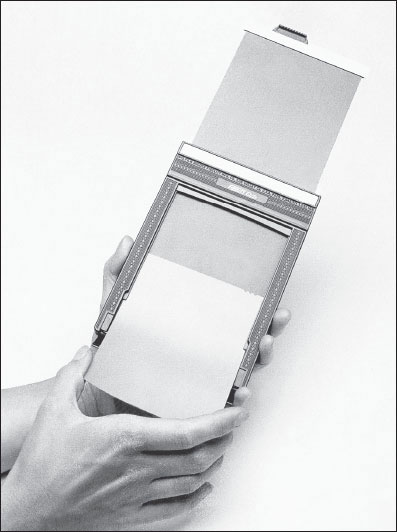
Holding the film by its edges, slide it into the correct slots at the sides of the compartment in the holder. The emulsion is correctly facing out when the code notches are in the upper right or lower left corner of a vertical film sheet. ■
As you might have imagined, the development of sheet film differs somewhat from that of roll film. The chemical process itself is the same for any size or shape of a specific film, but the procedure for immersing and agitating large-format film in development chemicals will be new to you.
As with any other film format, proper processing of sheet film requires that you: 1. Use the necessary solutions in correct sequence and at a controlled temperature; 2. Agitate the film or solution to promote the same rate of chemical activity over the entire film surface; 3. Wash away all residual chemicals; and 4. Protect the film from extraneous light and physical damage. Several methods of processing will satisfy all of these requirements, and your choice of one will be affected by the kind and quantity of film you use as well as by your equipment and working environment.
THE CUSTOM LAB AND QUANTITY PROCESSING
Users of large-format film, particularly color film, often choose to have it processed at a custom lab. These commercial darkrooms primarily serve professional photographers and have a large-scale manual or automated film processing setup called a line. Named for the linear progression of solutions and for Kodak’s brand name of processing chemicals, an E-6 line is for color reversal films (positive transparencies, often called chromes) and a C-41 line is for color negatives. Most labs also have a black-and-white line.
Color film processing is economical and easily controlled only with large batch processing; only a large-volume studio can justify in-house color development. A discussion of the methods used in processing large quantities of film is beyond the scope of this book, but information on these methods can be readily obtained from retailers serving industrial photographic accounts and from the manufacturers of processing chemicals and equipment.
Many custom labs are now integrated with service bureaus, their digital counterparts. Catering to the prepress trade as well as to professional photographers, service bureaus can scan conventional film into digital files, retouch or alter images on a computer, and turn digital files into prints, negatives, transparencies, or color-separation film. Often they also will rent computer time, should you wish to do your own retouching or compositing, as well as digital cameras and adapters (see p. 111). This will give you the opportunity to explore the use of advanced technologies without making a substantial investment in new (and very expensive) hardware.
Three methods, each based upon a different container, are used for processing small quantities of sheet film: tray development, open tanks with hangers, and closed tanks. At least one of these methods will suit your working habits. The development procedures in this chapter are all tailored for black-and-white film, but may be readily adapted to color. If you expect to develop color film, remember that color chemicals pose a much greater health hazard and require better darkroom ventilation and skin protection. Since most color processes require solutions to be much warmer than ambient (room) temperature, it is more difficult to maintain the chemicals at a constant temperature. Maintaining the temperature of the warmer solution is made even more difficult by introducing room-temperature objects such as film and hangers into it. Since small variations in temperature will produce more noticeable changes in color film than in black-and-white, you will have to pay much greater attention to controlling the temperature when developing color film.
Tray Development
If you already have a working small-format darkroom, you can develop your first sheets of film in your print-processing trays. The technique is much the same as that for developing prints, and you will need no additional equipment. The room must be lighttight, of course, as the film will be in an open tray for several minutes. Even a slight light leak can spoil your results with fog.
Setting Up. Use trays at least one standard size larger than your film: 5×7 trays for 4×5 film, 11×14 trays for 8×10. Until you are experienced in tray development, you will probably be more comfortable with trays two sizes larger than your film. Lay out five trays in the sink so that you can easily find them in the dark and determine which is the first in the sequence. The first tray should be plain water at the same temperature as the developer, followed by trays containing the developer, stop bath, and fixer, and a final tray of water.
Of the three methods used for processing small quantities of sheet film, tray development will allow you to use the minimum amounts of chemicals. Depending upon the capacity of your chosen film developer, you can use as little as 75ml per sheet of 4×5 film (20 square inches), or 300ml per sheet of 8×10 (four times the area). The solution in the tray must be deep enough to allow your hands some freedom of movement below the surface. You will want to practice developing some scrap film to learn how much solution you will need.

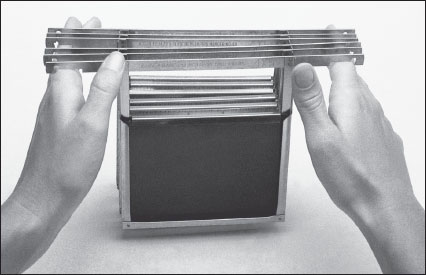
Hold the stack of film sheets in your left hand, keeping them under the surface of the liquid but not resting on the bottom of the tray. ■
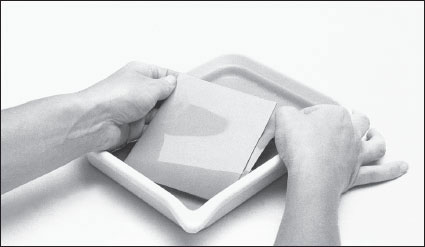
With your right thumb, gently separate the bottom sheet from the rest by peeling it down slightly. ■
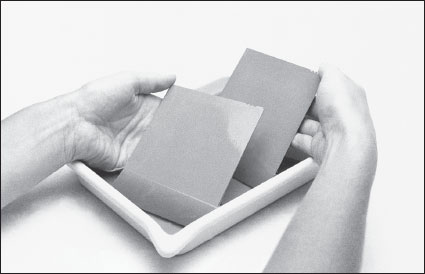
Slide the bottom sheet out from under the stack. Make sure you don’t scrape it on the corner of the stack on the way out. ■
The agitation procedure for developing more than one sheet at a time requires you to touch the film constantly during processing. The gelatin emulsion is extremely soft and fragile when wet and you must exercise caution throughout the process to avoid damaging it. Short fingernails and extreme vigilance are advisable. Also, your hands will be immersed in the processing chemicals, so if your skin is sensitive to photographic chemicals, wear surgical gloves. The thinner the gloves, the better; your tactile sense is your only guide in the dark.
The presence of your hands in the developer will change its temperature. Using stainless steel or enamel trays for your chemicals and surrounding them with a water bath will help keep the temperatures constant. If you don’t use a water bath, measure the temperature of the developer after processing your first test sheets to determine any change. If the temperature has increased, you may need to decrease development time slightly to compensate. Try using the time from the film’s developer/time/temperature chart that corresponds to a temperature halfway between beginning and ending temperatures. You should also set your stop bath and fixer at the higher temperature to prevent minor reticulation, a surface effect of temperature change on the film that resembles increased graininess.
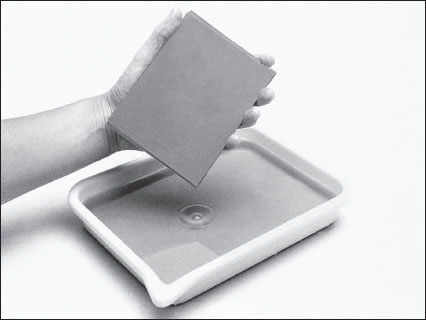
Agitation and Processing. After your trays have been set up, make sure your hands are clean and dry before turning off the lights and removing the exposed film from your holders or storage box. Make a stack of all the sheets you plan to develop and hold the stack by the edges in one hand. With the other hand place the sheets one at a time, emulsion side up, in the first tray—a water presoak. Wait for each sheet to sink below the surface before adding the next. From the time you place the sheets in water until they are hung up to dry, they should be kept moving. If you allow one sheet to settle on another in the tray for very long, even in water, the edge of one sheet can leave a permanent mark on the other.
A water presoak of a minute or longer with agitation will prevent air bells, the circular marks caused by bubbles clinging to the film during development. It will also give you time to ensure that none of the sheets have stuck together. If you inadvertently place two sheets in the tray simultaneously, they will indeed stick together. In the developer, this is a catastrophe; in the presoak, merely an annoyance. Slowly peel the two apart, holding them underwater and taking care not to scratch other sheets in the tray.
The agitation procedure for sheet film in a tray (shown in the illustrations on these pages) requires the constant repetition of a series of motions cycling each sheet through the stack from top to bottom. The corners of one sheet, as well as your fingernails, can scratch the soft emulsion on another sheet. Preventing scratches in the film’s emulsion is easier when you process fewer sheets and have deeper solutions in the trays. Practice developing four sheets of film in trays at least half full. After you become proficient with four, you will be able to increase the number of sheets you can develop at one time without damage. Although it is possible to achieve satisfactory results with more, eight sheets is a comfortable maximum for most people.
Once the film sheets are all in the presoak, gently arrange them into a stack with the emulsion side up. Keep the stack off the tray bottom by holding the fingers of one hand, palm up, under the film. If you are right-handed, you will probably use your left hand for this. For the rest of the process, handle the film only by the bottom (the backing side) and edges.
With the fingers of your left hand under the stack of film, separate the bottom sheet from the rest by pulling down one corner with your right thumb. Carefully slide the sheet out, lift it out of the solution, and replace it on top of the stack. Push the whole stack down gently with your right palm to immerse the top sheet. Repeat this procedure every 3 to 5 seconds for the duration of the 1-minute presoak. At the end of the minute, lift the stack of film out of the water tray and drain it for a few seconds. Place it in the developer, start the timer, and begin the agitation cycle again.
While the film is in the developer, the warmth and extra agitation generated by your fingers in handling the film can be a source of uneven development. Rotate the stack or the entire tray 90° each minute of development so that you handle each corner instead of just one. The more sheets you develop at once, the higher the risk of uneven development; keeping the film in a stack prevents fresh developer from reaching the center of each sheet until it comes around for agitation.
Ten seconds before the correct development time is over, remove the stack of film by the edges and drain by one corner. Place the stack into the stop bath and agitate in the same pattern as you used in the developer. Drain again, transfer to the fixer, and agitate in the fixer for the appropriate time. After fixing, the film will need to be washed.
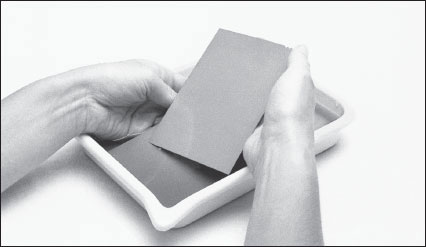
Place the sheet on top of the stack, taking care not to scratch the sheet directly below it with a corner. ■
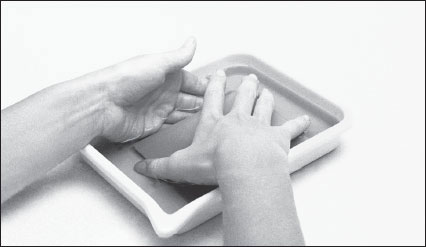
Gently push the stack down to submerge all the sheets, then begin the process again with the bottom sheet. ■
Drain the stack by one corner before transferring it to the next solution. Always hold the film by the edges when possible. ■
Washing and Drying. If you wish to wash the film in trays, transfer the stack to a tray of fresh water at the same temperature as the developing solutions. One sheet at a time, transfer the film to a second tray of water. Empty the first tray, refill it with water, and transfer the film back to the first tray one sheet at a time. Empty the second tray, refill, and repeat this sequence for the duration of the wash time. Other methods used to wash sheet film are described later in this chapter.
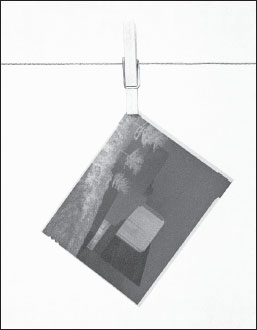
After washing and then a rinse in a wetting agent, hang each sheet by one corner to dry in a dust-free place. ■
In a tray, soak the washed film in a wetting agent, such as Photo-flo, mixed with distilled water. Using distilled water with the wetting agent will help prevent water spots. Then hang each sheet by one corner from a clip or clothespin to dry in a dust-free place. Do not use a squeegee on the film to remove excess wetting agent; it is unnecessary and can easily damage the film.
Tank Development
If you wish to keep your hands out of chemicals entirely, consider using the tanks-and-hangers method. The extra equipment you will need includes sheetfilm hangers and sheet-film developing tanks.
A hanger is a stainless steel or plastic frame designed to hold the film by its edges. Different sizes of hangers are available to hold each of the standard film sizes (4×5, 5×7, and 8×10) and to fit inside the readily available sheet-film developing tanks. Hangers that fit 8×10 tanks and hold four sheets of 4×5 film are also available. Each frame has a handle that allows you to agitate and transport the sheets. The handle on each hanger frame is a bar that fits across the top of the tank; the film hangs suspended from the handle into the tank. Since you must fill each tank with enough liquid to immerse the entire sheet, you will use considerably more of each chemical than with the tray method.
Sheet-film developing tanks are made of stainless steel, hard rubber, or plastic in sizes corresponding to the hanger sizes. You can also buy water-jacketed stainless steel tanks that use a constant flow of tempered water for precise control of processing temperatures. Tanks are made to accommodate only a certain number of hangers; the smallest tanks hold a maximum of six, larger ones hold up to 12. As you will see when you try tank development, the size of your hands may be the limiting factor on how many sheets you can develop at once.
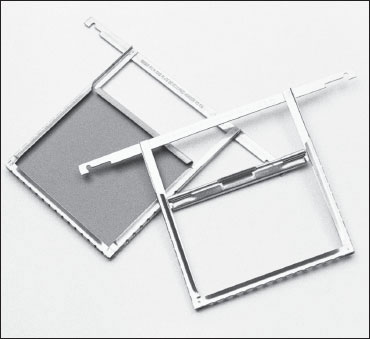
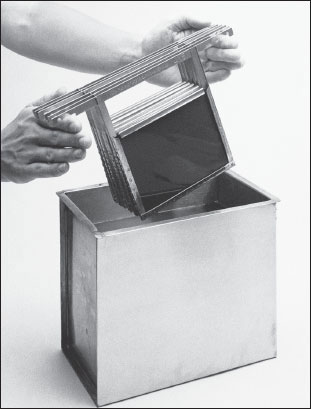
With sheet-film hangers, you can develop film without handling it and without having your hands in chemicals. The empty hanger shows its loading clip in the open position. ■
Hangers and tanks are made for each common size of sheet film. Most are stainless steel. The large hangers holdfour sheets of 4×5 film andfit a tank made for 8×10. ■
Tanks are available with airtight tops or with lids that float on the surface of the chemical to reduce its contact with the air. Covering the tank slows evaporation and oxidation (which spoils developers). If you use a developer that can be replenished after each use and if you keep it from oxidizing, you will not need to prepare developer before each processing session. The developer (and the other chemicals) can be left in the tank for storage. If you expect to develop film frequently, tanksand-hangers processing allows you to have all the chemicals ready for immediate use at any time.
Setting Up. For tank development, you will need one empty tank in addition to three—developer, stop bath, and fixer—for processing. A water presoak is likely to exacerbate a tendency for hangers to leave agitation marks at the film’s edges. Begin by filling the tanks with your processing chemicals at the correct temperature and setting them out in order. The dry, empty tank should be on the counter next to your empty hangers and the film holders containing the exposed film.
Once the tanks are filled and everything is in place, turn off the light and load the hangers in the dark. One at a time, pry back the covering clip on the hanger, slip the sheet into the frame of the hanger, cover it with the clip, and place the loaded hanger in the dry tank (or in a rack designed for the purpose). When all are loaded properly, lift them out by supporting the protruding ends of the handles along your index fingers, palms facing each other, and lower them carefully but not slowly into the developer tank. Tap the hangers several times quickly to dislodge air bubbles, then leave them undisturbed for the remainder of the first minute.
Agitation and Processing. Agitate the film by lifting all the hangers simultaneously, supporting the handles along the sides of your index fingers. Carefully lift and tilt the hangers to one side until all of the film sheets are out of the solution and tilted nearly 90° to the side. Lower them back into the solution again and repeat the lifting and tilting motion, tilting to the opposite side. Each of the two lift-and-tilt cycles should take 5–7 seconds with no pause in between. Repeat this agitation cycle once at the start of each remaining minute of development. Moving the film too rapidly or too slowly during agitation will produce uneven development at the film’s edges. Too little agitation can streak the film (the streaks are called bromide drag), although this problem is much less common. Use this agitation pattern and your standard times for the stop bath and fixer.
Hold and carry hangers between your hands. Be careful not to scratch the film with a sharp corner. ■
To agitate the film, lift the hangers out of the tank slowly and drain them for a few seconds in this position before returning them slowly into the tank. Then repeat the action, draining them to the other side. ■

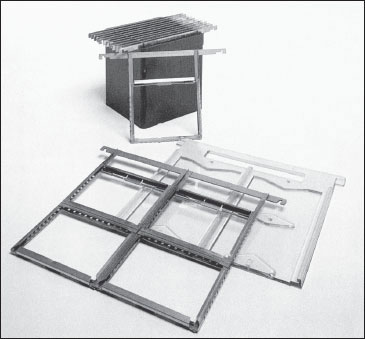
This daylight tank contains two reels, each with a capacity of six sheets of 4×5 film. It can be agitated by a mechanized roller base. The optional loading platform simplifies this tricky procedure. ■

Special-purpose film washers like this one provide a thorough washing to untendedfilm left in them in hangers. ■
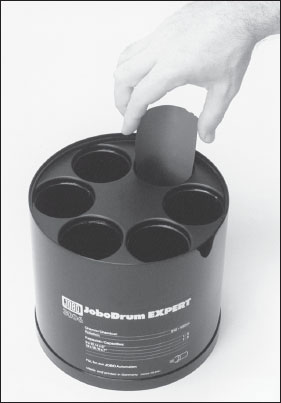
Jobo’s system of motor-driven processors uses drums like this one that holds up to six sheets of 4×5 film. Drums are available for larger quantities and for other sheet-film and print sizes. The mechanized system provides consistent even development and reduces the potential for physical damage to the film. ■
Washing and Drying. Wash the film with water by repeatedly filling and emptying the tank, or use one of the specially designed sheet-film washers. Many of the vertical print washers on the market can be used for film in hangers if you remove the interior dividers.
After immersing the film in a wetting agent, hang the film to dry and thoroughly rinse the film hangers and tanks with plain water. Wetting agent allowed to dry on the hangers can affect the results of the next batch of film by accelerating development at the film’s edges.
Daylight Developing Tanks
If your darkroom will not accommodate tray or tank processing, if you are processing film while traveling, or if you have a strong aversion to working in darkness (and insist on processing your own sheet film), you may use one of the several closed-tank systems available for sheet film.
Similar to roll-film developing systems, these daylight tanks allow liquids to be poured in and out through a light trap, and total darkness is needed only for loading them with film. Usually made for 4×5 and smaller sheet film, most daylight tanks will hold a maximum of six or eight sheets. For 8×10 sheet film, you can use a daylight processing drum made for color print processing to develop one sheet at a time. Because each daylight developing tank has its own system for holding the film in place, each requires a different procedure for loading, and all tanks come with directions. Some manufacturers make and recommend accessory loading devices to make the job easier. Except for adjusting the time in the developer slightly to compensate for the different agitation pattern, your normal sequence of chemicals and times will be correct for daylight tank development.
Intermittent agitation during development in a closed tank is likely to result in uneven development, despite the claims of the tank’s manufacturer. For the most even development possible with any closed-tank system, fill the tank halfway and agitate it vigorously, constantly, and in a random pattern, including complete inversion. Using a full tank and an agitation pattern similar to that for roll-film tanks, agitating for five seconds each minute, you will get results with slightly finer grain, but will risk streaks or overdevelopment at the film edges. The instruction sheet packaged with the film will give you development times for trays using constant agitation and for tank development with agitation at one-minute intervals. The time for constant agitation in a tank will be slightly less than that for tray development. Make sure you run tests before developing any important film.
You can wash film in the tank by repeatedly filling it with water and emptying it, or you can remove the film to wash it using any of the methods previously mentioned.
For complete uniformity during development, or for developing larger quantities of film, Jobo makes a system of film drums—like large daylight tanks—that may be used manually or with one of their automated processors. For a modest investment in equipment, they allow you repeatedly to produce evenly developed, scratch-free negatives.
Once your processed film is dry, transfer it to a safe package for storage and preservation. Negatives must be protected from heat, humidity, physical damage, and airborne pollutants, particularly sulfur compounds. For the most permanent, or archival, storage, only inert plastics such as polyethylene and polyester should touch the film. Currently, the safest material for negative storage is uncoated polyester (Mylar) with a frosted surface.
Special transparent polyethylene storage pages are made to accommodate sheet film in standard sizes. Punched to fit a three-ring binder, each page holds four 4×5 negatives, two 5×7 sheets, or one 8×10. Because the storage sheets are so pliable, a flat box is probably a more suitable container for these pages than a three-ring binder. Negatives stored in transparent polyethylene can be damaged by ferrotyping, the tendency for gelatin to conform to a surface in contact with it. Under very humid conditions and some pressure, negatives in polyethylene pages can develop glossy areas from touching the plastic, so don’t stack too many sheets together in a box. Acid-free paper envelopes and folders may be a satisfactory option, although those made acid-free by buffering are of questionable long-term value, and sliding negatives in and out of a paper sleeve may cause physical damage. Never use glassine (a translucent paper) or ordinary paper for long-term storage.
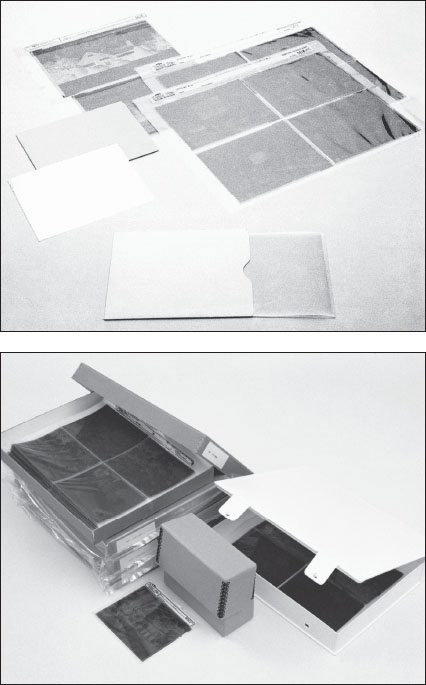
Your negatives will be protected from most environmental damage if kept inside polyethylene or polyester sleeves inside boxes made of acid-free cardboard or polypropylene. Keeping the boxes inside polyethylene bags will further protect the negatives against accidental spills or leaks. In the foreground at top is a Mylar sleeve with its acid-free paper envelope. These sleeves provide the safest, most inert surrounding for film. ■

A contact-printing frame will hold your negative in close contact with the print material. ■
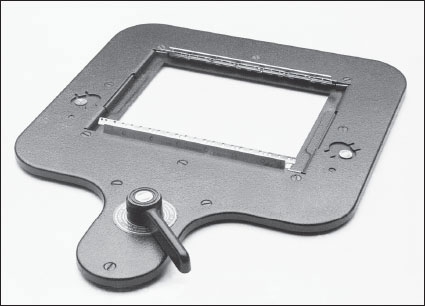
This 4×5 negative carrier grips the negative by two sides and stretches it flat for exposure. Larger negatives, particularly ones on thin plastic bases, can swell and buckle from heat during exposure, creating unsharp enlargements. ■
After seeing the prints from your first large-format negatives, you will wonder why anyone would use roll film. All the benchmarks of photographic quality—resolution, detail, sharpness, and fine grain—are the visual evidence of your chosen camera. And elaborate enlarging equipment is unnecessary because the negatives themselves are large; Edward Weston’s finest prints were made in a simple contact frame under an ordinary light bulb.
Large-format cameras flourished in the nineteenth century when all prints were made by contact: placing the negative in direct contact with a sheet of paper to make a positive image on the paper the same size as the negative. The larger the negative, the larger the print. Enlarging reduces quality by spreading the visual information from a negative over a greater area. The greater the degree of enlargement, the lower the image quality. But a print made by contact is faithful to the negative, retaining all the possible delicacy of tone and crispness of edge.
As a user of a large-format camera, you have the best of both worlds. You can contact-print your negatives for the highest quality, or enlarge them to any size with a lesser degree of enlargement (therefore less loss of quality) than with any smaller format. Other than the large size of the negative, all aspects of the printing procedure are identical to those of printing smaller film.
Printing by Contact
In addition to a conventional workspace—darkroom with safelight, trays, and chemicals—all you will need for printing by contact is a sheet of glass and a light source that can be turned on and off to make a correct exposure.
Holding the negative in close contact with the paper is as simple as covering the two, emulsion sides facing, with glass; the weight of a sheet of plate glass slightly larger than the paper should be sufficient. To avoid undesirable marks on the final print, make sure your glass is free of scratches, blemishes, and dust. Occasionally, usually with very thin or very large negatives, some areas of the resulting print will be unsharp from uneven pressure. If this happens, use a thin sheet of foam rubber under the paper, or use a contact-printing frame. This simple frame holds a sheet of glass and a backing board (and between them the negative and paper) together with pressure from springs.
Almost any light source will suffice for contact printing. The overhead light in your darkroom, a desk lamp, or even a match can be used, but an enlarger is ideal since it was designed to distribute light very evenly and can be switched on and off accurately with a timer.
Printing by contact allows you to use a broader range of materials on which to print. With a large negative and a brighter light source, you can use slow, rich-toned silver chloride printing-out papers or any of the early printing materials such as platinum, gum bichromate, or cyanotype. These printing materials need exposures to light as bright as the sun and rich in ultraviolet, such as a carbon arc or sunlamp, so an enlarger cannot be used. The amount of light that is safe to use in an enlarger is limited because the negative must be close to the source of light (therefore close to the source of heat). A bright enough enlarger light to expose these slow materials would produce too much heat too close to the fragile negative and burn it.
Enlarging
Most professional enlargers will accommodate film sizes up to and including 4×5. An enlarger designed to produce even illumination and to be sturdy enough for 4×5 film will also usually be more satisfactory for smaller negatives than a smaller enlarger. Because most professionals today use either 4×5 or 8×10, enlargers capable of handling a 5×7 sheet have become uncommon. A new 8×10 enlarger is as much an investment as buying a new car, and much more difficult to move.
Most enlargers for film sizes larger than 4×5 have a diffusion light source, named for the sheet of opal glass or translucent plastic immediately above the negative that provides even illumination by diffusing the light falling on it from above. The alternative, a condenser light source, uses a set of lenses above the negative stage to concentrate the light and project it straight down.
A diffusion light source will produce an image of lower contrast than that of a condenser, and spots on the print from dust and surface defects are greatly diminished. This is a great advantage since the glass-sandwich negative holder that is often necessary to hold a large negative flat during printing adds four dust-collecting surfaces to the two on your film. Some diffusion enlargers use fluorescent tubes instead of incandescent bulbs and are called cold-light enlargers. A cold-light source prevents problems due to heat, notably buckling or popping of the negative during exposure, but the limited output spectrum of the light can interfere with the effective use of variable-contrast or color enlarging papers.
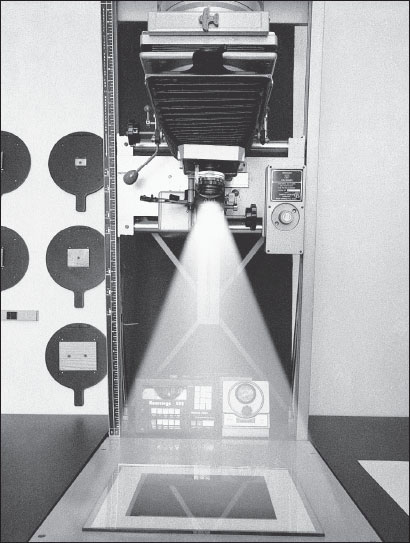
An enlarger is an ideal light source for contact printing. The light is adjustable and even, and your timer will allow precise and repeatable exposures. ■