
Spring is a Java framework that emerged to address many of the shortcomings present in the initial versions of the de facto Java platform targeting the enterprise market or server-side space: J2EE (Java 2 Enterprise Edition), today just Java EE. In this sense, Spring is a true grassroots movement that came about from two best practices books on this platform entitled J2EE Design and Development[5] and J2EE Development without EJB.[6]
To one of the authors of these books—Rod Johnson, who was Spring's lead architect—there were many complexities that needed to be addressed in order to embark on a server-side Java project using J2EE. Chief among these complexities was EJB (as implied by one of these titles), and the principles that emerged for designing applications without EJBs became the foundation of the Spring Framework.
While the landscape in server-side Java development has changed remarkably since the ideas underpinning Spring emerged, with the flagship enterprise Java platform undergoing three major revisions (J2EE 1.3, J2EE 1.4, and Java EE 5) and the "black sheep" in question, EJB, also being revamped the same number of times, Spring has continued to strike a chord with many Java practitioners dedicated to server-side development.
Today, Spring is considered a one-stop shop, or full stack, for all the needs encountered in the development life cycle of an enterprise Java project, providing everything from its own Model-View-Controller (MVC) module, which is a common paradigm used in server-side developments, to tight support of object-relational mapping tools, which are pretty much the norm for bridging Java objects to the relational database world that dominates enterprise IT data centers. Equipped with this brief background and awareness of the place Spring holds in the Java ecosystem, let's explore the technical foundations of Spring.
Software applications are generally chock-full of dependencies, whether to another application, an external resource, or some other type of mechanism. Each of these dependencies helps to make an application "tick" the way you intended it to. If you drill down deep enough at the code level—in the Java classes themselves—you will find that this same behavior continues to hold true.
You may find a few Java classes depend on the use of some third-party API, others on an external resource like a database connection, and yet others on an inheritance hierarchy imposed by some other classes. So you could effectively say dependencies are everywhere, but while these dependencies in themselves are necessary to achieve the ultimate goal of a functioning application, the way you go about defining them can have broad implications in the overall design of an application.
Take for instance the classes presented in Listings 2-1 and 2-2, both of which illustrate how to reference an external resource, or define a dependency. They differ, however, in the way this is done.
Example 2-1. Defining Resource Dependencies in Java
public class Sales {

    public double getMonthlySales(String month) {
        InitialContext ctx = new InitialContext();
        DataSource ds = (DataSource) ctx.lookup("java:comp/enb/jdbc/mysql");

        Connection conn = ds.getConnection();


       try {
           Statement stm = conn.createStatement();
           // Extract actual monthly sales
           return monthlySales;
       } catch (SQLException e) {
           // Handle error

       } finally {
           conn.close();
       }
    }

}
Example 2-2. Defining Resource Dependencies in Java via Dependency Injection
public class Sales {
    private DataSource ds;

    public void setDataSource(DataSource ds) {
        this.ds = ds;
    }
public double getMonthlySales(String month) {
Connection conn = this.ds.getConnection();
try {
Statement stm = conn.createStatement();
// Extract actual monthly sales
return monthlySales;
} catch (SQLException e) {
// Handle error
} finally {
conn.close();
}
}
}Notice how the class in Listing 2-1 relies on an explicit lookup sequence that requires the use of an API—the JNDI API—while the one in Listing 2-2is apparently devoid of any such mechanism, relying solely on the use of a method to gain access to the same DataSource. In reality, the Java class in Listing 2-2is gaining access to the same resource as the one in Listing 2-1, except it's obtaining the resource characteristics from another location. How can this be so? Through Inversion of Control.
Inversion of Control (IoC) is a software design pattern in which the flow of a system is inverted with respect to a traditional sequence of procedural calls; the flow is instead delegated over to an external entity, which then performs the sequence of calls based on a predefined set of instructions.[7]
In Spring's case, it is said to be an IoC container since it's precisely Spring that fulfills the part of an external entity in the IoC definition sense. Spring implements a particular type of IoC, Dependency Injection (DI), which is the pattern illustrated in Listing 2-2. In light of this IoC definition, the differences between Listings 2-1 and 2-2 should become more evident. It's not that Listing 2-2 is devoid of dependencies, but rather that its dependencies are injected from an external entity—the Spring IoC container—that has been configured with a set of predefined values.
The actual injection of values takes place when an object of the corresponding class is instantiated, either via its constructor method or setter methods—as is the case in Listing 2-2 using a setter method.
This is in contrast to Listing 2-1, in which the class itself takes responsibility for accessing the resource, therefore requiring a traditional sequence of procedural calls. DI can be used to tackle many types of dependencies in Java classes, not just resources as illustrated in Listing 2-2. For example, another case of DI could consist of a business service being injected into another business service, avoiding code dependencies between each service to be intertwined in the same location.
DI effectively allows you to simplify the thought process for designing programs, since you don't have to think of multiple sequences that need to be fulfilled at once, but rather individual sequences that can later be injected into certain locations of a program.
If you are new to developing enterprise applications, you may not see an immediate benefit to using DI until you immerse yourself in a typical enterprise-level project.
For the most part, enterprise applications are full of dependencies in the form of services and resources that are closely intertwined with the business logic they attempt to fulfill; things like data sources, transactions, security, and logging data are all carefully coordinated aspects that are taken into account in projects of this nature.
Were it not for the sheer size and life span of enterprise applications, using something like DI might be seen as a purely academic practice, but it is exactly the size and constant flux of enterprise projects that has given Spring and its DI approach an important market share in the area of enterprise Java projects.
By effectively separating business logic from all its underlying services and resources, a project's code base is kept increasingly clean, favoring what are four important characteristics in enterprise software: simplicity, maintenance, testing, and reusability.
Which takes us to another construct central to Spring that fosters these last characteristics: Plain Old Java Objects (POJOs).[8]
A POJO is an object instantiated from a Java class that possesses a few of the following technical characteristics:
It has numerous properties/fields.
Its properties/fields are accessed and assigned via getter and setter methods, respectively.
It may have other methods containing business logic, for manipulating either its properties/fields or other resources.
At first glance, these behaviors might seem strikingly similar to those of a Java Bean—as defined by the Java platform—and in fact, they have the same characteristics. So why not just say Java Bean and be done with it? Why POJO?
The term "POJO" started being thrown around when the original Java EE platform showcased its first versions of Enterprise Java Beans (EJBs). In order to differentiate from this last Java Bean incarnation, which is a completely different beast from a run-of-the-mill Java Bean, many started prefixing the "Plain Old" phrase when referring to non-EJB objects.
Further defining the term POJO was the fact that EJBs required the use of a nonstandard JVM life-cycle contract. A nonstandard life cycle implies that a Java object is required to go through certain steps not defined by a JVM—such as create, remove, activate, and passivate—that were a requirement in EJB objects. And by contract, it is to be understood that an EJB class needed to implement an interface defined by the EJB standard—the framework—in order to enforce this special life cycle.
Ever since then, the definition has taken on a life of its own, making POJOs a household name in the area of enterprise Java applications. So far you've seen a POJO's technical characteristics enumerated; next you will learn more about its behavioral characteristics.
Simplicity
It should be somewhat obvious that "Plain Old" goes hand in hand with simplicity. In a POJO's case, its most clear traces of simplicity come through with its often scant use of third-party APIs and light reliance on class inheritance hierarchies.
This is not to say a POJO can't or doesn't use third-party APIs, but more often than not, a POJO's import statements are reduced to either a few classes in the core Java SE platform or limited to a few constructs from some third-party library.
Similarly, most POJOs don't have deep inheritance hierarchies as is often the case with some object-oriented (OO) designs. With respect to interfaces, POJOs never rely on any framework interfaces that might tie them to a nonstandard life cycle, as outlined earlier. If employed at all, interfaces in POJOs are used to enforce business method contracts.
While it may indeed be a slippery slope to characterize a POJO by its number of import statements or its inheritance hierarchy, as a colleague once put it, "If at first glance a class doesn't look simple, needless to say it isn't a POJO," and there is nothing like the use of too many APIs or deep inheritance hierarchies to make a class look complicated even to the trained eye.
Maintenance
For the massive undertaking that is developing enterprise-grade applications, most projects of this nature portray a considerable investment to any organization and are seen as a critical business asset once placed in production, hence maintenance proves to be an important factor with the natural changing of business requirements.
When it comes to enterprise applications, it's not strange for numerous groups of people—internal employees or contractors—to work on the same application. Add to this the effective life span of most applications is in terms of years, and maintenance can prove to be a nightmare if different people are brought in to modify an overly complex code base.
The point here is that the kiss of death to maintenance is complexity, and in software development, we can draw from the well-known acronym KISS—keep it short and simple.
It doesn't matter if a code wizard's über-class concoction can shave days off a project's schedule. When maintenance or upgrade time comes around, having a code base composed of POJOs—even if this requires lengthier times—will pay off handsomely, not only because POJOs will allow different people to navigate a code base more easily, but also because it favors another important aspect to software development: testing.
Testing
In any software application, errors are something that users and development teams have come to live with; in thousands of lines of code, there is a high probability that buried amidst all the logic is some unforeseen sequence of calls that will break the intended purpose of an application. To solve this nuisance, testing has proven to be the most effective solution.
However, the issue with testing is that it's often a continuous process. More testing will tend to uncover more unforeseen behaviors, though it's a known fact that the sooner these unforeseen behaviors—errors—are uncovered, the less disruptive and expensive they become.
Until recently, most software testing took place once the first end users got their hands on a piece of software; however, a new approach named test-driven development[9] started to make its way into the development world. This approach consisted of testing code at the same time classes were being written, effectively shifting testing to one of the earliest possible phases in the life span of an application.
Test-driven development proves easiest to implement when applied to POJOs, due to their minimalistic approach and limited number of dependencies—especially dependencies on infrastructure resources.
In order to perform testing, it's critical to replicate everything a class would use in a production system. As a consequence, if a class depends on infrastructure resources, like a data source, or it depends on a nonstandard JVM life cycle, like an EJB that requires its own environment, testing can become difficult. Hence, it's much easier to write a test for a potential outcome when a class's logic is less convoluted with dependencies, like it is in POJOs.
Similarly, such tests at a class level also serve the purpose of "safety nets" once a project's code base starts being modified. By having such tests, each time an application is modified it can be checked against these benchmarks, guaranteeing that earlier logic contained in a class has not been compromised due to some unintended modification in the code base.
Testing is an extremely ample subject, and I won't even attempt to summarize all its benefits here. The objective was simply to emphasize that POJOs lend themselves extremely well to the whole testing paradigm, something that will become more evident once you create your first Spring application in the upcoming section.
Reusability
Reusability is one of the many goals pursued in OO projects, but it can be hard to achieve. The reason reusability proves difficult is because classes often fulfill too many duties in an OO project. This not only causes reusable logic to be obscured in large classes, but also breeds the mentality of "It's easier to rewrite it than to learn how to use it" given the complexity of some classes.
While reusability is undeniably linked to getting a project's "big picture" from the outset, there are many factors that foster it, and one of them is POJOs. Since POJOs themselves foster simplicity, this has the side effect of smaller and more understandable classes, which in turn favor reusability.
POJOs force a developer to think in terms of more manageable units and not get carried away with what a single class attempts to fulfill. This benefits not only an individual developer's efforts to reuse classes, but also the efforts of an entire team that can clearly understand a class's logic and therefore reuse it more easily. Having described a POJO's primary characteristics, let's finish the discussion on Spring's concepts and architecture with a look at the numerous parts that make up Spring.
Spring's popularity has seen it blossom from a grassroots project in the Java community to a federated portfolio of projects spanning beyond the Java platform. Table 2-1 presents a summary of the various projects that comprise the Spring portfolio.
Table 2-1. Spring Portfolio Projects
Project[a] | Function | Home Page |
|---|---|---|
| [a] | ||
Spring Framework (Core) | The core framework, Spring's main offering |
|
Spring Security | Project that provides authentication and authorization services for enterprise applications based on Spring tenets |
|
Spring Web Flow | A web application front-end framework based on Spring principles |
|
Spring Web Services | A framework designed to make the management of SOAP and Plain Old XML (POX) web services easier |
|
Spring Dynamic Modules for OSGi | Project designed to make use of OSGi features in Spring |
|
Spring Batch | A batch-processing framework based on Spring principles |
|
Spring IDE | A set of GUIs for Spring configuration files, built as Eclipse plug-ins |
|
Spring Modules | A collection of tools, add-ons, and modules to extend the Spring Framework |
|
Spring Java Configuration | Project that provides a typesafe, pure-Java option for configuring the Spring IoC container |
|
SpringBeanDoc | Project that facilitates documentation and graphing of Spring bean factories and application context files |
|
Spring .NET | Project for the .NET Framework, based on the same principles as its Java counterpart |
|
Spring LDAP | An LDAP library based on Spring principles |
|
Spring Rich Client | Project designed to leverage Spring's approach to the development of rich clients |
|
Spring Integration | Project designed to address Enterprise Integration Patterns in the context of Spring applications |
|
A module-based Java application server designed to leverage Spring, Apache Tomcat, and OSGi |
| |
[a] | ||
This book will cover every aspect related to the Spring Dynamic Modules for OSGi project and also introduce the SpringSource dm Server, the latter of which facilitates the use of OSGi and Spring technology in the enterprise.
However, before we get to those subjects, it's important for you to get a feel for what the Spring platform can accomplish without the use of OSGi and have a firsthand account on the use of POJOs; IoC, DI, and testing, among other core subjects related to Spring. Up next you will embark on the task of creating a Hello World application using Spring.
The Hello World application you are about to start will take you through the most basic steps in using Spring, such as defining your domain model and POJOs, to more advanced topics, such as connecting to a relational database using Object-Relational Mapping (ORM) principles and making use of the MVC pattern to enable applications on the Web.
Be advised that this is a "show it all" Hello World example on the Spring Framework, and not your typical one-line Hello World program. This is done with good reason, since the integration between OSGi and Spring requires an understanding on all the subjects presented in this example.
Though the following Hello World application might take you a little longer to re-create than most Hello World examples, it will save valuable time and effort if you are not familiar with Spring, since the application is the essence of entire books covering the Spring Framework.
Figure 2-1 illustrates the different layers and components that will make up this application using the Spring Framework.
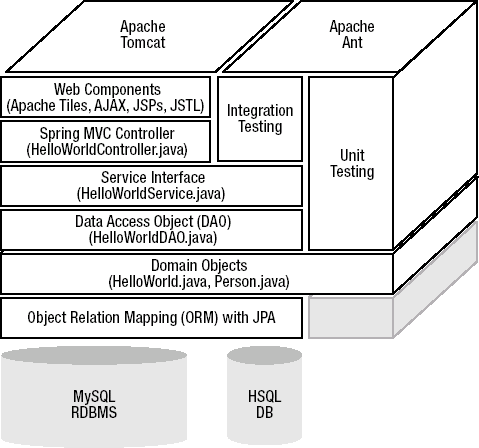
Table 2-2 lists the software you will need to download and install prior to embarking on your first Spring application.
Table 2-2. Spring Hello World Prerequisites and Downloads
Software | Function | Download Site |
|---|---|---|
Java SE 5 or higher | Java's runtime environment |
|
Java Ant 1.6 or higher | Popular Java build project, used for easing the compilation and creation of Spring applications |
|
Spring Framework 2.5.4 (with dependencies) | Spring Framework's core libraries |
|
Spring Web Flow 2.0.2 | Project that aids in the creation of Java web applications using Spring's MVC paradigm |
|
Web templating system used to incorporate Asynchronous JavaScript and XML (AJAX) functionality into Spring MVC designs |
| |
Apache Tomcat Core 5.5.26 | Java container for deploying applications on the Web |
|
Java Persistence API (JPA) reference implementation 1.0 | Java's de facto ORM API for persisting Java objects to a Relational Database Management System (RDBMS) | Included in the Spring Framework with dependencies download |
MySQL Community Server 5.0 | An open source RDBMS |
|
MySQL Connector/J Driver 5.1 | MySQL-Java driver |
|
HSQLDB 1.8 | A lightweight in-memory RDBMS used for testing | Included in the Spring Framework with dependencies download |
JUnit 4.4 | Java framework used for unit testing | Included in the Spring Framework with dependencies download |
It's very likely you may have some of this software already installed on your workstation; if so, just ensure that you have the suggested versions, as minor version variations may hold you back in getting through the outlined steps.
Additionally, since some of this software was already used in the OSGi Hello World application presented in Chapter 1, installation instructions for those packages will not be presented here, so please refer to Chapter 1 for detailed installation instructions.
Installing Spring Framework
The process for installing the Spring Framework consists of just one step: unzipping the downloaded file into a directory of your choice. As mentioned earlier, Spring consists of numerous parts, many of which I can't talk about in this introductory application, so while you are free to browse and explore on your own, it's only the following directories and files that will be of interest to you:
dist: Contains the main distribution filespring.jarused by every Spring application.modules(insidedist):Includes the numerous modules that form part of the Spring distribution. Among the ones used in this application will bespring-webmvc.jarandspring-orm.jarlib: Contains the various dependencies used by Spring, many of which are amply used in enterprise applications and will also serve your Hello World application, among them JUnit, JPA, and HSQLDB.
Installing Apache Tomcat
The process for installing Apache Tomcat also consists of one step: unzipping the downloaded file into a directory of your choice. Once you do this, descend into the unzipped directory and perform the following test.
While in Apache Tomcat's bin directory, execute java -jar bootstrap.jar; this will start Apache Tomcat under port 8080. Next, open a browser and attempt to access the address http://localhost:8080/; you should see an Apache Tomcat Welcome page. In case this test fails, verify that port 8080 is not busy: check that no other application is running on the same default port (8080) as Apache Tomcat.
Installing MySQL
Depending on your operating system, follow the instructions included in your download, which can vary from those given in a simple Installation Wizard on Windows, to executing a few scripts on Unix-type systems. Once you have installed MySQL's base system, you will need to create a database in order to place your application data. Follow these steps:
Create a database: execute the command
mysqladmin create springosgi, which will create a database instance by the namespringosgi.Note
You may be required to introduce MySQL's root password to create a new database. Use the following command if this is the case:
mysqladmin -u root -p<rootpassword> create springosgi.Create/Grant privileges to an application user: log in to the main database—mysql—with the command
mysql -u root -p<rootpassword> -D mysql, and then execute the instructionsGRANT ALL PRIVILEGES ON springosgi.* to hello@localhost IDENTIFIED BY 'world'. This process will grant connection rights to the userhellowith the passwordworldon thespringosgidatabase, credentials that will be used to connect from Java to MySQL.To ensure that the proper connection rights have been established, execute the following command from a command prompt:
mysql -u hello -pworld -D springosgi. Upon performing this instruction, you should be placed inside a MySQL shell.In case this test fails, verify
springosgidatabase credentials: ensure that the user/password credentials for the database were granted as outlined in the previous steps.
Installing Remaining Downloads
The remaining downloads simply contain JAR files that will aid you in the creation of the Hello World application. Just take note of their location—you will move them around when the need arises.
Setting Up the Hello World "Playground" Directory Structure
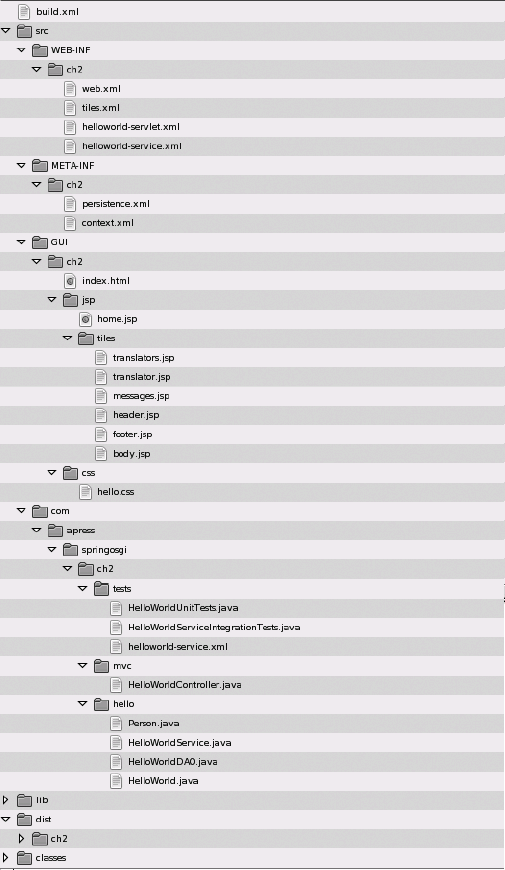
Now that you've got the tools working, it's time to create the proper workspace in which to maneuver, a directory structured like the one illustrated in Figure 2-2.
The directory structure functions as follows:
build.xml: This is the main Java Ant configuration file containing the necessary tasks to build the application.classes: All compiled Java classes are placed in this directory.dist: All built applications are placed in this directory.lib: All JARs needed to compile Java sources are placed in this directory.src: All Java sources files composing the application are placed accordingly in subdirectories inside this directory, including application web descriptors inWEB-INF, metadata files inMETA-INF, and application user interfaces (like JSPs) inGUI.
A domain model is used to describe a system's core competencies in terms of classes. Given the requirements of most Hello World examples, our domain model will be extraordinarily simple, consisting of just two classes: one used to associate "Hello World" messages in different languages, and another to associate a person performing the translation of each "Hello World"message.
In OO modeling terms, the domain model will consist of a single one-to-one relationship: each "Hello World" message will have one person, and consequently, each person will also have one "Hello World" message. Listing 2-3 illustrates the HelloWorld class, whileListing 2-4 contains the Person class.
Example 2-3. HelloWorld.java POJO
package com.apress.springosgi.ch2.hello;

import java.util.Date;

public class HelloWorld {

    private long id;
    private String language;
    private String message;
    private Date transdate;
    private Person translator;

    public HelloWorld(String language, String message, Date transdate,
Person translator) {
        this.language = language;
        this.message = message;
        this.transdate = transdate;
        this.translator = translator;
    }

    public HelloWorld() {
    }

    public void setId(long id) {
        this.id = id;
    }

    public long getId() {
        return id;
    }

    public void setLanguage(String language) {
        this.language = language;
    }
Person translator) {
this.language = language;
this.message = message;
this.transdate = transdate;
this.translator = translator;
}
public HelloWorld() {
}
public void setId(long id) {
this.id = id;
}
public long getId() {
return id;
}
public void setLanguage(String language) {
this.language = language;
}public String getLanguage() {
return language;
}
public void setMessage(String message) {
this.message = message;
}
public String getMessage() {
return message;
}
public void setTransdate(Date transdate) {
this.transdate = transdate;
}
public Date getTransdate() {
return transdate;
}
public Person getTranslator() {
return translator;
}
public void setTranslator(Person translator) {
this.translator = translator;
}
}Example 2-4. Person.java POJO
package com.apress.springosgi.ch2.hello;

public class Person {

    private long id;
    private String firstName;
    private String lastName;
    private double hourlyRate;
public Person(String firstName, String lastName, double hourlyRate){
this.firstName = firstName;
this.lastName = lastName;
this.hourlyRate = hourlyRate;
}
public Person() {
}
public double getHourlyRate() {
return hourlyRate;
}
public void setHourlyRate(double hourlyRate) {
this.hourlyRate = hourlyRate;
}
public String getLastName() {
return lastName;
}
public void setLastName(String lastName) {
this.lastName = lastName;
}
public String getFirstName() {
return firstName;
}
public void setFirstName(String firstName) {
this.firstName = firstName;
}
public void setId(long id) {
this.id = id;
}
public long getId() {
return id;
}
}Both class listings are in line with the POJO characteristics outlined earlier: each class has numerous fields, possesses various getter and setter methods to access and assign values to each field, and contains no framework-specific interfaces.
Also notice that at this juncture, there is no indication as to what objects of either the HelloWorld or Person class will do. Will they be presented on a web page? Will they be persisted to a database? Will they be presented on a desktop GUI? This is the whole point of using POJOs and Spring's IoC—having API-agnostic code with all the benefits mentioned in the last section.
Now, these two classes by themselves only represent the application's objects and their corresponding properties, but what about the application's actions? For that, you will need to define a service interface containing all the possible actions on this pair of objects. Listing 2-5 illustrates such an interface.
Example 2-5. HelloWorldService.java Interface
package com.apress.springosgi.ch2.hello;

import java.util.List;

public interface HelloWorldService {

    public HelloWorld findById(long id);

    public List<HelloWorld> findAll();

    public HelloWorld update(HelloWorld hw);

    public void save(HelloWorld hw);

    public void delete(HelloWorld hw);

    public void deleteMessage(long id);

    public List<HelloWorld> findByTranslatorFirstName(String firstName);

    public List<HelloWorld> findByTranslatorLastName(String lastName);

    public List<HelloWorld> findByTranslatorHourlyRateOver(double hourlyRate);

    public List<HelloWorld> findByLanguage(String language);
public List<HelloWorld> findByMessage(String message); }
This last interface illustrates a typical contract for actions performed on class objects linked to a data store; things like the findByX search methods, as well as the update, save, and delete methods, are all indicative of some type of persistence operation being involved.
But still, aside from using the HelloWorld class as an input parameter and returning Java lists of HelloWorld objects in various methods, there is still no trace of how persistence or an RDBMS will be involved in the Hello World application.
So up next, we will explore how you would go about persisting the application's domain model using the JPA and how to create a Data Access Object (DAO) out of this last interface with the aid of the same JPA and Spring.
A little background on the whole issue of persistence in Java may be in order to explain why JPA[10] was chosen for this application. If there is more than one way to skin a cat, the Java world has seen its fair share of cat skinning throughout the years for persisting data. Among these approaches you will find things like JDBC, JDO, Entity EJBs, Object-Relational Mappers (ORMs), and perhaps some other standards or home-brewed processes to achieve the same results.
Java aside, many in the object-oriented community have always favored the approach and results offered by ORMs for persisting objects to RDBMSs; however, until recently the issue with Java ORMs was that they were extremely fragmented, resulting in many contrasting ways of doing Object-Relational Mapping in the Java platform, that is, until JPA came to fruition.
JPA is now the standard API for performing Object-Relational Mapping in Java, and since its emergence, many Java ORM vendors have pegged their products against this API, with the biggest beneficiaries of this whole process being application developers, since a single and unified API can now be used across the board for object-relational purposes. This is why the Hello World application will use JPA.
Though the Hello World application will use a very basic set of JPA instructions, and Spring does an excellent job of abstracting away many direct uses of the API through its IoC/DI approach, be aware that JPA is an extensive technology in itself, with entire books written on the subject. That said, let's get started decorating the Hello World application POJOs with JPA annotations.
Listing 2-6 contains a modified version of the HelloWorld class decorated with JPA annotations.
Example 2-6. HelloWorld.java POJO with JPA Annotations
package com.apress.springosgi.ch2.hello; import java.util.Date;import javax.persistence.CascadeType;import javax.persistence.Column;import javax.persistence.Entity;import javax.persistence.GeneratedValue;import javax.persistence.Id;import javax.persistence.OneToOne;import javax.persistence.Temporal;import javax.persistence.TemporalType;@Entitypublic class HelloWorld {@Id@GeneratedValueprivate long id;@Columnprivate String language;@Columnprivate String message;@Temporal(TemporalType.DATE)private Date transdate;@OneToOne(cascade = CascadeType.ALL)private Person translator; // Followed by methods identical to Listing 2-3 }
The first thing to note about this listing is its various import statements, which represent JPA annotations and behaviors. Starting things off is the @Entity annotation used to decorate the class itself, indicating to the Java persistence runtime that the class represents an object that will be persisted using the JPA.
Immediately after, you find the remaining JPA annotations decorating the numerous fields belonging to the class. The @Id annotation indicates a class's field will be used as the primary key in a relational table, with the @GeneratedValue further specifying the strategy for the primary key, in this case a default strategy.
Next are two @Column annotations indicating the fields in question will be represented as columns in a relational table, with the @Temporal(TemporalType.DATE) serving the same purpose as the @Column annotation, except the former is specifically used for fields related to dates.
Finally, you find the @OneToOne annotation, which is used to represent a field's association to another class. In this case, the annotation indicates that the translator field is another entity class in the application, and hence has its own relational table. Of particular importance in this last annotation are its attributes,cascade = CascadeType.ALL,used to specify that any persistence operation occurring in the field be propagated out to its respective entity.
Listing 2-7 illustrates the other POJO used in the Hello World application decorated with JPA annotations.
Example 2-7. Person.java POJO with JPA Annotations
package com.apress.springosgi.ch2.hello;import javax.persistence.Column;import javax.persistence.Entity;import javax.persistence.GeneratedValue;import javax.persistence.Id;@Entitypublic class Person {@Id@GeneratedValueprivate long id;@Column(name = "FNAME")private String firstName;@Column(name = "LNAME")private String lastName;@Column(precision=4, scale=2)private double hourlyRate; // Followed by methods identical to Listing 2-4 }
The JPA annotations used in the Person class are pretty much the same as the ones used in the HelloWorld class, with the exception of the attributes included in the @Column annotation. In this particular case, the attributes used in the @Column annotation override the default properties assigned to columns in a relational table, where name is used to indicate a specific column name, and precision along with scale are used to indicate a number column's characteristics.
An extremely important aspect to emphasize before moving on is that both these classes still remain POJOs. The JPA annotations allow each class's logic to remain free of any clutter needed to persist objects, relying instead on the runtime interpretation of such annotations to perform the actual persistence work, while maintaining a class structure that favors simplicity, maintenance, and testing. See the sidebar "POJOS and Annotations: Hot Button" for the controversy surrounding this definition of a POJO.
Though having these two JPA-decorated classes is an important part topersisting HelloWorld and Person objects, you're still in need of another important part of the puzzle in order to make use of such objects: a DAO.
Since both aforementioned classes persist objects to an RDBMS, a mechanism in which to retrieve such objects still needs to be established, and though you might not have realized it, you already set the groundwork for creating a DAO back in Listing 2-5, which defined the numerous actions the Hello World application would be able to perform.
Under normal circumstances, creating a class to serve as a DAO would entail not only implementing all the methods contained in an interface likethe one in Listing 2-5, but also extensive use of the JPA in order to perform the necessary logic against an RDBMS to obtain the desiredresults.
Fortunately, this is one area where Spring makes its presence felt with a very simple and straightforward manner of implementing a DAO. Listing 2-8 illustrates the HelloWorldDAO class using JPA and implementing the HelloWorldService interface defined in Listing 2-5.
Example 2-8. HelloWorldDAO.java DAO Class
package com.apress.springosgi.ch2.hello;

import org.springframework.transaction.annotation.Propagation;
import org.springframework.transaction.annotation.Transactional;

import java.util.List;

import org.springframework.orm.jpa.support.JpaDaoSupport;

public class HelloWorldDAO extends JpaDaoSupport implements HelloWorldService {

    public HelloWorld findById(long id) {
        return getJpaTemplate().find(HelloWorld.class, id);
    }

    public List<HelloWorld> findAll() {
        return getJpaTemplate().find("select e from HelloWorld e");
    }

    public HelloWorld update(HelloWorld emp) {
        return getJpaTemplate().merge(emp);
    }

    public void save(HelloWorld emp) {
        getJpaTemplate().persist(emp);

    }

    public void delete(HelloWorld emp) {
        getJpaTemplate().remove(emp);
    }


    public List<HelloWorld> findByTranslatorFirstName(String firstName) {
        return getJpaTemplate().find("select e from HelloWorld e
where e.translator.firstName = ?1", firstName);
   }
public List<HelloWorld> findByTranslatorLastName(String lastName) {
return getJpaTemplate().find("select e from HelloWorld e where
e.translator.lastName = ?1", lastName);
}
public List<HelloWorld> findByTranslatorHourlyRateOver(double hourlyRate) {
return getJpaTemplate().find("select e from HelloWorld e where
e.translator.hourlyRate > ?1", hourlyRate);
}
public List<HelloWorld> findByLanguage(String language) {
return getJpaTemplate().find("select e from HelloWorld e where
e.language = ?1", language);
}
public List<HelloWorld> findByMessage(String message) {
return getJpaTemplate().find("select e from HelloWorld e where
e.message = ?1", message);
}
@Transactional(propagation = Propagation.REQUIRED)
public void deleteMessage(long id) {
HelloWorld hw = getJpaTemplate().find(HelloWorld.class, id);
getJpaTemplate().remove(hw);
}
}The bulk of the work behind this DAO class is performed by the org.springframework.orm.jpa.support.JpaDaoSupport class and its getJpaTemplate().Notice that each of the class's methods contain calls to getJpaTemplate(), along with other nested calls to methods like persist(),merge(),delete(), and find(), which is accompanied by Java Persistence Query Language (JPQL), an SQL-esque syntax for Java.
In this scenario, the JpaDaoSupport class takes care of the intricacies of using the JPA, such as explicitly managing a persistence context and its corresponding JPA Entity Manager, as well as the handling of transactions. Hence, each call to getJpaTemplate() performs an atomic operation to whatever underlying data source is boundto the JPA Entity Manager.
The last method in the DAO class is different in the sense that it uses the transactional Spring annotation @Transactional(propagation = Propagation.REQUIRED), indicating that the operations included in the method will be performed under a single transaction. In this case, since the method is performing two operations against a data source—find and remove—this annotation overrides the default behavior of initiating a new transaction on each of the two calls made to getJpaTemplate().
This is all it takes to perform object-relational actions using Spring and JPA. Now you may be questioning where exactly this HelloWorldDAO class is getting its information, such as on what database to perform its queries. A very valid question, of course, but also one with a very simple answer: descriptors.
Descriptors for Spring and JPA
All the JPA annotations and queries presented in this section are of no use if an application is not aware of where to persist and find such objects; as a consequence, you need to rely on the use of XML descriptors to provide such information.
The JPA standard dictates that a descriptor by the name persistence.xml be used to contemplate all the JPA code contained in a set of classes, indicate an Entity Manager, RDBMS connection parameters, and classes to be persisted, among other things.
As you've already been forewarned, JPA is a very deep subject, and its corresponding persistence.xml file can also become elaborate; fortunately, since you're already relying on Spring to aid you in the implementation of a DAO using JPA, you can delegate much of the work in this file over to Spring.
Nevertheless, given that the JPA requires the use of a persistence.xml descriptor, you can't forgo this requirement, so you need to include a minimum set of instructions in such a file. Listing 2-9 contains the typical persistence.xml descriptor used in Spring applications employing JPA, which will also be used for the Hello World example.
Example 2-9. persistence.xml Used in JPA-Spring Applications
<persistence xmlns="http://java.sun.com/xml/ns/persistence" version="1.0">

    <persistence-unit name="proSpringOSGiJpa" transaction-type="RESOURCE_LOCAL"/>

</persistence>
The remaining configuration parameters for using JPA in a Spring application are left in the hands of a service descriptor containing numerous Spring constructs. Listing 2-10 illustrates the helloworld-service.xml descriptor used in this Hello World application, with some of its values further explained in Tables 2-3 and 2-4 a little later in this section for cases in which different RDBMSs are used.
Example 2-10. helloworld-service.xml Used in the JPA-Spring Hello World Application
<?xml version="1.0" encoding="UTF-8"?<
<beans xmlns="http://www.springframework.org/schema/beans"
       xmlns:tx="http://www.springframework.org/schema/tx"
       xmlns:xsi="http://www.w3.org/2001/XMLSchema-instance"
xsi:schemaLocation="http://www.springframework.org/schema/beans
http://www.springframework.org/schema/beans/
spring-beans.xsd
http://www.springframework.org/schema/tx
http://www.springframework.org/schema/tx/
spring-tx-2.5.xsd"<
<tx:annotation-driven/<
<bean id="helloWorldService"
class="com.apress.springosgi.ch2.hello.HelloWorldDAO">
<property name="entityManagerFactory" ref="entityManagerFactory"/>
</bean>
<bean id="entityManagerFactory"
class="org.springframework.orm.jpa.LocalContainerEntityManagerFactoryBean">
<property name="dataSource" ref="dataSource"/>
<property name="jpaVendorAdapter">
<bean
class="org.springframework.orm.jpa.vendor.OpenJpaVendorAdapter">
<!-- See Table 2-3 for valid property values in this bean -->
</bean>
</property>
<property name="loadTimeWeaver">
<bean
class="org.springframework.instrument.classloading.SimpleLoadTimeWeaver"/>
</property>
</bean>
<bean id="dataSource" class="<!-- See Table 2-4 for valid class values -->">
<!-- See Table 2-4 for valid property values in this bean -->
</bean>
<bean id="transactionManager" class="org.springframework.orm.jpa.Jpa
TransactionManager">
<property name="entityManagerFactory" ref="entityManagerFactory"/>
<property name="dataSource" ref="dataSource"/>
</bean>
</beans>The first thing to note about Listing 2-9 is its ample use of <bean> declarations, each having its own ID, as well as numerous properties to assign more specific behaviors to the bean in question. This is what most Spring configuration files look like; after all, Spring is mostly about enabling Java Beans—POJOs—with IoC/DI.
The initial bean declaration <bean id="helloWorldService"> is related to the DAO class you created earlier, associated through the class attribute with a value of com.apress.springosgi.ch2.hello.HelloWorldDAO.Inside the bean, however, you will find a property name and reference to entityManagerFactory, which indicates a dependence on another bean by this name that is charged with the management of entities.
Searching for a bean with an id value of entityManagerFactory, you will come to the second bean declaration in the file, the entityManagerFactory bean, which is associated to the class org.springframework.orm.jpa.LocalContainerEntityManagerFactoryBean, a Spring Framework factory class for JPA operations.
In terms of properties, this last bean is a little a more interesting than the first one, not only because it has three properties, but also because these properties are beans themselves. The meaning behind each of the properties in Spring's JPA Entity Manager factory are as follows:
dataSource:Defines the actual data source that is going to be managed by the factory, with its value pointing to yet another<bean>ID containing the data source's properties.jpaVendorAdapter: Indicates the JPA vendor adapter used by the Entity Manager, which provides JPA behaviors like vendor-specific RBDMS mapping and SQLcreation strategies. Its value is another<bean>—in this case nested—pointing to the Spring-provided adapter classOpenJpaVendorAdapter(with other available Spring adapters classes beingHibernateJpaVendorAdapterandEclipseLinkJpaVendorAdapter).The internal properties for thejpaVendorAdapterbean used in this application can be found in Table 2-3.loadTimeWeaver: Provides the necessary weaving behaviors for using JPA with Spring, assigning the Spring-provided classorg.springframework.instrument.classloading.SimpleLoadTimeWeaver.
Note
I will elaborate on the use and need of weaving toward the end of this chapter in the sidebar "What Is Weaving? And Why Is It Important?"
Amid the properties defined for the entityManagerFactory bean, recallthere was a property named dataSource pointing to a bean by the same name, which is precisely declared as the third top-level bean in the hellworld-service.xml descriptor.
Table 2-3. Spring Open JPA Vendor Adapter Bean Properties
Property | Values | Sample | Description |
|---|---|---|---|
|
| <property name= "showSql" value="true"/> | Outputs SQL in the log or console |
|
| <property name= "generateDdl" value="true"/> | Specifies whether to execute Data Definition Language (DDL) each time the Entity Manager is initialized, that is, whether to create and update the respective relational tables associated with each managed entity |
| FirebirdDictionary, H2Dictionary, JDataStoreDictionary, AccessDictionary, OracleDictionary, EmpressDictionary, DBDictionary, MyQSLDictionary, HSQLDictionary, InformixDictionary, SQLServerDictionary, InterbaseDictionary, DB2Dictionary, PointbaseDictionary, SybaseDictionary, FoxProDictionary, DerbyDictionary, PostgresDictionary (all inside package org.apache.openjpa. jdbc.sql) | <property name= "databasePlatform" value="org.apache. openjpa.jdbc.sql. HSQLPlatform"/> | Indicates what specific platform to use for JPA mapping |
Not to be confused with the JPA Entity Manager factory bean, which defines how to persist objects to a specific RDBMS, the data source bean defines where to persist such objects including an RDBMS's connection parameters. In Spring, there are two primary ways you can go about the process, as described in Table 2-4.
Table 2-4. Spring Data Source Bean Alternatives
Type | Class | Sample | Notes |
|---|---|---|---|
Spring administered | org.springframework. jdbc.datasource. DriverManagerDataSource | <bean id="dataSource" class="org.springframework. jdbc.datasource. DriverManagerDataSource"> <property name="driverClassName" value="org.hsqldb.jdbcDriver"/> <property name="url" value="jdbc:hsqldb:mem: springosgi"/> <property name= "username" value="sa"/> <property name="password" value=""/></bean> | The data source is completely administered by Spring. In this case, the bean declares in-line properties related to the driver and username/password needed to connect to the RDBMS. |
Externally administered | org.springframework.jndi. JndiObjectFactoryBean | <bean id="dataSource" class="org.springframework. jndi.JndiObjectFactoryBean"> <property name="jndiName" value="java:comp/env/jdbc/ springosgi" /></bean> | The data source is administered externally; Spring simply accesses the data source via the provided JNDI name. In this case, it's a Java application server/container that administers the data source and makes it available via JNDI, where the corresponding RDBMS properties—driver, username, password—are configured in the JNDI data source itself. |
Finally, we come to the last bean in the helloworld-service.xml descriptor, one related to another important part to working with RDBMSs: transactions. The transactionManager bean is associated to the Spring-provided class org.springframework.orm.jpa.JpaTransactionManager, which is then charged with managing transactions on none other than the entityManagerFactory and dataSource beans, as can be seen by the respective <property> fields.
And last but not least, let's not forget the topmost declaration in the form, <tx:annotation-driven/>, which is used totell Spring to inspect declared beans for annotations related to transactions that in this case will enforce the transaction annotations specified in the DAO class.
With this, you now know the necessary descriptors for using JPA and Spring in the same application. For the moment, it's not important to know where these descriptor files need to be placed; in due time I will tell you where they should go.
Compiling the Domain Model
Before leaving your domain model POJOs decorated with JPA annotations and moving on to the next section, it's convenient to compile the classes not only to give this section closure, but also because the next section builds on compiled versions of these classes.
If you've been following along since Chapter 1, which presented a Hello World OSGi application and introduced the Hello World "playground," you may recall the compilation process for the book's applications rely on the use of Apache Ant.
Use the same Java Ant build.xml file presented back in Chapter 1—specifically Listing 1-6, which was used to compile classes—and place this chapter's classes according to their packages in the Hello World "playground" directory presented in Figure 2-1. Now follow these steps to enact the compilation process:
Copy dependent JAR files to the
libdirectory: as the domain model classes rely on several third-party libraries, you need to copy each of the following JARs to the HelloWorld "playground"libdirectory.persistence.jar: Located in thelib/j2eedirectory of the Spring Framework with dependencies downloadspring-beans.jar: Located in thedist/modulesdirectory of the Spring Framework with dependencies downloadspring-core.jar: Located in thedist/modulesdirectory of the Spring Framework with dependencies downloadspring-orm.jar: Located in thedist/modulesdirectory of the Spring Framework with dependencies downloadspring-tx.jar: Located in thedist/modulesdirectory of the Spring Framework with dependencies download
Execute
ant compile: while in the root directory of the Hello World "playground," execute the commandant compile. This will initiate the compilation process and place the compiled classes under theclassesdirectory.
You've now finished creating and compiling your HelloWorld domain model. It's time to get some hands-on experience on another area touted from the outset in Spring: testing.
Similar to the use of JPA in the last section, this exploration into the world of Java testing with Spring will be limited to a few basic constructs, since in much the same way, testing in itself is an extremely big subject, with numerous types and tools to support it in Java. That said, the two types of testing this Hello World application will demonstrate are unit testing and integration testing.
Unit Testing
Unit testing refers to process of guaranteeing the integrity of individual classes—hence the term "unit." It is the simplest form of software testing, because creating tests on individual classes is relatively easy.
Take for example your HelloWorld or Person class. Both contain numerous getter and setter methods, so creating a unit test for either class would consist of generating an object of each kind, invoking a series of setter and getter sequences, and later proving whether the outcome for the sequences turned out with the expected results. It's a classic process of "getting what you expect" from "what you put in": if you don't get the expected results, it means a class's logic is broken in some way.
In this Hello World application, things can't go terribly awry with the two classes in question, but in POJOs performing more elaborate logic, unit testing can avoid the presence of some pretty nasty behavioral errors that would be impossible to detect at compile time.
Listing 2-11 shows a unit test for both the HelloWorld and Person classes.
Example 2-11. Hello World Application Unit Test Using JUnit
package com.apress.springosgi.ch2.tests;

import java.util.Date;
import junit.framework.TestCase;

import com.apress.springosgi.ch2.hello.HelloWorld;
import com.apress.springosgi.ch2.hello.Person;

public class HelloWorldUnitTests extends TestCase {

    private Person    trans1, trans2;
    private HelloWorld     hw1, hw2;
    protected void setUp() throws Exception {

        trans1 = new Person("John","Smith",45.00);

        trans2 = new Person();
        trans2.setFirstName("Carlos");
        trans2.setLastName("Perez");
        trans2.setHourlyRate(40.00);

        hw1 = new HelloWorld("English","Hello World!",new Date(),trans1);
        hw2 = new HelloWorld();
        hw2.setLanguage("Spanish");
        hw2.setMessage("Hola Mundo!");
        hw2.setTransdate(new Date());
        hw2.setTranslator(trans2);
    }
    public void testPerson() throws java.text.ParseException  {
        assertEquals("John", trans1.getFirstName());
        assertEquals("Smith", trans1.getLastName());
        assertEquals(45.00, trans1.getHourlyRate());

        assertEquals("Carlos", trans2.getFirstName());
        assertEquals("Perez", trans2.getLastName());
        assertEquals(40.00, trans2.getHourlyRate());

    }
public void testHelloWorld() {
assertEquals("English", hw1.getLanguage());
assertEquals("Hello World!", hw1.getMessage());
assertEquals(new Date(), hw1.getTransdate());
assertEquals(trans1, hw1.getTranslator());
assertEquals("Spanish", hw2.getLanguage());
assertEquals("Hola Mundo!", hw2.getMessage());
assertEquals(new Date(), hw2.getTransdate());
assertEquals(trans2, hw2.getTranslator());
}
}The unit test in this last listing leverages the Java testing framework JUnit, which provides an excellent environment in which to perform such tests. First off, notice how the unit test class inherits its behavior fromthe TestCase class, which forms part of the JUnit framework.
The first method in the unit test is the setUp() method, which takes care of instantiating two Person objects and two HelloWorld objects, with each object being generated through different means—in one case through a class's overloaded constructor method, and in another using the class's default constructor and later using its corresponding setter methods.
An important aspect of the JUnit framework is that each of the objects generated in the setUp() method will be created at the outset of a test, further making these objects available to other methods in the unit test for future usage.
Continuing with the sequence of methods, you will find the testPerson() method, which is charged with testing the Person class. Inside this last method are various statements starting with assertEquals()—which is a JUnit method—used to invoke various getter methods on the Person objects created in setUp(), and comparing them to the expected values as inputted in this latter method. If for some reason the assertion fails, the unit test is said to have failed.
The testHelloWorld() method does pretty much the same as its testPerson() counterpart, except it does so for the HelloWorld class, identically using JUnit's assert() method to prove an object's getter methods return the expected values as inputted in the setUp() method.
This is basically the same process for performing any unit test usingthe JUnit framework, so you could easily add another testXXX() method to include more assert statements—or some other JUnit variation—to unit test any other class.
As far as the actual bootstrapping and execution of unit tests is concerned, JUnit offers various approaches, ranging from its own stand-alone GUI, to external support in IDEs like Eclipse, to the Java build utility you've already used and will be the tool of choice: Apache Ant. But before you get to executing unit tests, let's take a look at how you can perform integration testing on your Hello World application.
Integration Testing
Integration testing can be a little more elaborate than unit testing, since it consists of taking numerous parts—units—and testing how they interact with one another, with the addition of acquiring other resources and services to perform the necessary tests on the underlying logic.
In your Hello World application, you have a perfect candidate to perform integration testing on, the DAO class presented back in Listing 2-10. In this case, the integration test would consist of guaranteeing that each of the DAO's actions returned the appropriate results from an RDBMS.
This process is by far lengthier than the earlier unit test, since it entails prepopulating an RDBMS with values, performing a class's operations against an RDBMS, and verifying the output from the RDBMS is returned as expected. Fortunately, and as you will now see, Spring has excellent built-in support for bootstrapping resources like RDBMS for the purpose of testing. Listing 2-12 contains the integration test used for the HelloWorldService DAO class.
Example 2-12. Hello World Application Integration Test Using Spring
package com.apress.springosgi.ch2.tests;

import java.util.Date;
import java.util.List;

import com.apress.springosgi.ch2.hello.HelloWorld;
import com.apress.springosgi.ch2.hello.Person;
import com.apress.springosgi.ch2.hello.HelloWorldService;

import org.springframework.test.jpa.AbstractJpaTests;

public class HelloWorldServiceIntegrationTests extends AbstractJpaTests {

    private HelloWorldService helloWorldService;

    private long EnglishId;
    private long SpanishId;
    private long FrenchId;

    public void setHelloWorldService(HelloWorldService helloWorldService) {
        this.helloWorldService = helloWorldService;
    }
protected String[] getConfigLocations() {
return new String[] { "classpath:/com/apress/springosgi/ch2/tests/
helloworld-service.xml" };
}
protected void onSetUpInTransaction() throws Exception {
HelloWorld hw1 = new HelloWorld("English",
"Hello World!", new Date(),
new Person("John","Smith",45.00));
HelloWorld hw2 = new HelloWorld("Spanish",
"Hola Mundo!", new Date(),
new Person("Carlos","Perez",40.00));
HelloWorld hw3 = new HelloWorld("French",
"Bonjour Monde!", new Date(),
new Person("Pierre","LeClair",40.00));
helloWorldService.save(hw1);
helloWorldService.save(hw2);
helloWorldService.save(hw3);
EnglishId = helloWorldService.findByLanguage("English").get(0).getId();
SpanishId = helloWorldService.findByLanguage("Spanish").get(0).getId();
FrenchId = helloWorldService.findByLanguage("French").get(0).getId();
}
public void testFindById() {
HelloWorld hw = helloWorldService.findById(EnglishId);
assertNotNull(hw);
assertEquals("English", hw.getLanguage());
}
public void testFindByDoesNotExistId() {
HelloWorld hw = helloWorldService.findById(10000);
assertNull(hw);
}
public void testFindByLanguage() {
List<HelloWorld> hws = helloWorldService.findByLanguage("Spanish");
assertEquals(1, hws.size());
HelloWorld hw = hws.get(0);
assertEquals("Hola Mundo!", hw.getMessage());
}public void testFindByBadLanguage() {
List<HelloWorld> hws = helloWorldService.findByLanguage("Catalan");
assertEquals(0, hws.size());
}
public void testFindByTranslatorFirstName() {
List<HelloWorld> hws = helloWorldService.findByTranslatorFirstName("John");
assertEquals(1, hws.size());
HelloWorld hw = hws.get(0);
assertEquals(EnglishId, hw.getId());
}
public void testFindByTranslatorLastName() {
List<HelloWorld> hws = helloWorldService.findByTranslatorLastName
("LeClair");
assertEquals(1, hws.size());
HelloWorld hw = hws.get(0);
assertEquals(FrenchId, hw.getId());
}
public void testFindByTranslatorFirstNameDoesNotExist() {
List<HelloWorld> hws = helloWorldService.findByTranslatorFirstName("Bill");
assertEquals(0, hws.size());
}
public void testFindByTranslatorLastNameDoesNotExist() {
List<HelloWorld> hws = helloWorldService.findByTranslatorLastName
("Matsusaka");
assertEquals(0, hws.size());
}
public void testFindByTranslatorHourlyRateOver() {
List<HelloWorld> hws = helloWorldService.findByTranslatorHourly
RateOver(42.00);
assertEquals(1, hws.size());
}
public void testModifyHelloWorldMessage() {
String oldHelloMessage = "Bonjour Monde!";
String newHelloMessage = "Bonjour Le Monde!";
HelloWorld hw = helloWorldService.findByLanguage("French").get(0);
hw.setMessage(newHelloMessage);HelloWorld hw2 = helloWorldService.update(hw);
assertEquals(newHelloMessage, hw2.getMessage());
List<HelloWorld> hw3 = helloWorldService.findByMessage(oldHelloMessage);
assertEquals(0, hw3.size());
hw3 = helloWorldService.findByMessage(newHelloMessage);
assertEquals(1, hw3.size());
HelloWorld newhw3 = hw3.get(0);
assertEquals(newHelloMessage, newhw3.getMessage());
}
public void testDeleteHelloWorldCascade() {
String transFirstName = "Carlos";
HelloWorld hw = helloWorldService.findByTranslatorFirstName
(transFirstName).get(0);
int transCountBefore = countRowsInTable("person");
int helloCountBefore = countRowsInTable("helloworld");
helloWorldService.delete(hw);
List<HelloWorld> hws = helloWorldService.findByTranslator
FirstName(transFirstName);
assertEquals(0, hws.size());
int transCountAfter = countRowsInTable("person");
int helloCountAfter = countRowsInTable("helloworld");
assertEquals(transCountBefore −1, transCountAfter);
assertEquals(helloCountBefore −1, helloCountAfter);
}
public void testFindAll() {
List<HelloWorld> hws = helloWorldService.findAll();
assertEquals(3, hws.size());
}
}Much like the DAO class itself, which relies on one of Spring's core classes to facilitate the use of JPA, this integration test class inherits it behavior from another Spring class named org.springframework.test.jpa.AbstractJpaTests.
As you will likely notice in the last listing, the layout in terms of methods and their names is strikingly similar to the earlier unit test. The first difference, though is the use of the setHelloWorldService() method, which injects an instance of HelloWorldService into the test. Next, you will find two methods that are executed at the outset of a test: getConfigLocations() and onSetUpInTransaction().
The getConfigLocations() method is used to locate the RDBMS's parameters against which the integration tests will be performed, with the assigned value being a Spring-JPA descriptor file like the one described in Listing 2-13 in the next section. On the other hand, the onSetUpInTransaction() is charged with creating and saving three HelloWorld objects—and their corresponding Person objects—to theRDBMS for further use by the class's testing methods.
The testing methods that start with the prefix testXXX() perform various operations against the RDBMS using the DAO methods, later leveraging methods like assertEquals() and countRowsInTable() to verify that the returned results are in line with the input objects created in the onSetUpInTransation() method.
Now let's take a brief sidestep and see what the RDBMS's parameters bootstrapped in the getConfigLocations() method look like.
JPA Descriptor Files for Integration Testing
Since integration testing is mostly performed on development workstations and tends to be limited to a one-time affair, you will be taking the simplest and shortest route possible to set-up an RDBMS: a data source managed by Spring and an in-memory RDBMS to avoid any extra configuration steps.
Listing 2-13 illustrates the helloworld-service.xml descriptor used for integration testing.
Example 2-13. helloworld-service.xml Used in JPA-Spring for Integration Testing
<?xml version="1.0" encoding="UTF-8"?>
<beans xmlns="http://www.springframework.org/schema/beans"
       xmlns:xsi="http://www.w3.org/2001/XMLSchema-instance"
       xsi:schemaLocation="http://www.springframework.org/schema/beans
                           http://www.springframework.org/schema/beans/

spring-beans.xsd">

   <bean id="helloWorldService"
         class="com.apress.springosgi.ch2.hello.HelloWorldDAO">
     <property name="entityManagerFactory" ref="entityManagerFactory"/>
   </bean>

   <bean id="entityManagerFactory"
         class="org.springframework.orm.jpa.LocalContainerEntityManagerFactoryBean">
     <property name="dataSource" ref="dataSource"/>
     <property name="jpaVendorAdapter">
<beanclass="org.springframework.orm.jpa.vendor.OpenJpaVendorAdapter"><property name="showSql" value="true"/><property name="generateDdl" value="true"/><property name="databasePlatform" value="org.apache.openjpa.jdbc.sql.</bean> </property> <property name="loadTimeWeaver"> <bean class="org.springframework.instrument.classloading.SimpleLoadTimeWeaver"/> </property> </bean> <bean id="dataSource" class="org.springframework.jdbc.datasource.DriverHSQLDictionary"/>ManagerDataSource"><property name="driverClassName" value="org.hsqldb.jdbcDriver"/><property name="url" value="jdbc:hsqldb:mem:springosgi"/><property name="username" value="sa" /><property name="password" value="" /></bean> <bean id="transactionManager" class="org.springframework.orm.jpa.JpaTransactionManager"> <property name="entityManagerFactory" ref="entityManagerFactory"/> <property name="dataSource" ref="dataSource"/> </bean> </beans>
The RDBMS parameters specified in this last descriptor belong to the HSQL database— databasePlatform = HSQLPlatform—a popular in-memory RDBMS with the same general behaviors as more heavyweight RDBMSs, while specifying that JPA generate logging information— showSQL=true—and that it attempt to generate and update relational tables each time the Entity Manager is initialized— generateDdl=true. Additional parameters also include those for the data source, which are the HSQLDB driver, connection URL, and the default username and password for HSQLDB.
It should also be noted that since HSQLDB is configured an in-memory solution, data never survives beyond the parent process that initiates it, though for the purpose of testing and since JPA uses generateDdl=true, this is a perfectly reasonable trade-off.
Besides the helloworld-service.xml descriptor shown here, the JPA also requires a default persistence.xml descriptor. Whether used in the context of testing or deploying production-type Spring JPA applications, this file never changes, and hence can be taken from the code presented in Listing 2-9 earlier.
With this you finish up all aspects related to integration testing on your Hello World Spring application; now it's time to execute this test along with the corresponding unit test created earlier.
Running Tests
For executing the Hello World application tests, you will once again rely on the Apache Ant build tool. Prior to defining this Ant task, though, make sure you have incorporated all the following steps into your Hello World "playground":
Copy the test classes to the appropriate directory: ensure the sources for both the unit and integration tests are placed according to their package in the subdirectory
src/com/apress/springosgi/ch2/tests/.Copy the Spring-JPA descriptor to the appropriate directory: make sure the
helloworld-service.xmldescriptor in Listing 2-13 is also located under the subdirectorysrc/com/apress/springosgi/ch2/tests/.Copy the JPA default descriptor to the appropriate directory: a copy of the
persistence.xmlfile from Listing 2-9should be placed under the subdirectorysrc/META-INF/ch2/.Copy dependent JAR files to the
libdirectory: the test classes incorporate new dependencies into the application. Copy each of the following JARs to the Hello World "playground"libdirectory:commons-logging.jar: Located in thelib/jakarta-commonsdirectory of the Spring Framework with dependencies downloadcommons-lang.jar: Located in thelib/jakarta-commonsdirectory of the Spring Framework with dependencies downloadcommons-collections.jar: Located in thelib/jakarta-commonsdirectory of the Spring Framework with dependencies downloadhsqldb.jar: Located in thelib/hsqldbdirectory of the Spring Framework with dependencies downloadjunit.jar: Located in thelib/junitdirectory of the Spring Framework with dependencies downloadjta.jar: Located in thelib/j2eedirectory of the Spring Framework with dependencies downloadserp.jar: Located in thelib/serpdirectory of the Spring Framework with dependencies downloadspring.jar: Located in thedistdirectory of the Spring Framework with dependencies downloadspring-test.jar: Located in thedist/modulesdirectory of the Spring Framework with dependencies downloadopenjpa.jar: Located in thelib/openjpadirectory of the Spring Framework with dependencies download
Copy
junit.jarto Apache Ant'slibdirectory: ensure thejunit.jarfile—located in thelib/junitdirectory of the Spring Framework with dependencies download—is copied over to Apache Ant'slibdirectory.
With all dependencies, classes, and descriptor files in place, define an Ant task for the purpose of performing the application's unit and integration tests. Listing 2-14 shows such a task.
Example 2-14. Ant Task for Performing Unit and Integration Tests
<target name="ch2" depends="compile" description="Build Chapter 2Spring Application"> <echo message="-------------- Building Chapter 2 Spring Application forPro Spring-OSGi -------------- "/> <property name="ch2.dir" value="${dist.dir}/ch2/"/> <mkdir dir="${ch2.dir}"/> <property name="test.dir" value="${ch2.dir}/tests"/> <mkdir dir="${test.dir}"/> <mkdir dir="${ch2.dir}/lib/"/> <mkdir dir="${build.dir}/META-INF"/> <copy file="${src.dir}/META-INF/ch2/persistence.xml" tofile="${build.dir}/META-INF/persistence.xml"/><junit printsummary="yes"><classpath refid="classpath"/><formatter type="brief"/>
<batchtest todir="${test.dir}"><fileset dir="${build.dir}"><include name="com/apress/springosgi/ch2/tests/*"/></fileset></batchtest></junit></target>
This Ant task starts off by declaring a dependency on the compile target, ensuring that prior to attempting any tests, all classes are properly compiled. It then sets off on a few housekeeping tasks, creating a ch2 and test build directory to output results, and copying the persistence.xml descriptor over to the project's build directory, so it can be picked up by Java's classpath as required by the integration test.
Then you can observe the <junit> task, which in itself contains the printsummary="yes" attribute used for outputting one-line statistics on each test. Nested inside <junit>, you will also find numerous declarations used for the following:
<classpath>: Indicates the Ant variable to use as the JavaCLASSPATHfor executing tests, in this case containing a value pointing to thelibandcompiledclass directories.<formatter>: Specifies the type of formatting to use for the results obtained on each test.<batchtest>:Defines the location in which to place testing reports, as well as where to locate the classes containing the tests via a<fileset>directive. In this case, notice that the<fileset>directive points toward thecom/apress/springosgi/ch2/tests/subdirectory, which is where the compiled tests classes are placed.
Now, while inside the root directory of the Hello World "playground," invoke ant ch2. This last instruction will trigger the tests, presenting a one-line summary of the results on the console, and if you go to the dist/ch2/test subdirectory, you will be able to consult a detailed report on every test, including error stacks for failed tests and SQL logging information for integration tests, among other things.
You now have a tested domain model connecting to an RDBMS via JPA, but still no graphical interface for showing off such logic. It's time to switch gears over to another application tier in which Spring can also aid you with its POJO approach: the web tier.
Java web development often goes hand in hand with the MVC pattern, an approach that supports the multitier and stateless nature of web-enabled applications. Nowadays, nearly all Java web frameworks make use of the MVC pattern to a greater or lesser extent, and in Spring's case, it offers its own brew designed to accommodate the same IoC nature you saw in the domain model.
To integrate the MVC pattern in the Hello World Spring application, you already have your work cut out for you, since what you did in the last section as your domain model is the equivalent to the "Model" in MVC. The next thing you have to do is create a controller that will be charged with hooking up the model with the different views in the system.
Creating a Spring Controller
A Spring controller in the context of the MVC pattern takes care of brokering all incoming requests made to a web application, performing any corresponding action requested by the originating party—creating, reading, updating, or deleting data—and later delegating each request to an appropriate view indicating the outcome.
Listing 2-15 contains the controller used for the Hello World application.
Example 2-15. HelloWorldController.java
package com.apress.springosgi.ch2.mvc;

import java.util.List;
import java.util.Date;

import org.springframework.beans.factory.annotation.Autowired;
import org.springframework.stereotype.Controller;
import org.springframework.web.bind.annotation.RequestMapping;
import org.springframework.web.bind.annotation.RequestMethod;
import org.springframework.web.bind.annotation.RequestParam;
import org.springframework.web.bind.annotation.ModelAttribute;
import org.springframework.ui.ModelMap;

import com.apress.springosgi.ch2.hello.HelloWorld;
import com.apress.springosgi.ch2.hello.Person;
import com.apress.springosgi.ch2.hello.HelloWorldService;

@Controller
public class HelloWorldController {

    private HelloWorldService helloWorldService;
@Autowired
public HelloWorldController(HelloWorldService helloWorldService) {
this.helloWorldService = helloWorldService;
}
@RequestMapping(method = RequestMethod.GET)
@ModelAttribute("helloworlds")
public List<HelloWorld> home() {
return this.helloWorldService.findAll();
}
@RequestMapping(method = RequestMethod.GET)
public String translator(@RequestParam("id") Long id, ModelMap model) {
Person translator = helloWorldService.findById(id).getTranslator();
List<HelloWorld> hws = helloWorldService.findAll();
model.addAttribute("helloworlds",hws);
model.addAttribute("translator",translator);
return "home";
}
@RequestMapping(method = RequestMethod.GET)
public String deleteMessage(@RequestParam("id")
Long id) {
helloWorldService.deleteMessage(id);
return "redirect:home";
}
}The first thing that will likely strike you about this listing is its ample use of annotations, which are Spring controller annotations. Let's break down what each of them means.
At the top of the listing you will see that the class is designated with a @Controller annotation, which is simply indicating the class will be used for this purpose. Moving along, you will encounter the @Autowired annotation on the class's constructor method, which indicates it will be auto-wired with Spring's dependency injection facilities. What this means is that the controller will gain access to whatever beans are declared inside its constructor, in this case a HelloWorldService bean and all its corresponding methods that have access to an RDBMS.
Next, you will find three methods decorated with the @RequestMapping annotation. The @RequestMapping annotation dictates on what incoming request a method's actions will be executed; in this case, the value (method = RequestMethod.GET) is an open-ended way to inspect all incoming requests and match them against a method's name.
For example, if this controller handled a request in the form http://localhost/home, this would trigger the actions of the home() method; similarly, a request for http://localhost/translator?id=2 would execute the logic in the translator() method, and so on.
In a similar manner, if a request came into this controller and no corresponding method by that name was found—for example, http://localhost/foobar—no action would taken. Alternatively, @RequestMapping can also take a hard-coded value in case an incoming request requires it to match long or different method names (e.g., the annotation @RequestMapping(" /zipcode") decorating the method searchInAVeryLongNameMethodForZipcodes() would result in the method being executed on a request to the URL http://localhost/zipcode).
While the @RequestMapping annotation manages incoming requests, the @ModelAttribute annotation defines how the data for each method is transferred over to a corresponding view. For example, in the topmost controller method, home(), the value @ModelAttribute("helloworlds") indicates that whatever values are returned by the method in question will be placed inside a variable by the name helloworlds to later be manipulated inside a view template.
The remaining two methods make use of the find @RequestParam annotation, which extracts a parameter from the incoming request URL and passes it as an input value to a controller method. Of noted importance is that these same two methods don't make use of the @ModelAttribute annotation. So does this mean they don't return data to a view template? No, they still do, they just do it differently.
The second method makes use of a ModelMap object, which assigns two objects obtained from DAO service calls, information that will later be made available to a view template through the helloworld and translator values. In this scenario, the return value for the method indicates the name of the view to which control will be rescinded.
Before we move to the last method in the controller, you may be wondering what view name the first method returns control to, being it returns data. That would be to a method's default view, the one with the same name as the method, so the home() method would relinquish control over to a view named home, the same view explicitly returned in the second method.
Finally, we come to the third method in the controller, which eliminates a record from the RDBMS. This method rescinds control using the string redirect:home, signifying that the request be redirected to the home() method for further processing, further executing this last method's logic—obtaining all the messages in the RDBMS—and making them available to the home view. The logic behind this last controller method will become more obvious once you see its use in fulfilling AJAX type requests.
All the views—or the home view in this application—designated by Spring controllers are said to be logical views; in other words, they are not a physical view template (a file by that name) but are rather further mapped to one of the many view technologies supported by Spring's MVC, which include JavaServer Pages (JSP), JSP Standard Tag Library (JSTL), JavaServer Faces (JSF), and Apache Tiles, among others.
So let's see how a logical view in a Spring controller gets mapped to a view technology.
Creating Views with Tiles
In the context of Spring's MVC, a view can consist of everything from a vanilla HTML page, to an XML document, run-of-the mill JSP, or JSF, to a more sophisticated view system like Apache Tiles.
For your Hello World application, you will be using Apache Tiles, a comprehensive templating system that allows a web page to be divided into different units, permitting each unit to have its own structure made of either JSTL tags, JSP code, or simple text.
Its design is tailor-made to providing solutions for many of the layout issues faced in web applications, like avoiding monolithic pages and instead dividing a layout in terms of header, footer, sidebars, and body templates. Additionally, Apache Tiles integrates nicely with Spring's Web Flow project, a front-end companion to Spring's MVCs that supports complex page navigations and also includes the necessary libraries to use AJAX in Spring, and which will also be touched upon in this application.
Now that you know why I opted to have you use Apache Tiles as the view technology, take a look at Listing 2-16, which contains the main definition file for the tiles used in the Hello World application.
Example 2-16. Apache Tiles Definition File— tiles.xml
<?xml version="1.0" encoding="ISO-8859-1"?>
 <!DOCTYPE tiles-definitions PUBLIC
       "-//Apache Software Foundation//DTD Tiles Configuration 2-0//EN"
       "http://tiles.apache.org/dtds/tiles-config_2_0.dtd">
<tiles-definitions>

  <definition name="home" template="/jsp/home.jsp">
      <put-attribute name="title" value="Hello World - Pro Spring-OSGi"/>
      <put-attribute name="header" value="/jsp/tiles/header.jsp"/>
      <put-attribute name="content" value="index.body"/>
      <put-attribute name="footer" value="/jsp/tiles/footer.jsp" />
  </definition>

  <definition name="index.body" template="/jsp/tiles/body.jsp">
      <put-attribute name="helloMessages" value="/jsp/tiles/messages.jsp" />
      <put-attribute name="helloTranslators" value="/jsp/tiles/translators.jsp" />
      <put-attribute name="translator" value="/jsp/tiles/translator.jsp" />
  </definition>

</tiles-definitions>
The main page layout is contained in the <definition> named home, which points to a template named /jsp/home.jsp. Notice though that nested inside the home <definition> element are numerous <put-attribute> values, each of which represents a tile for the template.
One of these <put-attribute> elements declares a String value, while two others point to different JSP code, and yet another points to index.body, which is a <definition> statement also defined in the file. Listing 2-17 shows what the main Apache Tiles template, /jsp/home.jsp (which is assigned to the home <definition>), looks like.
Example 2-17. Home Page home.jsp) Using Apache Tiles
<!DOCTYPE HTML PUBLIC "-//W3C//DTD HTML 4.01//EN"
        "http://www.w3.org/TR/html4/strict.dtd">
<%@ taglib uri="http://tiles.apache.org/tags-tiles" prefix="tiles" %>
<%@ taglib prefix="c" uri="http://java.sun.com/jsp/jstl/core" %>
<html>
<head>

         <title><tiles:getAsString name="title"/></title>
        <link href="/springhelloworld/css/hello.css" rel="stylesheet"
type="text/css">
        <script type="text/javascript" src="<c:url value="/resources/dojo/
dojo.js" />"> </script>
        <script type="text/javascript" src="<c:url value="/resources/spring/
Spring.js" />"> </script>
        <script type="text/javascript" src="<c:url value="/resources/spring/
Spring-Dojo.js" />"> </script>
</head>
<body>

<div id="wrap">
          <div id="header">
          <h1><tiles:insertAttribute name="header"/></h1>
         </div>

         <div id="content">
          <tiles:insertAttribute name="content"/>
         </div>

          <div id="footer">
          <h3><tiles:insertAttribute name="footer"/></h3>
         </div>
</div>
</body>
</html>
Notice how this template has numerous <tiles:insertAttribute> elements scattered with plain HTML, and that each of these values corresponds to a <put-attribute>name as declared in the Apache Tiles definition file.
What Apache Tiles will do upon rendering this particular template is replace each of these values with those declared in the definition file, so <tiles:getAsString name="title"/> will be replaced by the string 'Hello World - Pro Spring-OSGi',<tiles:insertAttribute name="header"/> with the contents of the file /jsp/tiles/header.jsp, and so on.
It's a powerful layout approach, and one that can be nested to numerous degrees as can be observed in the content tile value, which points to another template that itself is composed of even more tiles.
Shifting the focus back to the controller designed earlier, recall that it was precisely the controller that is required to send control back to a logical view named home. As it turns out, each of the <definition> names in an Apache Tiles definition file maps to a logical view; this means that when a request comes into http://localhost/home, the logic inside the controller method home() will executed, returning a rendered Apache Tiles home view with all its nested tiles back to an end user.
Also remember the controller home() method returns a set of data extracted from the RDBMS that would be made available under the helloworlds name, so where is this information? This data is being manipulated in a tile within a tile, the helloMessages tile pointing to the jsp/tiles/messages.jsp file, which of course still forms part of the logical home view, nested as it may be. Listing 2-18 shows what the helloMessages tile's underlying JSP looks like and how it processes data sent by the controller.
Example 2-18. HelloMessage Tile messages.jsp) Processing Controller Data with AJAX Calls
<%@ taglib prefix="c" uri="http://java.sun.com/jsp/jstl/core" %> <%@ taglib prefix="fmt" uri="http://java.sun.com/jsp/jstl/fmt" %> <div id="helloMessages"><c:forEach var="hello" items="${helloworlds}"><div style="border:red 2px dashed;margin:10px;padding:5px"> <b><c:out value="${hello.language}"/></b> <c:out value="${hello.message}"/> - Translated on: <fmt:formatDatevalue="${hello.transdate}" dateStyle="long" /> <br/><a id="deleteMessage_${hello.id}" href="deleteMessage?id=${hello.id}">Delete Message </a><script type="text/javascript">Spring.addDecoration(new Spring.AjaxEventDecoration({elementId:"deleteMessage_${hello.id}",event:"onclick",params: {fragments:"helloMessages,helloTranslators"}}));
</script><br/> </div></c:forEach></div>
The JSP for this last tile makes use of the JSTL core library for iterating over the helloworlds data set sent by the controller and lays out each message inside an HTML <div> element. This tile has another important aspect of the Hello World application: an AJAX call.
In case you are unfamiliar with the term "AJAX," what this technique allows a web application to do is perform an out-of-band call from a browser back to a server-side controller, without the user experiencing a complete page refresh; in essence, only a piece of a page is updated.
The AJAX call in this tile is brought to you by the HTML link <a id="deleteMessage_${hello.id}" href="deleteMessage?id=${hello.id}">Delete Message </a>, which effectively calls deleteMessage?id=${hello.id}, invoking the deleteMessage() controller method, which in turn eliminates the message from the RDBMS.
This last HTML link doesn't act like a standard HTML link on account of the JavaScript declaration right next to it, the one starting with a JavaScript method Spring.addDecoration() that has the nested Spring.AjaxEventDecoration() method, which includes the following definitions:
elementId: This parameter associates a given HTML ID to an AJAX event. In this case, the valuedeleteMessage_${hello.id}signifies that each of the corresponding links (<a>) to delete a message will be associated with an AJAX call, hence overriding the default behavior of links to navigate to a new page.event: This parameter indicates on what action the AJAX event will be triggered. In this case, anonclickevent on the givenelementIdwill trigger the AJAX call.params: This parameter indicates what tile and HTML ID to re-render once the AJAX call has completed. In this case, since you are eliminating messages,paramsis indicating that both thehelloMessagesandhelloTranslatorstiles and HTML IDs—which contain messages—will be re-rendered, with the remaining tiles in the page remaining without update.
All this AJAX functionality comes from Spring's JavaScript module, which forms part of the grander Spring Web Flow project, the latter of which is a companion to projects made around Spring's MVC module. Here, the actual JavaScript libraries are made available through declarations at the top of the main template in Listing 2-17.
The remaining tiles composing the home page view contain another similar AJAX call and a few more basic constructs made up of text, HTML, and JSTL. Listings 2-19 through 2-25 show the application's remaining tiles, main index, and CSS file.
Example 2-20. Footer Tile footer.jsp) for Hello World
Pro Spring OSGi by Daniel Rubio - Published by Apress
Example 2-21. Body Tile body.jsp) for Hello World
<%@ taglib uri="http://tiles.apache.org/tags-tiles" prefix="tiles" %>
       <div id="index.body">
          <div id="main">
                  <h2>Hello World Messages </h2>
                  <tiles:insertAttribute name="helloMessages"/>
          </div>
          <div id="sidebar">
              <h2>Translators </h2>
                 <tiles:insertAttribute name="helloTranslators"/>

                 <tiles:insertAttribute name="translator"/>
          </div>
    </div>
Example 2-22. HelloTranslators Tile (translators.jsp) for Hello World
<%@ taglib prefix="c" uri="http://java.sun.com/jsp/jstl/core" %>
<div id="helloTranslators">
 <ul>
  <c:forEach var="hello" items="${helloworlds}">
       <li><c:out value="${hello.language}"/>
       <a id="showTranslator_${hello.id}" href="translator?id=${hello.id}">
Translator Details </a>
       <script type="text/javascript">
                Spring.addDecoration(new Spring.AjaxEventDecoration({
                elementId:"showTranslator_${hello.id}",
                event:"onclick",
                params: {fragments:"translator"}
        }));
       </script></li>
</c:forEach> </ul> </div>
Example 2-23. Translator Tile (translator.jsp) for Hello World
<%@ taglib prefix="c" uri="http://java.sun.com/jsp/jstl/core" %>
  <div id="person">
  <div style="border:red 2px dashed;margin:10px;padding:5px;">
   <b>Name</b> :<c:out value="${translator.firstName}"/>
<c:out value="${translator.lastName}"/><br/>
   <b>Hourly Rate</b> : $<c:out value="${translator.hourlyRate}"/><br/>
  </div>
</div>
Example 2-24. Main Index (index.html) for Hello World
<html>
<head>
  <meta http-equiv="Refresh" content="0; URL=spring/home">
</head>
</html>
Example 2-25. Cascading Style Sheet (hello.css) for Hello World
body,
html {
        margin:0;
         padding:0;
         background:#a7a09a;
        color:#000;
}

body {
        min-width:750px;
}

#wrap {
         background:#ffffff;
        margin:0 auto;
        width:750px;
}
#header {
background:#cfcfcf;
}
#header h1 {
padding:5px;
margin:0;
text-align:center;
}
#main {
background:#dfdfdf;
float:left;
width:500px;
}
#main h2, #main h3, #main p {
padding:0 10px;
}
#sidebar {
background:#ffffff;
float:right;
width:240px;
}
#sidebar ul {
margin-bottom:0;
}
#sidebar h3, #sidebar p {
padding:0 10px 0 0;
}
#footer {
background:#bfbfbf;
clear:both;
text-align:center;
}
#footer p {
padding:5px;
margin:0;
}.Copy the following files to the specified directories in the Hello World "playground": the main index.html file in Listing 2-24 to the src/GUI/ch2/ directory, the hello.css file in Listing 2-25 to the src/GUI/ch2/css/ directory, and the home.jsp file in Listing 2-17 to the src/GUI/ch2/jsp/ directory. You will also need to copy all tiles in Listings 2-18 through 2-23 to the directory src/GUI/ch2/jsp/tiles/.
Up next, you will create the corresponding descriptors needed to accompany the controller class, Apache Tiles definition file, and Apache Tiles templates you just created.
A Spring MVC project is always accompanied by the de facto descriptor used in Java web applications and a few other descriptors containing Spring's MVC behaviors. Listing 2-26 contains the web.xml file that is always used in Java web applications, applied to the Hello World application.
Example 2-26. web.xml for the Hello World Spring Application
<?xml version="1.0" encoding="UTF-8"?> <web-app id="WebApp_ID" version="2.4" xmlns="http://java.sun.com/xml/ns/j2ee"xmlns:xsi="http://www.w3.org/2001/XMLSchema-instance" xsi:schemaLocation="http://java.sun.com/xml/ns/j2ee http://java.sun.com/xml/ns/j2ee/web-app_2_4.xsd"> <display-name>Pro Sprng-OSGi</display-name> <context-param> <param-name>contextConfigLocation</param-name> <param-value>/WEB-INF/helloworld-service.xml</param-value> </context-param> <listener> <listener-class> org.springframework.web.context.ContextLoaderListener </listener-class> </listener> <servlet> <description> Pro Spring-OSGi MVC Dispatch Servlet </description> <display-name>DispatcherServlet</display-name> <servlet-name>helloworld</servlet-name> <servlet-class> org.springframework.web.servlet.DispatcherServlet </servlet-class> <load-on-startup>1</load-on-startup> </servlet>
<servlet>
            <servlet-name>ResourcesServlet</servlet-name>
           <servlet-class>org.springframework.js.resource.ResourceServlet
</servlet-class>
        </servlet>
  <servlet-mapping>
                <servlet-name>helloworld</servlet-name>
                <url-pattern>/spring/*</url-pattern>
        </servlet-mapping>

        <servlet-mapping>
            <servlet-name>ResourcesServlet</servlet-name>
            <url-pattern>/resources/*</url-pattern>
          </servlet-mapping>

         <welcome-file-list>
                 <welcome-file>index.html</welcome-file>
        </welcome-file-list>


 <resource-ref>
      <description>Database Connection</description>
      <res-ref-name>jdbc/springosgi</res-ref-name>
      <res-type>javax.sql.DataSource</res-type>
      <res-auth>Container</res-auth>
  </resource-ref>
</web-app>
The web.xml descriptor starts off by associating the helloworld-service.xml descriptor—which contains the DAO, JPA, and RDBMS properties—with the application's context through Spring's ContextLoaderListener class. Back when you tested your domain model, you also made use of a helloworld-service.xml file to associate the DAO class with a JPA Entity Manager and its corresponding data source. This time around though, the file will be different.
Since the application will now be deployed on the Web, it requires a more robust approach. Listing 2-27 contains the helloworld-service.xml descriptor needed to use MySQL as the underlying RDBMS and leverage an externally administered data source through JNDI.
Continuing with the web.xml file, you will find the declaration for two servlets, one of the type DispatcherServlet and another of the type ResourceServlet. The former is part of Spring's MVC module and the latter part of Spring's Web Flow/JavaScript module, with Spring's dispatcher servlet providing the "plumbing" for most web controller actions and Spring's resource servlet providing prepackaged resources—JavaScript libraries—for actions related to AJAX.
Next are the corresponding servlet mapping declarations, indicating under what URLs the servlets in question will be executed. Spring's dispatcher servlet will be invoked on every request under the spring directory, and Spring's resource servlet will also make use of the same wildcard notation except under the resources directory.
Finally, observe the <welcome-file-list> and <welcome-file> parameters used to configure a default home page for an application, as well as a <resource-ref> declaration loading a JNDI data source named jdbc/springosgi provided by an application server/container.
As this last data source is inside web.xml, it has some further configuration issues you need to address: how to go about its configuration in an application server/container—which you will explore in the upcoming section—and how to associate the data source to its corresponding JPA Entity Manager and the DAO classes it will manage. Listing 2-27 contains the helloworld-service.xml used for this purpose, which is similar in nature to the one employed in the testing phase of the domain model.
Example 2-27. helloworld-service.xml Used in JPA-Spring for Production Deployment
<?xml version="1.0" encoding="UTF-8"?>
<beans xmlns="http://www.springframework.org/schema/beans"
       xmlns:tx="http://www.springframework.org/schema/tx"
       xmlns:xsi="http://www.w3.org/2001/XMLSchema-instance"
       xsi:schemaLocation="http://www.springframework.org/schema/beans
                           http://www.springframework.org/schema/beans/
spring-beans.xsd
                           http://www.springframework.org/schema/tx
                           http://www.springframework.org/schema/tx/
spring-tx-2.5.xsd">

  <tx:annotation-driven/>

   <bean id="helloWorldService"
         class="com.apress.springosgi.ch2.hello.HelloWorldDAO">
     <property name="entityManagerFactory" ref="entityManagerFactory"/>
   </bean>

   <bean id="entityManagerFactory"
         class="org.springframework.orm.jpa.LocalContainerEntityManagerFactoryBean">
     <property name="dataSource" ref="dataSource"/>
     <property name="jpaVendorAdapter">
<beanclass="org.springframework.orm.jpa.vendor.OpenJpaVendorAdapter"><property name="showSql" value="true"/><property name="generateDdl" value="false"/><property name="databasePlatform" value="org.apache.openjpa.jdbc.sql.MySQLDictionary"/></bean> </property> <property name="loadTimeWeaver"> <bean class="org.springframework.instrument.classloading.SimpleLoadTimeWeaver"/> </property> </bean><bean id="dataSource" class="org.springframework.jndi.JndiObjectFactoryBean"><property name="jndiName" value="java:comp/env/jdbc/springosgi"/></bean><bean id="transactionManager" class="org.springframework.orm.jpa.JpaTransactionManager"> <property name="entityManagerFactory" ref="entityManagerFactory"/> <property name="dataSource" ref="dataSource"/> </bean> </beans>
In this Spring configuration used to wire up the DAO class with a data source and JPA Entity Manager, three things have changed from the configuration file you created for testing purposes.
One is the value generateDdl is set to false; this is done because it's not good practice for a JPA Entity Manager used in a production database to constantly refresh an RDBMS table's structure—DDL—each time it's started and stopped, which would equal each time the application itself is started and stopped.
And the other two changes correspond to the JPA data source, since the value databasePlatform is now pointing toward a mapping for a MySQL RDBMS, and the datasource bean is pointing toward an externally managed JNDI data source by an application server/container.
Next, you need to create just one more configuration file pertaining to the Spring Dispatcher servlet declared in web.xml. By convention, Spring looks for a Dispatcher servlet configuration file prefixed with its name. So in this case, since the Dispatcher servlet in web.xml is named helloworld, Spring will look for a configuration file named helloworld-servlet.xml. Listing 2-28 illustrates the helloworld-servlet.xml configuration file.
Example 2-28. helloworld-servlet.xml Used for Dispatcher Servlet
<?xml version="1.0" encoding="UTF-8"?>
<beans xmlns="http://www.springframework.org/schema/beans"
       xmlns:xsi="http://www.w3.org/2001/XMLSchema-instance"
       xmlns:context="http://www.springframework.org/schema/context"
       xsi:schemaLocation="http://www.springframework.org/schema/beans
                           http://www.springframework.org/schema/beans/
spring-beans.xsd
                           http://www.springframework.org/schema/context
                           http://www.springframework.org/schema/context/
spring-context-2.5.xsd">

<context:component-scan base-package="com.apress.springosgi.ch2.mvc"/>

<bean id="urlMapper" class="org.springframework.web.servlet.handler.SimpleUrl
HandlerMapping">
        <property name="mappings">
         <props>
          <prop key="/**">helloWorldController</prop>
         </props>
        </property>
</bean>

<bean id="tilesConfigurer"
      class="org.springframework.web.servlet.view.tiles2.TilesConfigurer">
    <property name="definitions">
      <list>
         <value>/WEB-INF/tiles.xml</value>
      </list>
    </property>
</bean>

<bean id="tilesViewResolver" class="org.springframework.js.ajax.AjaxUrlBasedView
Resolver">
    <property name="viewClass" value="org.springframework.webflow.mvc.view.Flow
AjaxTilesView"></property>
</bean>

</beans><context:component-scan>, which is the first declaration in the Dispatcher servlet file, is used to inspect class packages for annotations. In this case, the scan will be performed on the om.apress.springosgi.ch2.mvc package, which corresponds to the same package under which the MVC controller is located. This process will incorporate all the mappings and behaviors declared through annotations in the last class, as well as generate a Spring bean by the same name.
As you probably expected from seeing other Spring file configurations, next come various beans. The first bean declaration— urlMapper—is used to further map to the URL control that will be delegated. Given that you have only one controller class, the mapping for this Dispatcher servlet uses a wildcard to indicate that every request will be sent to the helloWorldController bean. Note that helloWorldController refers to a bean name, which is automatically available on account of the annotations used in this class and the previous component-scan declaration.
In the second bean declaration you will notice the Dispatcher servlet hooks up to the Apache Tiles logical views declared in Listing 2-16, effectively allowing the previous controller bean to redirect control to the appropriate logical tile names.
The third and last bean is a special bean provided by Spring's Web Flow project, allowing Apache Tiles to support AJAX calls to individual units. Under normal circumstances, an Apache Tiles definition file is considered to have logical names corresponding to top-level <definition> names only; as a consequence, without this definition your application would only have two logical names— home and index.body.
However, if you look back at the AJAX call described in the earlier tile (Listing 2-18), you will note that it makes use of refreshing certain internal tiles. It's with the AjaxUrlBasedViewResolver bean that each of the tile's <put-attribute> names are also converted into logical names, allowing control to be relinquished to individual tiles that provide AJAX type updates.
This concludes the review of all the parts that make up an MVC design in Spring. Up next, you will start ordering all these pieces to set the stage for final deployment.
Compiling and Preparing MVC Classes and Descriptors
Here is a list of steps you need to take from within the HelloWorld "playground" in order to compile and prepare all the MVC classes and descriptors you made in the last section.
Copy the MVC controller to the appropriate directory: ensure the source for the controller class is placed in its package subdirectory
src/com/apress/springosgi/ch2/mvc/.Copy all descriptor files to the appropriate directory: all descriptor files—
helloworld-service.xml, helloworld-servlet.xml, tiles.xml, andweb.xml—should be placed under the subdirectorysrc/WEB-INF/ch2/of your Hello World "playground."Copy all view templates to the appropriate directory: all JSP, CSS, and HTML files related to Apache Tiles should be placed inside the subdirectory
src/GUI/ch2/and its corresponding subdirectories.Copy the dependent JAR file to the
libdirectory: the MVC controller class incorporates a new dependency into the application. Copy thespring-webmvc.jarJAR located in Spring'sdist/modulesdownload to thelibdirectory of the Hello World "playground."
As soon as you've followed through with these steps, you can take the next step, packaging everything in the format that is used to distribute Java web applications: WAR (Web Archive).
Creating the Web Archive
WAR is the standard packaging format used in Java web applications. Its importance is due to the fact that all Java application server/containers are designed to execute this type of file.
This makes WAR files a common distribution format for Java web applications in general—not only those designed around Spring—allowing this type of package to be equally deployed in the various Java application servers/containers available in the market. However, for your Hello World application, you will be relying on the Apache Tomcat container.
Although a WAR file needs to adhere to a certain structure in order to be deployed, at its core, it is nothing more than a unit containing Java classes, JAR libraries, deployment descriptors, and GUI templates like JSP or CSS files—which is practically all you've created since starting the Hello World application.
At this juncture you have all that's required to create a WAR file, except one piece: a descriptor needed to tell the application server/container how to set up a JNDI data source required by Spring's MVC model. Listing 2-29illustrates the context.xml descriptor file used specifically for setting up a JNDI data source on the Apache Tomcat container.
Example 2-29. context.xml Used for Configuring a JNDI Data Source
<Context> <Loader loaderClass="org.springframework.instrument.classloading.tomcat.TomcatInstrumentableClassLoader" useSystemClassLoaderAsParent="false"/> <Resource name="jdbc/springosgi" auth="Container" type="javax.sql.DataSource" maxActive="100" maxIdle="30" maxWait="10000" username="hello" password="world" driverClassName="com.mysql.jdbc.Driver" url="jdbc:mysql://127.0.0.1:3306/springosgi"/> </Context>
The listing starts off by declaring the use of the class TomcatInstrumentableClassLoader in the <Loader> element, a class that overrides Apache Tomcat's default class loader and enables weaving, with the attribute useSystemClassLoaderAsParent set to false in order to not lose Apache Tomcat's remaining loading of staple libraries.
The context.xml file then defines the actual data source through the <Resource> element, using a JNDI name in line with the one used in Spring's descriptor— jdbc/springosgi—and then indicating all the necessary connection credentials to access an RDBMS, which correspond to default MySQL values or those created when you installed MySQL.
Armed with this descriptor file, you now need to place it accordingly in the Hello World "playground," along with a few more JAR files needed by the application at runtime. The steps are as follows:
Copy the
context.xmldescriptor: place a copy of thecontext.xmldescriptor under the subdirectorysrc/META-INF/ch2/.Copy dependent JAR files to the
libdirectory: the WAR file, being a deployable unit, incorporates new runtime dependencies on the application. Copy each of the following JARs to the Hello World "playground"libdirectory:spring-web.jar: Located in thedist/modulesdirectory of the Spring Framework with dependencies downloadspring-context.jar: Located in thedist/modulesdirectory of the Spring Framework with dependencies downloadspring-jdbc.jar: Located in thedist/modulesdirectory of the Spring Framework with dependencies downloadjstl.jar: Located in thelib/j2eedirectory of the Spring Framework with dependencies downloadstandard.jar: Located in thelib/jakarta-taglibsdirectory of the Spring Framework with dependencies downloadaopalliance.jar: Located in thelib/aopalliancedirectory of the Spring Framework with dependencies downloadspring-aop.jar: Located in thedist/modulesdirectory of the Spring Framework with dependencies downloadspringframework.webflow.jar: Located in thedistdirectory of the Spring Web Flow downloadspringframework.js.jar: Located in thedistdirectory of the Spring Web Flow downloadtiles-*.jar: All three located in the /(Root)directory of the Apache Tiles downloadcommons-*.jar: All three located in thelibdirectory of the Apache Tiles download
With every single file in place to create a WAR file, it's time to make use of Apache Ant in order to create it. Listing 2-30 contains the corresponding Ant syntax needed for the process.
Example 2-30. Ant Task for Building the JAR and WAR Files
<jar destfile="${ch2.dir}/lib/helloworld.jar">
    <fileset     dir="${build.dir}">
    <include name="com/apress/springosgi/ch2/hello/*"/>
   <include name="com/apress/springosgi/ch2/mvc/*"/>
    <include name="META-INF/persistence.xml"/>
  </fileset>
</jar>

<war destfile="${ch2.dir}/springhelloworld.war" webxml="${src.dir}/WEB-INF/ch2/
web.xml">
          <lib dir="${ch2.dir}/lib/">
            <include name="helloworld.jar"/>
          </lib>
          <lib dir="${lib.dir}">
              <include name="spring-core.jar"/>
              <include name="spring-beans.jar"/>
              <include name="spring-context.jar"/>
              <include name="spring-jdbc.jar"/>
              <include name="spring-orm.jar"/>
              <include name="spring-tx.jar"/>
              <include name="persistence.jar"/>
              <include name="jstl.jar"/>
              <include name="spring-web.jar"/>
              <include name="spring-webmvc.jar"/>
              <include name="standard.jar"/>
              <include name="persistence.jar"/>
              <include name="openjpa-1.0.2.jar"/>
              <include name="jta.jar"/>
              <include name="commons-collections.jar"/>
              <include name="commons-lang.jar"/>
<include name="serp-1.13.1.jar"/>
<include name="aopalliance.jar"/>
<include name="spring-aop.jar"/>
<include name="org.springframework.js-2.0.2.RELEASE.jar"/>
<include name="org.springframework.webflow-2.0.2.RELEASE.jar"/>
<include name="tiles-api-2.0.6.jar"/>
<include name="tiles-core-2.0.6.jar"/>
<include name="tiles-jsp-2.0.6.jar"/>
<include name="commons-beanutils-1.7.0.jar"/>
<include name="commons-digester-1.8.jar"/>
<include name="commons-logging-api-1.1.jar"/>
</lib>
<webinf dir="${src.dir}/WEB-INF/ch2/"/>
<metainf dir="${src.dir}/META-INF/ch2/"/>
<zipfileset dir="${src.dir}/GUI/ch2/" prefix=""/>
</war>The first declaration in the listing is used to create a JAR file needed by the WAR. What this JAR file will package are all the individual classes needed by the application, including the persistence.xml descriptor required by the JPA.
Next is the <war> task, which includes two attributes, a destfile value indicating where to place the created file and a webxml value indicating the location of the web.xml file that is to accompany the WAR, in this case the one corresponding to Listing 2-26.
Nested inside the <war> task are two <lib> declarations indicating what files will be placed within the WAR's lib directory, which is where all dependent JAR files are automatically picked up by an application server/container. Among the included JAR files is the helloworld.jar file, which includes the application's classes, as well as the various JARS for Spring, JPA, Apache Tiles, and so on needed to properly execute the application.
Capping off this Ant listing is <webinf>,which copies all the application's descriptors to the WAR's WEB-INF directory; <metainf>, which copies the application's context.xml file (the container's JNDI data source configuration) to the WAR's META-INF directory, and <zipfileset>, which copies the application's GUI files (Apache Tiles, JSP, and CSS) to the root directory of the WAR.
By appending the previous Ant listing to the existing ch2 target you created when testing your domain model (Listing 2-14) and reinvoking the command ant ch2,a WAR file by the name springhelloworld.war will be created under the subdirectory dist/ch2.
That's it! Now that your WAR file is ready, it's time to see the actual application on the Web.
In order to deploy your Spring application on the Web, you will need to make two final adjustments to the infrastructure software that will support it: the RDBMS MySQL and Apache Tomcat.
Prepopulating the RDBMS with Data
Since the Spring application displays data from an RDBMS, you will to prepopulate it with a data set in order to show "Hello World" messages upon visiting it. Listing 2-31 contains a script used to prepopulate MySQL with the relational tables needed by the application.
Example 2-31. SQL Script helloworld.sql for Prepopulating the RDBMS
CREATE TABLE `HelloWorld` ( `id` bigint(20) NOT NULL, `language` varchar(255) default NULL, `message` varchar(255) default NULL, `transdate` date default NULL, `translator_id` bigint(20) default NULL, PRIMARY KEY (`id`), KEY `I_HLLWRLD_TRANSLATOR` (`translator_id`) ) ENGINE=InnoDB DEFAULT CHARSET=latin1; INSERT INTO `HelloWorld` VALUES (51,'Italian','Ciao Monde!','2008-05-27',2),(52,'Spanish','Hola Mundo!','2008-05-27',1),(53,'English','Hello World!','2008-05-27',5),(54,'French','Bonjour Monde!','2008-05-27',3),(55,'German','Hallo Welt!','2008-05-27',4);CREATE TABLE `OPENJPA_SEQUENCE_TABLE` (`ID` tinyint(4) NOT NULL, `SEQUENCE_VALUE` bigint(20) default NULL, PRIMARY KEY (`ID`) ) ENGINE=InnoDB DEFAULT CHARSET=latin1;INSERT INTO `OPENJPA_SEQUENCE_TABLE` VALUES (0,101);CREATE TABLE `Person` ( `id` bigint(20) NOT NULL, `FNAME` varchar(255) default NULL, `hourlyRate` double default NULL, `LNAME` varchar(255) default NULL, PRIMARY KEY (`id`) ) ENGINE=InnoDB DEFAULT CHARSET=latin1; INSERT INTO `Person` VALUES (1,'Carlos',40,'Perez'),(2,'Dino',45,'Casiraghi'),(3,'Pierre',40,'LeClair'),(4,'Franz',45,'Becker'),(5,'John',45,'Smith'),
Before you actually prepopulate the RDBMS with these relation tables and values, a short note on their meaning: the Person and HelloWorld tables are of course in line with the domain model's POJO names, but you may be wondering about that table named OPENJPA_SEQUENCE_NAME.
This last table accommodates the default behavior of the JPA Entity Manager used in the application, Open JPA, and its mapping behavior to the MySQL RDBMS, all based on the annotations used to decorate the domain model.
Back when you annotated the HelloWorld and Person classes (Listings 2-6 and 2-7),upon using the annotation @Id @GeneratedValue, no strategy was specified to generate the IDs for persisting objects in these classes. In Open JPA's case as it specifically relates to MySQL, the default behavior is to consult a table by the name OPENJPA_SEQUENCE_TABLE in order to obtain a unique ID necessary to persist entity objects.
Be advised that this behavior is highly specific to both the JPA Entity Manager and RDBMS you are using. Other JPA/RDBMS combinations may rely on different table naming conventions, the use of an RDBMS sequence, or some other variation. And of course, all this default behavior could have been avoided if the JPA @GeneratedValue annotation in each class provided a strategy indicating a preexisting table or sequence to use as an ID generation source.
Next, you need to process the script so the data set makes its way to the application's database instance. While in a system shell, execute the following instruction: mysql -u hello -pworld -D springosgi < helloworld.sql—where helloworld.sql is the file containing the code from Listing 2-31. This will attempt to connect to the database instance named springosgi with the credentials you created at the outset, and insert the contents of the script helloworld.sql into the respective instance.
After the successful execution of the RDBMS script, MySQL should be prepared to offer data to the Spring application. Next, you need to prepare the hosting environment: Apache Tomcat.
Configuring Apache Tomcat
Apache Tomcat requires the incorporation of two JAR files into its underlying structure to properly execute the application, one to support the MySQL database and another to support Spring's operation within the application container itself. The steps are as follows:
Copy
spring-tomcat-weaver.jar: you need to copy this file located under the subdirectory/dist/weaving/within the Spring with dependencies download over to$TOMCAT_HOME/server/lib/, where$TOMCAT_HOMEis the root directory for Apache Tomcat.Copy
mysql-connector-java-bin.jar: you need to copy this file located under the root directory within the MySQL Connector/J driver download over to$TOMCAT_HOME/common/lib/, where$TOMCAT_HOMEis the root directory for Apache Tomcat.Next, you need to copy the
springhelloworld.warfile containing the application over to Apache Tomcat'swebappssubdirectory, also located in the root directory of Apache Tomcat.
Once these three files are in place, you're ready to start up Apache Tomcat and fire up a browser to see your application.
Starting Apache Tomcat
Move over to the bin directory inside Apache Tomcat and execute java -jar bootstrap.jar.Once you do this, Apache Tomcat will automatically expand springhelloworld.war,outputting a deployment message to the screen and making the application accessible under a virtual directory by the WAR's name.
Upon completion, Apache Tomcat will be running under port 8080 of your localhost, so if you open up a browser and point it toward http://localhost:8080/springhelloworld/,you will be able to access the Hello World Spring application.
In this chapter you learned how Spring emerged as a grassroots movement to address many of the shortcomings present in the earlier versions of the Java 2 Enterprise Edition (J2EE)—now Java Enterprise Edition (Java EE)—offering a fresh approach to building enterprise Java applications based on the concepts of IoC/DI and POJO architectures.
You also explored the many advantages to using a POJO-based architecture in enterprise applications, favoring such things as simplicity, maintenance, testing, and reuse. Additionally, you gained perspective on the numerous areas the Spring Framework has influenced since its inception, going even beyond the Java platform.
Later you experienced firsthand how to create a domain model based on POJO principles, which included enabling the model to use an RDBMS and leveraging Java's de facto object-relational API, JPA.
Then you performed both unit testing and integration testing on the same domain model using the Java JUnit framework and other artifacts provided by the Spring Framework. This was followed by a brief incursion into Spring's support for the MVC and AJAX type designs, both of which are staples in today's web applications.
Finally, you learned how to actually deploy a WAR that included application classes, JSPs, Apache Tiles, CSS, and configuration files created during the chapter, coming away with a live end-to-end Spring application using JPA and Spring's MVC, with Apache Tomcat serving as the Java EE container and MySQL as the RDBMS.
[5] Rod Johnson, J2EE Design and Development (Indianapolis, Indiana: Wrox, 2002)
[6] Rod Johnson, Juergen Hoeller, J2EE Development without EJB (Indianapolis, Indiana: Wrox, 2004)
[7] Martin Fowler, InversionOfControl definition,http://martinfowler.com/bliki/InversionOfControl.html
[8] Martin Fowler, POJO definition, http://martinfowler.com/bliki/POJO.html
[9] Wikipedia, "Test-driven Development," http://en.wikipedia.org/wiki/Test-driven_development
[10] http://java.sun.com/javaee/overview/faq/persistence.jsp