Graphics, video, sound, and printing are the hallmarks of a traditional rich client on the Microsoft Windows operating system. When it comes to multimedia, the Microsoft .NET Framework delivers a compromise, providing support for some of these features while ignoring others. For example, you will find a sophisticated set of tools for two-dimensional drawing and event-based printing with GDI+ and the types in the System.Drawing namespaces. These classes wrap GDI32.dll and USER32.dll, which provide the native graphics device interface (GDI) functions in the Windows application programming interface (API), and they make it much easier to draw complex shapes, work with coordinates and transforms, and process images. On the other hand, if you want to show a video file or get information about the current print jobs, you will need to look beyond the .NET Framework.
This chapter presents recipes that show you how to use built-in .NET features and, where necessary, native Win32 libraries via P/Invoke or COM Interop. The recipes in this chapter describe how to do the following:
Find the fonts installed in your system (recipe 8-1)
Perform hit testing with shapes (recipe 8-2)
Create an irregularly shaped form or control (recipe 8-3)
Create a sprite that can be moved around (recipe 8-4)
Display an image that could be made to scroll (recipe 8-5), learn how to capture the image of the desktop (recipe 8-6), and create a thumbnail for an existing image (recipe 8-8)
Enable double buffering to increase performance while redrawing (recipe 8-7)
Play a beep or a system-defined sound (recipe 8-9), play a WAV file (recipe 8-10), play a non-WAV file such as an MP3 file (recipe 8-11), and play an animation with DirectShow (recipe 8-12)
Retrieve information about the printers installed on the machine (recipe 8-13), print a simple document (recipe 8-14), print a document that has multiple pages (recipe 8-15), print wrapped text (recipe 8-16), show a print preview (recipe 8-17), and manage print jobs (recipe 8-18)
Perform text-to-speech (TTS) (recipe 8-19)
Perform optical character recognition (OCR) to find words in an image (recipe 8-20).
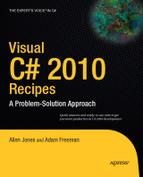
Create a new instance of the System.Drawing.Text.InstalledFontCollection class, which contains a collection of FontFamily objects representing all the installed fonts.
The InstalledFontCollection class allows you to retrieve information about currently installed fonts. It derives from the FontCollection class, which allows you to get a list of font families as a collection in the Families property.
The following code shows a form that iterates through the font collection when it is first created. Every time it finds a font, it creates a new Label control that will display the font name in the given font face (at a size of 14 points). The Label is added to a Panel control named pnlFonts with AutoScroll set to true, allowing the user to scroll through the list of available fonts.
using System;
using System.Drawing;
using System.Windows.Forms;
using System.Drawing.Text;

namespace Apress.VisualCSharpRecipes.Chapter08
{
    public partial class Recipe08_01: Form
    {
        public Recipe08_01()
        {
            InitializeComponent();
        }

        private void Recipe08_01_Load(object sender, EventArgs e)
        {
// Create the font collection.
using (InstalledFontCollection fontFamilies =
new InstalledFontCollection())
{
// Iterate through all font families.
int offset = 10;
foreach (FontFamily family in fontFamilies.Families)
{
try
{
// Create a label that will display text in this font.
Label fontLabel = new Label();
fontLabel.Text = family.Name;
fontLabel.Font = new Font(family, 14);
fontLabel.Left = 10;
fontLabel.Width = pnlFonts.Width;
fontLabel.Top = offset;
// Add the label to a scrollable Panel.
pnlFonts.Controls.Add(fontLabel);
offset += 30;
}
catch
{
// An error will occur if the selected font does
// not support normal style (the default used when
// creating a Font object). This problem can be
// harmlessly ignored.
}
}
}
}
}
}Figure 8-1 shows this simple test application.
Test the point where the user clicked with methods such as Rectangle.Contains and Region.IsVisible (in the System.Drawing namespace) or GraphicsPath.IsVisible (in the System.Drawing.Drawing2D namespace), depending on the type of shape.
Often, if you use GDI+ to draw shapes on a form, you need to be able to determine when a user clicks inside a given shape. The .NET Framework provides three methods to help with this task:
The
Rectangle.Containsmethod takes a point and returnstrueif the point is inside a given rectangle. In many cases, you can retrieve a rectangle for another type of shape. For example, you can useImage.GetBoundsto retrieve the invisible rectangle that represents the image boundaries. TheRectanglestructure is a member of theSystem.Drawingnamespace.The
GraphicsPath.IsVisiblemethod takes a point and returnstrueif the point is inside the area defined by a closedGraphicsPath. Because aGraphicsPathcan contain multiple lines, shapes, and figures, this approach is useful if you want to test whether a point is contained inside a nonrectangular region. TheGraphicsPathclass is a member of theSystem.Drawing.Drawing2Dnamespace.The
Region.IsVisiblemethod takes a point and returnstrueif the point is inside the area defined by aRegion. ARegion, like theGraphicsPath, can represent a complex nonrectangular shape.Regionis a member of theSystem.Drawingnamespace.
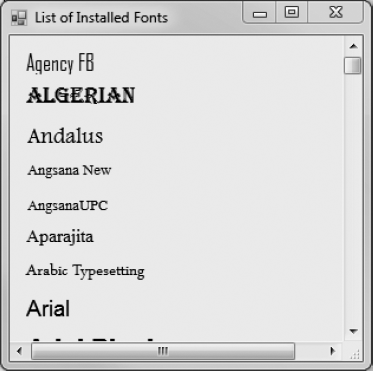
The following example shows a form that creates a Rectangle and a GraphicsPath. By default, these two shapes are given light-blue backgrounds. However, an event handler responds to the Form.MouseMove event, checks to see whether the mouse pointer is in one of these shapes, and updates the background to bright pink if the pointer is there.
Note that the highlighting operation takes place directly inside the MouseMove event handler. The painting is performed only if the current selection has changed. For simpler code, you could invalidate the entire form every time the mouse pointer moves in or out of a region and handle all the drawing in the Form.Paint event handler, but this would lead to more drawing and generate additional flicker as the entire form is repainted.
using System;
using System.Drawing;
using System.Windows.Forms;
using System.Drawing.Drawing2D;

namespace Apress.VisualCSharpRecipes.Chapter08
{
    public partial class Recipe08_02 : Form
    {
        // Define the shapes used on this form.
        private GraphicsPath path;
        private Rectangle rectangle;

        // Define the flags that track where the mouse pointer is.
        private bool inPath = false;
        private bool inRectangle = false;
// Define the brushes used for painting the shapes.
Brush highlightBrush = Brushes.HotPink;
Brush defaultBrush = Brushes.LightBlue;
public Recipe08_02()
{
InitializeComponent();
}
private void Recipe08_02_Load(object sender, EventArgs e)
{
// Create the shapes that will be displayed.
path = new GraphicsPath();
path.AddEllipse(10, 10, 100, 60);
path.AddCurve(new Point[] {new Point(50, 50),
new Point(10,33), new Point(80,43)});
path.AddLine(50, 120, 250, 80);
path.AddLine(120, 40, 110, 50);
path.CloseFigure();
rectangle = new Rectangle(100, 170, 220, 120);
}
private void Recipe08_02_Paint(object sender, PaintEventArgs e)
{
Graphics g = e.Graphics;
// Paint the shapes according to the current selection.
if (inPath)
{
g.FillPath(highlightBrush, path);
g.FillRectangle(defaultBrush, rectangle);
}
else if (inRectangle)
{
g.FillRectangle(highlightBrush, rectangle);
g.FillPath(defaultBrush, path);
}
else
{
g.FillPath(defaultBrush, path);
g.FillRectangle(defaultBrush, rectangle);
}
g.DrawPath(Pens.Black, path);
g.DrawRectangle(Pens.Black, rectangle);
}private void Recipe08_02_MouseMove(object sender, MouseEventArgs e)
{
using (Graphics g = this.CreateGraphics())
{
// Perform hit testing with rectangle.
if (rectangle.Contains(e.X, e.Y))
{
if (!inRectangle)
{
inRectangle = true;
// Highlight the rectangle.
g.FillRectangle(highlightBrush, rectangle);
g.DrawRectangle(Pens.Black, rectangle);
}
}
else if (inRectangle)
{
inRectangle = false;
// Restore the unhighlighted rectangle.
g.FillRectangle(defaultBrush, rectangle);
g.DrawRectangle(Pens.Black, rectangle);
}
// Perform hit testing with path.
if (path.IsVisible(e.X, e.Y))
{
if (!inPath)
{
inPath = true;
// Highlight the path.
g.FillPath(highlightBrush, path);
g.DrawPath(Pens.Black, path);
}
}
else if (inPath)
{
inPath = false;
// Restore the unhighlighted path.
g.FillPath(defaultBrush, path);
g.DrawPath(Pens.Black, path);
}
}
}
}
}Figure 8-2 shows the application in action.
Create a new System.Drawing.Region object that has the shape you want for the form, and assign it to the Form.Region or Control.Region property.
To create a nonrectangular form or control, you first need to define the shape you want. The easiest approach is to use the System.Drawing.Drawing2D.GraphicsPath object, which can accommodate any combination of ellipses, rectangles, closed curves, and even strings. You can add shapes to a GraphicsPath instance using methods such as AddEllipse, AddRectangle, AddClosedCurve, and AddString. Once you are finished defining the shape you want, you can create a Region object from this GraphicsPath—just submit the GraphicsPath in the Region class constructor. Finally, you can assign the Region to the Form.Region property or the Control.Region property.
The following example creates an irregularly shaped form (shown in Figure 8-3) using two curves made of multiple points, which are converted into a closed figure using the GraphicsPath.CloseAllFigures method.
using System;
using System.Drawing;
using System.Windows.Forms;
using System.Drawing.Drawing2D;

namespace Apress.VisualCSharpRecipes.Chapter08
{
    public partial class Recipe08_03 : Form
    {
        public Recipe08_03()
        {
            InitializeComponent();
        }

        private void Recipe08_03_Load(object sender, EventArgs e)
        {
            GraphicsPath path = new GraphicsPath();

            Point[] pointsA = new Point[]
                {
                    new Point(0, 0),
                    new Point(40, 60),
                    new Point(this.Width - 100, 10)
                };
            path.AddCurve(pointsA);

            Point[] pointsB = new Point[]
                {
                    new Point(this.Width - 40, this.Height - 60),
                    new Point(this.Width, this.Height),
                    new Point(10, this.Height)
                };
            path.AddCurve(pointsB);

            path.CloseAllFigures();

            this.Region = new Region(path);
        }
private void cmdClose_Click(object sender, EventArgs e)
{
this.Close();
}
}
}
Note
Another method for creating nonrectangular forms (not controls) is using the BackgroundImage and TransparentKey properties available in the Form class. However, this method could cause display problems when monitors are set to a color depth greater than 24-bit. For more information about this topic, refer to the Microsoft Developer Network (MSDN) documentation.
For an example that demonstrates a nonrectangular control, refer to recipe 8-4.
You need to create a shape the user can manipulate on a form, perhaps by dragging it, resizing it, or otherwise interacting with it.
Create a custom control, and override the painting logic to draw a shape. Assign your shape to the Control.Region property. You can then use this Region to perform hit testing.
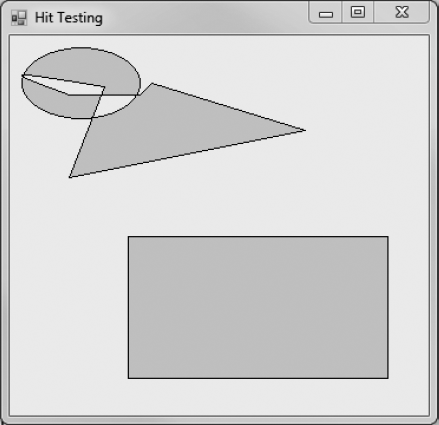
If you need to create a complex user interface that incorporates many custom-drawn elements, you need a way to track these elements and allow the user to interact with them. The easiest approach in .NET is to create a dedicated control by deriving a class from System.Windows.Forms.Control. You can then customize the way this control is painted in the way its basic set of events is raised.
The following example shows a control that represents a simple ellipse shape on a form. All controls are associated with a rectangular region on a form, so the EllipseShape control generates an ellipse that fills these boundaries (provided through the Control.ClientRectangle property). Once the shape has been generated, the Control.Region property is set according to the bounds on the ellipse. This ensures that events such as MouseMove, MouseDown, Click, and so on, will occur only if the mouse is over the ellipse, not the entire client rectangle.
The following code shows the full EllipseShape code:
using System;
using System.Drawing;
using System.Windows.Forms;
using System.Drawing.Drawing2D;

namespace Apress.VisualCSharpRecipes.Chapter08
{
    public partial class EllipseShape : Control
    {
        public EllipseShape()
        {
            InitializeComponent();
        }

        private GraphicsPath path = null;
private void RefreshPath()
{
// Create the GraphicsPath for the shape (in this case
// an ellipse that fits inside the full control area)
// and apply it to the control by setting
// the Region property.
path = new GraphicsPath();
path.AddEllipse(this.ClientRectangle);
this.Region = new Region(path);
}
protected override void OnPaint(PaintEventArgs e)
{
base.OnPaint(e);
if (path != null)
{
e.Graphics.SmoothingMode = SmoothingMode.AntiAlias;
e.Graphics.FillPath(new SolidBrush(this.BackColor), path);
e.Graphics.DrawPath(new Pen(this.ForeColor, 4), path);
}
}
protected override void OnResize(System.EventArgs e)
{
base.OnResize(e);
RefreshPath();
this.Invalidate();
}
}
}You could define the EllipseShape control in a separate class library assembly so that you could add it to the Microsoft Visual Studio .NET toolbox and use it at design time. However, even without taking this step, it is easy to create a simple test application. The following Windows Forms application creates two ellipses and allows the user to drag both of them around the form, simply by holding the mouse down and moving the pointer:
using System;
using System.Drawing;
using System.Windows.Forms;

namespace Apress.VisualCSharpRecipes.Chapter08
{
    public partial class Recipe08_04 : Form
    {
        public Recipe08_04()
        {
            InitializeComponent();
        }
// Tracks when drag mode is on.
private bool isDraggingA = false;
private bool isDraggingB = false;
// The ellipse shape controls.
private EllipseShape ellipseA, ellipseB;
private void Recipe08_04_Load(object sender, EventArgs e)
{
// Create and configure both ellipses.
ellipseA = new EllipseShape();
ellipseA.Width = ellipseA.Height = 100;
ellipseA.Top = ellipseA.Left = 30;
ellipseA.BackColor = Color.Red;
this.Controls.Add(ellipseA);
ellipseB = new EllipseShape();
ellipseB.Width = ellipseB.Height = 100;
ellipseB.Top = ellipseB.Left = 130;
ellipseB.BackColor = Color.Azure;
this.Controls.Add(ellipseB);
// Attach both ellipses to the same set of event handlers.
ellipseA.MouseDown += Ellipse_MouseDown;
ellipseA.MouseUp += Ellipse_MouseUp;
ellipseA.MouseMove += Ellipse_MouseMove;
ellipseB.MouseDown += Ellipse_MouseDown;
ellipseB.MouseUp += Ellipse_MouseUp;
ellipseB.MouseMove += Ellipse_MouseMove;
}
private void Ellipse_MouseDown(object sender, MouseEventArgs e)
{
// Get the ellipse that triggered this event.
Control control = (Control)sender;
if (e.Button == MouseButtons.Left)
{
control.Tag = new Point(e.X, e.Y);
if (control == ellipseA)
{
isDraggingA = true;
}
else
{
isDraggingB = true;
}
}
}private void Ellipse_MouseUp(object sender, MouseEventArgs e)
{
isDraggingA = false;
isDraggingB = false;
}
private void Ellipse_MouseMove(object sender, MouseEventArgs e)
{
// Get the ellipse that triggered this event.
Control control = (Control)sender;
if ((isDraggingA && control == ellipseA) ||
(isDraggingB && control == ellipseB))
{
// Get the offset.
Point point = (Point)control.Tag;
// Move the control.
control.Left = e.X + control.Left - point.X;
control.Top = e.Y + control.Top - point.Y;
}
}
}
}Figure 8-4 shows the user about to drag an ellipse.
Leverage the automatic scroll capabilities of the System.Windows.Forms.Panel control by setting Panel.AutoScroll to true and placing a System.Windows.Forms.PictureBox control with the image content inside the Panel.
The Panel control has built-in scrolling support, as shown in recipe 8-1. If you place any controls in it that extend beyond its bounds and you set Panel.AutoScroll to true, the panel will show scroll bars that allow the user to move through the content. This works particularly well with large images. You can load or create the image in memory, assign it to a picture box (which has no intrinsic support for scrolling), and then show the picture box inside the panel. The only consideration you need to remember is to make sure you set the picture box dimensions equal to the full size of the image you want to show.
The following example creates an image that represents a document. The image is generated as an in-memory bitmap, and several lines of text are added using the Graphics.DrawString method. The image is then bound to a picture box, which is shown in a scrollable panel, as shown in Figure 8-5.
using System;
using System.Drawing;
using System.Windows.Forms;

namespace Apress.VisualCSharpRecipes.Chapter08
{
    public partial class Recipe08_05 : Form
    {
        public Recipe08_05()
        {
            InitializeComponent();
        }

        private void Recipe08_05_Load(object sender, EventArgs e)
        {
            string text = "The quick brown fox jumps over the lazy dog.";
            using (Font font = new Font("Tahoma", 20))
            {
// Create an in-memory bitmap.
Bitmap b = new Bitmap(600, 600);
using (Graphics g = Graphics.FromImage(b))
{
g.FillRectangle(Brushes.White, new Rectangle(0, 0,
b.Width, b.Height));
// Draw several lines of text on the bitmap.
for (int i = 0; i < 10; i++)
{
g.DrawString(text, font, Brushes.Black,
50, 50 + i * 60);
}
}
// Display the bitmap in the picture box.
pictureBox1.BackgroundImage = b;
pictureBox1.Size = b.Size;
}
}
}
}
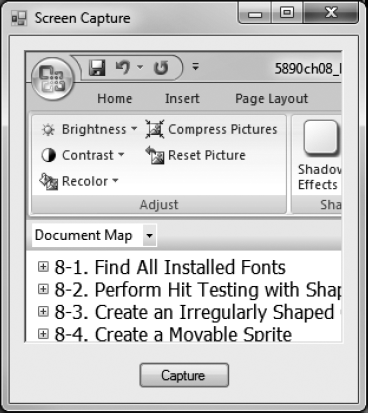
The Graphics class includes CopyFromScreen methods that copy color data from the screen onto the drawing surface represented by a Graphics object. This method requires you to pass the source and destination points and the size of the image to be copied.
The following example captures the screen and displays it in a picture box. It first creates a new Bitmap object and then invokes CopyFromScreen to draw onto the Bitmap. After drawing, the image is assigned to the picture box, as shown in Figure 8-6.
using System;
using System.Drawing;
using System.Windows.Forms;

namespace Apress.VisualCSharpRecipes.Chapter08
{
    public partial class Recipe08_06 : Form
    {
        public Recipe08_06()
        {
            InitializeComponent();
        }

        private void cmdCapture_Click(object sender, EventArgs e)
        {
            Bitmap screen = new Bitmap(Screen.PrimaryScreen.Bounds.Width,
                Screen.PrimaryScreen.Bounds.Height);

            using (Graphics g = Graphics.FromImage(screen))
            {
                g.CopyFromScreen(0, 0, 0, 0, screen.Size);
            }
pictureBox1.Image = screen;
}
}
}
You need to optimize drawing for a form or an authored control that is frequently refreshed, and you want to reduce flicker.
In some applications you need to repaint a form or control frequently. This is commonly the case when creating animations. For example, you might use a timer to invalidate your form every second. Your painting code could then redraw an image at a new location, creating the illusion of motion. The problem with this approach is that every time you invalidate the form, Windows repaints the window background (clearing the form) and then runs your painting code, which draws the graphic element by element. This can cause substantial onscreen flicker.
Double buffering is a technique you can implement to reduce this flicker. With double buffering, your drawing logic writes to an in-memory bitmap, which is copied to the form at the end of the drawing operation in a single, seamless repaint operation. Flickering is reduced dramatically.
The .NET Framework provides a default double buffering mechanism for forms and controls. You can enable this by setting the DoubleBuffered property of your form or control to true or by using the SetStyle method.
The following example sets the DoubleBuffered property of the form to true and shows an animation of an image alternately growing and shrinking on the page. The drawing logic takes place in the Form.Paint event handler, and a timer invalidates the form in a preset interval so that the image can be redrawn. The user can choose whether to enable double buffering through a check box on the form. Without double buffering, the form flickers noticeably. When double buffering is enabled, however, the image grows and shrinks with smooth, flicker-free animation.
using System;
using System.Drawing;
using System.Windows.Forms;
using System.Drawing.Drawing2D;

namespace Apress.VisualCSharpRecipes.Chapter08
{
   public partial class Recipe08_07 : Form
   {
       public Recipe08_07()
       {
           InitializeComponent();
       }

       // Track the image size and the type of animation
       // (expanding or shrinking).
       private bool isShrinking = false;
       private int imageSize = 0;

       // Store the logo that will be painted on the form.
       private Image image;
private void Recipe08_07_Load(object sender, EventArgs e)
{
// Load the logo image from the file.
image = Image.FromFile("test.jpg");
// Start the timer that invalidates the form.
tmrRefresh.Start();
}
private void tmrRefresh_Tick(object sender, EventArgs e)
{
// Change the desired image size according to the animation mode.
if (isShrinking)
{
imageSize--;
}
else
{
imageSize++;
}
// Change the sizing direction if it nears the form border.
if (imageSize > (this.Width - 150))
{
isShrinking = true;
}
else if (imageSize < 1)
{
isShrinking = false;
}
// Repaint the form.
this.Invalidate();
}
private void Recipe08_07_Paint(object sender, PaintEventArgs e)
{
Graphics g;
g = e.Graphics;
g.SmoothingMode = SmoothingMode.HighQuality;
// Draw the background.
g.FillRectangle(Brushes.Yellow, new Rectangle(new Point(0, 0),
this.ClientSize));
// Draw the logo image.
g.DrawImage(image, 50, 50, 50 + imageSize, 50 + imageSize);
}private void chkUseDoubleBuffering_CheckedChanged(object sender, EventArgs e)
{
this.DoubleBuffered = chkUseDoubleBuffering.Checked;
}
}
}Read the image from the file using the static FromFile method of the System.Drawing.Image class. You can then retrieve a thumbnail using the Image.GetThumbnailImage method.
The Image class provides the functionality for generating thumbnails through the GetThumbnailImage method. You simply need to pass the width and height of the thumbnail you want (in pixels), and the Image class will create a new Image object that fits these criteria. Anti-aliasing is used when reducing the image to ensure the best possible image quality, although some blurriness and loss of detail are inevitable. (Anti-aliasing is the process of removing jagged edges, often in resized graphics, by adding shading with an intermediate color.) In addition, you can supply a notification callback, allowing you to create thumbnails asynchronously.
When generating a thumbnail, it is important to ensure that the aspect ratio remains constant. For example, if you reduce a 200×100 picture to a 50×50 thumbnail, the width will be compressed to one quarter and the height will be compressed to one half, distorting the image. To ensure that the aspect ratio remains constant, you can change either the width or the height to a fixed size and then adjust the other dimension proportionately.
The following example reads a bitmap file and generates a thumbnail that is not greater than 200×200 pixels while preserving the original aspect ratio:
using System;
using System.Drawing;
using System.Windows.Forms;
namespace Apress.VisualCSharpRecipes.Chapter08
{
    public partial class Recipe08_08 : Form
    {
        public Recipe08_08()
        {
            InitializeComponent();
        }

        Image thumbnail;

        private void Recipe08_08_Load(object sender, EventArgs e)
        {
            using (Image img = Image.FromFile("test.jpg"))
            {
                int thumbnailWidth = 0, thumbnailHeight = 0;

                // Adjust the largest dimension to 200 pixels.
                // This ensures that a thumbnail will not be larger than
                // 200x200 pixels.
                // If you are showing multiple thumbnails, you would reserve a
                // 200x200-pixel square for each one.
                if (img.Width > img.Height)
                {
                    thumbnailWidth = 200;
                    thumbnailHeight = Convert.ToInt32(((200F / img.Width) *
                      img.Height));
                }
                else
                {
                    thumbnailHeight = 200;
                    thumbnailWidth = Convert.ToInt32(((200F / img.Height) *
                      img.Width));
                }

                thumbnail = img.GetThumbnailImage(thumbnailWidth, thumbnailHeight,
                  null, IntPtr.Zero);
            }
        }

        private void Recipe08_08_Paint(object sender, PaintEventArgs e)
        {
            e.Graphics.DrawImage(thumbnail, 10, 10);
        }
    }
}The .NET Framework has provides the Beep method in the Console class and the System.Media namespace, which provides classes for playing sound files.
Overloads of the Console.Beep method let you play a beep with the default frequency and duration or with a frequency and duration you specify. Frequency is represented in hertz (and must range from 37 to 32,767), and the duration is represented in milliseconds. Internally, these methods invoke the Beep Win32 function and use the computer's internal speaker. Thus, if the computer does not have an internal speaker, no sound will be produced.
The System.Media namespace contains the SystemSound, SystemSounds, and SoundPlayer classes. The SystemSound class represents a Windows sound event, such as an asterisk, beep, question, and so on. It also defines a Play method, which lets you play the sound associated with it.
The SystemSounds class defines properties that let you obtain the SystemSound instance of a specific Windows sound event. For example, it defines an Asterisk property that returns a SystemSound instance associated with the asterisk Windows sound event.
The SoundPlayer class lets you play WAV files. For more information on how to play a WAV file using this class, refer to recipe 8-10.
The following example plays two different beeps and the asterisk sound in succession, using the Console and SystemSound classes:
using System;
using System.Windows.Forms;
using System.Media;
using System.Threading;

namespace Apress.VisualCSharpRecipes.Chapter08
{
    public partial class Recipe08_09 : Form
    {
        public Recipe08_09()
        {
            InitializeComponent();
        }
private void Recipe08_09_Load(object sender, EventArgs e)
{
// Play a beep with default frequency
// and duration (800 and 200, respectively).
Console.Beep();
Thread.Sleep(500);
// Play a beep with frequency as 200 and duration as 300.
Console.Beep(200, 300);
Thread.Sleep(500);
// Play the sound associated with the Asterisk event.
SystemSounds.Asterisk.Play();
}
}
}Create a new instance of the System.Media.SoundPlayer class, pass the location or stream of the WAV file, and invoke the Play method.
The .NET Framework includes the System.Media namespace, which contains a SoundPlayer class. SoundPlayer contains constructors that let you specify the location of a WAV file or its stream. Once you have created an instance, you just invoke the Play method to play the file. The Play method creates a new thread to play the sound and is thus asynchronous (unless a stream is used). For playing the sound synchronously, use the PlaySync method. Note that SoundPlayer supports only the WAV format.
Before a file is played, it is loaded into memory. You can load a file in advance by invoking the Load or LoadSync method depending upon whether you want the operation to be asynchronous or synchronous.
The following example shows a simple form that allows users to open any WAV file and play it:
using System;
using System.Windows.Forms;
using System.Media;

namespace Apress.VisualCSharpRecipes.Chapter08
{
    public partial class Recipe08_10 : Form
    {
        public Recipe08_10()
        {
            InitializeComponent();
        }

        private void cmdOpen_Click(object sender, EventArgs e)
        {
            // Allow the user to choose a file.
            OpenFileDialog openDialog = new OpenFileDialog();
            openDialog.InitialDirectory = "C:\Windows\Media";
            openDialog.Filter = "WAV Files|*.wav|All Files|*.*";

            if (DialogResult.OK == openDialog.ShowDialog())
            {
                SoundPlayer player = new SoundPlayer(openDialog.FileName);

                try
                {
                    player.Play();
                }
                catch (Exception)
                {
                    MessageBox.Show("An error occurred while playing media.");
                }
                finally
                {
                    player.Dispose();
                }
            }
        }
    }
}Use the ActiveMovie COM component included with Windows Media Player, which supports WAV and MP3 audio.
The ActiveMovie Quartz library provides a COM component that can play various types of audio files, including the WAV and MP3 formats. The Quartz type library is provided through quartz.dll and is included as a part of Microsoft DirectX with Media Player and the Windows operating system.
The first step for using the library is to generate an Interop class that can manage the interaction between your .NET application and the unmanaged Quartz library. You can generate a C# class with this Interop code using the Type Library Importer utility (Tlbimp.exe) and the following command line, where [WindowsDir] is the path for your installation of Windows:
tlbimp [WindowsDir]system32quartz.dll /out:QuartzTypeLib.dll
Alternatively, you can generate the Interop class using Visual Studio .NET by adding a reference. Simply right-click your project in Solution Explorer, and choose Add Reference from the context menu. Then select the COM tab and scroll down to select ActiveMovie Control Type Library.
Once the Interop class is generated, you can work with the IMediaControl interface. You can specify the file you want to play using RenderFile, and you can control playback using methods such as Run, Stop, and Pause. The actual playback takes place on a separate thread, so it will not block your code.
The following example shows a simple form that allows you to open any audio file and play it.
You can also use the Quartz library to show movie files, as demonstrated in recipe 8-12.
using System;
using System.Windows.Forms;
using QuartzTypeLib;

namespace Apress.VisualCSharpRecipes.Chapter08
{
    public partial class Recipe08_11 : Form
    {
        public Recipe08_11()
        {
            InitializeComponent();
        }

        private void cmdOpen_Click(object sender, EventArgs e)
        {
            // Allow the user to choose a file.
            OpenFileDialog openFileDialog = new OpenFileDialog();
            openFileDialog.Filter =
                "Media Files|*.wav;*.mp3;*.mp2;*.wma|All Files|*.*";

            if (DialogResult.OK == openFileDialog.ShowDialog())
            {
// Access the IMediaControl interface.
QuartzTypeLib.FilgraphManager graphManager =
new QuartzTypeLib.FilgraphManager();
QuartzTypeLib.IMediaControl mc =
(QuartzTypeLib.IMediaControl)graphManager;
// Specify the file.
mc.RenderFile(openFileDialog.FileName);
// Start playing the audio asynchronously.
mc.Run();
}
}
}
}Use the ActiveMovie COM component included with Windows Media Player. Bind the video output to a picture box on your form by setting the IVideoWindow.Owner property to the PictureBox.Handle property.
Although the .NET Framework does not include any managed classes for interacting with video files, you can leverage the functionality of DirectShow using the COM-based Quartz library included with Windows Media Player and the Windows operating system. For information about creating an Interop assembly for the Quartz type library, refer to the instructions in recipe 8-11.
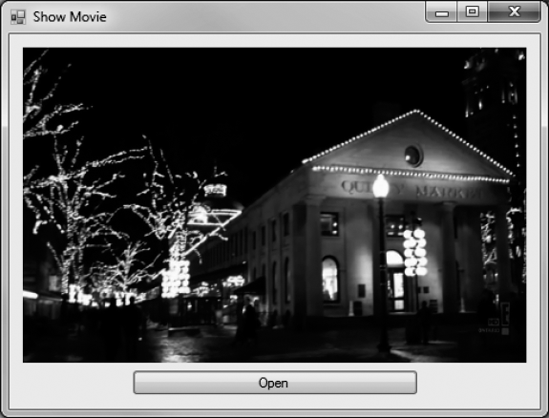
Once you have created the Interop assembly, you can use the IMediaControl interface to load and play a movie. This is essentially the same technique demonstrated in recipe 8-11 with audio files. However, if you want to show the video window inside your application interface (rather than in a separate stand-alone window), you must also use the IVideoWindow interface. The core FilgraphManager object can be cast to both the IMediaControl interface and the IVideoWindow interface—and several other interfaces are also supported, such as IBasicAudio (which allows you to configure balance and volume settings). With the IVideoWindow interface, you can bind the video output to a control on your form, such as a Panel or a PictureBox. To do so, set the IVideoWindow.Owner property to the handle for the control, which you can retrieve using the Control.Handle property. Then call IVideoWindow.SetWindowPosition to set the window size and location. You can call this method to change the video size during playback (for example, if the form is resized).
The following example shows a simple form that allows users to access a video file and play it back in the provided picture box. The picture box is anchored to all sides of the form, so it changes size as the form resizes. The code responds to the PictureBox.SizeChanged event to change the size of the corresponding video window.
using System;
using System.Windows.Forms;
using QuartzTypeLib;

namespace Apress.VisualCSharpRecipes.Chapter08
{
    public partial class Recipe08_12 : Form
    {
        public Recipe08_12()
        {
            InitializeComponent();
        }

        // Define constants used for specifying the window style.
        private const int WS_CHILD = 0x40000000;
        private const int WS_CLIPCHILDREN = 0x2000000;

        // Hold a form-level reference to the media control interface,
        // so the code can control playback of the currently loaded
        // movie.
        private IMediaControl mc = null;

        // Hold a form-level reference to the video window in case it
        // needs to be resized.
        private IVideoWindow videoWindow = null;

        private void cmdOpen_Click(object sender, EventArgs e)
        {
            // Allow the user to choose a file.
            OpenFileDialog openFileDialog = new OpenFileDialog();
            openFileDialog.Filter =
            "Media Files|*.mpg;*.avi;*.wma;*.mov;*.wav;*.mp2;*.mp3|" +
            "All Files|*.*";

            if (DialogResult.OK == openFileDialog.ShowDialog())
            {
                // Stop the playback for the current movie, if it exists.
                if (mc != null) mc.Stop();

                // Load the movie file.
                FilgraphManager graphManager = new FilgraphManager();
                graphManager.RenderFile(openFileDialog.FileName);
// Attach the view to a picture box on the form.
try
{
videoWindow = (IVideoWindow)graphManager;
videoWindow.Owner = (int)pictureBox1.Handle;
videoWindow.WindowStyle = WS_CHILD | WS_CLIPCHILDREN;
videoWindow.SetWindowPosition(
pictureBox1.ClientRectangle.Left,
pictureBox1.ClientRectangle.Top,
pictureBox1.ClientRectangle.Width,
pictureBox1.ClientRectangle.Height);
}
catch
{
// An error can occur if the file does not have a video
// source (for example, an MP3 file).
// You can ignore this error and still allow playback to
// continue (without any visualization).
}
// Start the playback (asynchronously).
mc = (IMediaControl)graphManager;
mc.Run();
}
}
private void pictureBox1_SizeChanged(object sender, EventArgs e)
{
if (videoWindow != null)
{
try
{
videoWindow.SetWindowPosition(
pictureBox1.ClientRectangle.Left,
pictureBox1.ClientRectangle.Top,
pictureBox1.ClientRectangle.Width,
pictureBox1.ClientRectangle.Height);
}
catch
{
// Ignore the exception thrown when resizing the form
// when the file does not have a video source.
}
}
}
}
}Figure 8-7 shows an example of the output you will see.
Read the names in the InstalledPrinters collection of the System.Drawing.Printing.PrinterSettings class.
The PrinterSettings class encapsulates the settings for a printer and information about the printer. For example, you can use the PrinterSettings class to determine supported paper sizes, paper sources, and resolutions, and check for the ability to print color or double-sided (duplexed) pages. In addition, you can retrieve default page settings for margins, page orientation, and so on.
The PrinterSettings class provides a static InstalledPrinters string collection, which includes the name of every printer installed on the computer. If you want to find out more information about the settings for a specific printer, you simply need to create a PrinterSettings instance and set the PrinterName property accordingly.
The following code shows a console application that finds all the printers installed on a computer and displays information about the paper sizes and the resolutions supported by each one.
You do not need to take this approach when creating an application that provides printing features. As you will see in recipe 8-14, you can use the PrintDialog class to prompt the user to choose a printer and its settings. The PrintDialog class can automatically apply its settings to the appropriate PrintDocument without any additional code.
using System;
using System.Drawing.Printing;

namespace Apress.VisualCSharpRecipes.Chapter08
{
    class Recipe08_13
    {
        static void Main(string[] args)
        {
            foreach (string printerName in PrinterSettings.InstalledPrinters)
            {
                // Display the printer name.
                Console.WriteLine("Printer: {0}", printerName);

                // Retrieve the printer settings.
                PrinterSettings printer = new PrinterSettings();
                printer.PrinterName = printerName;

                // Check that this is a valid printer.
                // (This step might be required if you read the printer name
                // from a user-supplied value or a registry or configuration file
                // setting.)
                if (printer.IsValid)
                {
                    // Display the list of valid resolutions.
                    Console.WriteLine("Supported Resolutions:");

                    foreach (PrinterResolution resolution in
                      printer.PrinterResolutions)
                    {
                        Console.WriteLine("  {0}", resolution);
                    }
                    Console.WriteLine();
// Display the list of valid paper sizes.
Console.WriteLine("Supported Paper Sizes:");
foreach (PaperSize size in printer.PaperSizes)
{
if (Enum.IsDefined(size.Kind.GetType(), size.Kind))
{
Console.WriteLine(" {0}", size);
}
}
Console.WriteLine();
}
}
Console.ReadLine();
}
}
}Here is the type of output this utility displays:
Printer: HP LaserJet 5L

Supported Resolutions:

  [PrinterResolution High]

  [PrinterResolution Medium]

  [PrinterResolution Low]

  [PrinterResolution Draft]

  [PrinterResolution X=600 Y=600]

  [PrinterResolution X=300 Y=300]


Supported Paper Sizes:

  [PaperSize Letter Kind=Letter Height=1100 Width=850]

  [PaperSize Legal Kind=Legal Height=1400 Width=850]

  [PaperSize Executive Kind=Executive Height=1050 Width=725]
[PaperSize A4 Kind=A4 Height=1169 Width=827]

  [PaperSize Envelope #10 Kind=Number10Envelope Height=950 Width=412]

  [PaperSize Envelope DL Kind=DLEnvelope Height=866 Width=433]

  [PaperSize Envelope C5 Kind=C5Envelope Height=902 Width=638]

  [PaperSize Envelope B5 Kind=B5Envelope Height=984 Width=693]

  [PaperSize Envelope Monarch Kind=MonarchEnvelope Height=750 Width=387]


Printer: Generic PostScript Printer

. . .
Note
You can print a document in almost any type of application. However, your application must include a reference to the System.Drawing.dll assembly. If you are using a project type in Visual Studio .NET that would not normally have this reference (such as a console application), you must add it.
Create a PrintDocument and write a handler for the PrintDocument.PrintPage event that uses the DrawString and DrawImage methods of the Graphics class to print data to the page.
.NET uses an asynchronous event-based printing model. To print a document, you create a System.Drawing.Printing.PrintDocument instance, configure its properties, and then call its Print method, which schedules the print job. The Common Language Runtime (CLR) will then fire the BeginPrint, PrintPage, and EndPrint events of the PrintDocument class on a new thread. You handle these events and use the provided System.Drawing.Graphics object to output data to the page. Graphics and text are written to a page in the same way as you draw to a window using GDI+. However, you might need to track your position on a page, because every Graphics class method requires explicit coordinates that indicate where to draw.
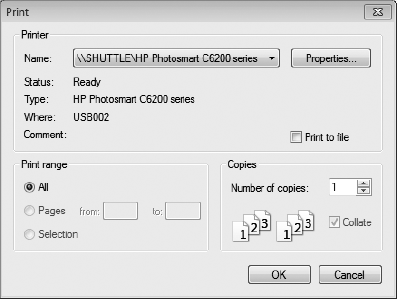
You configure printer settings through the PrintDocument.PrinterSettings and PrintDocument.DefaultPageSettings properties. The PrinterSettings property returns a full PrinterSettings object (as described in recipe 8-11), which identifies the printer that will be used. The DefaultPageSettings property provides a full PageSettings object that specifies printer resolution, margins, orientation, and so on. You can configure these properties in code, or you can use the System.Windows.Forms.PrintDialog class to let the user make the changes using the standard Windows Print dialog box (shown in Figure 8-8). In the Print dialog box, the user can select a printer and choose the number of copies. The user can also click the Properties button to configure advanced settings such as page layout and printer resolution. Finally, the user can either accept or cancel the print operation by clicking OK or Cancel.
Before using the PrintDialog class, you must explicitly attach it to a PrintDocument object by setting the PrintDialog.Document property. Then, any changes the user makes in the Print dialog box will be automatically applied to the PrintDocument object.
Note
The PrintDialog class may not work on 64-bit systems unless the UseEXDialog property is set to true. This displays a Windows XP–style dialog box, but is the only reliable way to display the dialog in a 64-bit installation of Windows. Alternatively, set the platform target for your application to be x86 instead of Any CPU in Visual Studio.
The following example provides a form with a single button. When the user clicks the button, the application creates a new PrintDocument, allows the user to configure print settings, and then starts an asynchronous print operation (provided the user clicks OK). An event handler responds to the PrintPage event and writes several lines of text and an image.
This example has one limitation: it can print only a single page. To print more complex documents and span multiple pages, you will want to create a specialized class that encapsulates the document information, the current page, and so on. Recipe 8-15 demonstrates this technique.
using System;
using System.Drawing;
using System.Windows.Forms;
using System.Drawing.Printing;
using System.IO;

namespace Apress.VisualCSharpRecipes.Chapter08
{
    public partial class Recipe08_14 : Form
    {
        public Recipe08_14()
        {
            InitializeComponent();
        }

        private void cmdPrint_Click(object sender, EventArgs e)
        {
            // Create the document and attach an event handler.
            PrintDocument doc = new PrintDocument();
            doc.PrintPage += this.Doc_PrintPage;

            // Allow the user to choose a printer and specify other settings.
            PrintDialog dlgSettings = new PrintDialog();
            dlgSettings.Document = doc;

            // If the user clicked OK, print the document.
            if (dlgSettings.ShowDialog() == DialogResult.OK)
            {

                // This method returns immediately, before the print job starts.
                // The PrintPage event will fire asynchronously.
                doc.Print();
            }
        }

        private void Doc_PrintPage(object sender, PrintPageEventArgs e)
        {
            // Define the font.
            using (Font font = new Font("Arial", 30))
            {
// Determine the position on the page.
// In this case, we read the margin settings
// (although there is nothing that prevents your code
// from going outside the margin bounds).
float x = e.MarginBounds.Left;
float y = e.MarginBounds.Top;
// Determine the height of a line (based on the font used).
float lineHeight = font.GetHeight(e.Graphics);
// Print five lines of text.
for (int i = 0; i < 5; i++)
{
// Draw the text with a black brush,
// using the font and coordinates we have determined.
e.Graphics.DrawString("This is line " + i.ToString(),
font, Brushes.Black, x, y);
// Move down the equivalent spacing of one line.
y += lineHeight;
}
y += lineHeight;
// Draw an image.
e.Graphics.DrawImage(
Image.FromFile(
Path.Combine(Application.StartupPath,"test.jpg")
),
x, y);
}
}
}
}You need to print complex documents with multiple pages and possibly print several different documents at once.
Place the information you want to print into a custom class that derives from PrintDocument, and in the PrintPage event handler, set the PrintPageEventArgs.HasMorePages property to true as long as pages are remaining.
The PrintDocument.PrintPage event is triggered to let you to print only a single page. If you need to print more pages, you need to set the PrintPageEventArgs.HasMorePages property to true in the PrintPage event handler. As long as HasMorePages is set to true, the PrintDocument class will continue firing PrintPage events. However, it is up to you to track which page you are on, what data should be placed on each page, and what is the last page for which HasMorePage is not set to true. To facilitate this tracking, it is a good idea to create a custom class.
The following example shows a class called TextDocument. This class inherits from PrintDocument and adds three properties. Text stores an array of text lines, PageNumber reflects the last printed page, and Offset indicates the last line that was printed from the Text array.
public class TextDocument : PrintDocument {

    private string[] text;
    private int pageNumber;
    private int offset;

    public string[] Text {
        get {return text;}
        set {text = value;}
    }

    public int PageNumber {
        get {return pageNumber;}
        set {pageNumber = value;}
    }

    public int Offset {
        get {return offset;}
        set {offset = value;}
    }

    public TextDocument(string[] text) {
        this.Text = text;
    }
}
Depending on the type of material you are printing, you might want to modify this class. For example, you could store an array of image data, some content that should be used as a header or footer on each page, font information, or even the name of a file from which you want to read the information. Encapsulating the information in a single class makes it easier to print more than one document at the same time. This is especially important because the printing process runs in a new dedicated thread. As a consequence, the user is able to keep working in the application and therefore update your data while the pages are printing. So, this dedicated class should contain a copy of the data to print to avoid any concurrency problems.
The code that initiates printing is the same as in recipe 8-14, only now it creates a TextDocument instance instead of a PrintDocument instance. The PrintPage event handler keeps track of the current line and checks whether the page has space before attempting to print the next line. If a new page is needed, the HasMorePages property is set to true and the PrintPage event fires again for the next page. If not, the print operation is deemed complete. This simple code sample does not take into account whether a line fits into the width of the page; refer to recipe 8-16 for a solution to this problem.
The full form code is as follows:
using System;
using System.Drawing;
using System.Windows.Forms;
using System.Drawing.Printing;

namespace Apress.VisualCSharpRecipes.Chapter08
{
    public partial class Recipe08_15 : Form
    {
        public Recipe08_15()
        {
            InitializeComponent();
        }

        private void cmdPrint_Click(object sender, EventArgs e)
        {
            // Create a document with 100 lines.
            string[] printText = new string[101];
            for (int i = 0; i < 101; i++)
            {
                printText[i] = i.ToString();
                printText[i] +=
                    ": The quick brown fox jumps over the lazy dog.";
            }

            PrintDocument doc = new TextDocument(printText);
            doc.PrintPage += this.Doc_PrintPage;

            PrintDialog dlgSettings = new PrintDialog();
            dlgSettings.Document = doc;

            // If the user clicked OK, print the document.
            if (dlgSettings.ShowDialog() == DialogResult.OK)
            {
                doc.Print();
            }
        }
private void Doc_PrintPage(object sender, PrintPageEventArgs e)
{
// Retrieve the document that sent this event.
TextDocument doc = (TextDocument)sender;
// Define the font and determine the line height.
using (Font font = new Font("Arial", 10))
{
float lineHeight = font.GetHeight(e.Graphics);
// Create variables to hold position on page.
float x = e.MarginBounds.Left;
float y = e.MarginBounds.Top;
// Increment the page counter (to reflect the page that
// is about to be printed).
doc.PageNumber += 1;
// Print all the information that can fit on the page.
// This loop ends when the next line would go over the
// margin bounds, or there are no more lines to print.
while ((y + lineHeight) < e.MarginBounds.Bottom &&
doc.Offset <= doc.Text.GetUpperBound(0))
{
e.Graphics.DrawString(doc.Text[doc.Offset], font,
Brushes.Black, x, y);
// Move to the next line of data.
doc.Offset += 1;
// Move the equivalent of one line down the page.
y += lineHeight;
}
if (doc.Offset < doc.Text.GetUpperBound(0))
{
// There is still at least one more page.
// Signal this event to fire again.
e.HasMorePages = true;
}
else
{
// Printing is complete.
doc.Offset = 0;
}
}
}
}
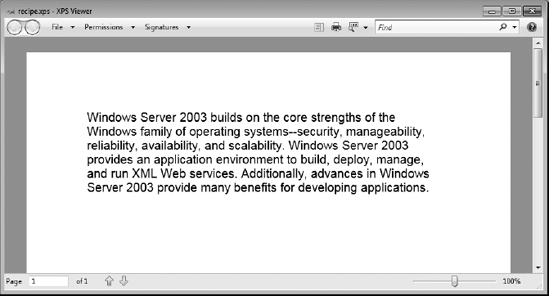
}Often, you will need to break a large block of text into separate lines that can be printed individually on a page. The .NET Framework can perform this task automatically, provided you use a version of the Graphics.DrawString method that accepts a bounding rectangle. You specify a rectangle that represents where you want the text to be displayed. The text is then wrapped automatically to fit within those confines.
The following code demonstrates this approach, using the bounding rectangle that represents the printable portion of the page. It prints a large block of text from a text box on the form.
using System;
using System.Drawing;
using System.Windows.Forms;
using System.Drawing.Printing;

namespace Apress.VisualCSharpRecipes.Chapter08
{
    public partial class Recipe08_16 : Form
    {
        public Recipe08_16()
        {
            InitializeComponent();
        }

        private void cmdPrint_Click(object sender, EventArgs e)
        {
            // Create the document and attach an event handler.
            string text = "Windows Server 2003 builds on the core strengths " +
              "of the Windows family of operating systems--security, " +
              "manageability, reliability, availability, and scalability. " +
              "Windows Server 2003 provides an application environment to " +
              "build, deploy, manage, and run XML Web services. " +
"Additionally, advances in Windows Server 2003 provide many " +
"benefits for developing applications.";
PrintDocument doc = new ParagraphDocument(text);
doc.PrintPage += this.Doc_PrintPage;
// Allow the user to choose a printer and specify other settings.
PrintDialog dlgSettings = new PrintDialog();
dlgSettings.Document = doc;
// If the user clicked OK, print the document.
if (dlgSettings.ShowDialog() == DialogResult.OK)
{
doc.Print();
}
}
private void Doc_PrintPage(object sender, PrintPageEventArgs e)
{
// Retrieve the document that sent this event.
ParagraphDocument doc = (ParagraphDocument)sender;
// Define the font and text.
using (Font font = new Font("Arial", 15))
{
e.Graphics.DrawString(doc.Text, font, Brushes.Black,
e.MarginBounds, StringFormat.GenericDefault);
}
}
}
public class ParagraphDocument : PrintDocument
{
private string text;
public string Text
{
get { return text; }
set { text = value; }
}
public ParagraphDocument(string text)
{
this.Text = text;
}
}
}Figure 8-9 shows the wrapped text.
Use PrintPreviewDialog or PrintPreviewControl (both of which are found in the System.Windows.Forms namespace).
.NET provides two elements of user interface that can take a PrintDocument instance, run your printing code, and use it to generate a graphical onscreen preview:
The
PrintPreviewDialog, which shows a preview in a stand-alone formThe
PrintPreviewControl, which shows a preview in a control that can be embedded in one of your own custom forms
To use a stand-alone print preview form, you simply create a PrintPreviewDialog object, assign its Document property, and call the Show method:
PrintPreviewDialog dlgPreview = new PrintPreviewDialog();
dlgPreview.Document = doc;
dlgPreview.Show();
The Print Preview window provides all the controls the user needs to move from page to page, zoom in, and so on. The window even provides a print button that allows the user to send the document directly to the printer. You can tailor the window to some extent by modifying the PrintPreviewDialog properties.
You can also add a PrintPreviewControl control to any of your forms to show a preview alongside other information. In this case, you do not need to call the Show method. As soon as you set the PrintPreviewControl.Document property, the preview is generated. To clear the preview, set the Document property to null, and to refresh the preview, simply reassign the Document property. PrintPreviewControl shows only the preview pages, not any additional controls. However, you can add your own controls for zooming, tiling multiple pages, and so on. You simply need to adjust the PrintPreviewControl properties accordingly.
The following example is the complete for code that incorporates a PrintPreviewControl and allows the user to select a zoom setting:
using System;
using System.Drawing;
using System.Windows.Forms;
using System.Drawing.Printing;

namespace Apress.VisualCSharpRecipes.Chapter08
{
    public partial class Recipe08_17 : Form
    {
        public Recipe08_17()
        {
            InitializeComponent();
        }

        private PrintDocument doc;
        // (PrintDocument.PrintPage event handler code omitted.
        // See code in recipe 8-15.)

        private void Recipe08_17_Load(object sender, EventArgs e)
        {
            // Set the allowed zoom settings.
            for (int i = 1; i <= 10; i++)
            {
                lstZoom.Items.Add((i * 10).ToString());
            }
// Create a document with 100 lines.
string[] printText = new string[100];
for (int i = 0; i < 100; i++)
{
printText[i] = i.ToString();
printText[i] += ": The quick brown fox jumps over the lazy dog.";
}
doc = new TextDocument(printText);
doc.PrintPage += this.Doc_PrintPage;
lstZoom.Text = "100";
printPreviewControl.Zoom = 1;
printPreviewControl.Document = doc;
printPreviewControl.Rows = 2;
}
private void cmdPrint_Click(object sender, EventArgs e)
{
// Set the zoom.
printPreviewControl.Zoom = Single.Parse(lstZoom.Text) / 100;
// Show the full two pages, one above the other.
printPreviewControl.Rows = 2;
// Rebind the PrintDocument to refresh the preview.
printPreviewControl.Document = doc;
}
}
// (TextDocument class code omitted. See recipe 8-15.)
}Use Windows Management Instrumentation (WMI). You can retrieve information from the print queue using a query with the Win32_PrintJob class, and you can use the Pause and Resume methods of the WMI Win32_PrintJob and Win32_Printer classes to manage the queue.
WMI allows you to retrieve a vast amount of system information using a query-like syntax. One of the tasks you can perform with WMI is to retrieve a list of outstanding print jobs, along with information about each one. You can also perform operations such as printing and resuming a job or all the jobs for a printer. To use WMI, you need to add a reference to the System.Management.dll assembly.
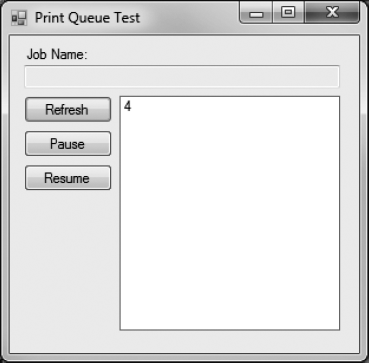
The following code shows a Windows application that interacts with the print queue. It performs a WMI query to get a list of all the outstanding jobs on the computer and displays the job ID for each one in a list box. When the user selects the item, a more complete WMI query is performed, and additional details about the print job are displayed in a text box. Finally, the user can click the Pause and Resume buttons after selecting a job to change its status.
Remember that Windows permissions might prevent you from pausing or removing a print job created by another user. In fact, permissions might even prevent you from retrieving status information and could cause a security exception to be thrown.
using System;
using System.Drawing;
using System.Windows.Forms;
using System.Management;
using System.Collections;
using System.Text;

namespace Apress.VisualCSharpRecipes.Chapter08
{
    public partial class Recipe08_18 : Form
    {
        public PrintQueueTest()
        {
            InitializeComponent();
        }

        private void cmdRefresh_Click(object sender, EventArgs e)
        {
            // Select all the outstanding print jobs.
            string query = "SELECT * FROM Win32_PrintJob";
            using (ManagementObjectSearcher jobQuery =
              new ManagementObjectSearcher(query))
            {
                using (ManagementObjectCollection jobs = jobQuery.Get())
                {
                    // Add the jobs in the queue to the list box.
                    lstJobs.Items.Clear();
                    txtJobInfo.Text = "";
foreach (ManagementObject job in jobs)
{
lstJobs.Items.Add(job["JobID"]);
}
}
}
}
private void Recipe08_18_Load(object sender, EventArgs e)
{
cmdRefresh_Click(null, null);
}
// This helper method performs a WMI query and returns the
// WMI job for the currently selected list box item.
private ManagementObject GetSelectedJob()
{
try
{
// Select the matching print job.
string query = "SELECT * FROM Win32_PrintJob " +
"WHERE JobID='" + lstJobs.Text + "'";
ManagementObject job = null;
using (ManagementObjectSearcher jobQuery =
new ManagementObjectSearcher(query))
{
ManagementObjectCollection jobs = jobQuery.Get();
IEnumerator enumerator = jobs.GetEnumerator();
enumerator.MoveNext();
job = (ManagementObject)enumerator.Current;
}
return job;
}
catch (InvalidOperationException)
{
// The Current property of the enumerator is invalid.
return null;
}
}
private void lstJobs_SelectedIndexChanged(object sender, EventArgs e)
{
ManagementObject job = GetSelectedJob();
if (job == null)
{
txtJobInfo.Text = "";
return;
}// Display job information.
StringBuilder jobInfo = new StringBuilder();
jobInfo.AppendFormat("Document: {0}", job["Document"].ToString());
jobInfo.Append(Environment.NewLine);
jobInfo.AppendFormat("DriverName: {0}", job["DriverName"].ToString());
jobInfo.Append(Environment.NewLine);
jobInfo.AppendFormat("Status: {0}", job["Status"].ToString());
jobInfo.Append(Environment.NewLine);
jobInfo.AppendFormat("Owner: {0}", job["Owner"].ToString());
jobInfo.Append(Environment.NewLine);
jobInfo.AppendFormat("PagesPrinted: {0}", job["PagesPrinted"].ToString());
jobInfo.Append(Environment.NewLine);
jobInfo.AppendFormat("TotalPages: {0}", job["TotalPages"].ToString());
if (job["JobStatus"] != null)
{
txtJobInfo.Text += Environment.NewLine;
txtJobInfo.Text += "JobStatus: " + job["JobStatus"].ToString();
}
if (job["StartTime"] != null)
{
jobInfo.Append(Environment.NewLine);
jobInfo.AppendFormat("StartTime: {0}", job["StartTime"].ToString());
}
txtJobInfo.Text = jobInfo.ToString();
}
private void cmdPause_Click(object sender, EventArgs e)
{
if (lstJobs.SelectedIndex == −1) return;
ManagementObject job = GetSelectedJob();
if (job == null) return;
// Attempt to pause the job.
int returnValue = Int32.Parse(
job.InvokeMethod("Pause", null).ToString());
// Display information about the return value.
if (returnValue == 0)
{
MessageBox.Show("Successfully paused job.");
}
else
{
MessageBox.Show("Unrecognized return value when pausing job.");
}
}private void cmdResume_Click(object sender, EventArgs e)
{
if (lstJobs.SelectedIndex == −1) return;
ManagementObject job = GetSelectedJob();
if (job == null) return;
if ((Int32.Parse(job["StatusMask"].ToString()) & 1) == 1)
{
// Attempt to resume the job.
int returnValue = Int32.Parse(
job.InvokeMethod("Resume", null).ToString());
// Display information about the return value.
if (returnValue == 0)
{
MessageBox.Show("Successfully resumed job.");
}
else if (returnValue == 5)
{
MessageBox.Show("Access denied.");
}
else
{
MessageBox.Show(
"Unrecognized return value when resuming job.");
}
}
}
}
}Figure 8-10 shows the window for this application.
Note
Other WMI methods you might use in a printing scenario include AddPrinterConnection, SetDefaultPrinter, CancelAllJobs, and PrintTestPage, all of which work with the Win32_Printer class. For more information about using WMI to retrieve information about Windows hardware, refer to the MSDN documentation.
Create an instance of System.Speech.Synthesis.SpeechSynthesizer, contained in the System.Speech assembly, and call the Speak instance method, passing in the string that you wish to be spoken.
The SpeechSynthesizer class provides managed access to the Windows Speech SDK. Creating an instance of SpeechSynthesizer allows you to have text spoken by passing a string to the Speak method. The Speak method is synchronous, meaning that your application will pause until the speech has completed—you can have text spoken aloud in the background by using the SpeakAsync method.
Windows provides support for having different voices read text. The voices available on your machine will depend on the version of Windows you have installed and which other applications are available—some Microsoft and third-party applications provide additional voices. You can get information about the voices available by calling the SpeechSynthesizer.GetInstalledVoices instance method, which returns an enumeration of System.Speech.Synthesis.InstalledVoice. You can select the voice to use for speech with the SpeechSyntheizer.SelectVoice method. Other useful members of the SpeechSynthesizer class are listed in Table 8-1.
Table 8.1. Useful Members of SpeechSynthesizer
Member | Description |
|---|---|
| Returns an enumeration of |
| Pauses the synthesizer |
| Resumes the synthesizer playback |
| Selects an installed synthesizer voice |
| Saves the synthesized speed to a sound file |
| Synchronously speaks a string |
| Asynchronously speaks a string |
| Returns the speed at which speech is performed |
| Returns the volume of the speech output |
The following example displays information about each speech synthesis voice installed on the local machine, and then enters a loop where lines of text read from the console are passed to the Speak method of a SpeechSynthesizer instance.
Note
You will need to add the System.Speech assembly as a reference to your Visual Studio project in order to use the System.Speech.Synthesis namespace.
using System;
using System.Collections.Generic;
using System.Linq;
using System.Text;
using System.Speech.Synthesis;

namespace Apress.VisualCSharpRecipes.Chapter08
{
    class Recipe08_19
    {
        static void Main(string[] args)
        {
            // Create a new synthesizer.
            SpeechSynthesizer mySynth = new SpeechSynthesizer();

            Console.WriteLine("--- Start of voices list ---");
            foreach (InstalledVoice voice in mySynth.GetInstalledVoices())
            {
                Console.WriteLine("Voice: {0}", voice.VoiceInfo.Name);
                Console.WriteLine("Gender: {0}", voice.VoiceInfo.Gender);
                Console.WriteLine("Age: {0}", voice.VoiceInfo.Age);
                Console.WriteLine("Culture: {0}", voice.VoiceInfo.Culture);
                Console.WriteLine("Description: {0}", voice.VoiceInfo.Description);
            }
            Console.WriteLine("--- End of voices list ---");

            while (true)
            {
                Console.WriteLine("Enter string to speak");
                mySynth.Speak(Console.ReadLine());
                Console.WriteLine("Completed");
            }
        }
    }
}Use COM Interop to access the features of Microsoft Office Document Imaging.
Note
This recipe requires Microsoft Office 2007.
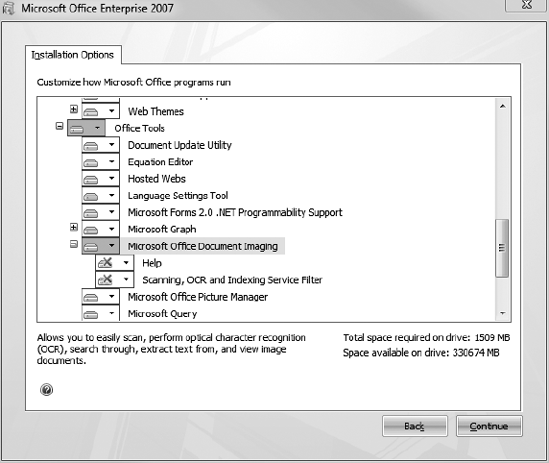
The first step is to install the Microsoft Office Document Imaging (MODI), which is not installed by default by the Microsoft Office installation. Run the Office installer, and select Microsoft Office Document Imaging from the Office Tools section, as shown in Figure 8-11.
Once the Office feature has been installed, you can add a reference to your project for the Microsoft Office Document Imaging 12.0 Type Library entry, available under the COM tab and import the MODI namespace into your class file. Because we are accessing MODI through COM, the API calls we have to make are a little awkward. The sequence for performing OCR follows:
Create a new instance of
Documentby callingnew Document().Load the image that you wish to process by calling the
Createmethod on theDocumentinstance from the previous step, passing in astringthat contains the name of the image file. OCR can be performed on PNG, JPG, GIF, and TIFF files.Call the OCR method on the
Documentinstance.Obtain the first element of the
Imagesarray property from theDocumentinstance, and from thatImageinstance, get theLayoutby calling theImage.Layoutproperty.
The Layout class is what we are trying to obtain—it represents the scanned content, and its members allow us to get information about the OCR results and access the words that have been scanned. The most important member of Layout is Words, which is a collection of Word instances, each of which represents a word scanned from the source image and that you can enumerate through to create the processed result. The Word class has two useful members—the most important is Text, which returns the string value of the scanned word. The second useful member is RecognitionConfidence, which returns a value indicating how confident the OCR process was in recognizing the word correctly, on a scale of 0 to 999.
The following example loads an image called ocr.GIF (which we have included in the sample code for this chapter) and performs OCR on it. Each word found is printed out, along with the
RecognitionConfidence value.
using System;
using System.Collections.Generic;
using System.Linq;
using System.Text;
using MODI;

namespace Apress.VisualCSharpRecipes.Chapter08
{
    class Recipe08_20
    {
        static void Main(string[] args)
        {
            // Create the new document instance.
            Document myOCRDoc = new Document();
            // Load the sample file.
            myOCRDoc.Create(@"....ocr.GIF");

            // Perform the OCR.
            myOCRDoc.OCR();
// Get the processed document.
Image image = (Image)myOCRDoc.Images[0];
Layout layout = image.Layout;
// Print out each word that has been found.
foreach (Word word in layout.Words)
{
Console.WriteLine("Word: {0} Confidence: {1}",
word.Text, word.RecognitionConfidence);
}
}
}
}