
Traditional COM-based extensions are not the only ones available for IE—the browser has exposed a simple metadata-based extensibility model since IE 5. These lightweight extensions link the IE frame to scripts and commands rather than oft-complicated COM communication models and command structure.
This chapter discusses the many lightweight IE frame extensions available to developers. Developers can create toolbar buttons, frame menu items, and context menus in a matter of minutes and using simple programming techniques. I begin this chapter by outlining the most common lightweight extensions available in IE and how those tie into the browser and pages. Following this introduction, I show you detailed examples of each major extension and demonstrate ways you can incorporate them into your desktop and web applications. For the brave and the interested, I bridge these extensions with their COM counterparts, showing how you can maximize the impact of your extensions by tying them into new or preexisting COM objects.
IE provides a number of ways to extend the browser frame and in-page context menus. These extensions are referred to as "lightweight" because of the way they are constructed; the simplest of these can be added to IE through a handful of registry values.
The first types of lightweight IE extensions are frame extensions. Frame extensions are those add-ons that extend the functionality of the browser frame itself. They can be found in the main IE toolbar, also referred to as a band object (band objects are discussed in more detail in the next chapter). Figure 10-1 shows the upper portion of the IE browser frame; the icons and drop-downs to the right of the browser tab set are examples of such extensions.

The simple buttons in the main IE toolbar are built-in or custom toolbar button extensions. These add-ons extend the frame by linking IE to external commands, scripts, COM objects, or, as discussed in the following chapter, Explorer bars. Figure 10-2 shows some toolbar buttons in more detail.
Drop-down menus can be found alongside buttons in IE's main toolbar. Two of these drop-down menus—the Tools and Help menus—can be extended through menu item extensions (Figure 10-3).

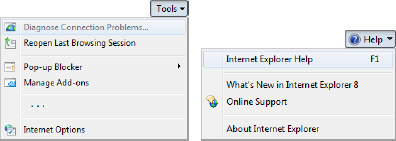
As with toolbar buttons, menu item extensions under either drop-down provide a way for users to launch external scripts, commands, or COM objects. Figure 10-4 shows the expanded menus that these extensions can be accessed from.
The next types of lightweight extensions are in-page context menu add-ons. Unlike frame extensions, in-page menu items are displayed and executed within the context of the active web page, even if this context is not obvious to the user.
Context menu items are shown in the in-page context menu, much like the Accelerators discussed earlier in this text. Unlike Accelerators, however, they are defined in the system registry and have the ability to launch script and executable files. Figure 10-5 shows some context menu extensions that can commonly be found on users' IE installations.

The addition of context menu extensions is distinct from replacement of the entire context menu using JavaScript. IE, along with all modern browsers, allows web site developers to prevent display of the default context menu via JavaScript. Context menu extensions also differ from Accelerators, as these add-ons are permitted more access to the local system and are not constructed using XML. Using event handlers, developers can completely replace the browser's context menu with a custom one designed for a specific web site or application. Of course, these overrides are only shown on sites that specifically include them; the default context menu (and its context menu extensions) is shown on all other pages.
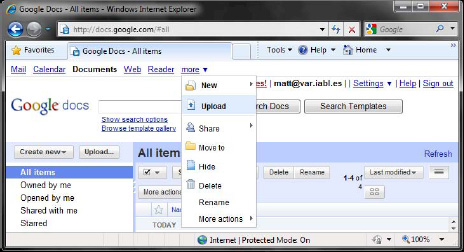
Figure 10-6 shows a great custom context menu example written in JavaScript; Google Docs uses the custom menu to provide easy access to common commands within its web application—all without installing a single extension.
Toolbar buttons are icons that can be added to the Command Bar toolbar (band object) of IE. These extensions allow users quick access to useful tasks and applications directly from the browser frame. The following sections describe how these extensions can be constructed, installed, and used.
Toolbar buttons are defined and loaded into IE through a set of basic registry values. These values can be stored in either the HKEY_LOCAL_MACHINE or the HKEY_CURRENT_USER hive. All extensions fall under the key SoftwareMicrosoftInternet ExplorerExtensions; on 64-bit systems, 32-bit extensions should be placed under the emulation key SoftwareWow6432NodeMicrosoftInternet ExplorerExtensions. Listing 10-1 shows an example of a basic toolbar button defined through the registry.
Example 10.1. Example of a Toolbar Button Added to the IE Command Bar
HKEY_CURRENT_USER
   Software
      Microsoft
         Internet Explorer
            Extensions
               {D862829C-9A39-4029-A4CC-2A78C9C1F2F3}
                  CLSID             (REG_SZ)  = "{1FBA04EE-3024-11D2-8F1F-0000F87ABD16}"
                  ButtonText        (REG_SZ)  = "My button"
                  Icon              (REG_SZ)  = "C:\MyIcon.ico"
                  HotIcon           (REG_SZ)  = "C:\MyHotIcon.ico"
                  Default Visible   (REG_SZ)  = "yes"
                  ...
Individual extensions are distinguished by a key underneath the parent Extensions key. This key's name is a GUID. Each registry entry underneath this key represents some data defining the toolbar button. Table 10-1 defines each value in detail.
Table 10.1. Common Toolbar Button Registry Values
Name | Value Type | Description |
|---|---|---|
|
| Class ID of the main IE Command Bar (toolbar), |
|
| Text displayed next to the toolbar icon |
|
| An icon file containing a grayscale icon (containing 16×16 and 24x24 formats) |
|
| An icon file containing a color icon (containing 16×16 and 24×24 formats) |
|
| Allows a button to appear in the toolbar by default |
The CLSID value represents the class ID of IE's Command Bar. ButtonText contains text that is displayed next to a toolbar button when text is shown. The Icon string points to an idle icon, typically grayscale, and the HotIcon string points to a color icon used by the button on hover. The icons specified should include both 16×16 and 24×24 icons to avoid scaling. Finally, the Default Visible setting tells IE whether to show the icon by default with a value of ("yes") or to hide it ("no").
Each flavor of toolbar button uses this base set of values to define how it is displayed in the browser frame.
Toolbar buttons can launch a web page or script when clicked. Toolbars can initiate script to modify the current web page or run system commands.
Developers looking to create an extension that launches script can do so via the Script registry value. The data for this value is the path to a markup or script file; it is located in the same key as the common toolbar button registry values (Table 10-2).
Table 10.2. Registry Values for Script-Based Toolbar Buttons
Name | Value Type | Description |
|---|---|---|
|
| Path to a script file |
Using script-based toolbar buttons is a simple process. Listing 10-2 shows a registry script that installs such a button. In this example, the toolbar button launches a script called "Run.html" that launches MSDN in a new browser window when clicked. The toolbar displays the MSDN favicon and displays the text "Launch MSDN" when the Command Bar's "Show all text labels" option is enabled.
Example 10.2. Sample Installation File for a Script-Based Toolbar Button
Windows Registry Editor Version 5.00

[HKEY_LOCAL_MACHINESOFTWAREMicrosoftInternet ExplorerExtensions
   {E210FAE5-3322-4DF7-94E2-B134CC624B35}]
"CLSID"="{1FBA04EE-3024-11D2-8F1F-0000F87ABD16}"
"ButtonText"="Launch MSDN"
"Icon"="C:\ProIeDev\10\ToolbarButton\Script\MSDN.ico"
"HotIcon"="C:\ProIeDev\10\ToolbarButton\Script\MSDN.ico"
"Default Visible"="Yes"
"Script"="C:\ProIeDev\10\ToolbarButton\Script\Run.html"

[HKEY_LOCAL_MACHINESOFTWAREWow6432NodeMicrosoftInternet ExplorerExtensions
   {1C1E2247-34CA-44B8-BE91-4E0798CAC048}]
"CLSID"="{1FBA04EE-3024-11D2-8F1F-0000F87ABD16}"
"ButtonText"="Launch MSDN"
"Icon"="C:\ProIeDev\10\ToolbarButton\Script\MSDN.ico"
"HotIcon"="C:\ProIeDev\10\ToolbarButton\Script\MSDN.ico"
"Default Visible"="Yes"
"Script"="C:\ProIeDev\10\ToolbarButton\Script\Run.html"
This registry script takes both 32-bit and 64-bit IE executables into account. Upon import, it writes a toolbar button to both the standard IE extensions key and the Wow6432Node registry emulation key.
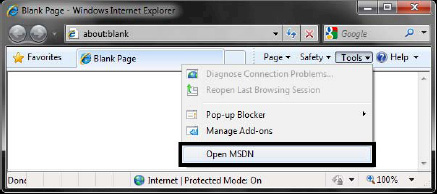
Figure 10-7 shows the toolbar button in the IE Command Bar after the installation script is run.

The "Run.html" script executed by this toolbar button uses JavaScript to launch MSDN (http://msdn.microsoft.com) in a new IE window. Listing 10-3 demonstrates this page.
Example 10.3. Source Code for Web Page Called by This Script-Based Toolbar Button
<html>
   <body>
      <script type="text/javascript">

         //  Create a new ActiveX shell object
         var shell = new ActiveXObject("WScript.Shell");

         //  Open up a new instance of IE pointing
         //  to a URL
         shell.run("iexplore.exe " +
                   "http://msdn.microsoft.com"
                   );

      </script>
   </body>
</html>
When this page is loaded by IE, the JScript engine executes the JavaScript in the body of the page. A new ActiveXObject is created from the Windows Scripting Host shell (WScript.Shell); this allows the script to access system resources and executables. Next, the shell is opened and passed the command line of the IE executable concatenated with an argument—the URL of MSDN's web page.
Developers should take away a key concept from this example: script instantiated from toolbar buttons runs with enhanced permissions. Normal web pages cannot instantiate the WScript.Shell object or other higher-privilege objects.
Figure 10-8 shows the result of a click event on this toolbar button. A new IE window is launched. This window accesses the URL argument passed to the object, in this case the MSDN web site.

Removing the toolbar button consists of deleting all registry keys and values associated with it. Listing 10-4 shows a registry script that removes both keys created during the installation of the example button. Two commands are run, each deleting the parent key containing values defining the buttons.
Example 10.4. Uninstallation Script for the Sample Toolbar Button
Windows Registry Editor Version 5.00

[-HKEY_LOCAL_MACHINESOFTWAREMicrosoftInternet ExplorerExtensions
   {E210FAE5-3322-4DF7-94E2-B134CC624B35}]
[-HKEY_LOCAL_MACHINESOFTWAREWow6432NodeMicrosoftInternet ExplorerExtensions
   {1C1E2247-34CA-44B8-BE91-4E0798CAC048}]
Removal of a button takes effect once all instances of IE are closed. A batch file, script, or binary may be used to write these values to (or remove these values from) the registry.
Toolbar buttons can directly execute a command or batch file instead of simple script. Executable toolbar buttons define a command to run through the Exec registry value. The data of this value is the path to an executable or batch file that IE will launch when a button using this method is clicked (Table 10-3).
Table 10.3. Registry Values for Executable-Based Toolbar Buttons
Name | Value Type | Description |
|---|---|---|
|
| Path to an executable or batch file |
Executable-based buttons can be installed through simple scripts, just as script-launching buttons. Listing 10-5 shows an example of an installation script for a button that launches an executable. This sample creates a new button that opens up the Windows Notepad text editor when clicked.
Example 10.5. Installation Script for a Toolbar Button That Executes a Command
Windows Registry Editor Version 5.00

[HKEY_LOCAL_MACHINESOFTWAREMicrosoftInternet ExplorerExtensions
   {40AD9F9B-3CD9-4F7E-88F2-C70FD438B8F1}]
"CLSID"="{1FBA04EE-3024-11D2-8F1F-0000F87ABD16}"
"ButtonText"="Launch Notepad"
"Icon"="C:\ProIeDev\10\ToolbarButton\Exec\Notepad.ico"
"HotIcon"="C:\ProIeDev\10\ToolbarButton\Exec\Notepad.ico"
"Default Visible"="yes"
"Exec"=""C:\windows\notepad.exe""

[HKEY_LOCAL_MACHINESOFTWAREWow6432NodeMicrosoftInternet ExplorerExtensions
   {B9759B89-2906-47DA-AE9B-F1CA25B8729D}]
"CLSID"="{1FBA04EE-3024-11D2-8F1F-0000F87ABD16}"
"ButtonText"="Launch Notepad"
"Icon"="C:\ProIeDev\10\ToolbarButton\Exec\Notepad.ico"
"HotIcon"="C:\ProIeDev\10\ToolbarButton\Exec\Notepad.ico"
"Default Visible"="yes"
"Exec"=""C:\windows\notepad.exe""
As in the previous example, this installation script creates icons for both 64-bit and 32-bit IE installations. The Icon and HotIcon values both refer to the application icon from Notepad.exe. The button text displayed next to this button is set to read "Launch Notepad," and it is set to display once installed. The last value of this script is Exec, whose data points to the Notepad.exe application file located in the Windows directory.
Figure 10-9 shows this button in the IE frame once the installation script is run. On the left side is the button in icon-only mode and to the right is the button icon displayed with its button text.

IE attempts to run the contents of the Exec value when the button is clicked. In this case, IE tries to launch Notepad.exe. In IE 8 and above, executables that have not previously been launched from the browser frame show a Protected Mode elevation prompt. Users must authorize the application for use in this context via the dialog in Figure 10-10.
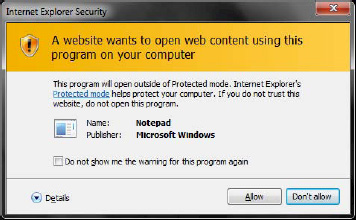
Figure 10.10. Protected Mode approval dialog, launched when the extension tries to launch an unapproved executable
Figure 10-11 shows Notepad launched from IE when the application is permitted to run. If the action is disallowed through the previous dialog, this application will not launch. Developers should note that the application will run if the user accepts it via the Protected Mode dialog. In contract, developers attempting to launch executables via script may find that those executables will not run because the elevation policy for the script may not launch the Protected Mode dialog.

The uninstallation process can be performed with a simple script that removes keys specific to this object. Listing 10-6 demonstrates a simple registry script that uninstalls this extension by removing its keys.
Example 10.6. Uninstallation Script for the Example Toolbar Button
Windows Registry Editor Version 5.00

[-HKEY_LOCAL_MACHINESOFTWAREMicrosoftInternet ExplorerExtensions
   {40AD9F9B-3CD9-4F7E-88F2-C70FD438B8F1}]
[-HKEY_LOCAL_MACHINESOFTWAREWow6432NodeMicrosoftInternet ExplorerExtensions
{B9759B89-2906-47DA-AE9B-F1CA25B8729D}]Toolbar buttons may invoke COM objects when clicked. This allows developers to incorporate existing functionality of COM applications into this simple IE extension.
Toolbar buttons using COM object invocation define the ClsidExtension registry value in addition to the common toolbar button values. The data of this value is a string containing the Class ID of the COM object to invoke (Table 10-4).
Table 10.4. Registry Values for Toolbar Buttons That Invoke COM Objects
Name | Value Type | Description |
|---|---|---|
|
| Class ID of the COM object to invoke |
When a toolbar button using COM object invocation is clicked, IE instantiates the object specified in this value and signals a click event through the Exec method of the IOleCommandTarget interface.
The first step in building a COM-object-invoking toolbar button is ensuring that an invokable object is available for use. Such an object can easily be constructed using the .NET Framework and its COM interop functionality.
Listing 10-7 shows the basic framework for a new COM component that implements the IOleCommandTarget interface and exposes itself through a new GUID.
Example 10.7. Basic Class Structure for the Toolbar Button's Target COM Object
namespace ProIeDev.ToolbarButtonComObject {

   [ComVisible(true), Guid(Plugin.Guid)]
   public class Plugin : IOleCommandTarget {
      ...
   }
}
The object, called Plugin, defines itself to be visible to COM and defines its GUID in its class attributes. It implements the IOleCommandTarget interface in the class definition. This interface is defined in another class included with the companion project accompanying this book.
A number of constants related to the extension and the COM object are defined in the Plugin class, mainly for convenience. Listing 10-8 defines these constants.
Example 10.8. Constants Definining Properties of the COM Object
#region Constants

/// <summary>
/// Guid of this assembly
/// </summary>
public const string Guid = @"193BD928-F965-47DD-B9FF-83173B9E20F5";

/// <summary>
/// ProgId of this plug-in
/// </summary>
public const string ProgId = "ProIeDev.ToolbarButtonComObject.Button";

/// <summary>
/// Name of the currently executing assembly
/// </summary>
public static string AssemblyName = Assembly.GetExecutingAssembly().GetName().Name;

/// <summary>
/// Guid of the IE plug-in
/// </summary>
public const string PluginGuid = "{9651DC31-B70E-4B80-BF02-BA3FF9A50E2B}";

/// <summary>
/// Registry key where the plug-in will be installed
/// </summary>
public const string PluginKey = @"SOFTWAREMicrosoftInternet ExplorerExtensions";

/// <summary>
/// WoW emulation registry key for the plug-in
/// </summary>
public const string PluginKeyWow = @"SOFTWAREWow6432NodeMicrosoftInternet ExplorerExtensions"; /// <summary> /// Hive to install the plug-in into /// </summary> public static readonly RegistryKey PluginHive = Registry.LocalMachine; #endregion Constants
This COM object also installs a toolbar button during its registration and unregistration functions. Data used for this process is stored in a settings property, as shown in Listing 10-9.
Example 10.9. Settings for the New IE Toolbar Button
#region Properties

/// <summary>
///
/// </summary>
public static Settings PluginSettings {
   get { return new Settings() {

      //  Text shown alongside the toolbar button
      { "ButtonText", "ToolbarButtonComObject Example" },

      //  Icon shown for the button's "active" state
      { "HotIcon", Utils.AssemblyDirectory + @"ResourcesIcon.ico" },

      //  Default icon for the button
      { "Icon", Utils.AssemblyDirectory + @"ResourcesIcon.ico" },

      //  Whether or not the button is initially visible
      { "Default Visible", "Yes" },

      //  CLSID of the IE toolbar band object
      { "CLSID", "{1FBA04EE-3024-11D2-8F1F-0000F87ABD16}" },

      //  Guid of the COM component to run when the button
      //  is clicked (this library)
      { "ClsidExtension", "{" + Guid + "}" }

   }; }
}

#endregion Properties
The properties defined in Listing 10-9 are written and removed from the system registry via the COM registration and unregistration methods, respectively. The .NET assembly registration utility calls these functions after it either registers or unregisters this COM object from both the system class directory and the Global Assembly Cache (GAC). IE will only load .NET COM objects whose assemblies are placed in the GAC.
Listing 10-10 shows the registration (RegisterServer(...)) and unregistration (UnregisterServer()) methods for the Plugin class.
Example 10.10. COM Registration and Unregistration Methods for the Target Object
#region COM Registration Methods

/// <summary>
/// Performs COM and GAC registration services
/// </summary>
/// <param name="type"></param>
[ComRegisterFunction]
public static void RegisterServer(Type type)
{

   //  Create a new registry tools object
   RegistryTools registry = new RegistryTools() {
      Hive = PluginHive
      };

   //  This is a 32-bit plug-in, so determine if the target
   //  key needs to access a WoW emulation key
   string key =
      String.Format(
         @"{0}{1}",
         ((Platform.GetPlatform() == PlatformType.X64) ?
            PluginKeyWow : PluginKey),
         PluginGuid
         );

   //  Loop through each of the plug-in settings and add
   //  them to the registry
   foreach (var setting in PluginSettings) {
      registry.WriteValue(
         key,
         setting.Key,
         setting.Value,
         RegistryValueKind.String
         );

   }

}

/// <summary>
/// Performs COM and GAC unregistration services
/// </summary>
[ComUnregisterFunction]
public static void UnregisterServer() {

   //  Create a new registry tools object
   RegistryTools registry = new RegistryTools() {
      Hive = PluginHive
      };

   //  Ensure that the 32-bit key is created since a user
// may be running a 64-bit .NET Framework as well
string key =
String.Format(
@"{0}{1}",
((Platform.GetPlatform() == PlatformType.X64) ?
PluginKeyWow : PluginKey),
PluginGuid
);
// Loop through each of the plug-in settings and
// delete them from the registry
foreach (var setting in PluginSettings)
registry.DeleteValue(
key,
setting.Key
);
// Delete the plug-in key altogether
registry.DeleteKey(PluginKey);
}
#endregion COM Registration MethodsEvery key/value pair defined in this class's Settings property is added to or deleted from the registry in these methods. IE will either add or remove the toolbar button when these values are added or removed; these methods serve the same purpose as the installation and uninstallation registry scripts used in the previous toolbar button implementation examples.
The Plugin class definition implements IOleCommandTarget, so it must implement all methods defined by this interface. IOleCommandTarget defines two methods: QueryStatus and Exec. Put simply, QueryStatus is used to emit the status of commands by an object. Exec is used to command an object to do something. IE uses the Exec command to tell a COM object that a toolbar button has been clicked. As a result, the Plugin class will perform an action when Exec is called.
Listing 10-11 shows the Plugin class's implementation of the IOleCommandTarget methods. It implements both QueryStatus and Exec, as required by the interface.
Example 10.11. Implementation of the IOleCommandTarget Interface
#region IOleCommandTarget Interface Methods

/// <summary>
/// Queries the object for the status of one or more
/// commands generated by UI events.
/// </summary>
/// ...
public int QueryStatus(
   ref Guid pguidCmdGroup,
   uint cCmds,
   OLECMD[] prgCmds,
   IntPtr pCmdText) {

   //  Acknowledge query
   return 0;  // S_OK
}
/// <summary>
/// Executes the specified command or displays help for the command
/// </summary>
/// ...
public int Exec(
ref Guid pguidCmdGroup,
uint nCmdID,
uint nCmdexecopt,
IntPtr pvaIn,
IntPtr pvaOut) {
// Call the plug-in click event helper
OnToolbarButtonClick();
// Acknowledge command
return 0; // S_OK
}
#endregion IOleCommandTarget Interface MethodsThe Exec method, however, is used to trigger an event in this case. When Exec is called by the host application (IE), the Plugin class calls the OnToolbarButtonClick() function to react to a button click. In both cases, a return value of (−1) is handed back to acknowledge the function call.
The Plugin class defines the OnToolbarButtonClick() method to perform an action when the toolbar button is clicked and the Exec method is invoked by IE. Listing 10-12 shows the source of this method.
Example 10.12. Helper Method for Launching a Dialog
#region Helper Methods

[STAThread]
public void OnToolbarButtonClick() {

   //  Create a new instance of the Display form and
   //  show it as a dialog
   Form display = new Display();
   DialogResult result = display.ShowDialog();

   //  Dispose of the form when finished
   display.Dispose();

}

#endregion Helper Methods
In this example, an instance of a form named Display is shown as a dialog. When the form is closed, its class instance is disposed of.
The last step in adding this plug-in to IE is registering the COM component that was just created. The registration process will also write the toolbar button settings to the registry, adding the plug-in to IE as well as the system COM class directory.
Listing 10-13 describes a separate utility application that is used to both register and unregister the new plug-in from a command line. This utility must be run with administrative privileges on Windows Vista and higher because it modifies the .NET GAC and Local Machine hive of the registry.
Example 10.13. Utility Application for Registering and Unregistering the New COM Object and Toolbar Button
/// <summary>
/// This program registers a .NET-based COM object
/// </summary>
class Program {

   /// <summary>
   /// Main entry point for this application
   /// </summary>
   /// <param name="args">Command line args</param>
   static void Main(string[] args) {

      //  If no argument was passed or too many were passed,
      //  exit the application
      if (args.Length != 1) return;

      //  Switch on the argument passed into the app
      switch (args[0].Trim().ToLower()) {

         //  Installation argument
         case "-i": {

            //  Attempt to register the assembly
            Assembly assembly = Assembly.LoadFile(
               String.Format(
                  @"{0}{1}.dll",
                  ProIeDev.ToolbarButtonComObject.Classes.Utils.AssemblyDirectory,
                  ProIeDev.ToolbarButtonComObject.Plugin.AssemblyName
                  )
               );
            RegistrationServices regasm = new RegistrationServices();
            regasm.RegisterAssembly(assembly, AssemblyRegistrationFlags.SetCodeBase);

            //  Exit the application
            return;

         }

         //  Uninstallation argument
         case "-u": {

            //  Attempt to unregister the assembly
            Assembly assembly = Assembly.LoadFile(
               String.Format(
                  @"{0}{1}.dll",
                  ProIeDev.ToolbarButtonComObject.Classes.Utils.AssemblyDirectory,
                  ProIeDev.ToolbarButtonComObject.Plugin.AssemblyName
)
);
RegistrationServices regasm = new RegistrationServices();
regasm.UnregisterAssembly(assembly);
// Exit the application
return;
}
}
}
}The utility takes one command argument that must be present. The value of this argument may either be -i (to install the plug-in) or -u (to remove it from the system).
Demonstration of this example begins by running the installer just described. The installer must be run with administrative privileges. Figure 10-12 shows a command prompt running the registration utility; it is passed the -i argument to signal installation.

The installation utility both registers the COM assembly and adds toolbar metadata to the system registry. Figure 10-13 shows the toolbar button after installation.

Figure 10-14 demonstrates the action of the new toolbar button. When clicked, IE invokes the new COM object. This object creates a new instance of a form and displays it as a dialog window atop the IE browser window.

Invoking the uninstallation switch runs the COM unregistration function of the Plugin library, removing the COM object from the registry and the GAC, and deleting the toolbar button registry values from the IE extensions registry key (Figure 10-15).

The Tools and Help menus provide a common location for extensions that offer either extended functionality or extended help information. The following sections describe these extensions in detail.
Menu items are defined and loaded into IE through a set of basic registry values. These values can be stored in either the HKEY_LOCAL_MACHINE or the HKEY_CURRENT_USER hive. All extensions fall under the key SoftwareMicrosoftInternet ExplorerExtensions; on 64-bit systems, 32-bit extensions should be placed under the emulation key SoftwareWow6432NodeMicrosoftInternet ExplorerExtensions. Listing 10-14 shows an example of a basic Tools menu item defined through the registry.
Example 10.14. Example of a Toolbar Button Added to the IE Command Bar
HKEY_CURRENT_USER
   Software
      Microsoft
         Internet Explorer
            {FF79E0FB-605D-41C4-B877-8559814F9B16}
               CLSID             (REG_SZ)  = "{1FBA04EE-3024-11D2-8F1F-0000F87ABD16}"
               MenuText          (REG_SZ)  = "My Tools Menu Item"
               MenuCustomize     (REG_SZ)  = "tools"
               MenuStatusBar     (REG_SZ)  = "Performs an action for my menu item"
               ...
Table 10-5 reviews each of the common registry values and their purpose.
Table 10.5. Common Registry Values for Tools and Help Menu Extensions
Name | Value Type | Description |
|---|---|---|
|
| CLSID of the main IE band object |
|
| Text of the menu item |
|
| Location of the menu item (in the Tools or Help menu) |
|
| Text shown on the status bar when the menu item is hovered |
The CLSID value is the class ID of the main IE toolbar. MenuText is the text associated with the menu item. MenuStatusBar is the text that is shown on the status bar when a menu item is hovered over. Finally, MenuCustomize is a string indicating whether the menu item should show up in the Tools menu ("tools") or the Help menu ("help").
Menu items can launch a web page or script when clicked. Developers looking to create an extension that launches script can do so via the Script registry value. The data for this value is the path to a markup or script file; it is located in the same key as the common menu item button registry values (Table 10-6).
Table 10.6. Registry Values for Script-Based Menu Item Extensions
Name | Value Type | Description |
|---|---|---|
|
| Path to a script file |
A menu item can be created using a simple registry script (as in Listing 10-15). In this example, a new menu item is created for both 64-bit (if present) and 32-bit IE. The new Tools menu item opens up MSDN in a new IE window, much like the previous example demonstrating script-based toolbar buttons.
Example 10.15. Installation Script for a Script-Based Menu Item
Windows Registry Editor Version 5.00

[HKEY_LOCAL_MACHINESOFTWAREMicrosoftInternet ExplorerExtensions{8B256D2C-9C36-43FD-ABE1-
D2703439D5BD}]
"CLSID"="{1FBA04EE-3024-11D2-8F1F-0000F87ABD16}"
"Script"="C:\ProIeDev\10\MenuItem\ToolsMenuItem\Script\Run.html"
"MenuText"="Open MSDN"
"MenuCustomize"="tools"
"MenuStatusBar"="Opens the Microsoft Developer Network web page"

[HKEY_LOCAL_MACHINESOFTWAREWow6432NodeMicrosoftInternet ExplorerExtensions{7B87C8DF-
3A69-4303-8C30-8296775D4302}]
"CLSID"="{1FBA04EE-3024-11D2-8F1F-0000F87ABD16}"
"Script"="C:\ProIeDev\10\MenuItem\ToolsMenuItem\Script\Run.html"
"MenuText"="Open MSDN"
"MenuCustomize"="tools"
"MenuStatusBar"="Opens the Microsoft Developer Network web page"
A new menu item is added to the IE Tools menu when this script is run. Figure 10-16 shows a new menu item entitled "Open MSDN" added to this menu.
When this button is clicked, a new instance of IE is created. This instance navigates to MSDN when loaded (Listing 10-16).
Example 10.16. Script Used to Launch MSDN from a Tools Menu Item
<html>
   <body>
      <script type="text/javascript">

         //  Create a new ActiveX shell object
         var shell = new ActiveXObject("WScript.Shell");

         //  Open up a new instance of IE pointing
         //  to a URL
         shell.run("iexplore.exe " +
                   "http://msdn.microsoft.com"
);
</script>
</body>
</html>Figure 10-17 shows a new IE window opened when this toolbar button is clicked. On opening, this window navigates to MSDN.

Removal of the menu item consists of deleting all registry keys and values associated with it. Listing 10-17 shows a registry script that removes both keys created during the installation of the example button. Two commands are run, each deleting the parent key containing values defining the item in question.
Example 10.17. Uninstallation Script for the New Tools Menu Item
Windows Registry Editor Version 5.00

[-HKEY_LOCAL_MACHINESOFTWAREMicrosoftInternet ExplorerExtensions
   {8B256D2C-9C36-43FD-ABE1-D2703439D5BD}]
[-HKEY_LOCAL_MACHINESOFTWAREWow6432NodeMicrosoftInternet ExplorerExtensions
   {7B87C8DF-3A69-4303-8C30-8296775D4302}]
Removal of a button takes effect once all instances of IE are closed. As with the installation file, a batch file, script, or binary may be used to write these values to the registry.
Menu items can execute a command or batch file instead of simple script. Executable toolbar buttons define a command to run through the Exec registry value. The data of this value is the path to an executable or batch file that IE will launch when a button using this method is clicked (Table 10-7).
Table 10.7. Registry Values for Executable-Based Menu Items
Name | Value Type | Description |
|---|---|---|
|
| Path to an executable or batch file |
New menu items that call executables or commands can be added through simple script. Listing 10-18 shows a registry script that adds a new Help menu item to IE. This extension opens up the Windows Help application.
Example 10.18. Registry Entries for a Help Menu Item That Launches an Executable
Windows Registry Editor Version 5.00

[HKEY_LOCAL_MACHINESOFTWAREMicrosoftInternet ExplorerExtensions{46FB380B-5E11-48F1-A9E8-
8F689F3E1C60}]
"CLSID"="{1FBA04EE-3024-11D2-8F1F-0000F87ABD16}"
"Exec"=""C:\Windows\winhlp32.exe""
"MenuText"="Open Windows Help"
"MenuCustomize"="Help"
"MenuStatusBar"="Opens the Windows help application"

[HKEY_LOCAL_MACHINESOFTWAREWow6432NodeMicrosoftInternet ExplorerExtensions{920C4ABC-
C0E4-4E00-B8FF-A068E1C83D82}]
"CLSID"="{1FBA04EE-3024-11D2-8F1F-0000F87ABD16}"
"Exec"=""C:\Windows\winhlp32.exe""
"MenuText"="Open Windows Help"
"MenuCustomize"="Help"
The button shown in Figure 10-18 is added to the Help menu once the registry entries in the previous listing are added to the registry.
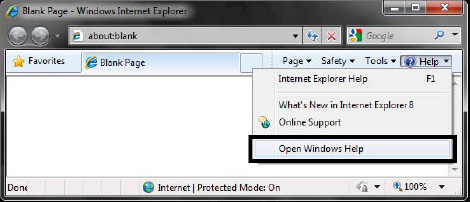
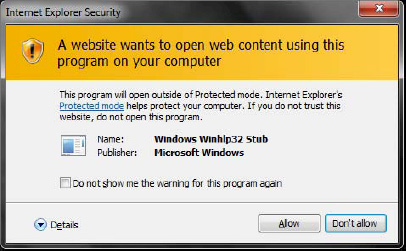
Figure 10-19 shows the Protected Mode dialog displayed after this button is clicked (if Protected Mode is both available and enabled). Applications that do not have an exemption or have never requested elevation from Protected Mode will trigger this. Users must explicitly allow the elevation to occur by clicking the Allow button; they can bypass future elevation requests for this application by ticking the "Do not show me the warning for this program again" check box.
If a user allows the Protected Mode elevation to occur (or Protected Mode is off), then the executable defined within the extension's registry settings will launch. Figure 10-20 shows the result in this example: the Windows Help and Support application is run and displayed atop the IE window.

As in the previous example, the extension can be removed by deleting all registry keys and values associated with it. Listing 10-19 shows a registry script that removes both keys created during the installation of the example button.
Example 10.19. Registry Script That Uninstalls This Help Menu Item from the IE Frame
Windows Registry Editor Version 5.00

[-HKEY_LOCAL_MACHINESOFTWAREMicrosoftInternet ExplorerExtensions
   {46FB380B-5E11-48F1-A9E8-8F689F3E1C60}]
[-HKEY_LOCAL_MACHINESOFTWAREWow6432NodeMicrosoftInternet ExplorerExtensions
{920C4ABC-C0E4-4E00-B8FF-A068E1C83D82}]The in-page context menu offers developers a way to provide additional functionality to page elements without cluttering up the browser frame.
There are a number of different "contexts," or target scenarios, available to menu items. These contexts represent different situations in which a context menu may be opened. For instance, a user may open up a context menu over an image or right-click a link. Contexts allow developers to add menu items for specific situations and help avoid cluttering up the context menu with unneeded entries.
Context menu items are added to IE through entries in the registry. Items are added on a per-user basis in the HKEY_CURRENT_USER registry hive and stored in the key HKEY_CURRENT_USERSoftwareMicrosoftInternet ExplorerMenuExt. Each item is given its own key below MenuExt, and that name is used as the menu item's text.
Listing 10-20 shows the registry structure for a menu extension called "View in Firefox." This extension opens up the current page in Firefox and is described later in the section.
Example 10.20. Example of a Menu Item Entry Called "View in Firefox"
HKEY_CURRENT_USER
   Software
      Microsoft
         Internet Explorer
            MenuExt
               View in Firefox
                  (Default)  (REG_SZ)
                  Contexts   (REG_DWORD)
                  Flags      (REG_DWORD)
Each key holds three values: a string describing the URL of a page to access when the item is clicked, a binary value containing context flags, and a REG_DWORD value indicating the modality behavior of the launched URL. Table 10-8 outlines how these values are stored under a menu item's key and the associated registry types for each value.
Table 10.8. Context Menu Contexts and Associated Values
Name | Value Type | Description |
|---|---|---|
|
| URL of script or markup to run |
|
| Contexts in which to show the item |
|
| Value indicating whether the script should result in a new window |
The first value, (Default), is a REG_SZ (string) value pointing to a URL. URLs can reference any registered protocol on the system. For instance, a menu item could launch a URL in a new window by pointing to http://www.google.com. URLs can open a folder in the Explorer shell by referring to the file:// protocol, and this same protocol can be used to launch an executable or open file types. Another item could refer to a resource in a DLL using the res:// protocol. Developers using URLs that open HTML resources in executable files or libraries can access individual resource by their ID values, appending the ID value to the URL after comma (e.g., res://my_library.dll,42).
The value Contexts is a REG_BINARY value that outlines the contexts for which the menu item should be shown in the context menu. This allows context menu items that are tailored for specific browsing scenarios, such as opening the menu over an image or accessing it when text is selected. Table 10-9 outlines the contexts that may be used by a menu item.
Table 10.9. Context Menu Contexts and Associated Values
Context | Description | Flag Value |
|---|---|---|
Default (Generic) | Menu items available in all page contexts |
|
Images | Available when the context menu is opened on an image |
|
Text Selection | Available when the context menu is opened over a text selection |
|
Anchors and Links | Available when the context menu is opened over an anchor tag (e.g., a link) |
|
A menu item is not restricted to one specific context. The values of each context may be combined as a bitmask using a logical OR. For instance, a menu item could opt to be shown only when a user right-clicks images or selected text; in this situation, the data stored in Contexts would be the logical OR of 0x2 and 0x10, equaling 0x12.
The Flags value is a REG_DWORD (32-bit integer) that selects a modality type for the launched URL. When the user clicks a context menu item, IE launches a new window to handle the call to the URL. Table 10-10 shows the possible values for this entry.
Web developers need easy ways to test their web pages in multiple browsers. One way to simplify the experience of site testing is to reduce the number of steps it takes to launch pages in alternative browsers. The IE context menu can be used to simplify this situation.
Figure 10-21 shows a set of IE context menu extensions that launch other web browsers and display the current page within them. This example adds entries for the Opera, Firefox, IE 9 Developer Preview, and Safari web browsers.

When installed, the context menu shows these entries when a user right-clicks a given web page. Clicking any of these extensions will launch the browser indicated in the extension's name and display the URL of the current page in it. Figure 10-22 shows an example of this in action; Google is loaded in IE 8 and, using the context menu, Safari is launched showing the same web page.

The first step in adding a context menu extension to IE is to add an entry in the registry. In this case, four different context menu extensions are added. This example adds the extensions to the current user's account when installed from the registry script in Listing 10-21.
Example 10.21. Installation Script for the LaunchBrowser Extension Set
Windows Registry Editor Version 5.00

[HKEY_CURRENT_USERSoftwareMicrosoftInternet ExplorerMenuExtView in IE&9 Alpha]
@="C:\Scripts\IE\ContextMenu\UseAlternateBrowsers\Run.html?browser=ie9alpha"
"Flags"=dword:00000001

[HKEY_CURRENT_USERSoftwareMicrosoftInternet ExplorerMenuExtView in Firefo&x]
@="C:\Scripts\IE\ContextMenu\UseAlternateBrowsers\Run.html?browser=firefox"
"Flags"=dword:00000001

[HKEY_CURRENT_USERSoftwareMicrosoftInternet ExplorerMenuExtView in &Opera]
@="C:\Scripts\IE\ContextMenu\UseAlternateBrowsers\Run.html?browser=opera"
"Flags"=dword:00000001

[HKEY_CURRENT_USERSoftwareMicrosoftInternet ExplorerMenuExtView in Safar&i]
@="C:\Scripts\IE\ContextMenu\UseAlternateBrowsers\Run.html?browser=safari"
"Flags"=dword:00000001
In each case, a key is added underneath the SoftwareMicrosoftInternet ExplorerMenuExt key in the HKEY_CURRENT_USER hive. The default value of each key is a string referring to the location of a web page IE can launch on the local system.
The registry script creates a (Default) string that points to a local web page called Run.html. Each context menu extension passes a query parameter (browser) to this URL indicating a browser to launch. A JavaScript block on the page parses that query parameter and extracts the name of the intended browser from it (Listing 10-22).
Example 10.22. Web Page Containing Script to Launch Alternate Browsers
<html>
   <head>
</head>
   <body>
      <script type="text/javascript">

         //  Get an associative array of query parameters and values
         //  passed to this URL
         function GetQueryParams()
         {
            var params = {};
            var items = window.location.search.substring(1).split("&");
            for(var i = 0; i < items.length; i++) {
               var pair = items[i].split("=");
               if(pair.length != 2) { continue; }
               else { params[pair[0]] = pair[1]; }
            }
            return params;
         }

         //  Get a the value of a specific query parameter specified
         //  by a string name
         function GetQueryParam(param)
{
var params = GetQueryParams();
if(param in params) return params[param];
else return null;
}
// Location of script used to launch
var launcher = "C:\Scripts\IE\ContextMenu\UseAlternateBrowsers\RunAsync.vbs";
// Associative array of browsers and the location of
// their executables
var apps = {
"ie9alpha" : "file://%PROGRAMFILES%\Internet Explorer Platform
Preview\iepreview.exe",
"firefox" : "file://%PROGRAMFILES%\Mozilla Firefox\firefox.exe",
"opera" : "file://%PROGRAMFILES%\Opera\opera.exe",
"safari" : "file://%PROGRAMFILES%\Safari\Safari.exe"
};
// Get the query parameter "browser" from the URL
var app = GetQueryParam("browser");
// Make sure the browser exists
if(app in apps) {
// Create a new ActiveX shell object
var shell = new ActiveXObject("WScript.Shell");
// Run the executable from the browser's associative array and
// append the URL to the command line. Make sure to set the
// WindowStyle (second) param to 0 (hidden) and the WaitForExit
// param (thrid) to 0 (run browser as async)
shell.run("wscript.exe "" +
launcher + "" "" +
apps[app] + "" "" +
external.menuArguments.document.URL + """
);
}
// Close the window or else it will stick around
window.close();
</script>
</body>
</html>Once extracted, the script attempts to launch a VBScript file through the Windows Scripting Host launcher, wscript.exe.
Windows Scripting Host is used to launch a script file outside of IE Protected Mode. Since IE may be running in Protected Mode, a script needs to be launched outside of that sandbox in order to start an external executable. Listing 10-23 details the contents of this script.
Example 10.23. VBScript used to Launch Commands Outside of Protected Mode
''  Grab the arguments passed to this script
Set Args = WScript.Arguments

''  Create a new Shell object
Set WshShell = WScript.CreateObject("WScript.Shell")

''  Concat all the passed arguments
Dim Command
For Each Arg in Args
   Command = Command + Chr(34) + Arg + Chr(34) + " "
Next

''  Send the concat string to the shell as a command
WshShell.Run Command, 1, False
When run, this script reads the name of a browser executable and the URL to run. It surrounds each of those entries in quotes and launches the selected browser through the Windows Explorer shell.
This extension can be uninstalled by removing the registry entries created earlier in this example. The script in Listing 10-24 shows such a script. When run, it will remove each of these context menu entries from IE (a change reflected the next time IE loads).
Example 10.24. Uninstall Script for the ViewInBrowsers Extension Set
Windows Registry Editor Version 5.00

[-HKEY_CURRENT_USERSoftwareMicrosoftInternet ExplorerMenuExtView in IE&9 Alpha]
[-HKEY_CURRENT_USERSoftwareMicrosoftInternet ExplorerMenuExtView in Firefo&x]
[-HKEY_CURRENT_USERSoftwareMicrosoftInternet ExplorerMenuExtView in &Opera]
[-HKEY_CURRENT_USERSoftwareMicrosoftInternet ExplorerMenuExtView in Safar&i]
The context menu itself may be turned off completely through the registry or indirectly using Group Policy. This entry has been present since IE 5, and gives enterprise developers and system administrators the ability to lock down this portion of IE from doing things such as initiating an elevation, as in the previous example.
This policy can be turned on in a system-wide or per-user context through the HKEY_LOCAL_MACHINE or HKEY_CURRENT_USER hives, respectively. The target key is SoftwarePoliciesMicrosoftInternet ExplorerRestrictions, and the DWORD value is named NoBrowserContextMenu. When this value contains data of 0x1, context menus are disabled; a value of 0x0 enables them.
Context menus can be overridden using JavaScript as an alternative to the registry. This feature depends on events exposed to web pages through IE's JavaScript engine. Script-based context menu extensions allow developers to deeply customize the user experience on their web pages beyond traditional markup and script.
JavaScript context menus are dependent on mouse click events emitted by a target browser. IE and other major browsers enable web developer to hook into these events through oncontextmenu, onmouseover, onmouseout, and other events.
A page supporting JavaScript context menus can be built in many ways. Listing 10-25 shows an outline of what one of those pages might look like. It contains basic styles, page contents, the markup shown as the context menu, and script to handle the menu events and triggers.
Example 10.25. Basic Outline of a Page Implementing a JavaScript Context Menu
<html>
   <head>
      <meta http-equiv="pragma" content="no-cache">
      <!-- Context menu styles -->
      <title>JavaScript Context Menu</title>
   </head>
   <body>
      <!-- Page contents -->
      <!-- Context menu markup -->
      <!-- Context menu script -->
   </body>
</html>
The context menu can be represented by a block shown and hidden when the right (or left in some configurations) mouse button is clicked. This is exactly the same concept as the context menu typically shown on a page. Listing 10-26 shows an example block that contains a list of links that can be displayed on a page in this style.
Example 10.26. List of Links to Be Shown in a JavaScript Context Menu
<!-- Begin context menu markup -->
<div id="contextMenuWrapper">
   <ul class="contextMenu">
      <li><a href="http://www.google.com">Go to Google</a></li>
      <li><a href="http://www.yahoo.com">Go to Yahoo</a></li>
      <li><a href="http://www.bing.com">Go to Bing</a></li>
      <li id=""></li>
   </ul>
</div>
<!-- End context menu markup -->
JavaScript ties into the browser mouse events to make this menu appear and replace the traditional context menu. The script in Listing 10-27 ties into the browser onmousedown and oncontextmenu events with event handlers that show and hide the block defined above and place it underneath the mouse cursor.
Example 10.27. Script Using Event Handlers to Show and Hide a Context Menu
<!-- Start context menu script -->
<script type="text/javascript">

   //  Create placeholder variables that will be used to
   //  access the context menu wrapper and keep track of when
   //  the right mouse button was clicked
   var showContextMenu = false;
var mouseOverContextMenu = false;
   var contextMenu = document.getElementById('contextMenuWrapper'),

   //  Add a callback function to the body element event handler on
   //  the document
   document.body.onmousedown = Body_OnMouseDown;
   document.body.oncontextmenu = Body_OnContextMenu;

   //  Keep track of when the mouse is on the context menu
   //  wrapper and when it isn't
   contextMenu.onmouseover
      = function() { mouseOverContextMenu = true; }
   contextMenu.onmouseout
      = function() { mouseOverContextMenu = false; }

   //  Return the currently selected text on a page
   function GetSelectedText() {

      var text = "";

      //  Attempt to get selection information from various
      //  browser configurations
      if(window.getSelection) text = window.getSelection();
      if(document.selection) text = document.selection.createRange().text;
      if(document.getSelection) text = document.getSelection();
      return text;

   }

   //  Handles the OnMouseDown event on the body element
   function Body_OnMouseDown(event) {

      //  Ensure that both the event and the event target
      //  objects are available
      if (event == null) event = window.event;
      var target = event.target != null ? event.target : event.srcElement;

      //  If the right mouse button was clicked, mark that
      //  the context menu should be shown on the context
      //  menu event
      if (event.button == 2) showContextMenu = true;
      else if(!mouseOverContextMenu) contextMenu.style.display = 'none';
   }

   //  Handles the OnContextMenu event on the body element
   function Body_OnContextMenu(event) {

      //  Ensure that both the event and the event target
      //  objects are available
      if (event == null) event = window.event;
      var target = event.target != null ? event.target : event.srcElement;

      //  Show a custom context menu if a user triggered
      //  the right mouse button
if (showContextMenu) {
// Get the current page offsets due to scrolling
var scrollTop
= document.body.scrollTop ?
document.body.scrollTop : document.documentElement.scrollTop;
var scrollLeft
= document.body.scrollLeft ?
document.body.scrollLeft : document.documentElement.scrollLeft;
// Hide the div while changes are made to it
contextMenu.style.display = 'none';
// Move the div to where the mouse is located
contextMenu.style.left = event.clientX + scrollLeft + 'px';
contextMenu.style.top = event.clientY + scrollTop + 'px';
// Display the context menu
contextMenu.style.display = 'block';
// Don't show the context menu again for this event
showContextMenu = false;
// Return false so the browser context menu will
// not show up
return false;
}
}
</script>
<!-- End context menu script -->The script begins by creating some placeholder variables: showContextMenu represents the current state of the mouse event capture, mouseOverContextMenu keeps track of the mouse location when the new context menu is open, and contextMenu references the block element of the custom menu <div>.
Body_OnMouseDown and Body_OnContextMenu are defined next, attaching to the OnMouseDown and OnContextMenu events on the current document's <body> tag, respectively.
The context menu is rounded out with a stylesheet, allowing it to become distinct from the rest of the page and to look more like a real context menu. Listing 10-28 shows some basic styles applied to the example menu.
Example 10.28. CSS for the JavaScript Context Menu
<!-- Begin context menu styles -->
<style>
   #contextMenuWrapper {
      border: 2px solid #444; display: none; position: absolute; }
   .contextMenu {
      margin: 0; padding: 10px; list-style-type: none; background-color: white; }
   .contextMenu li:hover { }
   .contextMenu hr { border: 0; margin: 5px; width: 150px; }
   .contextMenu a { color: #305aa6; border: 0 !important; }
.contextMenu a:hover { text-decoration: underline !important; }
</style>
<!-- End context menu styles -->Figure 10-23 shows the result of the markup, script, and styles laid out in this section. When a user right-clicks this page, a JavaScript-based context menu (simulated via a <div> block) is shown. When a user focuses outside of an open menu, this menu closes.

Lightweight browser extensions are a great way to extend the functionality of the IE frame and pages without forcing you to delve deep into the murky waters of COM programming. On the other hand, these extensions are versatile enough to allow for it if you want to take advantage of the additional functionality exposed by COM. All in all, these extensions are simple yet complete, allowing for some interesting and inventive add-on scenarios for IE and your projects.
I began this chapter by discussing the role of lightweight extensions in both the browser frame and individual pages. I presented frame extensions next, covering both toolbar buttons and menu item extensions. I highlighted the role of lightweight extensions in the in-page context menu, describing how you cannot only extend IE but extend pages themselves. Last, I covered some pure JavaScript solutions with regard to the context menu; you can develop custom menus for your pages without ever having to install an extension to a user's computer.