
Customization of the Document Object Model (DOM) is a powerful concept, especially when used with dynamic languages like JavaScript. Prototype and property modification can solve important compatibility and interoperability issues without requiring changes to existing code. While older IE releases do not support a mutable DOM, IE 8 has added mutable prototype support enabling these important scenarios. In this chapter, I will detail how you can apply these concepts to your projects and provide some examples you can reuse on your own web sites.
JavaScript has many traits of an object-oriented programming (OOP) language; however, it lacks the traditional class structure expected in most OOP contexts. JavaScript is classified as a prototypal language—an OOP language in which objects inherit behaviors (functions, properties, etc.) rather than object definitions (classes).
Objects in prototypal languages form inheritance hierarchies by inheriting sets of behavior rather than building on base structures. These sets of behaviors are called prototypes. Put simply, prototypes are blueprints for what an object can do and the information it can store.
Objects maintain an object-oriented inheritance hierarchy by way of prototype inheritance, also called prototype chaining. Instead of object definitions declaring their relationship to a base or superclass object, JavaScript objects extend their base or parent object by inheriting their prototype and (optionally) building or overriding its behavior.
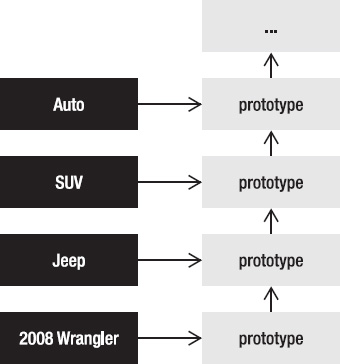
Figure 6-1 shows an inheritance diagram relating a chain of general to specific representations of an automobile to each other in a hierarchy. In this case, the hierarchy begins with the Auto object (representing a general automobile); as the relation grows, objects represent more specific (and detailed) automobile classifications (e.g., a 2008 Jeep Wrangler).
Class-based languages would represent this hierarchy using only the objects on the left side; the objects, represented through classes, would inherit from each other. In JavaScript, each object instead references a set of behaviors, or a prototype. These prototypes chain off of each other, extending their behavior from the base prototype to the more specific prototype later in the hierarchy.
JavaScript addresses the most important principles of an OOP system even though it doesn't implement a class-based OOP structure. Encapsulation (protection of private data via filtered accessibility) is one area that modern JavaScript implementations address (as of the ECMAScript 5 specification). Private data protection is ensured through the use of properties (commonly known as mutator methods). (Note that JavaScript has no true concept of access modifiers, so the use of public and private should be taken in an illustrative context.)
JavaScript properties encapsulate two basic activities: the reading of an object (get) and the writing to an object (set). A getter represents a function that handles the former action, and a setter is a function representing the latter.
There are two types of properties: data properties and accessor properties. Data properties are basic storage variables that can store and emit a value. The JavaScript engine handles the get and set actions for these objects. For example, you can set a value to the document object's data property through document.data.
Accessor properties are properties where a developer has explicitly defined the getter and setter for that property. Developers can define the set of actions that take place whenever a value is set to that property or when that property is read. For instance, a developer can customize the innerHTML property in such a way that the contents of that object are sanitized whenever it is read from or written to.
Developers can use property descriptors to define whether an object is a data property or an accessor property. Table 6-1 describes these descriptors; use of these descriptors is described later in this chapter.
Table 6.1. Property Descriptor Attributes
Description | Property Type | |
|---|---|---|
| Attribute indicating that the property can be changed | Data |
| Attribute indicating that the property may be enumerated off the owner object | Data, accessor |
| Attribute indicating that the property may be changed or deleted from the owner object | Data, accessor |
The DOM is an API for accessing markup-based documents. This API projects a web page's hierarchical, node-based structure onto JavaScript objects using prototypes and prototype chaining.
The W3C DOM Level 1, 2, and 3 specifications together represent the standard model for representing documents in JavaScript. Interfaces, such as a Document, Element, and Attribute, represent actual constructs found on a page; the Document object, for example, represents a web page's document container; an Element object represents any HTML element in that document; and so on. These objects derive from the Node object's prototype—the Node object being the W3C DOM specification's atomic representation of a markup entity. Figure 6-2 demonstrates a small cutaway of the W3C DOM for context.

IE exposes markup objects to JavaScript via a DOM; however, the DOM in IE 8 and below loosely resembles the W3C recommendation. Figure 6-3 shows the base structure and an example object chain.

Unlike the W3C DOM, IE's DOM does not have an atomic object that represents a basic markup entity. Instead, the IE DOM contains similar—many identical—loosely connected objects that form a markup-based document's representation to JavaScript.
This difference is unimportant from a functionality standpoint; however, it does mean that in IE versions up to 8, scripts that use DOM functionality may not be fully interoperable between IE and other browsers.
Mutable prototypes and properties were extended to DOM objects as of IE 8. This allows developers to modify and change IE's DOM behavior by overriding objects and properties of DOM object prototypes. The following sections outline how prototype objects and properties can be manipulated.
Creation, modification, and deletion of DOM objects is available in IE 8 and above. Prior to this version, DOM objects in IE were specially cased and could not have their prototypes modified in the way custom object prototypes could. Opening prototype modification to these objects allows for some great compatibility, interoperability, and augmentation scenarios that other browsers have enjoyed for quite some time.
New functionality can be added to objects by way of an object's prototype. For example, one can add a function to the Element interface by adding it to Element.prototype; objects using objects on the Element interface will automatically have this available to them, even if they were created before the new functionality was added. Listing 6-1 shows an example of this, adding two functions on the Element interface that control the case of an instance's text content.
Example 6.1. Adding Functionality via DOM Prototypes
<script type="text/javascript">

Element.prototype.toUpperCase = function() {

   //  Create a new toUpperCase function on the Element interface
   this.innerText = this.innerText.toUpperCase();

}

Element.prototype.toLowerCase = function() {

   //  Create a new toLowerCase function on the Element interface
   this.innerText = this.innerText.toLowerCase();

}Built-in (default) functions stored in object prototypes can be saved to variables. This is useful for extending existing functionality. For example, the setAttribute() function can be saved to a variable and later called through that variable. Listing 6-2 provides a simple illustration.
Existing functions can be replaced in the same way that new functions are defined. Setting a function value to an object's prototype will "hide" the existing function value, resulting in the new function being executed in response to future calls. The old function can be saved to a variable and called within the new function as well, essentially allowing for function overriding.
The example in Listing 6-3 shows the Element interface's setAttribute() function being overridden after the old functionality is saved to a variable.
Example 6.3. Wrapping the setAttribute() function
<script type="text/javascript">

   //  Save a copy of the default setAttribute function
   var defaultSetAttribute = Element.prototype.setAttribute;

   Element.prototype.setAttribute = function (attr, value) {

      //  Support the use of classname as a reference to class
      if (attr.toLowerCase() == "classname") {

         //  Pass to the original setAttribute as "class"
         defaultSetAttribute.call(this, "class", value);

      }
      else
        defaultSetAttribute.call(this, attr, value);
   };

</script>Custom functions can be deleted using the delete keyword. It is used by calling delete followed by the object and function names. Listing 6-4 demonstrates the removal of a custom getElementById function from the document element.
Example 6.4. Removing the Custom getElementById Function
<script type="text/javascript">

   try {

      //  Delete the custom innerText property on Element
      delete document.getElementById;

   } catch(e) {
      /*  Ignore exceptions thrown when no custom properties  */
      /*  exist on the object                                 */
   }

</script>
If a default function is overridden by a custom one, its original functionality is restored. Listing 6-4 is a good example of this; a custom version of getElementById was removed from the document object; thus, subsequent calls to document.getElementById() will use the default function. Default functions cannot be removed using the delete command.
Properties, like objects, can be modified for DOM objects as of IE 8. Each can have a getter and setter that can be applied in an interoperable fashion (one defined in the ECMAScript 5 specification). The following sections outline how DOM objects such as Element can have new properties and even have existing ones such as innerText extended. More detailed examples are provided later in this chapter.
New properties can be created on both existing DOM objects and custom objects. They are appended through the Object.defineProperty() function, which takes three parameters: the DOM object prototype that will house the property, the name of the property in string format, and a property object containing either a getter, a setter, or both. Listing 6-5 shows an example of adding a new property.
Example 6.5. Adding a New Property
<script type="text/javascript">

   //  Create a variable for storage
   var varData = "";

   //  Create a property to get and set varData
   Object.defineProperty(Element.prototype, "myProperty", {

      //  Property setter: Set varData to be contents of value
      //  and signal it was called with an alert
      set: function(value) {

         varData = value;
         alert("Set - varData: " + value);
},
// Property getter: Get and return contents of varData
// and signal it was called with an alert
get: function ()
{
alert("Get - varData:" + varData);
return varData;
}
});
</script>A number of descriptor attributes are available for properties. Descriptor attributes allow developers to define how a property works and what it does.
Built-in properties can be stored to a variable for later use. New properties applied to DOM objects can pass along data to these properties in order to modify or enhance the functionality of the original properties. Listing 6-6 demonstrates the Object.getOwnPropertyDescriptor function, used to return the property object for a given property on a DOM object.
Example 6.6. Storing a Default Property
//  Get the innerText property on Element
var defInnerText = Object.getOwnPropertyDescriptor(Element, "innerText");
This function takes two arguments: the DOM object being targeted and the property being targeted (in that order). The first should point to an object; the second should be a string containing a property name available to that object.
Tread carefully—storing built-in properties by reading them directly will lead to an unpleasant surprise. When property values are referenced in this way (e.g., var foo = bar.myProperty), only the getter is saved to the variable. This means any calls into the saved version of myProperty will fail if the setter is accessed. Developers looking to store a full property (both a getter and a setter) should do so by using the getOwnPropertyDescriptor() function shown in the preceding code.
Existing properties can be wrapped and replaced with new ones. They can be overridden by using the process described in the last section—copying the original property to a variable before replacing it. Property wrappers can pass information back and forth between saved properties; Listing 6-7 offers an example of this.
Example 6.7. Wrapping a Property
<script type="text/javascript">

   //  Get the innerText property on Element
   var defInnerText = Object.getOwnPropertyDescriptor(Element, "innerText");
//  Define a new property for innerText
   Object.defineProperty(Element.prototype, "innerText",
   {
      //  Return the value held by the original innerText property
      //  and prepend a test string
      get: function () { return "Test Get: " + defInnerText.get.call(this); }

      //  Map the setter to the original innerText property setter and
      //  call it after prepending a text string
      set: function (content) {
              defInnerText.set.call(this, "Test Set: " + content); }

   });

</script>
The script begins by saving the innerText property of the Element interface to the variable defInnerText. Next, the Object.defineProperty() function is called; the Element interface's prototype, the string innerText, and the code for a new property are passed to it. The new property consists of a getter and a setter. The new getter calls the original getter and returns the value on the original prepended with Test Get:. The new setter also prepends the value, but this time before it is run through the original setter.
Custom properties can be deleted using the delete command. Listing 6-8 demonstrates the removal of a custom innerText property from the Element interface's prototype.
Example 6.8. Removing a Property
<script type="text/javascript">

   try {

      //  Delete the custom innerText property on Element
      delete Element.prototype.innerText;

   } catch(e) {
      /*  Ignore exceptions thrown when no custom properties  */
      /*  exist on the object                                 */
   }

</script>
Just like deletion of custom objects, deletion of custom properties reverts those properties to DOM defaults if they existed before. The delete command cannot remove default properties.
Property descriptors can be used to specify whether a property acts like a data property or an accessor property. There are three attributes described at the beginning of this chapter, in Table 6-1: writable, enumerable, and configurable.
Developers can specify one or more of these attributes when defining a property with defineProperty(). Each attribute is specified as a Boolean array value and appended as the last parameter of this function (Listing 6-9).
Example 6.9. Using Property Descriptors with defineProperty()
<script type="text/javascript">

   //  Get the innerText property on Element
   var defInnerText = Object.getOwnPropertyDescriptor(Element, "innerText");

   //  Define a new property for innerText
   Object.defineProperty(Element.prototype, "innerText",
   {
      //  Return the value held by the original innerText property
      //  and prepend a test string
      get: function () { return "Test Get: " + defInnerText.get.call(this); }

      //  Map the setter to the original innerText property setter and
      //  call it after prepending a text string
      set: function (content) {
              defInnerText.set.call(this, "Test Set: " + content); }

   },
   {
      enumerable: true,
      configurable: true
   });

</script>The usefulness of IE's DOM improvements may not be obvious for developers who have never used this functionality before. The following sections provide a selection of examples of how IE mutable DOM prototypes and support for getters and setters can enhance pages run in IE 8 and above.
Microsoft made changes between IE 7 and 8 to bring IE closer to standards recommendations and cross-browser interoperability. Some of these changes, however, caused compatibility breaks between IE 8 and downlevel versions. Mutable DOM prototype support added in IE 8 can be used to simulate legacy functionality, allowing older scripts to run until they can be upgraded or rewritten for standards-compliance.
IE 8 dropped support for accessing an element's class attribute using the className moniker within the Element interface's getAttribute() and setAttribute() functions. This change removed the need for scripts to create special cases when accessing this attribute in IE. Solving this interoperability problem for a wide swath of the JavaScript development community caused breakage in another set of scripts: those designed for use in IE 7 and below.
Mutable DOM prototypes can be used to reinsert support for the class attribute's className moniker by overriding the default behavior of getAttribute() and setAttribute(). Listing 6-10 shows a script that does just this.
Example 6.10. Script Overriding get/setAttribute to Support class Attribute Access via the className Moniker
<script type="text/javascript">

   //  Create variables to hold the default set and get
   //  attribute functions
   var defaultSetAttribute = Element.prototype.setAttribute;
   var defaultGetAttribute = Element.prototype.getAttribute;

   //  Overwrite the default setAttribute function
   Element.prototype.setAttribute = function (attr, value) {

      //  Support the use of classname as a reference to class
      if (attr == "className") {

         //  Pass to the original setAttribute as "class"
         defaultSetAttribute.call(this, "class", value);

      }
      else
        defaultSetAttribute.call(this, attr, value);
   };

   //  Overwrite the default getAttribute function
   Element.prototype.getAttribute = function (attr) {

      //  Support the use of classname as a reference to class
      if (attr == "className") {

         //  Pass to the original getAttribute as "class"
         return defaultGetAttribute.call(this, "class");

      }
     return defaultGetAttribute.call(this, attr);
   };

</script>
The example begins with two variables, defaultSetAttribute and defaultGetAttribute; respectively, they point to the original implementation of the setAttribute() and getAttribute() functions on the Element interface. The script proceeds to specify a new implementation of Element.prototype.setAttribute—one that accepts a value of className and converts it to the IE 8's required "class" value; all other inputs are left alone. This value is passed to the original implementation saved in the defaultSetAttribute variable. The same is done for Element.prototype.getAttribute, converting "className" to "class" and passing the request to the defaultGetAttribute variable.
IE 8 does not offer full support in areas such as DOM Level 2 and 3 APIs, forcing web developers to create workarounds for some functionality until future releases of the browser. DOM prototypes, in many cases, offer a solution for interoperability scenarios left unfulfilled in current releases of IE. Developers looking to add or replace APIs on base DOM objects can do so through this method and, in doing so, use one script that works across browsers instead of sprinkling workarounds for IE throughout their code.
The innerText property is used in IE to get or set the inner text within a markup node (be it HTML or some generic XML). innerText, however, is not interoperable across all browsers. Firefox, for instance, uses the W3C-recommended textContent property instead. While these two properties perform the exact same task, the difference in naming can cause scripts to fail, frustrating developers trying to build interoperable pages.
Listing 6-11 demonstrates some HTML and script that would cause errors in this scenario—in IE, the call to textContent would not work as expected since the property does not exist; in Firefox, the call to innerText would yield a similar failure.
Example 6.11. Script Testing Browser Support for Both innerText and textContent
<div id="testInnerText"></div>
<div id="testTextContent"></div>

<script type="text/javascript">

   //  Access the two test divs
   var divInnerText   = document.getElementById("testInnerText");
   var divTextContent = document.getElementById("testTextContent");

   //  Attempt to write to the innerText property of divInnerText
   divInnerText.innerText = "This element supports innerText.";

   //  Attempt to write to the textContent property of divTextContent
   divTextContent.textContent = "This element supports textContent.";

</script>
Getter and setter support in IE 8, in combination with its handling of DOM prototypes, may be used to abstract this difference. The example in Listing 6-12 demonstrates a script that brings support for the textContent property to IE 8.
Example 6.12. Creating a textContent Property on the Element Interface, Aliasing innerText
<script type="text/javascript">

   //  Get the innerText property on the Element interface
   var defInnerText = Object.getOwnPropertyDescriptor(Element, "innerText");


   //  Define a new property for all elements called textContent
   Object.defineProperty(Element.prototype, "textContent",
{

      //  Map the getter to the original innerText property getter
      get: function () { return defInnerText.get.call(this); }

      //  Map the setter to the original innerText property setter
      set: function (content) {defInnerText.set.call(this, content); }

   });

</script>
The example begins with the defInnerText variable being set to the Element interface's implementation of innerText (through the getOwnPropertyDescriptor() function). Next, a new property called textContent is appended to Element. The script then defines a getter and setter for the textContent property; the getter calls the getter from the innerText reference, and the setter invokes the setter on this same reference, passing along the content parameter to be set as the text content of the element.
This approach can be used to address some other important scenarios. For example, many HTML 5 functions, such as getElementsByClassName(), and DOM functions currently unsupported by IE, such as addEventListener(), can help build interoperable web applications.
Note
Remember, storing built-in properties by reading them directly will result in only their getters being saved to a variable. Developers should use getOwnPropertyDescriptor() to store both the getter and setter of a property.
The threat of cross-site scripting attacks means that developers should build multiple layers of protection against injection into their web applications. The safe use of client-side script can be seen as one of these defenses, providing a first line of defense and a first chance to immobilize threats. The following examples highlight the use of IE's DOM improvements to streamline the mitigation of injection attacks.
The document.write() function permits script to override the content within the document object. A script may pass data to this function in order to completely replace page content. Although pages may intentionally use this function, malicious code injected into the page could also use this to emit misleading or dangerous content into the current session. Using the innerHTML property as a replacement for this is ineffective—it is no safer than document.write. Targeted writes using innerText provide a safer approach to dynamic content, but their use does not disable nor preclude the use of document.write().
The sample in Listing 6-13 demonstrates one possible solution: completely disabling document.write() by replacing it with an innocuous function.
Example 6.13. The disableWrite() Function and Its Replacement of document.write()
<script type="text/javascript">

   //  Create a function that does "nothing" except write
   //  a message to the console (or pop an alert if the console
   //  object doesn't exist
   function disableWrite(data) {
      var message = "There seems to be a bug in this page!";
      if(console) console.write(message);
      else alert(message);
   }

   //  Set the the disableWrite function as document.write
   HTMLDocument.prototype.write = disableWrite;
   HTMLDocument.prototype.writeln = disableWrite;

</script>
A new, empty function called disableWrite() is created; the intention of this function is to do nothing at all. The write() function on the HTMLDocument object prototype is set to this function; any calls to document.write() or document.writeln() are redirected to disableWrite() where they hit a dead end. Since disableWrite() does nothing with the input parameter data, the value is never written to the document as intended.
Listing 6-14 demonstrates the new, useless function in action. A form is created containing a text box whose value is intended for the document.write() function. On submit, the form calls the writeToDocument() function, which in turn passes input from the form text box into document.write(). Again, since write() was overridden by a dummy disableWrite() function, no data is ever written to the document, and the page remains the same after the Submit button is clicked.
Example 6.14. Form Whose Action Tests the document.write() Override via Prototypes
<script type="text/javascript">

   //  Write the current value of data to the document
   function writeToDocument() {
      document.write(document.getElementById("data").value);
   }

</script>


<form action="javascript:writeToDocument()">
   <p>
   Data to write:<br />
   <input type="text" id="data" name="data" />
   </p>
   <input type="submit" id="submit" name="submit" value="Write text" />
</form>The innerHTML property of the Element interface is widely used to provide dynamic user experiences. Data applied to this variable is assumed to be HTML and applied as a child tree to a target Element (the one whose innerHTML was set). Not only does it allow for changing HTML content, but it also allows scripts to capture the child DOM of a specific element—a scenario very important to Ajax-based systems. Unfortunately, the HTML content get and set using this property is far from safe—markup, styles, and script all remain active. Active content, especially script placed into an element through this function, poses a threat to the integrity of a web application due to script injection attacks.
Prototypes, getters, and setters can be used to sanitize incoming and outgoing content on innerHTML, avoiding case-by-case data sanitization (and thus avoiding those missed cases). Listing 6-15 shows a script that sanitizes content passing in and out of this property using another new IE 8 feature: toStaticHTML().
Example 6.15. Script Overriding the innerHTML Getter/Setter, Adding HTML Sanitization Using toStaticHTML
<script type="text/javascript">

   //  Get the innerHTML property on the Element interface
   var defInnerHTML = Object.getOwnPropertyDescriptor(Element, "innerHTML");
   var defInnerText = Object.getOwnPropertyDescriptor(Element, "innerText");

   //  Define a new property for innerText
   Object.defineProperty(Element.prototype, "innerHTML",
   {

      //  Map the getter to the original innerHTML property getter and
      //  return sanitized content using toStaticHTML
      get: function () {
         if(typeof toStaticHTML == "object") {
            return toStaticHTML(defInnerHTML.get.call(this));
         } else {
            return defInnerText.get.call(this);
         }
      }

      //  Map the setter to the original innerText property setter and
      //  call it after sanitizing the input content using toStaticHTML
      set: function (content) {
         if(typeof toStaticHTML == "object") {
            defInnerHTML.set.call(this, toStaticHTML(content));
         } else {
            defInnerText.set.call(this, content);
         }
      }
}); </script>
This script begins by referencing the default innerHTML and innerText properties held by the Element interface prototype. Next, Object.defineProperty() is used to create a new innerHTML property on the Element interface. A new getter is created that returns a sanitized version of the original innerHTML property's getter value using toStaticHTML; if the toStaticHTML object does not exist, the getter returns a sanitized value through innerText. The new setter follows the same paradigm; the parameter passed to the new innerHTML property is sanitized using toStaticHTML(), whose result is passed along to the Element interface's original innerHTML property. If toStaticHTML does not exist, innerText is used to set a sanitized version of the input content.
Input validation scenarios can be streamlined by appending validation functions to target elements and input. Forms, for example, often submit to server-side validation scripts that are distinct from the markup and script of the original page. Prototypes can streamline this workflow by making validation a seamless part of the input process.
The following example demonstrates how input validation can be implemented as prototype functions on target elements. Figure 6-4 displays a screenshot of a sample form that gathers three pieces of user information: a person's name, their e-mail address, and the URL of their home page.

The form shown here is constructed using basic <span>, <input>, and <label> tags. Listing 6-16 shows the markup for this form. The <span> tags house the label headers for each form element, the <input> text boxes receive input for each requested area, and the <label> tags are used by the validation script to display form validation errors (explained later in this section).
Example 6.16. Code for the Form Shown in Figure 6-4
<form action="">
   <p>
      <span class="label">name:</span><br />
      <input type="text" id="name" name="name" class="text" /><br />
      <label for="name" id="nameLabel"></label>
   </p>
   <p>
      <span class="label">email:</span><br />
      <input type="text" id="email" name="email" class="text" /><br />
      <label for="email" id="emailLabel"></label>
   </p>
   <p>
      <span class="label">homepage:</span><br />
      <input type="text" id="homepage" name="homepage" class="text" /><br />
      <label for="homepage" id="homepageLabel"></label>
   </p>
   <input type="submit" id="submit" name="submit" value="Submit" />
</form>
Form validation is a flow of validation and feedback, repeated until an input set fits some criteria. A user begins the process by visiting a page with a form, typing in required information, and submitting it. The form then calls a number of functions that check the input. If the input fails to meet some set criteria, the form and its values are passed back to the user. Well-designed validation systems highlight errors in user input and offer suggestions on how a user can correct his or her entry.
To begin, some CSS is used to create visual "pass" and "fail" markers. Validation functions in this example use visual cues alongside textual instructions to inform a user of input validity. Listing 6-17 defines two classes for <input> elements: validationFail, which sets a red background on input elements that do not pass validation, and validationPass, which sets a green background for ones that do. The validationFail and validationPass classes are also created for <label> elements; these elements will be used to display errors related to their partner <input> elements (if any exist).
Example 6.17. CSS Defining Visual Feedback for Validation Pass and Fail Cases
<style>

   input.validationFail {
      background: #ffdddd;
   }

   input.validationPass {
      background: #ddffdd;
   }

   label.validationFail {
      font-family: "Georgia", serif;
      font-style: italic;
      margin-top: 15px;
padding: 7px;
border-left: 3px solid red;
background: #ffdddd;
display: block;
}
label.validationPass {
display: none;
}
</style>Validity of elements in this example is determined through the use of regular expressions. JavaScript uses Perl-style regular expressions for text comparison. These expressions allow for text analysis without requiring complex use of the JavaScript string object or iterative evaluations of input text. Listing 6-18 defines two key parts of this validation system: first, a function that returns true or false based on whether a given regular expression matches an input string, and second, an associative array (object) containing validation expressions and their metadata.
Example 6.18. Script Defining Regular Expressions for Validation and a Utility Function for Matching
<script type="text/javascript">

   //  A function to determine if a source contains one or more matches of
   //  a pattern based on PREGs
   function regexMatch(source, pattern) {

      //  Create a new regular expression from the pattern
      var regEx = new RegExp(pattern);

      //  Execute that pattern against the source (use the test method
      //  since all validation strings start with ^ and end with $
      var matches = regEx.test(source);

      //  Return false if there are no matches, true if one or more exist
      return !(matches === null);

   }

   //  Array that defines different validation classes, their error strings,
   //  and their associated regular expressions
   var regexValidators = {
      '.validateName'     : [
         'This item may only contain letters and spaces.' ,
         /^[w ][^0-9_]+$/],
      '.validateNumeric'      : [
         'This item may only contain numbers.' ,
         /^[0-9]+$/, ],
      '.validateAlphanumeric' : [
         'This item may only contain numbers and letters.' ,
         /^[0-9a-zA-Z]+$/ ],
      '.validateEmail'        : [
         'This item must be a valid email address' ,
         /^[a-zA-Z0-9._%+-]+@[a-zA-Z0-9.-]+.[a-zA-Z]{2,4}$/ ],
'.validatePhoneNumber' : [
'This item must be a valid phone number.',
/^(([0-9]{1})*[- .(]*([0-9]{3})*[- .)]*[0-9]{3}[- .]*[0-9]{4})+$/ ]
};
</script>The regexValidators object contains keys defining different validation types. Each key is linked to a value array whose 0th element is an error description for invalid input and whose 1st is a regular expression defining how all valid input should be formed.
Keys defined in the regexValidators object aren't arbitrary—they represent valid CSS class name selectors. The validate() function, discussed later, maps <input> elements declaring these selectors in their class attribute to these keys. Elements that use one or more of these selectors will be subject to the regular expression validation associated with each.
Listing 6-19 shows the form defined in Listing 6-16, this time with inputs opting into validation rules. The name text box, for instance, requires that input only be alphabetical characters; it selects this rule by using the validateName class. The email text box requires, through the validateEmail class, input matching the general format of an e-mail address.
Example 6.19. Original Form with Class Selectors Opting into Input Validation Constructs
<form action="">
   <p>
      <span class="label">Name:</span><br />
      <input type="text" id="name" name="name" class="text validateName" /><br />
      <label for="name" id="nameLabel"></label>
   </p>
   <p>
      <span class="label">email:</span><br />
      <input type="text" id="email" name="email" class="text validateEmail" /><br />
      <label for="email" id="emailLabel"></label>
   </p>
   <p>
      <span class="label">homepage:</span><br />
      <input type="text" id="homepage" name="homepage" class="text" /><br />
      <label for="homepage" id="homepageLabel"></label>
   </p>
   <input type="submit" id="submit" name="submit" value="Submit" />
</form>
Listing 6-20 defines some utility functions used by the validation function. The first set of functions is built to manage the addition, removal, and existence checking of CSS classes on the Element interface. The addClass() function adds a CSS class to the Element interface if it isn't already present on that object. Conversely, the removeClass() function removes a CSS class from the Element interface if that selector is present on it. Both of these functions use the hasClass() function, used to return the existence (true) or nonexistence (false) of a class on the Element interface. All three of these functions are placed into the Element interface's prototype.
Example 6.20. Utility Functions for CSS Class Management and Label Access, Used As Object Prototypes
<script type="text/javascript">

   //  If a class does not exist on an element, add it
   function addClass(cn) {
      if(!this.hasClass(cn)) {
         try {
            var attrClass = this.getAttribute("class");
            this.setAttribute("class", attrClass + ' ' + cn);
         } catch(ex) { return false; }
         return true;
      } else { return true; }
   };

   //  If a class exists on an element, remove it
   function removeClass(cn) {
      if(this.hasClass(cn)) {
         try {
            var attrClass = this.getAttribute("class");
            this.setAttribute("class", attrClass.replace('/' + cn+ '/',''));
         } catch(ex) { return false; }
         return true;
      } else { return true; }
   }

   //  Indicate whether or not an element specifies a certain class
   function hasClass(cn) {
      var attrClass = this.getAttribute("class");
      return regexMatch(attrClass, '/' + cn+ '/'),
   }

   //  The getLabel function finds a label tag associated with
   //  the current element
   function getLabel() {

      //  Get all labels in the document
      var labels = document.getElementsByTagName("label");

      //  Loop through all document labels
      for(i = 0; i < labels.length; i++){

         //  If the associated "for" id is the id of this
         //  element, return it
         if(labels[i].htmlFor == this.id) { return labels[i]; }
      }

      //  If no label is found, return null (so we can differentiate
      //  between this and an HTMLInputElement interface)
      return null;

   }
// Assign the addClass, removeClass, and hasClass functions // to the Element interface Element.prototype.addClass = addClass; Element.prototype.removeClass = removeClass; Element.prototype.hasClass = hasClass; // Assign the getLabel function to the HTMLInputElement interface HTMLInputElement.prototype.getLabel = getLabel; </script>
The last function, getLabel(), uses the for attribute of <label> tags to associate a label object with an <input> tag. This function is bound to HTMLInputElement so that when it is called from an instance of an <input> element, it can return an associated instance of the HTMLLabelElement interface (if one exists).
The heart of this example lies in the validate() function; shown in Listing 6-21, it iterates through every input that specifies a validation selector in its class attribute.
Example 6.21. The validate() Function, Used to Validate Input Boxes Against a Set of Rules
<script type="text/javascript">

   function validate() {

      //  Create a variable to mark validation progress
      var isOk = true;

      //  Loop through each validation type
      for (key in regexValidators) {

         //  Get the error message and regex for this validation type
         var errorMessage   = regexValidators[key][0];
         var regexValidator = regexValidators[key][1];

         //  Grab all elements opting into this validation type
         var inputs = document.querySelectorAll(key);

         //  Loop through each element and check if its value passes
         //  validation. If it doesn't, ensure overall validation progress
         //  fails and this element's label indicates failure type
         for (i = 0; i < inputs.length; i++) {
            if (!regexMatch(inputs[i].value, regexValidator)) {
               isOk = false;
               try {
                  associatedLabel = inputs[i].getLabel();
                  if(associatedLabel != null) {
                     inputs[i].removeClass("validationPass");
                     inputs[i].addClass("validationFail");
                     associatedLabel.innerText = errorMessage;
                     associatedLabel.removeClass("validationPass");
                     associatedLabel.addClass("validationFail");
               } } catch(ex) { }
            }
            else {
               try {
associatedLabel = inputs[i].getLabel();
if(associatedLabel != null) {
inputs[i].removeClass("validationFail");
inputs[i].addClass("validationPass");
associatedLabel.innerText = "";
associatedLabel.removeClass("validationFail");
associatedLabel.addClass("validationPass");
} } catch(ex) { }
}
}
}
// Return the overall validation status
return isOk;
}
// Customize the DOM by accessing HTMLDocument's
// prototype and extend its functionality
// to include the validate() method.
HTMLDocument.prototype.validate = validate;
</script>The function begins by looping through each of the validation selectors. For each selector, validate() queries the document object for all child elements using the current selector through document.querySelectorAll(). A secondary loop begins, iterating over the results of that function call; text content of matching elements are compared to the regular expression associated with the current validation selector. If the validation pattern is matched, the form element and its associated label denote success. If a match is not found, a CSS class for failure is applied to the element, and an error notification is written to the element's label.
The validate() function is applied to the HTMLDocument object, allowing it to be accessed anywhere in the document context through document.validate().
The final step in this example consists of linking the validation prototypes with the target form. Listing 6-22 shows two parts to this: the document.validate() function is called by a form submission handler, submitForm(), which is set as the target form's action.
Example 6.22. Function Handling Form Submission and Updated Form Action Referring to It
<script type="text/javascript">

   //  Function that calls validation on the document object
   function submitForm() {

      //  Validate forms in the document
      document.validate();

   }

</script>  <!-- ... -->

<form action="javascript:submitForm()">
   <p>
<span class="label">Name:</span><br />
<input type="text" id="name" name="name" class="text validateName" /><br />Validation methods on this form are now defined, with validation occurring every time a user submits the form. Figure 6-5 shows a running example of the validation engine.

In this figure, numbers were input into the name field. Since the name field opted into accepting alphabetical characters only (A through Z, case insensitive), the submission of numbers triggers an error. The validation function changes the color of the offending input box and error label. The text of the error label referencing the name input box is set to the error associated with the validateName error text. The form displays without error messages once all values submitted by a user meet the validation criteria.
The DOM provides a powerful mechanism for making broad changes to your web site with minimal effort and changes to your existing design. As older versions of IE fade away, DOM scripting will become both a realistic and simple way to support interoperable functionality without sacrificing downlevel compatibility.
I began this chapter with a primer on the relevant portions of JavaScript programming and properties as they apply to DOM scripting. After that, you saw a number of examples of how DOM scripting can be used to solve real-world web programming challenges. I encourage you to use this chapter as a springboard for investigating and using these powerful features in your web applications.