
C H A P T E R 4
![]()
Advanced SQL for SQLite
You mastered the select statement in Chapter 3, so now it is time to add the rest of the SQL dialect to your capabilities. This chapter covers the remainder of SQL as implemented in SQLite, including insert, update, and delete statements to modify data; constraints to protect your data; and more advanced topics such as table creation and data types.
Modifying Data
Compared to select, the commands used to modify data are quite easy to use and understand. There are three Data Manipulation Language (DML) commands for modifying data—insert, update, and delete—and they do pretty much what their names imply.
Inserting Records
You insert records into a table using the insert command. insert works on a single table and can both insert one row at a time and can insert many rows at once using a select command. The general form of the insert command is as follows:
insert into table (column_list) values (value_list);
The variable table specifies which table—the target table—to insert into. The variable column_list is a comma-separated list of column names, all of which must exist in the target table. The variable value_list is a comma-separated list of values that correspond to the names given in column_list. The order of values in value_list must correspond to the order of columns in column_list.
Inserting One Row
For example, you'd use this to insert a row into foods:
sqlite> insert into foods (name, type_id) values ('Cinnamon Bobka', 1);
This statement inserts one row, specifying two column values. ‘Cinnamon Bobka’—the first value in the value list—corresponds to the column name, which is the first column in the column list. Similarly, the value 1 corresponds to type_id, which is listed second. Notice that id was not mentioned. In this case, the database uses the default value. Since id is declared as integer primary key, it will be automatically generated and associated with the record (as explained in the section “Primary Key Constraints”). The inserted record can be verified with a simple select, and the value used for id can be queried as well:
sqlite> select * from foods where name='Cinnamon Bobka';


id          type_id     name

----------  ----------  --------------

413         1           Cinnamon Bobka


sqlite> select max(id) from foods;


MAX(id)

----------

413


sqlite> select last_insert_rowid();


last_insert_rowid()

-------------------

413
Notice that the value 413 was automatically generated for id, which is the largest value in the column. Thus, SQLite provided a monotonically increasing value. You can confirm this with the built-in SQL function last_insert_rowid(), which returns the last automatically generated key value, as shown in the example.
If you provide a value for every column of a table in insert, then the column list can be omitted. In this case, the database assumes that the order of values provided in the value list corresponds to the order of columns as declared in the create table statement. Here's an example:
sqlite> insert into foods values(NULL, 1, 'Blueberry Bobka'),

sqlite> select * from foods where name like '%Bobka';


id          type_id     name

----------  ----------  ---------------

10          1           Chocolate Bobka

413         1           Cinnamon Bobka

414         1           Blueberry Bobka
Notice here the order of arguments. ‘Blueberry Bobka’ came after 1 in the value list. This is because of the way the table was declared. To view the table's definition, type .schema foods at the shell prompt:
sqlite> .schema foods

CREATE TABLE foods(

  id integer primary key,

  type_id integer,

  name text );

CREATE INDEX foods_name_idx on foods (name COLLATE NOCASE);
The first column is id, followed by type_id, followed by name. This, therefore, is the order you must list values in insert statements on foods. Why did the preceding insert statement use a NULL for id? SQLite knows that id in foods is an autoincrement column, and specifying a NULL is the equivalent of not providing a value at all. Not specifying a value triggers the automatic key generation. It's just a convenient trick. There is no deeper meaning or theoretical basis behind it. We will look at the subtleties of autoincrement columns later in this chapter.
Inserting a Set of Rows
Subqueries can be used in insert statements, both as components of the value list and as a complete replacement of the value list. When you specify a subquery as the value list, you are really inserting a set of rows, because you are inserting the set of rows returned by that subquery. Here's an example that generates a set having just one row:
insert into foods

values (null,

       (select id from food_types where name='Bakery'),

       'Blackberry Bobka'),

select * from foods where name like '%Bobka';
id          type_id     name

----------  ----------  ----------------

10          1           Chocolate Bobka

413         1           Cinnamon Bobka

414         1           Blueberry Bobka

415         1           Blackberry Bobka
Here, rather than hard-coding the type_id value, I had SQLite look it up for me. Here's another example:
insert into foods

select last_insert_rowid()+1, type_id, name from foods

where name='Chocolate Bobka';

select * from foods where name like '%Bobka';
id          type_id     name

----------  ----------  ----------------

10          1           Chocolate Bobka

413         1           Cinnamon Bobka

414         1           Blueberry Bobka

415         1           Blackberry Bobks

416         1           Chocolate Bobka
This query completely replaces the value list with a select statement. As long as the number of columns in the select clause matches the number of columns in the table (or the number of columns in the columns list, if provided), insert will work just fine. Here, this example added another chocolate bobka and used the expression last_insert_rowid()+1 as the id value. You could have just as easily used NULL instead. In fact, you probably should use NULL rather than last_insert_rowid(), because last_insert_rowid() will return 0 if you did not previously insert a row in the current session. You could safely assume that this would work properly for these examples, but it would not be a good idea to make this assumption in a program.
Inserting Multiple Rows
There is nothing stopping you from inserting multiple rows at a time using the select form of insert. As long as the number of columns matches, insert will insert every row in the result. Here's an example:
sqlite> create table foods2 (id int, type_id int, name text);

sqlite> insert into foods2 select * from foods;

sqlite> select count(*) from foods2;


count(*)

--------------------

418
This creates a new table foods2 and inserts into it all the records from foods.
However, there is an easier way to create and populate a table. The create table statement has a special syntax for creating tables from select statements. The previous example could have been performed in one step using this syntax:
sqlite> create table foods2 as select * from foods;

sqlite> select count(*) from list;


count(*)

--------

418
create table does both steps in one fell swoop. This can be especially useful for creating temporary tables:
create temp table list as

select f.name food, t.name name,

       (select count(episode_id)

        from foods_episodes where food_id=f.id) episodes

from foods f, food_types t

where f.type_id=t.id;

select * from list;
Food                  Name        Episodes

--------------------  ----------  ----------

Bagels                Bakery      1

Bagels, raisin        Bakery      2

Bavarian Cream Pie    Bakery      1

Bear Claws            Bakery      3

Black and White cook  Bakery      2

Bread (with nuts)     Bakery      1

Butterfingers         Bakery      1
Carrot Cake Bakery 1
Chips Ahoy Cookies Bakery 1
Chocolate Bobka Bakery 1
When using this form of CREATE TABLE, be aware that any constraints defined in the source table are not created in the new table. Specifically, the autoincrement columns will not be created in the new table, nor will indexes, UNIQUE constraints, and so forth. Many other databases refer to this approach as CTAS, which stands for Create Table As Select, and that phrase is not uncommon among SQLite users.
It is also worth mentioning here that you have to be aware of unique constraints when inserting rows. If you add duplicate values on columns that are declared as unique, SQLite will stop you in your tracks:
sqlite> select max(id) from foods;


max(id)

-------

416


sqlite> insert into foods values (416, 1, 'Chocolate Bobka'),

SQL error: PRIMARY KEY must be unique
Updating Records
You update records in a table using the update command. The update command modifies one or more columns within one or more rows in a table. update has the following general form:
update table set update_list where predicate;
update_list is a list of one or more column assignments of the form column_name=value. The where clause works exactly as in select. Half of update is really a select statement. The where clause identifies rows to be modified using a predicate. Those rows then have the update list applied to them. Here's an example:
update foods set name='CHOCOLATE BOBKA'

where name='Chocolate Bobka';

select * from foods where name like 'CHOCOLATE%';
id     type_  name

-----  -----  ------------------------------

10     1      CHOCOLATE BOBKA

11     1      Chocolate Eclairs

12     1      Chocolate Cream Pie

222    9      Chocolates, box of

223    9      Chocolate Chip Mint

224    9      Chocolate Covered Cherries
update is a very simple and direct command, and this is pretty much the extent of its use. As in insert, you must be aware of any unique constraints, because they will stop update every bit as much as insert:
sqlite> update foods set id=11 where name='CHOCOLATE BOBKA';

SQL error: PRIMARY KEY must be unique
This is true for any constraint, however.
Deleting Records
You delete records from a table using the delete command. The delete command deletes rows from a table. delete has the following general form:
delete from table where predicate;
Syntactically, delete is a watered-down update statement. Remove the SET clause from update, and you have delete. The where clause works exactly like select, except that it identifies rows to be deleted. Here's an example:
delete from foods where name='CHOCOLATE BOBKA';
Data Integrity
Data integrity is concerned with defining and protecting relationships within and between tables. There are four general types: domain integrity, entity integrity, referential integrity, and user-defined integrity. Domain integrity involves controlling values within columns. Entity integrity involves controlling rows in tables. Referential integrity involves controlling rows between tables—specifically foreign key relationships. And user-defined integrity is a catchall for everything else.
Data integrity is implemented using constraints. A constraint is a control measure used to restrict the values that can be stored in a column or columns. Going by just the values in columns, the database can enforce all four types of integrity constraints. In SQLite, constraints also include support for conflict resolution. Conflict resolution is covered in detail later in this chapter.
Let's deviate from our foods database for a moment and focus on the same contacts table introduced in Chapter 3. The contacts table is defined as follows:
create table contacts (

id integer primary key,

name text not null collate nocase,

phone text not null default 'UNKNOWN',

unique (name,phone) );
As you know by now, constraints are part of a table's definition. They can be associated with a column definition or defined independently in the body of the table definition. Column-level constraints include not null, unique, primary key, foreign key, check, and collate. Table-level constraints include primary key, unique, and check. All of these constraints are covered in the following sections according to their respective integrity types.
Now that you have familiarity with the update, insert, and delete commands in SQLite, the operation of many of the constraints will make sense. Just as these commands operate on data, constraints operate on them, making sure that they work within the guidelines defined in the tables they modify.
Entity Integrity
Relational theory—as implemented in most databases including SQLite—requires that every field in the database must be uniquely identifiable and capable of being located. For a field to be addressable, its corresponding row must also be addressable. And for that, the row must be unique in some way. This is the job of the primary key.
The primary key consists of least one column or a group of columns with a unique constraint. The unique constraint, as you will soon see, simply requires that every value in a column (or group of columns) be distinct. Therefore, the primary key ensures that each row is somehow distinct from all other rows in a table, ultimately ensuring that every field is also addressable. Entity integrity basically keeps data organized in a table. After all, what good is data if you can't find it?
Unique Constraints
Since primary keys are based on unique constraints, we'll start with them. A unique constraint simply requires that all values in a column or a group of columns are distinct from one another or unique. If you attempt to insert a duplicate value or update a value to another value that already exists in the column, the database will issue a constraint violation and abort the operation. unique constraints can be defined at the column or the table level. When defined at the table level, unique constraints can be applied across multiple columns. In this case, the combined value of the columns must be unique. In contacts, there is a unique constraint on both name and phone together. See what happens if we attempt to insert another ‘Jerry’ record with a phone value ‘UNKNOWN’:
sqlite> insert into contacts (name,phone) values ('Jerry','UNKNOWN'),

SQL error: columns name, phone are not unique


sqlite> insert into contacts (name) values ('Jerry'),

SQL error: columns name, phone are not unique


sqlite> insert into contacts (name,phone) values ('Jerry', '555-1212'),
In the first case, I explicitly specified name and phone. This matched the values of the existing record, and the unique constraint kicked in and did not let me do it. The third insert illustrates that the unique constraint applies to name and phone combined, not individually. It inserted another row with ‘Jerry’ as the value for name, which did not cause an error, because name by itself it not unique—only name and phone together.
NULL AND UNIQUE
Primary Key Constraints
In SQLite, a primary key column is always created when you create a table, whether you define one or not. This column is a 64-bit integer value called rowid. It has two aliases, _rowid_ and oid, which can be used to refer to it as well. Default values are automatically generated for it.
SQLite provides an autoincrement feature for primary keys, should you want to define your own. If you define a column's type as integer primary key, SQLite will create a default value on that column, which will provide an integer value that is guaranteed to be unique in that column. In reality, however, this column will simply be an alias for rowid. They will all refer to the same value. Since SQLite uses a 64-bit signed integer for the primary key, the maximum value for this column is 9,223,372,036,854,775,807.
Even if you manage to reach this limit, SQLite will simply start searching for unique values that are not in the column for subsequent inserts. When you delete rows from the table, rowids may be recycled and reused on subsequent inserts. As a result, newly created rowids might not always be in strictly ascending order.
![]() Caution You will remember our discussion on relational data not having implicit order when we discussed the
Caution You will remember our discussion on relational data not having implicit order when we discussed the order by statement in Chapter 3. This is another strong reminder never to assume data in a relational database such as SQLite has any particular order—even when your instincts say it should be safe.
If you want SQLite to use unique automatic primary key values for the life of the table—and not “fill in the gaps”—then add the autoincrement keyword after the integer primary key clause.
In the examples so far, you have managed to insert two records into contacts. Not once did you specify a value for id. As mentioned before, this is because id is declared as integer primary key. Therefore, SQLite supplied an integer value for each insert automatically, as you can see here:
Notice that the primary key is accessible from all the aforementioned aliases, in addition to id:
sqlite> select rowid, oid,_rowid_,id, name, phone from contacts;


id  id  id  id  name   phone

--  --  --  --  ----   -----

1   1   1   1   Jerry  UNKNOWN

2   2   2   2   Jerry  555-1212
If you include the keyword autoincrement after integer primary key, SQLite will use a different key generation algorithm for the column. This algorithm basically prevents rowids from being recycled. It guarantees that only new (not recycled) rowids are provided for every insert. When a table is created with a column containing the autoincrement constraint, SQLite will keep track of that column's maximum rowid in a system table called sqlite_sequence. It will only use values greater than that maximum on all subsequent inserts. If you ever reach the absolute maximum, then SQLite will return a SQLITE_FULL error on subsequent inserts. Here's an example:
sqlite> create table maxed_out(id integer primary key autoincrement, x text);

sqlite> insert into maxed_out values (9223372036854775807, 'last one'),

sqlite> select * from sqlite_sequence;


name        seq

----------  -------------------

maxed_out   9223372036854775807


sqlite> insert into maxed_out values (null, 'will not work'),

SQL error: database is full
Here, we provided the primary key value. SQLite then stored this value as the maximum for maxed_out.id in sqlite_sequence. We supplied the very last (maximum) 64-bit value before wraparound. In the next insert, you used the generated default value, which must be a monotonically increasing value. This wrapped around to 0, and SQLite issued a SQLITE_FULL error.
Although SQLite tracks the maximum value for an autoincrement column in the sqlite_sequence table, it does not prevent you from providing your own values for it in the insert command. The only requirement is that the value you provide must be unique within the column. Here's an example:
sqlite> drop table maxed_out;

sqlite> create table maxed_out(id integer primary key autoincrement, x text);

sqlite> insert into maxed_out values(10, 'works'),

sqlite> select * from sqlite_sequence;
name seq
---------- ----------
maxed_out 10
sqlite> insert into maxed_out values(9, 'works'),
sqlite> select * from sqlite_sequence;
name seq
---------- ----------
maxed_out 10
sqlite> insert into maxed_out values (9, 'fails'),
SQL error: PRIMARY KEY must be unique
sqlite> insert into maxed_out values (null, 'should be 11'),
sqlite> select * from maxed_out;
id x
---------- ------------
9 works
10 works
11 should be 11
sqlite> select * from sqlite_sequence;
name seq
---------- ----------
maxed_out 11
Here, you dropped and re-created the maxed_out table and inserted a record with an explicitly defined rowid of 10. Then you inserted a record with a rowid less than 10, which worked. You tried it again with the same value and it failed, because of the unique constraint. Finally, you inserted another record using the default key value, and SQLite provided the next l value—10+1.
In summary, autoincrement prevents SQLite from recycling primary key values (rowids) and stops when the rowid reaches the maximum signed 64-bit integer value. This feature was added for specific applications that required this behavior. Unless you have such a specific need in your application, it is perhaps best to just use integer primary key for autoincrement columns.
Like unique constraints, primary key constraints can be defined over multiple columns. You don't have to use an integer value for your primary key. If you choose to use another value, SQLite will still maintain the rowid column internally, but it will also place a unique constraint on your declared primary key. Here's an example:
sqlite> create table pkey(x text, y text, primary key(x,y));

sqlite> insert into pkey values ('x','y'),

sqlite> insert into pkey values ('x','x'),

sqlite> select rowid, x, y from pkey;
rowid x y
---------- ---------- ----------
1 x y
2 x x
sqlite> insert into pkey values ('x','x'),
SQL error: columns x, y are not unique
The primary key here is technically just a unique constraint across two columns, because SQLite will always still maintain an internal rowid. But many database design experts will encourage you to use real columns for your primary keys, and I encourage you to do that wherever it makes sense.
Domain Integrity
The simplest definition of domain integrity is the conformance of a column's values to its assigned domain. That is, every value in a column should exist within that column's defined domain. However, the term domain is a little vague. Domains are often compared to types in programming languages, such as strings or floats. And although that is not a bad analogy, domain integrity is actually much broader than that.
Domain constraints make it possible for you to start with a simple type—such as an integer—and add additional constraints to create a more restricted set of acceptable values for a column. For example, you can create a column with an integer type and add the constraint that only three such values are allowed: {-1, 0. 1}. In this case, you have modified the range of acceptable values (from the domain of all integers to just three integers), but not the data type itself. You are dealing with two things: a type and a range.
Consider another example: the name column in the contacts table. It is declared as follows:
name text not null collate nocase
The domain text defines the type and initial range of acceptable values. Everything following it serves to restrict and qualify that range even further. The name column is then the domain of all text values that do not include NULL values where uppercase letters and lowercase letters have equal value. It is still text and operates as text, but its range of acceptable values is further restricted from that of text.
You might say that a column's domain is not the same thing as its type. Rather, its domain is a combination of two things: a type and a range. The column's type defines the representation and operators of its values—how they are stored and how you can operate on them—sort, search, add, subtract, and so forth. A column's range is its set of acceptable values you can store in it, which is not necessarily the same as its declared type. The type's range represents a maximum range of values. The column's range—as you have seen—can be restricted through constraints. So for all practical purposes, you can think of a column's domain as a type with constraints tacked on.
Similarly, there are essentially two components to domain integrity: type checking and range checking. Although SQLite supports many of the standard domain constraints for range checking (not null, check, and so on), its approach to type checking is where things diverge from other databases. In fact, SQLite's approach to types and type checking is one of its most controversial, misunderstood, and disputed features. We'll cover the basics shortly and go into greater depths in Chapter 11 when we discuss SQLite internals.
For now, let's cover the easy stuff first: default values, not null constraints, check constraints, and collations.
Default Values
The default keyword provides a default value for a column if one is not provided in an insert command. The default keyword is only a constraint in that it prevents the absence of a value, stepping in when needed. However, it does fall within domain integrity because it provides a policy for handling null values in a column. If a column doesn't have a default value and you don't provide a value for it in an insert statement, then SQLite will insert null for that column. For example, contacts.name has a default value of ‘UNKNOWN’. With this in mind, consider the following example:
sqlite> insert into contacts (name) values ('Jerry'),

sqlite> select * from contacts;


id          name        phone

----------  ----------  ----------

1           Jerry       UNKNOWN
The insert command inserted a row, specifying a value for name but not phone. As you can see from the resulting row, the default value for phone kicked in and provided the string ‘UNKNOWN’. If phone did not have a default value, then in this example, the value for phone in this row would have been NULL instead.
default also accepts three predefined ANSI/ISO reserved words for generating default dates and times. current_time will generate the current local time in ANSI/ISO-8601 time format (HH:MM:SS). current_date will generate the current date (in YYYY-MM-DD format). current_timestamp will produce a combination of these two (in YYYY-MM-DD HH:MM:SS format). Here's an example:
create table times ( id int,

  date not null default current_date,

  time not null default current_time,

  timestamp not null default current_timestamp );

insert into times (id) values (1);

insert into times (id) values (2);

select * from times;
id   date        time        timestamp

---  ----------  ----------  -------------------

1    2010-06-15  23:30:25    2010-06-15 23:30:25

2    2010-06-15  23:30:40    2010-06-15 23:30:40
These defaults come in quite handy for tables that need to log or timestamp events.
NOT NULL Constraints
If you are one of those people who is not fond of NULL, then the NOT NULL constraint is for you. NOT NULL ensures that values in the column may never be NULL. insert commands may not add NULL in the column, and update commands may not change existing values to NULL. Oftentimes, you will see NOT NULL raise its ugly head in insert statements. Specifically, a NOT NULL constraint without a default constraint will prevent any unspecified values from being used in the insert (because the default values provided in this case are NULL). In the preceding example, the NOT NULL constraint on name requires that an insert command always provide a value for that column. Here's an example:
This insert command specified a phone value but not a name. The NOT NULL constraint on name kicked in and forbade the operation.
A pragmatic way to deal with unknown data and NOT NULL constraints is to also include a default constraint for the column. This is the case for phone. Although phone has a NOT NULL constraint, it has a default constraint as well. If an insert command does not specify a value for phone, the default constraint steps in and provides the value ‘UNKNOWN’, thus satisfying the NOT NULL constraint. To this end, people often use default constraints in conjunction with NOT NULL constraints so that insert commands can safely use default values while at the same time keeping NULL out of the column.
Check Constraints
Check constraints allow you to define expressions to test values whenever they are inserted into or updated within a column. If the values do not meet the criteria set forth in the expression, the database issues a constraint violation. Thus, it allows you to define additional data integrity checks beyond unique or NOT NULL to suit your specific application. An example of a check constraint might be to ensure that the value of a phone number field is at least seven characters long. To do this, you can add the constraint to the column definition of phone or as a stand-alone constraint in the table definition as follows:
create table contacts

( id integer primary key,

name text not null collate nocase,

phone text not null default 'UNKNOWN',

unique (name,phone),

check (length(phone)>=7) );
Here, any attempt to insert or update a value for phone less than seven characters will result in a constraint violation. You can use any expression in a check constraint that you would in a where clause, with the exception of subqueries. For example, say you have the table foo defined as follows:
create table foo

( x integer,

y integer check (y>x),

z integer check (z>abs(y)) );
In this table, every value of z must always be greater than y, which in turn must be greater than x. To show illustrate this, try the following:
insert into foo values (-2, -1, 2);

insert into foo values (-2, -1, 1);

SQL error: constraint failed


update foo set y=-3 where x=-3;

SQL error: constraint failed
The check constraints for all columns are evaluated before any modification is made. For the modification to succeed, the expressions for all constraints must evaluate to true.
Functionally, triggers can be used just as effectively as check constraints for data integrity. In fact, triggers can do much more. If you find that you can't quite express what you need in a check constraint, then triggers are a good alternative. Triggers are covered later in this chapter in the section “Triggers.”
Foreign Key Constraints
SQLite supports the concept of relational integrity from relational theory. Like most databases, it supports this through the mechanism of foreign key constraints. Relational integrity, and by extension foreign keys, ensures that where a key value in one table logically refers to data in another table, the data in the other table actually exists. Classic examples are parent-child relationships, master-detail relationships for things such as orders and line items, and even episode-food relationships.
SQLite supports foreign key creation in the create table statement using the following syntax (simplified here for easy reading):
create table table_name

( column_definition references foreign_table (column_name)

  on {delete|update} integrity_action

  [not] deferrable [initially {deferred|immediate}, ]

. . .);
That syntax looks daunting, but in reality it can be broken down into three basic components. Let's use a real example of foods database. The foods and food_types tables are currently defined as follows:
CREATE TABLE food_types(

  id integer primary key,

  name text );
CREATE TABLE foods(

  id integer primary key,

  type_id integer,

  name text );
We know each food_type has an id that uniquely identifies it (see the earlier discussion on primary keys). The foods table uses the type_id column to reference foods in the food_types table. If you want to use referential integrity to have SQLite protect your data and ensure that there always exists a food type for any reference of a food, then you can create the foods table like this instead:
create table foods(

  id integer primary key,

  type_id integer references food_types(id)

  on delete restrict

  deferrable initially deferred,

  name text );
The differences are shown in bold and are easy to understand if taken one at a time. The first part of the foreign key instructs SQLite that the type_id column references the id column of the food_types table. From there, you move on to the integrity action clause, which does most of the hard work. In this example, you've used the option on delete restrict. This instructs SQLite to prevent any deletion from the food_types table that would leave a food in the foods table without a parent food id. restrict is one of five possible actions you can define. The full set is as follows:
set null: Change any remaining child value toNULLif the parent value is removed or changed to no longer exist.
set default: Change any remaining child value to the column default if the parent value is removed or changed to no longer exist.
cascade: Where the parent key is updated, update all child keys to match. Where it is deleted, delete all child rows with the key. Pay particular attention to this option, because cascading deletes can surprise you when you least expect them.
restrict: Where the update or delete of the parent key would result in orphaned child keys, prevent (abort) the transaction.
no action: Take a laid-back approach, and watch changes fly by without intervening. Only at the end of the entire statement (or transaction if the constraint is deferred) is an error raised.
Lastly, SQLite supports the deferrable clause, which controls whether the constraint as defined will be enforced immediately or deferred until the end of the transaction.
Collations
Collation refers to how text values are compared. Different collations employ different comparison methods. For example, one collation might be case insensitive, so the strings ‘JujyFruit’ and ‘JUJYFRUIT’ are considered the same. Another collation might be case sensitive, in which case the strings would be considered different.
SQLite has three built-in collations. The default is binary, which compares text values byte by byte using a specific C function called memcmp(). This happens to work nicely for many Western languages such as English. nocase is basically a case-insensitive collation for the 26 ASCII characters used in Latin alphabets. Finally there is reverse, which is the reverse of the binary collation. Reverse is more for testing (and perhaps illustration) than anything else.
The SQLite C API provides a way to create custom collations. This feature allows developers to support languages and/or locales that are not well served by the binary collation. See Chapter 7 for more information.
The collate keyword defines the collation for a column. For example, the collation for contacts.name is defined as nocase, which means that it is case insensitive. Thus, if you try to insert another row with a name value of ‘JERRY’ and a phone value of ‘555-1212’, it should fail:
sqlite> insert into contacts (name,phone) values ('JERRY','555-1212'),

SQL error: columns name, phone are not unique
According to name's collation, ‘JERRY’ is the same as ‘Jerry’, and there is already a row with that value. Therefore, a new row with name='JERRY’ would be a duplicate value. By default, collation in SQLite is case sensitive. The previous example would have worked had we not defined nocase on name.
Storage Classes
As mentioned earlier, SQLite does not work like other databases when it comes to handling data types. It differs in the types it supports and in how they are stored, compared, enforced, and assigned. I'll cover the basics of SQLite storage classes next to give you a good working knowledge. In Chapter 11, I will address many of the internals of SQLite's radically different but surprisingly flexible approach to data types.
Internally, SQLite has five primitive data types, which are referred to as storage classes. The term storage class refers to the format in which a value is stored on disk. Regardless, it is still synonymous with type, or data type. Table 4-1 describes the five storage classes.
Table 4-1. SQLite Storage Classes
| Name | Description |
integer |
Integer values are whole numbers (positive and negative). They can vary in size: 1, 2, 3, 4, 6, or 8 bytes. The maximum integer range (8 bytes) is {-9223372036854775808,-1,0,1, 9223372036854775807}. SQLite automatically handles the integer sizes based on the numeric value. |
real |
Real values are real numbers with decimal values. SQLite uses 8-byte floats to store real numbers. |
text |
Text is character data. SQLite supports various character encodings, which include UTF-8 and UTF-16 (big and little endian). The maximum string value in SQLite is adjustable at compile time and at runtime and defaults to 1,000,000,000 bytes. |
blob |
Binary large object (BLOB) data is any kind of data. The maximum size for BLOBs in SQLite is adjustable at compile time and at runtime and defaults to 1,000,000,000 bytes. |
NULL |
NULL represents missing information. SQLite has full support for NULL handling. |
SQLite infers a value's type from its representation. The following inference rules are used to do this:
- A value specified as a literal in SQL statements is assigned class
textif it is enclosed by single or double quotes. - A value is assigned class
integerif the literal is specified as an unquoted number with no decimal point or exponent. - A value is assigned class
realif the literal is an unquoted number with a decimal point or an exponent. - A value is assigned class
NULLif its value isNULL. - A value is assigned class
blobif it is of the formatx'ABCD’, whereABCDare hexadecimal numbers. Thexprefix and values can be either uppercase or lowercase.
The typeof() SQL function returns the storage class of a value based on its representation. Using this function, the following SQL illustrates type inference in action:
sqlite> select typeof(3.14), typeof('3.14'),

        typeof(314), typeof(x'3142'), typeof(NULL);


typeof(3.14)  typeof('3.14')  typeof(314)  typeof(x'3142')  typeof(NULL)

------------  --------------  -----------  ---------------  ------------

real          text            integer      blob             null
Here are all of the five internal storage classes invoked by specific representations of data. The value 3.14 looks like a real and therefore is a real. The value ‘3.14’ looks like text and therefore is text, and so on.
A single column in SQLite may contain different values of different storage classes. This is the first difference in SQLite data handling that usually makes those familiar with other databases sit up and say, “What?” Consider the following example:
sqlite> drop table domain;

sqlite> create table domain(x);

sqlite> insert into domain values (3.142);

sqlite> insert into domain values ('3.142'),

sqlite> insert into domain values (3142);

sqlite> insert into domain values (x'3142'),

sqlite> insert into domain values (null);

sqlite> select rowid, x, typeof(x) from domain;


rowid       x           typeof(x)

----------  ----------  ----------

1           3.142       real

2           3.142       text

3           3142        integer

4           1B          blob

5           NULL        null
This raises a few questions. How are the values in a column sorted or compared? How do you sort a column with integer, real, text, blob, and NULL values? How do you compare an integer with a blob? Which is greater? Can they ever be equal?
As it turns out, values in a column with different storages classes can be sorted. And they can be sorted because they can be compared. SQLite implements well-defined rules to do so. Storage classes are sorted by using their respective class values, which are defined as follows:
- The
NULLstorage class has the lowest class value. A value with aNULLstorage class is considered less than any other value (including another value with storage classNULL). WithinNULLvalues, there is no specific sort order. integerorrealstorage classes have higher value thanNULLs and share equal class value.integerandrealvalues are compared numerically.- The
textstorage class has higher value thanintegerorreal. A value with anintegeror arealstorage class will always be less than a value with atextstorage class no matter its value. When twotextvalues are compared, the comparison is determined by the collation defined for the values. - The
blobstorage class has the highest value. Any value that is not of classblobwill always be less than a value of classblob.blobvalues are compared using the C functionmemcmp().
When SQLite sorts a column, it first groups values according to storage class—first NULLs, then integers and reals, next text, and finally blobs. It then sorts the values within each group. NULLs are not ordered at all, integers and reals are compared numerically, text is arranged by the appropriate collation, and blobs are sorted using memcmp(), effectively comparing them in a bitwise fashion. Figure 4-1 illustrates a hypothetical column sorted in ascending order.
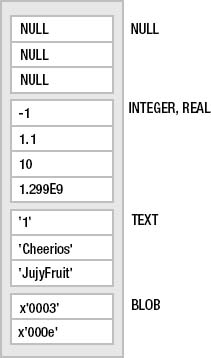
Figure 4-1. Storage class sort order
It's probably worth reading this section again once you've had a chance to practice some SQL using SQLite's storage classes, just to reinforce this particular aspect of SQLite. You'll return to this topic in Chapter 11, when you'll delve into the internals of storage classes, manifest typing, type affinity, and other under-the-hood topics related to types and storage classes.
Views
Views are virtual tables. They are also known as derived tables, because their contents are derived from the results of queries on other tables. Although views look and feel like base tables, they aren't. The contents of base tables are persistent, whereas the contents of views are dynamically generated when they are used. The syntax to create a view is as follows:
create view name as select-stmt;
The name of the view is given by name and its definition by select-stmt. The resulting view will look like a base table named name. Imagine you had a query you ran all the time, so much that you get sick of writing it. Views are the solution for this particular chore. Say your query was as follows:
select f.name, ft.name, e.name

from foods f

inner join food_types ft on f.type_id=ft.id

inner join foods_episodes fe on f.id=fe.food_id

inner join episodes e on fe.episode_id=e.id;
This returns the name of every food, its type, and every episode it was in. It is one big table of 504 rows with just about every food fact. Rather than having to write out (or remember) the previous query every time you want these results, you can tidily restate it in the form of a view. Let's name it details:
create view details as

select f.name as fd, ft.name as tp, e.name as ep, e.season as ssn

from foods f

inner join food_types ft on f.type_id=ft.id

inner join foods_episodes fe on f.id=fe.food_id

inner join episodes e on fe.episode_id=e.id;
Now you can query details just as you would a table. Here's an example:
sqlite> select fd as Food, ep as Episode

        from details where ssn=7 and tp like 'Drinks';


Food                  Episode

--------------------  --------------------

Apple Cider           The Bottle Deposit 1

Bosco                 The Secret Code

Cafe Latte            The Postponement

Cafe Latte            The Maestro

Champagne Coolies     The Wig Master

Cider                 The Bottle Deposit 2

Hershey's             The Secret Code

Hot Coffee            The Maestro

Latte                 The Maestro

Mellow Yellow soda    The Bottle Deposit 1

Merlot                The Rye

Orange Juice          The Wink

Tea                   The Hot Tub

Wild Turkey           The Hot Tub
The contents of views are dynamically generated. Thus, every time you use details, its associated SQL will be reexecuted, producing results based on the data in the database at that moment. Some features of views available in other databases, like view-based security, are not generally available. Some view-based security is available if you program with SQLite, using its operational control facilities. This is covered in Chapters 5 and 6.
Finally, to drop a view, use the DROP VIEW command:
drop view name;
The name of the view to drop is given by name.
UPDATABLE VIEWS
Indexes
Indexes are a construct designed to speed up queries under certain conditions. Consider the following query:
SELECT * FROM foods WHERE name='JujyFruit';
When a database searches for matching rows, the default method it uses to perform this is called a sequential scan. That is, it literally searches (or scans) every row in the table to see whether its name attribute matches ‘JujyFruit’.
However, if this query is used frequently and the foods table is very large, it makes far more sense to use an index approach to finding the data. SQLite uses B-tree indexes, similar to many other relational databases.
Indexes also increase the size of the database. They literally keep a copy of all columns they index. If you index every column in a table, you effectively double the size of the table. Another consideration is that indexes must be maintained. When you insert, update, or delete records, in addition to modifying the table, the database must modify each and every index on that table as well. So although indices can make queries run much faster, they can slow down inserts, updates, and similar operations.
The command to create an index is as follows:
create index [unique] index_name on table_name (columns)
The variable index_name is the name of the index, and table_name is the name of the table containing the column(s) to index. The variable columns is either a single column or a comma-separated list of columns.
If you use the unique keyword, then the index will have the added constraint that all values in the index must be unique. This applies to both the index and, by extension, to the column or columns it indexes. The unique constraint covers all columns defined in the index, and it is their combined values (not individual values) that must be unique. Here's an example:
sqlite> create table foo(a text, b text);

sqlite> create unique index foo_idx on foo(a,b);

sqlite> insert into foo values ('unique', 'value'),
sqlite> insert into foo values ('unique', 'value2'),
sqlite> insert into foo values ('unique', 'value'),
SQL error: columns a, b are not unique
You can see here that uniqueness is defined by both columns collectively, not individually. Notice that collation plays an important role here as well.
To remove an index, use the drop index command, which is defined as follows:
drop index index_name;
Collations
Each column in the index can have a collation associated with it. For example, to create a case-insensitive index on foods.name, you'd use the following:
create index foods_name_idx on foods (name collate nocase);
This means that values in the name column will sort without respect to case. You can list the indexes for a table in the SQLite command-line program by using the .indices shell command. Here's example:
sqlite> .indices foods

foods_name_idx

For more information, you can use the .schema shell command as well:

sqlite> .schema foods

CREATE TABLE foods(

  id integer primary key,

  type_id integer,

  name text );

CREATE INDEX foods_name_idx on foods (name COLLATE NOCASE);
You can also obtain this information by querying the sqlite_master table, described later in this section.
Index Utilization
It is important to understand when indexes are used and when they aren't. There are very specific conditions in which SQLite will decide to use an index. SQLite will use a single column index, if available, for the following expressions in the WHERE clause:
column {=|>|>=|<=|<} expression

expression {=|>|>=|<=|<} column

column IN (expression-list)

column IN (subquery)
Multicolumn indexes have more specific conditions before they are used. This is perhaps best illustrated by example. Say you have a table defined as follows:
create table foo (a,b,c,d);
Furthermore, you create a multicolumn index as follows:
create index foo_idx on foo (a,b,c,d);
The columns of foo_idx can be used only sequentially from left to right. That is, in the following query:
select * from foo where a=1 and b=2 and d=3
only the first and second conditions will use the index. The reason the third condition was excluded is because there was no condition that used c to bridge the gap to d. Basically, when SQLite uses a multicolumn index, it works from left to right column-wise. It starts with the left column and looks for a condition using that column. It moves to the second column, and so on. It continues until either it fails to find a valid condition in the WHERE clause that uses it or there are no more columns in the index to use.
But there is one more requirement. SQLite will use a multicolumn index only if all of the conditions use either the equality (=) or IN operator for all index columns except for the rightmost index column. For that column, you can specify up to two inequalities to define its upper and lower bounds. Consider this example:
select * from foo where a>1 and b=2 and c=3 and d=4
SQLite will only do an index scan on column a. The a>1 expression becomes the rightmost index column because it uses the inequality. All columns after it are not eligible to be used as a result. Similarly, the following:
select * from foo where a=1 and b>2 and c=3 and d=4
will use the index columns a and b and stop there as b>2 becomes the rightmost index term by its use of an inequality operator.
Lastly, when you create an index, have a reason for creating it. Make sure there is a specific performance gain you are getting before you take on the overhead that comes with it. Well-chosen indexes are a wonderful thing. Indexes that are thoughtlessly scattered here and there in the vain hope of performance are of dubious value.
Triggers
Triggers execute specific SQL commands when specific database events transpire on specific tables. The general syntax for creating a trigger is as follows:
create [temp|temporary] trigger name

[before|after] [insert|delete|update|update of columns] on table

action
A trigger is defined by a name, an action, and a table. The action, or trigger body, consists of a series of SQL commands. Triggers are said to fire when such events take place. Furthermore, triggers can be made to fire before or after the event using the before or after keyword, respectively. Events include delete, insert, and update commands issued on the specified table. Triggers can be used to create your own integrity constraints, log changes, update other tables, and many other things. They are limited only by what you can write in SQL.
Update Triggers
Update triggers, unlike insert and delete triggers, may be defined for specific columns in a table. The general form of this kind of trigger is as follows:
create trigger name

[before|after] update of column on table

action
The following is a SQL script that shows an UPDATE trigger in action:
create temp table log(x);


create temp trigger foods_update_log update of name on foods

begin

  insert into log values('updated foods: new name=' || new.name);

end;


begin;

update foods set name='JUJYFRUIT' where name='JujyFruit';

select * from log;

rollback;
This script creates a temporary table called log, as well as a temporary update trigger on foods.name that inserts a message into log when it fires. The action takes place inside the transaction that follows. The first step of the transaction updates the name column of the row whose name is ‘JUJYFRUIT’. This causes the update trigger to fire. When it fires, it inserts a record into the log. Next, the transaction reads the log, which shows that the trigger did indeed fire. The transaction then rolls back the change, and when the session ends, the log table and the update trigger are destroyed. Running the script produces the following output:
# sqlite3 foods.db < trigger.sql
create temp table log(x);


create temp trigger foods_update_log after update of name on foods

begin

  insert into log values('updated foods: new name=' || new.name);

end;


begin;

update foods set name='JUJYFRUIT' where name='JujyFruit';

SELECT * FROM LOG;

x

--------------------------------------------------

updated foods: new name=JUJYFRUIT

rollback;
SQLite provides access to both the old (original) row and the new (updated) row in update triggers. The old row is referred to as old and the new row as new. Notice in the script how the trigger refers to new.name. All attributes of both rows are available in old and new using the dot notation. You could have just as easily recorded new.type_id or old.id.
Error Handling
Defining a trigger before an event takes place gives you the opportunity to stop the event from happening and, equally, examining the event afterward allows you to have second thoughts. before and after triggers enable you to implement new integrity constraints. SQLite provides a special SQL function for triggers called raise(), which allows them to raise an error within the trigger body. raise is defined as follows:
raise(resolution, error_message);
The first argument is a conflict resolution policy (abort, fail, ignore, rollback, and so on). The second argument is an error message. If you use ignore, the remainder of the current trigger along with the SQL statement that caused the trigger to fire, as well as any subsequent triggers that would have been fired, are all terminated. If the SQL statement that caused the trigger to fire is itself part of another trigger, then that trigger resumes execution at the beginning of the next SQL command in the trigger action.
Updatable Views
Triggers make it possible to create something like updatable views, as mentioned earlier in this chapter. The idea here is that you create a view and then create a trigger that handles update events on that view. SQLite supports triggers on views using the instead of keywords in the trigger definition. To illustrate this, let's create a view that combines foods with food_types:
create view foods_view as

  select f.id fid, f.name fname, t.id tid, t.name tname

  from foods f, food_types t;
This view joins the two tables according to their foreign key relationship. Notice that you have created aliases for all column names in the view. This allows you to differentiate the respective id and name columns in each table when you reference them from inside the trigger. Now, let's make the view updatable by creating an UPDATE trigger on it:
create trigger on_update_foods_view

instead of update on foods_view

for each row

begin

   update foods set name=new.fname where id=new.fid;

   update food_types set name=new.tname where id=new.tid;

end;
Now if you try to update the foods_view, this trigger gets called. The trigger simply takes the values provided in the UPDATE statement and uses them to update the underlying base tables foods and food_types. Testing it yields the following:
.echo on

-- Update the view within a transaction

begin;

update foods_view set fname='Whataburger', tname='Fast Food' where fid=413;

-- Now view the underlying rows in the base tables:

select * from foods f, food_types t where f.type_id=t.id and f.id=413;

-- Roll it back

rollback;

-- Now look at the original record:

select * from foods f, food_types t where f.type_id=t.id and f.id=413;
begin;

update foods_view set fname='Whataburger', tname='Fast Food' where fid=413;

select * from foods f, food_types t where f.type_id=t.id and f.id=413;

id   type_id  name            id   name

---  -------  --------------  ---  ---------

413  1        Whataburger     1    Fast Food


rollback;


select * from foods f, food_types t where f.type_id=t.id and f.id=413;

id   type_id  name            id   name

---  -------  --------------  ---  -------

413  1        Cinnamon Bobka  1    Bakery
You can just as easily add insert and delete triggers to complete the trigger based manipulation of data via views.
Transactions
Transactions define boundaries around a group of SQL commands such that they either all successfully execute together or not at all. This is typically referred to as the atomic principle of database integrity. A classic example of the rationale behind transactions is a money transfer. Say a bank program is transferring money from one account to another. The money transfer program can do this in one of two ways: first insert (credit) the funds into account 2 and then delete (debit) it from account 1, or first delete it from account 1 and insert it into account 2. Either way, the transfer is a two-step process: an insert followed by a delete, or a delete followed by an insert.
But what happens if, during the transfer, the database server suddenly crashes or the power goes out, and the second operation does not complete? Now the money either exists in both accounts (the first scenario) or has been completely lost altogether (second scenario). Either way, someone is not going to be happy. And the database is in an inconsistent state. The point here is that these two operations must either happen together or not at all. That is the essence of transactions.
Transaction Scopes
Transactions are issued with three commands: begin, commit, and rollback. begin starts a transaction. Every operation following a begin can be potentially undone and will be undone if a commit is not issued before the session terminates. The commit command commits the work performed by all operations since the start of the transaction. Similarly, the rollback command undoes all the work performed by all operations since the start of the transaction. A transaction is a scope in which operations are performed and committed, or rolled back, together. Here is an example:
sqlite> begin;

sqlite> delete from foods;

sqlite> rollback;

sqlite> select count(*) from foods;


count(*)

--------

412
We started a transaction, deleted all the rows in foods, changed our mind, and reversed those changes by issuing a rollback. The select statement shows that nothing was changed.
By default, every SQL command in SQLite is run under its own transaction. That is, if you do not define a transaction scope with begin. . .commit/rollback, SQLite will implicitly wrap every individual SQL command with a begin…commit/rollback. In that case, every command that completes successfully is committed. Likewise, every command that encounters an error is rolled back. This mode of operation (implicit transactions) is referred to as autocommit mode: SQLite automatically runs each command in its own transaction, and if the command does not fail, its changes are automatically committed.
SQLite also supports the savepoint and release commands. These commands extend the flexibility of transactions so that a body of work that incorporates multiple statements can set a savepoint, which SQLite can then revert to in the event of a rollback. Creating a savepoint is a simple as issuing the savepoint command with a name of your choice, just as in this next example:
savepoint justincase;
Later, if we realize our processing needs to be reverted, instead of rolling all the way back to the start of the transaction, we can use a named rollback as follows:
rollback [transaction] to justincase;
I've chosen justincase as the savepoint name. You can choose any name you like.
Conflict Resolution
As you've seen in previous examples, constraint violations cause the command that committed the violation to terminate. What exactly happens when a command terminates in the middle of making a bunch of changes to the database? In most databases, all of the changes are undone. That is the way the database is programmed to handle a constraint violation—end of story.
SQLite, however, has an uncommon feature that allows you to specify different ways to handle (or recover from) constraint violations. It is called conflict resolution. Take, for example, the following UPDATE:
sqlite> update foods set id=800-id;

SQL error: PRIMARY KEY must be unique
This results in a UNIQUE constraint violation because once the update statement reaches the 388th record, it attempts to update its id value to 800-388=412. But a row with an id of 412 already exists, so it aborts the command. But SQLite already updated the first 387 rows before it reached this constraint violation. What happens to them? The default behavior is to terminate the command and reverse all the changes it made, while leaving the transaction intact.
But what if you wanted these 387 changes to stick despite the constraint violation? Well, believe it or not, you can have it that way too, if you want. You just need to use the appropriate conflict resolution. There are five possible resolutions, or policies, that can be applied to address a conflict (constraint violation): replace, ignore, fail, abort, and rollback. These five resolutions define a spectrum of error tolerance or sensitivity: from replace, the most forgiving, to rollback, the most strict. The resolutions are defined as follows in order of their severity:
replace: When auniqueconstraint violation is encountered, SQLite removes the row (or rows) that caused the violation and replaces it (them) with the new row from theinsertorupdate. The SQL operation continues without error. If aNOT NULLconstraint violation occurs, theNULLvalue is replaced by the default value for that column. If the column has no default value, then SQLite applies theabortpolicy. It is important to note that when this conflict resolution strategy deletes rows in order to satisfy a constraint, it does not invoke delete triggers on those rows. This behavior, however, is subject to change in a future release.ignore: When a constraint violation is encountered, SQLite allows the command to continue and leaves the row that triggered the violation unchanged. Other rows before and after the row in question continue to be modified by the command. Thus, all rows in the operation that trigger constraint violations are simply left unchanged, and the command proceeds without error.fail: When a constraint violation is encountered, SQLite terminates the command but does not restore the changes it made prior to encountering the violation. That is, all changes within the SQL command up to the violation are preserved. For example, if anupdatestatement encountered a constraint violation on the 100th row it attempts to update, then the changes to the first 99 rows already modified remain intact, but changes to rows 100 and beyond never occur as the command is terminated.abort: When a constraint violation is encountered, SQLite restores all changes the command made and terminates it.abortis the default resolution for all operations in SQLite. It is also the behavior defined in the SQL standard. As a side note,abortis also the most expensive conflict resolution policy—requiring extra work even if no conflicts ever occur.rollback: When a constraint violation is encountered, SQLite performs arollback—aborting the current command along with the entire transaction. The net result is that all changes made by the current command and all previous commands in the transaction are rolled back. This is the most drastic level of conflict resolution where a single violation results in a complete reversal of everything performed in a transaction.
Conflict resolution can be specified within SQL commands as well as within table and index definitions. Specifically, conflict resolution can be specified in insert, update, create table, and create index. Furthermore, it has specific implications within triggers. The syntax for conflict resolution in insert and update is as follows:
insert or resolution into table (column_list) values (value_list);

update or resolution table set (value_list) where predicate;
The conflict resolution policy comes right after the insert or update command and is prefixed with OR. Also, the insert or replace expression can be abbreviated as just replace. This is similar to other database's “merge” or “upsert” behavior.
In the preceding update example, the updates made to the 387 records were rolled back because the default resolution is abort. If you wanted the updates to stick, you could use the fail resolution. To illustrate this, in the following example you copy foods into a new table test and use it as the guinea pig. You add an additional column to test called modified, the default value of which is ‘no’. In the update, you change this to ‘yes’ to track which records are updated before the constraint violation occurs. Using the fail resolution, these updates will remain unchanged, and you can track afterward how many records were updated.
create table test as select * from foods;

create unique index test_idx on test(id);

alter table test add column modified text not null default 'no';

select count(*) from test where modified='no';


count(*)

--------------------

412


update or fail test set id=800-id, modified='yes';

SQL error: column id is not unique


select count(*) from test where modified='yes';


count(*)

--------------------

387


drop table test;
![]() Caution There is one consideration with
Caution There is one consideration with fail of which you need to be aware. The order that records are updated is nondeterministic. That is, you cannot be certain of the order of the records in the table or the order in which SQLite processes them. You might assume that it follows the order of the rowid column, but this is not a safe assumption to make. There is nothing in the documentation that says so. Once again, never assume any implicit ordering when working with any kind of database. If you are going to use fail, in many cases it might be better to use ignore. ignore will finish the job and modify all records that can be modified rather than bailing out on the first violation.
When defined within tables, conflict resolution is specified for individual columns. Here's an example:
sqlite> create temp table cast(name text unique on conflict rollback);

sqlite> insert into cast values ('Jerry'),

sqlite> insert into cast values ('Elaine'),

sqlite> insert into cast values ('Kramer'),
The cast table has a single column name with a unique constraint and conflict resolution set to rollback. Any insert or update that triggers a constraint violation on name will be arbitrated by the rollback resolution rather than the default abort. The result will abort not only the statement but the entire transaction as well:
sqlite> begin;

sqlite> insert into cast values('Jerry'),

SQL error: uniqueness constraint failed


sqlite> commit;

SQL error: cannot commit - no transaction is active
commit failed here because the name's conflict resolution already aborted the transaction. create index works the same way. Conflict resolution within tables and indices changes the default behavior of the operation from abort to that defined for the specific columns when those columns are the source of the constraint violation.
Conflict resolution at the statement level (DML) overrides that defined at the object level (DDL). Working from the previous example:
sqlite> begin;

sqlite> insert or replace into cast values('Jerry'),

sqlite> commit;
the replace resolution in the insert overrides the rollback resolution defined on cast.name.
Database Locks
Locking is closely associated with transactions in SQLite. To use transactions effectively, you need to know a little something about how it does locking.
SQLite has coarse-grained locking. When a session is writing to the database, all other sessions are locked out until the writing session completes its transaction. To help with this, SQLite has a locking scheme that helps defer writer locks until the last possible moment in order to maximize concurrency.
WRITE-AHEAD LOGGING: THE FUTURE OF SQLITE
SQLite uses a lock escalation policy whereby a connection gradually obtains exclusive access to a database in order to write to it. There are five different locking states in SQLite: unlocked, shared, reserved, pending, and exclusive. Each database session (or connection) can be in only one of these states at any given time. Furthermore, there is a corresponding lock for each state, except for unlocked—there is no lock required to be in the unlocked state.
To begin with, the most basic state is unlocked. In this state, no session is accessing data from the database. When you connect to a database or even initiate a transaction with BEGIN, your connection is in the unlocked state.
The next state beyond unlocked is shared. For a session to read from the database (not write), it must first enter the shared state and must therefore acquire a shared lock. Multiple sessions can simultaneously acquire and hold shared locks at any given time. Therefore, multiple sessions can read from a common database at any given time. However, no session can write to the database during this time—while any shared locks are active.
If a session wants to write to the database, it must first acquire a reserved lock. Only one reserved lock may be held at one time for a given database. Shared locks can coexist with a reserved lock. A reserved lock is the first phase of writing to a database. It does not block sessions with shared locks from reading, and it does not prevent sessions from acquiring new shared locks.
Once a session has a reserved lock, it can begin the process of making modifications; however, these modifications are cached and not actually written to disk. The reader's changes are stored in a memory cache (see the discussion of the cache_size pragma in the section “Database Configuration,” later in this chapter, for more information).
When the session wants to commit the changes (or transaction) to the database, it begins the process of promoting its reserved lock to an exclusive lock. To get an exclusive lock, it must first promote its reserved lock to a pending lock. A pending lock starts a process of attrition whereby no new shared locks can be obtained. That is, other sessions with existing shared locks are allowed to continue as normal, but other sessions cannot acquire new shared locks. At this point, the session with the pending lock is waiting for the other sessions with shared locks to finish what they are doing and release them.
Once all shared locks are released, the session with the pending lock can promote it to an exclusive lock. It is then free to make changes to the database. All of the previously cached changes are written to the database file.
Deadlocks
Although you may find the preceding discussion on locking to be interesting, you are probably wondering at this point why any of it matters. Why do you need to know about locking? Well, if you don't know what you are doing, you can end up in a deadlock.
Consider the following scenario illustrated in Table 4-2. Two sessions, A and B—completely oblivious to one another—are working on the same database at the same time. Session A issues the first command, B the second and third, A the fourth, and so on.
Table 4-2. A Portrait of a Deadlock
| Session A | Session B |
sqlite> begin; |
|
sqlite> begin; |
|
sqlite> insert into foo values ('x'), |
|
sqlite> select * from foo; |
|
sqlite> commit; |
|
SQL error: database is locked |
|
sqlite> insert into foo values ('x'), |
|
SQL error: database is locked |
Both sessions wind up in a deadlock. Session B was the first to try to write to the database and therefore has a pending lock. A attempts to write but fails when INSERT tries to promote its shared lock to a reserved lock.
For the sake of argument, let's say that A decides to just wait around for the database to become writable. So does B. Then at this point, everyone else is effectively locked out too. If you try to open a third session, it won't even be able to read from the database. The reason is that B has a pending lock, which prevents any sessions from acquiring shared locks. So, not only are A and B deadlocked, they have locked everyone else out of the database as well. Basically, you have a shared lock and one pending lock that don't want to relinquish control, and until one does, nobody can do anything.
How do you avoid a deadlock? It's not like A and B can sit down in a meeting and work it out with their lawyers. A and B don't even know each other exists. The answer is to pick the right transaction type for the job.
Transaction Types
SQLite has three different transaction types that start transactions in different locking states. Transactions can be started as deferred, immediate, or exclusive. A transaction's type is specified in the begin command:
begin [ deferred | immediate | exclusive ] transaction;
A deferred transaction does not acquire any locks until it has to. Thus, with a deferred transaction, the begin statement itself does nothing—it starts in the unlocked state. This is the default. If you simply issue a begin, then your transaction is deferred and therefore sitting in the unlocked state. Multiple sessions can simultaneously start deferred transactions at the same time without creating any locks. In this case, the first read operation against a database acquires a shared lock, and similarly the first write operation attempts to acquire a reserved lock.
An immediate transaction attempts to obtain a reserved lock as soon as the begin command is executed. If successful, begin immediate guarantees that no other session will be able to write to the database. As you know, other sessions can continue to read from the database, but the reserved lock prevents any new sessions from reading. Another consequence of the reserved lock is that no other sessions will be able to successfully issue a begin immediate or begin exclusive command. SQLite will return a SQLITE_BUSY error. During this time, you can make some modifications to the database, but you may not necessarily be able to commit them. When you call commit, you could get SQLITE_BUSY. This means that there are other readers active, as in the earlier example. Once they are gone, you can commit the transaction.
An exclusive transaction obtains an exclusive lock on the database. This works similarly to immediate, but when you successfully issue it, exclusive guarantees that no other session is active in the database and that you can read or write with impunity.
The crux of the problem in the preceding example is that both sessions ultimately wanted to write to the database, but they made no attempt to relinquish their locks. Ultimately, it was the shared lock that caused the problem. If both sessions had started with begin immediate, then the deadlock would not have occurred. In this case, only one of the sessions would have been able to enter begin immediate at one time, while the other would have to wait. The one that has to wait could keep retrying with the assurance that it would eventually get in. begin immediate and begin exclusive, if used by all sessions that want to write to the database, provide a synchronization mechanism, thereby preventing deadlocks. For this approach to work, though, everyone has to follow the rules.
The bottom line is this: if you are using a database that no other connections are using, then a simple begin will suffice. If, however, you are using a database that other connections are also writing to, both you, and they should use begin immediate or begin exclusive to initiate transactions. It works out best that way for both of you. Transactions and locks are covered in more detail in Chapter 5.
Database Administration
Database administration is generally concerned with controlling how a database operates. Many of the database administration tasks you'll want to perform are done via SQL commands. SQLite includes some unique administrative features of its own, such the means to “attach” multiple databases to a single session, as well as database pragmas, which can be used for setting various configuration parameters.
Attaching Databases
SQLite allows you to “attach” multiple databases to the current session using the attach command. When you attach a database, all of its contents are accessible in the global scope of the current database file. attach has the following syntax:
attach [database] filename as database_name;
Here, filename refers to the path and name of the SQLite database file, and database_name refers to the logical name with which to reference that database and its objects. The main database is automatically assigned the name main. If you create any temporary objects, then SQLite will create an attached database name temp. (You can see these objects using the database_list pragma, described later.) The logical name may be used to reference objects within the attached database. If there are tables or other database objects that share the same name in both databases, then the logical name is required to reference such objects in the attached database. For example, if both databases have a table called foo, and the logical name of the attached database is db2, then the only way to query foo in db2 is by using the fully qualified name db2.foo, as follows:
sqlite> attach database '/tmp/db' as db2;

sqlite> select * from db2.foo;


x

----------

bar
If you really want to, you can qualify objects in the main database using the name main:
sqlite> select * from main.foods limit 2;


id          type_id     name

----------  ----------  --------------

1           1           Bagels

2           1           Bagels, raisin
The same is true with the temporary database:
sqlite> create temp table foo as select * from food_types limit 3;

sqlite> select * from temp.foo;


id   name

---  -------------

1    Bakery

2    Cereal

3    Chicken/Fowl
You detach databases with the detach database command, defined as follows:
detach [database] database_name;
This command takes the logical name of the attached database (given by database_name) and detaches the associated database file. You get a list of attached databases using the database_list pragma, explained in the section “Database Configuration.”
Cleaning Databases
SQLite has two commands designed for cleaning—reindex and vacuum. reindex is used to rebuild indexes. It has two forms:
reindex collation_name;

reindex table_name|index_name;
The first form rebuilds all indexes that use the collation name given by collation_name. It is needed only when you change the behavior of a user-defined collating sequence (for example, multiple sort orders in Chinese). All indexes in a table (or a particular index given its name) can be rebuilt with the second form.
Vacuum cleans out any unused space in the database by rebuilding the database file. Vacuum will not work if there are any open transactions. An alternative to manually running VACUUM statements is autovacuum. This feature is enabled using the auto_vacuum pragma, described in the next section.
Database Configuration
SQLite doesn't have a configuration file. Rather, all of its configuration parameters are implemented using pragmas. Pragmas work in different ways. Some are like variables; others are like commands. They cover many aspects of the database, such as runtime information, database schema, versioning, file format, memory use, and debugging. Some pragmas are read and set like variables, while others require arguments and are called like functions. Many pragmas have both temporary and permanent forms. Temporary forms affect only the current session for the duration of its lifetime. The permanent forms are stored in the database and affect every session. The cache size is one such example.
This section covers the most commonly used pragmas. You can find a complete list of all SQLite pragmas.
The Connection Cache Size
The cache size pragmas influence how many database pages a session can hold in memory. To set the default cache size for the current session, you use the cache_size pragma:
sqlite> pragma cache_size;


cache_size

---------------

2000


sqlite> pragma cache_size=10000;

sqlite> pragma cache_size;


cache_size

---------------

10000
You can permanently set the cache size for all sessions using the default_cache_size pragma. This setting is stored in the database. This will take effect only for sessions created after the change, not for currently active sessions.
One of the uses for the cache is in storing pending changes when a session is in a reserved state (it has a reserved lock), as described earlier in the section “Transactions.” If the session fills up the cache, it will not be able to continue further modifications until it gets an exclusive lock, which means that it may have to first wait for readers to clear.
If you or your programs perform many updates or deletes on a database that is being used by many other sessions, it may help you to increase the cache size. The larger the cache size, the more modifications a session can cache change before it has to get an exclusive lock. This not only allows a session to get more work done before having to wait, it also cuts down on the time the exclusive locks needs to be held, because all the work is done up front. In this case, the exclusive lock only needs to be held long enough to flush the changes in the cache to disk. Some tips for tuning the cache size are covered in Chapter 5.
Getting Database Information
You can obtain database information using the database schema pragmas, defined as follows:
database_list: Lists information about all attached databases.index_info: Lists information about the columns within an index. It takes an index name as an argument.index_list: Lists information about the indexes in a table. It takes a table name as an argument.table_info: Lists information about all columns in a table.
The following illustrates some information provided by these pragmas:
sqlite> pragma database_list;


seq   name     file

----  -------  --------------------

0     main     /tmp/foods.db

2     db2      /tmp/db


sqlite> create index foods_name_type_idx on foods(name,type_id);

sqlite> pragma index_info(foods_name_type_idx);


seqn  cid      name

----  -------  --------------------

0     2        name

1     1        type_id


sqlite> pragma index_list(foods);


seq    name                unique

-----  ------------------- ---------------

0      foods_name_type_idx 0


sqlite> pragma table_info(foods);


cid    name             type             notn  dflt  pk

-----  ---------------  ---------------  ----  ----  ----------

0      id               integer          0           1

1      type_id          integer          0           0

2      name             text             0           0
Synchronous Writes
Normally, SQLite commits all changes to disk at critical moments to ensure transaction durability. This is similar to the checkpoint functionality in other databases. However, it is possible to turn this off for performance gains. You do this with the synchronous pragma. There are three settings: full, normal, and off. They are defined as follows:
Full: SQLite will pause at critical moments to make sure that data has actually been written to the disk surface before continuing. This ensures that if the operating system crashes or if there is a power failure, the database will be uncorrupted after rebooting.Fullsynchronous is very safe, but it is also slow.Normal: SQLite will still pause at the most critical moments but less often than infullmode. There is a very small (though nonzero) chance that a power failure at just the wrong time could corrupt the database innormalmode. But in practice, you are more likely to suffer a catastrophic disk failure or some other unrecoverable hardware fault.Off: SQLite continues operation without pausing as soon as it has handed data off to the operating system. This can speed up some operations as much as 50 or more times. If the application running SQLite crashes, the data will be safe. However, if the operating system crashes or the computer loses power, the database may be corrupted.
There is no persistent form of the synchronous pragma. Chapter 5 explains this setting's crucial role in transaction durability and how it works.
Temporary Storage
Temporary storage is where SQLite keeps transient data such as temporary tables, indexes, and other objects. By default, SQLite uses a compiled-in location, which varies between platforms. There are two pragmas that govern temporary storage: temp_store and temp_store_directory. The first pragma determines whether SQLite uses memory or disk for temporary storage. There are actually three possible values: default, file, or memory. default uses the compiled-in default, file uses an operating system file, and memory uses RAM. If file is set as the storage medium, then the second pragma, temp_store_directory, can be used to set the directory in which the temporary storage file is placed.
Page Size, Encoding, and Autovacuum
The database page size, encoding, and autovacuuming must be set before a database is created. That is, to alter the defaults, you must first set these pragmas before creating any database objects in a new database. The defaults are a page size derived from a number of host-specific factors such as disk sector size and UTF-8 encoding. SQLite supports page sizes ranging from 512 to 32,786 bytes, in powers of 2. Supported encodings are UTF-8, UTF-16le (little-endian UTF-16 encoding), and UTF-16be (big-endian UTF-16 encoding).
A database's size can be automatically kept to a minimum using the auto_vacuum pragma. Normally, when a transaction that deletes data from a database is committed, the database file remains the same size. When the auto_vacuum pragma is enabled, the database file shrinks when a transaction that deletes data is committed. To support this functionality, the database stores extra information internally, resulting in slightly larger database files than would otherwise be possible. The vacuum command has no effect on databases that use auto_vacuum.
Debugging
There are four pragmas for various debugging purposes. The integrity_check pragma looks for out-of-order records, missing pages, malformed records, and corrupted indexes. If any problems are found, then a single string is returned describing the problems. If everything is in order, SQLite returns ok. The other pragmas are used for tracing the parser and virtual database engine and can be enabled only if SQLite is compiled with debugging information. You can find detailed information on these pragmas in Chapter 11.
The System Catalog
The sqlite_master table is a system table that contains information about all the tables, views, indexes, and triggers in the database. For example, the current contents of the foods database are as follows:
sqlite> select type, name, rootpage from sqlite_master;


type        name                       rootpage

----------  -------------------------  ----------

table       episodes                   2

table       foods                      3

table       foods_episodes             4

table       food_types                 5

index       foods_name_idx             30

table       sqlite_sequence            50

trigger     foods_update_trg           0

trigger     foods_insert_trg           0

trigger     foods_delete_trg           0
The type column refers to the type of object, name is of course the name of the object, and rootpage refers to the first B-tree page of the object in the database file. This latter column is relevant only for tables and indexes.
The sqlite_master table also contains another column called sql, which stores the DML used to create the object. Here's an example:
sqlite> select sql from sqlite_master where name='foods_update_trg';


create trigger foods_update_trg

before update of type_id on foods

begin

  select case

     when (select id from food_types where id=new.type_id) is null

     then raise( abort,

                 'Foreign Key Violation: foods.type_id is not in food_types.id')

  end;

end
Viewing Query Plans
You can view the way SQLite goes about executing a query by using the explain query plan command. The explain query plan command lists the steps SQLite carries out to access and process tables and data to satisfy your query.
To use explain query plan, just issue the command followed by your normal query text. For instance, here's what explain query plan has to say about how a query on the foods table is processed:
sqlite> explain query plan select * from foods where id = 145;

order       from        detail

----------  ----------  -----------------------------

0           0           TABLE foods USING PRIMARY KEY
This means that SQLite is accessing the foods table and using the primary key (on id) to perform the access (rather than scanning the table's data in a brute-force fashion).
Studying these query plans is the key to understanding how SQLite is approaching your data and satisfying your query. You can spot when and how indices are used and the order in which tables are used in joins. This is of immense help when troubleshooting long-running queries and other issues.
Summary
SQL may be a simple language to use, but there is quite a bit of it, and it's taken us two chapters just to introduce the major concepts for SQLite's implementation of SQL. But that shouldn't be too surprising, because it is the sole interface through which to interact with a relational database. Whether you are a casual user, system administrator, or developer, you have to know SQL if you are going to work with a relational database.
If you are programming with SQLite, then you should be off to a good start on the SQL side of things. Now you need to know a little about how SQLite goes about executing all of these commands. This is where Chapter 5 should prove useful. It will introduce you to the API and show you how it works in relation to the way SQLite functions internally.