
C H A P T E R 12
Clustering for High Availability
One of the most common measures applied to modern IT systems is the Service Level Agreement (SLA) for Availability — an agreement that an IT Service will be available for a certain amount of time per year. Commonly, this measure specifies how much of the time a server is available and working – its “uptime” - and is normally defined as a percentage over a year.
The three most common uptime targets are 99.9%, 99.99%, and 99.999%; or, as they are often expressed, three 9s, four 9s, and five 9s, respectively. These require a website to run uninterrupted for an entire year with downtime not exceeding
- Three 9s: 8.76 hours
- Four 9s: 52.56 minutes
- Five 9s: 5.26 minutes
There are agreements in place stipulating that a website must be available for an entire year with the amount of acceptable downtime allowed being under 5 and a half minutes.
Of course, that is a very high level of service to maintain because it provides time for no more than one reboot of the server per year. Moreover, it means that there is realistically not enough time to recover if the server has any problem whatsoever - because it can take more than 5 minutes to log in and diagnose basic issues with a server. Let alone the time needed to fix any of these issues.
While some of these SLAs may seem fantastic, they are not. Take, for instance, an online retailer (such as Amazon or Ebay) and imagine how much business it would lose if its servers were to go down for an hour – it could run into millions. Imagine a moderately sized bank's central transaction processing server going down. How much money would the bank lose? It is for these reasons that these fantastic SLA targets aren't just needed; they are mandatory. Because the world could end if some of these servers are down at the wrong moment.
But we hear you saying, “Downtime is unavoidable in practice! What about patching, maintenance, upgrades, hardware issues?” All true. These are also inescapable parts of having a server. The answer to these problems lies in two concepts: clustering and High Availability.
The aim of this chapter, therefore, is the following:
- Introduce you to the idea of High Availability, what it means and some methods of achieving it
- Introduce you to clustering, what it means and how it works
- Introduce you to the idea of single point of failure
- Give you the skills to identify a single point of failure and offer some common mitigation strategies
- Show you how to configure an LVS system to work in a clustered manner
So, with this in mind, let's begin.
High Availability
High Availability is just what it sounds like: it is the ability for servers to be nearly always available for use in their intended purpose. High Availability (as with most other IT products) also refers to the method used to create servers that have the capability to be called highly available.
More than a few software vendors have called their software that provides systems with high availability just that: High Availability (or HA for short). For you purposes, High Availability is much more pure — it is the ability for the web site to remain available and running at all times, meeting that lofty 5 nine target from before.
In order to achieve something of this magnitude, you need to first examine what you would need to do to achieve this.
The main reason why you would breach a given level of availability is through the time needed to recover from one of the components of the web server being unable to fulfill its function. This means that like any High Availability system, the goal is to be able to work despite the failure of one of the components of the system. The main way you are to achieve this is through redundancy - having a backup system to take over. And in more advanced cases, you can do this automatically. One of the key advantages of what you have been doing so far with Load Balancing is that you already have much of this redundancy available in the form of the systems you have set up to allow us to share load.
For example, have a look at the system you created earlier when you were working with IPVS in Chapter 11 to share the load between multiple servers in Figure 12-1 and Figure 12-2.

Figure 12-1. Basic web server configuration

Figure 12-2. LoadBalanced web server configuration
From here, imagine that WebServer1 suffers a failure and need to be forcibly shut down and restarted. This process would take several minutes. Normally, if there is only WebServer1 (as in Figure 12-1) and it goes down, your site would be offline; however, in this instance, there are two servers that have been load balanced with IPVS (as in Figure 12-2).
The IPVS system means that if one of the servers goes down, you simply need to temporarily remove it from the list of servers within IPVS and you will be running fully again, but with a lower capacity. You can see that having the load balanced architecture provides a clear advantage over single server architecture. If one of the servers dies, you have the ability to continue that servers load on the other. This concept is called Fail Over and is one of the key principles involved in High Availability.
Now that you understand High Availability, you can learn more about how to achieve it.
Single Point of Failure
To achieve high availability in servers, you need to have the system configured so that all the systems are redundant. What you are looking to find in these examples is called single points of failure, which is one single system that if it becomes unavailable would stop the entire system from being able to function. This is simple enough in principle to achieve, but occasionally there are some caveats. Take the server setup in Figure 12-3.

Figure 12- 3. Twin SSL and web server layout
In this instance, there is only one single point of failure: the Load Balancer because even if one SSL server or web server goes down, the other pair of servers can still function. Now look over the next design, shown in Figure 12-4.

Figure 12-4. Dual web server and database
In this case, there are two Single Points of Failure: the Load Balancer as before and this time the database server. The reasoning for this is that if either of the web servers falls over, there is no problem. But if the DB server falls over neither of the web servers will function because the DB server feeds into both the web servers.
Single point of failure can go much deeper than simply redundancy for servers. More and more complex systems actually go so far as to have two full network routes and to have two fully independent power sources! Moreover, they expand beyond this by attempting to have these systems set up in a “physically dispersed” manner. They work to ensure that no two redundant sources of a critical resource share the same space: networking cables, power cables, and the like take different physical paths to get between their source and destination. Often this leads to having two totally different sets of cables running down each side of a building. Just in case by accident one set of cables gets cut, the others will still function as they are in a different place.
From all the above, you should now have the impression that much of what creates a High Availability environment is about creating a setup where the failure of no single point can stop it functioning. To this end, you look to create redundant systems that can take over or accept more load in the event of a failure. This concept of creating a group of servers that are capable of supporting each other in the event of a failure is called a cluster.
Clustering
Clustering is the creation of a group of servers that are designed to perform the same function: share load, and in the case of a failure of a cluster member, to have the remainder of the cluster assume its workload. Clustering can be simply one of a group of applications performing the same application function over a several servers, or several servers that aim to assume the full load of another in its group in the event of a failure.
As mentioned earlier, clustering is widely seen as one of the most effective methods of creating a High Availability environment. This is due to the fact that it uses already-running systems that are being used to share load to deal with the failure of one of its members. Moreover, because most clustered systems have automated or semi-automated methods for dealing with the failure of a member, these systems can continue functioning with little intervention – beyond, of course, the work required to either repair the server or reconfigure the cluster to remove the broken server permanently.
Clustering for High Availability differs from the other most common methods in that it aims to make use of the servers that are being used to provide High Availability.
The other common method of providing High Availability is called the Standby method, which involves having a spare server ready to assume the load of the original in the event of its failure. This server can be either cold (turned off, waiting to be activated and called for), warm (running, but needing to have the application systems it is to take over from enabled) or hot (working in parallel to the server it is to replace and ready to take over from exactly where it was at the moment it is needed). As you can imagine, cold standby servers are of less use than warm or hot standbys, but are significantly less costly. Although hot standbys are very useful when a failure occurs, it is very wasteful to allocate all that energy to a just-in-case server.
While there are some circumstances when having a server ready to take over is a distinct benefit, such as when you need to have a specific application at a specific IP address it is often much more efficient to have these servers in a position to perform some of the processing, instead of spending a huge amount of their time waiting in readiness. Having a cluster of servers that are all processing together provides a real advantage as you get both the surety that your application is available, and you also get the increased performance from having an extra server involved in the processing. While we initially described a cluster as a group of servers that are joined together sharing a workload and covering incase one should fail, clusters can be more complex.
Some clusters are built with a controlling application overseeing the distribution of the workload and ensuring that if one of the servers fails, its workload is covered. If this seems very familiar, you are quite correct. In Chapter 11, you began making a basic cluster using the IPVS application as the cluster controller. You added several servers that shared a processing load for a website and with only a small amount of human intervention, you can remove a problematic from the group and its processing will be shared among the remaining servers. While this is a good situation it is far from ideal, it would be best if we could introduce a way for IPVS to automatically detect a failed server and work around it.
IPVS Failover
To create this cluster, you need two things: you need an automated way to change which servers are being used by the virtual server to create a virtual server. There is a specialist daemon designed to work with IPVS in just this fashion; it is called ldirectord. Ldirectord works closely with the IPVS system implemented in Chapter 10 to modify the IPVS tables when a server fails or stops responding to HTTP (website) requests.
The second issue you may have spotted is that the load balancer being used by IPVS is a glaring single point of failure. If the load balancer stops functioning, you could not use the website.
The solution is to introduce a failover server that will take over the function of the load balancer in the event of its failure. In addition to creating a failover server, you need a mechanism that allows the secondary load balancer to detect a failure in the primary load balancer and take over. This application is called heartbeat, which works by having communications between both the load balancer servers and in the event of one failing, the second takes over.
This leaves us with a final issue that we have not mentioned yet. Having two load balancers means you have two load balancer IP addresses. While we list this as an issue, it is a very common part of a cluster because if the machine connecting outward at the time fails, the cluster becomes unreachable.
The solution to this problem is called a virtual IP address, where at any one time; one server within the cluster will have the virtual IP address which allows it to speak on the clusters behalf. This means that you can simply point all traffic to this virtual IP address, which is the permanent access point for the cluster. The setup you will make means you can create something akin to the setup shown in Figure 12-5.
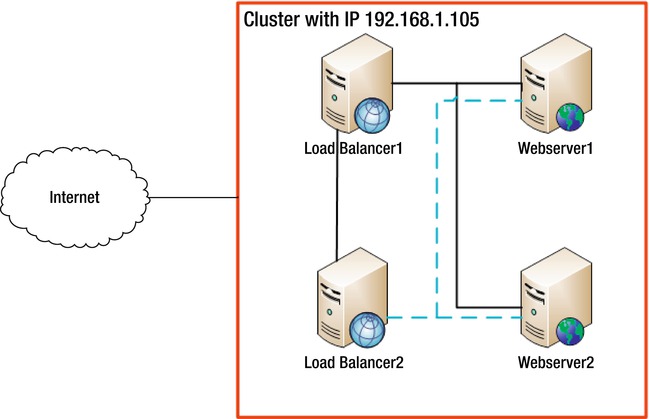
Figure 12-5. Cluster with load balancer
To begin, install ipvsadm, ldirectord, and heartbeat. Perform this on both your intended load balancers because they will be the ones that control the cluster and need to ensure that the load balancing system is running.
Install with Ubuntu
root@testbox:~# apt-get install ipvsadm ldirectord heartbeat

Reading package lists... Done

Building dependency tree

Reading state information... Done

The following extra packages will be installed:

  cluster-agents cluster-glue fancontrol gawk libauthen-radius-perl libcluster-glue libconvert-asn1-perl libcorosync4 libcrypt-ssleay-perl libcurl3 libdbi-perl libdigest-hmac-perl libdigest-sha1-perl libesmtp5 libheartbeat2

  libio-socket-inet6-perl libio-socket-ssl-perl libltdl7 libmail-pop3client-perl libnet-daemon-perl libnet-dns-perl libnet-imap-simple-perl libnet-imap-simple-ssl-perl libnet-ip-perl libnet-ldap-perl libnet-libidn-perl

  libnet-ssleay-perl libnet1 libnl1 libnspr4-0d libnss3-1d libopenhpi2 libopenipmi0 libperl5.10 libplrpc-perl libsensors4 libsnmp-base libsnmp15 libsocket6-perl libxml2-utils libxslt1.1 lm-sensors openhpid pacemaker perl perl-base

  perl-modules

Suggested packages:

  keepalived dbishell libauthen-sasl-perl sensord read-edid i2c-tools perl-doc libterm-readline-gnu-perl libterm-readline-perl-perl

The following NEW packages will be installed:

  cluster-agents cluster-glue fancontrol gawk heartbeat ipvsadm ldirectord libauthen-radius-perl libcluster-glue libconvert-asn1-perl libcorosync4 libcrypt-ssleay-perl libcurl3 libdbi-perl libdigest-hmac-perl libdigest-sha1-perl

  libesmtp5 libheartbeat2 libio-socket-inet6-perl libio-socket-ssl-perl libltdl7 libmail-pop3client-perl libnet-daemon-perl libnet-dns-perl libnet-imap-simple-perl libnet-imap-simple-ssl-perl libnet-ip-perl libnet-ldap-perl

  libnet-libidn-perl libnet-ssleay-perl libnet1 libnl1 libnspr4-0d libnss3-1d libopenhpi2 libopenipmi0 libperl5.10 libplrpc-perl libsensors4 libsnmp-base libsnmp15 libsocket6-perl libxml2-utils libxslt1.1 lm-sensors openhpid pacemaker

The following packages will be upgraded:

  perl perl-base perl-modules

3 upgraded, 47 newly installed, 0 to remove and 75 not upgraded.

Need to get 10.6MB/21.5MB of archives.

After this operation, 36.2MB of additional disk space will be used.

Do you want to continue [Y/n]? y

addgroup: The group `haclient' already exists as a system group. Exiting.

Warning: The home dir /var/lib/heartbeat you specified already exists.

The system user `hacluster' already exists. Exiting.


Setting up lm-sensors (1:3.1.2-2) …


Processing triggers for libc-bin …

ldconfig deferred processing now taking place

Processing triggers for python-central …

root@testbox:~#
Install with Centos
Unfortunately, the latest version of Centos hasn't had ldirectord and heartbeat ported to it. To install on an earlier version of Centos (such as 5) execute the following:
yum install heartbeat heartbeat-ldirector ipvsadm -y
Configure
Now that you have installed everything, ensure all these servers can reference each other by name. The /etc/hosts file has been modified to ensure that each server has the same reference name as every other server.
This function can also be performed by having a DNS server provide identities for each of your servers, but setting up a DNS is well beyond the scope of what is done here. You will need to use the name given by uname -n for each server as one of the recognizable hostnames for the cluster.
This is very important as heartbeat uses these names. So, I've added the following to our /etc/hosts file:
192.168.1.2 server1

192.168.1.3 server2

192.168.1.4 loadbalancer1

192.168.1.1 loadbalancer2
These entries provide the previous name aliases to all the servers we are currently working with. These entries need to be added to all servers to ensure consistency among them. Again, on both load balancers, you will need to enable IPv4 forwarding. Open /etc/sysctl.conf and set the following:
net.ipv4.ip_forward = 1
Then execute the following:
root@testbox:~# sysctl -p

net.ipv4.ip_forward = 1

root@testbox:~#
You should expect to see the ipv4 foward = 1, as this means that the particular part of the configuration has been loaded. Now that you have ipv4 forwarding and server names standard, you need to begin configuring heartbeat.
Heartbeat has three main configuration files:
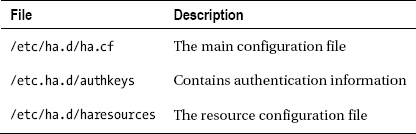
These files must be configured before you can use heartbeat. Heartbeat will fail to start otherwise.
Let's start by adding the heartbeat configuration at /etc/ha.d/ha.cf.
Following is the basic configuration we used:
logfacility local0

bcast eth1 # Linux

mcast eth1 225.0.0.1 694 1 0

auto_failback off

node loadbalancer1

node loadbalancer2

respawn hacluster /usr/lib/heartbeat/ipfail

apiauth ipfail gid=haclient uid=hacluster
![]() Note
Note /etc/ha.d/ha.cf needs to be the same on each load balancer.
There are quite a few configuration options setup there, so let's go over them.
The mcast and bcast Ethernet adapters are set to allow communications between the servers of your cluster. This is because these adapters will not send standard addressed IP packets, but will instead use broadcast (bcast) and multicast (mcast) packets, which give them more flexibility.
The auto failback is set to off, which means that in the event of a failure you will continue using the server you were on. This can be advantageous if one of your servers is having intermittent failures and to save on constantly failing back to the original server. You may, however, want to change this if your second load balancer is a failover server that lacks the power of the original.
We have also added the names of each of the load balancers as nodes to the cluster. At this point, it is very important for us to point out that you need to use the first name outputted by uname -n as the node names. This is the method that heartbeat uses to identify servers, so you will need to ensure that you are using these uname -n names and that each server knows how to contact the other via these names. This is the reason the /etc/hosts file on each server was set up.
Next, you need to modify /etc/ha.d/haresources to allocate some resources specifically for the cluster to use. Our configuration is the following:
loadbalancer

ldirectord::ldirectord.cf

LVSSyncDaemonSwap::master

IPaddr2::192.168.1.105/24/eth1
This tells heartbeat to take over the IP address 192.168.1.105 using the subnet mask 24 and use eth1 as the device.
![]() Note
Note /etc/ha.d/haresources must be the same on each load balancer.
This specifies that you have to create on the load balancer (which will be your primary) an instance of lddirectord from lddirector.cf.
You will set this server up as the master of the cluster. And finally you need to create the special virtual IP address that will be the cluster's IP address. This command specifies the IP you will use, its netmask (the standard 24), the Ethernet adapter to which it will belong, and finally the network address for this adapter.
If you are using a different network setup, you need to adapt it accordingly.
Having set up the failover setup and allocated some resources to the cluster on the load balancers, you need to have a shared authentication method.
To set this up, create the following in /etc/ha.d/authkeys:
auth 3

3 md5 password1
![]() Note
Note /etc/ha.d/authkeys must be the same on each load balancer.
This creates an authentication mechanism to use an MD5 hashed password (one of the Internet standard authentication methods) and sets the password to the ever secure 'password1'. Once you have added this, you need to set authkeys to be read only by root. To do this, execute the following:
chmod 600 /etc/ha.d/authkeys
![]() Note Remember to change the password to something other than ‘password1'.
Note Remember to change the password to something other than ‘password1'.
Finally, you need to add the ldirectord.cf mentioned earlier. This configuration file is to be found at /etc/ha.d/ldirectord.cf. Our configuration is as follows:
virtual=192.168.1.105:80

        real=192.168.1.2:80 masq

        real=192.168.1.3:80 masq

        fallback=127.0.0.1:80

        service=http

        request="index.html"

        receive="Welcome to nginx!"

        scheduler=wrr

        protocol=tcp

        checktype=negotiate
![]() Note You will need tabs for each entry after the virtual! This lets ldirectord know they belong to the virtual above.
Note You will need tabs for each entry after the virtual! This lets ldirectord know they belong to the virtual above.
Many of these configuration options will seem familiar from Chapter 10, but let's go over them quickly. We provide the virtual IP address we have allocated and set up in the resources section. You then link two real servers to this virtual server and set yourself as the fallback address.
Now that you have the basics of the cluster set up, you need to specify how you are to check that the real servers are available. You specify the page they are to request and the response they are to expect. For this purpose, we have set the item expected to receive as the title of our nginx basic index page.
Finally, you need to set the scheduler that is to be used and the scheduler being used to perform it (for more in-depth information on schedulers, see Chapter 10).
Now that you have done the setup, you need to do some quick housework. You need to ensure that heartbeat starts on boot and ldirectord doesn't! You need to stop ldirectord from starting because heartbeat will call it depending on when it is needed - which avoids having two servers running it at once and consuming extra resources.
Execute the following to alter your boot configuration:
root@loadbalancer:~# update-rc.d heartbeat start 75 2 3 4 5 . stop 05 0 1 6 .

 System start/stop links for /etc/init.d/heartbeat already exist.

root@loadbalancer:~# update-rc.d -f ldirectord remove

 Removing any system startup links for /etc/init.d/ldirectord …

   /etc/rc0.d/K20ldirectord

   /etc/rc1.d/K20ldirectord

   /etc/rc2.d/S20ldirectord

   /etc/rc3.d/S20ldirectord

   /etc/rc4.d/S20ldirectord

   /etc/rc5.d/S20ldirectord

   /etc/rc6.d/K20ldirectord
And now, you start the applications with the following:
/etc/init.d/ldirectord stop

/etc/init.d/heartbeat start
Common Config Problems
If you see errors similar to Unknown command real=X (as follows), you will need to add a tab to the start of each entry below the virtual in your /etc/ha.d/ldirectord.cf file:
root@loadbalancer:~# /etc/init.d/heartbeat start

Starting High-Availability services: 1 better written as $1 at /etc/ha.d/resource.d/ldirectord line 1252.

1 better written as $1 at /etc/ha.d/resource.d/ldirectord line 1252.

Error [354] reading file /etc/ha.d/ldirectord.cf at line 2: Unknown command real=192.168.1.103:80 gate


 Heartbeat failure [rc=6]. Failed.


heartbeat[376]: 2011/08/21_02:21:38 ERROR: Cannot open keyfile [/etc/ha.d//authkeys].  Stop.

heartbeat[376]: 2011/08/21_02:21:38 ERROR: Authentication configuration error.

heartbeat[376]: 2011/08/21_02:21:38 ERROR: Configuration error, heartbeat not started.
When starting heartbeat, we ran into the following issue:
Starting High-Availability services: 1 better written as $1 at /etc/ha.d/resource.d/ldirectord line 1252.

1 better written as $1 at /etc/ha.d/resource.d/ldirectord line 1252.
The fix was to open /etc/ha.d/resource.d/ldirectord and modify line 1252 to the regular expression there so it looks like the following:
$addr =~ s/^”([^"]*)”$/$1/;
This simply adds a $ sign in front of the number 1. This is likely due to a typo in the release we were using.
If you see the following, you will need to execute chmod 600 /etc/ha.d/authkeys. This is a security feature that is designed to limit anyone but root from having access to your shared authentication keys:
root@loadbalancer:~# /etc/init.d/heartbeat start

Starting High-Availability services:  Heartbeat failure [rc=6]. Failed.


heartbeat[715]: 2011/08/21_02:28:12 ERROR: Cannot open keyfile [/etc/ha.d//authkeys].  Stop.

heartbeat[715]: 2011/08/21_02:28:12 ERROR: Authentication configuration error.

heartbeat[715]: 2011/08/21_02:28:12 ERROR: Configuration error, heartbeat not started.
If you see the following, you may not have set the uname -n nodenames as the node entries in /etc/ha.d/ha.cf.
root@loadbalancer:~# /etc/init.d/heartbeat start

Starting High-Availability services:  Heartbeat failure [rc=6]. Failed.

heartbeat: baudrate setting must precede media statementsheartbeat[846]: 2011/08/21_02:32:30 WARN: Core dumps could be lost if multiple dumps occur.

heartbeat[846]: 2011/08/21_02:32:30 WARN: Consider setting non-default value in /proc/sys/kernel/core_pattern (or equivalent) for maximum supportability

heartbeat[846]: 2011/08/21_02:32:30 WARN: Consider setting /proc/sys/kernel/core_uses_pid (or equivalent) to 1 for maximum supportability

heartbeat[846]: 2011/08/21_02:32:30 info: Version 2 support: false

heartbeat[846]: 2011/08/21_02:32:30 ERROR: Current node [loadbalancer] not in configuration!

heartbeat[846]: 2011/08/21_02:32:30 info: By default, cluster nodes are named by `uname -n` and must be declared with a 'node' directive in the ha.cf file.

heartbeat[846]: 2011/08/21_02:32:30 info: See also: http://linux-ha.org/wiki/Ha.cf#node_directive

heartbeat[846]: 2011/08/21_02:32:30 WARN: Logging daemon is disabled --enabling logging daemon is recommended

heartbeat[846]: 2011/08/21_02:32:30 ERROR: Configuration error, heartbeat not started.
If you have configured your system correctly you should simply expect to see this:
root@loadbalancer:~# /etc/init.d/heartbeat start

Starting High-Availability services: Done.
Confirming Your System
If all has started execute ip addr sh ethx on the primary server of your cluster, remembering to replace the Ethernet adapter in the text with the one you are using for your cluster (that is, replace ethx with eth0 or eth1). You should expect to see something akin to this:
This line contains a global IP address that references our new cluster IP address. If not, check your configs; the ha.cf and the haresources need to be identical on all servers. If this line doesn't appear below your Ethernet adapter, you should follow all the previous config steps, ensure that you have referenced your server names correctly, and are executing on the master. After this, the following are some common solutions we found to common problems and are extremely useful.
The first thing that has given us endless hours of problems was a missing LVSSyncDaemonSwap.
Check your /etc/ha.d/resources.d folder; if the LVSSyncDaemonSwap script doesn't exist within it, you will need to download from source. When doing this, we downloaded the source code from the Internet and extracted the LVSSyncDaemonSwap file from source and installed it into /etc/ha.d/resources.d.
If you are doing this, be sure to check that the line /etc/ha.d/shellfuncs is present because it is required for the script to execute correctly.
If all is working from here, you can start to test by executing this:
ldirectord ldirectord.cf status
It will list the status of the ldirectord server and the PID of its process on the primary server and will show it as being stopped on the failover server.
Execution on primary server:
root@loadbalancer:~# ldirectord ldirectord.cf status

ldirectord for /etc/ha.d/ldirectord.cf is running with pid: 10517

root@loadbalancer:~#
Execution on secondary server:
root@testbox:~#  ldirectord ldirectord.cf status

ldirectord is stopped for /etc/ha.d/ldirectord.cf

root@testbox:~#
If you see both ldirectords as stopped, you need to follow the same steps as if you saw no second IP address. Go over your configs, check the log files in /var/logs, and check your process table (ps –ef) to see that heartbeat (and by consequence) ldirectord are running.
Now that you have established that heartbeat and ldirectord are running, check your ipvsadm tables on the primary server and you should see something akin to this:
root@loadbalancer:~# ipvsadm

IP Virtual Server version 1.2.1 (size=4096)

Prot LocalAddress:Port Scheduler Flags

  -> RemoteAddress:Port           Forward Weight ActiveConn InActConn

TCP  192.168.1.105:www wrr

  -> server2:www                  Masq    1      0          0

  -> server1:www                  Masq    1      0          0
On the secondary server you should see this:
root@testbox:~# ipvsadm

IP Virtual Server version 1.2.1 (size=4096)

Prot LocalAddress:Port Scheduler Flags

  -> RemoteAddress:Port           Forward Weight ActiveConn InActConn
It shows that only the primary server, which has the virtual IP address, has the IPVS system running and has the configuration you loaded into the ldirectord.cf file.
If you see something like this, you need to check that both the servers are up, running and available from the load balancer and the IP addresses you specified:
root@loadbalancer:~# ipvsadm

IP Virtual Server version 1.2.1 (size=4096)

Prot LocalAddress:Port Scheduler Flags

  -> RemoteAddress:Port           Forward Weight ActiveConn InActConn

TCP  192.168.1.105:www wrr

  -> localhost:www                Local   1      0          0

root@loadbalancer:~#
You will also need to check that the file you have specified for the ldirectord daemon to load is present on both pages and contains the specified test string to search for. The preceding entry with localhost means that your remove servers are unavailable and it has gone to the failback server on localhost.
Testing
The first test you can do is reboot the load balancer on the primary server with /etc/init.d/heartbeat restart.
This will failover the server to the backup. You can test with your ipvsadm command, executed on both servers like before.
On the primary server, you will see this:
root@testbox:~# ipvsadm

IP Virtual Server version 1.2.1 (size=4096)

Prot LocalAddress:Port Scheduler Flags

  -> RemoteAddress:Port           Forward Weight ActiveConn InActConn
On the secondary server, you should see this:
root@loadbalancer:~# ipvsadm

IP Virtual Server version 1.2.1 (size=4096)

Prot LocalAddress:Port Scheduler Flags

  -> RemoteAddress:Port           Forward Weight ActiveConn InActConn

TCP  192.168.1.105:www wrr

  -> server2:www                  Masq    1      0          0

  -> server1:www                  Masq    1      0          0
This shows that your backup is working as expected and that you have failed over. To fail back, simply execute /etc/init.d/heartbeat restart on the secondary server, and the system will simply start again via the primary (assuming it's running, of course!)
You can also test the load balancing adaptation in the same manner. Simply stop your web server on one of the real servers. Here is an example of our system with our web server being stopped and restarted:
root@loadbalancer:~# ipvsadm

IP Virtual Server version 1.2.1 (size=4096)

Prot LocalAddress:Port Scheduler Flags

  -> RemoteAddress:Port           Forward Weight ActiveConn InActConn

TCP  192.168.1.105:www wrr

  -> server1:www                  Masq    1      0          0

  -> server2:www                  Masq    1      0          0
The preceding code shows the normal running state, just prior to the restart.
root@loadbalancer:~# ipvsadm

IP Virtual Server version 1.2.1 (size=4096)

Prot LocalAddress:Port Scheduler Flags

  -> RemoteAddress:Port           Forward Weight ActiveConn InActConn

TCP  192.168.1.105:www wrr

  -> server2:www                  Masq    1      0          0
The preceding code now shows our web server to be stopped and the unavailable server has been removed from the cluster.
root@loadbalancer:~# ipvsadm

IP Virtual Server version 1.2.1 (size=4096)

Prot LocalAddress:Port Scheduler Flags

  -> RemoteAddress:Port           Forward Weight ActiveConn InActConn

TCP  192.168.1.105:www wrr

  -> server1:www                  Masq    1      0          0

  -> server2:www                  Masq    1      0          0
Finally, after it powers back up, the server is visible again!
Web Server Specifics
Now that you have set everything up, you simply need to add a gateway entry for your IP addresses. This means that all connections outbound via these servers' local network connections should be passed via the virtual IP address.
To do this, you need to edit the networking configuration files per the config for your operating system.
Ubuntu
Open /etc/network/interfaces.
Add the following line to the end of the entry for your cluster network address gateway 192.168.1.105 E.G.
auto eth1

iface eth1 inet static

   address 192.168.1.2

   netmask 255.255.255.0

   gateway 192.168.1.105
Now reboot your network adapters with /etc/init.d/networking restart.
Centos
Open the network file for the Ethernet adapter you are working with within the folder /etc/sysconfig/network. For ourselves, we edited ifcfg-eth1 and added this:
GATEWAY=192.168.1.105
Now execute /etc/init.d/network restart to reboot your network adapters.
This should allow you to visit your servers via the virtual IP address and view your websites!
Advanced Config Options
The two primary files (ha.cf and ldirectord.cf) you used to configure the HA cluster. While we provided a working simple config in our examples, there are a number of other useful configuration options that can be used. We will go over these in some more depth here.
ha.cf
The following allow you to have much more granular control over the relationship between your primary load balancer and your secondary load balancer via heartbeat:
logfile <filename>– As its name implies, it allows you to specify a log file for the heartbeat daemon to write, tookeepalive <number>– The amount of time between checks that your real servers are alivedeadtime <number>– The amount of time that a server needs to be unresponsive before it is declared deadauto_failback <on or off>- This allows you to toggle weather; following a failover your server will attempt to automatically switch back to having the original primary run the cluster.
![]() Note Remember that ha.cf needs to be the same on each load balancer.
Note Remember that ha.cf needs to be the same on each load balancer.
ldirectord.cf
The following are all global directives and do not need to be tabbed in as the entries below a virtual server do. They allow for a higher level of control:
checktimeout– The timeout given to a check of the real servers by ldirectord before it is declared deadcheckinterval– The interval between checks that each real server is functioning
In addition, more virtual servers can be added to your ldirectord.cf, which should allow you to work with both the HTTP and HTTPS portions of your web page, for example. An example of this is the following:
virtual=192.168.6.240:80

        fallback=127.0.0.1:80

        real=192.168.1.2:80 masq

        real=192.168.1.3:80 masq
        service=http

        request="Welcome to nginx!"

        receive="Test Page"

        scheduler=wrr

        protocol=tcp

        checktype=negotiate


virtual=192.168.6.240:443

        fallback=127.0.0.1:443

        real=192.168.1.2:443 masq

        real=192.168.1.3:443 masq

        service=https

        request="index.html"

        receive="Welcome to nginx!"

        scheduler=wlc

        protocol=tcp

        checktype=negotiate
Web Server
In the previous configurations, we simply listed the contents of our index page. It is highly recommended to create a simple file with a known piece of text in it as your web server test. In our servers, we created a file called loadbalancer.html and added the simple text “Server Is Available” to our web servers' root.
This can be a real advantage when the content of your index page is dependent on some user information, or is dynamically generated and there are no concrete pieces of the page you can rely on.
Summary
This chapter discussed High Availability and how it can provide a significant advantage to your servers. You learned what clustering is and about the relationship between clustering and High Availability. You now have the ability to identify a single point of failure.
From here, you should be able to build a working High Availability cluster on Linux using ipvsadm, heartbeat, and ldirectord. Finally, you should be able to change the configuration of both to better suit your load balancing needs!