Android Security Architecture
In Chapter 2, we looked at a simple example of how we can protect information using encryption. However, that example did not make use of Android’s built-in security and permissions architecture. In this chapter, we will take a look at what Android is able to offer the developer and end user with regard to security. We will also look at some direct attacks that can take place on applications and how to take the necessary safeguards to minimize the loss of private data.
The Android platform has several mechanisms that control the security of the system and applications, and it attempts to ensure application isolation and compartmentalization at every stage. Each process within Android runs with its own set of privileges, and no other application is able to access this application or its data without explicit permissions provided by the end user. Even though Android exposes a large number of APIs to the developer, we cannot use all of these APIs without requiring the end user to grant access.
Revisiting the System Architecture
Let’s start by looking at the Android architecture once more. We covered the Android system architecture in Chapter 1, where you will recall that each process runs in its own isolated environment. There is no interaction possible between applications unless otherwise explicitly permitted. One of the mechanisms where such interaction is possible is by using permissions. Again in Chapter 1, we looked at a simple example of how we needed to have the RECORD_AUDIO permission set, so that our application can make use of the device’s microphone. In this chapter, we will look at the permissions architecture in a little bit more detail (see Figure 3-1).
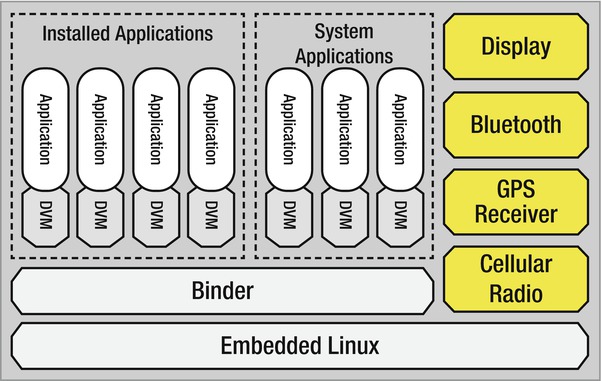
Figure 3-1. The Android system architecture
Figure 3-1 depicts a simpler version of the Android architecture than the one presented in Chapter 2; specifically, this figure focuses more on the applications themselves.
As we saw previously, Android applications will execute on the Dalvik virtual machine (DVM). The DVM is where the bytecode, or the most fundamental blocks of code, will execute. It is analogous to the Java Virtual Machine (JVM) that exists on personal computers and servers today. As depicted in Figure 3-1, each application—even a built-in system application—will execute in its own instance of the Dalvik VM. In other words, it operates inside a walled garden of sorts, with no outside interaction among other applications, unless explicitly permitted. Since starting up individual virtual machines can be time consuming and could increase the latency between application launch and startup, Android relies on a preloading mechanism to speed up the process. The process, known as Zygote, serves two functions: it acts first as a launch pad for new applications; and second, as a repository of live core libraries to which all applications can refer during their life cycles.
The Zygote process takes care of starting up a virtual machine instance and preloading and pre-initializing any core library classes that the virtual machine requires. Then, it waits to receive a signal for an application startup. The Zygote process is started up at boot time and works in a manner similar to a queue. Any Android device will always have one main Zygote process running. When the Android Activity Manager receives a command to start an application, it calls up the virtual machine instance that is part of the Zygote process. Once this instance is used to launch the application, a new one is forked to take its place. The next application that is started up will use this new Zygote process, and so on.
The repository part of the Zygote processwill always make the set of core libraries available to applications throughout their life cycles. Figure 3-2 shows how multiple applications make use of the main Zygote process’s repository of core libraries.
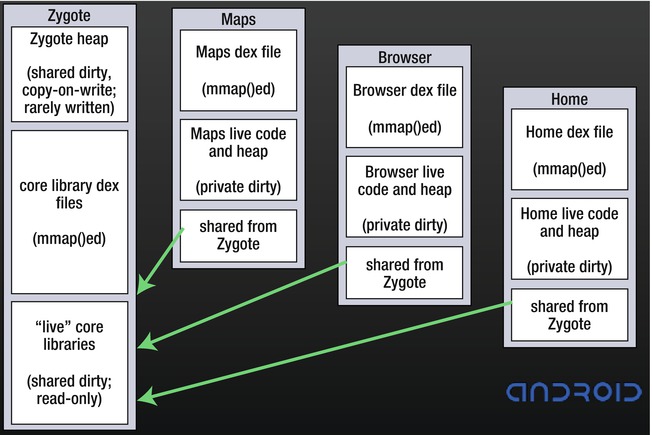
Figure 3-2. How applications use Zygote’s repository of core libraries
Understanding the Permissions Architecture
As we discussed in Chapter 1, applications running on the Android operating system all run with their own set of user and group identifiers (UID and GID, respectively). The constrained manner in which applications execute make it impossible for one application to read or write data from another. To facilitate information sharing and interprocess communication among applications, Android uses a system of permissions.
By default, an application has no permissions to perform any types of activities that would cause damage or drastically impact other applications on the device. It also has no ability to interact with the Android operating system, nor can it call any of the protected APIs to use the camera, GPS, or networking stacks. Finally, a default application does not have the ability to read or write to any of the end user’s data. The Linux kernel handles this task.
In order for an application to access high-privileged APIs or even gain access to user data, it has to obtain permission from the end user. You, as the developer, have to understand what permissions your application will require before you release it to the public. Once you make a list of all your required permissions, you will need to add each one of them to your AndroidManifest.xml file. Then, when installing an application for the first time, the end user is prompted by the device to grant or deny specific permissions as required by the application. Therefore, a good practice is to develop your application in a manner that will fail modularly if a user does not provide a specific permission. For example, let’s say you’ve written an application that uses GPS Location inquiries, accesses user data, and sends SMS messages. The end user grants your application two of the three permissions, but leaves out SMS message sending. You should be able to write your application such that the functionality requiring SMS sending will disable itself (unless omitting this permission breaks your entire application). This way, the end user can still use your application with reduced functionality.
Before exploring permissions further, you need to familiarize yourself with a couple of topics that are used in the context of Android software development and security: content providers and intents. Although you most likely have heard these terms mentioned before, let’s go over them here to make sure your understanding is complete.
Content providers are synonymous with data stores. They act as repositories of information from which applications can read and write. Since the Android architecture does not allow for a common storage area, content providers are the only way that applications can exchange data. As a developer, you might be interested in creating your own content providers, so that other applications can gain access to your data. This is as easy as subclassing the ContentProvider object in the android.content package. We will cover the creation of a custom ContentProvider objects in more detail in subsequent chapters of this book.
In addition to allowing the creation of your own content providers, Android provides several content providers that allow you to access the most common types of data on the device, including images, videos, audio files, and contact information. The Android provider package, android.provider, contains many convenience classes that allow you to access these content providers; Table 3-1 lists these.
Table 3-1. Content Provider Classes
Accessing a content provider requires prior knowledge of the following information:
- The content provider object (Contacts, Photos, Videos, etc.)
- The columns required from this content provider
- The query to fetch this information
As stated previously, content providers act in a similar manner to a Relational Database, such as Oracle, Microsoft SQL Server, or MySQL. This becomes evident when you first try to query one. For example, you access the MediaStore.Images.Media content provider to query for images. Let’s assume that we want to access each of the image names stored on the device. We first need to create a content provider URI to access the external store on the device:
Uri images = MediaStore.Images.Media.EXTERNAL_CONTENT_URI;
Next, we need to create a receiver object for the data we will be fetching. Simply declaring an array does this:
String[] details = new String[] {MediaStore.MediaColumns.DISPLAY_NAME};
To traverse the resulting dataset, we need to create and use a managedQuery and then use the resulting Cursor object to move through rows and columns:
Cursor cur = managedQuery(details,details, null, null null);
We can then iterate over the results using the Cursor object we created. We use the cur.moveToFirst() method to move to the first row and then read off the image name, like so:
String name = cur.getString(cur.getColumnIndex(MediaStore.MediaColumns.DISPLAY_NAME));
After that, we advance the cursor to the next record by calling the cur.moveToNext() method. To query multiple records, this process can be wrapped in either a for loop or do/while block.
Note that some content providers are controlled, and your application will need to request specific permissions before attempting to access them.
Intents are types of messages that one application sends to another to control tasks or transport data. Intents work with three specific types of application components: activity, service, and broadcast receiver. Let’s take a simple example where your application requires the Android device browser to start up and load the contents of a URL. Some of the main components of an Intent object include the intent action and the intent data. For our example, we want our user to view the browser, so we will use the Intent.ACTION_VIEW constant to work with some data that is at the URL, http://www.apress.com. Our Intent object will be created like this:
Intent intent = new Intent(Intent.ACTION_VIEW, Uri.parse(http://www.apress.com);
To invoke this intent, we call this code:
startActivity(intent);
To control which applications can receive intents, a permission can be added to the intent prior to dispatching it.
Checking Permissions
We’ve very briefly covered content providers and intents, including how the Android operating system controls access to these objects through the use of permissions. In Chapter 1, we looked at how an application can request the end user for specific permissions to interact with the system. Let’s look at how permission checks really take place and where.
A validation mechanism will handle permission checks within the Android operating system. When your application makes any API call, the permission validation mechanism will check if your application has the required permissions to complete the call. If a user grants permission, the API call is processed; otherwise, a SecurityException is thrown.
API calls are handled in three separate steps. First, the API library is invoked. Second, the library will invoke a private proxy interface that is part of the API library itself. Finally, this private proxy interface will use interprocess communication to query the service running in the system process to perform the required API call operation. This process is depicted in Figure 3-3.
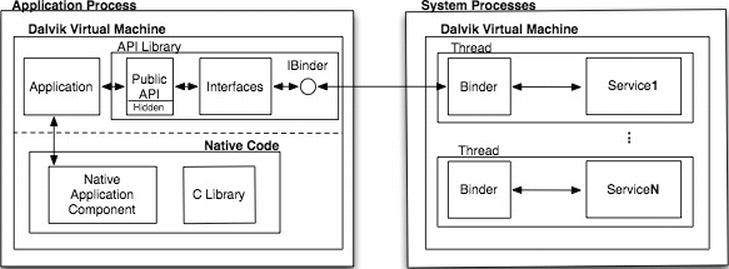
Figure 3-3. The API call process
In some instances, an application may also use native code to conduct API calls. These native API calls are also protected in a similar manner because they are not allowed to proceed unless they are called through Java wrapper methods. In other words, before a native API call can be invoked, it has to go through a wrapped Java API call that is then subject to the standard permission-validation mechanism. All validation of permissions is handled by the system process. Additionally, applications that require access to the BLUETOOTH, WRITE_EXTERNAL_STORAGE, and INTERNET permissions will be assigned to a Linux group that has access to the network sockets and files associated with those permissions. This small subset of permissions has its validation performed at the Linux kernel.
Using Self-Defined Permissions
Android allows developers to create and enforce their own permissions. As with system permissions, you need to declare specific tags and attributes within the AndroidManifest.xml file. If you write an application that provides a specific type of functionality accessible by other developers, you can choose to protect certain functions with your own custom permissions.
In your application’s AndroidManifest.xml file, you have to define your permissions as follows:
<manifest xmlns:android="http://schemas.android.com/apk/res/android"
    package="net.zenconsult.mobile.testapp" >
    <permission android:name="net.zenconsult.mobile.testapp.permission.PURGE_DATABASE"
        android:label="@string/label_purgeDatabase"
        android:description="@string/description_purgeDatabase"
        android:protectionLevel="dangerous" />
    ...
</manifest>
You define the name of your permission in the android:name attribute. The android:label and android:description attributes are required. They are pointers to strings that you define in your AndroidManifest.xml file. The strings will identify what the permission is and describe what this permission does to end users that browse the list of permissions present on the device. You will want to set these strings with something descriptive, as in this example:
<string name=" label_purgeDatabase ">purge the application database </string>
<string name="permdesc_callPhone">Allows the application to purge the core database of the information store. Malicious applications may be able to wipe your entire application information store.</string>
The android:protectionLevel attribute is required. It categorizes the permission into one of the four levels of protection discussed earlier.
Optionally, you can also add an android:permissionGroup attribute to have Android group your permission along with either the system groups or with groups you have defined yourself. Grouping your custom permission with an already existing permissions group is best because this way, you can present a cleaner interface to the end user when browsing permissions. For example, to add the purgeDatabase permission into the group that accesses the SD card, you would add the following attribute to the AndroidManifest.xml file:
android:permissionGroup=" android.permission-group.STORAGE"
One thing to note is that your application will need to be installed on the device before any other dependent application. This is usually the case; but during development, it bears remembering because you may run into difficulties if the application is not installed first.
When creating your own permissions, you have the option of categorizing the permission according to the level of protection you want the operating system to offer. In our preceding example, we defined the protectionLevel of our permission to purge the database as "dangerous". The "dangerous" protection level indicates that, by granting this permission, the end user will enable an application to modify private user data in a way that could adversely affect him.
A permission marked with protectionLevel"dangerous" or higher will automatically trigger the operating system to prompt or notify the end user. This behavior exists to let the end user know that the application being executed has the potential to cause harm. It also offers the user a chance to either signify trust or mistrust in the application by granting or denying permission to the requested API call. Descriptions of the permission protection levels are provided in Table 3-2.
Table 3-2. Permission Protection Levels
| Constant | Value | Description |
|---|---|---|
| normal | 0 | A somewhat low-risk permission that gives an application access to isolated application-level features, with minimal risk to other applications, the system, or the user. The system automatically grants this type of permission to a requesting application at installation, without asking for the user’s explicit approval (though the user always has the option to review these permissions before installing). |
| dangerous | 1 | A higher risk permission that gives a requesting application access to private user data or control over the device in a way that can negatively impact the user. Because this type of permission introduces potential risk, the system may not automatically grant it to the requesting application. Any dangerous permissions requested by an application may be displayed to the user and require confirmation before proceeding, or some other approach may be taken so the user can avoid automatically allowing the use of such facilities. |
| signature | 2 | The system will grant this permission only if the requesting application is signed with the same certificate as the application that declared the permission. If the certificates match, the system automatically grants the permission without notifying the user or asking for the user’s explicit approval. |
| signatureOrSystem | 3 | The system grants this permission only to packages in the Android system image or that are signed with the same certificates. Please avoid using this option because the signature protection level should be sufficient for most needs, and it works regardless of exactly where applications are installed. This permission is used for certain special situations where multiple vendors have applications built into a system image, and these applications need to share specific features explicitly because they are being built together. |
Sample Code for Custom Permissions
The sample code in this section provides concrete examples of how to implement custom permissions in an Android application. The project package and class structure is depicted in Figure 3-4.
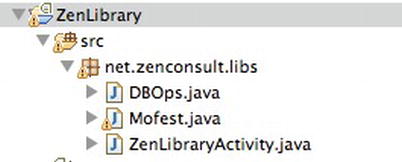
Figure 3-4. The structure and classes of the example
The Mofest.java file contains a nested class called permissions that holds the permission string constants that will be invoked by calling applications. The source code is in Listing 3-1.
Listing 3-1. The Mofest Class
package net.zenconsult.libs;
public class Mofest {
public Mofest(){
}
public class permission {
public permission(){
final String PURGE_DATABASE = ![]()
"net.zenconsult.libs.Mofest.permission.PURGE_DATABASE";
}
}
}
At this point, the DBOps.java file is of no consequence because it contains no code. The ZenLibraryActivity.java file contains our application’s entry point. Its source code is given in Listing 3-2.
Listing 3-2. The ZenLibraryActivity Class
package net.zenconsult.libs;
import android.app.Activity;
import android.os.Bundle;
public class ZenLibraryActivity extends Activity {
/** Called when the activity is first created. */
@Override
public void onCreate(Bundle savedInstanceState) {
super.onCreate(savedInstanceState);
setContentView(R.layout.main);
}
}
Again, this class does nothing remarkable; it starts up the main activity of this application. The real changes lie in the AndroidManifest.xml file of this project, which is shown in Listing 3-3. This is where the permissions are defined and used.
Listing 3-3. The Project’s AndroidManifest.xml File
<?xml version="1.0" encoding="utf-8"?>
<manifest xmlns:android="http://schemas.android.com/apk/res/android"
package="net.zenconsult.libs"
android:versionCode="1"
android:versionName="1.0">
<uses-sdk android:minSdkVersion="10" />
<permission android:name="net.zenconsult.libs.Mofest.permission.PURGE_DATABASE"
android:protectionLevel="dangerous"
android:label="@string/label_purgeDatabase"
android:description="@string/description_purgeDatabase"
android:permissionGroup="android.permission-group.COST_MONEY"/>
<uses-permission android:name="net.zenconsult.libs.Mofest.permission![]()
.PURGE_DATABASE" />
<uses-permission android:name="android.permission.SET_WALLPAPER" />
<application android:icon="@drawable/icon" android:label="@string/app_name">
<activity android:name=".ZenLibraryActivity"
android:permission="net.zenconsult.libs.Mofest.permission![]()
.PURGE_DATABASE"
android:label="@string/app_name"
>
<intent-filter>
<action android:name="android.intent.action.MAIN" />
<category android:name="android.intent.category.LAUNCHER" />
</intent-filter>
</activity>
</application>
</manifest>
As you can see, we both declare and use the PURGE_DATABASE permission in this application. The code that is in bold all pertains to our custom permission implementation for this application.
To ensure that the installer will prompt for a permission request screen, you have to build the project as an .apk file and sign it. Next, upload the .apk file to a web server or copy it to the device. Clicking this file will start the installation process; and at that time, the device will display the request for permissions screen to the end user. Figure 3-5 shows what this screen looks like.
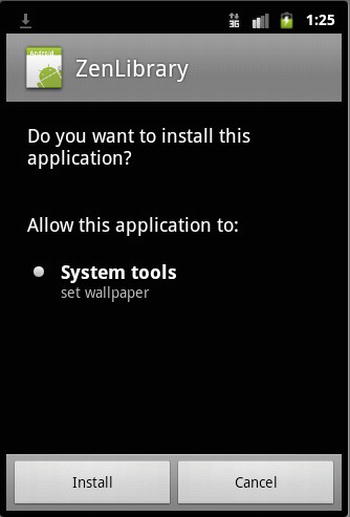
Figure 3-5. The permissions request screen
Summary
In this chapter, we looked at Android permissions, both built-in and custom. We also examined intents, content providers, and how to check permissions in more detail. The key points discussed were as follows:
- Android has a core set of mechanisms that handle application isolation and security.
- Each application will run in its own isolated space with unique user and group identifiers.
- Applications are not allowed to exchange data unless they explicitly request permissions from the user.
- Content providers store and allow access to data. They behave similar to databases.
- Intents are messages sent between applications or the system process to invoke or shut down another service or application.
- Access to specific APIs is controlled using permissions. Permissions are divided into four categories, and category 1, 2, and 3 permissions will always notify or prompt the end user. Since these permissions have the ability to adversely affect user data and experience, they are handed over to the user for final confirmation.
Custom permissions can be created to protect your individual applications. An application that wishes to use your application will need to explicitly request your ermission to do so by using the <uses-permission> tag in the AndroidManifest.xml file.
