Publishing and Selling Your Apps
You may decide that you want to make some cash by selling the applications that you’ve spent countless hours developing. With the way the mobile space has evolved lately, it is now easier than ever for an individual developer to market, sell, and earn income from his applications. Apple has the iTunes App Store, BlackBerry has AppWorld, and Android has the Market. The process of selling your apps is simple: sign up as an application seller and publish your app on the online store. Once approved, your app will be instantly available for download by Android users. In this chapter, we will examine this process in a bit more detail, and I’ll cover the basics of how you can get your app listed on the Android Market. Along the way, I’ll touch on what steps are involved from the time when you’ve decided your app works well, up until the point you decide to publish it online. I am also going to cover another important point when it comes to selling your apps online: revenue protection. If your app becomes popular on any of the online stores, then it is more than likely that you’re going to attract individuals who want to “crack” and pirate your app. Unless you’ve planned to give out your app for no charge, this could hurt your income. I will spend some time on this topic and explore how you can write good license key and registration routines that will deter piracy. During this section, I will also shed some light on some of the things your app may have to go through if it finds itself in a hostile environment.
Do you recall the Proxim app that we wrote before? Let’s publish that on the Android Market for free. I’ll take you through the basics of publishing an app. In this case, I won’t enter any specific financial information that would allow me to receive money (e.g., my bank account number) because I’m not planning on selling the app. Also, I don’t want to spend too much time telling you how to register yourself as a developer because Google already has a lot of helpful information on that and a comprehensive set of articles on how to get started.
One of the first things you need to do before publishing your app is to sign up as a developer. You can sign up using one of your existing Gmail accounts for this. Navigate to http://market.android.com/publish and sign in (see Figure 9-1). At the time of publication, the cost to register a developer is $25. You pay this amount through Google Checkout, and it is a one-time fee for registration (see Figure 9-2). The fee exists to make sure that you are a serious developer. According to Google, it helps to reduce the number of “spammy products” that may make their way onto the market.
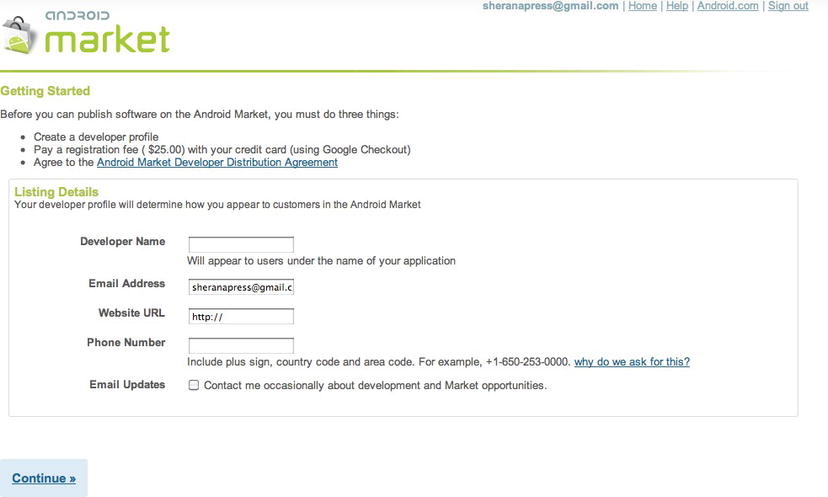
Figure 9-1. Registering to publish your application
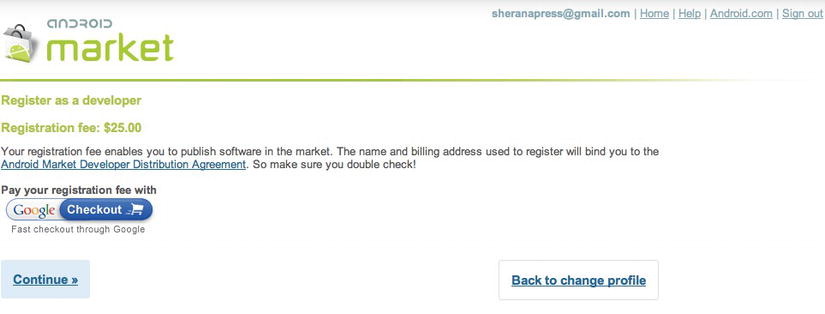
Figure 9-2. The registration fee payment
Your Apps—Exposed
It’s a jungle out there. Who knows where your apps will end up? Well, this is probably an exaggeration; but as I mentioned in the beginning of this chapter, any number of people who have access to the Android Market can download your app. It’s great if these downloads translate into revenue; unfortunately, in some cases, piracy of your app can make you lose revenue. Piracy is nothing new. It has existed since the desktop computing era began. The formal term for piracy is copyright infringement of software; it means copying a piece of software from one device to another without the proper authorization. In most cases, this simply translates into copying software that you haven’t purchased and paid for. If a friend buys some software and gives you a copy that you don’t pay for, then you are in possession of software that you have not purchased. Growing up, I remember how I would eagerly go into this store where I bought my first 8088 computer (a huge beast of heavy, impregnable metal) and spend my weekly allowance on the latest games. At the time, I never thought that I was engaged in aiding piracy. As far as I knew, I paid cash and received a game in return. I never realized that I was paying about a tenth of what the software cost to buy from the original developer. I was also not aware that my money never reached the original developer; it stayed in the store.
Developers still lose revenue to software piracy. How popular your software is and how you distribute it will play a key role in how much your software is pirated. For instance, if you allow a free trial download of your app that is limited to seven days, but allow full access to all its features, then it is likely that someone will try to circumvent this seven-day trial. If successful, then there is no need for that person to pay for and download the full version of your app. Another insidious form of copyright infringement is code theft. This occurs when someone downloads your software, reverse-engineers it, and copies the code. The person then repackages your code as a new product and puts it on sale, usually for a lower price. The only way to prove this copyright infringement is to download the new and similar app, reverse engineer it and look for coding structures that are identical to your own. If the code is modified though, it will be a tough task to prove and even tougher to fight in court because of high costs involved. As an individual developer, you are probably not going to have many resources to devote to fighting piracy. Therefore it is best to decide if you want to protect your apps from piracy—and if so, how.
In this section, I will discuss some of the topics that you will want to consider in your decision. Then, if you are convinced that you need to secure your apps from piracy, I will give you some examples of how to use Android’s License Verification Library (LVL) to deter future pirates from illegally copying and distributing your apps. Let’s start with what happens to your app when it is placed on the Android Market.
When your app is available on the Android Market, end-users can download it. If you charge for the app, then obviously the end-user will have to purchase it first before downloading it. Once the app is on a device, you can copy it onto a computer by using the Android Debug Bridge (adb). adb allows you to interact with your Android device in different ways. You can install software, open a Linux shell to explore the device file system, and copy files to and from the device. I’ve given you a full list of adb features in Listing 9-1. You can find adb in your Android SDK under the platform-tools directory. For me, this location is at /Users/sheran/android-sdk-mac_x86/platform-tools.
Listing 9-1. Adb Commands and Features
Android Debug Bridge version 1.0.29

 -d - directs command to the only connected USB device
  returns an error if more than one USB device is
 present.
 -e - directs command to the only running emulator.
  returns an error if more than one emulator is running.
 -s  <  serial number> - directs command to the USB device or emulator with
  the given serial number. Overrides ANDROID_SERIAL
  environment variable.
 -p  <  product name or path> - simple product name like 'sooner', or
  a relative/absolute path to a product
  out directory like 'out/target/product/sooner'.
  If -p is not specified, the ANDROID_PRODUCT_OUT
  environment variable is used, which must
  be an absolute path.
 devices    - list all connected devices
 connect  <  host  >  [:<port>]    - connect to a device via TCP/IP
  Port 5555 is used by default if no port number is
 specified.
 disconnect [<host  >  [:<port>]] - disconnect from a TCP/IP device.
  Port 5555 is used by default if no port number is
 specified.
  Using this command with no additional arguments
  will disconnect from all connected TCP/IP devices.

device commands:
  adb push  <  local  >  <remote>    -      copy file/dir to device
  adb pull  <  remote  >  [<local>]    -      copy file/dir from device
  adb sync [ <directory> ]    - copy host-  >  device only if changed
  (−l means list but don't copy)
  (see 'adb help all')
  adb shell    - run remote shell interactively
  adb shell  <  command> - run remote shell command
  adb emu  <  command> - run emulator console command
  adb logcat [ <filter-spec> ]    - View device log
  adb forward  <  local  >  <remote  >   − forward socket connections
     forward specs are one of:
  tcp:<port>
  localabstract:<unix domain socket name>
  localreserved:<unix domain socket name>
  localfilesystem:<unix domain socket name>
  dev:<character device name>
  jdwp:<process pid  >  (remote only)
  adb jdwp    - list PIDs of processes hosting a JDWP transport
  adb install [−l] [−r] [−s]  <  file  >  − push this package file to the device and install
 it
  ('-l' means forward-lock the app)
  ('-r' means reinstall the app, keeping its data)
  ('-s' means install on SD card instead of internal
 storage)
  adb uninstall [−k]  <  package  >  − remove this app package from the device
  ('-k' means keep the data and cache directories)
  adb bugreport    -     return all information from the device
  that should be included in a bug report.

  adb backup [−f  <  file>] [−apk|-noapk] [−shared|-noshared] [−all] [−system|-nosystem]
 [<packages...>]
     -     write an archive of the device's data to  <  file  >  .
  If no -f option is supplied then the data is written
  to "backup.ab" in the current directory.
  (−apk|-noapk enable/disable backup of the .apks
 themselves
  in the archive; the default is noapk.)
  (−shared|-noshared enable/disable backup of the
 device's
  shared storage / SD card contents; the default is
 noshared.)
  (−all means to back up all installed applications)
  (−system|-nosystem toggles whether -all automatically
 includes
  system applications; the default is to include
 system apps)
  (<packages...  >  is the list of applications to be
 backed up. If
  the -all or -shared flags are passed, then the
 package
  list is optional. Applications explicitly given
 on the
  command line will be included even if –nosystem
 would
  ordinarily cause them to be omitted.)

  adb restore  <  file> - restore device contents from the  <  file  >  backup archive

  adb help    -     show this help message
  adb version    -     show version num

scripting:
  adb wait-for-device    -     block until device is online
  adb start-server    -     ensure that there is a server running
  adb kill-server    -     kill the server if it is running
  adb get-state    -     prints: offline | bootloader | device
  adb get-serialno    -     prints: <serial-number>
  adb status-window    -     continuously print device status for a specified device
  adb remount    -     remounts the /system partition on the device read-write
  adb reboot [bootloader|recovery] - reboots the device, optionally into the
 bootloader or recovery program
  adb reboot-bootloader    -     reboots the device into the bootloader
  adb root    -     restarts the adbd daemon with root permissions
  adb usb    -     restarts the adbd daemon listening on USB
  adb tcpip  <  port> -     restarts the adbd daemon listening on TCP on the
 specified port
networking:
  adb ppp  <  tty  >  [parameters]    -     Run PPP over USB.
 Note: you should not automatically start a PPP connection.
 <tty  >  refers to the tty for PPP stream. Eg. dev:/dev/omap_csmi_tty1
 [parameters] - Eg. defaultroute debug dump local notty usepeerdns

adb sync notes: adb sync [ <directory> ]
  <localdir  >  can be interpreted in several ways:

  - If  <  directory  >  is not specified, both /system and /data partitions will be updated.

  - If it is "system" or "data", only the corresponding partition
  is updated.

environmental variables:
  ADB_TRACE - Print debug information. A comma separated list of
 the following values
  1 or all, adb, sockets, packets, rwx, usb, sync,
 sysdeps, transport, jdwp
  ANDROID_SERIAL - The serial number to connect to. -s takes priority
 over this if given.
  ANDROID_LOG_TAGS - When used with the logcat option, only these debug
 tags are printed.
For someone wishing to copy files to or from the Android device to his computer, the pull and push commands are useful. Generally, third-party apps are stored in the /data/app directory of the device. First, let’s check out the what’s in the application directory:
- Open a shell to your device by typing adb shell.
- Change directories to /data/app by doing cd /data/app.
- List the contents by using ls.
You will see something similar to this as your output:
$ ./adb shell
# cd /data/app
# ls
net.zenconsult.android.chucknorris-1.apk
test_limits_host
ApiDemos.apk
test_list_host
test_set_host
CubeLiveWallpapers.apk
test_iostream_host
test_iomanip_host
SoftKeyboard.apk
test_iterator_host
test_vector_host
test_algorithm_host
test_uninitialized_host
GestureBuilder.apk
test_sstream_host
test_char_traits_host
test_memory_host
test_ios_base_host
test_type_traits_host
test_ios_pos_types_host
test_streambuf_host
test_functional_host
test_string_host
Let’s look at the net.zenconsult.android.chucknorris-1.apk package. We can copy it to have a look at it.
To copy a package from the device, you use the command adb pull. Let’s do that. Exit your current adb shell session by typing exit and pressing Return. Next, type in the following:
adb pull /data/app/ net.zenconsult.android.chucknorris-1.apk.
This will copy the package to your current directory. If you want to copy the file elsewhere on your computer, replace the period with a directory of your choice. You now have a copy of the package file, just as it would have left the developer’s computer. We can explore this file further.
Reverse Engineering
The curious sort will not stop with just copying the package file from the device. They will want to take a closer look at the application and code. This is where reverse engineering comes into play. Reverse engineering is the process of taking a compiled binary program and generating equivalent assembly or source code for easier readability. In most cases, obtaining source code is the ideal situation because it is far easier to read source code than it is to read assembly code. The process of reverse engineering a program into assembly code is known as dis-assembly, and generating source code from a program is called de-compiling. You have to understand that each CPU will have its own assembler and its own assembly language. That is why assembly code on an Intel x86 CPU is different from that on an ARM–based CPU. We don’t have to go to such a low level though. Generally, working to the level of the Dalvik VM (DVM) is sufficient.
The DVM also contains an assembler. For the purpose of this explanation, assume that the DVM is the CPU. Therefore, your Java code has to be built to work on the DVM by using this assembler. This is what happens when you build your application using the Android SDK. The resulting executable files that will run on the DVM are called Dalvik Executable (DEX) files. You write your code in Java and compile it into a Java class file using the standard Java compiler (javac). Then, to convert this class file into the DEX format, you can use the command called dx. You can find this tool in your platform-tools directory, as well. Once the DEX file is generated, it is packaged into an APK file. You may already be aware that an APK file is nothing more than a ZIP file. If I wanted to examine the files in my APK file, I would extract the file as follows:
$ unzip net.zenconsult.android.chucknorris-1.apk
Archive: net.zenconsult.android.chucknorris-1.apk
  inflating: res/layout/main.xml
  inflating: AndroidManifest.xml
 extracting: resources.arsc
 extracting: res/drawable-hdpi/ic_launcher.png
 extracting: res/drawable-ldpi/ic_launcher.png
 extracting: res/drawable-mdpi/ic_launcher.png
  inflating: classes.dex
  inflating: META-INF/MANIFEST.MF
  inflating: META-INF/CERT.SF
  inflating: META-INF/CERT.RSA
$
Notice the DEX file.
Fortunately, Eclipse will handle the entire build process and will make sure to insert, align, and package all relevant files within our project. I’ve shown the entire build process in Figure 9-3.
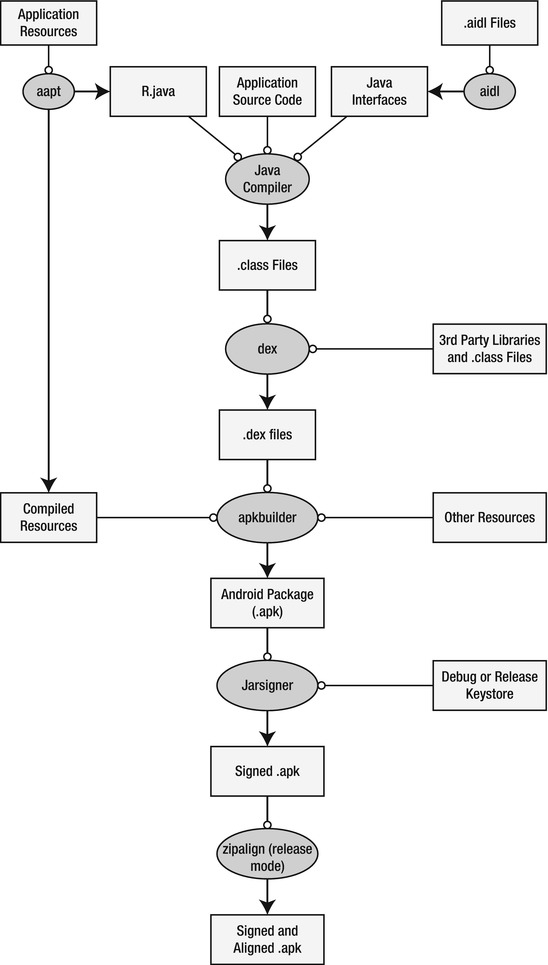
Figure 9-3. The Android Build Process
Now that you have a brief idea of how the applications are built, let’s see how we can take them apart. As we saw when we extracted the contents of our APK file, we have direct access to the classes.dex file. Since we’re considering DVM to be our CPU, this is our binary. Just like a Win32 PE-file or a Linux ELF file, this DEX file is our binary because it runs on our CPU (DVM). Google has also provided us with the tool called dexdump (also found in your platform-tools directory). If I were to run dexdump on my extracted classes.dex file, I would get a lot of information on how the file was built, including members, calls, and so on. Listing 9-2 shows what a typical dexdump disassembly looks like.
Listing 9-2. Dexdump Output
$ dexdump –d classes.dex
...
...
Virtual methods -
  #0 : (in Lnet/zenconsult/android/chucknorris/e;)
  name : 'a'
  type : '()Ljava/lang/String;'
  access : 0x0011 (PUBLIC FINAL)
  code -
  registers : 16
  ins : 1
  outs : 2
  insns size : 180 16-bit code units
0009d4: |[0009d4] net.zenconsult.android
.chucknorris.e.a:()Ljava/lang/String;
0009e4: 1202 |0000: const/4 v2, #int 0 // #0
0009e6: 1a00 5100 |0001: const-string v0,
 "http://www.chucknorrisfacts.com/" // string@0051
0009ea: 7020 2900 0f00 |0003: invoke-direct {v15, v0},
 Lnet/zenconsult/android/chucknorris/e;.a:(Ljava/lang/String;)Ljava/io/InputStream;
 // method@0029
0009f0: 0c05 |0006: move-result-object v5
0009f2: 7100 1600 0000 |0007: invoke-static {},
 Ljavax/xml/parsers/DocumentBuilderFactory;.newInstance:()Ljavax/xml/
parsers/DocumentBuilderFactory; // method@0016
0009f8: 0c00 |000a: move-result-object v0
0009fa: 1a01 0000 |000b: const-string v1, "" // string@0000
0009fe: 2206 1100 |000d: new-instance v6,
 Ljava/util/Vector; // type@0011
000a02: 7010 1000 0600 |000f: invoke-direct {v6},
 Ljava/util/Vector;.  <  init>:()V // method@0010
000a08: 6e10 1500 0000 |0012: invoke-virtual {v0},
 Ljavax/xml/parsers/DocumentBuilderFactory;.newDocumentBuilder:()Ljavax/xml
/parsers/DocumentBuilder; // method@0015
000a0e: 0c00 |0015: move-result-object v0
000a10: 6e20 1400 5000 |0016: invoke-virtual {v0, v5},
...
...
I guess you get the idea. Disassembled DEX files are hard to read, just like disassembled code on Linux or Windows. It is not impossible; but for the uninitiated, it can seem overwhelming.
Thanks to some very clever people who also believed disassembled DEX files are hard to read, we now have disassemblers that can generate more readable output. A talented individual known as JesusFreke built a completely new assembler and disassembler for the DEX file format. He called these smali and baksmali, respectively; and he has released them as open source software at http://code.google.com/p/smali/. The beauty of his approach is that you can disassemble a file, modify the disassembly code, and reassemble it into a DEX file. You may wonder what’s special about smali and baksmali, so I’ll show you some output of the same file disassembled by baksmali:
$ java -jar ∼/Downloads/baksmali-1.2.8.jar classes.dex
$ cd out/net/zenconsult/android/chucknorris/
$ ls
ChuckNorrisFactsActivity.smali b.smali d.smali
a.smali c.smali e.smali
$
This disassembles the files into individual ones, and it is far easier to examine. Let’s look at the file b.smali. Listing 9-3 shows the disassembled code.
Listing 9-3. Code Disassembled by baksmali
.class public final Lnet/zenconsult/android/chucknorris/b;
.super Ljava/lang/Thread;


# instance fields
.field private a:Lnet/zenconsult/android/chucknorris/a;


# direct methods
.method public constructor  <  init  >  (Lnet/zenconsult/android/chucknorris/a;)V
  .registers 2

  invoke-direct {p0}, Ljava/lang/Thread;-  >  <init  >  ()V

  iput-object p1, p0, Lnet/zenconsult/android/chucknorris/b;-  >  a:Lnet/zenconsult
/android/chucknorris/a;

  return-void
.end method


# virtual methods
.method public final run()V
  .registers 3

  new-instance v0, Lnet/zenconsult/android/chucknorris/e;

  invoke-direct {v0}, Lnet/zenconsult/android/chucknorris/e;-  >  <init  >  ()V

  iget-object v1, p0, Lnet/zenconsult/android/chucknorris/b;-  >  a:Lnet/zenconsult
/android/chucknorris/a;

  invoke-virtual {v0}, Lnet/zenconsult/android/chucknorris/e;-  >  a()Ljava/lang/String;

  move-result-object v0

  invoke-interface {v1, v0}, Lnet/zenconsult/android/chucknorris/a;-  >  a
(Ljava/lang/String;)V

  return-void
.end method
This isn’t all that much better, but it is significantly easier to understand and follow. Another tool that allows you to disassemble DEX files is called dedexer, and it was written by Gabor Paller. You can find it at http://dedexer.sourceforge.net/.
A significantly easier tool to use is dex2jar, which you can find at http://code.google.com/p/dex2jar/. This tool helps you deconstruct android .dex files directly into a Java JAR file. After you have the JAR file generated, you can use any standard Java decompiler to retrieve the Java source code. I use JD-, or Java Decompiler, which you can find at http://java.decompiler.free.fr/.
To run dex2jar, simply download and unpack the archive file from the URL given, and then run the .bat or .sh file, as shown in Figure 9-4. This will generate a .jar file with a similar sounding name, except it ends in _dex2jar.jar. If you open this file in JD-GUI, you can look at the reconstructed Java source code. In most cases, the decompiled code can be recompiled in your development environment like Eclipse.
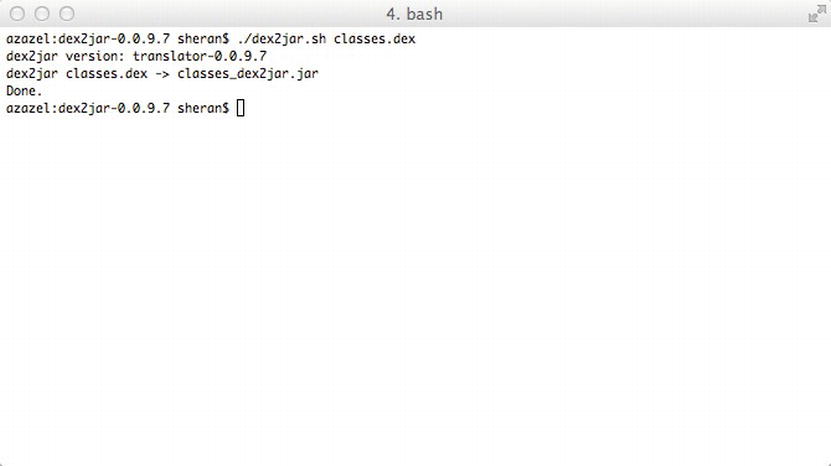
Figure 9-4. Running dex2jar on a classes.dex file
Figure 9-5 shows you what the decompiled source code looks like in JD-GUI. JD-GUI has an easy and intuitive interface for browsing the JAR file source code and can even export the source into Java files.
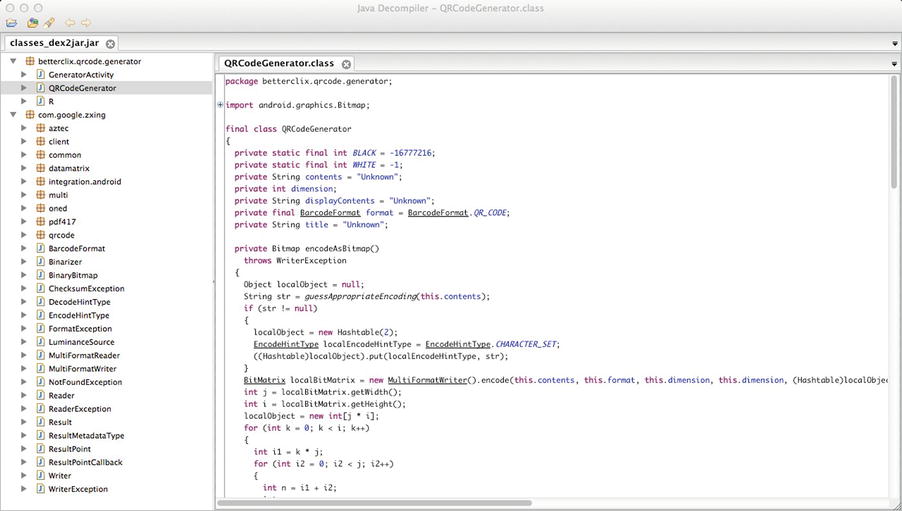
Figure 9-5 . Decompiling the JAR file using JD-GUI
With evolving tools like this, it is much easier for determined users to download, modify, and repackage your apps. If you plan to write your own protection mechanisms to prevent piracy, then you’re off to a good start. But is it something you should consider? I’ll talk briefly about that in the next section.
Should You License?
This question is a common one that I see developers asking. Do you really want to spend as much time as you took developing your app just to write a licensing routine? The answer is very subjective, and it really depends on what your app does. If your app has features that are unique or several times more efficient than other apps; or if it demonstrates a sense of uniqueness that can ensure it sells very well, then it might be worth considering to develop a licensingroutine. Note, however, that when I say licensing, that does not mean the same thing as charging. You can still charge users for your app; it’s just that, if your app doesn’t have a way of monitoring licenses, then end users will have free rein in copying and distributing the app.
Another reason you might consider developing a licensing routine would be if you plan on developing more apps in the future, and you would want to license them, as well. In that case, you could simply use the one licensing library you’ve already created. One caveat to this, however, is that you need to vary the algorithms or license check routines for each app slightly. So, if one of your apps is pirated, then the same technique will not work on the other apps.
Android License Verification Library
Google has provided the Android LVL to help developers protect their apps from indiscriminate distribution. You add LVL to your application build path and use APIs from it to check and verify user licenses. LVL interfaces with the Android Market App (see Figure 9-6) that will then check with the Google market server. Based on the response you receive, you can choose whether to permit or deny further application use. The best way to learn about LVL is to use it in an example app, so let’s do that. Before you proceed, however, you will need to sign up as an app publisher. You don’t need to do that right now, though. Let’s begin by writing a very basic app with which to test our licensing routines. Listings 9-4 through 9-7 demonstrate the code for this basic app.
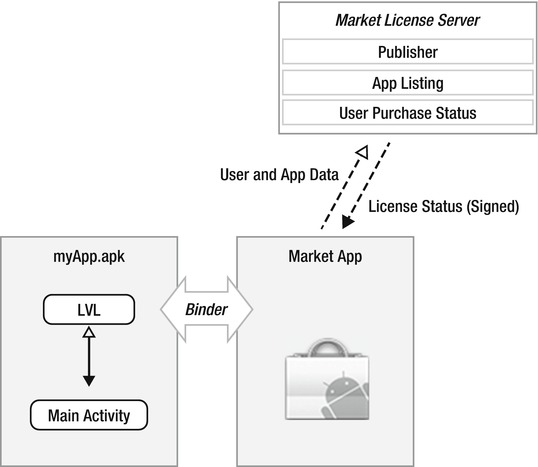
Figure 9-6. The LVL library interfaces with the Market App and then the Market Server
The app itself is quite simple. It involves Chuck Norris (as you would have guessed from the previous section of extracting and reverse engineering.) We all know and fear Chuck Norris. His roundhouse kicks are legendary, and people report that they are often the cause of many a natural disaster. To pay my respects to the great man, I will create my app around fetching the latest Chuck Norris fact from a popular site called Chuck Norris Facts (www.chucknorrisfacts.com/). The app will fetch all quotes from this site and display a random one in the text area of our app screen. Simply click the button to fetch another fact. I am relying on the randomness of the quotes from the site to make sure a new quote appears each time. As always, this app is merely an illustration of how and where you will need to add LVL checks. There is little to no error checking, and the functionality of the app is minimal. Having said this, I don’t know why I need to defend myself; it’s a Chuck Norris app. That alone should be sufficient. You may notice several areas in the app that you can improve. Feel free to do so.
Listing 9-4. The Main Activity—ChuckNorrisFactsActivity.java
package net.zenconsult.android.chucknorris;

import android.app.Activity;
import android.os.Bundle;
import android.view.View;
import android.widget.Button;
import android.widget.TextView;

public class ChuckNorrisFactsActivity extends Activity implements CommsEvent {
        private Activity activity;
        private TextView view;
        private CommsEvent event;

        /** Called when the activity is first created. */
        @Override
        public void onCreate(Bundle savedInstanceState) {
                super.onCreate(savedInstanceState);
                setContentView(R.layout. main );
                activity = this;
                event = this;
                view = (TextView) findViewById(R.id.editText1);

                // Click Button
                final Button button = (Button) findViewById(R.id.button1);
                button.setOnClickListener(new View.OnClickListener() {
                        public void onClick(View v) {
                                view.setText("Fetching fact...");
                                CommsNotifier c = new CommsNotifier(event);
                                c.start();
                        }
                });
        }

        @Override
        public void onTextReceived(final String text) {
                runOnUiThread(new Runnable() {
                        public void run() {
                                view.setText(text);
                        }
                });

        }
}
Listing 9-5. The CommsEvent.java file
package net.zenconsult.android.chucknorris;

public interface CommsEvent {
        public void onTextReceived(String text);
}
Listing 9-6. The CommsNotifier.java ile
package net.zenconsult.android.chucknorris;

public class CommsNotifier extends Thread {
        private CommsEvent event;

        public CommsNotifier(CommsEvent evt) {
        event = evt;
        }

        public void run() {
        Comms c = new Comms();
        event.onTextReceived(c.get());
        }
}
Listing 9-7. The Comms.java File
package net.zenconsult.android.chucknorris;

import java.io.IOException;
import java.io.InputStream;
import java.util.Random;
import java.util.Vector;

import javax.xml.parsers.DocumentBuilder;
import javax.xml.parsers.DocumentBuilderFactory;
import javax.xml.parsers.ParserConfigurationException;

import org.apache.http.HttpResponse;
import org.apache.http.client.ClientProtocolException;
import org.apache.http.client.methods.HttpGet;
import org.apache.http.impl.client.DefaultHttpClient;
import org.apache.http.util.EntityUtils;
import org.w3c.dom.Document;
import org.w3c.dom.NamedNodeMap;
import org.w3c.dom.Node;
import org.w3c.dom.NodeList;
import org.xml.sax.SAXException;

import android.app.Activity;
import android.content.Context;
import android.util.Log;
import android.widget.Toast;

public class Comms {
        private final String url = "http://www.chucknorrisfacts.com/";

        private DefaultHttpClient client;

        public Comms() {

        client = new DefaultHttpClient();
        }

        public String get() {
        InputStream pageStream = doGetAsInputStream(url);
        DocumentBuilderFactory dbFactory = DocumentBuilderFactory.newInstance();
        DocumentBuilder db = null;
        Document doc = null;
        String pageText = "";
        Vector        < String >        quotes = new Vector        < String >        ();
        try {
        db = dbFactory.newDocumentBuilder();
        doc = db.parse(pageStream);
        NodeList nl = doc.getElementsByTagName("div");
        for (int x = 0; x < nl.getLength(); ++x) {
        Node node = nl.item(x);
        NamedNodeMap attributes = node.getAttributes();
        for (int y = 0; y        <        attributes.getLength(); ++y) {
        if (attributes.getNamedItem("class") ! = null) {
        Node attribute =
       attributes.getNamedItem("class");
        if (attribute.getNodeValue()
        .equals("views-
field-title")) {
        NodeList children =
       node.getChildNodes();
        for (int z = 0; z <
       children.getLength(); ++z) {
        Node child =
       children.item(z);
        if (child.getNodeName()

.equalsIgnoreCase("span"))
        quotes.add
(child.getTextContent());
        }
        }
        }

        }
        }
        Random r = new Random();
        pageText = quotes.get(r.nextInt(quotes.size() - 1));
        pageStream.close();
        } catch (SAXException e) {
              // TODO Auto-generated catch block
        e.printStackTrace();
        } catch (IOException e) {
              // TODO Auto-generated catch block
        e.printStackTrace();
        } catch (ParserConfigurationException e) {
              // TODO Auto-generated catch block
        e.printStackTrace();
        }
        return pageText;
        }

        public String doGetAsString(String url) {
        HttpGet request = new HttpGet(url);
        String result = "";
        try {
        HttpResponse response = client.execute(request);
        int code = response.getStatusLine().getStatusCode();
        if (code == 200) {
        result = EntityUtils.toString(response.getEntity());
        } else {
        Log.e("CN", "Non 200 Status Code "        +        code);
        }
        } catch (ClientProtocolException e) {
              // TODO Auto-generated catch block
        e.printStackTrace();
        } catch (IOException e) {
              // TODO Auto-generated catch block
        e.printStackTrace();
        }
        return result;

        }

        public InputStream doGetAsInputStream(String url) {
        HttpGet request = new HttpGet(url);
        InputStream result = null;
        try {
        HttpResponse response = client.execute(request);
        int code = response.getStatusLine().getStatusCode();
        if (code == 200) {
        result = response.getEntity().getContent();
        } else {
        Log.e("CN", "Non 200 Status Code "        +        code);
        }
        } catch (ClientProtocolException e) {
              // TODO Auto-generated catch block
        e.printStackTrace();
        } catch (IOException e) {
              // TODO Auto-generated catch block
        e.printStackTrace();
        }
        return result;
        }
}
Starting from the main activity, you can see that there is a button and a text view that we will use for our user interaction. When the user clicks our button, we start our CommNotifier thread. This thread will execute the HTTP get request in our Comms file and return a random quote picked from the list of Chuck Norris facts that it gathers from the website. The CommNotifier then triggers the onTextReceived(String text) function. Our main activity implements the CommEvent interface. Therefore, whenever this method is fired, we need to access the text argument to receive our quote. When we execute the app and click the button, we see something similar to the output shown in Figure 9-7. Chuck Norris is indeed scary.
Now that we’ve got our application, let’s see what we can do to protect it using LVL.

Figure 9-7. The Chuck Norris Facts app in action
I’m going to run this demo on an Android simulator. This involves an additional step because the Android simulators do not come pre-packaged with the Android Market app. I will need to download the Google API Add-On platform, which provides a rudimentary background implementation of the Android Market. It implements the Licensing Service that we need to test out LVL. I’m getting ahead of myself, though. Let’s start by preparing our development environment. I’m going to make the assumption that you use Eclipse for your development and that you already downloaded and installed the Android SDK with at least API level 8. And off we go!
Download the Google API Add-On
I’m going to describe the steps required to get the Google API Add-On if you use Eclipse. First, open the Android SDK Manager. Select Window ![]() Android SDK Manager. Next, navigate to the API level you plan on using and tick the Google API’s by Google Inc. (see Figure 9-8). Before you click the Install button, navigate once more to the Extras folder and tick the Google Market Licensing Package (see Figure 9-9). Now click the Install button. For this app, I use the Android API level 10 for version 2.3.3, so that is what I selected.
Android SDK Manager. Next, navigate to the API level you plan on using and tick the Google API’s by Google Inc. (see Figure 9-8). Before you click the Install button, navigate once more to the Extras folder and tick the Google Market Licensing Package (see Figure 9-9). Now click the Install button. For this app, I use the Android API level 10 for version 2.3.3, so that is what I selected.
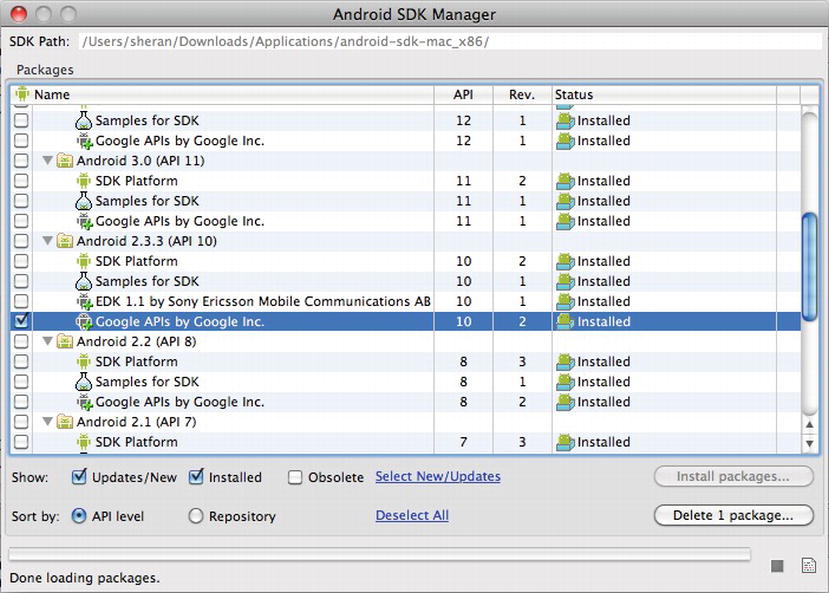
Figure 9-8. Installing the Google APIs for Android Version 2.3.3

Figure 9-9. Installing the Market Licensing Package
That’s it. Eclipse will download and install your APIs to your SDK directory. To locate the LVL sources, navigate from your Android SDK directory to /extras/google/market_licensing/library. Here, you will see a directory structure similar to that shown in Figure 9-10. Let’s move onto the next set of steps, which are importing, modifying, and building LVL.
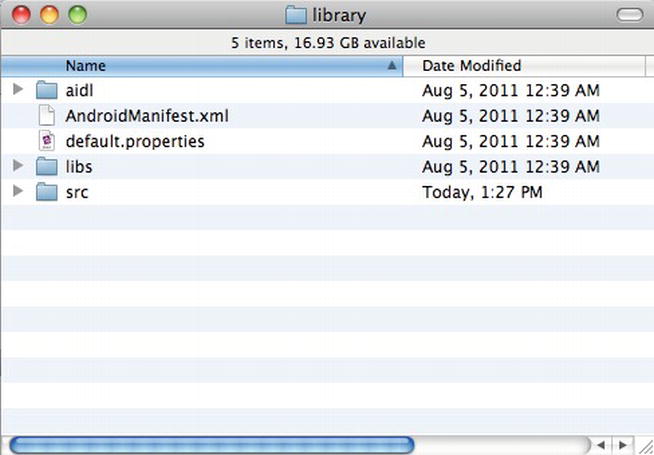
Figure 9-10. The LVL sources
Copy LVL Sources to a Separate Directory
Now that we have the LVL source with us, let’s move it to another working directory. The main reason for doing this is because, if we continue to work from the original source directory, whenever we do an update, all our changes are likely going to be overwritten. Therefore, we need to keep our LVL source in a separate directory that will not be overwritten. This is simple enough. Copy the library directory and all subdirectories and files into your development directory.
Import LVL Source As a Library Project
We will now build the LVL library. To do this, we have to create a new Eclipse Android project and mark the project as a Library Project. A Library project has no activity and does not interact directly with the end user. Instead, it exists so that other apps can use its functions from within their code. To create a new Eclipse project, select File ![]() New
New ![]() Other, open the Android folder, and choose Android Project (see Figure 9-11). Name your project (see Figure 9-12) and select the correct API version that you plan to develop the project (see Figure 9-13). You will need to name your package the same as the LVL source code, which is com.android.vending.licensing (see Figure 9-14).
Other, open the Android folder, and choose Android Project (see Figure 9-11). Name your project (see Figure 9-12) and select the correct API version that you plan to develop the project (see Figure 9-13). You will need to name your package the same as the LVL source code, which is com.android.vending.licensing (see Figure 9-14).
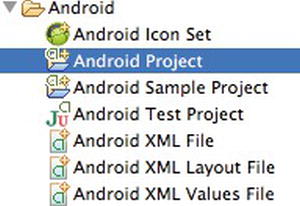
Figure 9-11. The Android project
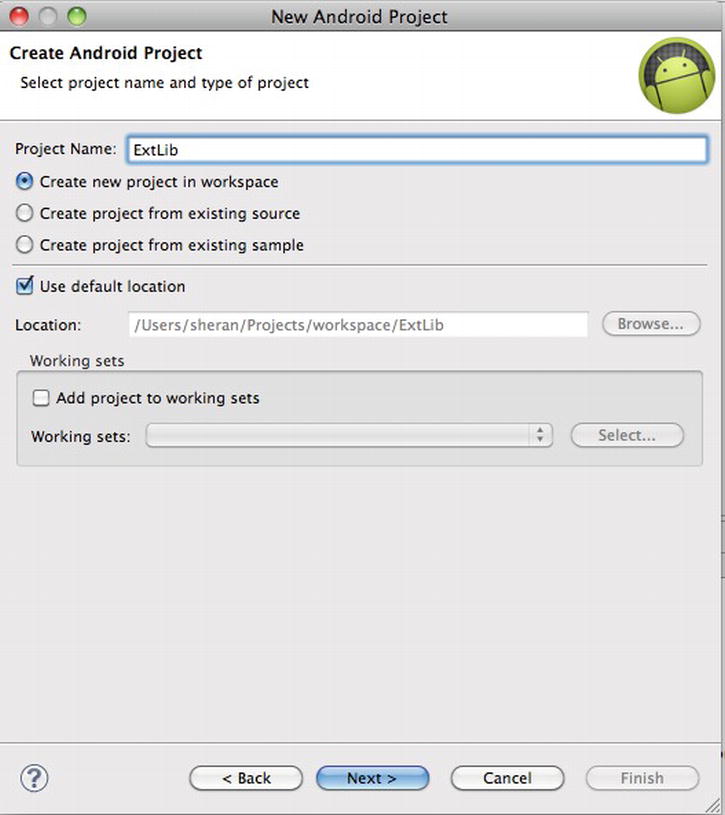
Figure 9-12. Name your project
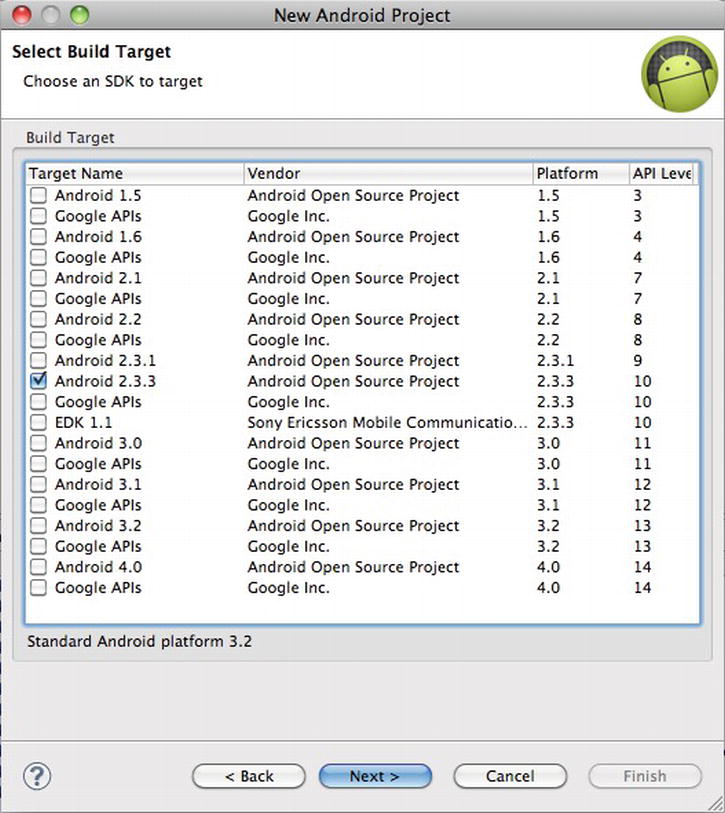
Figure 9-13. Select the API version
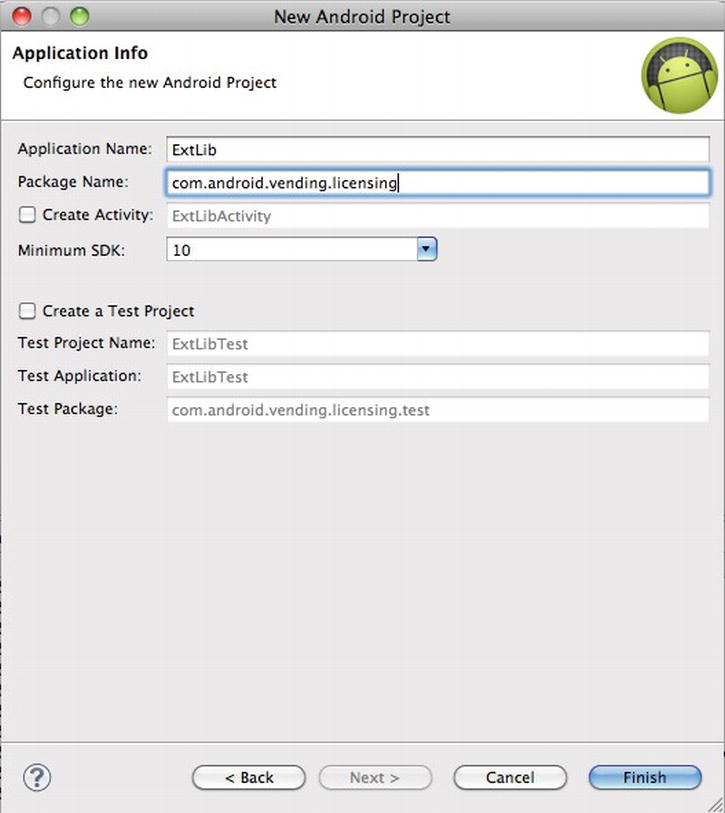
Figure 9-14. Specify the package name. It should be the same as the LVL source package
Once this is done, let’s import the LVL source into our project. But before this, let’s set the project as a Library project. Right click the project name in your Project Explorer window and select Properties. Select the Android option in the left-hand pane and in the bottom half of the right pane, you will see a tick box marked Is Library. Tick this option and click the OK button (see Figure 9-15).
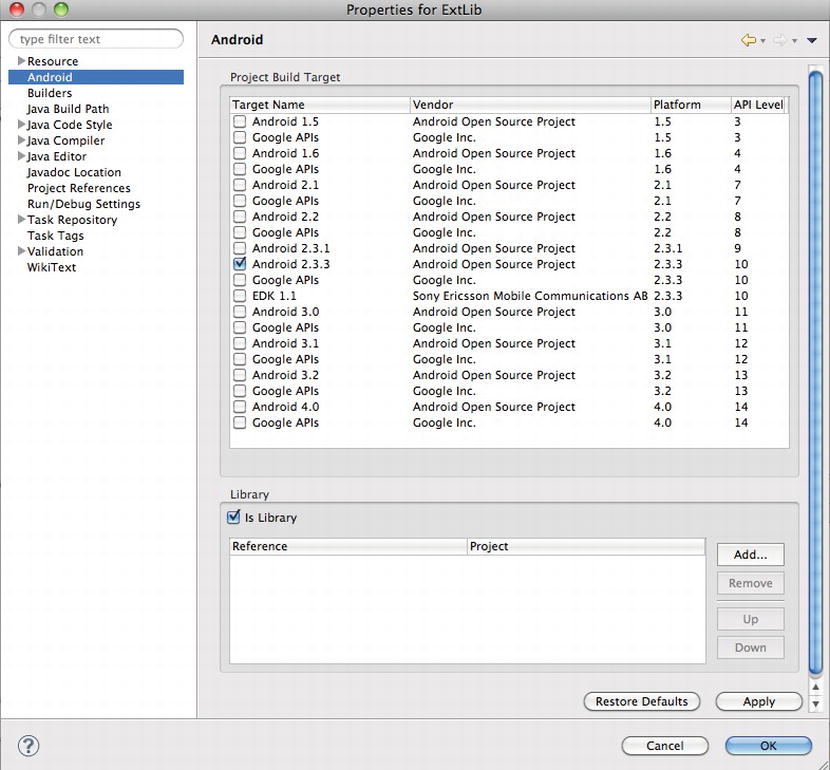
Figure 9-15 . Mark the project as a Library
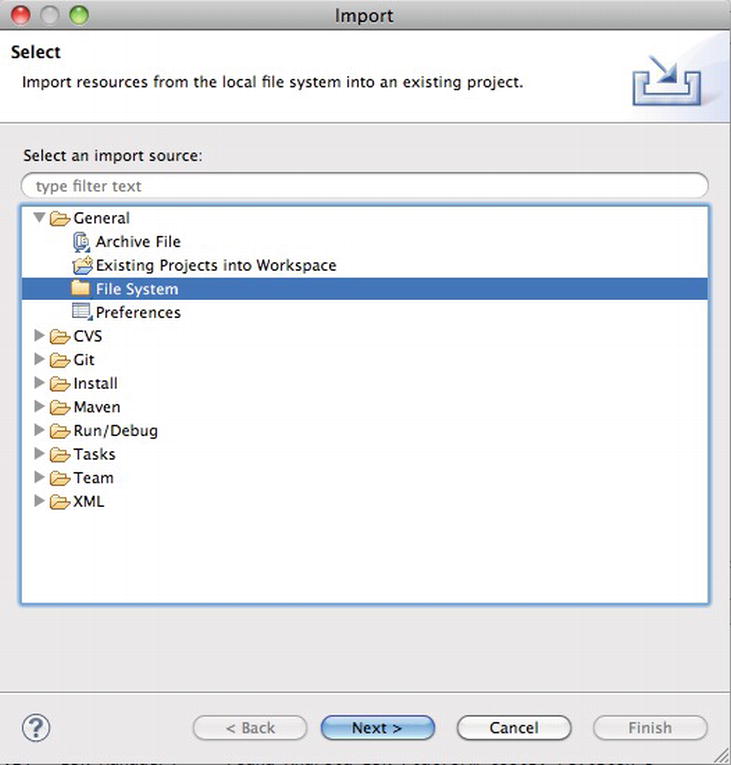
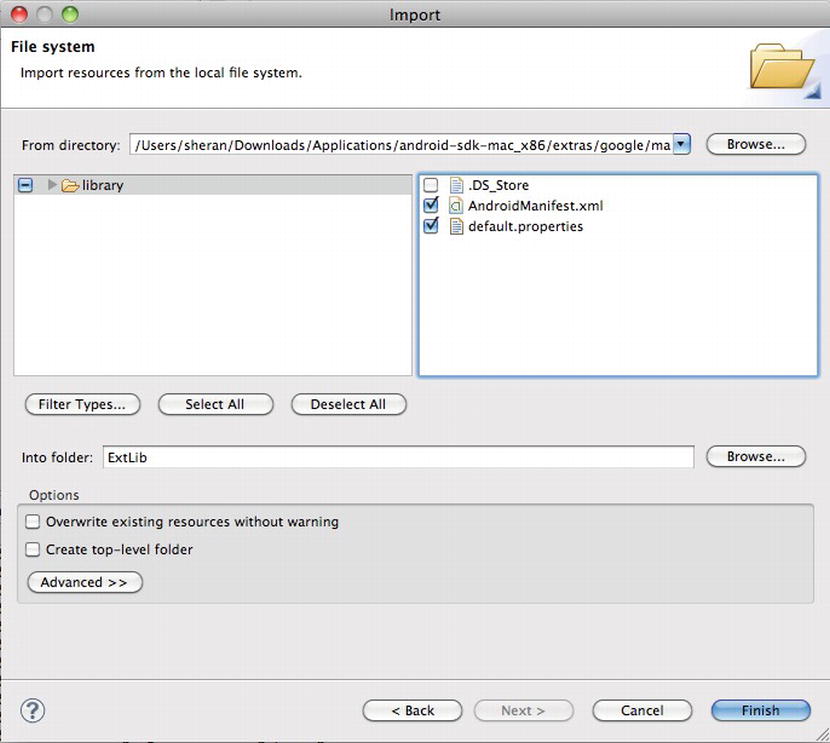
Now we can import our source. Right-click the project name in the Project Explorer window and select Import. In the resulting window, choose File System (see Figure 9-16) and click the Next button. In the next window, click the Browse button and navigate to the library folder that is part of the Android LVL source. On the left-middle window pane, you should then see the directory appear. Tick the library directory and click the Finish button to import the LVL source into your project (see Figure 9-17). If you’re asked to overwrite the AndroidManifest.xml file, choose Yes. Your LVL source is now part of your project.
Building and Including LVL in our app
Let’s first integrate the basic version of LVL that Google provides into our app. After this, I will explain some possible areas where you can modify the LVL source to make it your own. I highly recommend this approach because, as I mentioned before, the LVL modified source code you write will not be well known, and thus it will take an attacker longer to break your licensing module.
To include the LVL in your app, navigate to your app name in the Project Explorer view in Eclipse, right click, and select Properties. Select the Android option from the left window pane and, in the bottom-right window page, click the Add button. You’re then prompted to select a library project (see Figure 9-18). Choose the Android LVL library project that we just created. After this is done, you will see the library project included in your app’s project (see Figure 9-19).
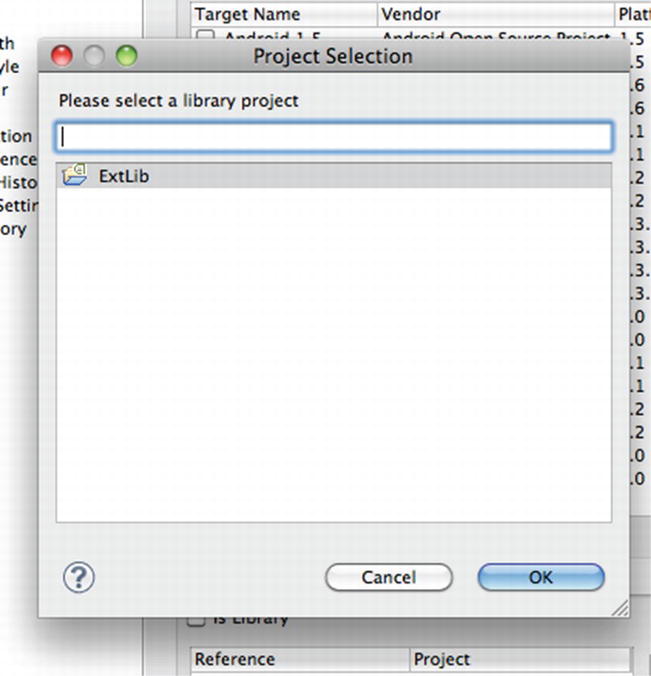
Figure 9-18. Select the Android LVL library project
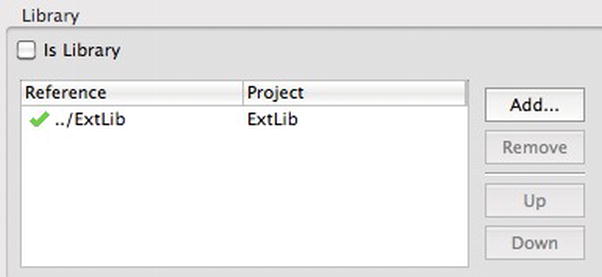
Figure 9-19. The LVL library project is included in the app project
Now let’s change our ChuckNorrisFactsActivity.java file to that shown in Listing 9-8. You can see that we have added a new private class called LicCallBack. This implements the LVL’s LicenseCheckerCallBack class. This class is called when the license check is complete and when there is either a positive or a negative response from the license server. The allow() or dontAllow() methods are called, respectively.
Listing 9-8. The Modified ChuckNorrisFactsActivity.java File
package net.zenconsult.android.chucknorris;

import java.util.UUID;

import com.android.vending.licensing.AESObfuscator;
import com.android.vending.licensing.LicenseChecker;
import com.android.vending.licensing.LicenseCheckerCallback;
import com.android.vending.licensing.ServerManagedPolicy;

import android.app.Activity;
import android.content.Context;
import android.os.Build;
import android.os.Bundle;
import android.provider.Settings.Secure;
import android.view.View;
import android.view.Window;
import android.widget.Button;
import android.widget.TextView;
import android.widget.Toast;

public class ChuckNorrisFactsActivity extends Activity implements CommsEvent {
        private Button button;
        private TextView view;
        private Activity activity;
        private CommsEvent event;
        private LicCallBack lcb;
        private static final StringPUB_KEY = "MIIBI...";// Add your Base64 Public
        // key here
        private staticfinal byte[]SALT = new byte[] { −118, -112, 38, 124, 15,
        -121, 59, 93, 35, -55, 14, -15, -52, 67, -53, 54, 111, -28,
       -87, 12 };

        /** Called when the activity is first created. */
        @Override
        public void onCreate(Bundle savedInstanceState) {
        super.onCreate(savedInstanceState);
        requestWindowFeature(Window.FEATURE_INDETERMINATE_PROGRESS);
        setContentView(R.layout.main);
        event = this;
        activity = this;
        view = (TextView) findViewById(R.id.editText1);

        // Click Button
        button = (Button) findViewById(R.id.button1);
        button.setOnClickListener(new View.OnClickListener() {
        public void onClick(View v) {
        // Do License Check before allowing click

        // Generate a Unique ID
        String deviceId = Secure.getString(getContentResolver(),
        Secure.ANDROID_ID);
        String serialId = Build.SERIAL;
        UUID uuid = new UUID(deviceId.hashCode(),
       serialId.hashCode());
        String identity = uuid.toString();
        Context ctx = activity.getApplicationContext();

        // Create an Obfuscatorand a Policy
        AESObfuscator obf = new AESObfuscator(SALT,
       getPackageName(),
        identity);
        ServerManagedPolicy policy = new
       ServerManagedPolicy(ctx, obf);

        // Create the LicenseChecker
        LicenseChecker lCheck = new LicenseChecker(ctx,
       policy,PUB_KEY);

        // Do the license check
        lcb = new LicCallBack();
        lCheck.checkAccess(lcb);
        }
        });
        }

        @Override
        public void onTextReceived(final String text) {
        runOnUiThread(new Runnable() {
        public void run() {
        setProgressBarIndeterminateVisibility(false);
        view.setText(text);
        button.setEnabled(true);

        }
        });

        }

        public class LicCallBack implements LicenseCheckerCallback {

        @Override
        public void allow() {
        if (isFinishing()) {
        return;
        }

        Toast toast = Toast.makeText(getApplicationContext(),
       "Licensed!",
        Toast.LENGTH_LONG);
        toast.show();
        button.setEnabled(false);
        setProgressBarIndeterminateVisibility(true);
        view.setText("Fetching fact...");
        CommsNotifier c = new CommsNotifier(event);
        c.start();
        }

        @Override
        public void dontAllow() {
        if (isFinishing()) {
        return;
        }
        Toast toast = Toast.makeText(getApplicationContext(),
        "Unlicensed!", Toast.LENGTH_LONG);
        toast.show();
        }

        @Override
        public void applicationError(ApplicationErrorCode errorCode) {
        // TODO Auto-generated method stub

        }

        }

}
The next thing you will notice is that we don’t do any activity on our button click. Instead, we do a license check. This means that we move our quote fetching activity into the allow() section of the LicenseCallBack class. To use the license check from LVL, you have to call the checkAccess() method of the LicenseChecker class. You have to build the LicenseChecker with the following arguments:
For the application context, you can use the current application context. If your LicenseChecker is instantiated in another class, then you will need to pass the Application Context object along to this class. Your Base 64 encoded public key will be in your Publisher profile page online. To access it, log into https://market.android.com/publish/Home, click Edit Profile, and then scroll down to the section called Licensing & In-App Billing. The text area named Public Key holds your key (see Figure 9-20). Copy and paste this into your app. The licensing policy requires a bit more explanation, so I will describe it in the next section.
Look at this line code, as well:
AESObfuscator obf = new AESObfuscator(SALT, getPackageName(),identity);
When your app receives a response from the Android license server, it will need to store information about this response locally, on the device. Leaving the response data in plain text form will only mean that an attacker can read and tamper with this information. To prevent this from happening, LVL allows us to obfuscate the information before storing it on the device. The AESObfuscator class does just this. It requires a salt value (which is just a random 20 bytes) and a unique device identity. The unique identity ensures that the data can only be read from the device with this matching identity. In your own code, you will want to build this identity string from as many sources of information as possible. In this case, I am using the ANDROID_ID and OS Build serial number.
Note also that your app will have to request a new permission. For it to be able to verify licenses through the Android Market, make sure you add the following permission to your AndroidManifest.xml file:
<uses-permission android:name = "com.android.vending.CHECK_LICENSE">
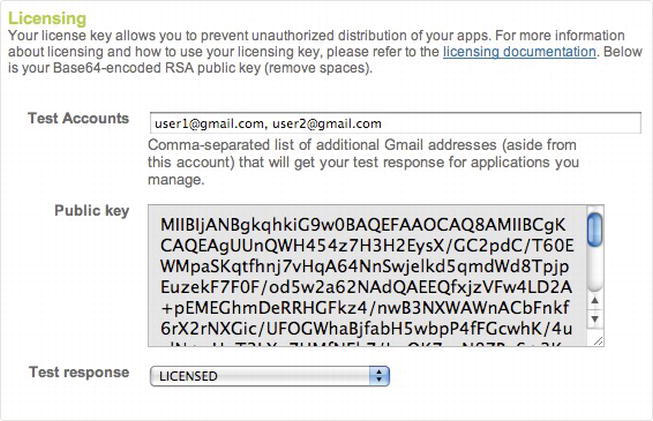
Figure 9-20. The Base64 encoded public key
Your publisher dashboard has a pull-down menu marked Test Response (see Figure 9-20). You can test your app by setting this value to either LICENSED or NOT_LICENSED. The Google API and LVL will contact the Android Market server and present this response to your app. Setting the Test Response value to NOT_LICENSED lets you see how your app behaves if an unlicensed user attempts to use it (see Figure 9-21). Accordingly, you can make changes and either present a message (I present a one word response to indicate whether the app is licensed or not) or redirect the user to the Android Market, so that she may purchase your app.
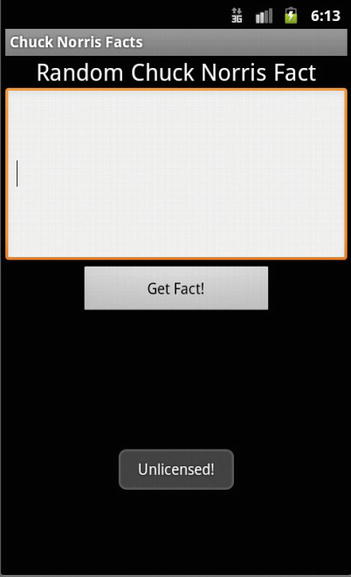
Figure 9-21. An unlicensed user receives a negative response, and the app does not work
One of the key mechanisms that you can use to customize your licensing process is the licensing policy. Android LVL ships with two default policies:
- StrictPolicy
- ServerManagedPolicy
Google recommends that you use the ServerManagedPolicy because, among other things, it also handles caching of the server response. This is often useful because Google enforces limits on the number of times your application can query its servers. The StrictPolicy will always make a query to the server; and while this can be more secure by the fact that it prevents local device data tampering, it may lock your end-user out if the Google server refuses to give you a response because you reached your limits.
Both Policy objects provide two basic methods that you will be concerned with: allowAccess() and processServerResponse(). The allowAccess() method must return a Boolean value. When called, return true if you choose to permit access; otherwise, return false. Look at the sample implementation in Listing 9-9.
Listing 9-9. The allowAccess() method in the ServerManagedPolicy object (courtesy of Google)
public boolean allowAccess() {
        long ts = System.currentTimeMillis();
        if (mLastResponse == LicenseResponse.LICENSED) {
        // Check if the LICENSED response occurred within the validity timeout.
        if (ts        <        = mValidityTimestamp) {
        // Cached LICENSED response is still valid.
        return true;
        }
        } else if (mLastResponse == LicenseResponse.RETRY &&
        ts < mLastResponseTime        +        MILLIS_PER_MINUTE) {
        // Only allow access if we are within the retry period or we haven't
       used up our
        // max retries.
        return (ts        <        = mRetryUntil || mRetryCount        <        = mMaxRetries);
        }
        return false;
        }
You can see that the function returns true if it receives LicenseResponse.LICENSED as its response. The function first checks whether the last response received indicated that the app was licensed. It then checks whether the date is still within the valid period. If so, then it returns true. If the date is greater than the validity period, it returns false. The function also checks whether the server has asked us to keep retrying, and it does so within reasonable retry limits and time intervals. The response object, mLastResponse,is derived from the processServerResponse() method shown in Listing 9-10. You can see that this function checks for three responses:
- LicenseResponse.RETRY
- LicenseResponse.LICENSED
- LicenseResponse.NOT_LICENSED
Accordingly, it then sets parameters that the allowAccess() method can read. You will notice one other thing. The last line in the processServerResponse() object is a commit() operation. This is the caching function where the response is obfuscated and then stored in the device’s Shared Preferences. This part does not exist in the StrictPolicy because no data is cached.
Listing 9-10. The processServerResponse() method in the ServerManagedPolicy object (courtesy of Google)
public void processServerResponse(LicenseResponse response, ResponseData rawData) {

        // Update retry counter
        if (response != LicenseResponse.RETRY) {
        setRetryCount(0);
     } else {
        setRetryCount(mRetryCount        +        1);
     }

     if (response == LicenseResponse.LICENSED) {
        // Update server policy data
        Map        < String, String >        extras = decodeExtras(rawData.extra);
        mLastResponse = response;
        setValidityTimestamp(extras.get("VT"));
        setRetryUntil(extras.get("GT"));
        setMaxRetries(extras.get("GR"));
     } else if (response == LicenseResponse.NOT_LICENSED) {
        // Clear out stale policy data
        setValidityTimestamp(DEFAULT_VALIDITY_TIMESTAMP);
        setRetryUntil(DEFAULT_RETRY_UNTIL);
        setMaxRetries(DEFAULT_MAX_RETRIES);
     }

     setLastResponse(response);
     mPreferences.commit();
 }
Effective Use of LVL
It is worth the effort if you modify the LVL source code (i.e., your policy) so that it becomes something unique to your app. One mistake you can make is to use a vanilla implementation of LVL to which everyone knows the source. This makes it easier for someone to patch your app and bypass your license checking routines. Justin Case has already demonstrated this vulnerability over at the Android Police site. You can find the article at www.androidpolice.com/2010/08/23/exclusive-report-googles-android-market-license-verification-easily-circumvented-will-not-stop-pirates/. Granted, it is an old article, but it still demonstrates the principle that you can easily understand and modify reverse-engineered code if you know what the source looks like. In this case, Justin demonstrates how to patch and bypass LVL checking in a demo and an actual commercial app.
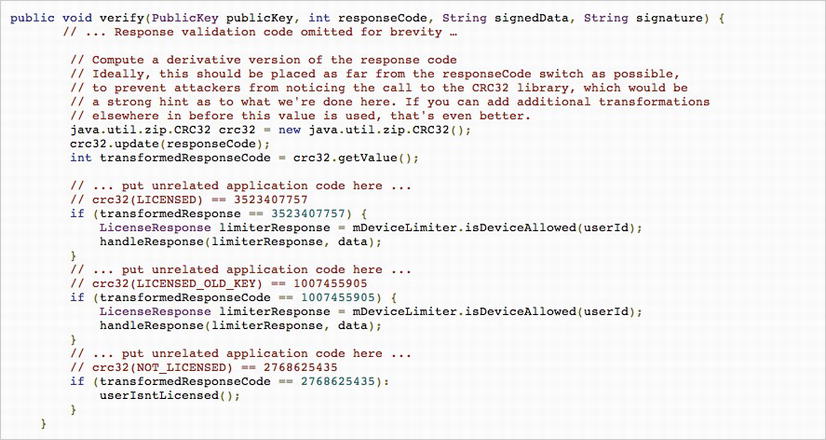
Another good set of guidelines comes to us from Trevor Johns over at the Android Developers blog. The article is a great read and lists a few techniques for more effective use of LVL. One particular piece of code was very interesting. Look at Figure 9-22. Trevor tells us that an attacker can guess the response of the LICENSED and NOT_LICENSED constant values, and then swap them so that an unlicensed user will receive full use of the app. To prevent this, Trevor shows us some code that will run a CRC32 check on the responses; and instead of checking for the constants, check for the result of the CRC32 check on the constant. I want to expand on this subject a little bit more. Imagine if you will, rather than running a check for a fixed value, you execute another HTTP fetch to retrieve a response from your own server.
Consider the code in Listing 9-11. Instead of making a direct comparison to a number, you make an additional request to your server and retrieve the response code from there. One of the good points about this is that you can engineer your ServerVerifier object in any way you prefer. You can even set it up so that the response code changes every single time. You may even consider making use of Challenge Response in your code to vary the response each time.
Listing 9-11. The Modified Verify Function
public void verify(PublicKey publicKey, int responseCode, String signedData, String
       signature) {
        // ... Response validation code omitted for brevity ...

        // Compute a derivative version of the response code
        // Rather than comparing to a static value, why not retrieve the value from
       a server that you control?

        java.util.zip.CRC32 crc32 = new java.util.zip.CRC32();
        crc32.update(responseCode);
        int transformedResponseCode = crc32.getValue();

        ServerVerifier sv = new ServerVerifier(); // This class will make an
       HTTP request to your server to fetch the code.
        int serverResponse = sv.retrieveLicensedCode(); // There is no limit
       to how you can create this routine.

        // ... put unrelated application code here ...
        // crc32(LICENSED) == 3523407757 But this part is calculated on your server.
        if (transformedResponse == serverResponse) {
        LicenseResponse limiterResponse = mDeviceLimiter.isDeviceAllowed(userId);
        handleResponse(limiterResponse, data);
        }

        ...
        ...
        ...
Alternatively, this can take place in the Policy, as well (as opposed tochecking a hardcoded server response):
if (response == LicenseResponse.LICENSED)
You can have the response checked by retrieving it from one of your servers that you trust in a manner similar to this:
ServerVerifier sv = new ServerVerifier();
if (response == sv.getLicensedResponse())
Obfuscation is another important point that you will want to consider. It applies to software piracy, as well as to intellectual property theft. Obfuscation is a process by which you change all class names, variable names, and method names in your source code to random, unrelated ones. You may have wondered why my decompiled app had files like a.smali, b.smali, c.smali, and so on in the directory listing. When I used BakSmali to decompile my app, I was running it on an obfuscated version of the binary. The code obfuscator made sure to change my class names like Comms, CommsEvent, CommsNotifier, and so on to ones that do not volunteer information about what they do. Additionally, if you look inside these files, you will see that the method names and member names are all obfuscated. This can be very frustrating to someone trying to reverse engineer code, and it can act as an excellent deterrent to intellectual property or code theft.
Obfuscation cannot guarantee that your code won’t be stolen or pirated. It simply makes the task of reverse engineering much harder. The Android SDK ships with an obfuscator called ProGuard. You can use ProGuard for obfuscating any of your Java code. You can download it at http://proguard.sourceforge.net/; it is free and open source software. The Android developer documents strongly encourage you to obfuscate your code when you are packaging your apps for release. If you use Eclipse, then this is a straightforward task. Locate your project.properties file in your project (see Figure 9-23) and add this line (see Figure 9-24):
proguard.config = proguard.cfg
Note that this line assumes you haven’t moved the location of the proguard.cfg file from its default location.
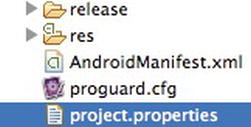
Figure 9-23. The Project properties file

Figure 9-24. Adding the proguard.config property
To export either a signed or an unsigned APK file, right-click your project name, select Android Tools, and then select Export Unsigned Application Package or Export Signed Application Package (see Figure 9-25).

Figure 9-25. Exporting the obfuscated package
ProGuard is a free, open source Java code obfuscator. In addition to obfuscation, ProGuard also attempts to shrink, optimize, and preverify the code that you feed it. Preverification is important for mobile apps in terms of improving execution times. The preverification phase ensures that the Java class is annotated in a manner that allows the VM to read and perform some runtime checks much faster. In most cases, using the default proguard.cfg file should suffice. Figure 9-26 shows output from a decompiled, obfuscated class file. As you can see, the code itself is quite unreadable due to the renamed, mostly cryptic looking class and variable names. Obfuscation is not meant to stop reverse engineering; rather, it acts more as a deterrent because it could take a long time to rebuild variable and class names that are renamed. Some commercial Java obfuscators go as far as even obfuscating the strings within the class file. This makes the code even more difficult to reverse engineer.
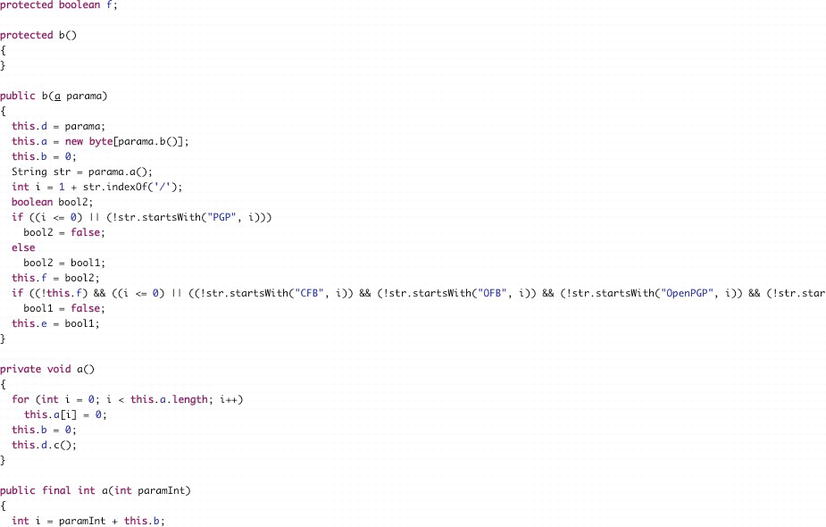
Figure 9-26. A decompiled, obfuscated class file
Summary
This chapter was dedicated to some important issues you will face when monetizing your app. While sites like Apple App Store, BlackBerry App World, and the Android Market make it easy for you to pull in revenue, you will no doubt have to face issues like software piracy and intellectual property theft. You should keep in mind that the topics discussed in this chapter aren’t magic bullets. They will not protect you completely, but they will offer you an edge so that your code becomes harder to attack. In a best case scenario, an attacker will leave your app alone because he will not want to make the effort it would cost to reverse engineer it.
In this chapter, we looked at what your app can be subject to if it finds itself in a hostile environment. We looked at how your app can be reverse engineered and re-built after modifications. We showed how you can obfuscate your source code so that it becomes harder for an attacker to read your code even after reverse engineering. We then looked at how you can check licenses in your app so that you ensure your end-users aren’t pirating your app. We did this by using the Android LVL. One thing to remember is to always write your own routines in the license checking libraries. This ensures that your code is fresh, new and is not well known. It makes reverse engineering harder.
Bear in mind these few steps before you release your application. You can find full descriptions of them online at http://developer.android.com/guide/publishing/preparing.html.
- Choose a good package name. One that will work for the entire life of the app.
- Turn off debugging and logging. Make sure to search for debug tracing and disable that.
- Clean your project directories from backup files or other unnecessary files you may have created during development and testing.
- Review your Manifest file and ensure all the required permissions exist. Ensure that your label and icon values are set as well as the correct versionCode and versionName attributes.
- Check and optimize your application for the correct versions of Android. Make sure your app is suited to run on devices with different specifications.
- Update your URLs within your app. This means removing any local IP addresses and testing servers. Change them to the correct production IP Addresses.
- Implement licensing in your app.

