
C H A P T E R 8
![]()
SharePoint Designer Workflows
Workflows are one of the great features of SharePoint Online and are generally favored by power users (end users with some technical know-how) because of the ability to quickly automate business processes without the need for programming knowledge or IT involvement.
SharePoint Designer 2010 introduces a new workflow designer that makes the process of creating workflows intuitive and fairly painless. The process of creating a workflow has become less about “learning SharePoint Designer” and more about mapping out the logic for the workflow and making sure it accurately reflects the business process(es) you’re trying to automate.
In this chapter, we’ll cover the following topics:
- Introduction to Workflows in SharePoint Online
- A Quick Tour of SharePoint Designer
- Building and Deploying a Simple Workflow
- Integration with Microsoft Visio 2010
- Developing Custom Workflow Actions in Visual Studio
Introduction to Workflows in SharePoint Online
Let’s start by covering some workflow basics. If you’re new to workflow development or could use a refresher on the topic, this section will quickly get you up to speed on key concepts that are critical to understanding the rest of this chapter.
What Is a Workflow?
A workflow can be described in a very general sense as a series of tasks that produce an outcome. In the context of SharePoint Online, we can define a workflow more narrowly as the automated movement of documents, items, or information through a sequence of actions or tasks that are related to a business process. In other words, workflows allow us to apply automation to business processes.
![]() Note The terms workflow and business process are often used interchangeably. In this chapter, we’ll keep the two terms separate for the sake of clarity. When we say workflow we’re talking specifically about automation applied to a business process in SharePoint Online.
Note The terms workflow and business process are often used interchangeably. In this chapter, we’ll keep the two terms separate for the sake of clarity. When we say workflow we’re talking specifically about automation applied to a business process in SharePoint Online.
Workflows in SharePoint Online have a beginning, an end, and a sequential flow of logic that progresses from start to finish. It’s possible for workflows to execute tasks in parallel (using a structure called a parallel block), but they still ultimately progress sequentially from start to finish (an initial state to a final state).
Modeling a Workflow
A workflow is typically modeled (visually represented) using a flowchart, which is a natural fit because it has a beginning point, an end point, and a flow of actions and conditions in between. SharePoint Online and SharePoint Designer are both aware of this and have built-in capabilities that let us view and work with our workflows as flowcharts. You’ll learn more about those capabilities later in this chapter when we start building workflows.
Types of Workflows
SharePoint Online supports three types of workflows:
- List
- Reusable
- Site
List Workflows
A list workflow is one that is associated with a specific list (or library). Because it operates in the context of a specific list, it automatically has access to any custom fields that exist on that list. It cannot be associated with any other lists, however, so using it elsewhere means having to manually create another, separate instance of it. Therefore, a list workflow probably isn’t the best choice if your workflow needs to operate on multiple lists or operate at the site level. (To be fair, there are some creative ways to “copy” list workflows from one list to another that you can find out on the Internet by searching on the topic. However, SharePoint Designer provides no built-in, supported way to do it.)
Reusable Workflows
Reusable workflows are associated with a content type rather than a specific list. If they’re published to the top-level site of a site collection, they’re said to be “globally reusable” because they’re available across the entire site collection.
Reusable workflows can also be exported from one site and then imported into another, providing a means to accomplish tasks such as migrating a workflow between environments (such as from test to production).
Because reusable workflows are associated with a content type rather than a specific list, the way we work with them in SharePoint Designer is a little different (especially if you choose to associate your workflow with all content types, which is one of the options when creating it).
A reusable workflow is a good choice if you’re creating a workflow that will be used on multiple lists or in multiple sites.
Site Workflows
A site workflow is exactly what the name implies: a workflow that operates on a site and not within the context of any list, library, or content type. One “side effect” of this difference in scope is that many of the actions available to the other workflow types are not available to site workflows because they don’t apply when not working with list items.
Site workflows are a good choice when you need to create a workflow that doesn’t operate in the context of a specific list, library, or content type.
Workflow Building Blocks
The building blocks of a workflow are actions, conditions, and steps.
Actions are what actually do the “work” in a workflow. SharePoint Designer includes a set of built-in actions such as Send an Email and Copy List Item that you can use in your workflows.
Conditions control the flow of execution in a workflow by executing actions only when a given statement about something is true. For example, there’s a condition called Created by a Specific Person that lets you execute a set of actions only when a list item was created by the person you specify.
Steps provide a way to logically organize a workflow into related sets of actions and conditions. Strictly speaking, you could put your entire workflow into a single step, but it’s often more beneficial (in terms of readability and maintenance) to use multiple steps unless the workflow is extremely short.
SharePoint Designer provides a fairly robust set of built-in actions you can use in your workflows. However, if you need more, it’s possible to build custom actions in Visual Studio 2010, deploy them to SharePoint Online, and then use them within SharePoint Designer. You’ll learn more about that in the “Developing Custom Workflow Actions in Visual Studio” section later in this chapter.
How Are Workflows Started?
Workflows are started (initiated) by events. There are three types of events that can start a workflow in SharePoint Online:
- An item is created
- An item is changed
- The workflow is manually started
Initiation of the workflow is automatic in the case of the first two events.
![]() Note Site workflows cannot be started automatically because they’re not tied to an item in a list or library. They must always be started manually.
Note Site workflows cannot be started automatically because they’re not tied to an item in a list or library. They must always be started manually.
The workflow settings page in SharePoint Designer provides a set of start options that let you configure how your workflow can be started. You’ll learn more about the workflow settings page in the section titled “A Quick Tour of SharePoint Designer” coming up shortly in this chapter.
Workflow Permissions
By default, the actions in a workflow execute with the permissions of the user who started the workflow (the workflow initiator). There is, however, a special type of step called an impersonation step that lets a workflow execute actions with the permissions of the workflow author. The workflow author is considered to be the last person who published the workflow. If a workflow is republished by a different user, the workflow author will not change for any in-process workflows; only for new instances that begin after the workflow was republished.
![]() Note Impersonation steps can be added only to the root (outermost level) of a workflow. They cannot be nested within another step.
Note Impersonation steps can be added only to the root (outermost level) of a workflow. They cannot be nested within another step.
A Quick Tour of SharePoint Designer
Now that we’ve covered some workflow basics, it’s time to take you on a tour of the tool you’ll use to build them: SharePoint Designer 2010. We’re calling this a “quick” tour because we’re focusing on the aspects of SharePoint Designer related to building and deploying workflows. SharePoint Designer is a powerful tool, however, and has a lot more capabilities for working with SharePoint Online than what’s covered here.
GET SHAREPOINT DESIGNER 2010
Connecting to Your Site
There are two ways to connect SharePoint Designer to your SharePoint Online site.
Method #1: Open SharePoint Designer from Your Site
For this method, begin by navigating to your SharePoint Online site in a browser. Once there, open the Site Actions menu and choose Edit in SharePoint Designer, as shown in Figure 8-1.
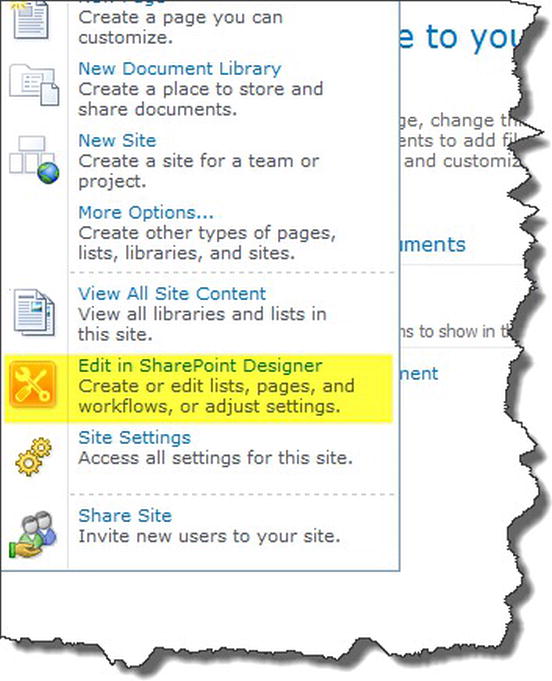
Figure 8-1. Selecting Edit in SharePoint Designer option in Site Actions menu
Method #2: Open Your Site from SharePoint Designer
For this method, begin by launching SharePoint Designer 2010. The first screen you see will be SharePoint Designer’s backstage view (File tab). If your site is listed in the Recent Sites list, you can simply click it to open it. Otherwise, click the Open Site button as shown in Figure 8-2.
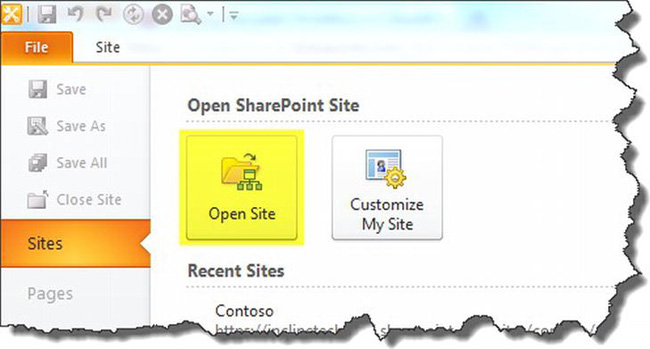
Figure 8-2. The Open Site button in SharePoint Designer’s backstage view
When the Open Site dialog appears, enter the complete URL of your site and click the Open button to connect to it.
Site Page
Once you’ve connected to your site, you’ll be presented with the Site page in SharePoint Designer. The Site page lets you view and manage settings for your site and also displays a Site tab in the ribbon. In the Site tab’s New group, you’ll see two buttons related to workflow: a List Workflow button and a Reusable Workflow button, as shown in Figure 8-3.
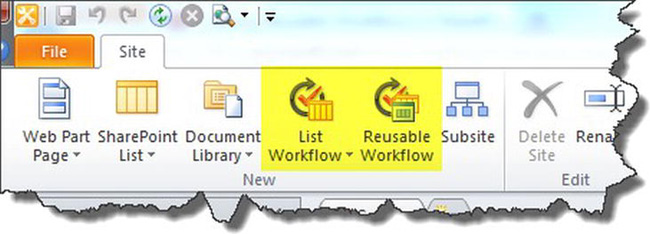
Figure 8-3. Workflow buttons in Site tab of ribbon in SharePoint Designer
Opening the drop-down menu beneath the List Workflow button will show you the lists and libraries in your site. Choosing one will begin the process of creating a list workflow for that particular list or library.
Notice the lack of a button in the ribbon for creating site workflows. Unfortunately, you can’t create a site workflow from here. To do that you must use the Workflows page, which we discuss next.
Workflows Page
To access the Workflows page, click the Workflows link in the Navigation pane, as shown in Figure 8-4.
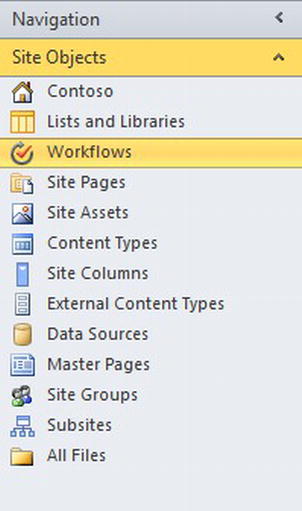
Figure 8-4. The Navigation pane with Workflows link selected
The Workflow page contains a list of all workflows in the site as well as the Workflows ribbon tab for working with workflows. The Workflows page is pictured in Figure 8-5.
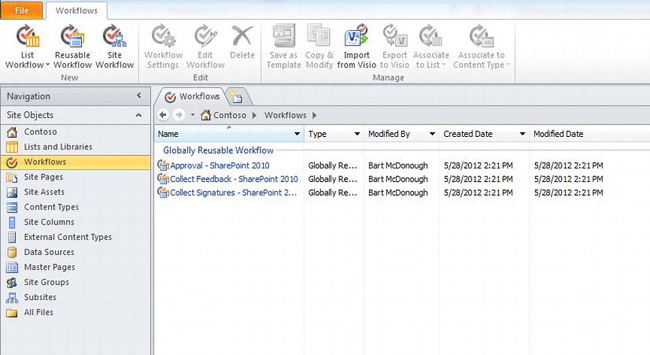
Figure 8-5. The Workflows page in SharePoint Designer 2010
First, let’s look at the New group of the Workflows tab in the ribbon. Notice that unlike on the Site page, we now have a Site Workflow button we can use to create site workflows. The other two buttons for creating list and reusable workflows operate the same way as on the Site page.
![]() Note Most of the buttons in the ribbon will show a help tip if you hover your mouse pointer over the button for a moment. This can be helpful if you’re unsure of (or forgot) what a button does.
Note Most of the buttons in the ribbon will show a help tip if you hover your mouse pointer over the button for a moment. This can be helpful if you’re unsure of (or forgot) what a button does.
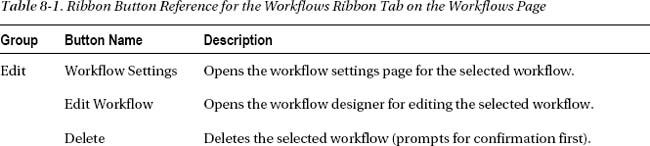
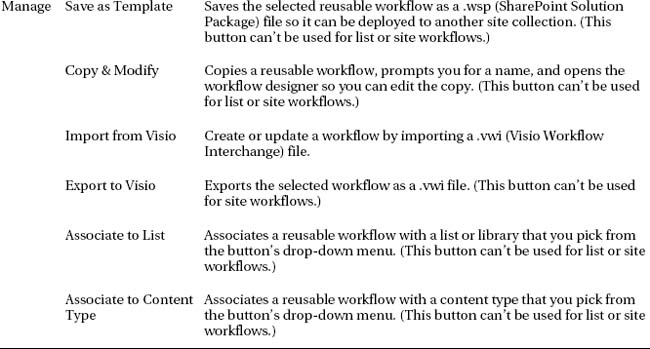
Table 8-1 explains what the other ribbon buttons do.
![]() Note The last two buttons in Table 8-1 will work only if the reusable workflow has been published. If it’s been saved but not published, you’ll get an error when the browser tries to bring up the workflow association page. It can be a bit confusing because there’s no Publish button on this page. You’ll need to visit the workflow settings page or edit the workflow to see the Publish button.
Note The last two buttons in Table 8-1 will work only if the reusable workflow has been published. If it’s been saved but not published, you’ll get an error when the browser tries to bring up the workflow association page. It can be a bit confusing because there’s no Publish button on this page. You’ll need to visit the workflow settings page or edit the workflow to see the Publish button.
Workflow Designer
The workflow designer is what you’ll use to edit your workflows in SharePoint Designer. The workflow designer for a brand-new list workflow is pictured in Figure 8-6.
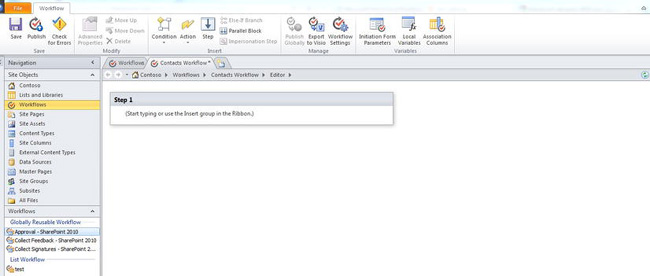
Figure 8-6. Workflow designer in SharePoint Designer 2010
As shown in the figure, new workflows are automatically given a default step called “Step 1.”
![]() Tip You can change the name of a step by clicking the step’s title in the workflow designer. A text box will appear and allow you to edit the name.
Tip You can change the name of a step by clicking the step’s title in the workflow designer. A text box will appear and allow you to edit the name.
When working in the workflow designer, a blinking cursor indicates where the next element (action, condition, and so on) in your workflow will be positioned. Did you notice the instruction Start typing or use the Insert group in the Ribbon within Step 1 in Figure 8-6? This instruction is letting you know that there are two ways you can insert elements into your workflow:
- Start typing. A search box will appear where the cursor was and will compile a list of suggested workflow elements as you type. You can press Enter to view the list of suggestions and choose one (assuming you have at least one match).
- Use the Insert group in the ribbon. The buttons in this ribbon group allow you to insert all the standard elements into your workflow.
Besides inserting elements into your workflow, the ribbon in the workflow designer allows you to do other things as well, including:
- Saving and publishing your workflow
- Checking your workflow for errors (e.g., a required property of an action hasn’t been assigned a value)
- Exporting your workflow to Microsoft Visio
- Managing settings for your workflow (such as how it can be started)
- Configuring parameters for your workflow’s initiation form (a form that’s displayed when the workflow is started)
- Defining local variables for your workflow
- Defining association columns for your workflow (association columns are columns that are automatically added to a list when your workflow is associated with that list; they’re a way for you to ensure the columns your workflow requires are present)
Many elements—once inserted into your workflow—will allow you to configure their properties by clicking hyperlinks. Consider, for example, the If value equals value condition shown in Figure 8-7.

Figure 8-7. Configurable workflow element with hyperlinks
There are three hyperlinks in the condition shown in the Figure 8-7: value, equals, and value. The first and last hyperlinks are blue, indicating they represent properties that haven’t yet been assigned values (properties with blue hyperlinks must be set before the workflow can function). The middle hyperlink is black, indicating it represents a property with an assigned value but that you can change the value by clicking it if you wish.
Clicking either value link will display a text box with a lookup button. The lookup button lets you set a value dynamically based on data the workflow knows about (such as the current list item for a list workflow). Clicking equals will display a drop-down menu of alternate conditions you can select if equals isn’t the one you want.
Many other workflow elements are configured in exactly the same way: by clicking hyperlinks and setting property values. You can also hover over a workflow element to reveal the element’s menu. When you open the menu, you get additional options for working with the element, as shown in Figure 8-8.
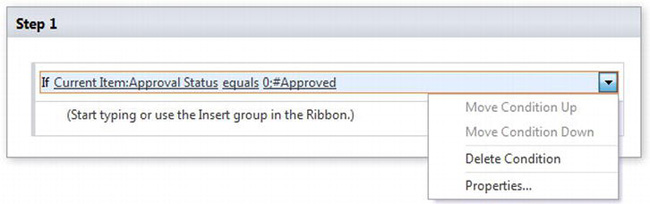
Figure 8-8. Workflow element menu
Workflow Settings Page
The workflow settings page lets you configure settings for your workflow (see Figure 8-9).
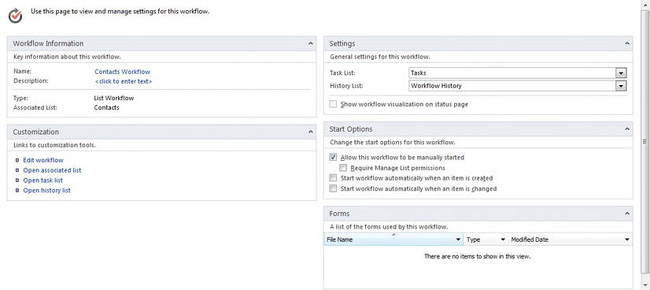
Figure 8-9. Workflow settings page
The workflow settings page can be reached a few different ways in SharePoint Designer:
- The Workflow Settings ribbon button on the Workflows page (that lists all workflows in the site)
- The Workflow Settings ribbon button in the workflow designer (when editing a workflow)
- By clicking the workflow name hyperlink on the Workflows page
You can perform all the following tasks from the workflow settings page:
- Configure general information (such as name and description) about your workflow
- Edit the workflow (clicking the Edit Workflow link will take you to the workflow designer)
- Configure start options, forms, and other general settings for your workflow
As long as we’re on the subject of workflow settings, this is also a good time to discuss workflow visualization and workflow forms (because both appear on the settings page).
Workflow Visualization
If you have a SharePoint Online plan that supports Visio Graphics Services (for example, the E3 plan) and have Microsoft Visio Premium installed on the computer from which your workflow is published, you can use workflow visualization in SharePoint Online.
![]() Note Visio does not need to be installed on client computers that view workflow visualizations. It’s only required to be on the computer from which the workflow is published.
Note Visio does not need to be installed on client computers that view workflow visualizations. It’s only required to be on the computer from which the workflow is published.
You enable this feature from the workflow settings page by checking the Show workflow visualization on status page option in the Settings category. When workflow visualization is enabled, viewing the workflow status page in a browser will display a Visio workflow diagram indicating the current status of the workflow.
Other requirements for using workflow visualization include these:
- Make sure the SharePoint Server Enterprise Site features feature is activated at the site level and the SharePoint Server Enterprise Site Collection features feature is activated at the site collection level.
- Make sure Silverlight 3.0 or higher is installed in the client browser (because the Visio diagram is rendered using Silverlight). Technically, workflow visualization will still work without Silverlight, but a plain image will be rendered instead (so you’ll lose zooming/panning capabilities you get with Silverlight).
![]() Note When you republish a workflow after enabling visualization, instances of in-progress workflows will not be affected. Only new workflow instances will honor the visualization setting.
Note When you republish a workflow after enabling visualization, instances of in-progress workflows will not be affected. Only new workflow instances will honor the visualization setting.
There are a couple of ways you can reach the status page for a list workflow from your browser:
- Select/view an item in the list and click the Workflows button in the ribbon. From the workflows page for the item, you can click the workflow name (it’s a link) and view the workflow’s status.
- When a workflow is associated with a list and has been run on at least one item, an extra column will appear in the list that’s named after the workflow. The column contains an In Progress or Complete link that you can click to view the workflow’s status on an item.
For site workflows, you can reach the workflow status page by selecting View All Site Content from the Site Actions menu and clicking Site Workflows at the top of the page (just as you would to initiate a site workflow). From there, you can click the link with the site workflow name and view its status.
Workflow Forms
Workflow forms are used to initiate workflows and to collect information from users at various points throughout the workflow’s execution.
SharePoint Designer 2010 allows you to create three types of workflow forms:
- Initiation form: This type of form is generated automatically by SharePoint Designer when a workflow is created. The default version of this form contains only two buttons: Start and Cancel. However, from the workflow designer, you can use the Initiation Form Parameters button in the ribbon to add extra fields and collect data from the user who initiates the workflow.
- Custom task form: A custom task form is just a list form that lets users interact with items in a workflow’s Tasks list. Several of the standard workflow actions available in SharePoint Designer collect data from users by using tasks. Custom task forms give you more control over that process by specifying exactly what information gets collected.
- Association form: This type of form applies only to reusable workflows and is displayed when the workflow is associated with a list or content type. By default, a reusable workflow provides only the fields that are common to all list items (across content types). An association form lets you associate fields with a reusable workflow so those fields will be available when you design and run the workflow. To create association form parameters (fields), use the Initiation Form Parameters button in the ribbon just as you would for an initiation form. However, when you go to add a parameter, you’ll notice an extra option that lets you specify whether it appears on the workflow’s initiation form, association form, or both.
If your SharePoint Online subscription includes InfoPath Forms Services (e.g., the E3 plan), these forms will all be generated as InfoPath form templates (.xsn files). If you have InfoPath Designer 2010 installed on your computer, you can simply click the form link in SharePoint Designer (on the workflow settings page) to open the form in InfoPath and customize it. Otherwise, if your subscription does not include InfoPath Forms Services, the forms will be generated as ASP.NET web pages (.aspx files) and can be customized by opening them in SharePoint Designer and editing them like any other ASP.NET page.
Building and Deploying a Simple Workflow
In this section, we’ll walk you through the process of building a simple workflow and deploying it to SharePoint Online. Why a simple workflow and not a more complex one? The biggest reason is if you understand the basics, you can always create a more complicated workflow. It’s just a matter of mapping out what your workflow needs to look like (for example, by using a flowchart diagram in Visio) and then choosing the appropriate actions and conditions to implement it. All the built-in actions and conditions are documented on Microsoft’s help site for SharePoint Online (we provide links at the end of this section), so we’re not going to rehash them here.
What Our Workflow Will Do
Let us start by saying we’re not going to demonstrate how to build an approval workflow. That topic has been heavily documented over the years, and you can find tons of examples of how to do it with a simple web search. And now that SharePoint Designer lets you copy and edit the built-in approval workflow that comes with SharePoint Online (assuming you have an enterprise-level plan like an E3 plan that includes that workflow), the process is even easier than it used to be. Instead, we’re going to demonstrate how to create something we know many organizations want: a conditional alert based on the value of a column in a list.
The scenario is this: A department manager in a company requires weekly status reports on a project from the people who work in her department. The library in which the reports are submitted contains a column called Overall Status that can be set to three possible values: Stellar, On Track, and At Risk. The workflow will notify the department manager whenever a status report is submitted with its Overall Status column set to At Risk. For any other Overall Status value, she doesn’t need a notification.
Because our workflow will operate in the context of a specific list, we’ll be creating a list (nonreusable) workflow.
The List
The list our workflow will use is a document library called Status Reports. It was created through the browser using the built-in Document Library list template. We then created a new choice column (marked as required) on the library called Overall Status and gave it the values mentioned in the last section. Versioning and content approval were not enabled, and a simple information management policy was created that moves status reports to the recycle bin once they become three months old (which isn’t really relevant to our workflow but is included as a reminder to consider growth and retention when designing your lists).
Workflow
Now we’ll delve into the process of creating our workflow. First, we open SharePoint Designer and click the Lists and Libraries link in the navigation pane. On the Lists and Libraries page, we click the Status Reports link to navigate to the summary page for our library. We then locate the Workflows category in the lower-right portion of the screen and click the New button as shown in Figure 8-10.
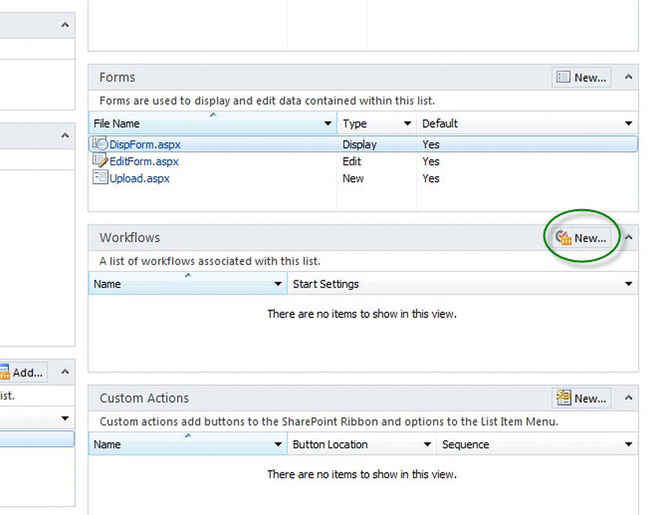
Figure 8-10. Creating a new workflow on the Status Reports library
Next we’ll see the Create List Workflow dialog and fill in the name and description of our workflow, as shown in Figure 8-11.

Figure 8-11. Create List Workflow dialog with workflow name and description
When we click OK on the dialog, we’ll be taken straight to the workflow designer. All we’ll see initially is an empty step called “Step 1.” In this case, our workflow is short and doesn’t need to be broken into multiple steps, so one step is fine. However, we’ll rename Step 1 to “Notify if Report is At Risk” (by clicking the words “Step 1” in the step header and changing the value in the text box). Even with a single step, it’s good to be descriptive.
Next, we’ll click the Condition button in the Insert group of the ribbon and select If current item field equals value. Then we’ll click the hyperlinks in the condition and set the values as shown in Figure 8-12.
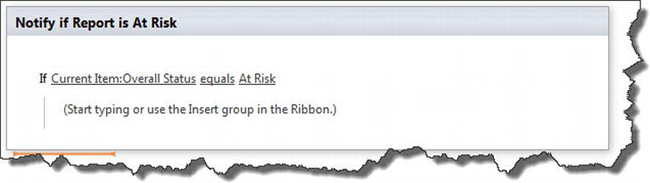
Figure 8-12 Snapshot of workflow after configuring condition
Once the condition is in place, we’ll add an action within it (so that the action is executed only when the condition is true). To do so, we click inside the condition where the Start typing… message is and insert the Lookup Manager of a User action (it’s in the Relational Actions category of the menu under the Actions button in the ribbon). The action, once inserted into the workflow, displays a hyperlink for the words this user. We click the hyperlink and see the Select Users dialog. We select Workflow Lookup for a user… and click the Add button, as shown in Figure 8-13.
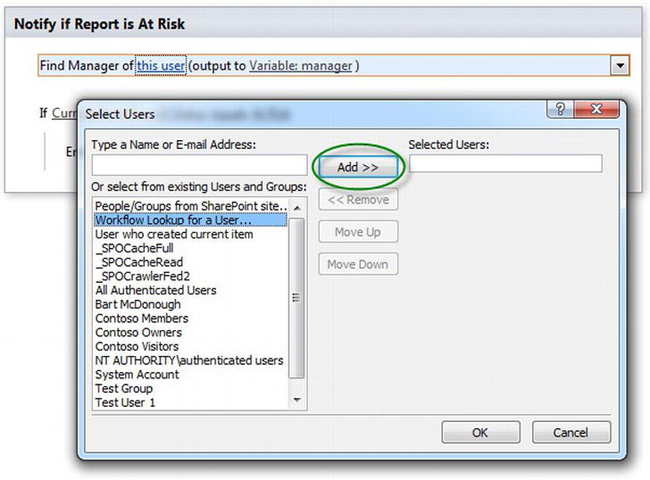
Figure 8-13. The Select Users dialog for the Find Manager action
Clicking Add brings up the Lookup for Person or Group dialog. For Data source, we select Workflow Context. For Field from source, we select Current User. For Return field as, we select Login Name. We click OK to close the dialog and click OK again on the Select Users dialog to close that one, too.
Next we’ll insert the Send an Email action from the Actions button in the ribbon. When this action is inserted, it appears in the designer as Email these users, where these users is a hyperlink. What we want to do next is replace these users with the e-mail address of the department manager. In our case we know that all employees who use this site are members of the same department and report to the same manager. We also know that their managers are correctly mapped in Active Directory and that Active Directory is synchronized with Office 365 using the Directory Synchronization tool (http://bit.ly/xKJCw7). Therefore, there’s an easy way we can get the e-mail address of the department manager, as we’ll see in a moment.
To start configuring the e-mail action, we click the “these users” hyperlink and an e-mail message dialog appears with To, CC, Subject, and body fields. We click the book icon to the right of the To field, revealing the Select Users dialog again. We again select Workflow Lookup for a User… and click Add just like before. This time, however, we choose Workflow Variables and Parameters as the data source and select Variable: manager as the field from source. (Recall that our Find Manager action stored its result in a variable called manager, as seen at the top of Figure 8-13.) For the return type of the field, this time we choose Email Address and then click OK to close the dialog (and OK again to close the Select Users dialog).
We type a simple message into the e-mail body for now, as shown in Figure 8-14. To create the link to view the report, we used the hyperlink button in the toolbar (rightmost button) above the message body and selected Current Item URL from the Workflow Context data source.
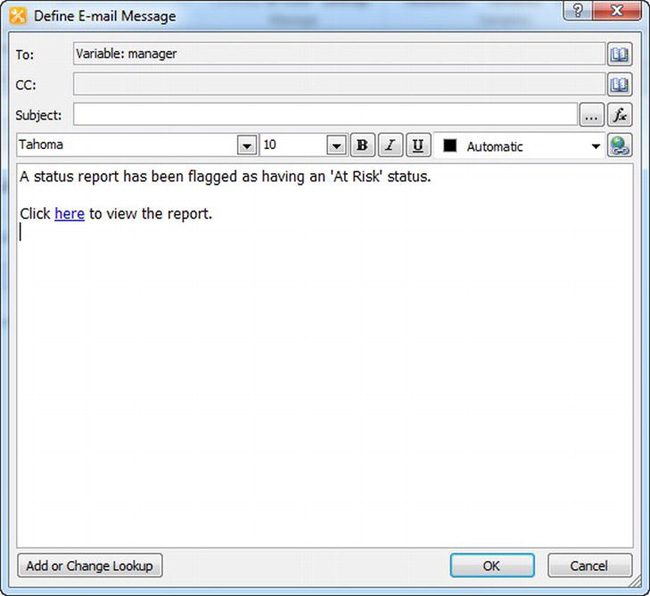
Figure 8-14. E-mail body for notification
Finally, we enter “At risk status report” in the subject field and click OK to save the message. The final workflow is pictured in Figure 8-15.
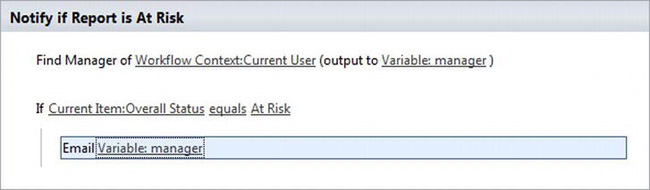
Figure 8-15. Final workflow in workflow designer
We’re not quite done, though. We still need to tell SharePoint to start our workflow automatically whenever a status report is submitted. To do so, we click the Workflow Settings button in the ribbon. On the settings page, under Start Options, we uncheck the Allow this workflow to be started manually option and select Start workflow when an item is created. Now, whenever a status report is uploaded to the Status Reports list, our workflow will automatically run on that report.
Deployment to SharePoint
To deploy the workflow, we save it (using the Save button in the ribbon) and then use the Publish button in the ribbon to publish it. That’s it. Deployment is pretty easy when using SharePoint Designer.
Once you test it, if all works the way it should, you’ll get an e-mail like the one shown in Figure 8-16.
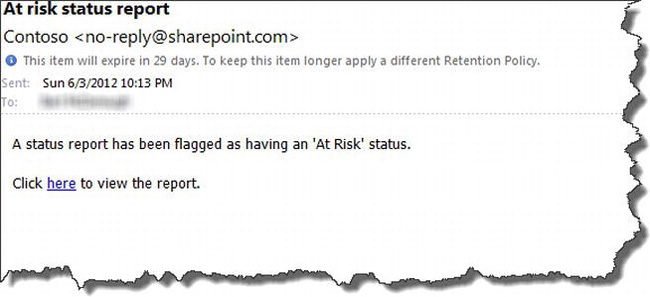
Figure 8-16. E-mail sent by notification workflow
Finally, even though we didn’t show it here, consider adding the Log to History List action in multiple places in your workflow and logging messages indicating where you are in the overall workflow execution. (For example, a message in the middle of our workflow might have said “Found manager. About to send e-mail.”) That way, if something goes wrong, and your workflow doesn’t fully execute (which happens frequently when you’re first learning how to create workflows), you can view the messages when you look at the workflow status page in SharePoint. They’ll help you narrow down where the problem is by seeing how far your workflow got before it failed.
Resources
As promised in the beginning of this section, here are some resources that you can reference when building workflows in SharePoint Designer 2010:
- Workflow actions quick reference:
http://bit.ly/nnJWrr- Workflow conditions quick reference:
http://bit.ly/KparbA- Understanding approval workflows in SharePoint 2010:
http://bit.ly/LdXGds(targets SharePoint Server 2010, not SharePoint Online, but most concepts will be the same if you have an enterprise-level SharePoint Online subscription)
Integration with Microsoft Visio 2010
If you have Microsoft Visio 2010 Premium, you can design workflows in Visio, export them, and then import them into SharePoint Designer to put the finishing touches on them and deploy them to SharePoint.
After opening Visio, select the Microsoft SharePoint Workflow template from the Flowchart template category. Design your workflow using the template shapes by dragging and dropping them onto the drawing canvas like normal (remember to start and end the workflow with the Start and End shapes under the SharePoint Workflow Terminators shape group). When you are done, you can use the Export button under the Process tab in the ribbon to export your workflow as a .vwi (Visio Workflow Interchange) file. The .vwi file can then be imported into SharePoint Designer using the Import from Visio ribbon button that appears on the Workflows page and in the workflow designer.
The process works in reverse as well. Suppose you create a workflow in SharePoint Designer and want other team members (business analysts, perhaps) to review it before you publish it to SharePoint. You can use the Export to Visio button in SharePoint Designer (available on the Workflows page and in the workflow designer) to export the workflow as a .vwi file. You can then import the .vwi file into Visio (the import button in Visio is right next to the export button) to view the workflow as a flowchart diagram.
Developing Custom Actions with Visual Studio
As good as the built-in workflow actions are in SharePoint Designer, you’re likely to hit a situation sooner or later where you need one that isn’t there. When that happens, you can develop your own custom action in Visual Studio 2010 and then deploy it to SharePoint Online as a sandboxed solution. Once deployed, the action will be available for you to use in the workflow designer in SharePoint Designer.
As the focus of this chapter is on creating workflows with SharePoint Designer, we’re not going to delve into the details here of creating your own actions with Visual Studio. If you’re interested in creating custom actions in Visual Studio, the following resources will help you:
http://bit.ly/Lr6bE3:(MSDN article: “How to Create and Deploy Workflow Actions in Sandboxed Solutions”)http://bit.ly/LXs0ua:(Channel 9 video about creating custom workflow actions in Visual Studio and deploying them as sandboxed solutions)
See Chapter 7 for more information about creating custom solutions in Visual Studio 2010 for SharePoint Online.
Summary
This chapter covered what workflows are and introduced you to the features in SharePoint Designer 2010 that are focused on creating and deploying them. We talked about the workflow designer and walked you through creating a sample workflow that creates a “conditional alert” on a status report document library. We also talked a little bit about how other tools, such as Microsoft Visio 2010 and Visual Studio 2010, can be brought into the mix to augment and streamline the workflow development process as needed.