C H A P T E R 7
![]()
Custom Development with Visual Studio
So far in this book, we’ve discussed two customization tools for SharePoint Online: a web browser (see Chapter 4) and SharePoint Designer 2010 (see Chapter 5). But there’s another tool—much more powerful and flexible than the first two—that will be the subject of this chapter: Visual Studio 2010.
If you have a background in software development and have developed solutions using the Microsoft .NET framework, you’re probably no stranger to Visual Studio. It’s the development tool of choice for most .NET developers and has an extensive array of features built in to aid you in developing for the Microsoft platform.
Up until the 2010 version, Visual Studio didn’t have much to offer for SharePoint development (even with add-ons such as VSeWSS, the experience was pretty marginal), but thankfully those days are behind us now. Visual Studio 2010 introduces a wealth of new capabilities and templates that specifically target SharePoint development. While many of them were created with SharePoint 2010 in mind (rather than SharePoint Online), most of them still apply in the Office 365 world and will help us in developing custom solutions.
In this chapter, we’ll cover the following topics:
- When to Use Visual Studio for customization
- Preparing Visual Studio for SharePoint Online development
- Creating a project
- Restrictions of the sandboxed environment
- Creating a feature and adding a feature receiver
- Creating a web part
- Creating a module to deploy files
- Creating an event receiver
- Creating a content type
- Creating a list definition
- Creating a custom action
- Packaging and deploying your solution
- Tips and recommendations
When to Use Visual Studio for Customization
On the customization spectrum, Visual Studio is definitely at the advanced end. While a site administrator can customize SharePoint Online with a browser and a power user or web designer can customize SharePoint Online with SharePoint Designer 2010, the use of Visual Studio requires full-fledged software development skills. It also requires knowledge of SharePoint as a development platform (i.e., understanding that SharePoint is built on top of ASP.NET and knowing what its extension points are).
So when is it appropriate to make the jump to Visual Studio for your customizations? There’s no one simple answer to this question, but here are some questions you can ask yourself that will help make that determination. Think of them as guidelines.
Have You Exceeded What You Can Do in the Browser and SharePoint Designer?
This is an easy one. If the customization you want to make goes beyond what can be done in the browser or SharePoint Designer, Visual Studio is the only other choice. Of course, even that consideration assumes that the customization is possible in SharePoint Online in the first place. If the customization you want to make requires coding and deploying a custom timer job to the farm, for example, you’re out of luck whether you’ve got Visual Studio or not (since that goes beyond the limits of what you’re allowed to do in SharePoint Online).
Who Will Be Doing the Work?
Visual Studio is definitely a tool aimed squarely at developers. Power users and designers generally aren’t familiar with it and don’t use it. If a developer or group of developers will be making customizations for SharePoint Online, Visual Studio will likely be the tool of choice. However, that’s not to say developers may not also use other tools like SharePoint Designer to accomplish some of the customizations. It all comes down to what needs to be done and what the best tool is for the job. (For example, even developers will find SharePoint Designer useful for creating custom workflows for SharePoint Online.)
How Reusable Do the Customizations Need to Be?
If you’re developing customizations that will be used over and over again in SharePoint Online (for example, to be deployed to multiple sites or site collections that may even reside in multiple tenancies), Visual Studio is a great tool for packaging up those customizations and making them reusable. While you can certainly accomplish some of that without Visual Studio (e.g., creating a list template from a list and using it in multiple sites), Visual Studio offers more options and flexibility for creating truly reusable customizations that can even include custom code if desired.
Preparing Visual Studio for SharePoint Online Development
Setting Up Your Development Environment
Before you can use Visual Studio to customize SharePoint Online, you’ll need a development environment you can develop and test against. If you don’t already have a development environment set up, see Chapter 3 for instructions on how to do so.
Extending Visual Studio
One extremely useful extension that will help you develop solutions for SharePoint Online is the CKS Development Tools for Visual Studio extension for Visual Studio 2010. The extension comes in two flavors (one targeting SharePoint 2010 Foundation and one targeting SharePoint 2010 Server) and is available from Microsoft’s online Visual Studio Gallery.
To get the extension, open the Visual Studio extension gallery (either by clicking Tools > Extension Manager or by navigating to visualstudiogallery.msdn.microsoft.com) and search for “cks dev.” Both flavors should come back in the search results. Download the one that matches the edition of SharePoint you’re using in your development environment. The extension adds several new features and capabilities to Visual Studio, including:
- Several new project item templates (e.g., a Custom Action template for creating custom actions)
- Additional debugging and deployment options
- A “SharePoint” tab in the Add References dialog that lets you easily add SharePoint DLL references to your project without having to go browse the SharePoint root/hive folder and find them
- A Sandboxed Visual Web Part project item template
- Compile-time checking of sandboxed code to ensure that you’re not using types or members that aren’t allowed in sandboxed solutions
Creating a Project
If you don’t already have a project created for your customizations (for example, that you’re grabbing from a source control system), that’s the first thing you’ll need to do.
To create a new SharePoint project, follow these steps:
- Open the File menu in Visual Studio, and choose New
Project.
- On the New Project dialog, expand the SharePoint node on the left and choose 2010. Select the Empty SharePoint Project template, give it a name, and click OK. See Figure 7-1 for an illustration of this step.

Figure 7-1. Creating a new SharePoint project in Visual Studio 2010
Tip If you’re creating a new solution and you think you may end up housing multiple projects, we recommend checking the Create directory for solution box, as shown in Figure 7-1. This will create a parent folder (which we’ve named “Chapter7.SharePoint”) for the solution that can house all your projects.
- Figure 7-2 shows the SharePoint Customization Wizard. Choose a local site for development/debugging and select the Deploy as a sandboxed solution option (which is the only valid choice when developing for SharePoint Online even though Visual Studio doesn’t specifically call that out). Click the Finish button to create the project.

Figure 7-2. SharePoint Customization Wizard
Restrictions of the Sandboxed Environment
Remember that Deploy as sandboxed solution option you selected when creating your SharePoint project? Before we go much further, it’s important to understand the implications of operating in a sandboxed environment. In this section, we’ll explore what a sandboxed solution is and what the sandboxed environment in SharePoint Online does and does not allow us to do.
Sandboxed Solutions
A sandboxed solution is a solution (.wsp file) that is deployed to SharePoint Online and operates within the confines of the sandboxed environment. The sandboxed environment is a special environment (separate process) on the server farm in which custom code can execute but is subject to certain restrictions to prevent it doing any serious damage should something go wrong.
Packaging and Installation
Just like farm solutions (the opposite of a sandboxed solution is a farm solution), sandboxed solutions are packaged into .wsp files. However, rather than being deployed to the farm’s solution store, they are deployed to the Solution Gallery of a specific site collection by a site collection administrator. Just like other galleries in SharePoint sites (e.g., the Master Page gallery or the List Template gallery), the contents of this gallery live in the content database in which the site collection resides. For more information about deploying sandboxed solutions, see the “Deploy Your Solution to SharePoint Online” section later in this chapter.
Restrictions
Sandboxed solutions are subject to a variety of restrictions compared with farm solutions. For instance, sandboxed solutions
- Cannot read from or write to the file system (except for reading/executing assemblies in the global assembly cache)
- Cannot call out to the network (for example, to access an external database)
- Cannot write to the registry
- Cannot call any assembly that’s not deployed to the global assembly cache except for ones deployed as part of the sandboxed solution
- Can only access a subset of the server-side object model contained in Microsoft.SharePoint.dll
- Are restricted to the site collection in which they live (so you can’t, for example, access a list in a different site collection)
- Are subject to the “split page rendering system” (explained in a moment)
- Are subject to resource usage limitations
- Are subject to a process called “validation” before they can be activated and used
- Are also subject to a few miscellaneous restrictions, including:
- Cannot deploy a HideCustomAction element
- Cannot deploy a CustomActionGroup element
- Cannot register a control candidate for a delegate control
And this isn’t even a complete list. There are a few other restrictions that we haven’t specifically called out for the sake of brevity. For a complete list, we recommend you visit http://bit.ly/ly9u5Y (“Restrictions on Sandboxed Solutions in SharePoint 2010”).
Also, not being able to read from or write to the file system introduces one big challenge: you cannot deploy files to the root (or “hive” folder) on the SharePoint farm like you can with farm solutions. That means no application pages, mobile pages, user controls, or visual web parts (using the normal Visual Web Part template that ships with Visual Studio, that is; the extension we mentioned earlier in this chapter works around that limitation). It also means no resource (.resx) files and no modifications to web.config. However, localization is still possible if that’s a requirement for your solution. Visit http://bit.ly/lgB0Zp for more information.
Split Page Rendering System
Many of the restrictions in the preceding section are pretty self-explanatory. However, we believe one in particular deserves a little more explanation because it directly affects how you develop web parts in sandboxed solutions: the “split page” rendering system.
Here’s a quick explanation of how the system works. When a SharePoint page is requested that includes a component from a sandboxed solution (e.g., a web part you deployed with your solution), SharePoint renders more than one page object (hence the “split” part of “split page”). One page is rendered in the normal ASP.NET worker process (w3wp.exe), and the other is rendered in the sandboxed worker process. When the page in the sandboxed process is fully rendered, it’s merged in with the “real” page object in the ASP.NET process. If there is more than one sandboxed component on a page, each is rendered in its own page object that’s later merged with the real one. That’s all we’re going to say about the technical details for now. The main thing you need to understand is how it affects development. In particular, there are certain properties of the Page object you have access to that are pointless to set because they won’t get merged into the real Page object. A few examples include the following:
- ClientScriptManager (code in sandboxed solutions should not write to the ClientScript property—instead use a LiteralControl to render JavaScript to the page)
- ScriptManager
- Cache
- MasterPage (however, you can point to a different master page by setting the MasterPageFile property)
- HttpSessionState
That’s all we’re going to say about sandboxed solutions for now. If you’re interested in knowing more of the technical details about how the sandboxed environment is architected, see http://bit.ly/a0Qxzi.
We’ll call out sandboxed solution considerations as appropriate throughout the remainder of this chapter.
Creating a Feature and Adding a Feature Receiver
Since deploying customizations to SharePoint Online via solutions requires features (because you can’t directly deploy elements to the SharePoint root folder on the farm), we’re going to explain how to create a feature and associate custom code (called a feature receiver) if necessary.
Creating a Feature
Follow these steps to create a feature in Visual Studio:
- In the Solution Explorer window, right-click the Features node and select Add Feature. Visual Studio will create a feature (named FeatureX, where X is a number) and open the feature designer (see Figure 7-3).
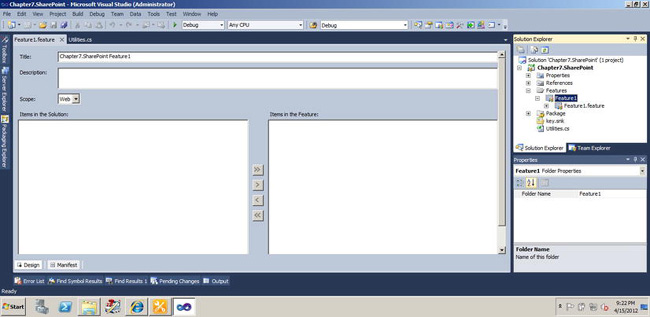
- Set the title, description, and scope (Site or Web) of your feature in the feature designer. If your project contains SharePoint elements that can be added to your feature, they will appear in the Items in the Solution section. Using the arrow buttons in the middle, you can move items to the Items in the Feature section, which adds them to the feature. While the feature designer is open, you can also set properties of the feature using the Properties window.
![]() Note One slight annoyance of the feature designer is it doesn’t provide an easy way to reorder the items in the right column. To reorder them, you must remove them and then re-add them in the desired order (or edit the feature XML directly, but doing so through Visual Studio disables the designer).
Note One slight annoyance of the feature designer is it doesn’t provide an easy way to reorder the items in the right column. To reorder them, you must remove them and then re-add them in the desired order (or edit the feature XML directly, but doing so through Visual Studio disables the designer).
At the moment, the project we’re showing in Figure 7-3 doesn’t contain any SharePoint elements, so there’s nothing readily available for us to add to our feature. That will change, however, as elements (lists, content types, and so on) are added to the project.
Adding a Feature Receiver
A common task when creating features is to also create something called a feature receiver, which is a class containing “event handlers” that respond to various events associated with the feature’s lifecycle.
To add a feature receiver in Visual Studio, right-click the feature in the Solution Explorer window and select Add Event Receiver.
After doing so, Visual Studio creates a class (named FeatureNameEventReceiver) that inherits from SPEventReceiver. The class contains five overridden methods, all of which are initially commented out:
- FeatureActivated
- FeatureDeactivating
- FeatureInstalled
- FeatureUninstalling
- FeatureUpgrading
Uncommenting and implementing these methods allow you to respond to those particular events in the feature lifecycle (for example, the “activated” event if you uncomment and implement FeatureActivated). If you aren’t sure which event you need to handle, see http://bit.ly/HYcAnd for an explanation of all of the events associated with a feature. In general, though, the “activated” and “deactivating” events are probably the most common ones you’ll want to handle.
When would you need a feature receiver? There are plenty of times when they come in handy. Consider a simple example. Suppose you’re doing a branding solution for a SharePoint Online site and your solution includes a custom master page that’s deployed to the Master Page Gallery. When you deploy your solution and activate its features, you’ll discover that although your master page was deployed, it was left in a pending (unapproved) state. With a feature receiver you can handle the “activated” event and add some code to approve the master page so it’s immediately viewable by anyone who visits the site. You could even add code that sets it as the master page for the site when the feature is activated, saving an administrator the work of manually making that change.
Creating a Web Part
One of the most common tasks you’re likely to do when developing for SharePoint Online is to create custom web parts. Why? Well, aside from the normal reasons to create a web part (such as personalization), one big reason is you can’t create and deploy custom controls in sandboxed solutions, so custom web parts are about as close as you can get to developing reusable “controls” you can use on multiple pages.
Let’s get started. In the Solution Explorer window, right-click your project and select Add ![]() New Item. Select the Web Part SharePoint project item template on the Add New Item dialog, and click the Add button.
New Item. Select the Web Part SharePoint project item template on the Add New Item dialog, and click the Add button.
Right away, a couple of things happen:
- Visual Studio creates a web part SharePoint element and adds it to your project, as pictured in Figure 7-4.

Figure 7-4. Web part element in a SharePoint project in Visual Studio
- Visual Studio may create another feature (separate from any existing ones) and add your web part element to it. That’s actually what happened in Figure 7-4. The project contained “Feature1,” and adding the web part caused Visual Studio to create “Feature2.” If the new feature isn’t needed, just delete it and use an existing one (deleting the feature won’t delete the web part).
![]() Note The latest edition of the CKS Development extension for Visual Studio we mentioned earlier in this chapter offers a way to prevent Visual Studio from automatically adding new SharePoint project items to features (allowing you to control when they’re added to a feature and which feature they’re added to).
Note The latest edition of the CKS Development extension for Visual Studio we mentioned earlier in this chapter offers a way to prevent Visual Studio from automatically adding new SharePoint project items to features (allowing you to control when they’re added to a feature and which feature they’re added to).
- Several files were created and placed under the web part element. You can see these in Figure 7-4. They include an Elements.xml file, a class file for your web part code, and an XML file with a “.webpart” extension.
Open the class (.cs) file, and you’ll see something similar to Listing 7-1.
Listing 7-1. Web Part class auto-generated by Visual Studio
namespace Chapter7.SharePoint.WebPart1

{

[ToolboxItemAttribute(false)]

public class WebPart1 : WebPart

{

    protected override void CreateChildControls()

    {

    }

}

}
Notice the class inherits from the System.Web.UI.WebControls.WebParts.WebPart class (which is the standard ASP.NET base class for web parts, even outside of SharePoint).
Remember what we said earlier about sandboxed solutions only supporting a subset of the server-side object model from Microsoft.SharePoint.dll? This is one instance where it’s important to remember that. If you try changing this class to inherit from a web part class that ships with SharePoint—like the Microsoft.SharePoint.WebPartPages.XsltListViewWebPart class, for example—you won’t be able to do it. While that approach often works in SharePoint 2010 and is a common way to extend the functionality of SharePoint’s built-in web parts, you can’t do it in SharePoint Online. The namespaces that include the built-in web parts—including Microsoft.SharePoint.WebPartPages—are simply not available to us in sandboxed solutions.
Listing 7-2 shows the code for a simple web part. All this web part does is display a configurable number of months (mini-calendars) vertically on the page. If you wanted to get fancier, you could do something like add more code to this web part to query events lists in SharePoint Online and then link the dates on these calendars to those events.
Listing 7-2. SimpleCalendarWebPart class
using System;

using System.ComponentModel;

using System.Web.UI;

using System.Web.UI.WebControls;

using System.Web.UI.WebControls.WebParts;


namespace Chapter7.SharePoint.SimpleCalendarWebPart

{

    [ToolboxItemAttribute(false)]

    public class SimpleCalendarWebPart : WebPart

    {

        [WebBrowsable(true),

        Category("Calendar Settings"),

        WebDisplayName("Number of Months"),

        WebDescription("Number of months (1 or more) to display"),

        Personalizable(PersonalizationScope.Shared)]

        public int NumberOfMonths

        {

            get { return _numMonths; }

            set { _numMonths = Math.Max(1, value);  }

        }

        int _numMonths;


        protected override void CreateChildControls()

        {

            DateTime today = DateTime.Today;

            for (int i = 0; i < this.NumberOfMonths; ++i)

            {

                Calendar cal = new Calendar();

                cal.VisibleDate = today.AddMonths(i);

                cal.Style[HtmlTextWriterStyle.MarginBottom] = "10px";


                this.Controls.Add(cal);

            }

        }

    }

}
If we deploy this web part to SharePoint Online and add it to a page, it will look like the one pictured in Figure 7-5.
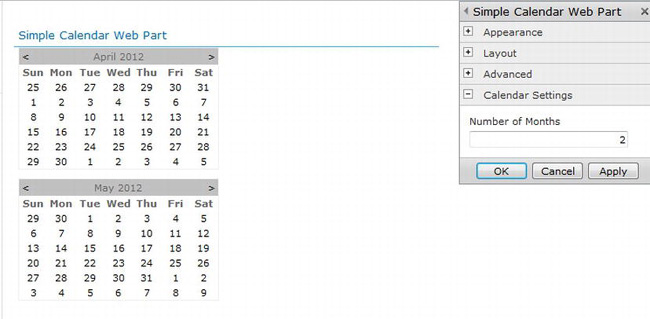
Figure 7-5. Simple Calendar Web Part on page in SharePoint Online
As you can see in the figure, the web part properties pane automatically added a Number of Months property editor due to the attributes we added to our NumberOfMonths property in our web part class. We set this property to 2 in the browser and saved the changes, causing the web part to display two minicalendars on the page. (Incidentally, if you’re interested in how the web part properties pane auto-generates property editors based on attributes, see this article that talks about the System.Web.UI.WebControls.WebParts.PropertyGridEditorPart class: http://bit.ly/II7jA2. The alternative, if you need more control, is to develop your own editor part class that inherits from System.Web.UI.WebControls.WebParts.EditorPart.)
Creating a Module to Deploy Files
If your solution includes files you need to deploy to SharePoint Online (for example, CSS or JavaScript files), you’ll need to create one or more modules to tell SharePoint where to provision those files within the site or site collection where your feature is activated.
To create a module, right-click your project in the Solution Explorer window and select Add ![]() New Item. Select the Module SharePoint project item template on the Add New Item dialog, and click the Add button.
New Item. Select the Module SharePoint project item template on the Add New Item dialog, and click the Add button.
When the project item for your module has been created, you’ll see that Visual Studio has included two files beneath it: an Elements.xml file and a Sample.txt file. Delete the Sample.txt file. It’s only there to demonstrate that adding files to the module will cause Visual Studio to automatically add them to Elements.xml (and likewise, deleting files from the module causes Visual Studio to automatically remove them from Elements.xml).
One key difference between modules in farm solutions and modules in sandboxed solutions (like we have to use for SharePoint Online) is the behavior of the Type attribute for a <File> tag in Elements.xml. If present, this attribute can be set to one of two values: Ghostable or GhostableInLibrary. Both values tell SharePoint the file can be cached on the web front-end server (rather than stored entirely in the content database). The only difference is that the latter attribute also creates a parent list item for the file if it’s being deployed to a document library.
In farm solutions, the distinction between the two attribute values matters. However, it does not matter in sandboxed solutions. Even if you add Type=”Ghostable” to a file in Elements.xml, SharePoint will still create a parent list item for the file if it’s being deployed to a document library. This means the file will be visible as a list item in the library and able to be manipulated the same way as other files in the library.
Creating an Event Receiver
Event receivers are classes that handle events associated with various objects in SharePoint. Visual Studio allows us to quickly create event receivers and deploy them to SharePoint Online.
To create an event receiver, right-click your project in the Solution Explorer window and select Add ![]() New Item. Select the Event Receiver SharePoint project item template on the Add New Item dialog, and click the Add button. This will bring up the SharePoint Customization Wizard, as shown in Figure 7-6.
New Item. Select the Event Receiver SharePoint project item template on the Add New Item dialog, and click the Add button. This will bring up the SharePoint Customization Wizard, as shown in Figure 7-6.
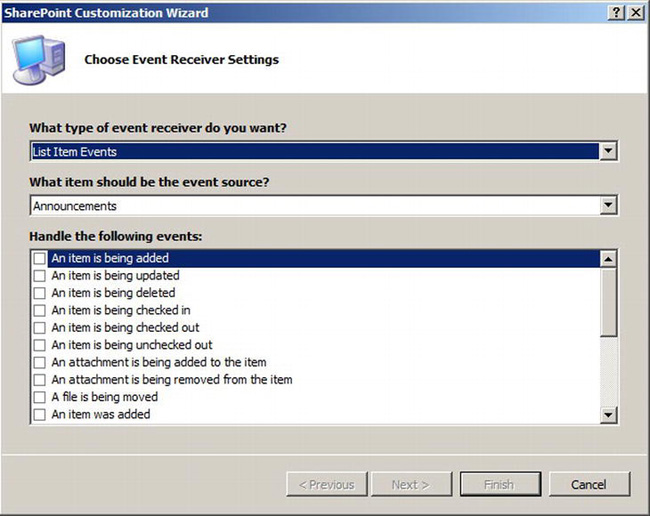
Figure 7-6. SharePoint Customization Wizard for adding an event receiver
As you can see in the figure, you have a variety of choices when creating an event receiver. First, you need to select which type of receiver you want. The choices include the following:
The event source can then be selected in the second drop-down menu if you choose List Item Events, List Email Events, or List Workflow Events in the first drop-down menu.
Finally, you can choose which specific events you want to handle. The list of events you can handle will vary depending on what type of event receiver you’re creating. (For example, the events you can handle for a List Item Events receiver differ from what you can handle for a Web Event Receiver.)
For the sake of example, suppose you want to create a web (site) event receiver that automatically sets the master page of any newly created site to match that of the top-level site in the site collection.
On the dialog in Figure 7-6 you’d select Web Events for the type of event receiver and select A site was provisioned as the event you want to handle. This results in Visual Studio creating a class like the one in Listing 7-3.
Listing 7-3. Empty Web event receiver class created by Visual Studio
namespace Chapter7.SharePoint.WebReceiver

{

    /// <summary>

    /// Web Events

    /// </summary>

    public class WebReceiver : SPWebEventReceiver

    {

       /// <summary>

       /// A site was provisioned.

       /// </summary>

       public override void WebProvisioned(SPWebEventProperties properties)

       {

           base.WebProvisioned(properties);

       }

    }

}
As you can see in the listing, because we chose A site was provisioned as the event we wanted to handle on the dialog shown in Figure 7-6, Visual Studio has automatically overridden the WebProvisioned method for us.
To continue with our example, we can implement this method as shown in Listing 7-4.
Listing 7-4. Implementation of the WebProvisioned method in a Web event receiver
public override WebProvisioned(SPWebEventProperties properties)

{

    SPSite site = properties.Web.Site;

    SPWeb web = properties.Web;


    web.MasterUrl = site.RootWeb.MasterUrl;

    web.CustomMasterUrl = site.RootWeb.CustomMasterUrl;

    web.Update();

}
Now, assuming we include this event receiver in a Site-scoped feature, the MasterUrl and CustomMasterUrl properties of every newly created (provisioned) site will be set to match those of the top-level site in the site collection.
Creating a Content Type
Next we’ll discuss how to create a custom content type in Visual Studio to include in your solution—a fairly common scenario when customizing SharePoint Online.
Suppose we want to create a content type called “Custom Announcement” that inherits all the properties and functionality of the normal “Announcement” content type in SharePoint Online except for one important difference: our custom content type includes a “Show On Home Page” field that lets us determine whether the announcement should be automatically displayed on our site’s home page in addition to where it would normally appear. This could be useful in a scenario in which we have an intranet site with a bunch of subsites (representing departments or divisions) and we want to put a web part on the home page that automatically rolls up and displays certain announcements from the various subsites.
To accomplish this, we’ll need to do two things:
- Create a “Show On Home Page” field we can use in our content type
- Create the content type and include our custom field
To get started, we’ll perform these steps:
- Right-click our project in the Solution Explorer window and select Add
- From the list of SharePoint 2010 project item templates, we’ll select Content Type and name it CustomAnnouncement.
- Next the SharePoint Customization Wizard will appear and ask us which content type our new one should inherit from. We’ll choose Announcement (the very first choice) and click Finish.
Visual Studio has now created a SharePoint project item (in the Solution Explorer window) for our content type and has created an Elements.xml file that looks similar to Listing 7-5.
Listing 7-5. Elements.xml file for newly created content type
<?xml version="1.0" encoding="utf-8"?>

<Elements xmlns="http://schemas.microsoft.com/sharepoint/">

  <!-- Parent ContentType: Announcement (0x0104) -->

  <ContentType ID="0x0104007ba7567139aa41ddb84c6b93eabee061"

               Name="Chapter7.SharePoint - CustomAnnouncement"

               Group="Custom Content Types"

               Description="My Content Type"

               Inherits="TRUE"

               Version="0">

    <FieldRefs>

    </FieldRefs>

  </ContentType>

</Elements>
Right away, there are few changes we can see we need to make:
- Change the value of the Name attribute in the <ContentType> tag. Normally the name is something similar to “[Company Name] [Content Type Name]” like “Contoso Announcement.” Part of the reason for qualifying the name with a prefix (like a company name) is because SharePoint doesn’t allow duplicate content type names within a site collection, so you should take steps in advance to ensure uniqueness.
- Change the value of the Group attribute in the <ContentType> tag. Generally speaking, the group name is usually something like “[Company Name] Content Types,” e.g. “Contoso Content Types.”
- Change the value of the Description attribute in the <ContentType> tag. This one is often overlooked but it’s important. After all, if you use this content type in a list and make it available via the New button in a list view, this description is what shows up next to the content type name when that button is clicked.
- Add some fields inside of the <FieldRefs> tag. We’ll be tackling this in a moment.
Adding Fields to Your Content Type
Adding fields takes us into a little bit of a gray area (you knew gray areas existed in SharePoint, right?).
Don’t get us wrong, the actual process of adding fields to the content type is very straightforward as we’ll show in a moment. However, what’s not as straightforward is where to put the field definitions (<Field> tags) in your project.
Here’s some general guidance to help you. If the fields will only be used for a specific content type and aren’t needed anywhere else in the project (e.g., list definitions or other content types), declaring the fields directly within the Elements.xml file for the content type is fine. In fact that’s a pretty common practice.
However, if the fields will be used elsewhere, it’s not a bad idea to put them in their own file (for the sake of “findability” and maintenance when working on the project down the road). Unfortunately there’s no obvious way to do this in Visual Studio because “Field” isn’t a SharePoint project item template we can pick from in the Add New Item dialog. However, there is a project item template called Empty Element we can use. Adding one of those to your project essentially creates an empty Elements.xml file that you can use for whatever you want. You can then put your field definitions in there. Just be careful that the Elements.xml file for your fields is included before the one for your content type (that uses the fields) in your feature manifest (XML). SharePoint takes a fairly unsophisticated approach to processing the feature manifest and essentially just goes in order. So if your field definitions appear after a content type that uses them, that will cause an error. (And remember that the feature designer in Visual Studio doesn’t give you an easy way to reorder items in the feature manifest. You may need to remove items and then re-add them in the correct order.)
Suppose that we stick with the simple approach for now and define our custom field in the same file as our content type; we end up with an Elements.xml file that looks similar to Listing 7-6.
Listing 7-6. Elements.xml file for content type that includes a field definition
?<?xml version="1.0" encoding="utf-8"?>

<Elements xmlns="http://schemas.microsoft.com/sharepoint/">

  <Field ID="{D67EBB56-A947-459D-8895-D7F18944D237}"

         Type="Boolean"

         Name="ContosoShowOnHomePage"
         DisplayName="Show On Home Page"

         Group="Contoso Fields"

         Description="Indicates whether item will be displayed on the site collection home

page.">

  </Field>


  <!-- Parent ContentType: Announcement (0x0104) -->

  <ContentType ID="0x0104007ba7567139aa41ddb84c6b93eabee061"

               Name="Contoso Announcement"

               Group="Contoso Content Types"

               Description="An announcement that can optionally be rolled up to the site

collection home page."

               Inherits="TRUE"

               Version="0">

    <FieldRefs>

      <FieldRef ID="{D67EBB56-A947-459D-8895-D7F18944D237}" Name="ContosoShowOnHomePage"

Required="FALSE" />

    </FieldRefs>

  </ContentType>

</Elements>
Now we’ve created a content type and a custom field to go with it. If we include the project item for this content type in a feature in our solution, they’ll be availble for us to use in SharePoint Online when our solution is deployed.
Creating a List Definition
List definitions let us define reusable list templates that users can choose when creating lists in SharePoint Online. A list definition contains all the details that define a particular type of list (such as which fields, content types, and views it has).
Follow these steps to create a list definition in Visual Studio:
- Right-click your project in the Solution Explorer window and select Add
- On the Add New Item dialog, you’ll see there are two project item templates for list definitions: List Definition and List Definition from Content Type. If you choose the latter, the SharePoint Customization Wizard will appear and ask you which content type (from your Visual Studio project) you’d like to use for the list definition. Choose the former template for now so you can see what it’s like to start from scratch.
- The SharePoint Customization Wizard will ask you three questions related to your list definition:
- What is its display name? (This is what a user will see when creating a list using your template.)
- What is its type? (What type of built-in list template in SharePoint is it based on?)
- Do you want a list instance created along with your definition? (Selecting this will create an instance of the list in SharePoint Online when the feature containing the list definition is activated.)
- Click Finish to complete the process.
When finished, Visual Studio will have created a list definition project item in your solution and will have added two files to it: Elements.xml and Schema.xml. (It will also have added a list instance project item beneath your list definition if you selected that option in the SharePoint Customization Wizard.)
Elements.xml contains a <ListTemplate> tag with details about your list definition. This is where you set its display name, description, and image (all common tasks when deploying a list definition to SharePoint Online).
Schema.xml contains the “guts” of the list definition. This is where fields and content types are defined (including which fields are required, hidden, and so on); and also where the views and forms associated with the list definition are defined.
If you’re comfortable editing these files, you can now dive right in and start making your changes. Otherwise, if you need to brush up or haven’t done it before, see http://bit.ly/HLUplb for information about the <ListTemplate> tag and Schema.xml file and how they can be changed to customize a list definition.
Creating a Custom Action
Custom Actions give us a way to insert new functionality into existing menus and toolbars (including the ribbon) in SharePoint Online.
To demonstrate the concept, let’s consider a real-world example. One of the first things many SharePoint Online administrators ask about is how to gather and report on web analytics data. Unbeknownst to many folks, SharePoint Online actually includes a fairly simple implementation of web analytics right out of the gate. If you need to get fancier you can (e.g., by integrating Google Analytics into your site), but sometimes the built-in analytics can be a great way to get started (or may even be enough depending on your needs). The only problem is they’re not readily accessible in the SharePoint Online UI without some customization on your part.
Here’s how you can do it:
- Right-click your project in the Solution Explorer window and select Add
- In the list of SharePoint 2010 project item templates, select Empty Element. This gives you a blank Elements.xml file you can edit.
- Add a <CustomAction> tag like the one shown in Listing 7-7.
Listing 7-7. Elements.xml file with custom action for web analytics link
  <CustomAction GroupId="SiteTasks" RequireSiteAdministrator="TRUE"

Id="Chapter7.SiteSettings.SiteTasks.WebAnalytics" Location="Microsoft.SharePoint.SiteSettings"

Sequence="105" Title="View Web Analytics">

    <UrlAction Url="_layouts/UsageDetails.aspx" />

  </CustomAction>
When you’re done, and your solution is deployed, your web analytics link will be visible on the Site Settings page for every site in your site collection (assuming you deploy this in a Site-scoped feature), as shown in Figure 7-7.
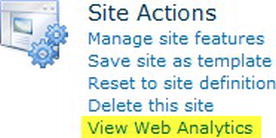
Figure 7-7. View Web Analytics link added to Site Settings page with a custom action
In farm solutions, you would also have the ability to hide existing menu and toolbar links (using a HideCustomAction element) and the ability to create new groups/headings (such as a “Custom Reports” heading on the Site Settings page under which our web analytics link could have gone), but those elements are unfortunately not available to us in sandboxed solutions. If you try to use them, they’ll be ignored.
See http://bit.ly/bEWX15 for more information about the schema for custom actions. Remember that certain items mentioned in the documentation (such as HideCustomAction elements) are not available in sandboxed solutions.
Packaging and Deploying Your Solution
When all your project elements have been created, it’s time to get them packaged into features and into an overall solution (by which we mean a SharePoint solution package, or .wsp file, not a “solution” in the Visual Studio sense).
Prepare Your Features
For the feature side of packaging, you’re probably already part of the way or mostly done. Visual Studio automatically puts project’s elements into features as they’re created (unless you’ve turned that off with an extension that adds that capability), so you may just need to look them over and verify everything is in the correct feature. For example, you might have a feature called “Contoso Web Parts” that has a list definition in it simply because Visual Studio put it there. Double-click each feature in the Solution Explorer window and use the feature designer to ensure everything is where it should be. (Also, double-check the scope of your features, which should be Site or Web for SharePoint Online. Often, if you don’t see an item in the feature designer that you expect to see, it’s because Visual Studio is hiding it due to the feature’s scope not matching the scope of the item.)
Make sure you also set titles and descriptions for your features so site administrators know what they’re activating. (Images are nice, too, and can be set in the feature properties and show up next to the feature on the feature activation page in SharePoint).
Preparing the Solution Package
Next, you can use the package designer to check the contents of the overall package (“package” is short for “SharePoint solution package”). To do so, find the node in the Solution Explorer window that’s called Package and double-click it. You’ll see the package designer shown in Figure 7-8.
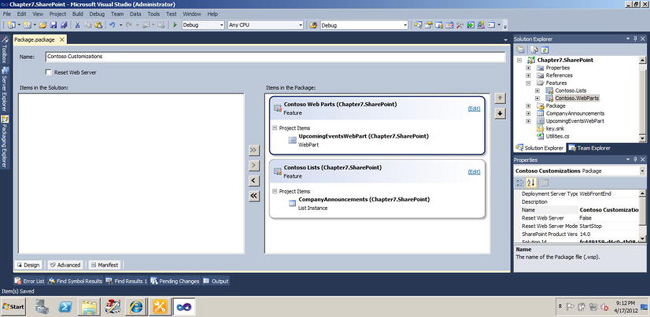
Figure 7-8. The package designer in Visual Studio 2010
The package designer lets you add features to the package as well as reorder them (unlike the feature designer, the package designer actually has a reordering capability built into it).
If you need to manually edit the package XML, you can do so by following these steps:
- Click the Manifest tab at the bottom of the designer.
- Expand the Edit Options panel at the bottom.
- Click the Overwrite generated XML and edit manifest in the XML editor link at the bottom.
Set Your Build Configuration
This may seem obvious, but in all the excitement of preparing features and packages, it often gets overlooked. If you’re done testing, and this will be deployed to production (i.e. the live SharePoint Online site), make sure you change your project’s build configuration to Release (rather than Debug).
Deploy Your Solution to SharePoint Online
For this step, you’ll need to navigate to the live site collection in SharePoint Online where your solution will be deployed. On the Site Settings page for the site collection, click the Solutions link under the Galleries heading (see Figure 7-9).
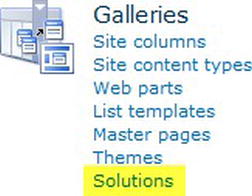
Figure 7-9. The Solutions Gallery link on the Site Settings page
Clicking the link will take you to the Solutions Gallery page. Click the Solutions tab in the ribbon to expose the Upload Solution button. Click that button to open the Upload dialog, as pictured in Figure 7-10.
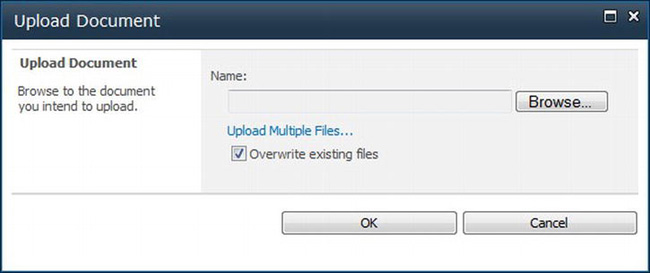
Figure 7-10. Upload solution dialog window
Once the solution is uploaded, you’ll see the solution activation dialog shown in Figure 7-11. Click the Activate button to active your solution.
![]() Note Activating your solution also validates it, which verifies that nothing in it violates the restrictions of the sandboxed environment. Also note that site-scoped features are automatically activated when the solution is activated. Web-scoped features are not.
Note Activating your solution also validates it, which verifies that nothing in it violates the restrictions of the sandboxed environment. Also note that site-scoped features are automatically activated when the solution is activated. Web-scoped features are not.
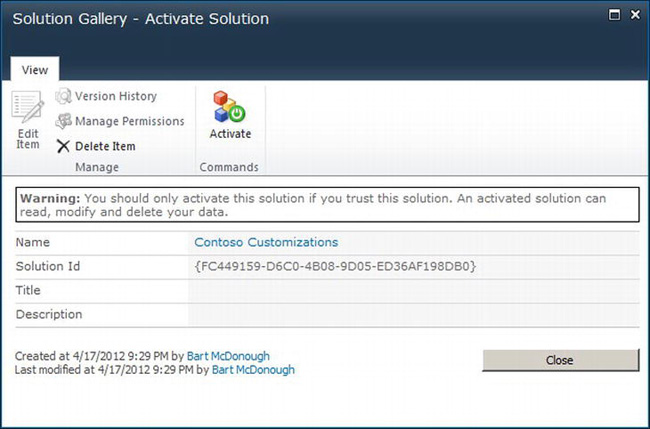
Figure 7-11. Solution activation dialog
Tips and Recommendations
If you’re new to developing custom solutions for SharePoint (whether for SharePoint 2010 or SharePoint Online), you’re about to discover what phrases such as “open-ended” and “gray area” really mean. Developing for SharePoint is both a very rewarding and sometimes very frustrating experience. There’s a lot you can do, but there are also a lot of ways you can accomplish almost every single task you set out to do, hence the importance of establishing patterns and best practices to assist you along the way.
Along that same line of thought, we’ve decided to list some tips and recommendations here that we hope you will find helpful and will make your life as a SharePoint developer a little more rewarding.
Organize Your Projects in a Logical Manner
Project organization in Visual Studio is one of those “gray areas” in SharePoint development, and what ends up happening many times is developers just let things end up wherever Visual Studio puts them in the project, making maintenance more difficult down the road. Our recommendation is to structure things in a logical fashion, such as grouping related elements together. One example is if your project contains ten custom content types, you can create a “Content Types” folder and put all the content types in there. Then another developer can easily find your custom content types if doing maintenance on your project later.
Don’t Be Afraid to Change Namespaces
Just because Visual Studio generates a namespace for something in your project doesn’t mean that it’s the best namespace for you to use. Two examples that come immediately to mind are feature receivers and web parts. When creating these things, check the namespaces and change them if what Visual Studio generates doesn’t make sense for your architecture and requirements.
Just be aware that if you change the namespace for a web part in its class file, you also need to update two other items:
- Update its type name in its .webpart file.
- Update any Safe Control Entries that reference it. To do so, view the web part project item’s properties in the Properties window and edit the Safe Control Entries property. Fix the Namespace and Type Name attributes as required.
Logging
Normally, in SharePoint development we’d recommend logging errors and trace messages to the Unified Logging Service (ULS) logs, but doing so isn’t an option in SharePoint Online due to the sandboxed environment. However, there’s still a work-around we can employ: using a list.
When you’re creating custom solutions for SharePoint Online, consider adding a list instance (either through XML or through code) for a “logging” list of some kind. Put a few of the standard logging fields in there (category, message, details, and so on) and use it for logging in custom code. And of course, remember to ensure that the list is trimmed periodically to keep your storage allocation from getting eaten up by logging. (You can set a content expiration policy on the list, create a page in SharePoint where an administrator can clean it out, or do whatever else makes the most sense for your situation.)
Also remember that you can’t call SPSecurity.RunWithElevatedPrivileges() in SharePoint Online, so you’ll need to make sure every user has rights to create log entries in the list (because your logging code will always operate under the account of the current user).
Summary
This chapter discussed when it might be appropriate to make the jump to Visual Studio for developing custom solutions for SharePoint Online (over using a web browser or SharePoint Designer). We also discussed the sandboxed environment in which our solutions operate and walked you through how to create some of the most common SharePoint elements in Visual Studio and add them to your solution. We then brought it all together by discussing how to deploy your customizations to SharePoint Online and offered a few development tips from our experience that will hopefully make your life a little easier.