C H A P T E R 3
![]()
Setting up a Development Environment for SharePoint Online
Introduction
To be able to customize your SharePoint Online environment for Office 365, you first need to set up a development environment locally. Some of the changes to your online environment can be made directly to the SharePoint Site Collections and pages in your online environment without the need for a local development environment. However, there are other customizations that can be deployed to your SharePoint Office 365 Site Collections only by way of a specialized packaged solution file. These solution files can be constructed using Visual Studio 2010 (and later editions). A local environment helps avoid the necessity of direct production changes without the ability to experiment and refine solutions.
Goals
The primary goal in setting up a development environment for SharePoint Online and Office 365 is to have a place to work on customizations that is not your primary production environment. The online offerings of Office 365 do not provide a common development and testing environment as part of the core offerings, so a different approach is needed to be able to make ongoing modifications that will not affect your end users.
Other goals that are related to this can include initiating a repeatable environment and process for all the software developers in your organization to be able to develop, test and deploy solutions and customizations for SharePoint Online and on your corporate Office 365 instance. Also a goal could be to provide management and end users the ability to preview, give feedback on, and approve solutions being developed before they are deployed to Office 365. Still another goal could be compliance with any internal corporate procedures and processes in place related to software development.
Hardware and Software Requirements
Hardware Requirements
Table 3.1 shows the hardware requirements for SharePoint Server 2010.
SharePoint 2010 is a product that is built based on a 64-bit code base. As such, SharePoint 2010 can be installed on operating systems that are 64-bit. For the purposes of Office 365 customizations, it is not necessary to install a local development SharePoint environment as a full-featured SharePoint 2010 Server install on one of the 2008 Server products. It is sufficient to work with a Windows 7 x64 operating system and a simplified SharePoint 2010 Server installation there. The scripting option shown later in this chapter—the SharePoint 2010 Easy Setup Script—offers two options for installing SharePoint 2010 on Windows 7 environments through a PowerShell-scripted environment.
For a virtualized hardware environment it is important to keep in mind that some processors do not support 64-bit virtualization.
Software Requirements
The key point to remember regarding software requirements for SharePoint 2010 is that SharePoint 2010 is an x64 application. It is built upon a 64-bit base, so it can be installed only on 64-bit operating systems. This is different from SharePoint 2007. The exact details behind all the operating systems supported can be found, including the latest information at the SharePoint Technet sites at http://technet.microsoft.com/en-us/library/cc262485.aspx. A shortened version of that list is as follows:
The server products are useful for server installations, but it is fine to use Windows 7 x64 for your development environment.
Virtual Machine Options
If you are accustomed to standard ASP.NET or other .NET development environments, you might not be used to working in a virtual machine (VM). SharePoint can be set up in any supported environment on a VM, just as it can on physical hardware.
To run VMs on your local Windows 7 (or other OS) environments, you will need some type of hypervisor (virtualization) software. For SharePoint development, there are a few choices available.
![]() Note The hypervisor software (as well as your hardware) must support 64-bit operating systems.
Note The hypervisor software (as well as your hardware) must support 64-bit operating systems.
Hypervisor Software
Hypervisor software is software that specializes in running a full virtual machine within software on another machine. Virtual hard drives (.vhd files for HyperV or .vmdx files for VMWare) are used as operating system drives, and machine settings are stored within VMs. There are several options on the market for this type of software.
VMWare Workstation is a full-featured hypervisor option for running VMs. You can learn more about the software, licensing, and purchasing options at http://www.vmware.com/
VirtualBox is a free option available at https://www.virtualbox.org/. It is the only option of its kind released under the GNU GPL (version 2), so a core portion of it is guaranteed to remain free. It is a fully featured hypervisor or virtualization product and works well for SharePoint 2010 and Office 365 development.
Hyper-V is a hypervisor that Microsoft provides and is available as a role on the 2008 Server R2 products. It is also available as a free operating system (OS) from Microsoft. The OS is Microsoft HyperV Server 2008 R2. It can be obtained from Microsoft Downloads at http://www.microsoft.com/download/en/details.aspx?displaylang=en&id=3512
For x86 environments (such as running a hypervisor on a laptop Windows 7 OS), VMWare Workstation and VirtualBox are the only products supported. HyperV Server or Windows Server 2008 R2 can be run on a laptop or desktop environment, but many convenience options such as Power Saver options on laptops will be missing.
VMWare and VirtualBox are great solutions for mobile or demo environments on laptops or desktops running Windows 7. Standalone server hardware or an old desktop that is upgraded to have enough hardware is a great environment for running Windows 2008 Server R2 or HyperV Server 2008 R2.
![]() Note At some point not too far from the intended publication date of this book, Windows 8 and Windows 8 Server environments will become available with more-advanced virtualization options. Be sure to check on those options before settling on a path for your development environments.
Note At some point not too far from the intended publication date of this book, Windows 8 and Windows 8 Server environments will become available with more-advanced virtualization options. Be sure to check on those options before settling on a path for your development environments.
Advantages and Disadvantages of Virtual Machines
There are advantages and disadvantages of using VMs as opposed to setting up your development environment on your main local hardware.
Advantages
- Snapshots: Easier to reset virtual environments.
- Scalability: You can store a VM for each client, project, or customer you work for to keep it contained.
- Mobility: You can copy and move VMs to and from more permanent storage solutions as necessary. Included in this advantage is the ability to pull up an old VM to look at something you worked on years ago.
- Templates: You can save VM configurations as templates and run sysprep on them to remove individual machine SIDs. This makes copying and spinning up a new VM much faster.
Disadvantages
- More work: It is more work to install another OS on a VM. Some of that can be alleviated with templates and other tools (such as SystemCenter Virtual Machine Manager and some of VMWare’s Labmanager products, which are more expensive).
- Storage: It takes more disk space.
- Time: Copying around all those VMs consumes a lot of time that you could avoid with a simple hardware SharePoint environment.
- Snapshots: It takes a lot of discipline to maintain and record snapshots diligently. Restore might not take you to exactly where you want to go. Sometimes many snapshots can degrade an OS; we’ve had to take a machine out of and rejoin domains at times because of this problem.
We like the best of both worlds: we maintain a local SharePoint environment that is simple for doing quick walkthroughs and code tests, but do the bulk of the customization and development work in VMs.
Visual Studio 2010 Setup
To develop solutions for SharePoint 2010 (including Office 365) with Visual Studio, your development environment must meet the requirements outlined in this section.
Version
Visual Studio 2010 Professional or higher is required in order to get the SharePoint 2010 development templates. You must also enable either the Visual C# or Visual Basic feature, or both, when installing Visual Studio.
Visual Studio 2010 SharePoint Power Tools
One important add-on to Visual Studio for Office 365 development is the Visual Studio 2010 SharePoint Power Tools found at http://bit.ly/jdeGVF. These tools include a template for building Visual web parts in a sandboxed solution. The advantage is that you can use the built-in Visual Designer in Visual Studio to help build customizations.
Visual Studio Extensions
One of the most useful extensions to Visual Studio 2010 for doing SharePoint 2010 development is the CKS Development toolkit (found at http://cksdev.codeplex.com). This is the Codeplex center for development surrounding the tools. However, the actual installation extensions are distributed through the Visual Studio Gallery at http://bit.ly/eLft1J.
Resources
The one other resource that is recommended for download for getting started with SharePoint 2010 online development is the product SDK – that is available at http://msdn.microsoft.com/en-us/library/ee557253.aspx. This has rich code and platform examples to help you be able to get a head start on SharePoint development.
Another great online resource is the SharePoint 2010 Online Developer Resource Center at http://msdn.microsoft.com/en-us/sharepoint/gg153540.
SharePoint 2010 Local Setup
Two separate versions of SharePoint 2010 are available for local setup: SharePoint Server (SPS) 2010 and SharePoint Foundation (SPF) 2010. While SPF is sufficient for the majority of customizations you will want to create, if you are trying to access Term Stores such as the ones in your Office 365 E1-E4 plans, you may wish to install SPS. If you are developing against an Office 365 P1 plan, SPF is sufficient.
Office 365 SharePoint Unique Points
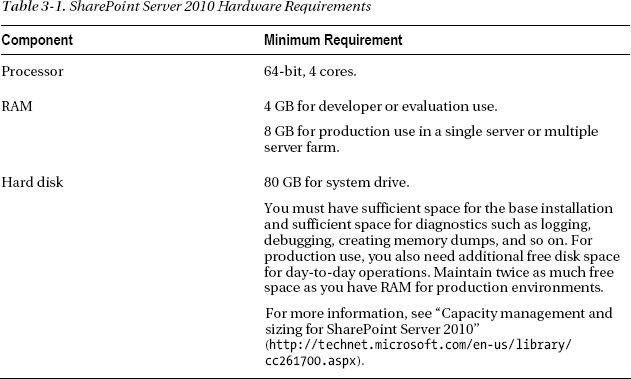
Office 365 offers an environment that is somewhat unique when compared with SharePoint on-premise installations. The overall look and feel of SharePoint’s express team site is different (see Figure 3-1).
Figure 3-1 Office 365 team site
There are many other unique points to Office 365 as we start drilling down into development techniques. Other chapters in the book will start to highlight them as we develop the concepts further.
SharePoint 2010 Easy Setup Script (for Setting Up a Dev Environment)
One of the tools that has been provided by members of Microsoft’s product teams (the Metro SharePoint Productivity Team) is a PowerShell-based setup script that makes setting up a development environment on Windows 7 for SharePoint 2010 much simpler.
This Easy Setup script can be downloaded from http://www.microsoft.com/download/en/details.aspx?id=23415. Extracting the downloaded .zip files to the default download location unzips it to C:SharePoint2010EasySetup. The files appear as shown in Figure 3-2.

Figure 3-2 Installed SharePoint EasyScript files
The EasyScript files consist of HTML files, a Microsoft PowerPoint presentation, a lab file written up in Microsoft Word, and a series of PowerShell scripts for installation. All these are packaged up into an HTML based learning package that is similar to the Microsoft Online Learning Labs.
One of the reference files that shows up in the Easy Setup Lab is the SharePoint 2010 Professional Developer Evaluation Guide and Walkthroughs, which can be found at http://www.microsoft.com/download/en/details.aspx?displaylang=en&id=7204.
While this evaluation guide is very useful, it is more focused toward standard SharePoint development. There is a more pertinent evaluation guide titled SharePoint Online for Office 365: Developer Guide that can be found at http://www.microsoft.com/download/en/details.aspx?id=17069.
This guide at the time of writing is the beta version of the guide. The contents are more directly focused on SharePoint Online development, so should be referenced in place of the standard guide.
Prerequisites
Before kicking off the Easy Setup Script, we need to determine whether we will choose to install SharePoint directly on the Windows 7 box or if we want to set it up on a bootable VHD.
![]() Note A bootable VHD will provide an additional option on bootup of Windows 7 to allow you to select the Easy Script SharePoint environment to boot to rather than your current OS. This can be effective for isolating your development environment but is less convenient than having everything on your Windows 7 work environment.
Note A bootable VHD will provide an additional option on bootup of Windows 7 to allow you to select the Easy Script SharePoint environment to boot to rather than your current OS. This can be effective for isolating your development environment but is less convenient than having everything on your Windows 7 work environment.
Running Easy Setup Script
After downloading the SharePoint 2010 Easy Setup Script, we can get started by opening up the Default.htm file and navigating through the Easy Setup labs. Start with the “Getting Started With Sharepoint Development” lab, which will help you download and set up your SharePoint environment.
Browse to the Labs directory – Easy Setup Lab – Source – found at C:SharePoint2010EasySetupLabsEasySetupSource. Click the Run.bat file; the output is shown in Figure 3-3.

Figure 3-3 Start of SharePoint Easy Setup batch script: run.bat
In the default running of the script, all the necessary software will download to the Setup directories of your SharePoint2010EasySetup folders.
Included are all the following (trial editions):
- SharePoint 2010 Server
- SharePoint 2010 Prerequisites
- Filter Pack
- Chart Controls for .NET 3.5
- Sql Server 2008 Analysis Services
- Windows Identity Framework
- Sql Server 2008 Native Client
- Synch Framework
- Visual Studio 2010 Ultimate Edition Trial
- Silverlight 4 Tools for Visual Studio
- Expression Studio 4 Ultimate Trial
- Open XML SDK
- Visual Studio 2010 SDK
- Visual Studio SharePoint Power Tools
- Office 2010 Professional Plus Trial (includes InfoPath 2010)
- SharePoint Designer 2010
- Visio 2010 Trial
Next, the setup script asks if you want to install on this host or on a new VHD (see Figure 3-4).
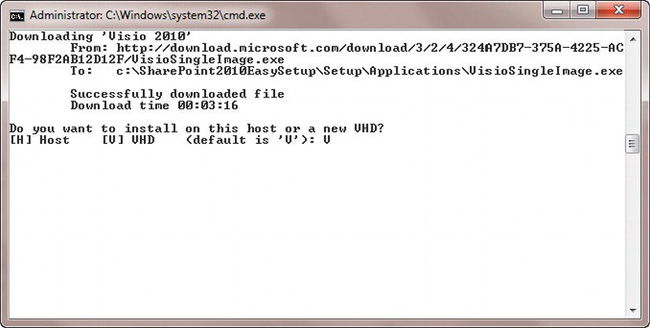
Figure 3-4 Install on this host or VHD
The script proceeds to install the prerequisites and set up SharePoint 2010 (see Figure 3-5).
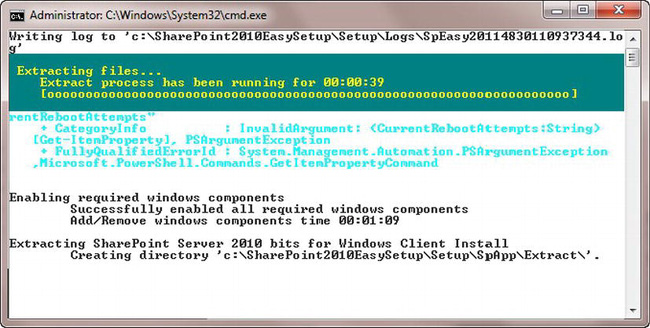
Figure 3-5 Installing prerequisites and SharePoint 2010
After the script completes running, you should be able to browse to the default URL for your computer and pick a template, as Figure 3-6 shows.
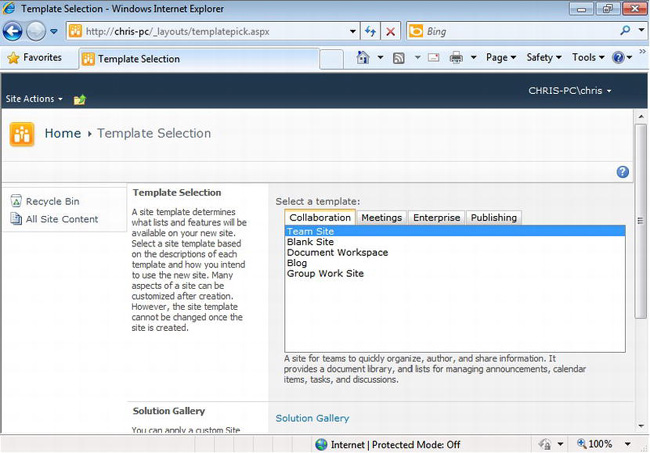
Figure 3-6 Select template
Then you should be able to browse to your local team site, as shown in Figure 3-7.

Figure 3-7 Local SharePoint site
SharePoint 2010 Setup on Windows 7
For installations outside of using EasyScript, the MSDN article entitled “Setting Up the Development Environment for SharePoint 2010 on Windows Vista, Windows 7, and Windows Server 2008, ”which is found at http://msdn.microsoft.com/en-us/library/ee554869(office.14).aspx, is an excellent resource. It highlights specific steps for installing SharePoint 2010 on Windows 7.
The difference in setting up SharePoint 2010 on Windows 7 as opposed to a Windows Server product is that the automated Prerequisites Installer that is available on the server products is not available on Windows 7 (or Vista*).
![]() Note We are obligated to mention Vista as an option because it is officially supported and is mentioned in the MSDN and TechNet articles. However, no .NET developer is likely at the time of this writing to be doing development work on a machine with Vista installed on it. As a result, we focus mainly on Windows 7 in this chapter.
Note We are obligated to mention Vista as an option because it is officially supported and is mentioned in the MSDN and TechNet articles. However, no .NET developer is likely at the time of this writing to be doing development work on a machine with Vista installed on it. As a result, we focus mainly on Windows 7 in this chapter.
For Windows 7 installs, you need to run the Prerequisites Installer yourself. The Easy Setup Script provides an automated way to do that. Also, resources are available to automate the download of prerequisites. One source is the Technet Gallery at http://bit.ly/kBjdbG or search for “Download SharePoint 2010 Pre-Requisites”. This is the script portion of the Codeplex project AutoSPInstaller (http://autospinstaller.codeplex.com/). The advantage is that you can do prerequisites installations in environments in which your computer cannot reach the Internet.
If you follow the standard setup steps shown in the article, you should have a SharePoint 2010 environment ready to start customizing.
Sandboxed/User Code Service Setup
One final thing that you need to ensure before starting to deploy sandboxed or user code solutions in your local environment is that the service that supports them needs to be turned on in your SharePoint environment. The Microsoft SharePoint Foundation Sandboxed Code Service is a Windows Service that is started and stopped in SharePoint through Central Administration.
We will enable the Microsoft SharePoint Foundation Sandboxed Code Service through Central Administration. The following steps outline the process:
- On the Start menu, click All Programs, click Microsoft SharePoint 2010 Products, and then click SharePoint 2010 Central Administration.
- In the System Settings section, click Manage Services on Server.
- In the list, next to the Microsoft SharePoint Foundation Sandboxed Code Service, verify that the service is started or click Start to start the service.
If you are testing in a multiserver environment, the Sandboxed Code Service must be started on at least one of the web front-end (WFE) servers. Starting it on multiple WFE servers will allow for load balancing of sandboxed solutions.
When this service is running, you can deploy sandboxed solutions to your local environment as well as attach your Visual Studio debugger to them.
Duplicating Your Office 365 Environment
For a local development environment, it is desirable to duplicate as many settings as you can from your Office 365 SharePoint environment. This would include a representation of users and permissions, although you won’t be able to exactly duplicate these locally. You also won’t be able to duplicate exactly the same sandboxed or user code solution filters as there are in the Office 365 environment. However, a close approximation on your local settings will help you to develop your solutions in an efficient manner, without needing to rework things that could be avoided due to disparate settings between your on-premise development environment build and your Office 365 environment. Aside from duplicating settings as closely as you can, another approach that’s often used is to create a fresh site collection in your Office 365 environment that serves as a test-bed for testing your customizations. You can delete the site collection when you’re done testing to free up resources. Of course, this approach assumes that you have an Office 365 for Enterprises plan that allows you to have multiple site collections.
SharePoint Designer 2010 Setup
Another tool commonly used for customizing SharePoint Online is SharePoint Designer (SPD) 2010. SPD can be used for customizing pages, master pages, and workflows.
Installation
SPD 2010 can be downloaded and installed for free by visiting http://bit.ly/jWplOw. This is the 32-bit version, which is best for most development environments.
![]() Note The 32-bit version corresponds to the 32-bit version of Microsoft Office 2010. If you have installed the 64-bit version of Microsoft Office 2010, also install the 64-bit version of SharePoint Designer 2010. The 32-bit versions of Microsoft Office work a little bit better with respect to the social media plug-ins available and some synchronization tools. Even though SharePoint 2010 is 64-bit, and you have a 64-bit SharePoint 2010 install on your local Windows 7 environment, use the Microsoft Office 2010 32-bit version and SPD 32-bit version for best results.
Note The 32-bit version corresponds to the 32-bit version of Microsoft Office 2010. If you have installed the 64-bit version of Microsoft Office 2010, also install the 64-bit version of SharePoint Designer 2010. The 32-bit versions of Microsoft Office work a little bit better with respect to the social media plug-ins available and some synchronization tools. Even though SharePoint 2010 is 64-bit, and you have a 64-bit SharePoint 2010 install on your local Windows 7 environment, use the Microsoft Office 2010 32-bit version and SPD 32-bit version for best results.
The download and installation of SPD 2010 is pretty straightforward. Follow the installation wizard to successfully install SPD.
Connecting SharePoint Designer to SharePoint
To connect to SharePoint, open SPD 2010, as in Figure 3-8.

Figure 3-8 SharePoint Designer initial screen
In Figure 3-8, several of the Recent Sites selections represent the URLs of local SharePoint Site Collections that we have connected to recently with SPD.
To connect to a new site in Office 365, click “Open Site” and type in the URL of your Office 365 team site, as in Figure 3-9.
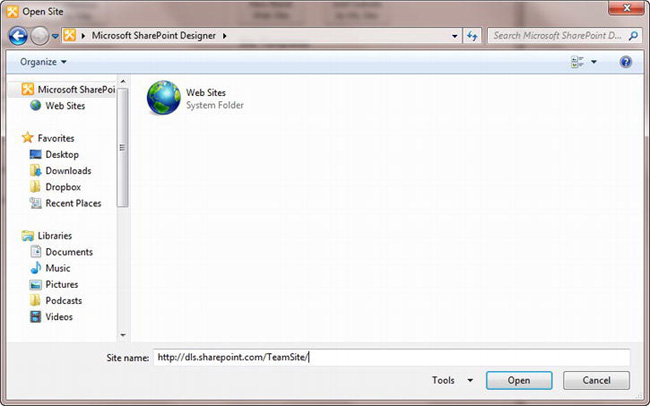
Figure 3-9 Open team site in SPD
If the site is local, you will connect directly to it.
Connecting to Office 365
To connect to Office 365, enter the URL of your Office 365 team site, as shown in Figure 3-9. This will connect you to the remote team site on Office 365 instead of to one of your local SharePoint sites.
After you click the “Open” button, you may be presented a credentials screen like the one shown in Figure 3-10.
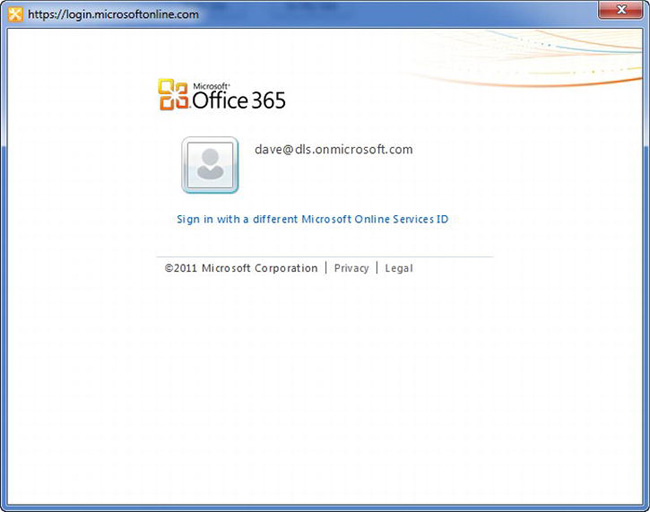
Figure 3-10 Credentials screen from SPD 2010
Credentials for your Office 365 account must be entered to allow SPD access to your Office 365 team site. After you enter your credentials successfully, you will see your Office 365 team site properties screen in SPD as shown in Figure 3-11.

Figure 3-11 SPD 2010 open to Office 365 team site
Setting Up a Good HTML Editor
Some SharePoint customizations for Office 365 can involve a good HTML editor. Easy Scripts installs a trial version of Expression Studio Ultimate edition, which includes Expression Web 4. While SharePoint Designer 2010 has some capabilities with respect to editing and producing HTML, there are some areas in which you might want to utilize another good HTML editor to shore up how things will look prior to plugging them into your final page design. Many HTML editors (either on the market as products or free versions) will have tools for quickly crafting CSS, JavaScript, and HTML together. You can prototype designs in another editor and then plug them into SPD 2010 in your development environment for final checking.
Team Development
One of the biggest questions that arises when starting to set up environments for customizing Office 365 is how to work together with a team of other developers who also are making changes to the environment. Some core tenets of team development for Office 365 include each developer maintaining his or her own local development environment, and then having a common development and/or testing environment in which all changes can be tested before rolling them to production.
Common Virtual Hard Drive Images
One great way to work with all developers having their own SharePoint 2010 local environments is to set up all the prerequisite software to prepare one developer machine and then sysprep the machine image to be able to clone to other developers’ environments. Full SharePoint development images will require at least two virtual machines (VMs): one for the domain controller to contain Active Directory and another for the SharePoint environment. To be able to fit both machines on a USB drive, you will need a 64 GB drive to hold them. You may be able to squeeze a basic development image on a 32 GB drive, but a 64 GB drive will definitely provide enough room to include other software on your development images.
The problem of standardizing on and providing common development environments for your SharePoint development teams is a very common one. Solving it by providing a standard development environment on a sysprepped USB drive or download folder will save many setup hours for a developer and development teams.
Environments
Local Development Environment
The local development environment is the one that we have been setting up in this chapter to this point. It offers debugger attach capabilities and a quick turnaround for testing. This is the primary starting point for Office 365 development.
Centralized Test Environment
While it is ideal to have a local test environment to test all your SharePoint changes and customizations against, it is recommended that before you deploy your changes to your production Office 365 or SharePoint Online site, you should perform a final verification of the functionality of what you are deploying in an environment that closely mirrors your Office 365 platform.
There are a couple of possibilities that are available with respect to setting up an online centralized test environment.
Test Office 365 Site Collection
A simple solution is to simply set up a separate site collection within your Office 365 SharePoint account to use as a testing environment. To do this, log on to Office 365 as an Administrator and select “Manage” under SharePoint Online (see Figure 3-12).
![]() Note The Admin features shown are part of the enterprise-level Office 365 plans (E1 to E4). If you have a P1 plan, it allows a total of only one Site Collection, so it is not possible to add a new one for test purposes.
Note The Admin features shown are part of the enterprise-level Office 365 plans (E1 to E4). If you have a P1 plan, it allows a total of only one Site Collection, so it is not possible to add a new one for test purposes.
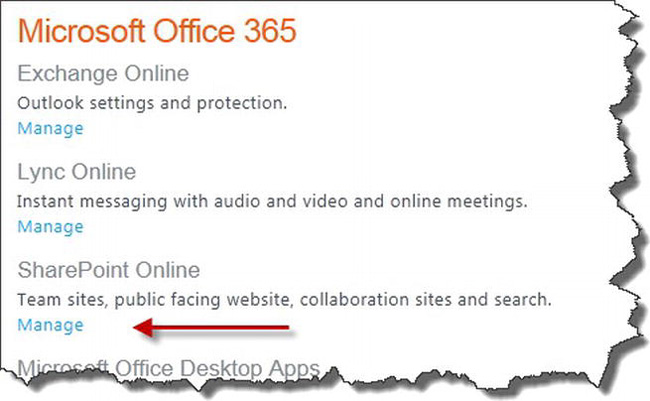
Figure 3-12. Manage SharePoint Online
From the SharePoint Online screen, select “Manage Site Collections,” as shown in Figure 3-13.
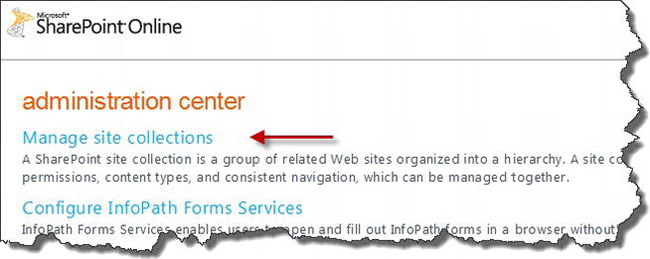
Figure 3-13 Manage site collections
Add a new site collection, as shown in Figure 3-14. Ensure that you select the “Private Site Collection” option in the drop-down menu as opposed to a public website.

Figure 3-14 New site collection
The New Private Site Collection option displays the pop-up window shown in Figure 3-15.

Figure 3-15 New Site Collection window
Depending on the Office 365 plan that you purchased, you can select from a number of site templates including the standard Collaboration templates as well as Meeting, Publishing, and Enterprise templates. Provide a title and a URL for the website address.
Next, scroll down to see the rest of the screen (see Figure 3-16).
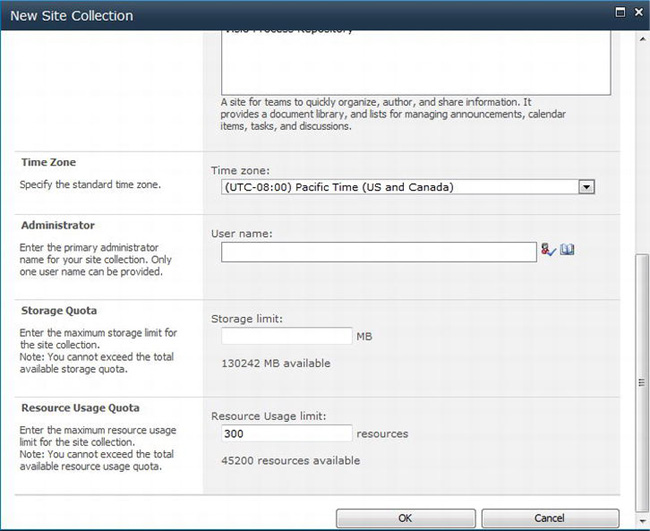
Figure 3-16 New Site Collection window 2
Select a primary administrator from your online users. You can also add other administrators later and grant access to the site collection directly through the site collection permissions. The storage quota is a limit on the overall storage for the site collection.
The Resource Usage quota is a site collection metric compiled by SharePoint Online. The main purpose of resource quotas is to limit the risk that custom code may negatively affect the site collection.
Now you are ready to deploy customizations to a site collection that mirrors your production environment.
Test Office 365 Account
One possibility for a centralized test environment is to purchase a separate Office 365 account that has only one (or a limited number) of accounts set up as test accounts. This would completely separate the test environment from any production environment, including different access URLs and credentials.
The cost of this solution would simply be the monthly cost of the individual test user licenses involved in the separate account. One thing to consider with this option is to ensure that the type of plan you use for your test account matches your production account. (Example: A P1 test account and an E3 production account might not match up well.)
![]() Note The process for adding test site collections to a new account is the same as for a new site collection in your production account. This option could be a possibility for small businesses who have P1 plans for Office 365 because each P1 plan only offers one site collection.
Note The process for adding test site collections to a new account is the same as for a new site collection in your production account. This option could be a possibility for small businesses who have P1 plans for Office 365 because each P1 plan only offers one site collection.
Change Control
One critical thing to consider when starting to do customizations to the Office 365 environment is to instantiate some form of a change control process for ensuring quality in the environment. Because sandboxed solutions are already somewhat controlled, it can be tempting to bypass all the diligent processes that your company already has in place for deploying code to production in other environments. This is not a good practice to adopt!
On the contrary, the same discipline that you have for your other development environments should carry directly over to SharePoint Online. Three critical concepts to put in practice are source control, binary control, and a process.
Source Control
Source control is a core fundamental of software development. For SharePoint 2010 Online and Office 365, you should be using a source control system to maintain your codebase and customizations. There are many options available, including the ALM product offering from Microsoft that includes Team Foundation Server, or TFS. One advantage of using TFS is that it has a high level of integration with SharePoint, and SharePoint site collections house many TFS features.
What you use for source control is not as important as the fact that you do use source control.
Binary Control
One question that commonly comes up is what should be stored in a source control system versus what should be compiled and deployed every time. SharePoint solutions deploy as packaged .wsp files. It is a decision for each development team whether or not they want to store .wsp files directly in source control or depend on the repeatable process in the test builds that produce a high enough quality result to not to have to store .wsp files in source control.
Process
Equally as important as using source control is to hone a process for SharePoint Online development. Build, test locally, test in a common dev/test site collection, obtain user approval through user acceptance testing UAT, and then deploy to production. This a very quick and high level depiction of a process for deploying customizations.
Summary
This chapter walked you through the process of setting up a local development environment to use when customizing SharePoint Online. We covered the requirements for installing SharePoint locally and discussed some of the advantages and disadvantages of using virtual machines over actual physical hardware. For those who want to use a Windows 7–based development environment, we talked about the Easy Setup PowerShell script Microsoft provides for installing SharePoint and its prerequisites on Windows 7. We also talked about tools you’ll want to install for development work, approaches for making your local environment “match” your production environment, and some best practices related to change control.
This chapter delved into setting up a development environment for Office 365 and SharePoint Online. Now you are ready to dive into customizing your Office 365 environment.