
C H A P T E R 14
![]()
Windows 8 Applications
From a .NET developer's point of view, one of the most significant releases in 2012 is Visual Studio 2012. But from Microsoft's point of view, the most significant release would have to be that of Windows 8. Applications specifically written for Windows 8 bring a big paradigm shift not only in how users experience applications, but also in how developers write them. This chapter talks about how you can get started creating these new styles of applications using Visual Studio 2012.
Windows 8 Apps
Windows has been the predominant operating system used in PCs for a long time. Microsoft originally thought that they could put this OS onto other devices such as PDAs, mobile phones, and other handheld devices and the same success would follow. In fact, I used to think that some of the older smart phones, which ran a modified version of the Windows operating system for the phone, were really cool—they even ran applications such as Excel on them!
I, like several other users, didn't know any better until the iPhone was launched. The iPhone provided a user experience that incorporated touch, fluid animation, and sensors such as a gyro, accelerometer, proximity sensors, and GPS in such a way that it left its competitors far behind. When the iPhone, and later the Android smart phones, started dominating the market, Microsoft took notice. Microsoft went back to the drawing board and came up with a brand-new design and OS to run on its smart phones. This new design had the following design principles:
- Typography: The designers believed that type is beautiful and well-placed type can lead to more content. They believed that apart from being visually pleasing, type can also be functional.
- Motion: The designers believed that motion is a very key part of bringing an application to life—so transitions and animations are very important in a UI design.
- Content, not chrome: Running the phone on a small form factor meant that the emphasis had to be on the content—the information the user needs and cares about—more than the chrome, which includes all the UI elements such as toolbars and menus that surround it.
- Honesty: The phone delivers digital content, and the designers believed that the design should be authentically digital (in other words, not pretend to be something else or use metaphors in design to signify that it isn't digital).
Although the Windows Phone 7, which uses the new design for its apps, is still a distant third behind Android and iPhones in terms of market share in the smart-phone segment, Microsoft saw the potential of new-style apps. The success of iPad and Android tablet devices also opened up a fast growing market segment that Microsoft could just not ignore—touch-based devices.
To counter these threats, Microsoft has come up with a strategy to create and run new-style applications on the next version of its operating system—Windows 8. Windows 8 will run on both tablets and desktops, and it brings a shift in the way that applications are developed, how they are installed, and how users interact with these applications.
The principles behind the new design, which Microsoft now refers to as Modern UI (see sidebar), extend what was originally designed for the phone into Windows 8 and are listed as follows:
- Show pride in craftsmanship: Make sure UI designers and developers focus on the smallest of things in the application and are pixel perfect in every way.
- Be fast and fluid: Be extremely responsive to user interaction and use things such as touch and animation to create a compelling user experience.
- Be authentically digital: Embrace the fact that application runs in a digital medium and create applications accordingly.
- Do more with less: Focus more on the content, remove clutter, and ensure that the user does not have any distractions while working with the application.
- Win as one: Seamlessly combine with other applications as well as the devices present in the system to work as one.
These applications will be sold via the Windows Store, and they are also referred to as Windows Store apps.
MODERN UI, WINDOWS 8 APPS, WINDOWS STORE APPS
Classic Apps
So, what happens to all the existing applications that have been written in .NET? Does all this new Windows 8/Modern UI stuff mean we have to throw them away? Not at all. That would make all the previous chapters in this book redundant, wouldn't it?
You can still write applications for .NET, and they will continue to run on Windows 8. There are some apps that will be really well suited for the Modern UI principles, some that may require quite a few changes, and some that may just not be suitable. For example, running Visual Studio as a Windows Store app may not work at all. But there are several line-of-business apps that may fit really well with the Modern UI's design principles.
The non-Windows 8 apps—the ones that will continue to run in .NET or Silverlight—will coexist with the newer style of apps. Some people call them legacy apps, but I prefer the term classic apps.
![]() Note The Windows 8 operating system will run on a wide range of hardware and form factors including tablets running on ARM processors. The version of Windows 8 running on tablets with ARM processors is called Windows RT, and it will have restrictions on the applications it can run. Apart from certain applications such as Microsoft Word and Excel, it can only run apps purchased through the Windows Store.
Note The Windows 8 operating system will run on a wide range of hardware and form factors including tablets running on ARM processors. The version of Windows 8 running on tablets with ARM processors is called Windows RT, and it will have restrictions on the applications it can run. Apart from certain applications such as Microsoft Word and Excel, it can only run apps purchased through the Windows Store.
Windows 8 Apps—Fundamentals
Writing Windows 8 applications is quite different to the way you've been writing applications so far. Apart from certain guidelines on how the user interface should look like, it has quite a few things that should be taken into consideration—like running applications full screen, how long-running operations should be async, how applications communicate with each other, and so on. This section gives you an introduction to these concepts.
Writing Code in Windows: A Brief History
When Windows first came out several years ago, developers used to write code in C. The Windows SDK, which the applications accessed, was available in DLLs that were shipped with Windows. People then moved on to writing applications using other languages such as C++, but the underlying SDK still remained the same. Although additions and changes were made to this SDK with newer versions of the operating system, fundamentally it stayed the same. When .NET came about, people had a choice of using several languages such as C# and VB.NET to write applications in order to run on Windows, but the .NET runtime itself ran on Windows and used the Windows SDK.
Code written to run directly on the Windows SDK using a language such as C++ is referred to as native code, and code written to run on the .NET Common Language Runtime (CLR) is referred to as managed code. .NET provided a nice layer of abstraction over the Windows SDK, and it also provided features such as garbage collection and the ability to program in modern programming languages.
If you want to continue writing code using .NET for Windows, it is still possible in Windows 8. In addition, a new Windows runtime, or WinRT, has been introduced that lets you write Windows 8 applications using code that looks like .NET code but runs directly on the WinRT. On the surface, WinRT looks like a subset of .NET, but it really isn't. Even though it contains a lot of classes that .NET developers are familiar with and use the same .NET languages to code, it contains a whole range of changes and a new programming paradigm that developers will have to learn. In addition, one of the key inclusions is the ability to code in HTML5 and JavaScript.
Let's look at part of this paradigm shift that I talk about in the subsequent sections.
Embrace the Modern UI Guidelines
At the beginning of this chapter, I spoke briefly about the Modern UI design guidelines. The Modern UI, or the UX, is markedly different from any other designs you may have encountered in the past. Touch is now a first-class citizen, and your application needs to ensure that it works well with touch gestures. You need to ensure that the touch targets are large enough to be “fat-finger” friendly.
In addition, your applications have to be fast and fluent with animations and transitions. Modal message boxes and dialog boxes are passé in the Modern UI. So, you need to figure out how you to get around that. You also need to think about how users navigate from one screen to another.
Windows Store apps are fully immersive apps—what this means is that they run full screen and as mentioned earlier, we need to think “content not chrome.” In other words, we need to figure out how we provide the equivalent of toolbars and menus to users.
![]() Tip Microsoft has provided a rich set of resources on the Modern UX design principles. You can find these resources at
Tip Microsoft has provided a rich set of resources on the Modern UX design principles. You can find these resources at http://msdn.microsoft.com/library/windows/apps/hh779072.
Install through Windows Store
When users want to install your Windows 8 application, they install it through the Windows Store. So, as a developer, you no longer need to create an installer or worry about how you provide newer versions of your applications to your users. Instead, you package and submit your application to the Windows Store where people can either buy it or install it for free.
If you already own a smart phone and download applications to it this way, you are already familiar with this paradigm.
When a newer version of your application is available, Windows Update notifies your users of the newer version and they may choose to update the application. When they no longer need your application, they just remove it and Windows will take care of all the cleanups.
![]() Note If you are a developer, you can install an unpackaged app to the OS without having to go through the Windows Store.
Note If you are a developer, you can install an unpackaged app to the OS without having to go through the Windows Store.
Everything Is Async (Well, Almost)
Windows has had multi-threading support from its very early days, but updating the UI could only be done through one thread—this thread, which is referred to as the UI thread, is responsible for processing user actions such as mouse moves and also updating the various screen elements. If you use this thread to perform a long-running operation, it makes the operating system unresponsive.
One of the main tenets of Windows 8 is to make applications fast and fluid. Having an unresponsive UI because of a long-running task on the UI thread would defeat this. So, the designers of Windows 8 decided that in the Modern UI, all calls that take up time to execute will have to be asynchronous. If a method has the potential to take more than 50ms to complete, it will have to be an asynchronous call.
So, if you make a call to the operating system to read a file or make a call to another server across the network, it will have to be async. As it turns out, about 10–15% of calls in WinRT had to be made asynchronous in order to keep the UI thread responsive. As you learned in earlier chapters, the introduction of await-async in C# makes this easier.
Everything Is Restricted (Well, Kinda)
All along, when you've written applications, you've been able to access file system resources such as the document or picture library, devices such as webcams, or even use the network rather freely. In Windows Store apps, you only have restricted access. Before you start panicking, let me clarify that this is not as bad as it sounds.
When you write your application, you need to create a manifest file where you request access to these “capabilities.” When you submit your application to the Windows Store, Microsoft will check to make sure that the capabilities you have requested are in line with what the application supposedly does. Customers can also look at the capabilities the application uses before they decide to install it. Some of the capabilities that Windows 8 apps support include the following:
- Documents, music, pictures, and video libraries
- Microphone and webcams
- Text messaging
- Removable storage
- Location
- Proximity
- Internet, public, and private networks
- Certificate store
Your Application Runs Forever (Well, At Least It Appears To)
When you want to close an application now, all you have to do is hit the x at the top of your window or press File ![]() Exit from the menu. In a fully immersive application in Windows 8, you generally don't see these options. So, your application seemingly runs forever—well, at least as long as the system allows it to. When there are too many applications running and the system runs out of resources, the operating system may decide to close Modern UI applications that are not currently active (but running in the background).
Exit from the menu. In a fully immersive application in Windows 8, you generally don't see these options. So, your application seemingly runs forever—well, at least as long as the system allows it to. When there are too many applications running and the system runs out of resources, the operating system may decide to close Modern UI applications that are not currently active (but running in the background).
![]() Tip You can close an application in Windows 8 if you really want to although most people would not bother. Just hit Alt+F4. If that doesn't work, touch the top of your application (or click on the top of the application with your mouse when your cursor changes to a hand). Then when the size of the screen changes, drag it to the bottom of the screen and drop it.
Tip You can close an application in Windows 8 if you really want to although most people would not bother. Just hit Alt+F4. If that doesn't work, touch the top of your application (or click on the top of the application with your mouse when your cursor changes to a hand). Then when the size of the screen changes, drag it to the bottom of the screen and drop it.
When the user decides to start a Windows 8 application again, it has to start off from where the user left it originally. This means that you, as a developer, should have saved the state of the application including the documents and the screen it was in before the application was closed by Windows—maybe even the cursor position. This brings with it challenges and new ways of thinking on how and when to save all this information.
Applications Running in the Background Aren't Really Running …
Like any modern OS, you can run multiple applications at once in Windows 8. These applications can also have multiple threads and do different things simultaneously. However, users interact with only one application at a time, and Windows 8 applications run full screen (there are exceptions to this rule, but for the most part, they do run full screen), which means that there can only be one active application. When your application is active, it means all the other Windows 8 apps are not active. There are three states in which an application can be in: Not running, running, and suspended.
As soon as you start or switch to another application, that app moves into the running state and pushes the previously running application into a suspended state. As the system starts to run out of resources, a suspended application is shut down and it moves to a Not running state.
When an application is in the running state, the system gives it all the attention it needs. The application is therefore very responsive and fast. As soon as the application moves in to a suspended state, it does not get any attention from the OS—not even a single CPU cycle. Does that mean you can't run anything in the background? Not exactly. There are some ways to get around this problem, which we will look at later.
Interfacing with Other Windows 8 Apps
Windows 8 also allows Windows 8 Store apps to communicate with other Windows 8 Store apps. But how do you communicate and what do you communicate? This is specified by a mechanism known as contracts. Your application can share its content with another application by providing a source contract that other applications can use, or your application can provide a target contract and use the content from another application that provides the source to you.
Like capabilities, these contracts are also specified in the manifest file. Some common contracts available in Windows 8 apps are the following:
- Search contract: Allows users to search your application
- Share contract: Allows users to share content of your application with other apps
- Play to contract: Allows users to play digital media in your application
Enough Talk
Now that you've gotten an overview of Windows 8 applications and what they do, let's see what the screens look like.
Figure 14-1 shows the Start screen with the Windows 8 applications present in the machine. This is the kind of screen that will show up as soon as you log in to Windows 8. If you are familiar with the Windows Phone user interface, you will see an immediate parallel with the way the screen is presented with tiles. The tiles on the screen are “live tiles.” In other words, they will automatically update themselves when new content for the tile arrives.
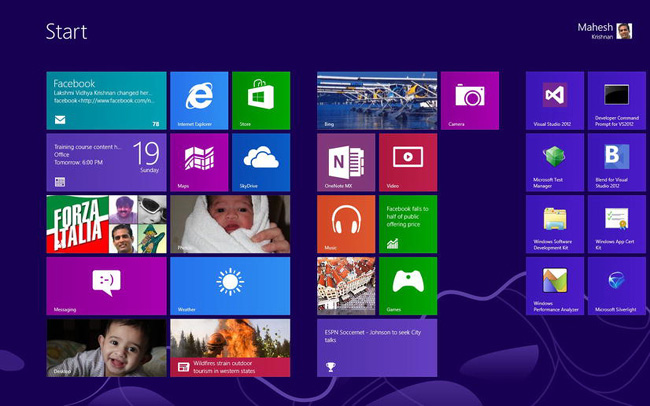
Figure 14-1. The Start screen
To scroll to the right or left of the screen, you use your finger to flick the screen left or right. If your computer does not support touch, you can still use the scrollbar at the bottom of the screen to scroll to the left or right to look at other applications. To launch an application from the start screen, all you need to do is tap the tile (or click with your mouse).
Figure 14-2 shows a typical Windows 8 app—the weather app running. There are a few things you will notice about the application straight away:
- It is a fully immersive application. That is, it runs full screen.
- It has no chrome. In other words, there are no window frames or menus to clutter the screen.
- As you click on arrows icons on the screen, you see fluid animation when things show up or disappear.

Figure 14-2. A typical Windows 8 app
If you are running the same weather app that you have on screen, you must be wondering how you can change the city for which you want the weather information displayed. After all, there are no menus or buttons to do that. This is where the application bar, or AppBar, comes into play. Right-click the mouse and you will see the AppBar appear on the screen, as shown in Figure 14-3. You can also get the AppBar by swiping your finger up from the bottom of the screen.

Figure 14-3. The AppBar in action
Depending on the type of application and what you are currently doing in the application, you may have the AppBar appear both at the top and bottom. This gives you application-specific options. In this case, there are options to look at world weather, remove the city for which the weather is being displayed, and so on.
One of the key features of Windows 8 apps is the ability to share information with other applications. Let's assume you are reading a news article in one of the Windows 8 applications and you want to share this on Facebook, Twitter, or even through your mail. You can do this by invoking what are known as Charms and selecting the Share option from it. You can invoke Charms at any time while your application is running by swiping the right-hand side of the tablet with your finger or just by moving your mouse to the right bottom corner of the screen. Figure 14-4 shows Charms in action.
You can use Charms to search for specific things in your application, share your application data with others, go back to the Home or Start screen, use devices to print, or use settings to change application-related settings.
Figure 14-5 shows the Share options available for the USAToday application—in this case, just mail.
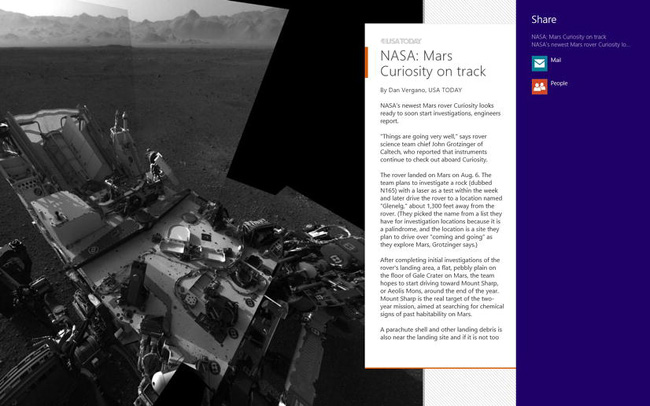
Figure 14-5. Sharing application data with others
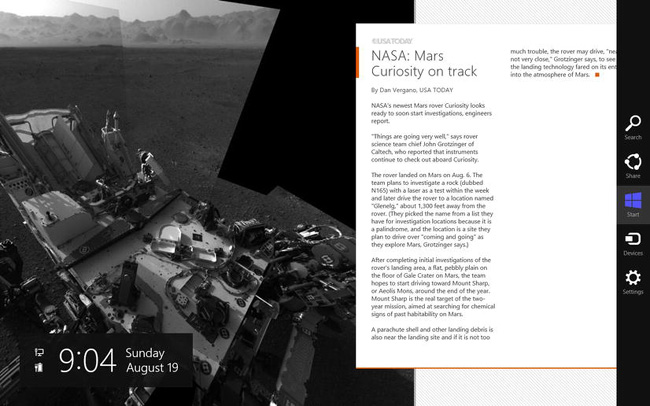
Sometimes you may want to see what is happening in one application (say, your mail client) while continuing to use another (such as your browser). In these scenarios, Windows 8 allows your Modern UI apps to be snapped to one side, while the other application is still active. Figure 14-6 shows one such example¬¬: the weather application is snapped to the side while the main application where you are reading the news occupies the major portion of your screen. You can write your application to be smart enough to show a different view to the user when it is snapped to the side as the screen real estate available to you is limited.
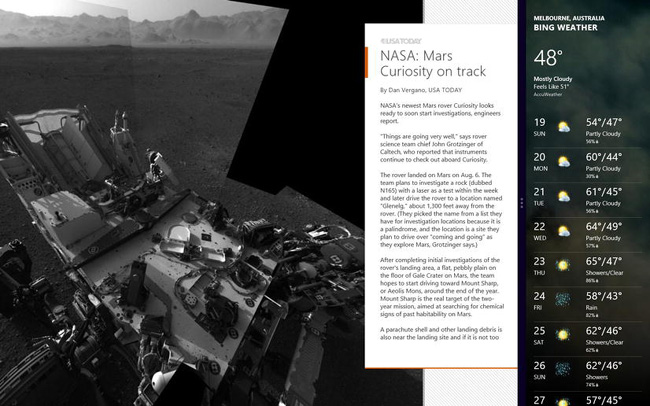
Figure 14-6. Application snapped to the side
Figure 14-7 shows the roles reversed where the USAToday application is snapped while the Bing Weather app takes center stage. You will notice that the image in the USAToday app is much smaller and the text is formatted differently.
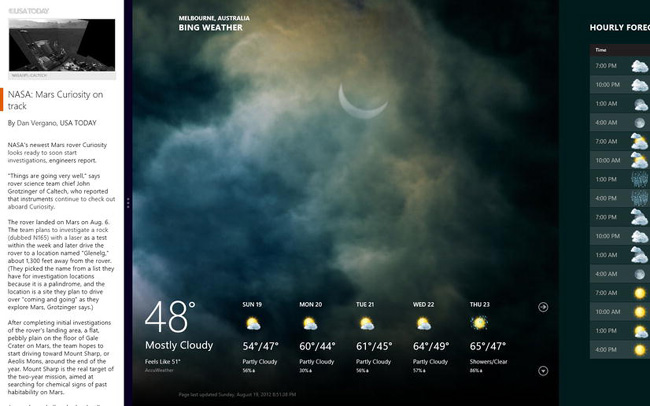
Figure 14-7. Application snapped to the side
To switch between applications in Windows 8, you simply press Alt+Tab as you used to. You can also press Windows+Tab to bring the Application-switching panel on the side as shown in Figure 14-8. This panel can be useful to see what applications are running before you switch to them.
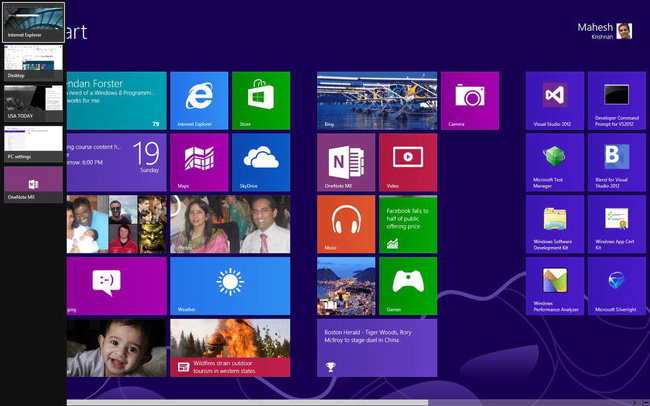
Figure 14-8. Application-switching panel
Creating Your First Windows 8 Store App
There are two main ways in which you can create Windows 8 Store apps::
- Using XAML and a language such as C#, VB.NET, or C++: In this case, the view or the UI is created using XAML. If you have written applications using WPF or Silverlight, you will already be familiar with XAML. The code behind file for XAML, where all the logic lies, is written in a language such as C#, C++, or VB.NET. In the examples used in this chapter, we stick to just XAML and C#.
- Using HMTL5, CSS, and JavaScript: In this case, the view or UI is written using HTML and CSS. The code that runs the application is written in JavaScript. Developers who currently write applications for the web may find writing applications using HTML5 and JavaScript for Windows 8 applications a lot easier.
![]() Note The choice of using XAML or HTML to write the application does not affect the way the application looks or behaves. But as WinRT is written in C++, using C++ along with XAML may give you the best results in terms of performance.
Note The choice of using XAML or HTML to write the application does not affect the way the application looks or behaves. But as WinRT is written in C++, using C++ along with XAML may give you the best results in terms of performance.
Your First Windows Store App Using XAML/C#
To write your first Windows Store application in C#, follow these steps:
- Select File
 New Project from the menu to bring up the New Project dialog box. Select the Windows Store template listed under Visual C# on the left panel to reveal a set of Windows Store app projects you can create, as shown in Figure 14-9.

Figure 14-9. Create project dialog box for a Windows Store app
- Select the Blank Application option from the list of available projects, type in a name for the project, and press OK. This will create a Windows Store project with two XAML files called
App.xamlandMainPage.xaml. In addition, you will also have additional files and folders that have been automatically generated for you. - Open the
MainPage.xamlfile in Visual Studio by double-clicking it. It will open the XAML file in the XAML designer and the screen will look similar to Figure 14-10.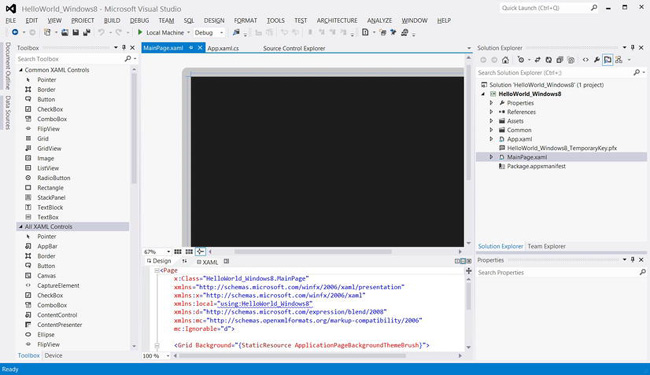
Figure 14-10. Working with an XAML file in a Windows Store project
- You will notice that the XAML UI editor has two parts to it— a design panel at the top and a text panel at the bottom that displays the XAML as text. If you've worked with XAML before in Visual Studio for creating WPF or Silverlight applications, you will already be familiar with it. A toolbox panel is available on the left of the screen that contains the controls that you can add to your Windows Store application.
- Select a
TextBoxfrom the Toolbox panel and draw a TextBoxon the design surface of the XAML UI editor. Once you've drawn it, you will notice that the Properties panel shows the properties for the added text box, as shown in Figure 14-11. If the Properties panel is not visible, press Alt+Enter.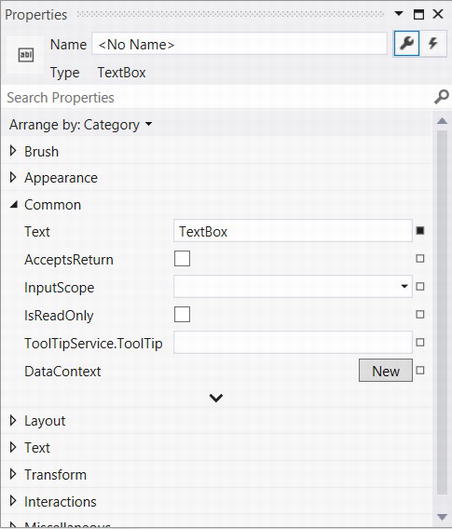
- Set the name for the text box to
txtInputin the Properties panel. This is needed to access the control from the code behind file. - Add a button and a text box to the
MainPage.xamlfile as well and set the name of theTextBlocktotxtOutput. - Increase the size of the fonts of the added controls so they look nice and big, set the button
Contentproperty to Say Hello, and clear theTextproperties of theTextBoxandTextBlock. Once you've done all that, the XAML for the file should look like the following snippet:<Page
x:Class="HelloWorld_Windows8.MainPage"
xmlns="http://schemas.microsoft.com/winfx/2006/xaml/presentation"
xmlns:x="http://schemas.microsoft.com/winfx/2006/xaml"
xmlns:local="using:HelloWorld_Windows8"
xmlns:d="http://schemas.microsoft.com/expression/blend/2008"
xmlns:mc="http://schemas.openxmlformats.org/markup-compatibility/2006"
mc:Ignorable="d">
<Grid Background="{StaticResource ApplicationPageBackgroundThemeBrush}">
<TextBox x:Name="txtInput" HorizontalAlignment="Left" Height="66" Margin="50,42,0,0" TextWrapping="Wrap" VerticalAlignment="Top" Width="414" FontSize="48"/>
<Button Content="Say Hello" HorizontalAlignment="Left" Height="66" Margin="469,42,0,0" VerticalAlignment="Top" Width="275" FontSize="36"/><TextBlock x:Name="txtOutput" HorizontalAlignment="Left" Height="151" Margin="50,113,0,0" TextWrapping="Wrap" VerticalAlignment="Top" Width="694" FontSize="48"/>
</Grid>
</Page> - Double-click the button from the XAML designer. This will create a button click handler in the code behind file and open it in the editor. Add the following line (shown in bold) to the even handler:
private void Button_Click_1(object sender, RoutedEventArgs e)

{

    txtOutput.Text = string.Format("Hello, {0}", txtInput.Text);

} - Press F5 to run the application. Type in World or any other text of your choice into the text box, hit the Say Hello button and watch the text Hello, World appear.
The App.xaml and App.xaml.cs Files
The App.xaml.cs file contains the entry point into the application. If you open the file up and look at the OnLaunched method, which gets called when the application is started up, you will notice that the MainPage class is created here. Following is the code generated with the OnLaunched method:
protected override void OnLaunched(LaunchActivatedEventArgs args)

{

    if (args.PreviousExecutionState == ApplicationExecutionState.Terminated)

    {

        //TODO: Load state from previously suspended application

    }


    // Create a Frame to act navigation context and navigate to the first page

    var rootFrame = new Frame();

    rootFrame.Navigate(typeof(MainPage));

    // Place the frame in the current Window and ensure that it is active Window.Current.Content = rootFrame; Window.Current.Activate();

}
The App.xaml file contains resource dictionaries that hold styles and templates common to the whole application. If you open the file, you will see that it includes one resource dictionary called Common/StandardStypes.xaml. This file contains standard styles of the resources that you can use in your Windows Store app. The markup in App.xaml file follows:
<Application

    x:Class="HelloWorld_Windows8.App"

    xmlns="http://schemas.microsoft.com/winfx/2006/xaml/presentation"

    xmlns:x="http://schemas.microsoft.com/winfx/2006/xaml"

    xmlns:local="using:HelloWorld_Windows8">

    <Application.Resources>

        <ResourceDictionary>

            <ResourceDictionary.MergedDictionaries>
                <!--

                    Styles that define common aspects of the platform look and feel

                    Required by Visual Studio project and item templates

                 -->

                <ResourceDictionary Source="Common/StandardStyles.xaml"/>

            </ResourceDictionary.MergedDictionaries>

        </ResourceDictionary>

    </Application.Resources>

</Application>
Assets and Common Folder
If you open up the Solution Explorer to look at the auto-generated files and folders, you will notice two folders—one called Assets and the other called Common (see Figure 14-12).
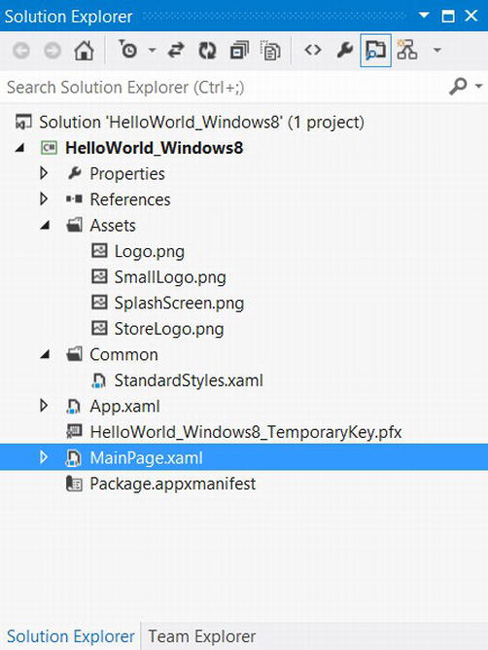
Figure 14-12. Solution Explorer showing folders created by default—Assets and Common
The Assets folder contains images that are used for the logo, the splash screen (when the application is starting up), and the image to be used when the application is published to the Windows Store.
The Common folder, according to the documentation, contains classes and XAML styles that simplify application development. You would have seen that the StandardStyles.xaml file is used as a resource dictionary in the previous section. New files get added in this folder when you add new items to the project. For instance, if you add a Basic Page from the Add New Item dialog box, a bunch of files get added under this folder.
The Manifest File
You saw in the previous section that the Assets folder contains images that can be used for logos within the application. But how does Windows know which image to use and for what? This is where the application manifest file comes into play.
If you double-click the Package.appxmanifest file from the Solution Explorer, it will open the manifest file within Visual Studio. The manifest file opened in Visual Studio is shown in Figure 14-13 and contains four tabs—Application UI, Capabilities, Declaration, and Packaging.
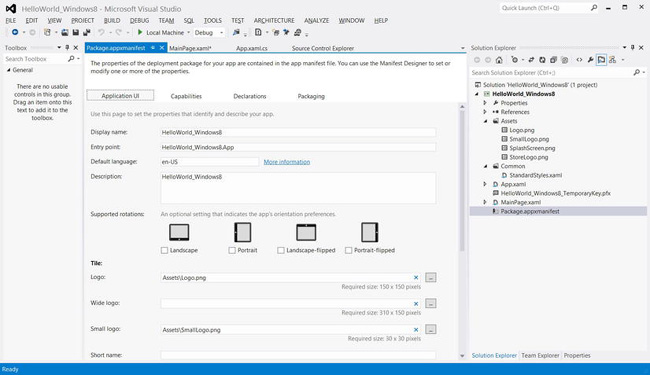
Figure 14-13. The manifest file of a Windows Store app
- Application UI: This tab contains the options to set the name, entry point, images for logos, supported initial rotations, and so forth.
- Capabilities: This contains the capabilities that the application will use. Options include items such as use of document library, webcam, microphone, removable storage, the Internet, and so on.
- Declarations: This tab contains declarations for the applications. Declarations are used to specify features such as whether this application will be a share target, whether it can provide search, and so forth.
- Packaging: This tab is used to set properties that will be used to package the application before it is deployed to Windows Store.
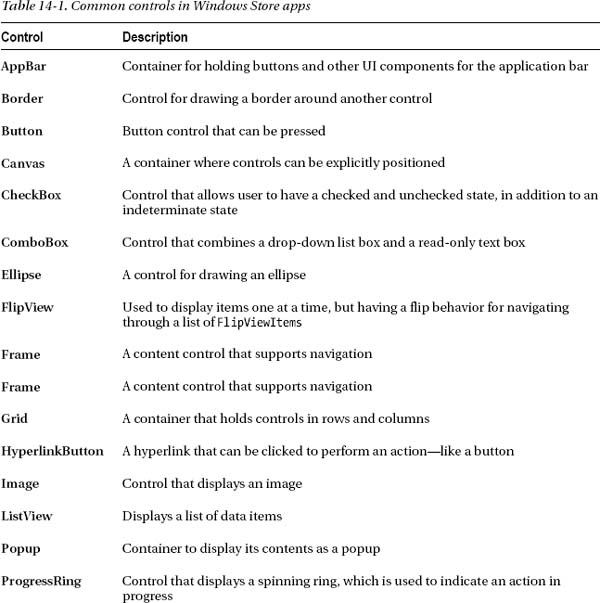
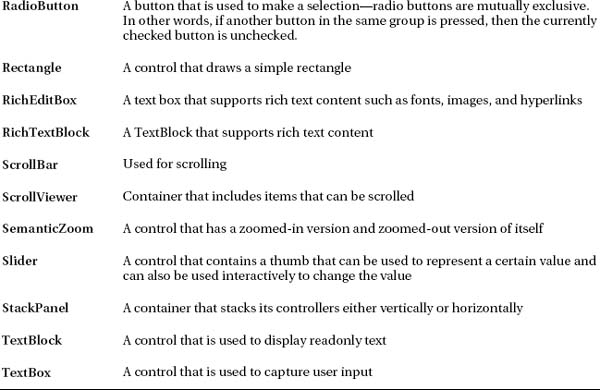
Controls in Windows Store Apps
If you are already familiar with Silverlight or WPF, you will feel right at home with the controls in Windows 8. You will find that most of the controls that you've been using in WPF or Silverlight are also present in Windows 8. Table 14-1 lists some of the popular controls.
Laying Out Controls
There are a whole bunch of containers, such as Grid, StackPanel, WrapGrid, and ScrollViewer, that can be used to lay out your controls. The most commonly used container is Grid, which is the default container when you create pages in a Windows Store app from Visual Studio.
The usage of a Grid control is very similar to its counterpart in WPF and Silverlight. You initialize a set of Column and Grid definitions in XAML and add controls to individual cells of the grid. The following is a sample XAML snippet for a Grid control:
    <Grid Background="{StaticResource ApplicationPageBackgroundThemeBrush}">

        <Grid.ColumnDefinitions>

            <ColumnDefinition Width="121*"/>

            <ColumnDefinition Width="562*"/>

        </Grid.ColumnDefinitions>

        <Grid.RowDefinitions>

            <RowDefinition Height="50*"/>

            <RowDefinition Height="60*"/>

            <RowDefinition Height="500*"/>

        </Grid.RowDefinitions>

        <Button Content="Button 1"  />

        <Button Content="Button 2" Grid.Column="1"/>
        <Button Content="Button 3" Grid.Column="1"  Grid.Row="1" />

    </Grid>
A StackPanel is another container that is very simple to use. All you need to do is add controls to it, and it automatically places them either vertically or horizontally based on the Orientation property. The following is a sample XAML snippet for a StackPanel:
<StackPanel  Orientation="Horizontal">

    <Button Content="Button 1"  />

    <Button Content="Button 2" />

    <Button Content="Button 3" />

</StackPanel>
You will notice that the XAML for these controls are exactly the same as the ones used for Silverlight or WPF. Other containers such as Canvas or ScrollViewer also work the same.
A Look at Some Windows 8 App Specific Controls
Controls for Windows 8 apps, such as Button, TextBox, and ListBox, work exactly like their WPF and Silverlight counterparts. In addition to these controls, there are some new controls that have been added to help with the Modern UI style. Let's look at a few of them.
The AppBar
Earlier in this chapter, we saw how the AppBar is used in Windows Store applications (Figure 14-3). To add an AppBar to your application, all you need to do is drag and drop the AppBar control from the toolbox on to your page and configure its properties.
The buttons in the AppBar use a special style called AppBarButtonStyle that is defined in the StandardStyles.xaml file that gets auto-generated for you when you create the file in Visual Studio. The font used in the AppBar buttons is Segoe UI Symbols. This font provides symbols that allow you to display Windows 8 style icons in these buttons. In the following markup, the AppBar is placed at the bottom of the page and contains four buttons in a horizontal StackPanel—one each for the different symbols in a deck of playing cards, as shown in Figure 14-14. This AppBar will automatically show up when the user presses the right button when the application is running (or do the right swipe action in the case of a tablet).
<Page
x:Class="Win8Controls.MainPage"
xmlns="http://schemas.microsoft.com/winfx/2006/xaml/presentation"
xmlns:x="http://schemas.microsoft.com/winfx/2006/xaml"
xmlns:local="using:Win8Controls"
xmlns:d="http://schemas.microsoft.com/expression/blend/2008"
xmlns:mc="http://schemas.openxmlformats.org/markup-compatibility/2006"
mc:Ignorable= "d">
<Page.BottomAppBar>
<AppBar HorizontalContentAlignment= "Stretch" Height= "88" VerticalContentAlignment= "Stretch" >
<StackPanel Grid.Column= "1" Orientation= "Horizontal">
<Button Content= "♡" Style= "{StaticResource AppBarButtonStyle}" AutomationProperties.Name= "Heart" />
<Button Content= "♢" Style= "{StaticResource AppBarButtonStyle}" AutomationProperties.Name= "Diamond"/>
<Button Content= "♤" Style= "{StaticResource AppBarButtonStyle}" AutomationProperties.Name= "Spade"/>
<Button Content= "♧" Style= "{StaticResource AppBarButtonStyle}" AutomationProperties.Name= "Clover"/>
</StackPanel>
</AppBar>
</Page.BottomAppBar>
…
</Page>
![]() Tip To find out what the symbols in Sego UI Symbol font look like and to use them in your application, you can use the Insert Symbol dialog box from Microsoft Word. Just browse through the symbols present, choose a symbol, insert it into Word, and then cut and paste it into your application. Although you can paste the symbol directly into the Content of a button, the preferred approach is to paste the hexadecimal value as in the previous snippet.
Tip To find out what the symbols in Sego UI Symbol font look like and to use them in your application, you can use the Insert Symbol dialog box from Microsoft Word. Just browse through the symbols present, choose a symbol, insert it into Word, and then cut and paste it into your application. Although you can paste the symbol directly into the Content of a button, the preferred approach is to paste the hexadecimal value as in the previous snippet.

Figure 14-14. Sample app with an AppBar
In addition to the style AppBarButtonStyle in StandardStyles.xaml, there are a few other styles for commonly used button types. These styles are, however, commented out, as you may not require all of them. To use them in your own markup, uncomment these styles from StandardStyles.xaml and simply use them in your own code. For example, to display buttons with Yes, No, or Edit in the AppBar, you need to find the styles YesAppBarButtonStyle, NoAppBarButtonStyle, and EditAppBarButtonStyle in StandardStyles.xaml and uncomment them. You can then simply specify the style:
       <AppBar HorizontalContentAlignment="Stretch" Height="88" VerticalContentAlignment="Stretch" >

            <StackPanel Grid.Column="1" Orientation="Horizontal">

                <Button Style="{StaticResource YesAppBarButtonStyle}" />

                <Button Style="{StaticResource NoAppBarButtonStyle}" />

                <Button Style="{StaticResource EditAppBarButtonStyle}" />

            </StackPanel>

        </AppBar>
You can explore all the pre-defined button styles by looking in the StandardStyles.xaml file
The FlipView
When you have a list of items that need to be displayed one at a time, such as a series of images, then the FlipView control can be used. Figure 14-15 shows an example of a FlipView in action. You will be able to flip between the images in the example by just swiping your finger across or clicking the arrows that appear on the sides.
A very simple example of a FlipView control is shown in the following markup:
  <StackPanel Background="{StaticResource ApplicationPageBackgroundThemeBrush}">

        <TextBlock Margin="30" Style="{StaticResource HeaderTextStyle}" Text="FlipView Example" />

        <FlipView Margin="30">

            <FlipViewItem>

                <Image Source="Images/Image1.JPG" />

            </FlipViewItem>

            <FlipViewItem>

                <Image Source="Images/Image2.JPG" />

            </FlipViewItem>

            <FlipViewItem>

                <Image Source="Images/Image3.JPG" />

            </FlipViewItem>

        </FlipView>

    </StackPanel>

Figure 14-15. A FlipView example
As seen in the markup, FlipView is merely a collection of FlipViewItem objects. Each FlipViewItem can contain other controls in them, but like a list box, you can also specify an ItemTemplate that defines the databinding and the view of individual fields:
<FlipView ItemsSource="{Binding Source={StaticResource mySource}}">

    <FlipView.ItemTemplate>

        <DataTemplate>

             <StackPanel Margin="20">

                 <TextBlock Text="{Binding Title}" FontSize="32" />

                 <Image Source="{Binding Image}" />

             </StackPanel>

        </DataTemplate>

    </FlipView.ItemTemplate>

</FlipView>
CarouselPanel
The CarouselPanel helps you to scroll through a list of items using simple finger gestures. When you reach the end of the list, the carousel automatically starts from the beginning. You can also use the mouse scrollview and scrollbar to scroll, but this control comes in very handy with finger swipes. A very simple XAML implementation that allows you to scroll through a small set of images is shown in the following code snippet:
      <ListBox Width="300" Height="700"  HorizontalAlignment="Left"  >

            <ListBoxItem>
                <Image Source= "Images/Image1.JPG" />

            </ListBoxItem>

            <ListBoxItem>

                <Image Source= "Images/Image2.JPG" />

            </ListBoxItem>

            <ListBoxItem>

                <Image Source= "Images/Image3.JPG" />

            </ListBoxItem>

            <ItemControl.ItemsPanel>

                <ItemsPanelTemplate >

                    <CarouselPanel  />

                </ItemsPanelTemplate>

            </ListBox.ItemsPanel>

        </ListBox>
The resulting image will look like Figure 14-16. You will notice how as you scroll past the last item in the list, the first item starts appearing again.
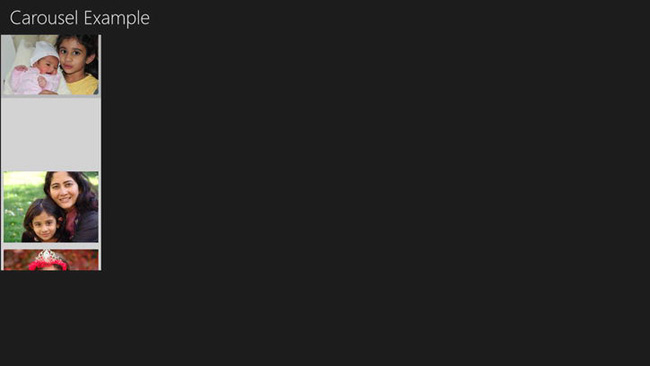
Figure 14-16. CarouselPanel starting to display the first item as it scrolls past the last item
![]() Note The
Note The CarouselPanel can only be used with a ItemsControl.
SemanticZoom
SemanticZoom is used to display and navigate through a large set of data. Like the other controls we've discussed in this section, the SemanticZoom control is also heavily optimized for touch gestures. It allows you to tap, swipe, pinch, and stretch with your fingers to navigate through large amounts of data.
The SemanticZoom control has two zoom modes:
- Zoomed-in mode where you can look at items in a fine-grained way
- Zoomed-out mode where you can look at items in a coarse-grained way, usually by some kind of grouping
To see how this works, drag and drop the SemanticZoom control on to an empty page. The markup that gets generated for you looks like the following:
<SemanticZoom>

    <SemanticZoom.ZoomedInView>

        <GridView/>

    </SemanticZoom.ZoomedInView>

    <SemanticZoom.ZoomedOutView>

        <ListView/>

    </SemanticZoom.ZoomedOutView>

</SemanticZoom>
As you can see, there is a ZoomedInView and a ZoomedOutView element in the generated markup. Inside these markups, you will find empty GridView and ListView controls. You need to replace these empty views with the right markup to get the SemanticZoom to work.
Figure 14-17 shows a zoomed-in view, and Figure 14-18 shows a zoomed-out view of a simple book collection. The book collection is grouped by genre, and as you can see from the figure, when the SemanticZoom is zoomed out, only the genre is shown, and when it is zoomed in, it shows details of all the books under each genre.
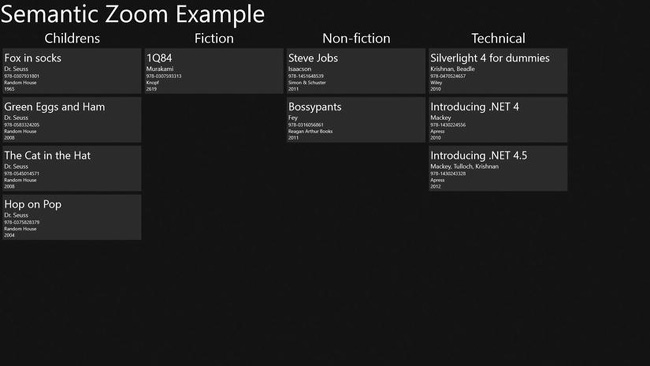
Figure 14-17. Zoomed-in view in a SemanticZoom control
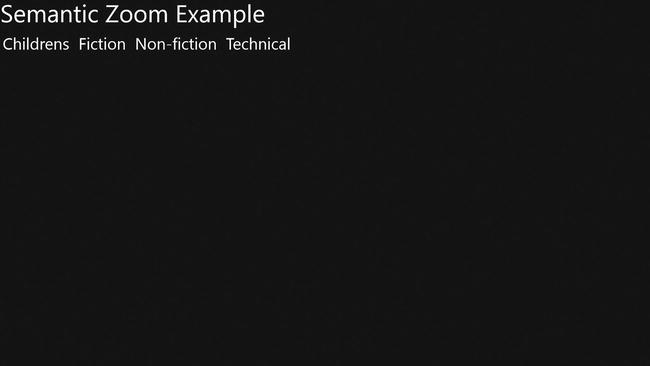
Figure 14-18. Zoomed-out view in a SemanticZoom control
In order for this example to work, follow these steps:
- From Visual Studio, select File New Project… to bring up the New Project dialog box. Select the Windows Store style template on the left panel in the dialog box and then select Blank Application from the project template list. Change the name of the application to
SemanticZoom. - Open the
MainPage.xamlfile and add a resource section by adding the following markup to the file:<Page
x:Class="SemanticZoom.MainPage"
xmlns="http://schemas.microsoft.com/winfx/2006/xaml/presentation"
xmlns:x="http://schemas.microsoft.com/winfx/2006/xaml"
xmlns:local="using:SemanticZoom"
xmlns:d="http://schemas.microsoft.com/expression/blend/2008"
xmlns:mc="http://schemas.openxmlformats.org/markup-compatibility/2006"
mc:Ignorable= "d">
<Page.Resources>
<CollectionViewSource x:Name="BookCollection" IsSourceGrouped="True" ItemsPath="Items"/>
<DataTemplate x:Key="BookTemplate">
<Border Background="{StaticResource ListViewItemPlaceholderBackgroundThemeBrush }">
<StackPanel Margin="5" HorizontalAlignment="Left" Width="400">
<TextBlock Text="{Binding Title}" FontSize="32" />
<TextBlock Text="{Binding Authors}" FontSize="18"/>
<TextBlock Text="{Binding Isbn}" FontSize="14"/>
<TextBlock Text="{Binding Publisher}" FontSize="14"/>
<TextBlock Text="{Binding YearPublished}" FontSize="14"/>
</StackPanel></Border>
</DataTemplate>
</Page.Resources>
…
</Page>This markup creates a static resource called
BookCollection, to which we are going to add a list of books. The propertyIsSourceGroupedis set to true to indicate that we will be grouping the list, and the propertyItemsPathis used to identify the name of the property that contains the list of items in that group. In addition, we've also added a data template calledBookTemplateto display an object with the propertiesTitle,Authors,Isbn,Publisher, andYearPublished. - Replace the
Gridpresent in the file with the following markup:…
</Page.Resources>
<StackPanel Background="{StaticResource ApplicationPageBackgroundThemeBrush }">
<TextBlock Text="Semantic Zoom Example" FontSize="72"/>
<SemanticZoom HorizontalAlignment="Left" >
<SemanticZoom.ZoomedInView>
<GridView x:Name="ZoomIn" Height="700" SelectionMode="None"
ItemsSource="{Binding Source={StaticResource BookCollection}}"
ItemTemplate="{StaticResource BookTemplate}"
VerticalAlignment="Center">
<GridView.GroupStyle>
<GroupStyle>
<GroupStyle.HeaderTemplate>
<DataTemplate>
<StackPanel HorizontalAlignment="Center">
<TextBlock Text="{Binding Genre}" FontSize="40" HorizontalAlignment="Center"/>
</StackPanel>
</DataTemplate>
</GroupStyle.HeaderTemplate>
</GroupStyle>
</GridView.GroupStyle>
</GridView>
</SemanticZoom.ZoomedInView>
<SemanticZoom.ZoomedOutView>
<ListView x:Name="ZoomOut" Height="700" SelectionMode="None" VerticalAlignment="Center" >
<ListView.ItemTemplate>
<DataTemplate>
<TextBlock Text="{Binding Group.Genre}" FontSize="48" />
</DataTemplate>
</ListView.ItemTemplate>
<ListView.ItemsPanel><ItemsPanelTemplate>
<StackPanel Orientation="Horizontal" />
</ItemsPanelTemplate>
</ListView.ItemsPanel>
</ListView>
</SemanticZoom.ZoomedOutView>
</SemanticZoom>
</StackPanel>
</Page>This markup adds two controls to the page—a
TextBlockto hold the title of the application and aSemanticZoomcontrol. TheSemanticZoom'sZoomedInViewcontains aGridViewcontrol that is databound to theBookCollectionobject we added as a static resource in Step 2. TheSematicZoom'sZoomedOutViewcontains a list panel that just displays the different genres. - Open the file
MainPage.xaml.csand add a method calledInitDataas shown:private void InitData()
{
var data = new[]
{
new { Title="Silverlight 4 for dummies", Isbn="978-0470524657 " , Publisher="Wiley", Authors="Krishnan, Beadle" , YearPublished="2010" , Genre="Technical" },
new { Title="Introducing .NET 4", Isbn="978-1430224556" , Publisher="Apress", Authors="Mackey" , YearPublished="2010" , Genre="Technical" },
new { Title="Introducing .NET 4.5", Isbn="978-1430243328" , Publisher="Apress", Authors="Mackey, Tulloch, Krishnan" , YearPublished="2012" , Genre="Technical" },
new { Title="Fox in socks", Isbn="978-0307931801" , Publisher="Random House ", Authors="Dr. Seuss" , YearPublished="1965" , Genre="Childrens" },
new { Title="Green Eggs and Ham ", Isbn="978-0583324205 " , Publisher="Random House ", Authors="Dr. Seuss" , YearPublished="2008" , Genre="Childrens" },
new { Title="The Cat in the Hat", Isbn="978-0545014571 " , Publisher="Random House ", Authors="Dr. Seuss" , YearPublished="2008" , Genre="Childrens" },
new { Title="Hop on Pop", Isbn="978-0375828379 " , Publisher="Random House", Authors="Dr. Seuss" , YearPublished="2004" , Genre="Childrens" },
new { Title="Steve Jobs", Isbn="978-1451648539 " , Publisher="Simon & Schuster", Authors="Isaacson" , YearPublished="2011" , Genre="Non-fiction" },
new { Title="Bossypants", Isbn="978-0316056861" , Publisher="Reagan Arthur Books", Authors="Fey" , YearPublished="2011" , Genre="Non-fiction" },
new { Title="1Q84", Isbn="978-0307593313" , Publisher="Knopf", Authors="Murakami" , YearPublished="2619" , Genre="Fiction" },
};
var query = from item in data
orderby item.Genre
group item by item.Genre into g
select new { Genre = g.Key, Items = g };
BookCollection.Source = query.ToList();
ZoomOut.ItemsSource = BookCollection.View.CollectionGroups;
}This code creates a sample data for a collection of books, and we've also got a LINQ query that groups the data based on their genre. In addition, the source of the
BookCollectionobject declared in the resources is set and theZoomOutListViewcontrol'sItemsSourceis set. - From the constructor of the page, call
InitDatato initialize the data:public MainPage()
{
this.InitializeComponent();
InitData();
} - Now press F5 to run the application. The application will open up in the zoomed-in view. If you use your scroll wheel, while pressing down the Control button (zoom out) or just pinching the display with your fingers, the zoomed-out view will be visible.
- To zoom in again, you can either click on the genre grouping or stretch the screen with your fingers.
Sharing Data with Other Applications
One of the nice things about Windows Store apps is the ability to share information from your application with others. To see how this works, follow these steps:
- Create a new Windows Store blank app project. You can give it any name you want, but I've chosen the name
ShareSource. - Open
MainPage.xamlfile and replace the content with the following XAML:<Page
x:Class="ShareSource.MainPage"
IsTabStop="false"
xmlns="http://schemas.microsoft.com/winfx/2006/xaml/presentation"
xmlns:x="http://schemas.microsoft.com/winfx/2006/xaml"
xmlns:local="using:ShareSource"
xmlns:d="http://schemas.microsoft.com/expression/blend/2008"
xmlns:mc="http://schemas.openxmlformats.org/markup-compatibility/2006"
mc:Ignorable="d">
<StackPanel Background="{StaticResource ApplicationPageBackgroundThemeBrush}">
<TextBlock Text="Sharing Text Application" Style="{StaticResource HeaderTextStyle}" />
<TextBox x:Name="txtShare" Margin="40" AcceptsReturn="True" Height="300" FontSize="24" />
</StackPanel>
</Page>This adds two controls to the display, one TextBlock for the title of the application, and one TextBox that will hold the contents of the text that needs to be shared with other applications.
- Open the
MainPage.xaml.csfile and modify theOnNavigatedTomethod as shown in the following code snippet:protected override void OnNavigatedTo(NavigationEventArgs e)
{
DataTransferManager.GetForCurrentView().DataRequested += _dataTransferManager_DataRequested;
}This adds an event handler for the current view when data is requested.
- Now, add an event handler method that sends the text data from the text box by setting properties in the
DataRequestedEventArgsparameter that is passed to the event as shown in the following code snippet:void _dataTransferManager_DataRequested(DataTransferManager sender, DataRequestedEventArgs args)
{
var textToShare = txtShare.Text;
var requestData = args.Request.Data;
requestData.Properties.Title = "Sharing text for textbox";
requestData.Properties.Description = textToShare;
if (!String.IsNullOrEmpty(textToShare))
{
requestData.SetText(textToShare);
}
else
{
args.Request.FailWithDisplayText("Textbox is empty");
}
}The
DataPackageobject calledrequestDatacontains methods such asSetText,SetUri, andSetBitmapthat are used to pass data from the screen on to other applications that can accept such data. - Now press F5 to run the application. If you invoke the Share charm without typing anything into the text box, you will see the message “Textbox is empty” as shown in Figure 14-19.
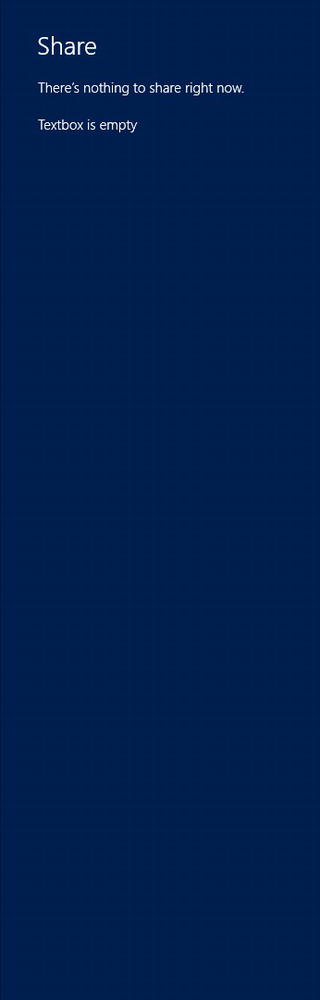
Figure 14-19. Message from the application when there is nothing to share
If you entered any text into the text box, the Share panel will show all the applications that can consume the text content. In this case, there is only one application—Mail, as shown in Figure 14-20.
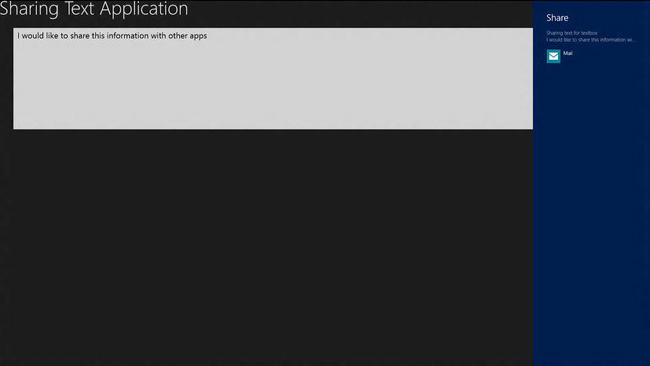
Figure 14-20. Sharing text from the text box
Picking Data from Other Applications
In the previous section, you saw how your application can be ShareSource, but typically, you want to create applications that can also be a ShareTarget. In other words, you want applications that consume data from other applications. To create a simple application that consumes text data (which is an inverse of the previous example), follow these steps:
- Create a new Windows Store blank app project. You can give it any name you want, but I've chosen the name
ShareTargetApp. - Right-click the project from the Solution Explorer and choose Add New Item…
- In the Add New Item dialog box, select Share Target Contract, change the name of the file to
ShareTargetPage.xaml, and press OK. - You will be prompted with a message box to add certain dependencies into the project automatically. Press Yes to add the files automatically. This will add files to the common folder, create a
ShareTargetPage.xamlfile, make modifications to the application manifest file, and also changes to theApp.xaml.csfile. - Press F5 to run the application. You will notice that all you get is an empty screen. This is because you haven't made any changes to the
MainPage.xamlfile, and as we want to keep this example simple, this is totally fine. Press Alt+F4 to close the application. We really want to invoke this application from another application that wants to share data with it. - Now, run the
ShareSourceexample that we created in the previous section, type something in to the text box, and invoke the Share Charm. You will notice that theShareTargetAppwill also be shown in the list of apps with which you can share data, as shown in Figure 14-21.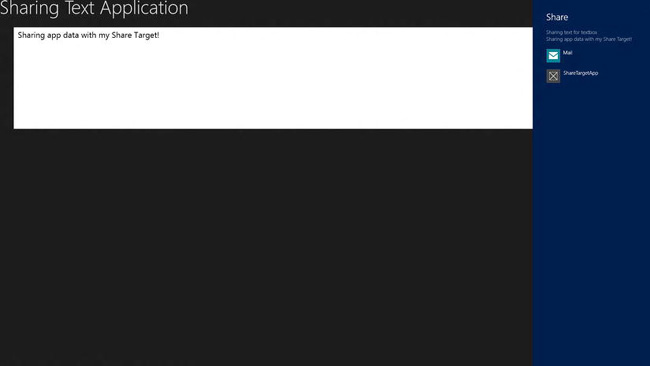
Figure 14-21. Sharing data with our Share Target
- Choose the
ShareTargetAppfrom the Charms menu. This will display a panel for sharing data with theShareTargetApp, as shown in Figure 14-22.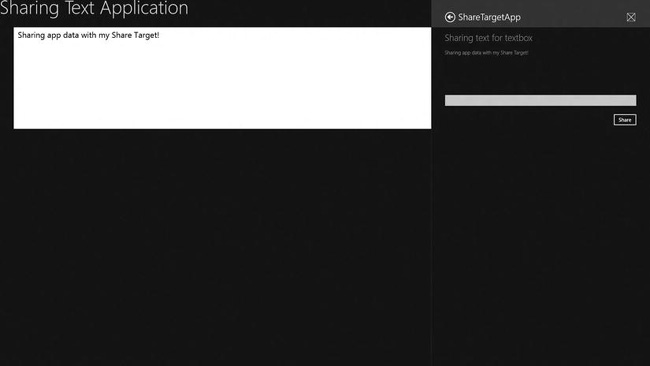
- You can type some additional comments in the field shown and press Share to start sharing the data with the
ShareTargetApp.
The Magic That Binds It All Together
I am sure the first question that comes to your mind is How does the ShareSource application know that it can share information with the ShareTargetApp? The answer to that lies in the application manifest file. When you added the Share Target Contract item to the project, Visual Studio automatically updated the application manifest file to specify which data formats can be shared with this application. To manually set this, open the Package.appxmanifest file from the Solution Explorer by double-clicking it. Open the Declarations tab, which should look like Figure 14-23.
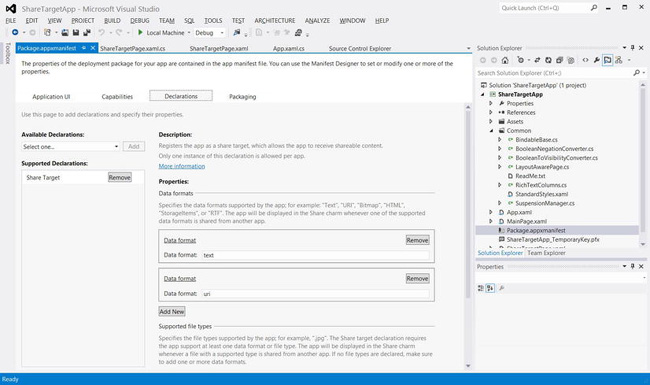
Figure 14-23. Declarations tab in the manifest file
The Share Target declaration is used by Windows 8 apps to specify that it can act as a share target, and the Data Formats Properties section allows you to specify what data formats you can use within your application. In this example, it supports both text and URI. You can also add file types that this application can support by adding them in the Supported file types section.
Invoking the Share Target UI
In the previous example, the file that Visual Studio code generated to display the user interface when invoked as a share target from another application is ShareTargetPage.xaml. You can change this file to suit your application needs, but a very simple way of extending it is to replace the to-do comments in the XAML that was generated:
<common:LayoutAwarePage

    x:Name="pageRoot"

    x:Class="ShareTargetApp.ShareTargetPage"

    DataContext="{Binding DefaultViewModel, RelativeSource={RelativeSource Self}}"

    IsTabStop="false"

    xmlns="http://schemas.microsoft.com/winfx/2006/xaml/presentation"

    xmlns:x="http://schemas.microsoft.com/winfx/2006/xaml"

    xmlns:local="using:ShareTargetApp"

    xmlns:common="using:ShareTargetApp.Common"

    xmlns:d="http://schemas.microsoft.com/expression/blend/2008"

    xmlns:mc="http://schemas.openxmlformats.org/markup-compatibility/2006"
    mc:Ignorable="d"

    d:ExtensionType="ShareTarget">


    <Page.Resources>

        <common:BooleanToVisibilityConverter x:Key="BooleanToVisibilityConverter"/>

        <common:BooleanNegationConverter x:Key="BooleanNegationConverter"/>

    </Page.Resources>


    <!--

        This grid acts as a root panel for the page that defines three rows:

        * Row 0 contains the standard share target header.

        * Row 1 contains a TextBox for adding a comment.

        * Row 2 contains the standard share target footer.

    -->

    <Grid Style="{StaticResource LayoutRootStyle}">

        <Grid Margin="40,20,40,60">

            <Grid.RowDefinitions>

                <RowDefinition Height="180"/>

                <RowDefinition Height="Auto"/>

                <RowDefinition Height="*"/>

            </Grid.RowDefinitions>

            <Grid.ColumnDefinitions>

                <ColumnDefinition Width="Auto"/>

                <ColumnDefinition Width="*"/>

            </Grid.ColumnDefinitions>

            <!-- The standard share target header displays metadata about the shared item -->

            <Image

                Source="{Binding Image}"

                Stretch="Uniform"

                Visibility="{Binding ShowImage, Converter={StaticResource BooleanToVisibilityConverter}}"

                VerticalAlignment="Top"

                MinWidth="80"

                MinHeight="80"

                MaxWidth="240"

                MaxHeight="160"

                Margin="0,0,20,0"/>

            <StackPanel Grid.Column="1">

                <TextBlock

                    Text="{Binding Title}"

                    Margin="0,-10,0,20"

                    TextWrapping="NoWrap"

                    Foreground="{StaticResource ApplicationSecondaryForegroundThemeBrush}"

                    Style="{StaticResource SubheaderTextStyle}"/>

                <TextBlock

                    Text="{Binding Description}"

                    MaxHeight="60"

                    Foreground="{StaticResource ApplicationSecondaryForegroundThemeBrush}"

                    Style="{StaticResource BodyTextStyle}"/>

            </StackPanel>

            <Grid Grid.Row="1" Grid.ColumnSpan="2">

                <!-- TODO: Add application scenario-specific sharing UI -->
</Grid>
<TextBox
Grid.Row="1"
Grid.ColumnSpan="2"
Margin="0,0,0,27"
Text="{Binding Comment}"
Visibility="{Binding SupportsComment, Converter={StaticResource BooleanToVisibilityConverter}}"
IsEnabled="{Binding Sharing, Converter={StaticResource BooleanNegationConverter}}"/>
<!-- Standard share target footer -->
<Grid Grid.Row="2" Grid.ColumnSpan="2">
<ProgressRing
IsActive="{Binding Sharing}"
MinWidth="20"
MinHeight="20"
HorizontalAlignment="Left"
VerticalAlignment="Top"
Margin="0,5,0,0"/>
<TextBlock
Text="Sharing…"
Visibility="{Binding Sharing, Converter={StaticResource BooleanToVisibilityConverter}}"
HorizontalAlignment="Left"
Margin="25,0,0,0"
Style="{StaticResource ItemTextStyle}"/>
<Button
AutomationProperties.AutomationId="ShareButton"
AutomationProperties.Name="Share"
TabIndex="1"
Content="Share"
IsEnabled="{Binding Sharing, Converter={StaticResource BooleanNegationConverter}}"
HorizontalAlignment="Right"
VerticalAlignment="Top"
Margin="0,-5,-3,0"
Click="ShareButton_Click"/>
</Grid>
</Grid>
</Grid>
</common:LayoutAwarePage>
In the code behind of this file, you need to replace the to-do section in comments to perform whatever action you want to do when data is shared with your application:
private void ShareButton_Click(object sender, RoutedEventArgs e)

{

    this.DefaultViewModel["Sharing"] = true;

    this._shareOperation.ReportStarted();


    // TODO: Perform work appropriate to your sharing scenario using

    //       this._shareOperation.Data, typically with additional information captured
    //       through custom user interface elements added to this page such as

    //       this.DefaultViewModel["Comment"]


    this._shareOperation.ReportCompleted();

}
In addition to this file, Visual Studio also makes some modifications to App.xaml.cs, so that it calls the Activate method on the ShareTargetPage class when the share target is invoked:
protected override void OnShareTargetActivated

(Windows.ApplicationModel.Activation.ShareTargetActivatedEventArgs args)

{

    var shareTargetPage = new ShareTargetApp.ShareTargetPage();

    shareTargetPage.Activate(args);

}
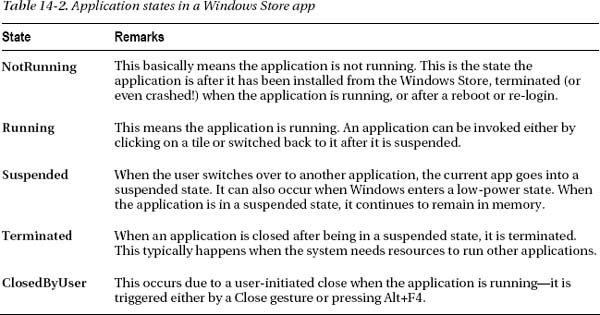
Handling the Life Cycle of a Windows Store App
A Windows Store application, as mentioned in an earlier section, runs only when it is the active application. When another application is started, the currently running application is suspended, and the other application becomes the active application. When you switch back to the suspended application, it becomes the active one, and any other application that was running becomes suspended. When the operating system needs more resources, it terminates a suspended application and it moves to a terminated state. There are also other states the application can be in, as explained in Table 14-2.
When an application is run, you need to check in your startup script what the previous state was and perform some actions accordingly. In particular, you should check if your application was terminated. If it was, then you need to restore the application's previous session state and continue from where the user left off. This could mean switching the user to the right screen and restoring the fields and scroll position to exactly the same state as they were when the user switched away from the application.
So, where do you store session data and how do you do it? The answer to the first question is simple—in local storage. The answer to the second question is a little bit more complicated, but you do it using the SuspensionManager. The SuspensionManager is a class that gets automatically generated when you add a Basic Page to your project (by right-clicking the project in Solution Explorer and choosing Add ![]() New Item). The Basic Page template also generates a class called
New Item). The Basic Page template also generates a class called LayoutAwarePage, which has virtual methods called LoadState and SaveState that you override in your derived classes. The page that the Basic Page template generates is also derived from LayoutAwarePage.
The SuspensionManager class has a method called RegisterFrame, which allows the navigation history of the frame to be saved and restored by the session manager. The SuspensionManager also has methods called SaveAsync and RestoreAsync that take care of saving and retrieving the session data using local storage.
![]() Tip While debugging your application from Visual Studio, the Windows Store application doesn't really get suspended. So, how can you test it? The answer is simple—Visual Studio has a toolbar called Debug Location. The toolbar contains options to Suspend, Resume, and Suspend and shutdown. This can be used to put the application in the state you desire.
Tip While debugging your application from Visual Studio, the Windows Store application doesn't really get suspended. So, how can you test it? The answer is simple—Visual Studio has a toolbar called Debug Location. The toolbar contains options to Suspend, Resume, and Suspend and shutdown. This can be used to put the application in the state you desire.
To see how this all falls together, follow this example:
- Create a new blank app project. You can give it any name you want, but I've chosen the name
LifeCycleSampleApp. - Right-click the project from Solution Explorer and choose Add New Item… When the Add New Item dialog box appears, select the Basic Page template from the list, change the name of the file to
BasicPage.xaml, and press OK. You will be prompted whether you want to add missing files automatically. Press Yes. This will not only add theBasicPage.xamlfile to your project, but also add a whole heap of files such asSuspensionManager.csandLayoutAwarePage.cs - Open the
App.xaml.csfile and add the following line to the top of the file:using LifeCycleSampleApp.Common;This ensures that we can use the
SuspensionManagerclass in theApp.xaml.csfile. - Change the method
OnLaunchedto be async and also call theRestoreAsyncmethod present in theSuspensionManagermanager as shown in the following code snippet:protected override async void OnLaunched(LaunchActivatedEventArgs args)
{
// Do not repeat app initialization when already running, just ensure that
// the window is active
if (args.PreviousExecutionState == ApplicationExecutionState.Running)
{Window.Current.Activate();
return;
}
if (args.PreviousExecutionState == ApplicationExecutionState.Terminated)
{
//TODO: Load state from previously suspended application
await SuspensionManager.RestoreAsync();
}
// Create a Frame to act navigation context and navigate to the first page
var rootFrame = new Frame();
if (!rootFrame.Navigate(typeof(MainPage)))
{
throw new Exception("Failed to create initial page");
}
// Place the frame in the current Window and ensure that it is active
Window.Current.Content = rootFrame;
Window.Current.Activate();
} - Before the application restores the state, it needs to be saved. To do that, modify the
OnSuspendingmethod to call theSaveAsyncmethod present in theSuspensionManageras shown:private async void OnSuspending(object sender, SuspendingEventArgs e)
{
var deferral = e.SuspendingOperation.GetDeferral();
//TODO: Save application state and stop any background activity
await SuspensionManager.SaveAsync();
deferral.Complete();
} - The code generated
App.xaml.csfile navigates to theMainPage.xamlat startup. You can either change theMainPageclass to derive from theLayoutAwarePagebase class or change theApp.xaml.csfile to load theBasicPageclass you created. For this example, use the latter. In addition, you also need to register the frame with theSuspensionManager. Replace theOnLaunchedmethod as shown to allow for these changes:protected async override void OnLaunched(LaunchActivatedEventArgs args)
{
// Do not repeat app initialization when already running, just ensure that
// the window is active
if (args.PreviousExecutionState == ApplicationExecutionState.Running)
{
Window.Current.Activate();
return;
}
// Create a Frame to act navigation context and navigate to the first page
var rootFrame = new Frame();SuspensionManager.RegisterFrame(rootFrame, "rootFrame");
if (args.PreviousExecutionState == ApplicationExecutionState.Terminated)
{
//TODO: Load state from previously suspended application
await SuspensionManager.RestoreAsync();
}
if (!rootFrame.Navigate(typeof(BasicPage)))
{
throw new Exception("Failed to create initial page");
}
// Place the frame in the current Window and ensure that it is active
Window.Current.Content = rootFrame;
Window.Current.Activate();
} - Open the
BasicPage.xamlfile and add aTextBoxto it as shown in the following markup:<Grid Style="{StaticResource LayoutRootStyle}">
….
<TextBlock x:Name="pageTitle" Grid.Column="1" Text="{StaticResource AppName}" Style="{StaticResource PageHeaderTextStyle}"/>
</Grid>
<TextBox x:Name="MyTextBox" HorizontalAlignment="Left" VerticalAlignment="Top" Height="150" Margin="20" Grid.Row="1" TextWrapping="Wrap" Width="500" />
....This
TextBoxis used as an example to show how the data can be persisted. - Open the
BasicPage.xaml.csfile and add two overridden methods calledLoadStateandSaveStateas shown in the following code snippet:protected override void LoadState(Object navigationParameter, Dictionary<String, Object> pageState)
{
if (pageState != null && pageState.ContainsKey("TextBoxValue"))
{
MyTextBox.Text = pageState["TextBoxValue"] as string;
}
}
protected override void SaveState(Dictionary<String, Object> pageState)
{
pageState["TextBoxValue"] = MyTextBox.Text;
}These methods will automatically save the state and restore the state as needed.
![]() Tip Microsoft has provided guidelines on how Windows 8 style apps should behave during suspend and resume. It can be found at
Tip Microsoft has provided guidelines on how Windows 8 style apps should behave during suspend and resume. It can be found at http://msdn.microsoft.com/en-US/library/windows/apps/hh465088.
Running in the Background
As you saw in the previous section, when an application is suspended, it does not receive any CPU cycles to do work. What this means is that the application that is currently running gets the user's undivided attention. There will be no lag or delay in the user interface because an application running in the background is chewing up resources or valuable CPU cycles. Does that mean you cannot run anything in the background? Well, kind of, but there are ways to get around this. Windows 8 has a concept of a background task that you can use to run code that doesn't have any user interaction. To use a background task, you need to implement the IBackgroundTask interface as shown:
using Windows.ApplicationModel.Background;

namespace BackgroundTaskApp

{

    class BackgroundTask : IBackgroundTask

    {

        public void Run(IBackgroundTaskInstance taskInstance)

        {

            //Do background operation here

        }

    }

}
This background task's Run method will be called by the operating system when a certain event, such as a certain time or network becoming available, is triggered. To get it to work, the application needs to do the following things:
- Register the triggers on which the application's background tasks need to be called—this is done using the application manifest file.
- Register the class that needs to be called when the trigger is reached. This is done in code.
Hooking Up a Background Task to an Application
To hook up a background task to an application, follow these steps:
- Either create a new Windows Store application or use an existing application on which you want to add a background task.
- From the Solution Explorer, right-click the solution file and choose Add New Project. In the Add New Project dialog box, choose the Class Library (Windows Store apps) template and call the name of the project
BackgroundTasks. - Select the Tasks project from the Solution Explorer and press Alt+Enter. This opens up the Properties tab for the project. Change the output type to WinMD. WinMD stands for Windows Metadata file.
- In the Tasks project, add a new class called
BackgroundTaskand make it implement theIBackgroundTaskinterface as shown in the following snippet:using System.Diagnostics;
using Windows.ApplicationModel.Background;
namespace BackgroundTasks
{
public sealed class BackgroundTask : IBackgroundTask
{
public void Run(IBackgroundTaskInstance taskInstance)
{
Debug.WriteLine("Starting {0}...", taskInstance.Task.Name);
//Add your actual background task code here
Debug.WriteLine("Finished {0}...", taskInstance.Task.Name );
}
}
} - To register the application so that background tasks can be called, open the application manifest file by double-clicking the
Package.appxmanifestfile for the Windows Store project from the Solution Explorer. Then go to the Declarations tab and from the Available Declarations drop-down list, choose Background Tasks and press Add. This will display a bunch of options as shown in Figure 14-24.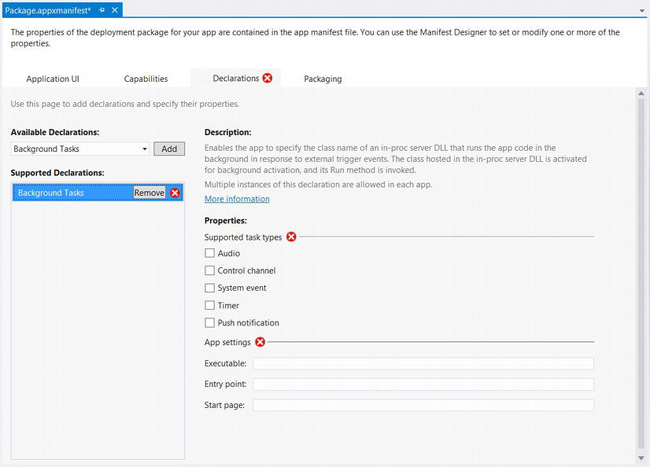
Figure 14-24. Application manifest showing BackgroundTasks options
- In the manifest file, select the task System event for this example. In the Entry point field, you need to fill in the name of the class that implements the
IBackgroundTaskinterface, which in this case will beBackgroundTasks.BackgroundTask. - Right-click the References from the Solution Explorer for the Windows Store project and choose Add References…. In the Reference Manager dialog box, choose the
BackgroundTasksproject and press OK. - To register what kind of System event to process, open the
App.csfile in the Windows Store project and add a method calledRegisterBackgroundTask, as shown: - Add a line of code in the constructor to call the
RegisterBackgroundTaskmethod.
Once all this is done, you can run the program to see if the background tasks are getting started. The Output panel in Visual Studio should display the Start/Stop messages we added in the Run method of BackgroundTask.
![]() Tip In one of the previous sections, we spoke about how you can trigger actions such as Suspend and Resume from the Debug Location toolbar. In the same drop-down, any triggers for background tasks that you may have registered using the
Tip In one of the previous sections, we spoke about how you can trigger actions such as Suspend and Resume from the Debug Location toolbar. In the same drop-down, any triggers for background tasks that you may have registered using the BackgroundTaskBuilder are displayed. This lets you trigger the background tasks from Visual Studio and test them easily.
Conclusion
Writing Windows Store apps is a big paradigm shift for developers. This chapter covers the most important bits—how to get started, how to use some of the newer controls in Windows 8, how you can share content, how the application life cycle works, and how you can run background tasks. Hopefully, this information will get you started, but there is so much new stuff and content in Windows 8 apps, that a single chapter just does not do it justice. But it does get you started …
![]() Note We only covered XAML/C# in this chapter. A lot of web developers may end up choosing HTML/JS to do Windows 8 programming. Apress has a book called Pro Windows 8 Development with HTML5 and JavaScript, written by Adam Freeman, which talks about how you can build Windows 8 apps with HTML5 and JavaScript.
Note We only covered XAML/C# in this chapter. A lot of web developers may end up choosing HTML/JS to do Windows 8 programming. Apress has a book called Pro Windows 8 Development with HTML5 and JavaScript, written by Adam Freeman, which talks about how you can build Windows 8 apps with HTML5 and JavaScript.